
If you have landed here in this little corner of the internet, I am going to assume you already know what Tasmota is and what the benefits are to running Tasmota on your devices and keeping your smart home cloud-free.
If you haven’t flashed your device with Tasmota yet, check out the tutorials on flashing the firmware.
You can flash your device by connecting it to a Raspberry Pi or in some cases you can flash your device over the air, no soldering required!
If you have a Wemos D1 Mini or other ESP device with USB, there is a special tutorial just for you.
This tutorial will show you how to easily set up Tasmota and configure MQTT so that your device will auto discover in Home Assistant.
Table of Contents
Requirements
- A device flashed with Tasmota
- Your favourite web browser
- MQTT broker
Install MQTT in Home Assistant
If you have already installed the MQTT add-on in Home Assistant or you are using an external MQTT broker, you can skip this step.
What is MQTT? I don’t intend on writing an exhaustive explanation as our goal here is to get things up and running. However it is beneficial to know that MQTT is a protocol used by many smart home devices and it is required in order for them to communicate.
You can think of the MQTT broker like the Post Office. Home Assistant and Tasmota mail each other with instructions such as “turn the light on” or “the temperature is currently 22 degrees,” but these letters need to go via the Post Office. The MQTT broker functions like the post office, which Home Assistant and Tasmota use in order for them to send messages to each other.
Firstly you need to open up Home Assistant in your browser and navigate to the Hass.io page using the link in the left-hand menu. Then click Add-on Store at the top of the page and scroll down until you find Mosquito Broker.
Click the Mosquito Broker add-on to open the page and then click install. Once installed click start to start the Mosquito broker.
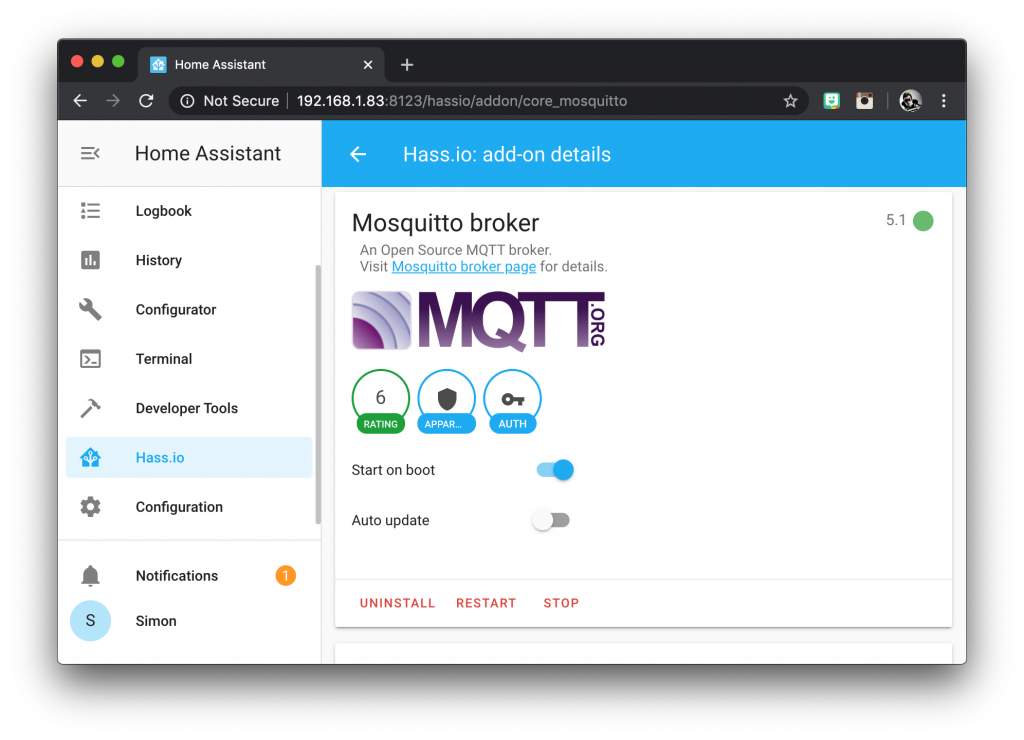
If everything was successful you will see the Uninstall, Restart and Stop options beneath the option switches like in the image above.
Configure Tasmota
Assuming you have already flashed Tasmota to your device, we can now configure it for auto discovery in Home Assistant.
If you have already connected your Tasmota device to your WiFi network you can skip ahead to accessing the Tasmota configuration menu.
Connect Tasmota to your WiFi network
Upon completion of flashing Tasmota to your device, it will appear as a network access point named Tasmota-xxxx where four random numbers are generated for the latter part of the name.

Firstly you will need to connect your computer to your Tasmota device. Once connected you will be presented with a pop-up window similar to when you connect to a public WiFi network with a login.
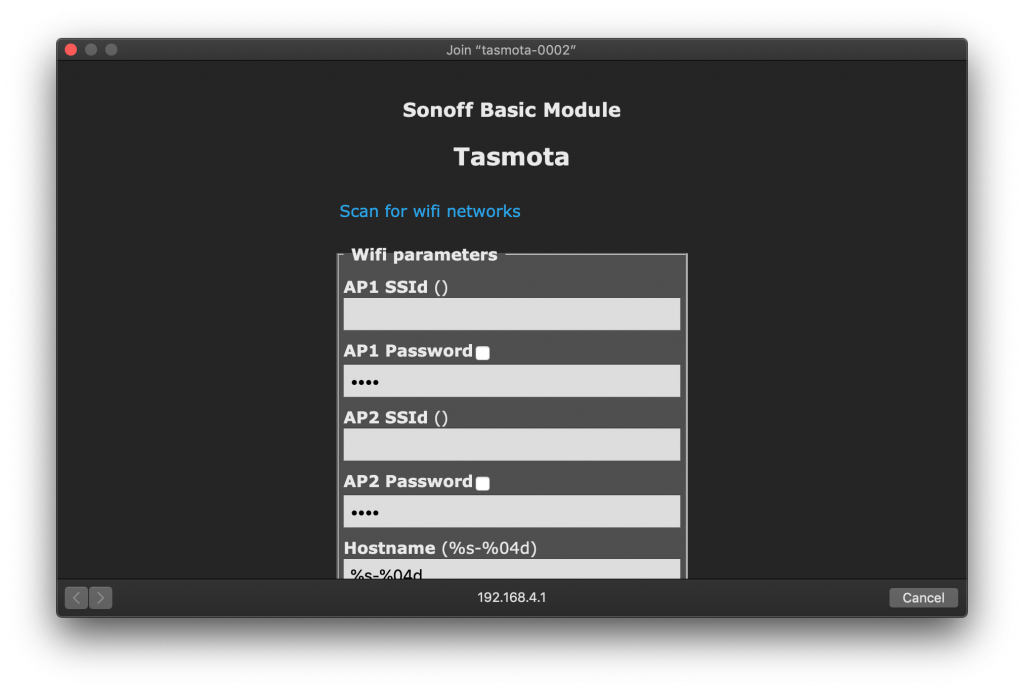
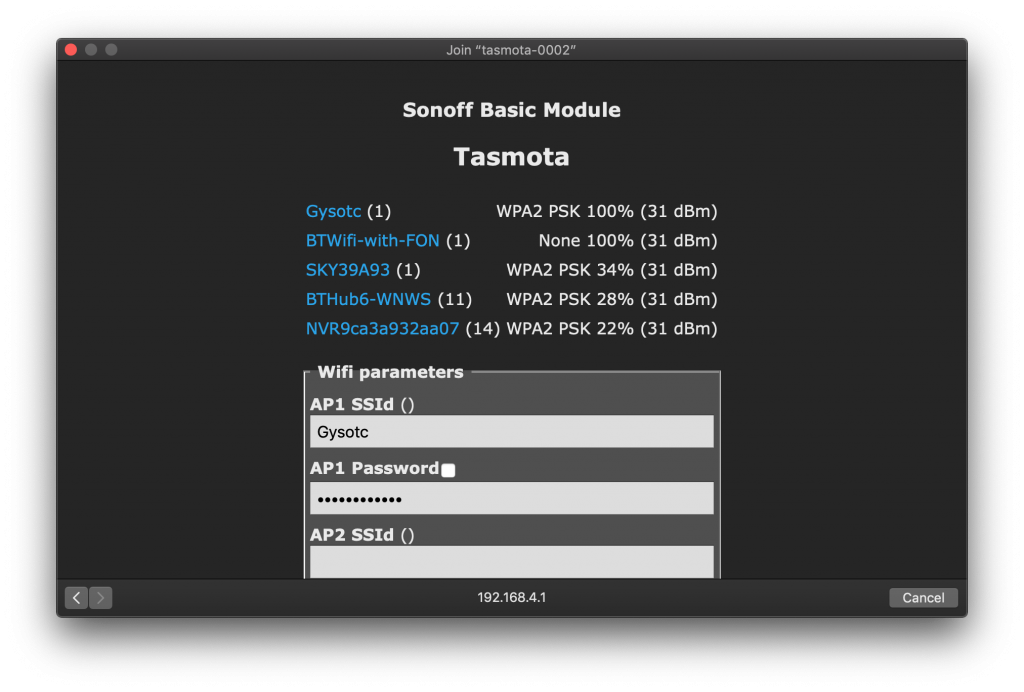
Go ahead and click scan for WiFi networks and select your WiFi router from the list. Enter your password and click save at the bottom of the page.
After a few moments your Tasmota device will disconnect from WiFi. If your computer does not automatically reconnect to your router, you can now reconnect.
Tasmota should now be connected to your router and we can access it in the web browser to complete the configuration.
Find the Tasmota device IP address
The easiest way to to find the IP address of your new Tasmota device is to look for it in your router management page. You can usually access this page by navigating to some local IP address like http://192.168.1.1 but it is device specific, therefore you should consult the manual for your router.
In my case I am currently using the stock router supplied by my ISP and navigating to http://192.168.1.254 brings me to the management page. Here I am able to see the new Tasmota device and its IP address, 192.168.1.129.
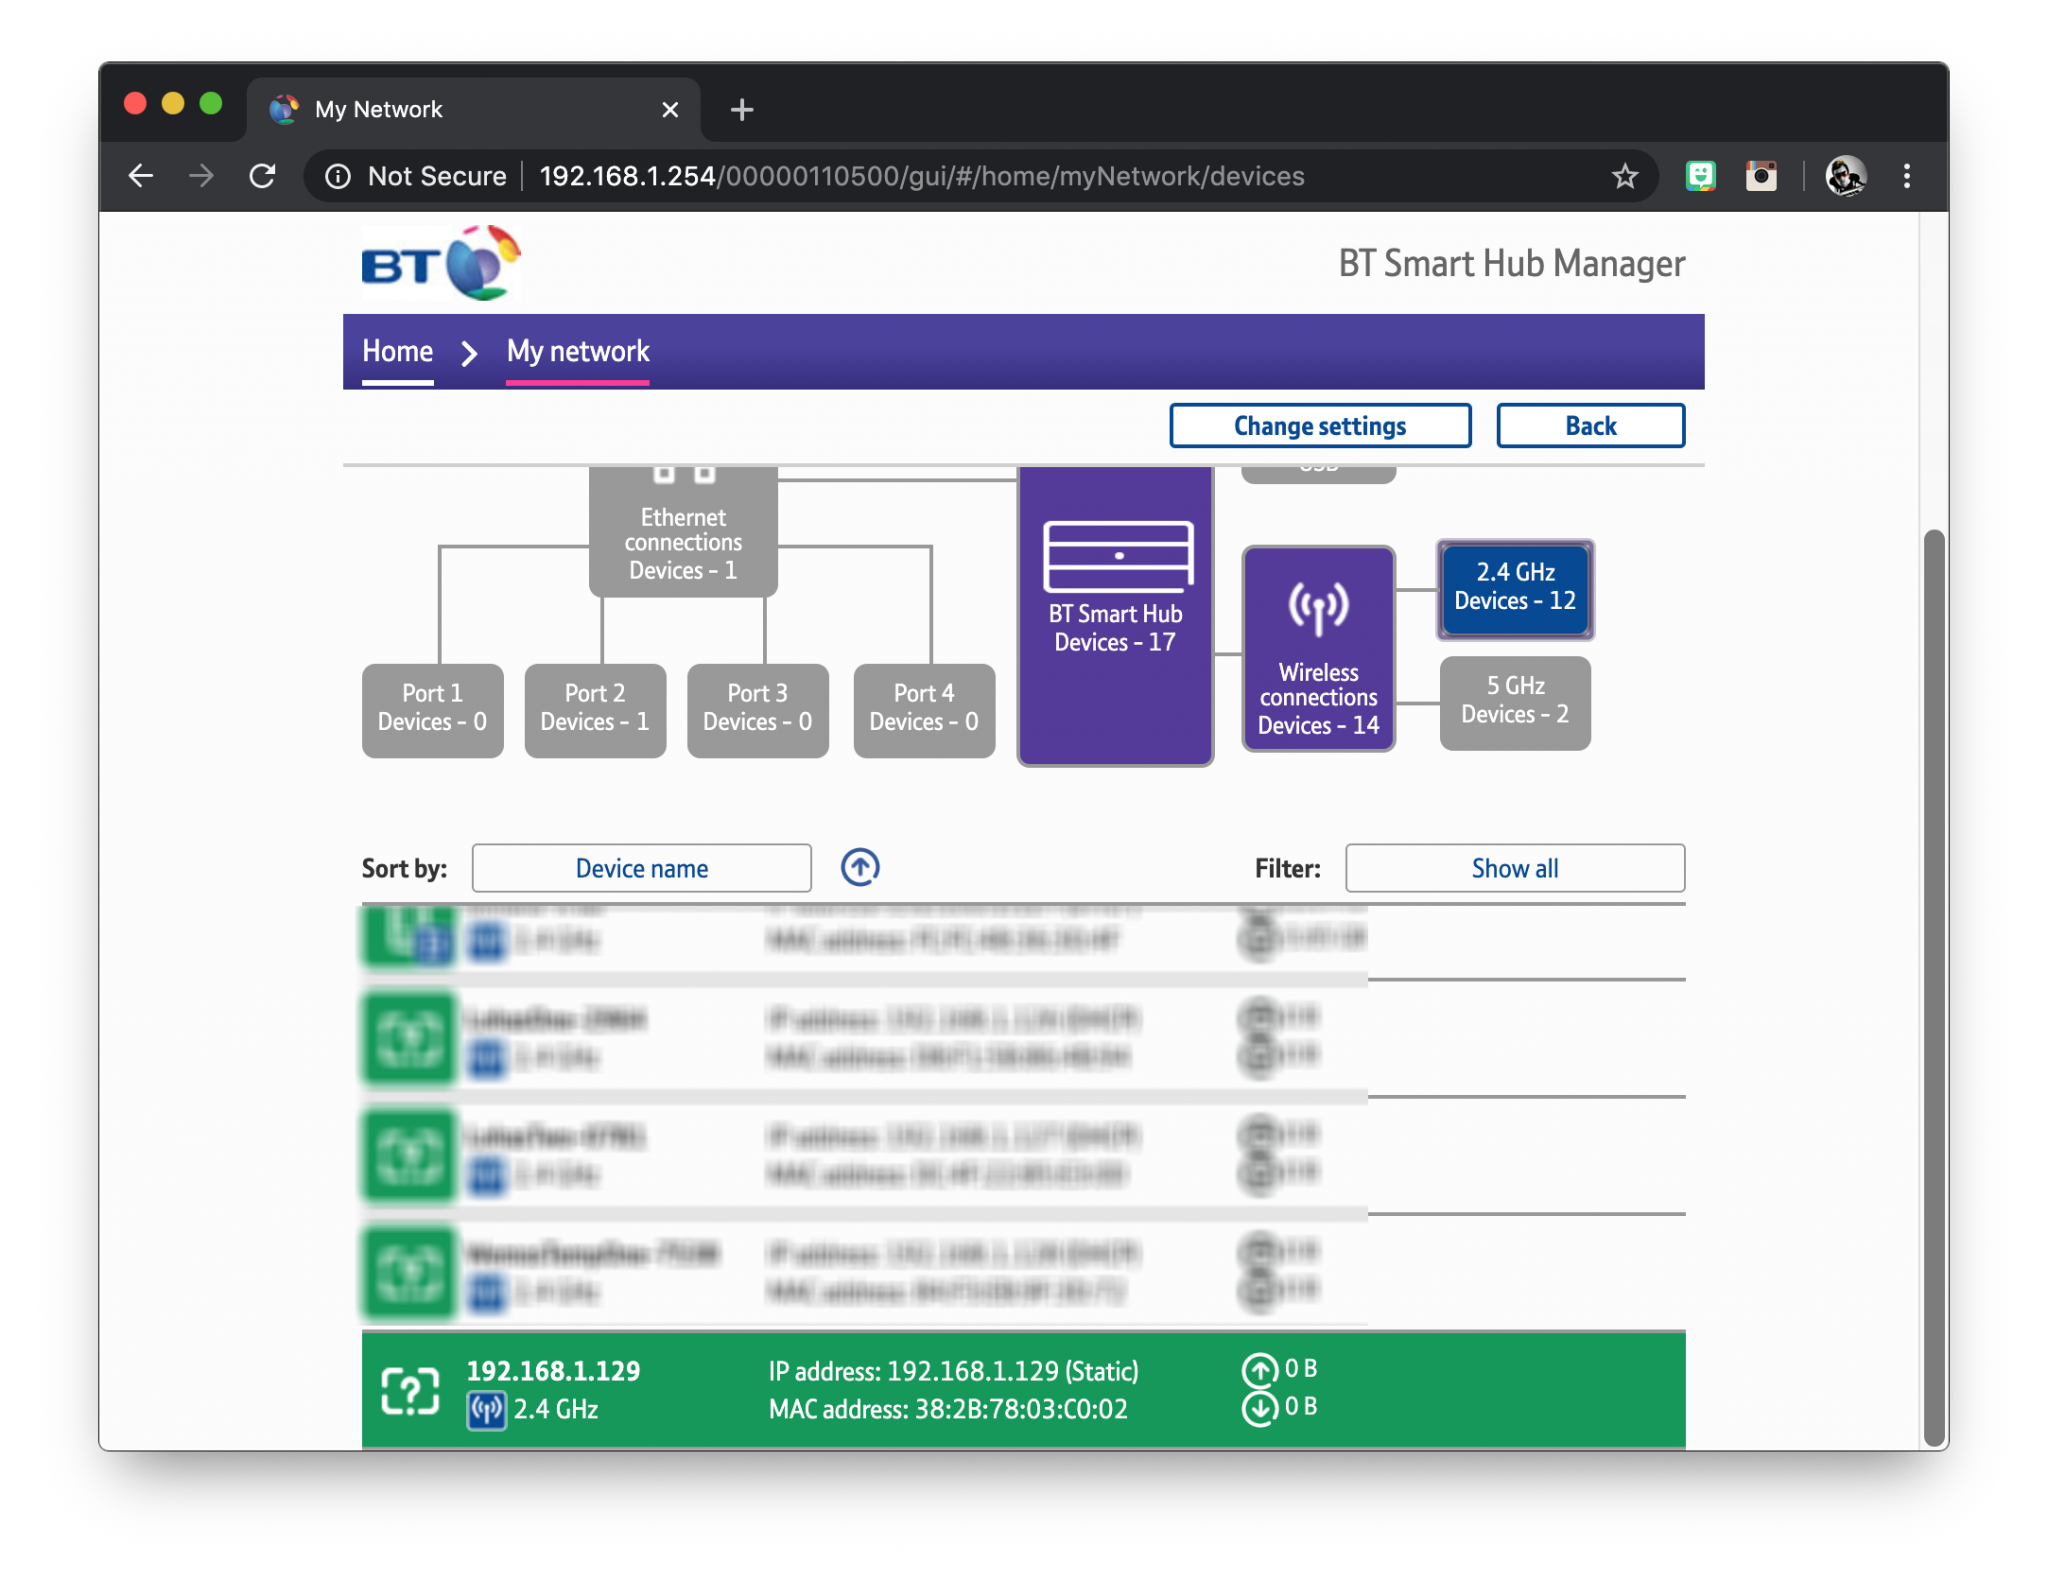
In my case it is not always obvious which is the new Tasmota device, but usually the first time the device is visible on the management page it has no name. All of the other devices have names, therefore I know this is the new Tasmota device.
Alternatively you can use a third party application like Fing to find the IP address if you don’t have the facility on your router.
Access the Tasmota Configuration Menu
Now that we know the IP address of the new Tasmota device, we can navigate to it in a browser in order to access the configuration menu. In my case it will be http://192.168.1.129 but you should use your own IP address here.
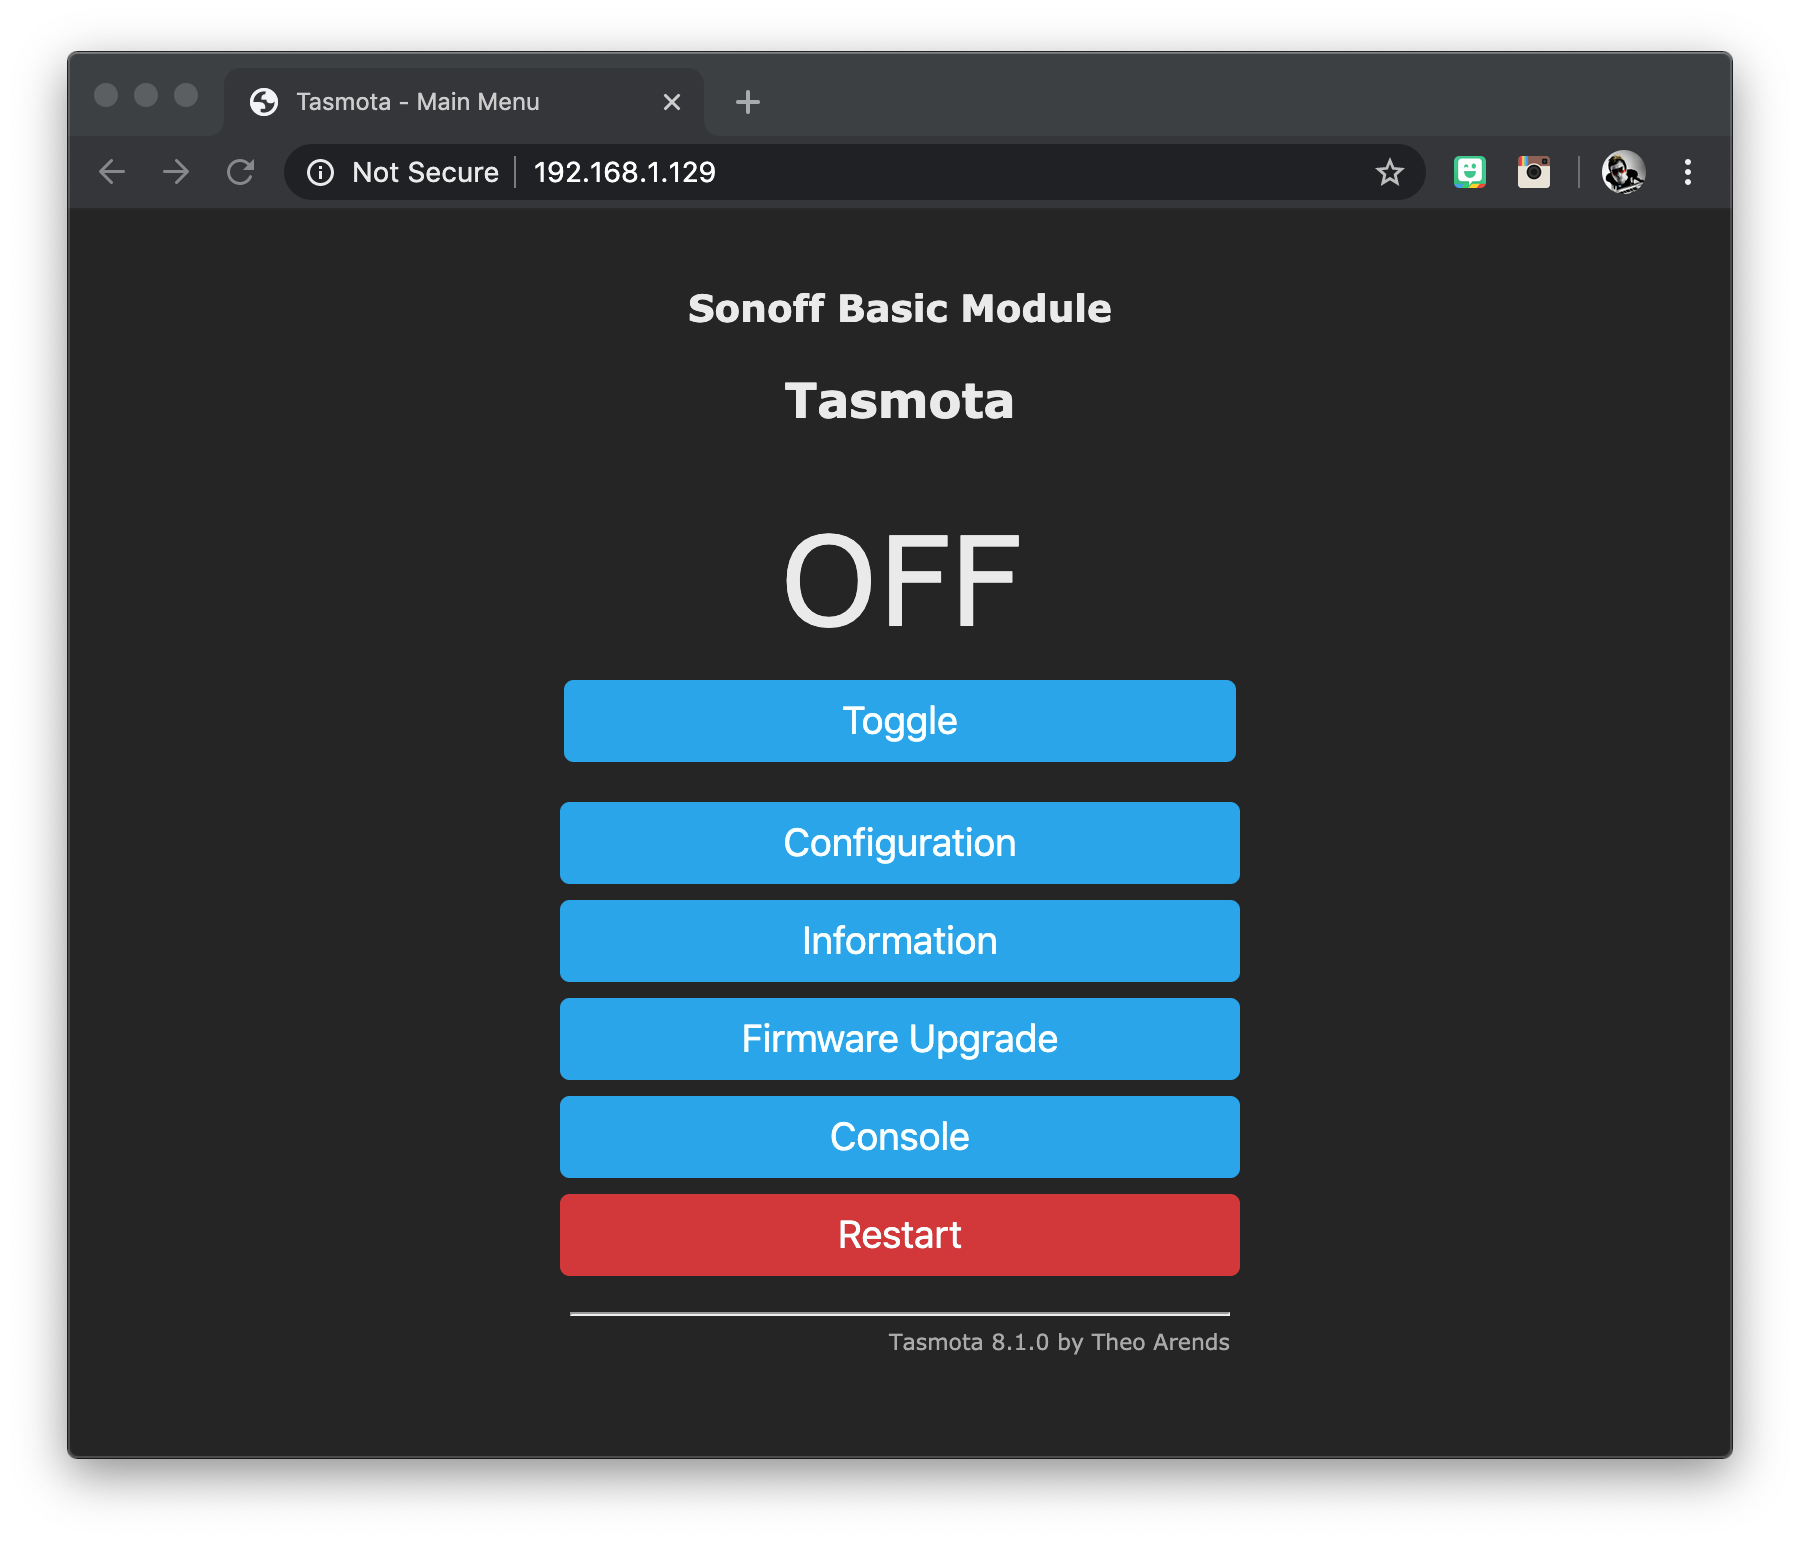
Firstly click Configuration to access the main configuration menu.
Configure your Tasmota device
At this stage you should configure your Tasmota device. This process will tell the Tasmota firmware about your particular hardware and whether or not it should function as a plug, switch or some other device.
It is of course device specific and there are several ways you can configure your device. We will focus on the two easiest options.
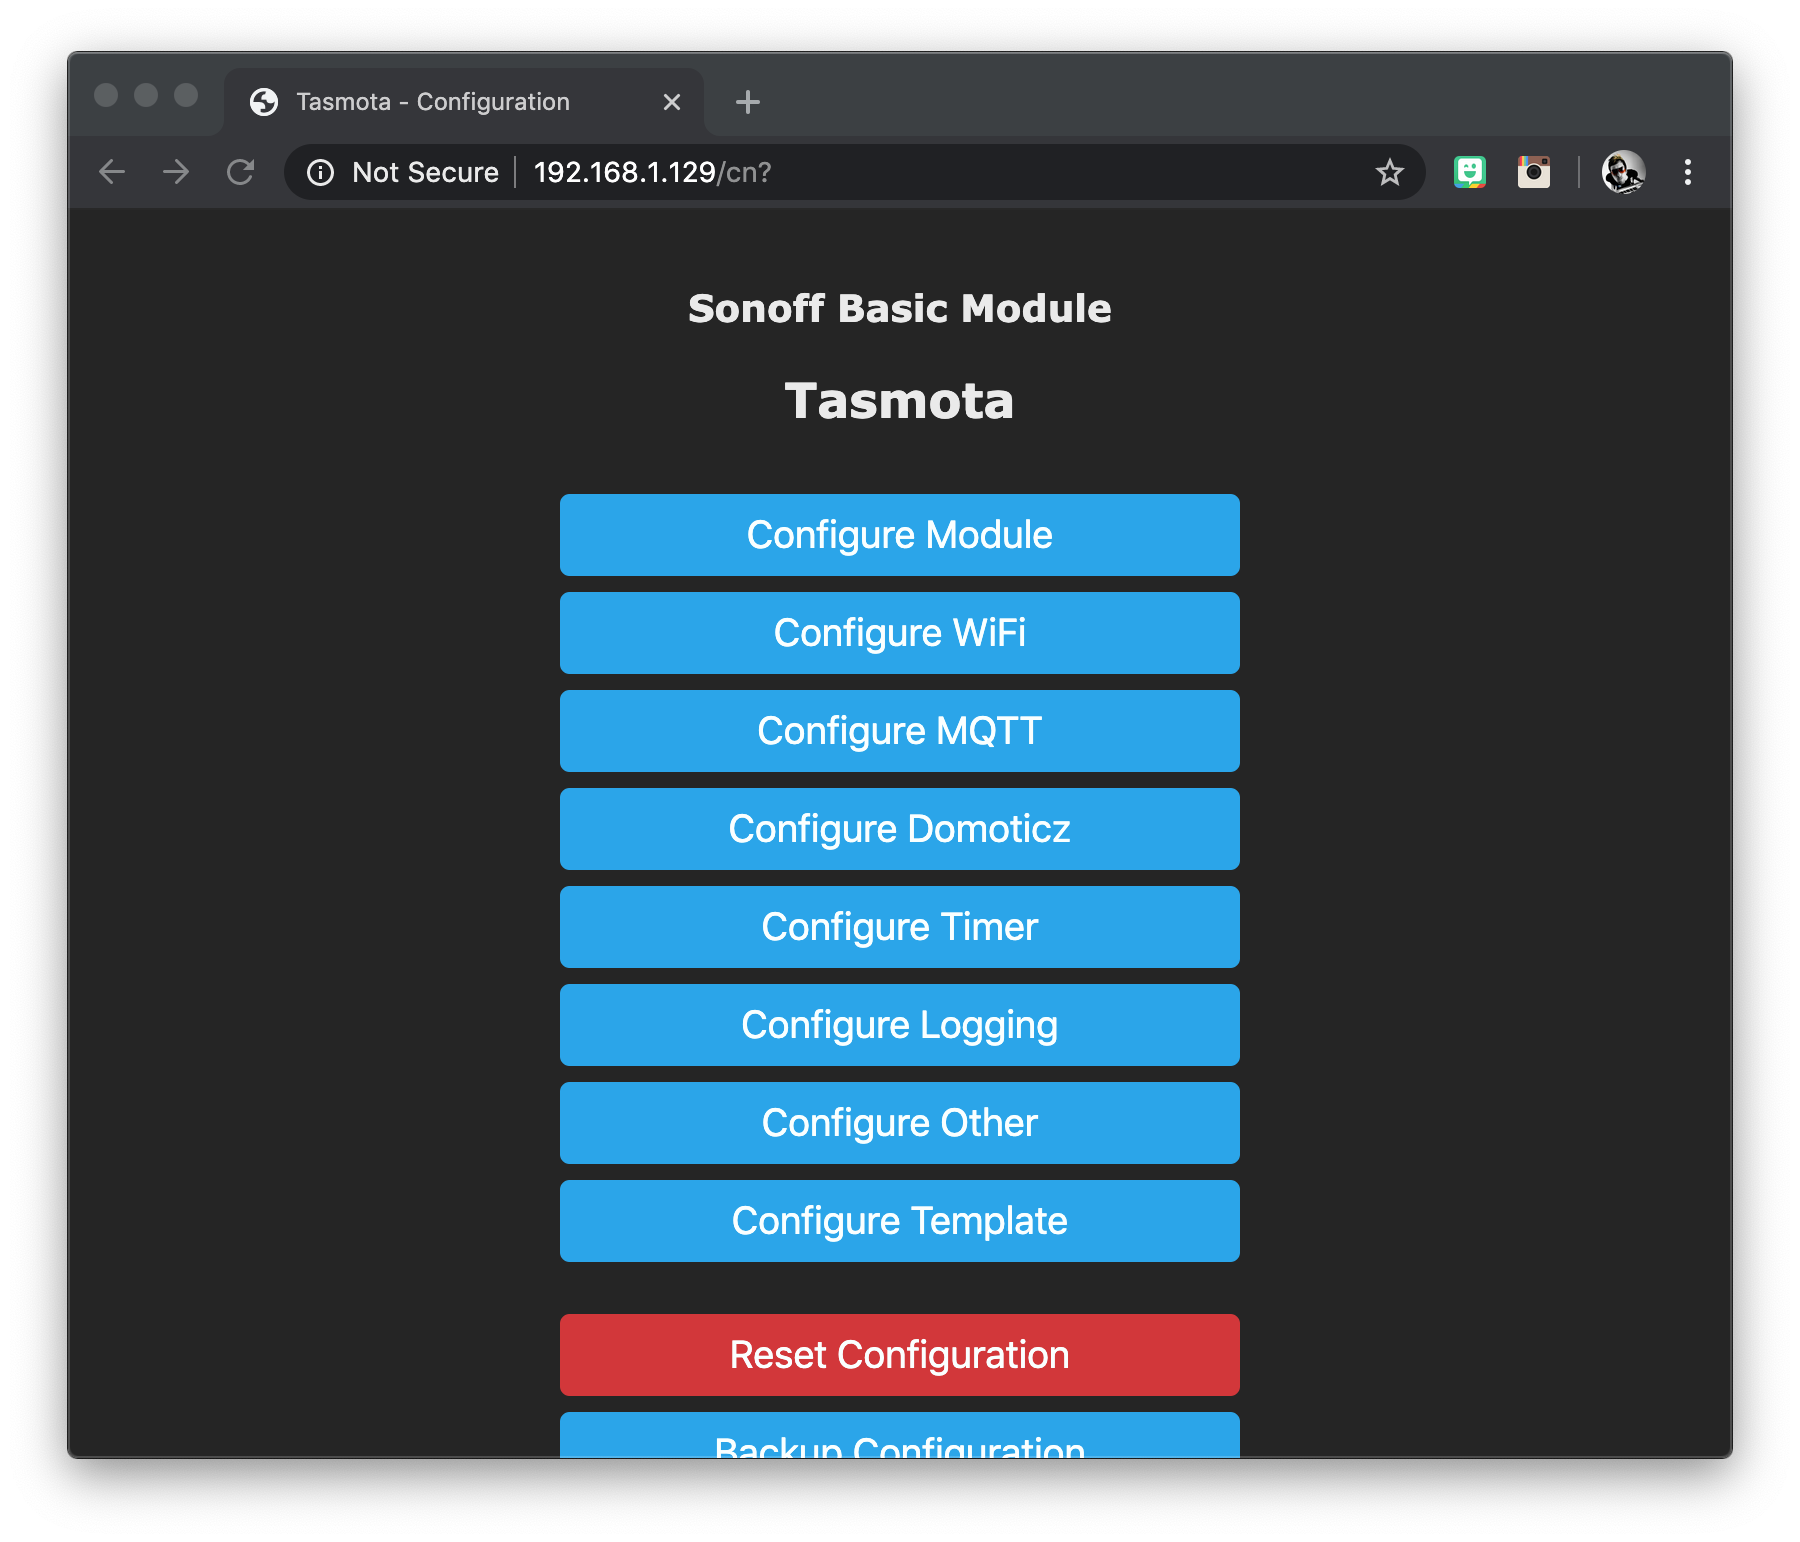
Configure Module
Tasmota has a library of pre-configured devices, which make it very easy to set up. I would recommend checking this list first to see if your device is available. Click configure module from the configuration menu.
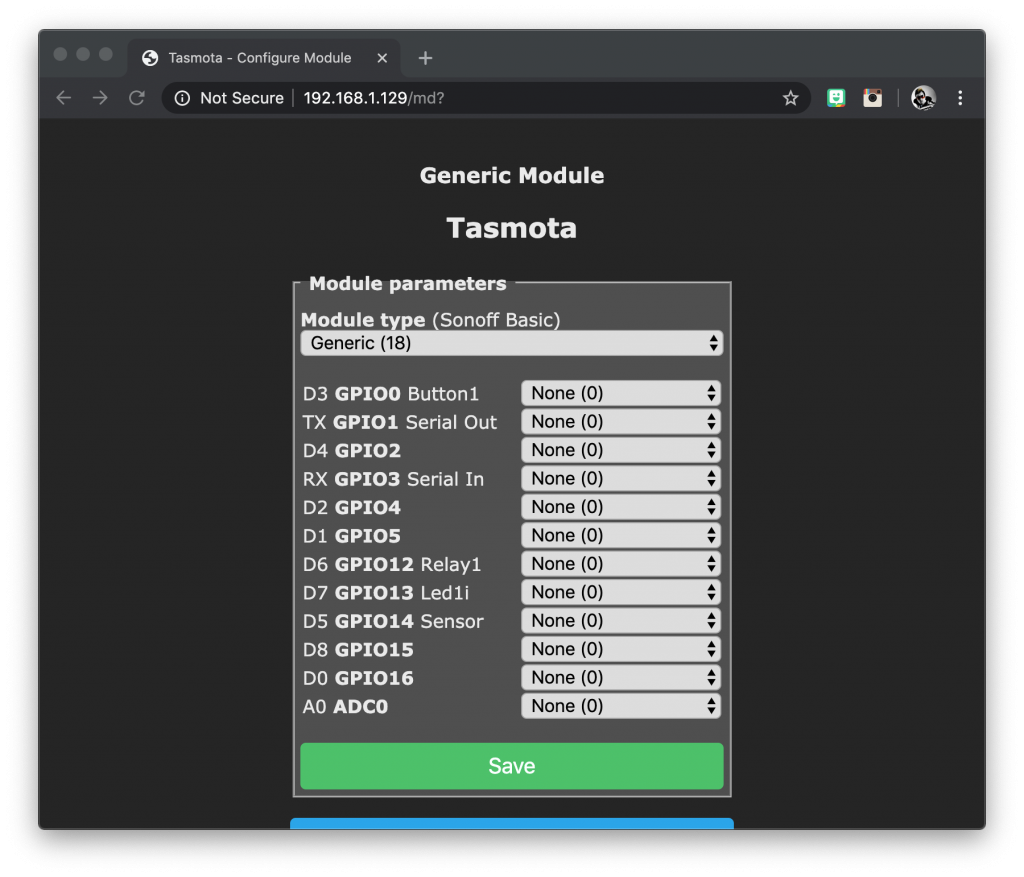
In the module type drop down menu, look for your device and if it is available, select it. Then click save and allow Tasmota to reboot.
Configure Other
If your device is not in the list, it is possible to configure it using a template. From the main configuration menu, click configure other and you will be presented with the following menu.
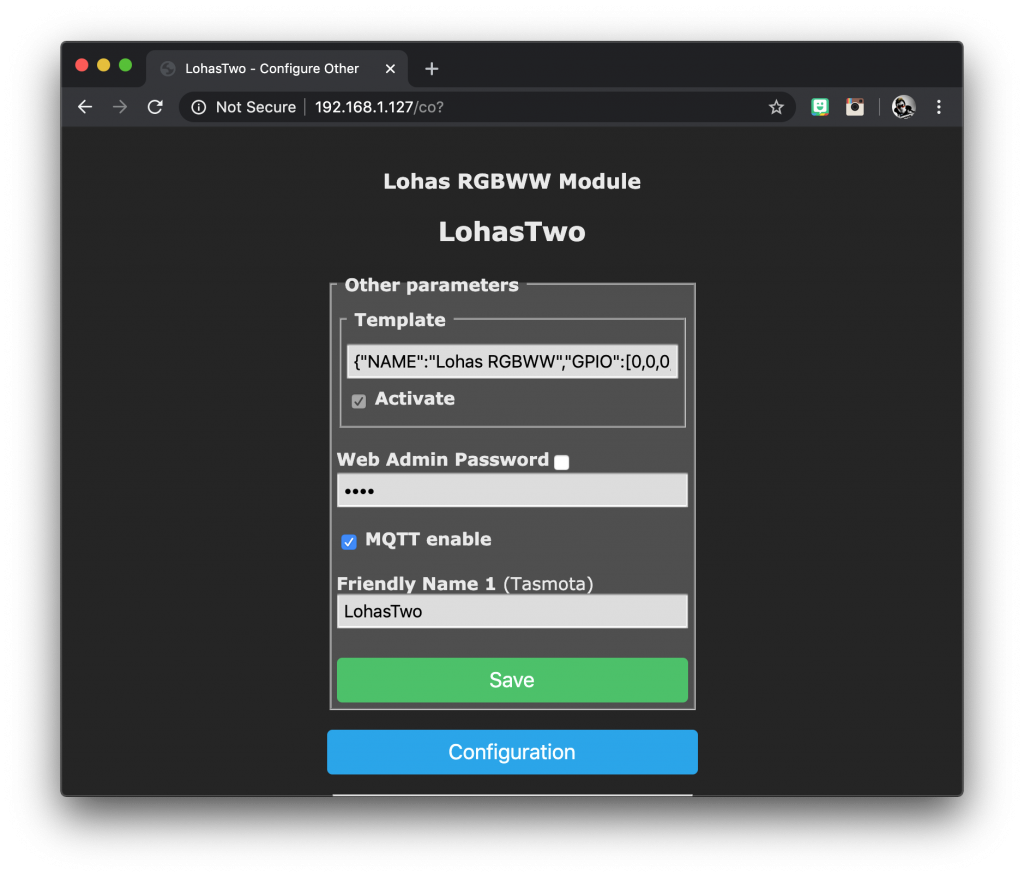
I already have this Tasmota device configured as a Lohas RGBWW bulb. For this I used the relevant template for this bulb. This is device specific so we will need to find a template that is relevant for your device.
Head on over to the Blakadder Repository and locate your device. In my case I am using the Lohas ZN033 RGBCT bulb in this example. If you cannot find the exact model, try to find something as close to it as possible. Alternatively you can create your own and I have a detailed tutorial explaining how to do this here.
There are many instances of devices that have different brand names but are fundamentally the same internal hardware. Take note of the visual appearance and find a device that looks the same.
On the device page within the Blakadder Repository you will find the template, simply copy it from the website and paste it into the template box in your Tasmota configuration. In my example I am using the Lohas ZN033 template, which looks like this.
{"NAME":"Lohas RGBWW","GPIO":[0,0,0,0,38,37,0,0,41,39,40,0,0],"FLAG":0,"BASE":18}
Tip: If your chosen template doesn’t quite function correctly, for example the red and blue colours are mixed up, you can try swapping round some of the numbers in the template.
Don’t forget that you must activate your device by putting a tick in the activate box just below the template box. It’s easy to overlook this and then spend ages wondering why its not working! …yes, I did it at least once!
Make sure MQTT is also enabled by ticking the box and enter a friendly name. This is the name of the device that will appear in Home Assistant.
It is called a “friendly name” because it does not need to be formatted in such a way that it is compatible with being embedded within computer code. For example, you can use spaces.
Once done click on save at the bottom of the page and wait for Tasmota to reboot.
Testing the device
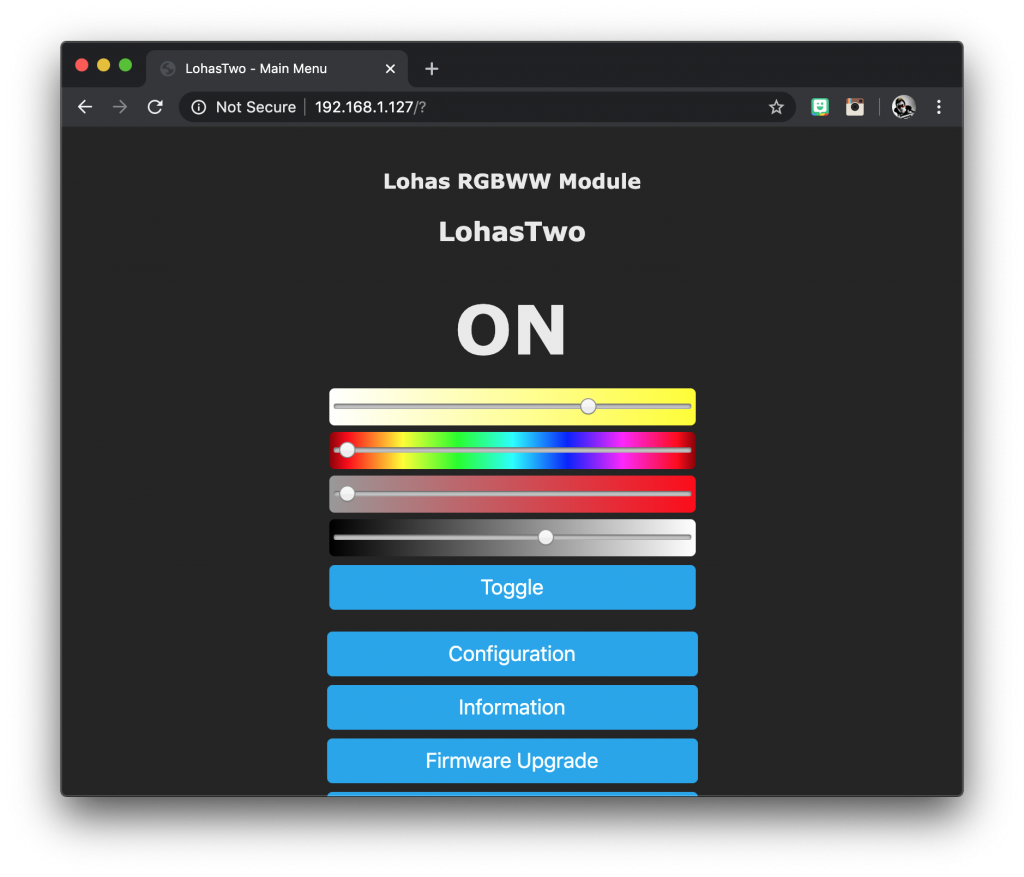
Once you have configured your device, we can quickly test it before configuring MQTT.
After Tasmota has rebooted and you are back to the main menu, you should now see the controls for your device. Go ahead and have a play with your new device! If everything works here, we are ready for the next step.
If your device does not function as expected then you will need to manually amend the template with some trial and error.
Configure MQTT
Now that we have our device configured, we can set up MQTT. Click on configuration and then configure MQTT to bring up the configuration options for MQTT.
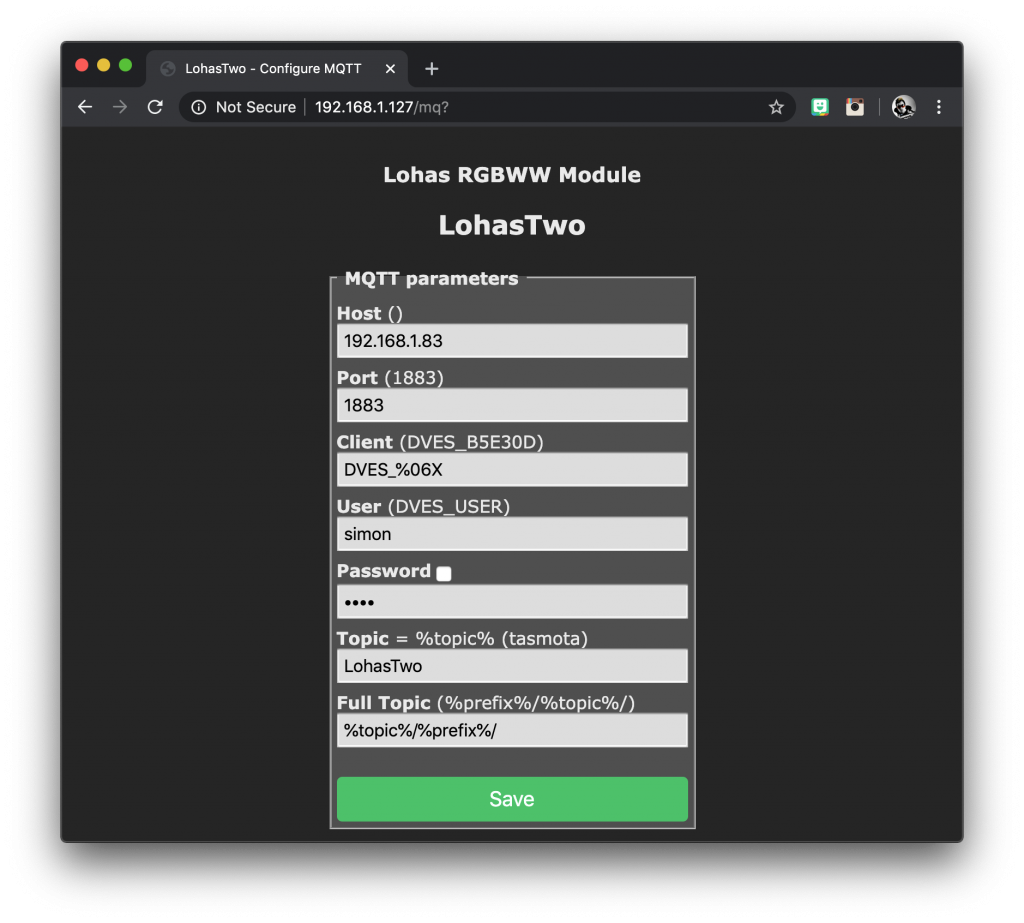
Enter your Home Assistant server IP address (or IP address of your MQTT broker if you are using one external to Home Assistant) under host. Enter the port under port, although it is likely the default port 1883 is already correct. If in doubt just leave it set to default.
Enter the user name and password for your MQTT broker. If you are using MQTT in Home Assistant, it will be the same user name and password that you use to log in to Home Assistant.
Enter your device name with no spaces under topic. This is the name that MQTT will use when communicating with the broker.
Now click save and allow Tasmota to reboot. Once you are back to the main menu, we need to go to the Tasmota console, so go ahead and click console.
In order to turn on discovery mode so that Home Assistant can auto discover our device, we must turn on SetOption 19. Simply enter the following command in the Tasmota console.
SetOption19 on
You can see a full list of Tasmota commands here, including a detailed explanation of how to use them.
Shortly after turning this option on, Tasmota will broadcast a list of information over MQTT to Home Assistant. Your console screen will look something like this.
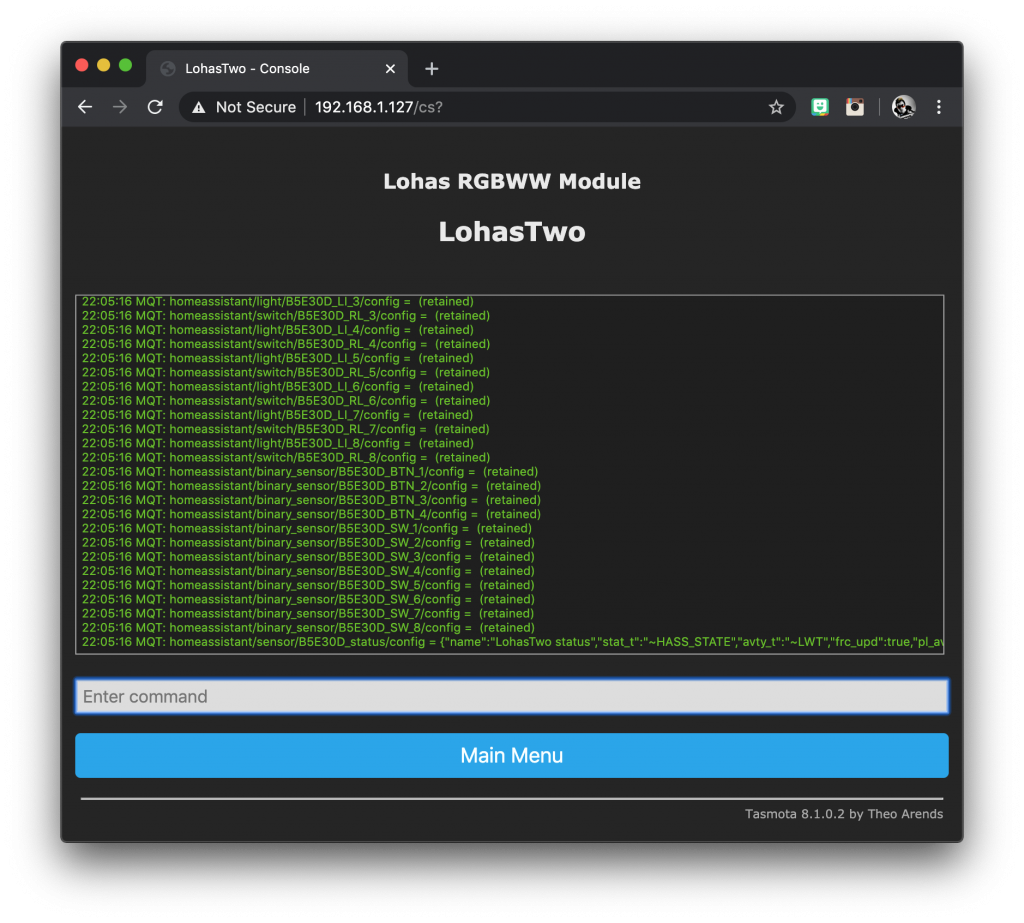
You should see the messages transmitted to Home Assistant. Now when we go to Home Assistant, our device should be auto discovered. Tasmota is now configured correctly so you can go ahead and close the Tasmota browser tab.
Configuring Home Assistant
Now that our Tasmota device is configured on the network and auto discovery is enabled, go ahead and navigate to your Home Assistant server page. Log in if necessary and wait until you are directed to the overview page.
On the left-hand menu select configuration to load the configuration page. Then click on integrations followed by Mosquito broker.
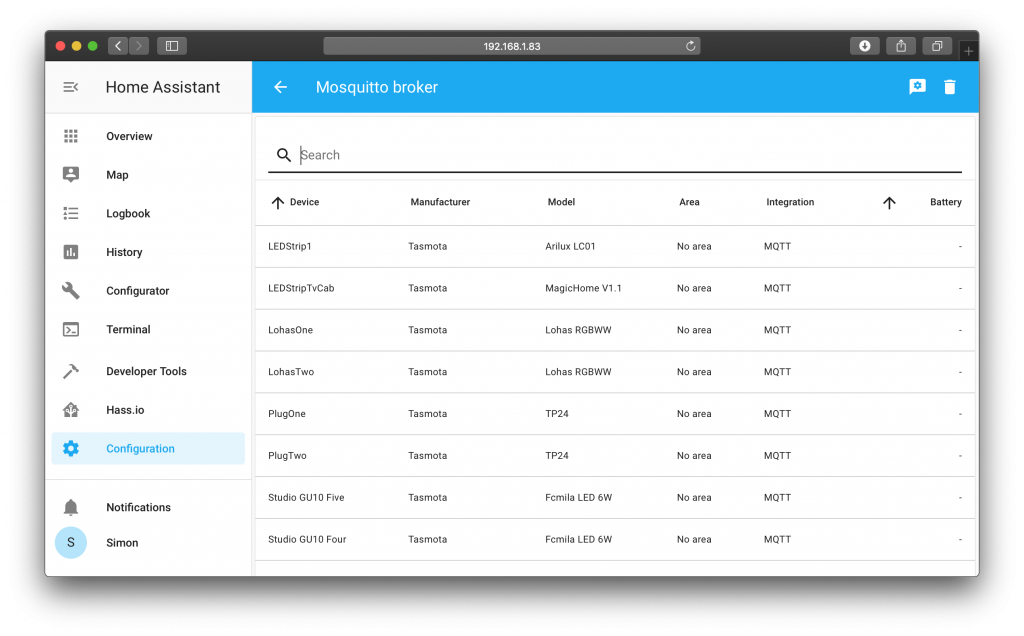
You will be presented with a list of all of the devices in MQTT that have been discovered by Home Assistant. If everything is correct you should see your new Tasmota device.
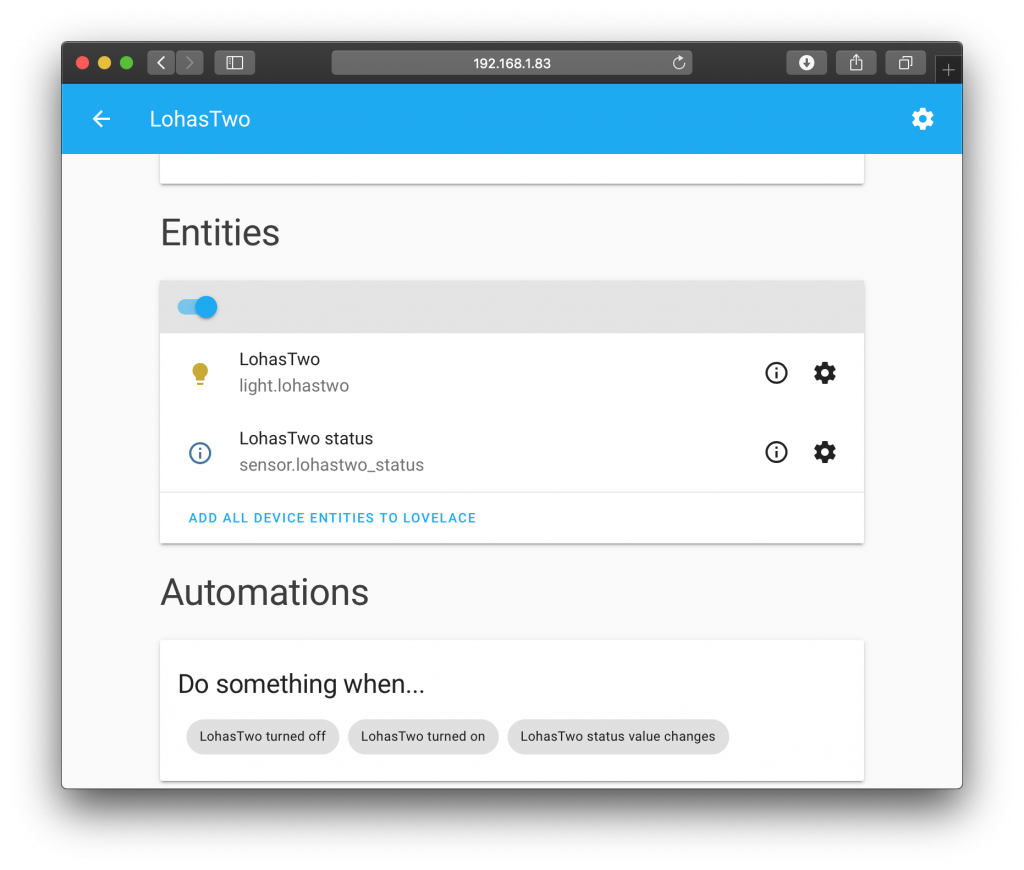
Click your new Tasmota device to enter the Device info page. Here you will be able to see the entities created for your device. If you are allowing Home Assistant to automatically add entities to Lovelace, your device will already be visible on the overview page.
If you would like to add the device to Lovelace you can click the Add all device entities to lovelace button. Also you can of course add items to Lovelace manually if you have your Home Assistant set up in this way.
Congratulations! You have successfully configured your Tasmota device in Home Assistant. I hope this tutorial was helpful, please check out some of my other awesome tutorials!
Thanks so much for visiting my site! If this article helped you achieve your goal and you want to say thanks, you can now support my work by buying me a coffee. I promise I won't spend it on beer instead... 😏


great summary beautifully put together.
I wish I had found this earlier it would have saved me hours of work.
It took me hours to bumble my way through as there is so much information available that it puts you in overload
Thanks for visiting Ian and glad it was helpful for you!