
Home Assistant, a popular open-source home automation platform, empowers users to create smart and interconnected environments within their homes.
One key challenge many users face is enabling remote access to their Home Assistant instance while maintaining the security of their network.
Traditionally, achieving remote access has often required configuring port forwarding, a process that can be complex, potentially exposing devices to security risks, and sometimes even impractical due to network limitations.
However, there’s a powerful solution that allows you to achieve remote access to your Home Assistant setup without the need for port forwarding: leveraging the capabilities of Cloudflare, a content delivery network and security provider.
Cloudflare not only enhances the performance and security of websites but also enables a secure and streamlined remote access solution for your Home Assistant installation.
In this guide, we’ll explore how to set up and configure Home Assistant for remote access using Cloudflare, all while avoiding the intricacies of port forwarding.
By following these steps, you’ll ensure a secure connection to your Home Assistant instance from anywhere in the world, while maintaining your network’s integrity and safeguarding your devices and data.
Whether you’re an experienced Home Assistant user or just getting started, this guide will walk you through the process of achieving seamless and secure remote access to your smart home environment.
Say goodbye to complex port forwarding configurations, and say hello to a hassle-free method of staying connected to your home automation ecosystem. Let’s dive into the world of remote access without port forwarding using Home Assistant and Cloudflare.
- Prerequisites
- Does Home Assistant Need Port Forwarding?
- Why Choose Cloudflare for Home Assistant Remote Access?
- Setting Up a Domain Name for Home Assistant
- Getting Started with Cloudflare
- Configuring DNS Records
- Integrating Cloudflare with Home Assistant
- Updating Trusted Proxies in Home Assistant
- Testing Remote Access
- Conclusion
Prerequisites
Before you begin setting up remote access to your Home Assistant instance without port forwarding using Cloudflare, make sure you have the following prerequisites in place:
- Home Assistant Installation: Ensure that you have a working Home Assistant installation. This guide assumes you have already set up and configured Home Assistant on a compatible device or platform.
- Familiarity with YAML and Configuration: Some steps in this guide involve editing YAML configuration files for Home Assistant. Basic familiarity with YAML syntax and configuration concepts will be helpful.
- Basic Networking Knowledge: While this guide aims to be beginner-friendly, having a basic understanding of networking concepts, IP addresses, and DNS records will be beneficial.
- Terminal or Command Line Access: You may need access to the terminal or command line interface to execute commands on your Home Assistant host machine or server, depending on the type of Home Assistant installation that you are using.
By ensuring you have these prerequisites met, you’ll be well-prepared to follow the steps outlined in this tutorial to successfully set up remote access to your Home Assistant instance using Cloudflare.
Pricing
This tutorial requires that you register your own domain name. The cost of a domain name varies depending on the name that you wish to choose, however you will almost certainly be able to find a suitable domain name for considerably less than $1 per month.
You will also need a Cloudflare account, which is completely free. Cloudflare do offer premium services, but none of these are necessary for completing this tutorial and accessing Home Assistant remotely.
Does Home Assistant Need Port Forwarding?
No, Home Assistant does not need port forwarding to be configured in order to access it remotely. In this tutorial you will learn exactly how to access Home Assistant from anywhere in the world, without port forwarding.
Home Assistant can be configured to work without traditional port forwarding by using a cloud-based solution like Cloudflare Tunnel (formerly known as Argo Tunnel).
With Cloudflare Tunnel, you can securely expose your Home Assistant instance to the internet without directly opening ports on your router and setting up traditional port forwarding.
By using Cloudflare Tunnel, you essentially create a secure connection between your Home Assistant server and Cloudflare’s infrastructure.
This allows you to access your Home Assistant instance remotely without exposing your local network’s IP address or requiring explicit port forwarding.
Here’s a simplified overview of how it works:
- Cloudflare Setup: You set up a Cloudflare account and configure a Cloudflare Tunnel for your Home Assistant instance.
- Tunnel Software: You install Cloudflare’s tunnel software on your Home Assistant server. This software establishes a secure connection to Cloudflare’s servers.
- Secure Connection: All traffic between your Home Assistant server and Cloudflare’s servers is encrypted and routed through Cloudflare’s network.
- Access: You can access your Home Assistant instance securely using a domain name provided by Cloudflare, without needing to manually configure port forwarding on your router.
Using Cloudflare Tunnel is a more secure way to expose your Home Assistant instance to the internet, as it adds an extra layer of protection and doesn’t require exposing specific ports on your router. However, it’s important to follow Cloudflare’s documentation and best practices to ensure a secure setup.
Thank you for providing the accurate information, and I apologize again for any confusion caused by my previous response.
Why Choose Cloudflare for Home Assistant Remote Access?
When it comes to achieving remote access to your Home Assistant instance, Cloudflare stands out as an exceptional solution that offers several benefits.
While traditional methods might involve complex port forwarding configurations, Cloudflare streamlines the process and provides added security and performance advantages. Here’s why you should consider Cloudflare for remote access:
Enhanced Security
Cloudflare is renowned for its robust security features. By routing your traffic through Cloudflare’s network, your Home Assistant instance benefits from protection against DDoS attacks, malicious bots, and other online threats.
SSL Encryption
Cloudflare provides SSL encryption for traffic between your users and your Home Assistant instance. This ensures that data transmitted between devices and your instance is encrypted, protecting sensitive information from eavesdropping and tampering.
Simplified Networking
With Cloudflare, you can say goodbye to the complexities of port forwarding. Instead of configuring your router’s settings to expose your instance to the internet, Cloudflare acts as an intermediary, allowing you to securely access your Home Assistant instance without exposing it directly to the public internet.
This is particularly useful if you don’t have access to your router administration page. For example if you live in a complex (such as a university) and use shared WiFi, you can still make Home Assistant accessible remotely using this method, without having to log in to the router and configure port forwarding.
Dynamic DNS Updates
In the event of a power cut, your router will likely reboot and reconnect to your internet service provider. This may cause your router to be issued a different IP address for internet access.
Cloudflare’s DNS management allows you to set up dynamic DNS updates, ensuring that your domain always points to the correct IP address, even if your internet connection’s IP address changes.
Global Availability
Cloudflare operates data centers around the world, meaning that your remote access connection benefits from Cloudflare’s distributed network, regardless of where you or your Home Assistant instance are located.
Flexible Domain Management
Cloudflare offers a user-friendly interface for managing DNS records. You can easily add and modify DNS records to control how traffic is routed to your Home Assistant instance.
Setting Up a Domain Name for Home Assistant
You are likely already familiar with accessing Home Assistant on your local network using either http://homeassistant.local:8123 or http://<your-ip-address>:8123.
However in both cases, these addresses are only accessible from within your local area network. This means you can only access Home Assistant from devices connected to your local network, or router.
In order to access Home Assistant over the internet, we will need to assign a public domain name to our Home Assistant instance.
Why Do You Need a Domain Name to Access Home Assistant Remotely?
When you access websites or services over the internet, you usually use domain names like “www.example.com” instead of IP addresses like “192.168.1.1”.
Domain names are easier to remember and provide a more user-friendly way to access online resources. Think of them like the addresses you use to find places in the physical world.
For Home Assistant to be accessible over the internet, you can use a domain name in a similar way. Here’s why you need an internet domain name to access Home Assistant remotely:
- Dynamic IP Addresses: Most home internet connections have dynamic IP addresses, which means the IP address assigned to your router can change over time. A domain name remains constant, even if the IP address changes. This is crucial for remote access because your Home Assistant instance might be at a different internet IP address each time you connect (e.g. after a router reboot, in the event of a power cut or similar).
- Remote Access: When you’re away from home, accessing your Home Assistant instance using a domain name enables you to connect to it from anywhere with an internet connection. You don’t need to know the specific IP address your home network is currently using.
- Human-Friendly Access: IP addresses are a sequence of numbers that computers use to locate each other on networks. They are not easy for humans to remember. Domain names, on the other hand, are designed to be human-friendly and can represent complex IP addresses in simple words, making it easier for you to remember and access your Home Assistant instance.
- Security and Privacy: Using a domain name to access Home Assistant over the internet allows you to keep your IP address private. Without a domain name, you would need to share your IP address, which could potentially expose your network to security risks.
- Configuration and Management: Domain names provide flexibility in routing traffic. You can configure your domain’s settings to point to your Home Assistant instance, ensuring that your requests reach the right place.
To use a domain name for remote access, you typically configure DNS records. DNS (Domain Name System) is like the internet’s phone book.
When you enter a domain name in a web browser, your request goes to DNS servers that translate the domain name into the corresponding IP address, allowing your browser to find the correct server.
This guide will walk you through the process of assigning a domain name to Home Assistant. Don’t worry, it really isn’t as complex as you might think!
Can I Use my Existing Domain for Home Assistant?
Yes, if you already own a domain name then you can use it to access Home Assistant remotely, providing that you have access to the domain administration tools. You will also need to have the ability to point the domain at the Cloudflare DNS servers.
If you are already using custom DNS servers for something else, for example the Ezoic ad network, you may want to consider just registering a seperate domain for Home Assistant.
If you already own a domain name that you would like to use for Home Assistant, feel free to skip ahead to the next section.
Can I Link a Subdomain to Home Assistant?
Yes, if you already own a domain that is pointing at something else, for example your website, it is possible to use a separate subdomain of your primary domain in order to access Home Assistant.
For example if your website address is https://www.example.com, then you could use the subdomain https://ha.example.com to access your Home Assistant instance.
If you already own a domain name and plan to create a subdomain for accessing Home Assistant, feel free to skip ahead to the next section.
Getting a New Domain Name
If you don’t own a domain name yet then it is very easy to register a new one. In this section we will learn how to register a new domain name for Home Assistant.
The first thing we are going to need to do is choose a domain name and register it. You can pick any free domain name you like, although pricing can be different depending on the name that you would like to choose.
Note that registering a domain usually has a small annual fee, which will renew year on year. You can get a cheap domain for less than $1 per month, so it really isn’t cost prohibitive for most people.
That’s more than 6 times cheaper than Nabu Casa!
With that said, if you really don’t want to commit to a small subscription for a domain name, it is still possible to access Home Assistant remotely for free but you are going to need to use this method instead, which requires port forwarding.
In order to register your domain name, you simply need to pick a registration company, search for your desired domain and then complete the registration process.
Personally, I use Namecheap for both my Home Assistant Domain name, as well as for several of my blog websites. I find their prices very competitive and the admin dashboard very easy to use.
For this tutorial I will use Namecheap, however you are welcome to use any registrar of your choice, should you find a better deal for your chosen domain somewhere else.
Just be aware that a part of this tutorial will be specific to Namecheap (and the Namecheap dashboard), so if you use a different company, you will need to locate the relevant tools yourself within the dashboard of the company of your choice.
If you want to keep things as simple and easy as possible, just go with Namecheap.
Registering a Domain Name
In order to register a domain name, first click here to open the Namecheap website in a new tab.
Next, search for a domain name that you would like to register. If you are unsure on what name to use, you can try something like [your family name]-home-assistant.
For example, let’s say my family name is “Smith.” We can search for smiths-home-assistant and Namecheap will return the best suggestion, along with some other suggestions.
In this example, smiths-home-assistant.casa is available. The larger price given at the top is for the first year’s subscription and the smaller price is for the subsequent years afterwards.
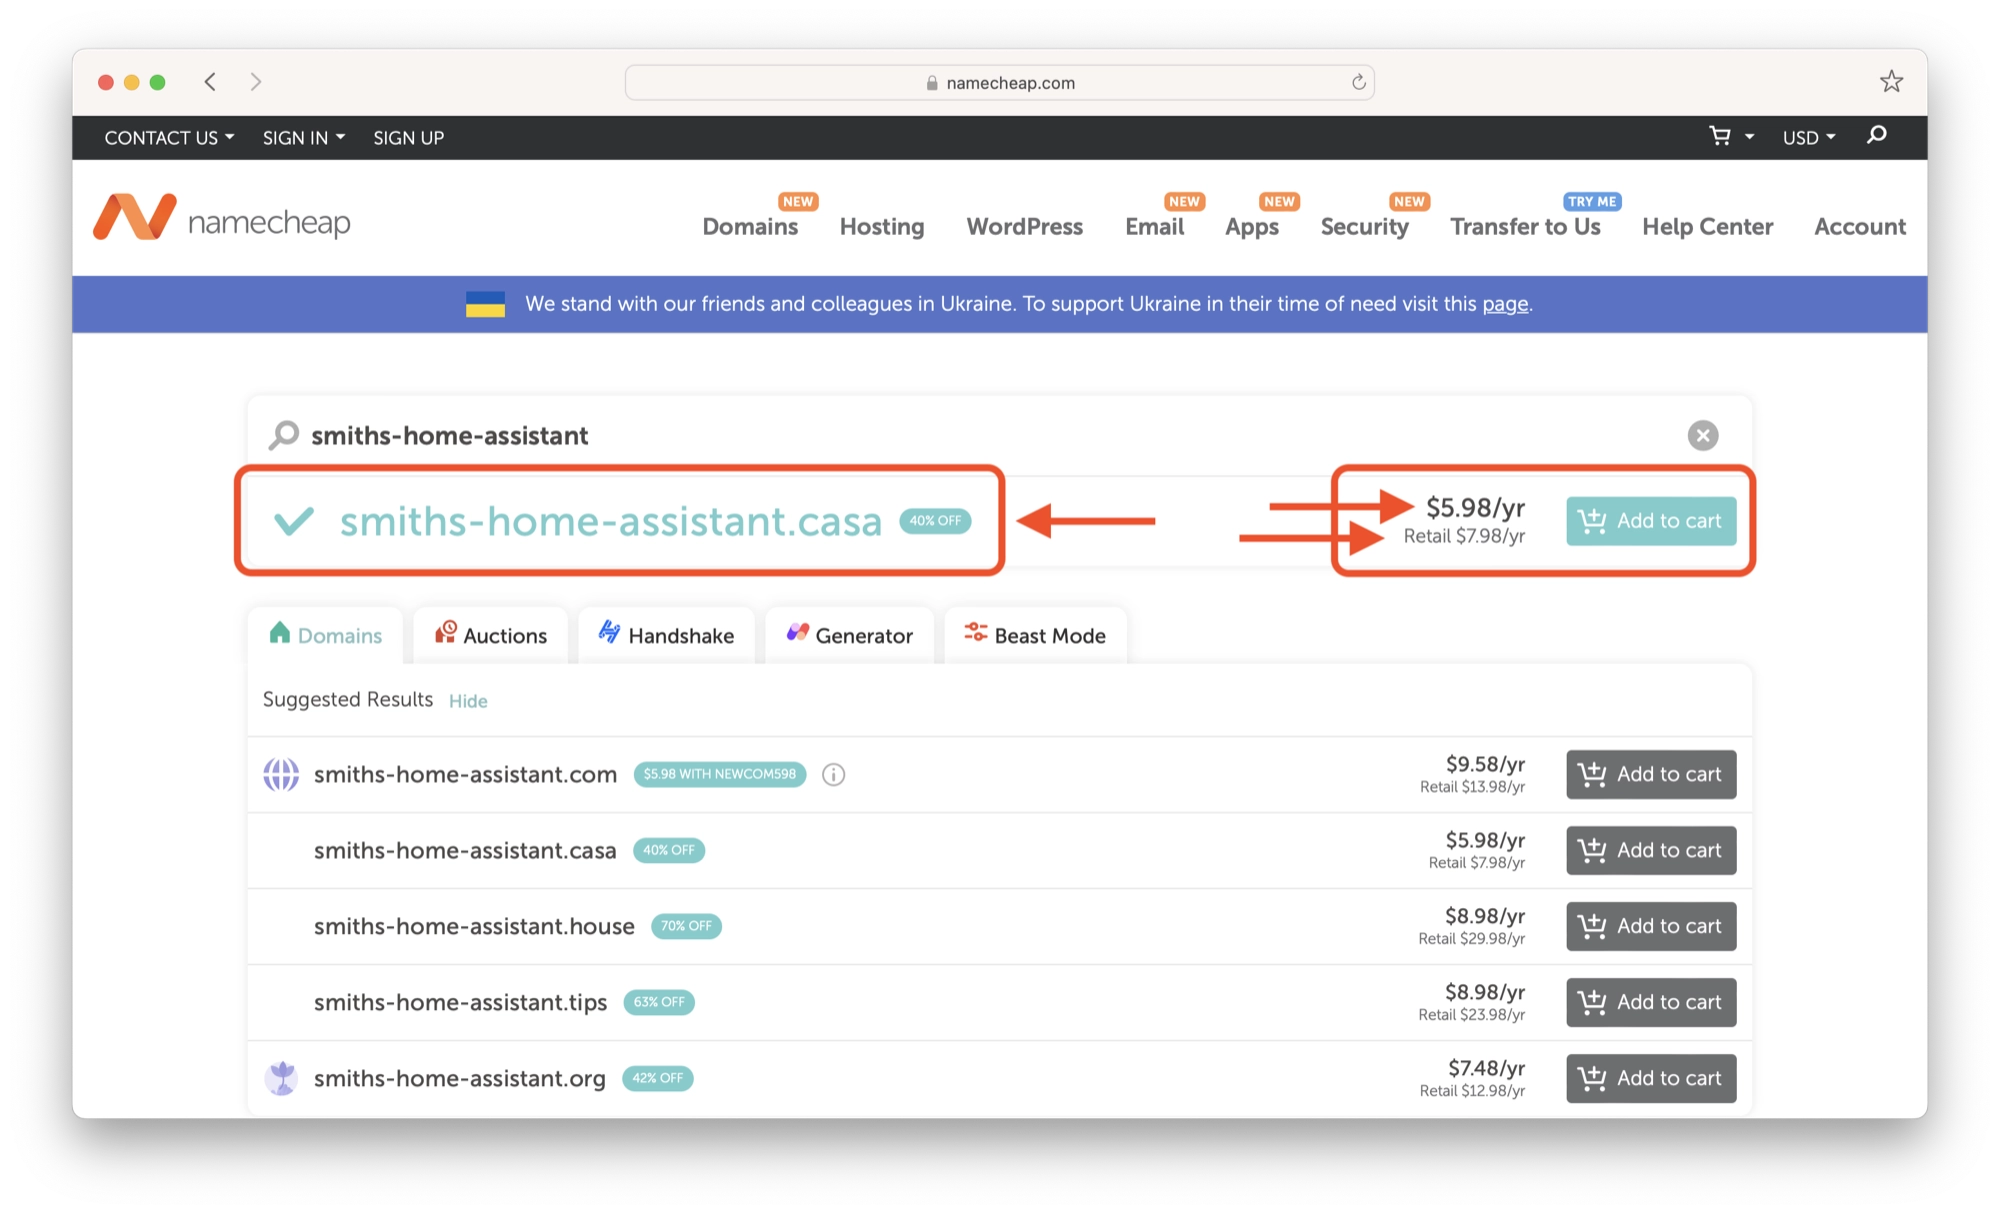
In this case, the domain will cost $5.98 for the first year and $7.98 for the subsequent years. Just to clarify, that is just less than $0.50 per month for the first year and then $0.67 per month for the second year onwards.
You can also scroll down the list and view the other suggested domain names to see if there is something else that you prefer. Alternatively, you can click the Beast Mode tab for more granular control over the search
For this example, we will use the smiths-home-assistant.casa example. Purchasing this domain will allow us to access Home Assistant from a browser anywhere in the world, simply by typing the following address:
https://smiths-home-assistant.casa
Once you have found your own desired domain name, click the Add to Cart button. Namecheap may offer you additional services, such as SSL or VPN. You do not need to add any of the additional services as Cloudflare will handle these requirements.
Next, click the Checkout button. At the top of the page you will be given a few options:
Domain Registration
By default the duration is set to 1 year with auto-renew turned off. This means you will be registering your domain for 1 year and it will expire after this time period.
I would highly recommend setting auto-renew to on. This means your domain will remain as yours indefinitely and the annual payment will be taken automatically after each year.
You can also choose to register the domain for a longer period of time if you would just prefer to pay up front, but this is entirely optional.
Domain Privacy
Domain privacy is enabled by default and it does not cost anything. You should ensure that this option is left turned on in order to make sure that your personal details are not made publically available on the domain name register.
Premium DNS
You do not need to add premium DNS, nor any of the other additional services. Cloudflare will handle all of the necessary additional features required, such as SSL security.
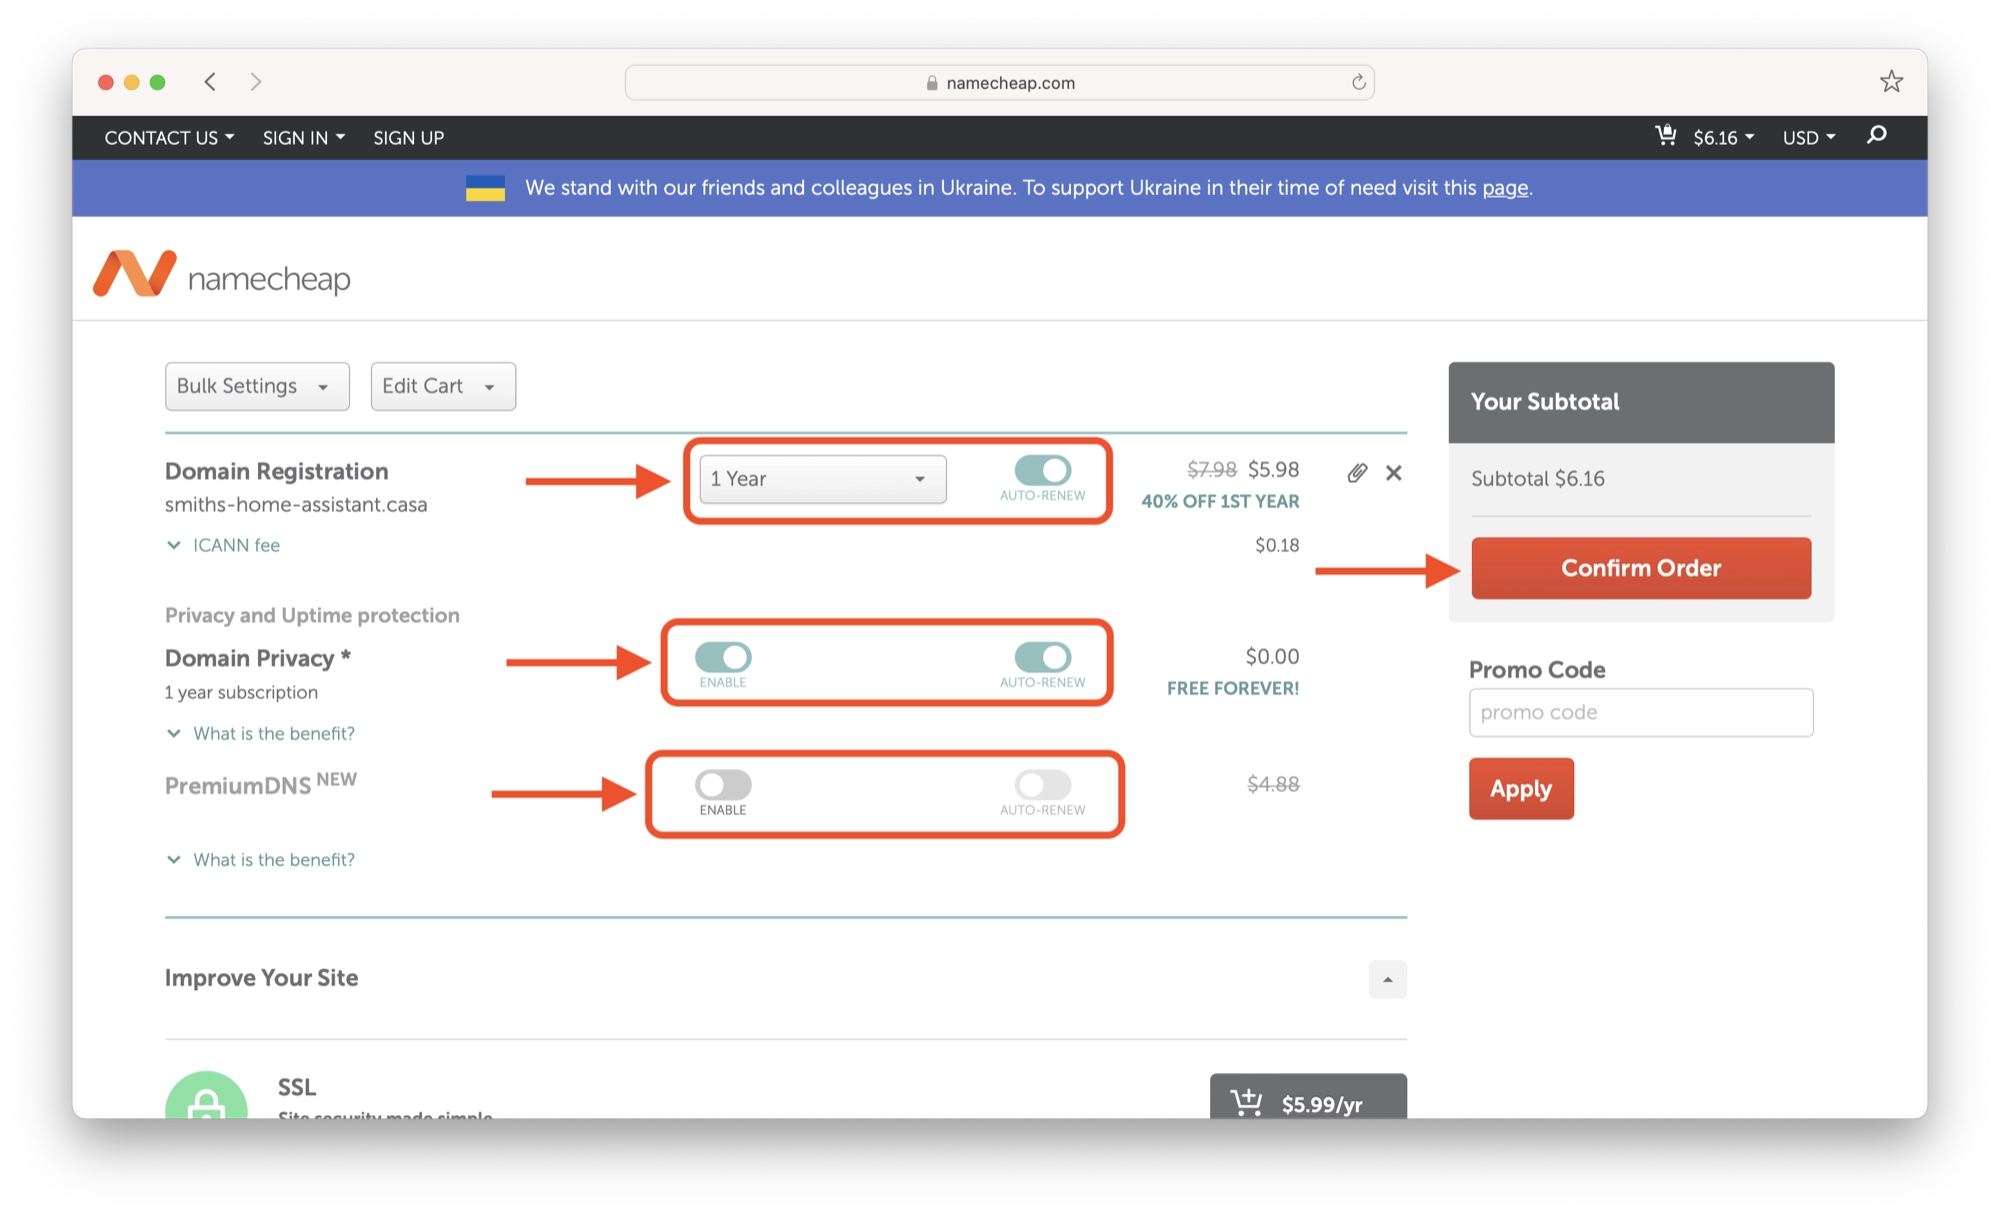
Once you have completed the settings, click the Confirm Order button and complete the payment process.
Upon completing the registration process, you will be able to access your Namecheap dashboard and will see your new domain name in the list of domains that you own.
Getting Started with Cloudflare
Once you have a domain name registered, the next step is to create an account with Cloudflare if you don’t already have one yet.
Creating a Free Cloudflare Account
Creating a new Cloudflare account is completely free and the services offered in their free account will be enough for us to be able to access Home Assistant. You do not need to sign up for a premium Cloudflare account.
To create a new free account with Cloudflare, click here to open the registration page in a new tab and complete the registration. It is quick and easy, taking just a couple of minutes.
Linking a Domain to Cloudflare
Once you have created a Cloudflare account and logged in, you will be able to access the Cloudflare dashboard.
Click Websites in the left-hand sidebar and then click the Add New Site button.

Next, enter your domain name and click Continue. I will use the one from our earlier example, smiths-home-assistant.casa.
Note that if you are planning on using a subdomain for Home Assistant, you should not enter the subdomain here. For example, if you are planning to use ha.example.com then you should enter example.com for the domain.
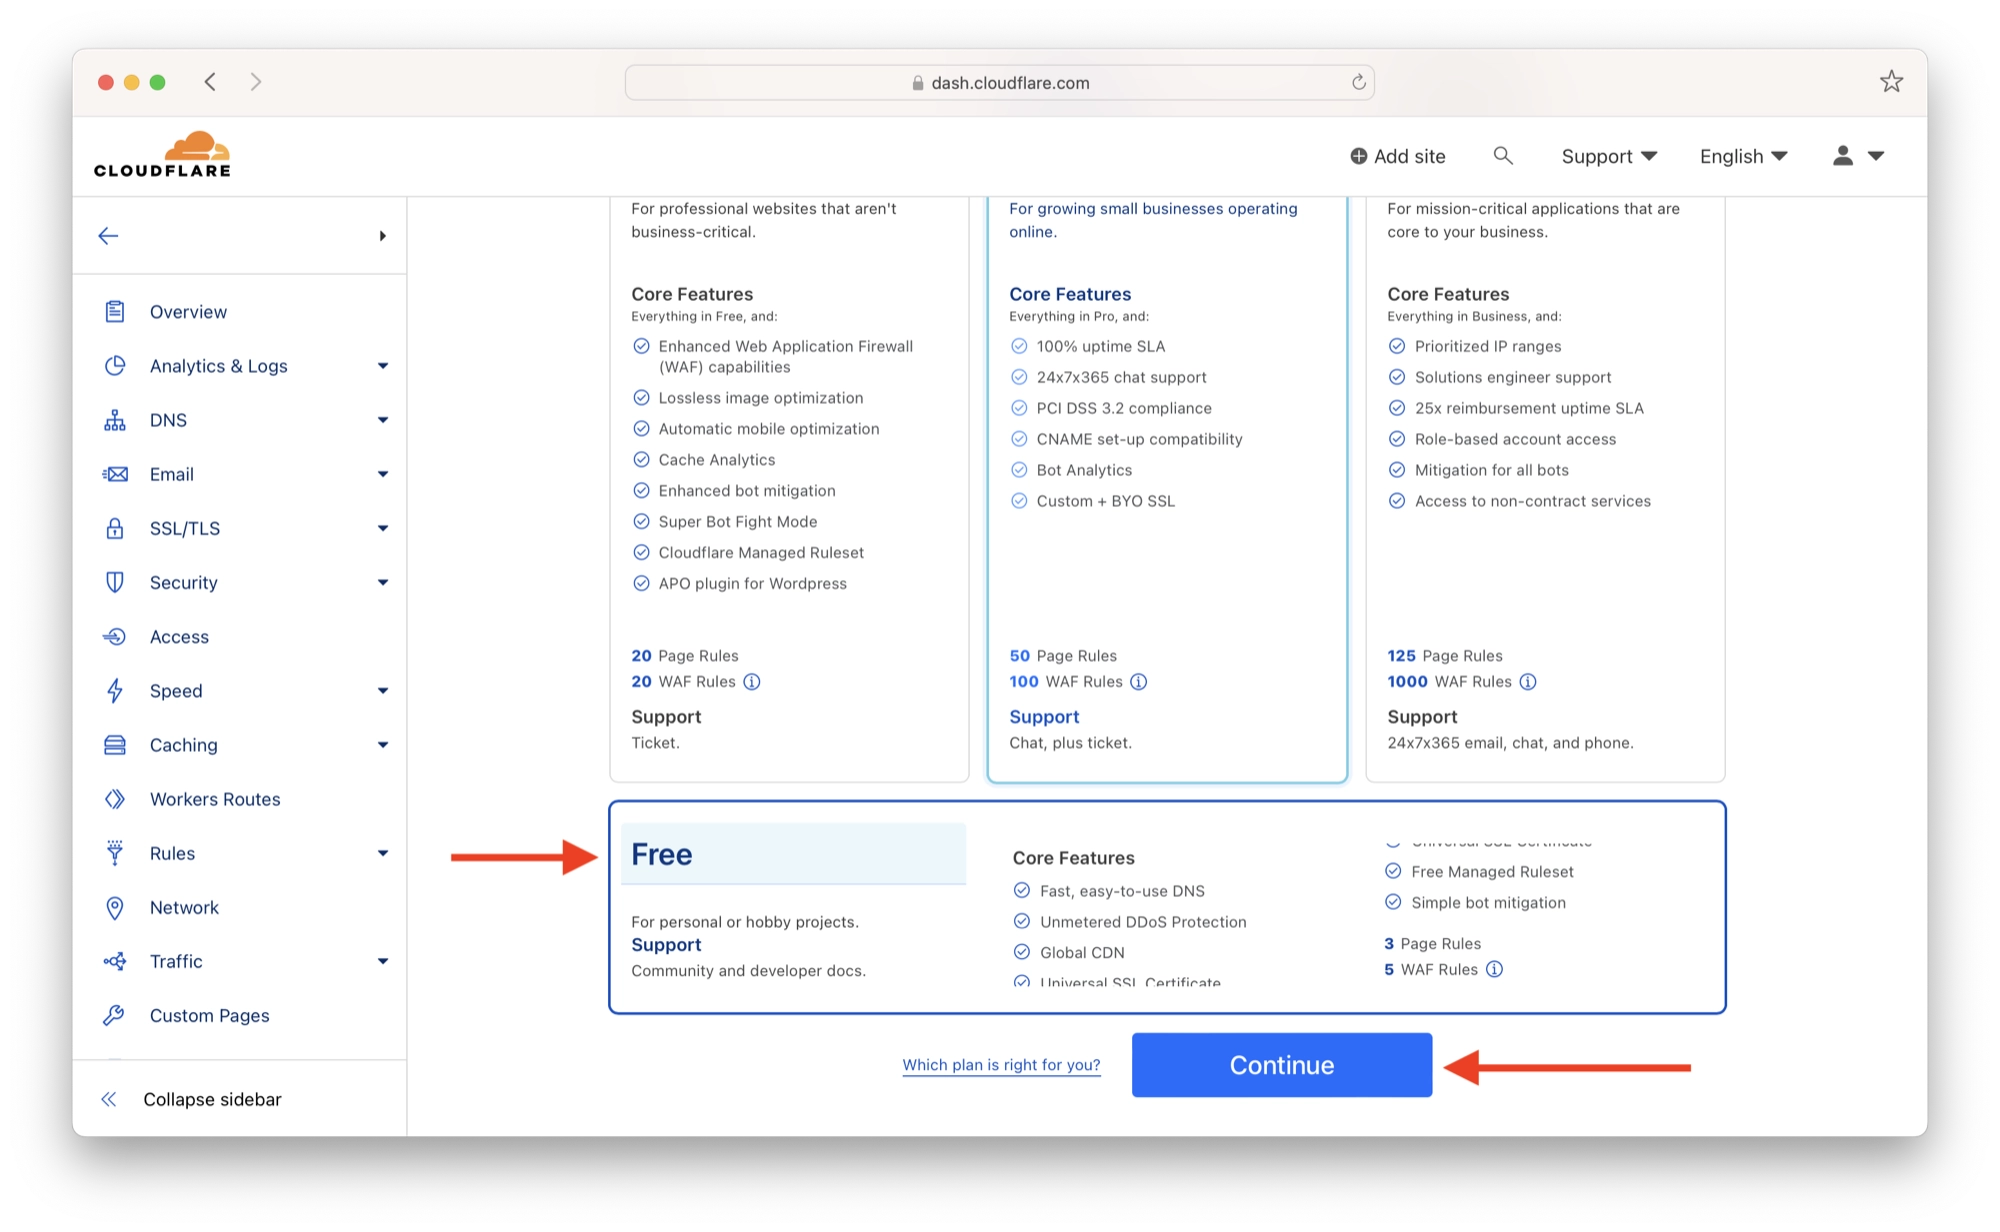
On the next page, scroll down to the bottom and choose the free plan, then click Continue.
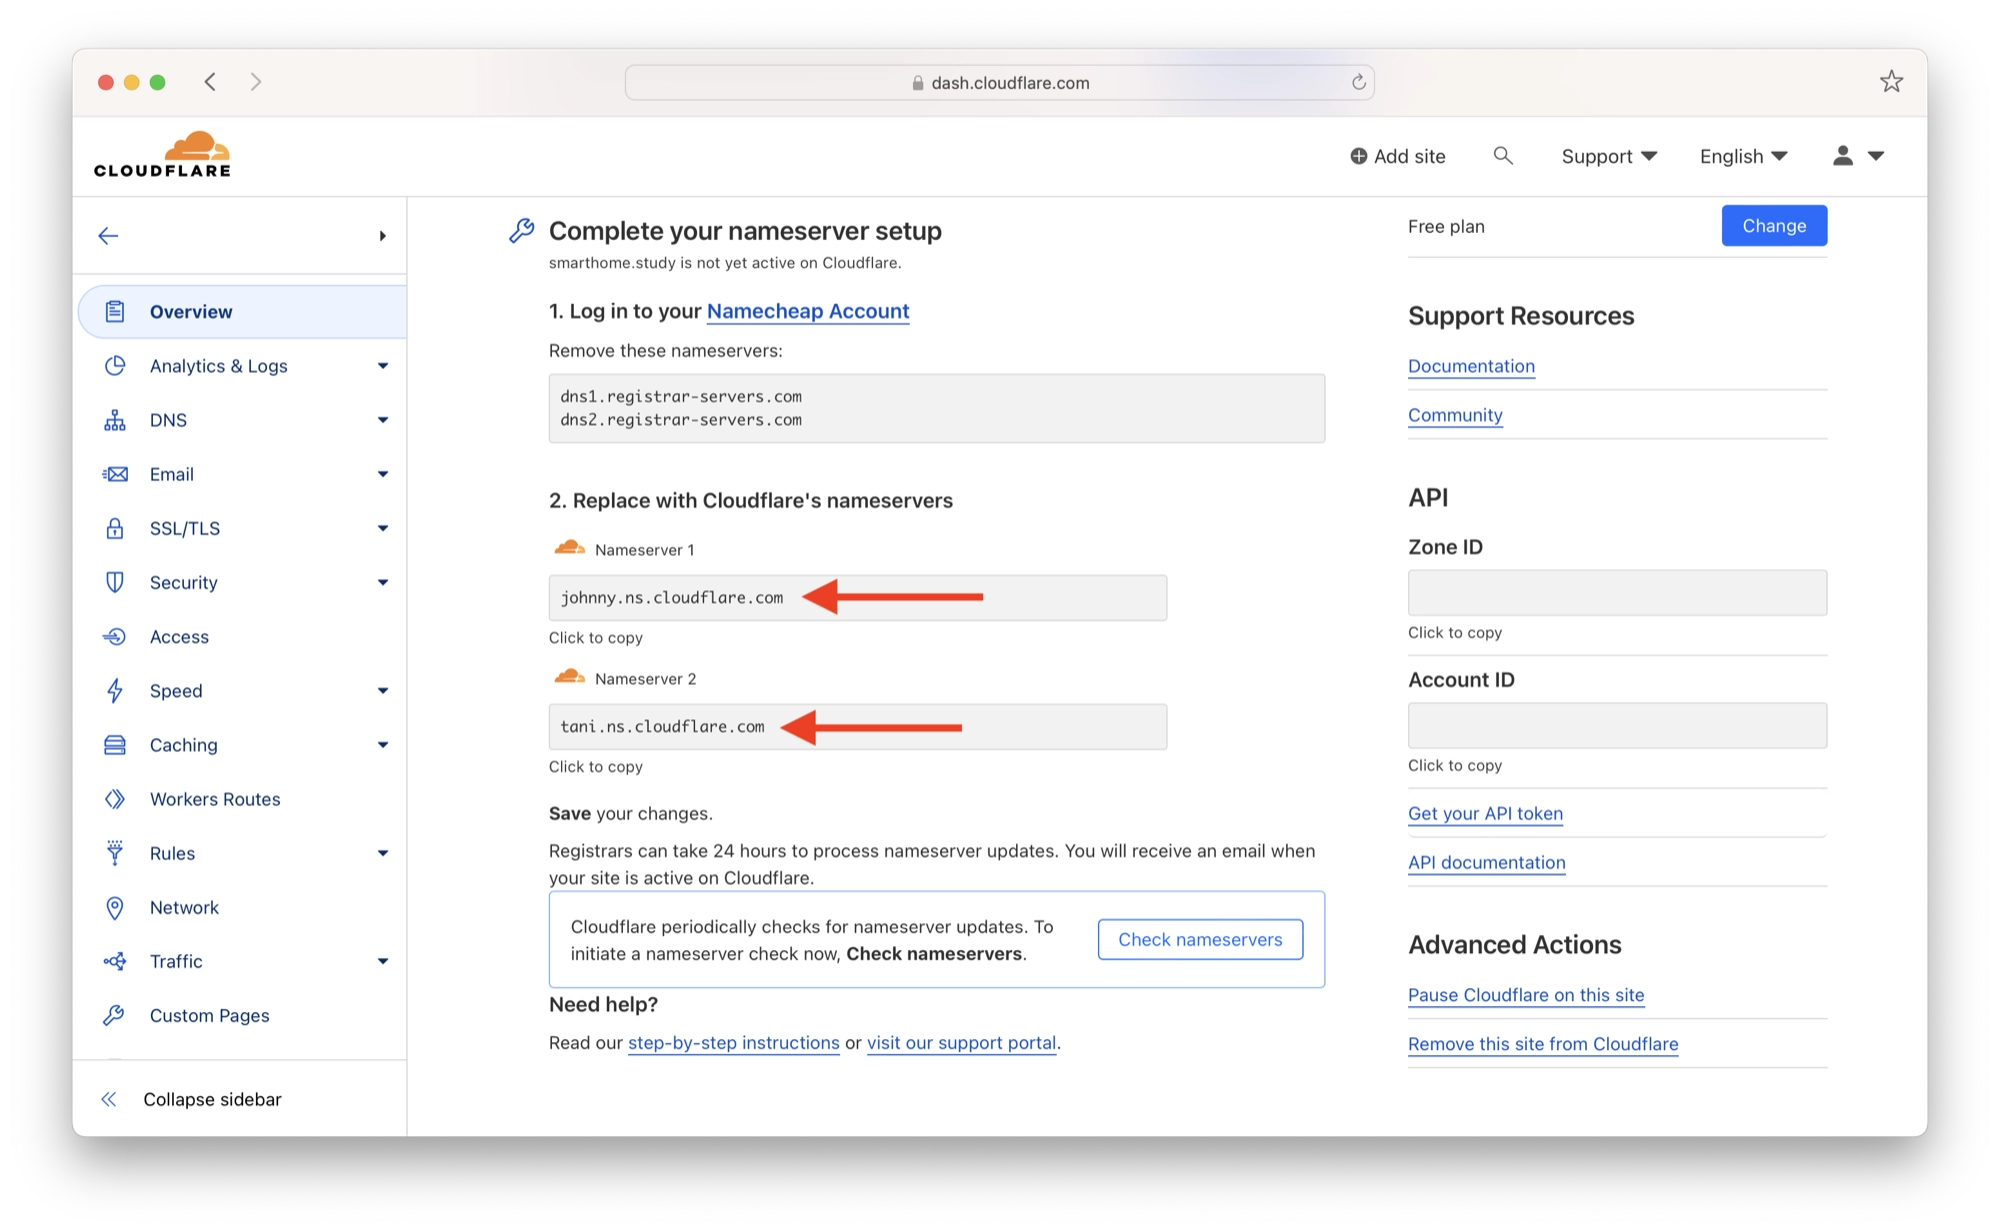
On the next page, you will need to make a note of the two name servers that Cloudflare specifies. In this example, the name servers are as follows:
johnny.ns.cloudflare.com
tani.ns.cloudflare.com
Configuring DNS Records
Now that we have added our domain name to Cloudflare and we have the required domain name server (DNS) addresses, we can proceed with linking our domain to Cloudflare.
Changing the DNS Records
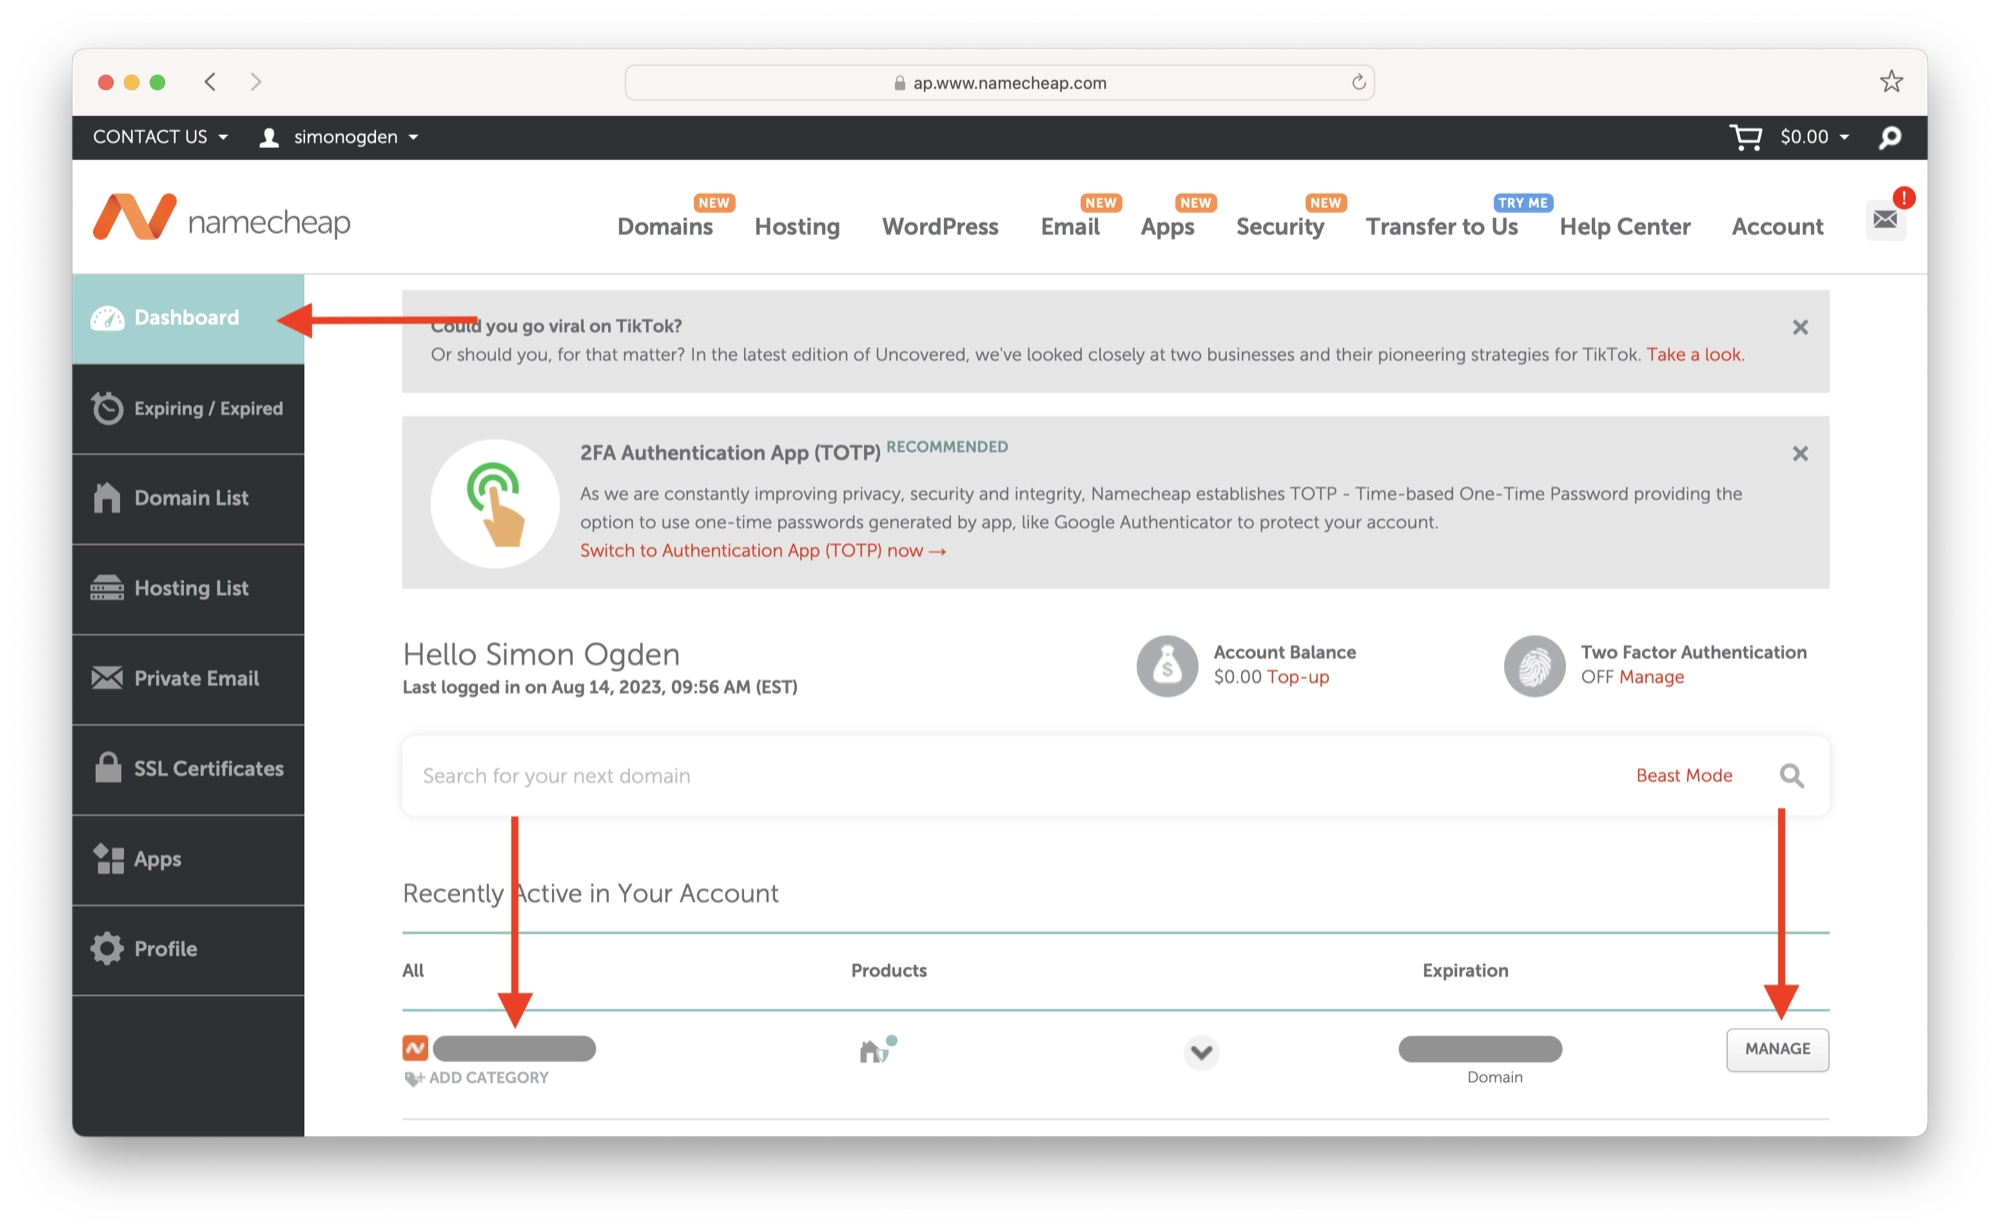
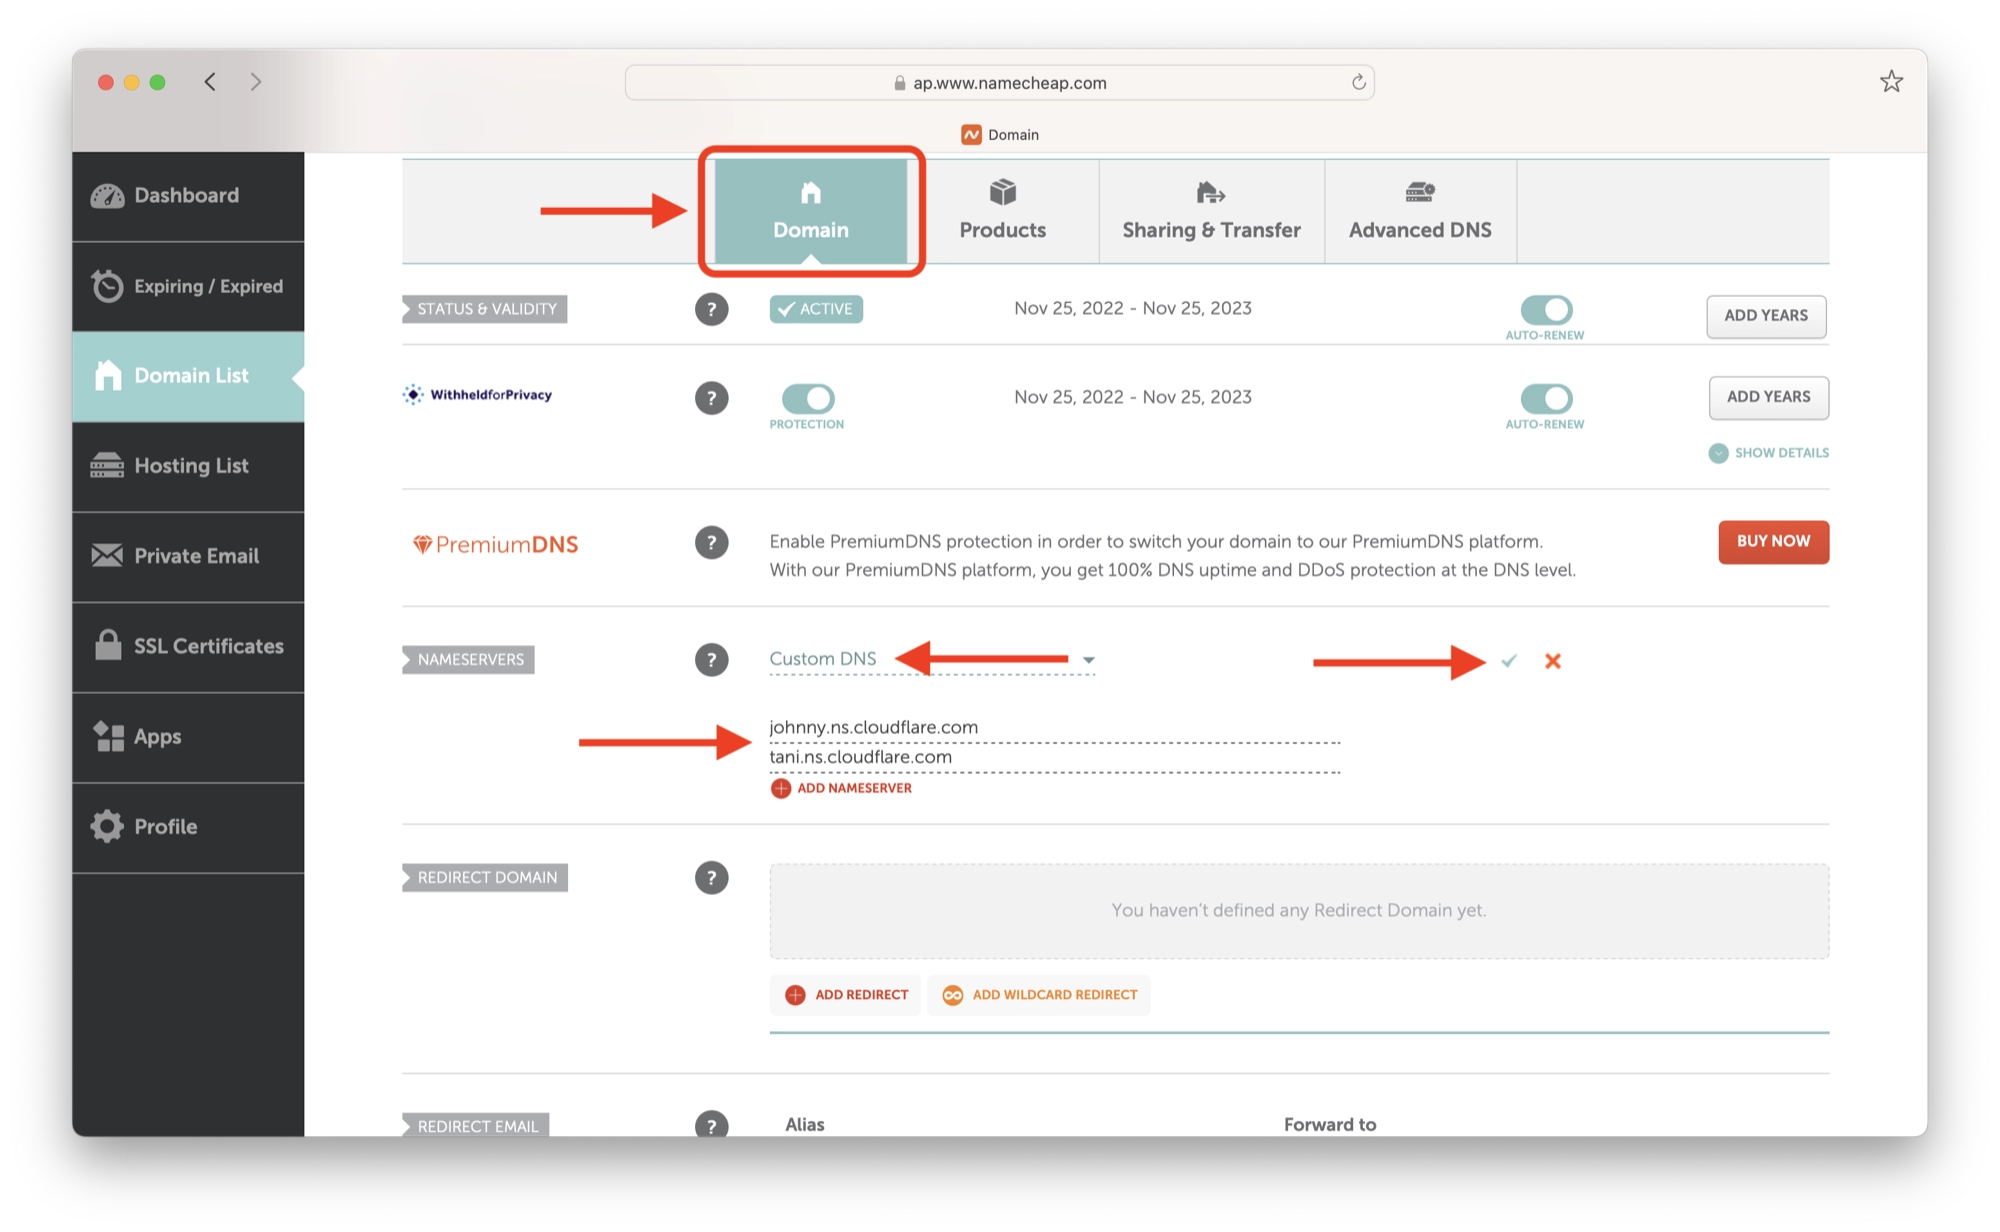
In order to do this, log in to your Namecheap account and click Dashboard in the left-hand sidebar. Scroll down and locate your domain name, then click the Manage button.
Next, click the Domain tab and scroll down to Nameservers. From the drop down menu, choose Custom DNS and then enter the domain name servers given during the Cloudflare setup. Click the green tick to apply the changes.
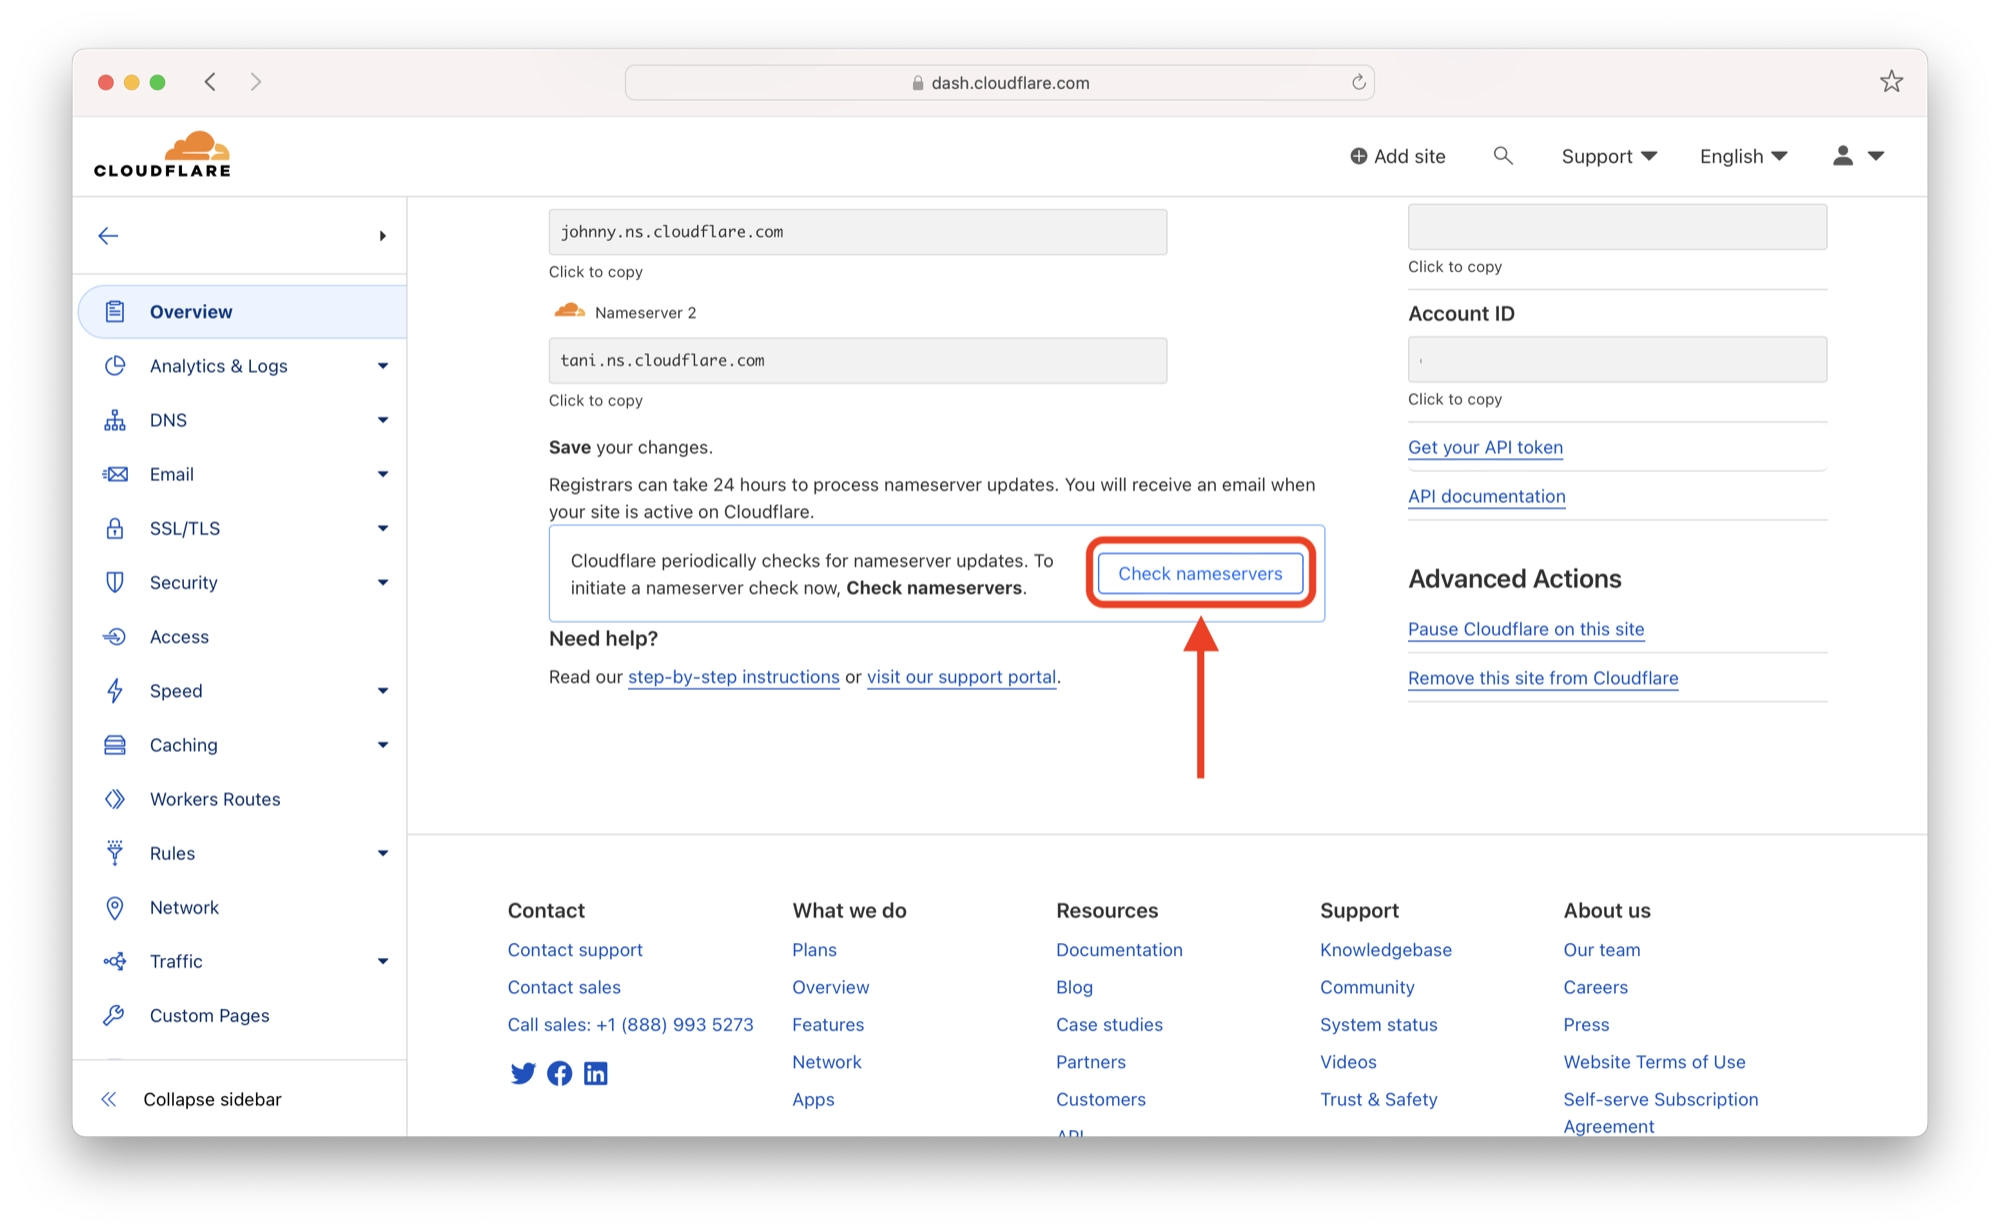
Now we need to wait for Cloudflare to detect the changes to the domain nameservers. Cloudflare will periodically check automatically, but you can check manually by clicking the Check Nameservers button.
Cloudflare will also send you an email once the nameserver changes have been detected.
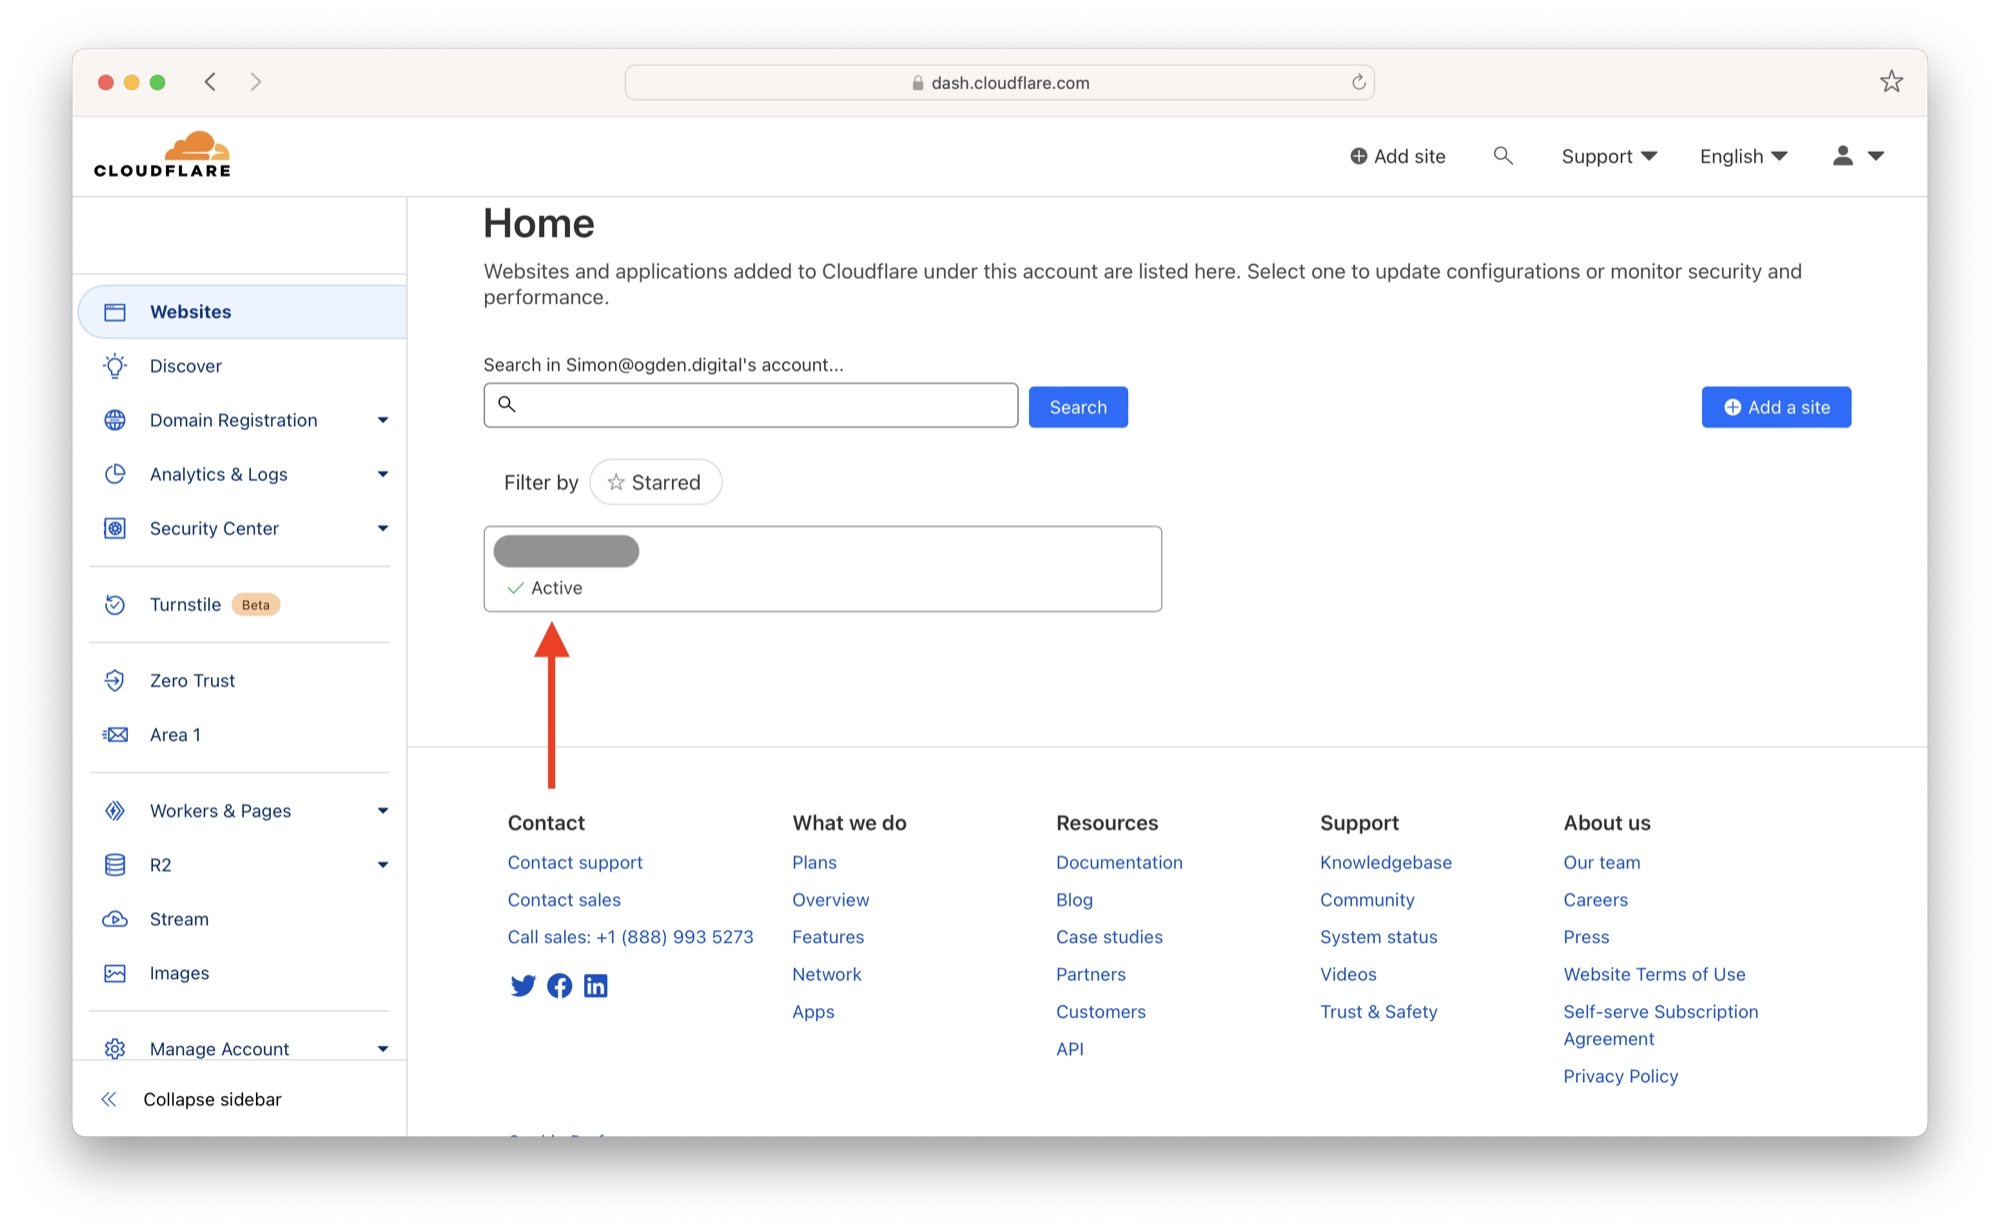
From the main home page you can check the current status of the nameserver update.
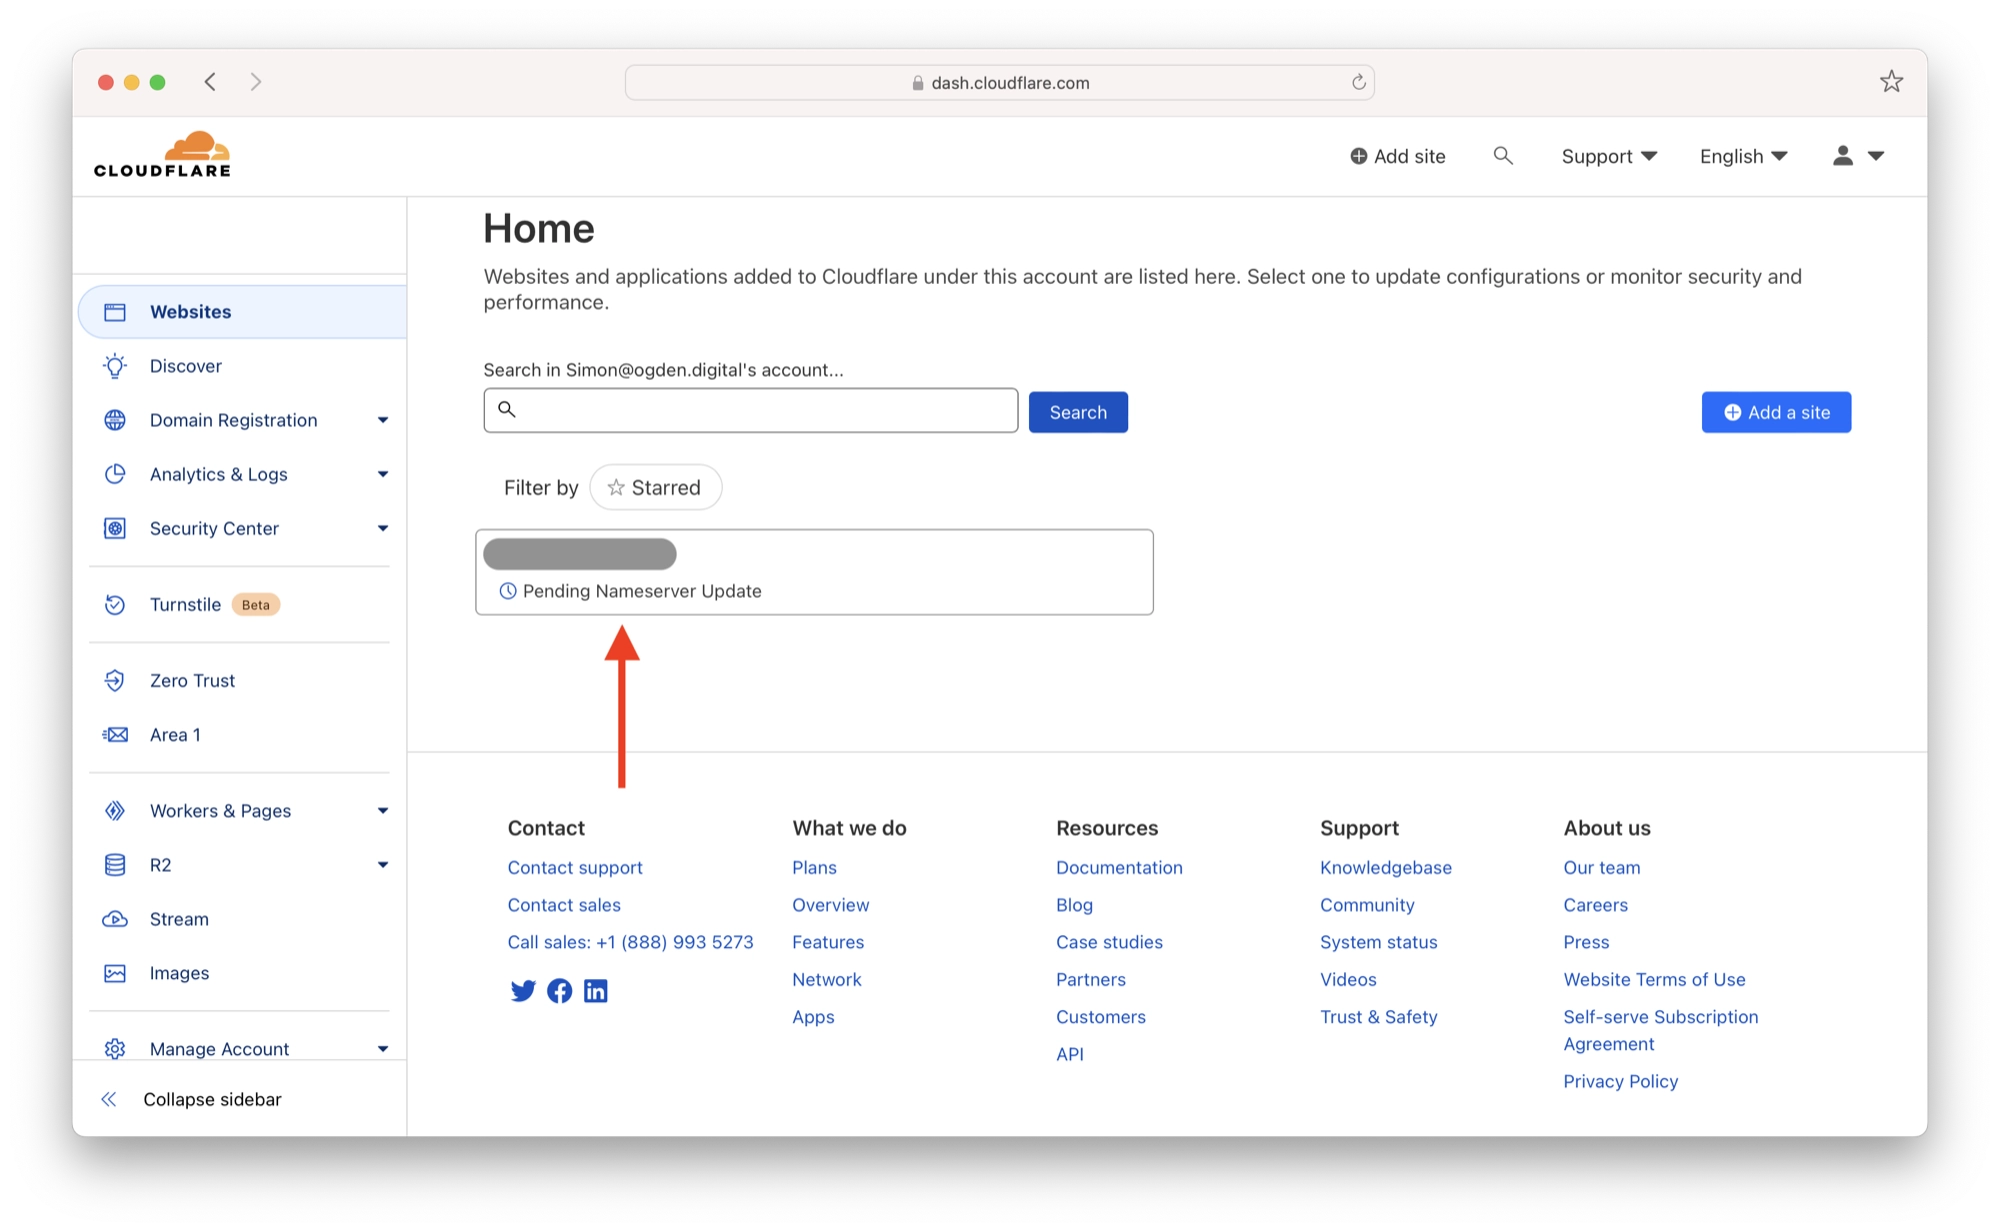
Once complete, the status will turn to Active. Click the box containing your domain name in order to continue with the setup.
Enhancing SSL/TLS Security
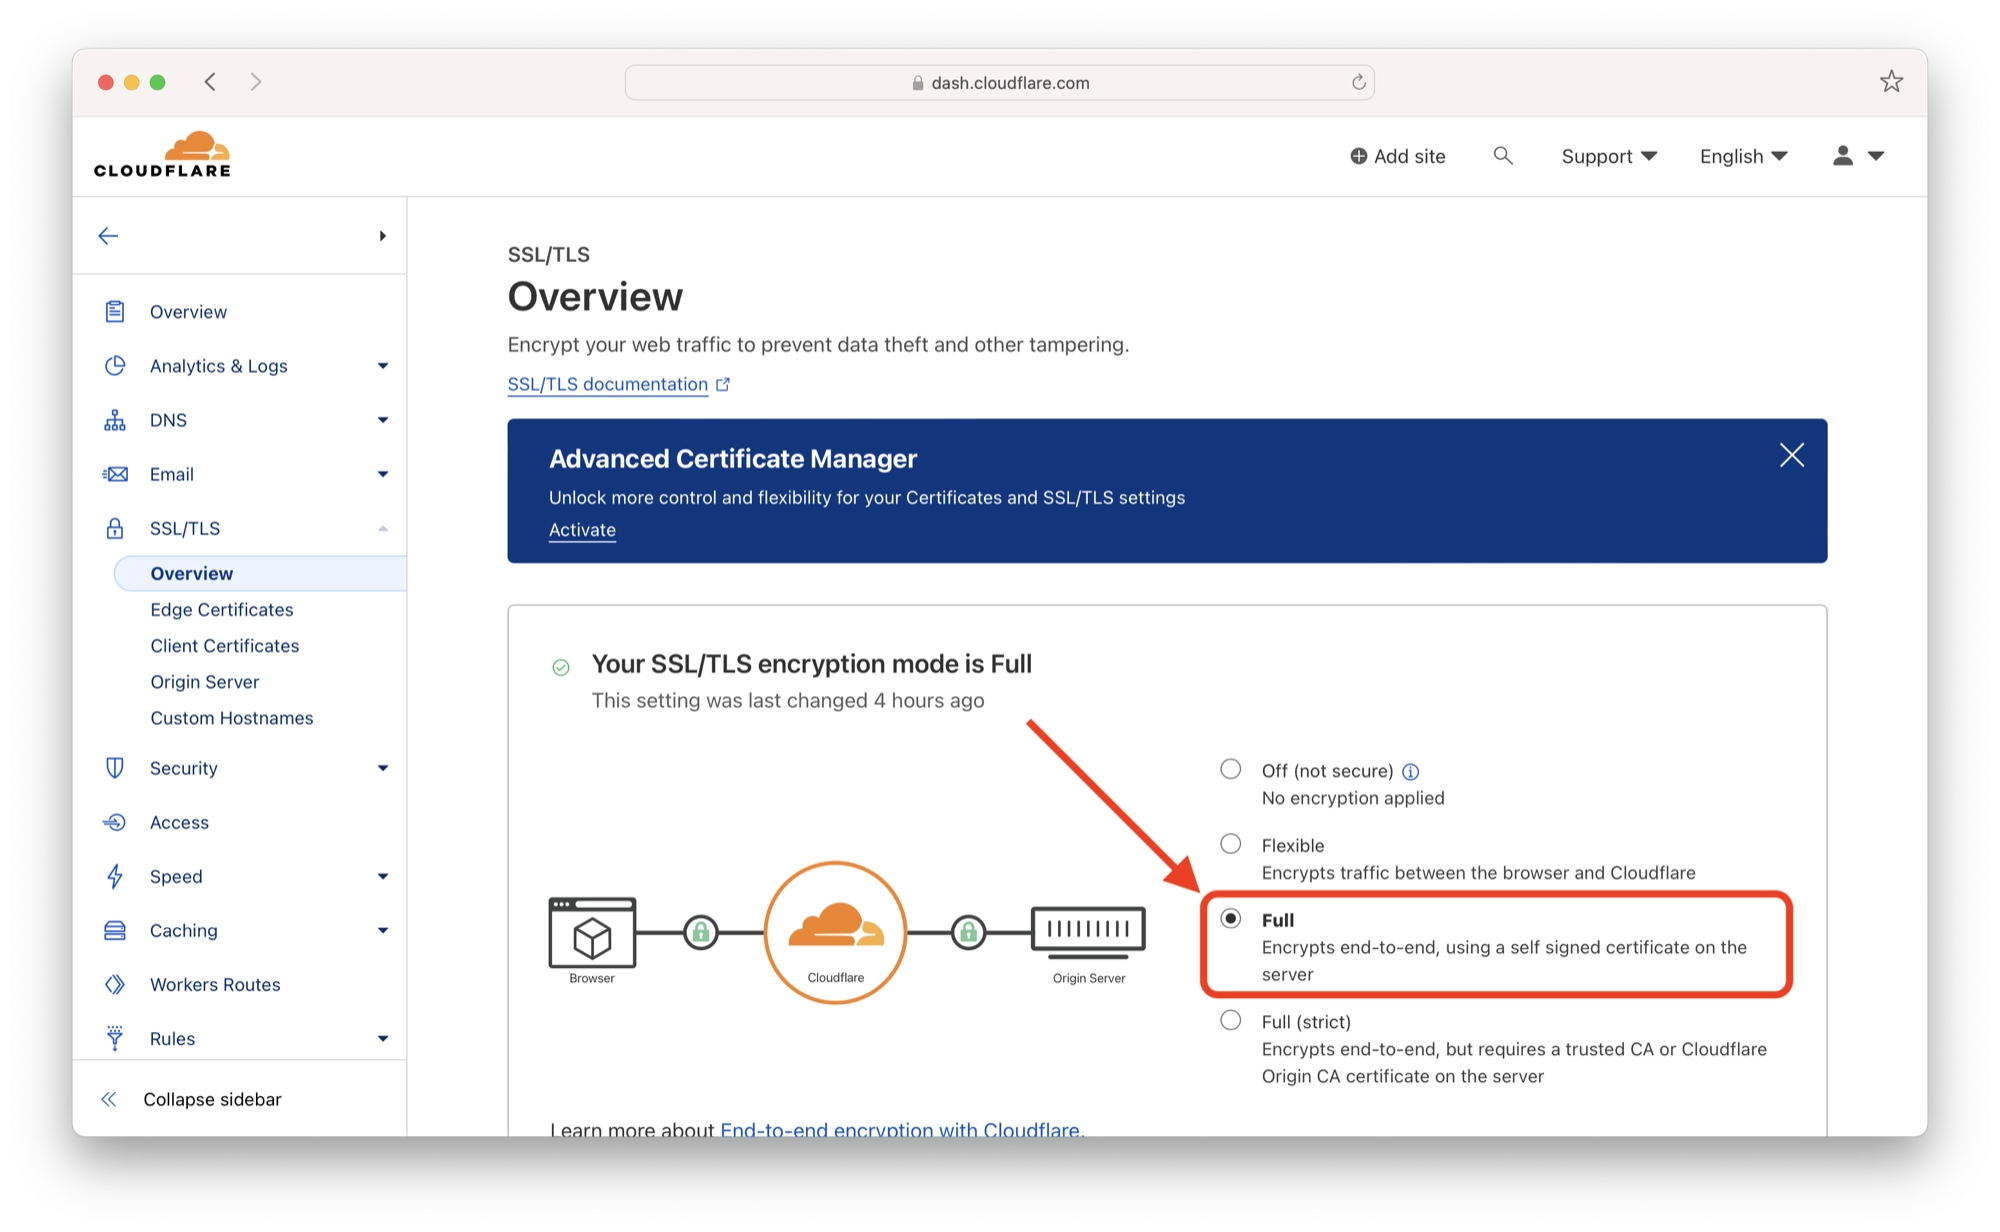
I would also recommend enhancing the SSL/TLS security settings to give your Home Assistant instance an extra layer of protection.
On the left-hand sidebar under SSL/TLS, choose Overview. Then set the SSL/TLS encryption mode to Full.
Integrating Cloudflare with Home Assistant
Once we have our domain name linked to Cloudflare and the necessary security settings are dialed in, we can integrate Home Assistant with Cloudflare using a Home Assistant add-on called Cloudflared.
Cloudflared will automate the process of creating a Cloudflare tunnel between Home Assistant and our Cloudflare account.
This will allow us to make our Home Assistant instance accessible over the internet without exposing it directly to the public internet or dealing with complex port forwarding configurations.
Installing the Cloudflared Home Assistant Add-On
If you have My Home Assistant configured, you can simply click the following button to install the Cloudflared add-on:
Alternatively, you can install the Cloudflared add-on manually. First, visit the Home Assistant add-ons store by Settings > Add-ons, and then click the Add-Ons Store button.
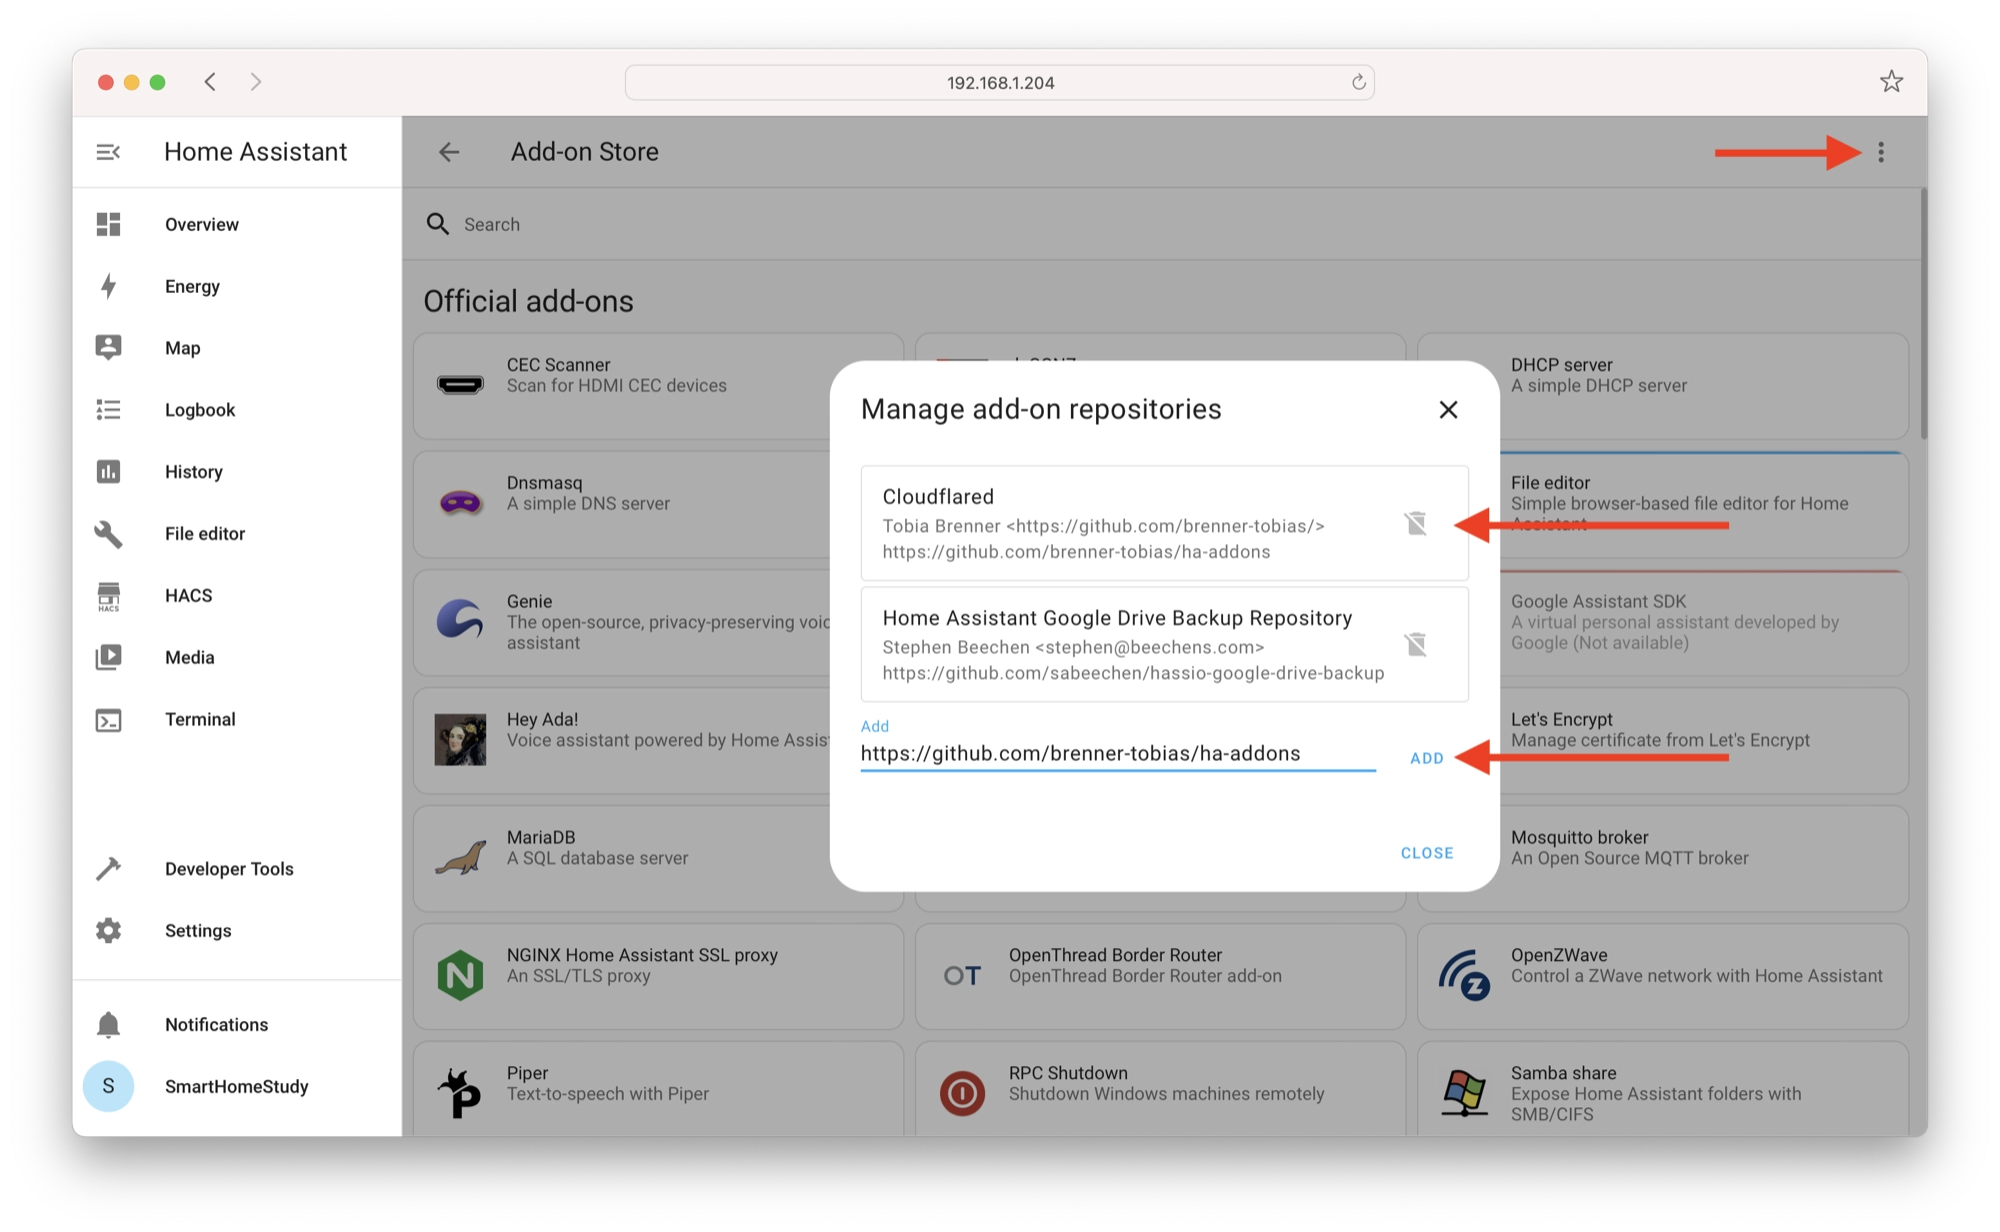
Next, click the kebab (three dots) menu in the top right-hand corner of the screen and choose Repositories.
In the text field at the bottom of the popup, enter the following repository address:
https://github.com/brenner-tobias/ha-addons
Click the Add button in order to add the repository and then click Close.
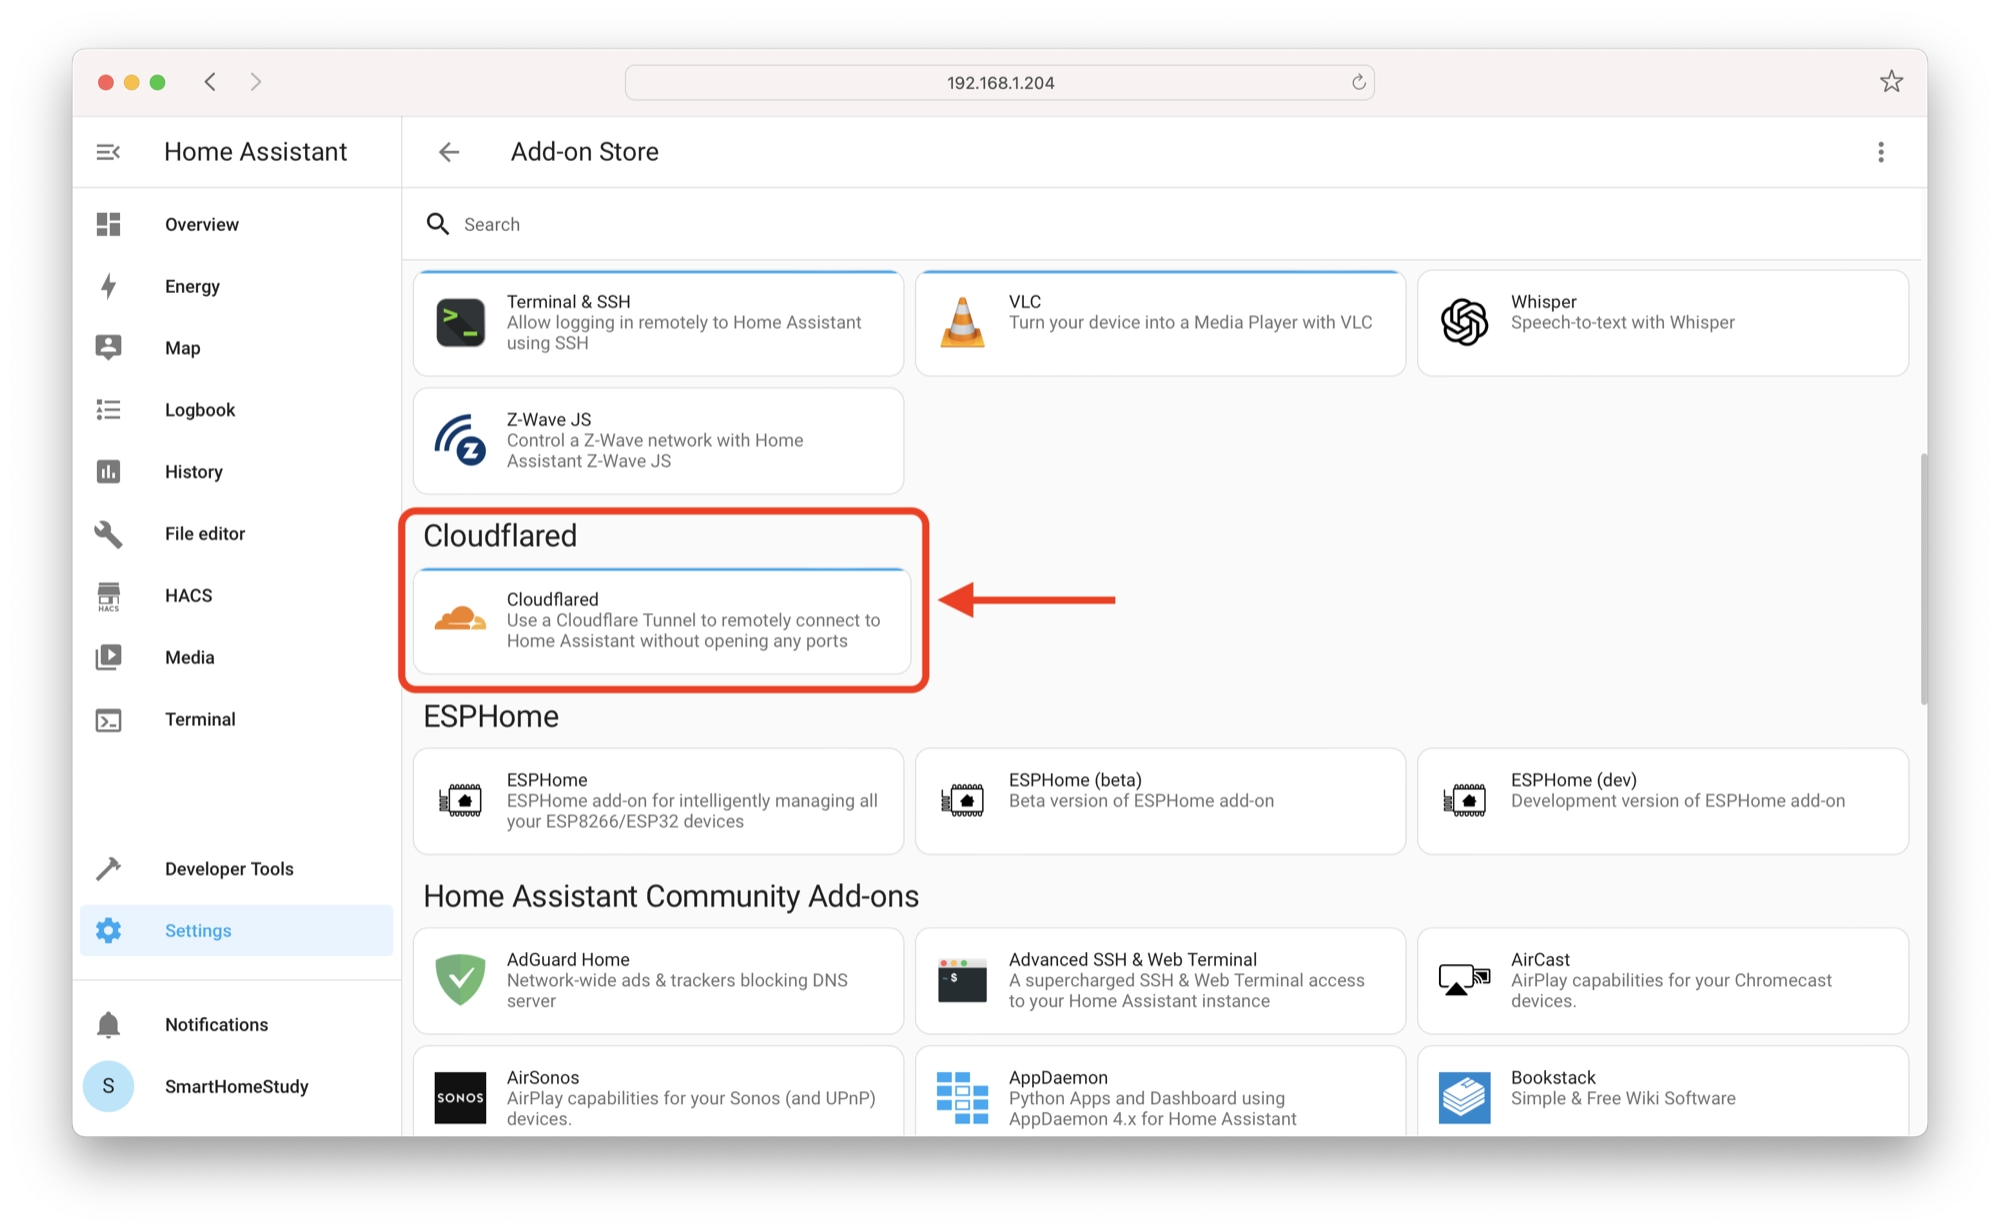
Next, refresh your browser window and then scroll down and locate the Cloudflared add-on. Click the Cloudflared add-on in order to open the settings window.
Configuring the Cloudflared Home Assistant Add-On
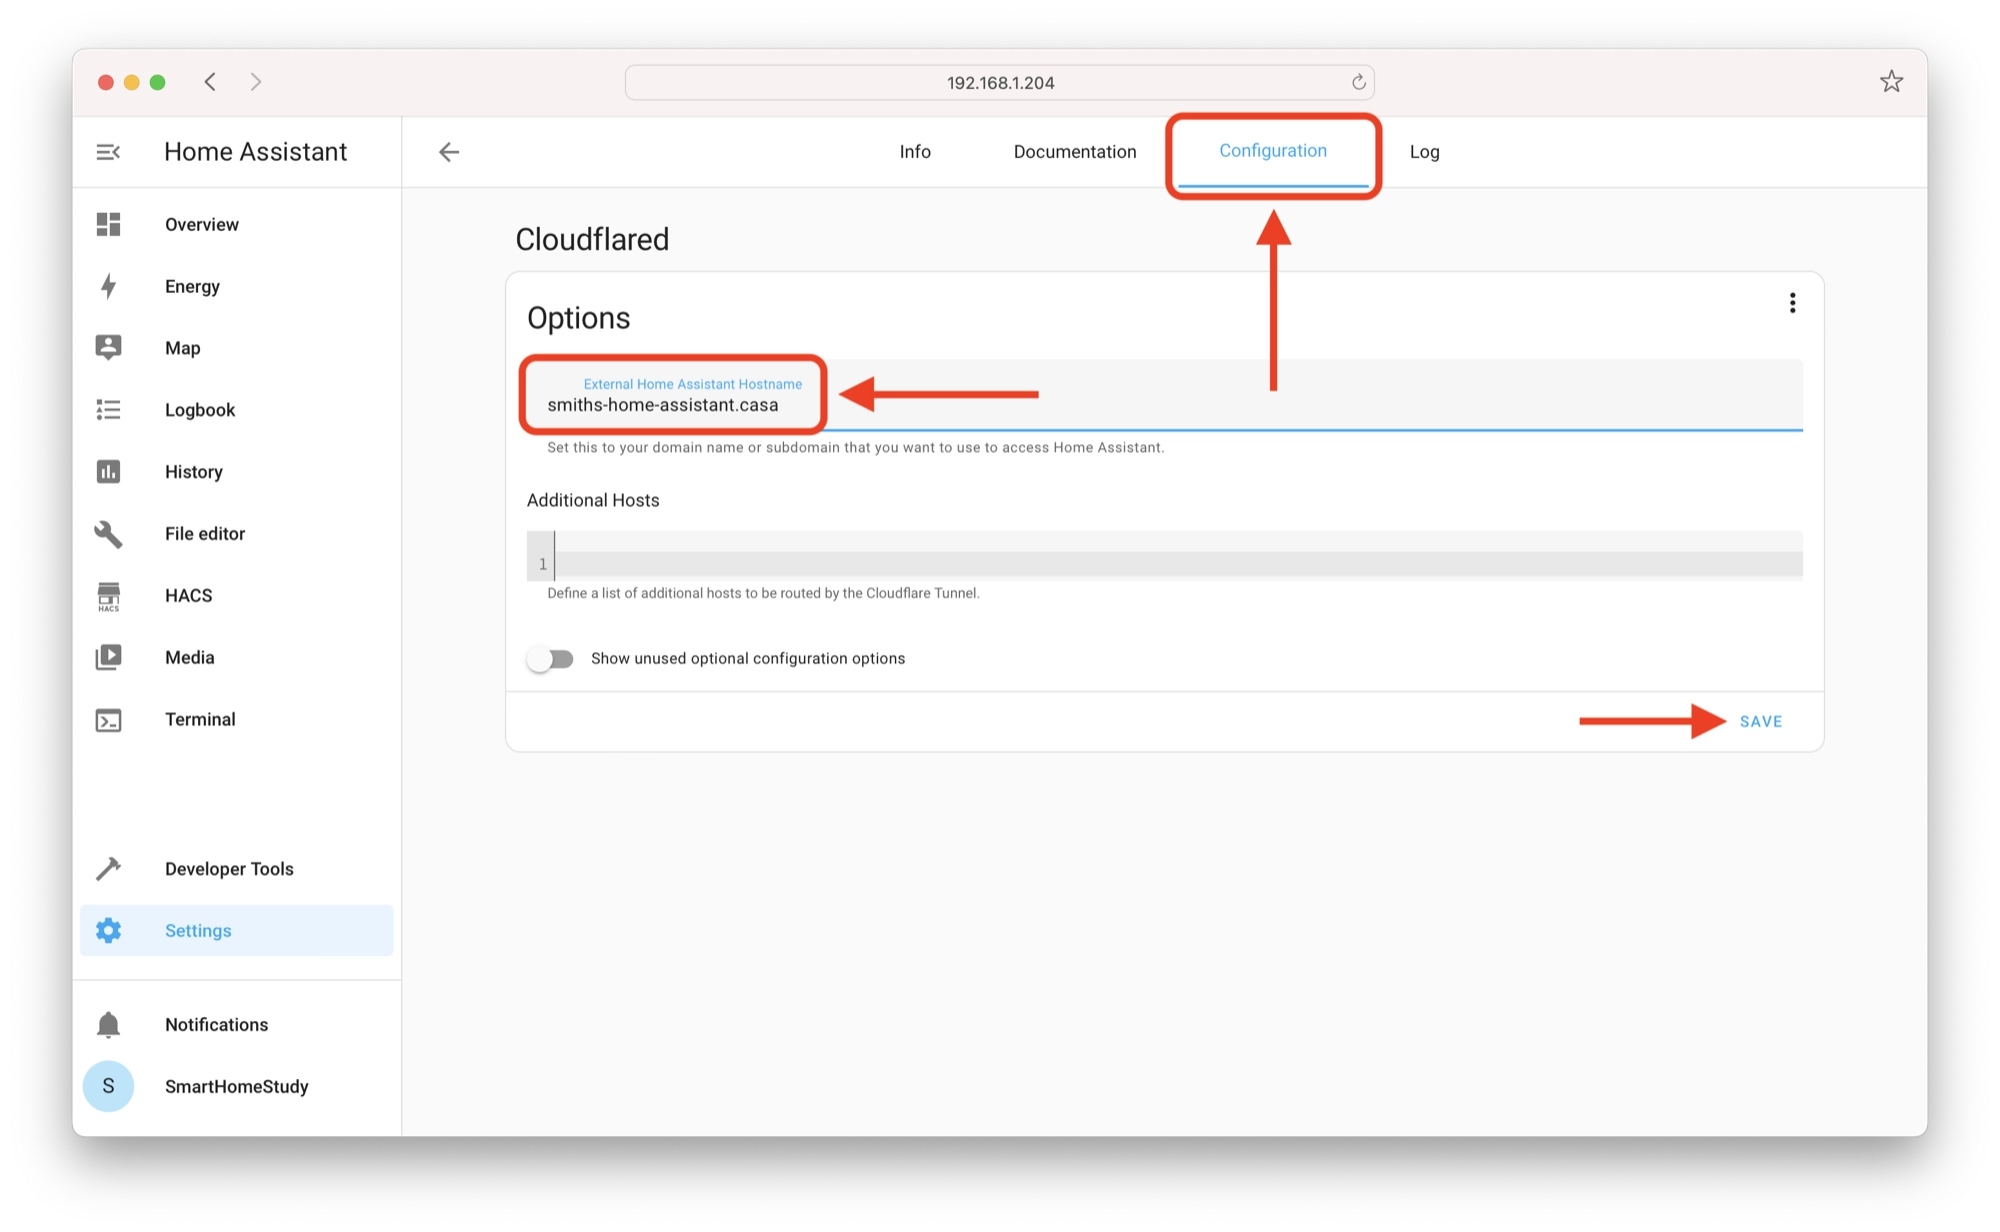
Once you have opened the Cloudflared add-on, click the Configuration tab. Enter your domain or subdomain in the External Home Assistant Hostname text field and then click Save.
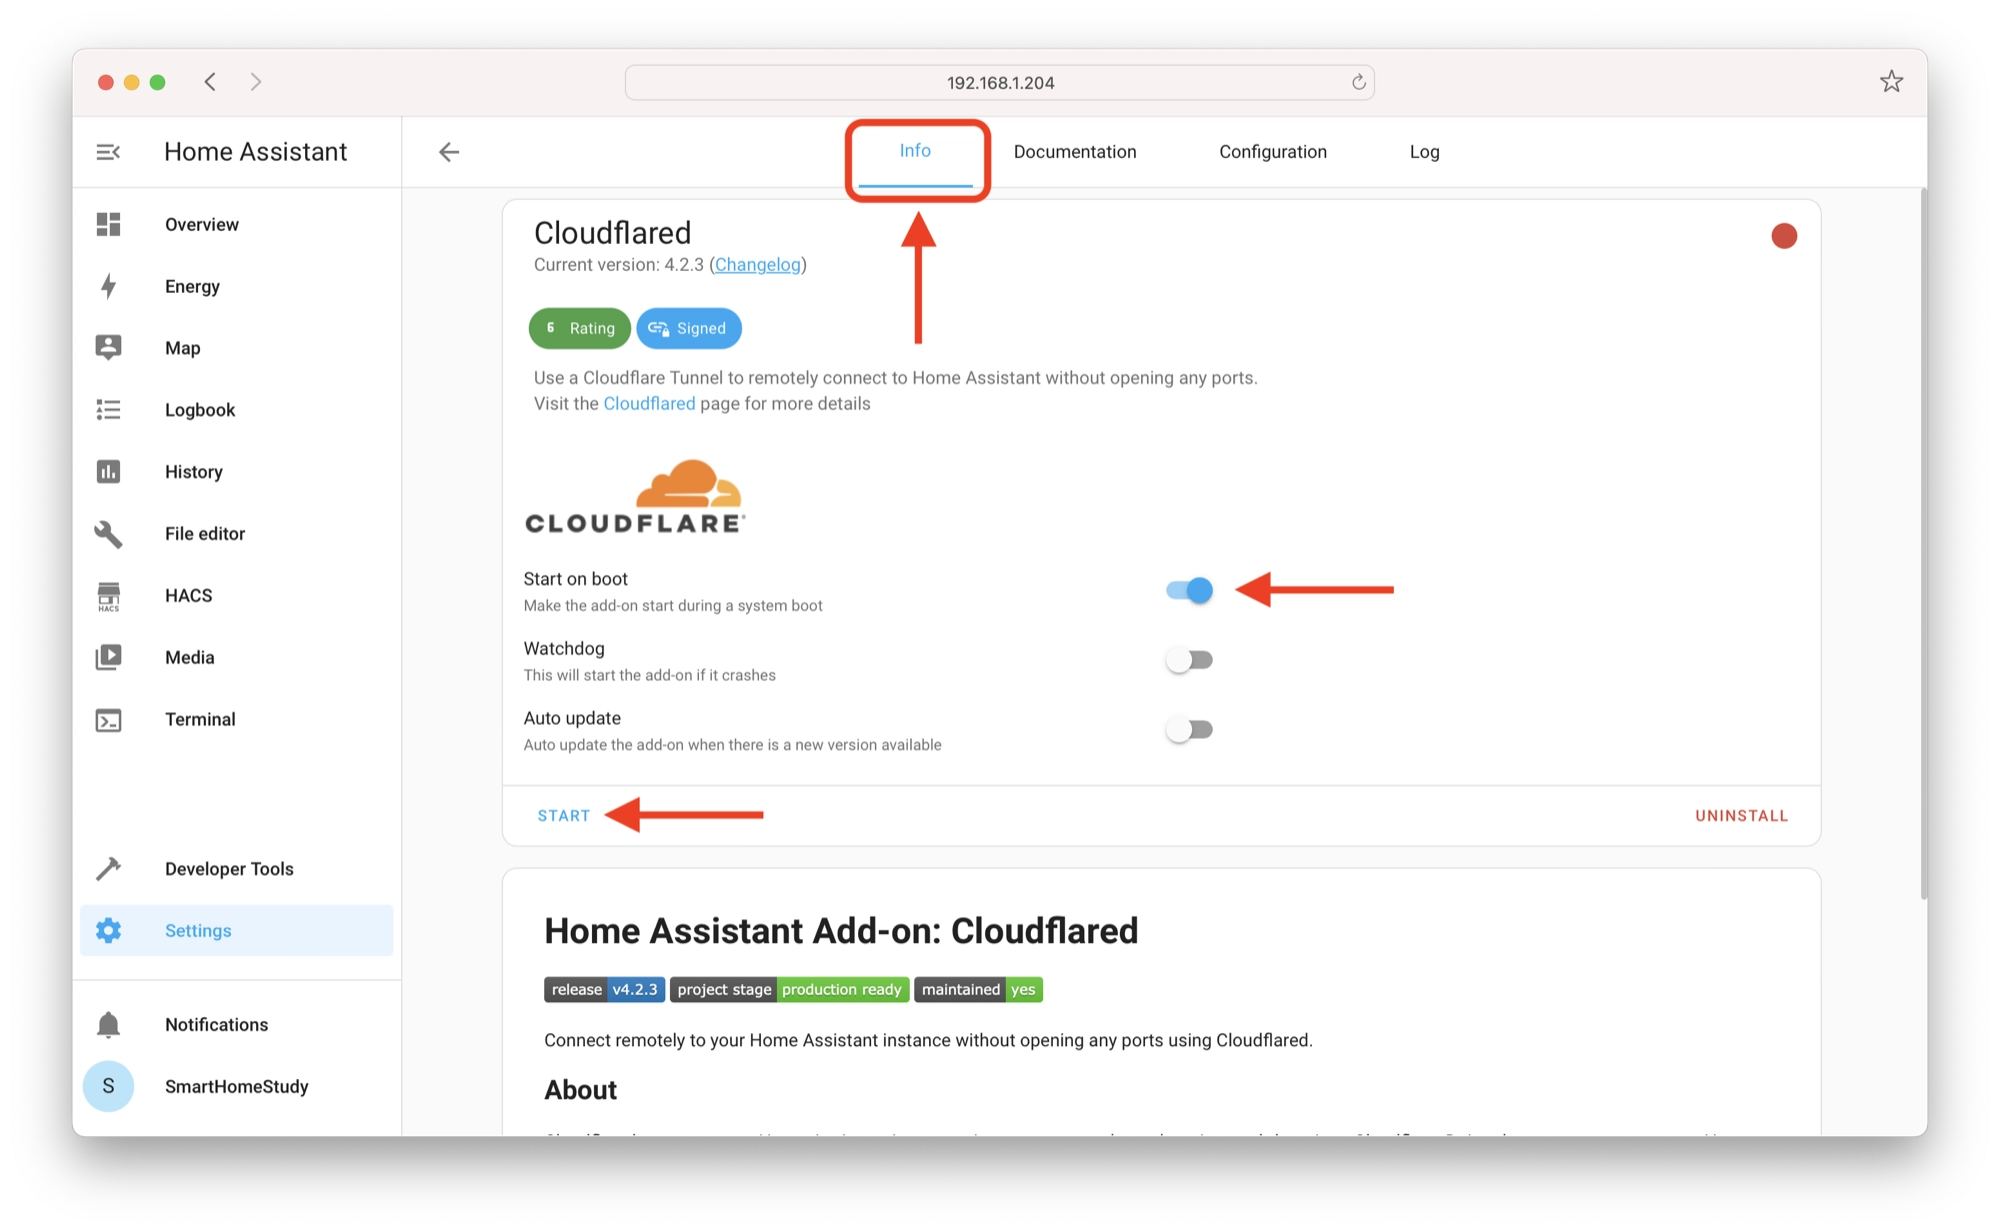
Next, click the Info tab, ensure that Start on boot is enabled and then click the Start button to start the Cloudflared plugin.
Updating Trusted Proxies in Home Assistant
When setting up remote access to your Home Assistant instance, especially when using services like Cloudflare Tunnel, it’s essential to configure your Home Assistant to recognize and trust the sources of incoming requests correctly.
In order to do this, we will use the trusted_proxies configuration, which needs to be added in the Home Assistant configuration.yaml file under the http section.
In order to edit the configuration.yaml file, you will need to have the File Editor add-on installed. If you don’t have the File Editor installed yet, click here to learn how to install it quickly and easily.
First, you will need to fetch the list of Cloudflare IP addresses relevant to your region. Click here to open the list of Cloudflare IP addresses relevant to your region.
Adding Cloudflare IP Addresses to Trusted Proxies
You will need to add the following to your configuration.yaml file. Note that the IP addresses in the example code below are the ones that I retrieved for my local region.
You may need to replace them with the addresses from the list linked above, which will be relevant to your region.
http:
  use_x_forwarded_for: true
  trusted_proxies:
    # Cloudflare IP ranges
    - 173.245.48.0/20
    - 103.21.244.0/22
    - 103.22.200.0/22
    - 103.31.4.0/22
    - 141.101.64.0/18
    - 108.162.192.0/18
    - 190.93.240.0/20
    - 188.114.96.0/20
    - 197.234.240.0/22
    - 198.41.128.0/17
    - 162.158.0.0/15
    - 104.16.0.0/13
    - 104.24.0.0/14
    - 172.64.0.0/13
    - 131.0.72.0/22
Let’s take a quick look at what this YAML is actually doing:
use_x_forwarded_for: true: This setting enables the utilization of theX-Forwarded-Forheader. When a request goes through a reverse proxy like Cloudflare, the proxy includes the original client’s IP address in this header. Enabling this option ensures Home Assistant considers this header when identifying the source IP of a request.trusted_proxies: This section is pivotal in handling requests that come through a trusted reverse proxy. It comprises a list of IP addresses or IP ranges that Home Assistant should regard as trusted sources. When you’re using a service like Cloudflare as a reverse proxy, you need to specify Cloudflare’s IP ranges in thetrusted_proxieslist.
Adding the Docker Local IP Address to Trusted Proxies
If you are running Home Assistant Supervised under Debian (rather than using the Home Assistant OS) then you will also need to add the internal IP address for the Cloudflare docker container to the list of trusted proxies.
Adding this IP address to the list of trusted proxies will prevent a 400: Bad Request error when trying to access Home Assistant using your public domain.
First, we need to find the IP address for the Cloudflared docker container. This should be done from the command line of the Debian host operating system.
Enter the following command into the Debian CLI order to fetch the IP address for the Cloudflared docker container.
sudo docker inspect -f '{{range .NetworkSettings.Networks}}{{.IPAddress}}{{end}}' $(sudo docker ps -q --filter "name=cloudflared")
In my case, the Cloudflared docker container has the IP address 172.30.33.3.
Next, we need to add this IP address to the end of the list of trusted proxies. Ensure that you amend the example with the IP address returned from the command above.
http:
  use_x_forwarded_for: true
  trusted_proxies:
    # Cloudflare IP ranges
    - 173.245.48.0/20
    - 103.21.244.0/22
    - 103.22.200.0/22
    - 103.31.4.0/22
    - 141.101.64.0/18
    - 108.162.192.0/18
    - 190.93.240.0/20
    - 188.114.96.0/20
    - 197.234.240.0/22
    - 198.41.128.0/17
    - 162.158.0.0/15
    - 104.16.0.0/13
    - 104.24.0.0/14
    - 172.64.0.0/13
    - 131.0.72.0/22
    # Docker container IP address
    - 172.30.33.3
Testing Remote Access
Once you have completed the configuration.yaml file, go ahead and save the file and then reboot your Home Assistant instance.
Upon rebooting you should now be able to access Home Assistant both using the local IP address and by using your newly assigned domain.
Note that the newly assigned domain will work from anywhere in the world!
Conclusion
In this guide, we’ve explored the world of secure and convenient remote access to your Home Assistant instance using the power of Cloudflare.
By leveraging Cloudflare’s advanced capabilities and integrating them with your Home Assistant setup, you’ve taken a significant step towards enhancing the accessibility, security, and performance of your smart home environment.
We’ve learned about the benefits of using Cloudflare’s reverse proxy technology, which allows you to expose Home Assistant to the internet without the complexities of port forwarding.
This approach not only streamlines the setup process but also ensures that your smart home remains shielded from potential threats and unauthorized access.
Thank you for joining me on this journey to enhanced remote access and security with Cloudflare and Home Assistant. Here’s to a smarter, more connected, and safer home environment!
Thanks so much for visiting my site! If this article helped you achieve your goal and you want to say thanks, you can now support my work by buying me a coffee. I promise I won't spend it on beer instead... 😏


If you like Home Assistant, why not pay a few euro/dollar per month to keep up the good work.
Looking at this manual it doesn’t seem easier than setting up a port forwarding.
Apart from that keep up the good work!
Some people don’t have access to their router admin page (shared internet/student dorms etc etc) in order to set up port forwarding, so this provides an ideal solution for them. I use port forwarding myself, but good to have options to choose from I think. Thanks for visiting and taking the time to leave a comment! 🙂
I got 400: Bad Request when going to my domain, on local ip it works fine. I run HAOS on VirtualBox. Can somebody help me?