A beautiful and welcoming GUI is both an asset and a comfort for most of your routine Mac tasks. However there are quicker and slicker methods that can be used to accomplish some computing tasks, which also make you feel as cool as Neo from the Matrix.
For this type of task the command line is your new best friend. Plus there are many other tasks that are possible, beyond what the GUI can manage.
For those who are new to terminal, the next 10 commands are a roundup of some of the most useful basic commands for getting you started with navigating the command line.
If you have used the terminal before then it still would be worth a read, incase there are one or two commands that you forgot about!
1. Change Directory : cd
cd [-L|-P] [dir]
This is probably the first command everyone should learn. It quite simply switches the current directory to whatever is specified in the following argument.
There are some other useful shorthand references that you can use as the argument, for example the tilde character can be used as shorthand for the home directory.
cd ~
2. List Directory Contents : ls
ls [-Option(s)] [file ...]
The next command that everyone should learn simply lists the contents of the current directory.
There are a surprising amount of options that can be used with this command, but most of the time you will simply use the command without arguments.
3. Move Something : mv
mv <source file/folder> <target path>
Another staple terminal command use for moving files or folders. Following the mv command you simply specify the target file or folder path as the first argument and the destination path as the second argument.
The following example will move the file quickbrownfox.txt located in the home directory to the Desktop.
mv ~/quickbrownfox.txt ~/Desktop
4. Make A Directory : mkdir
mkdir [-pv] [-m mode] [folder...]
Once someone has become comfortable with navigating directories and listing their contents, the next skill to master is creating a directory.
This can be achieved simply by using the mkdir command and specifying a path and directory name. The following creates a new folder in the home directory called new directory:
mkdir ~/new directory
Note the use of the forward slash, which is required to indicate that a space is required in the name. Without this the command would create two new directories called new and directory.
For example multiple directories can be created in a single command simply by separating the names with a space:
mkdir ~/dir1 dir2 dir3
You can also specify only the new directory name and this will create a new folder with that name in the current working directory.
mkdir new directory
5. Display The Content Of Files : cat
cat [-benstuv] [-] [file ...]
The cat command takes the contents of a file and ‘prints’ it into the terminal window. Here we don’t actually mean print [to paper] with ink, we mean to display on the screen.
cat quickbrownfox.txt
Executing this command will simply display the contents of quickbrownfox.txt into the terminal.
This command is marginally useful if you want to view the contents of a file quickly from the terminal, however nano would probably be a better option.
Where this command really shines is when it is used with a pipe, such as with the pbcopy command.
6. Copy And Paste : pbcopy
pbcopy [-pboard {general | ruler | find | font}]
The pbcopy command allows us to copy something to the clipboard. We can use additional commands in conjunction with pbcopy in order to pass data to it that we wish to copy.
For example we can use the echo command to print some text to the screen:
echo "hello world"
We can use this in conjunction with the pbcopy command to place this text on the clipboard instead of just printing it to the terminal screen. We achieve this by using a pipe symbol to pass the data to pbcopy:
echo "hello world" | pbcopy
Another example would be to use the cat command to copy a file to the clipboard:
cat ~/quickbrownfox.txt | pbcopy
We can then paste this using the pbpaste command:
pbpaste > ~/slowpinkrabbit.txt
7. View System Utilisation : top
top
Executing the top command launches an in-terminal app that monitors the current processes and resource usage.
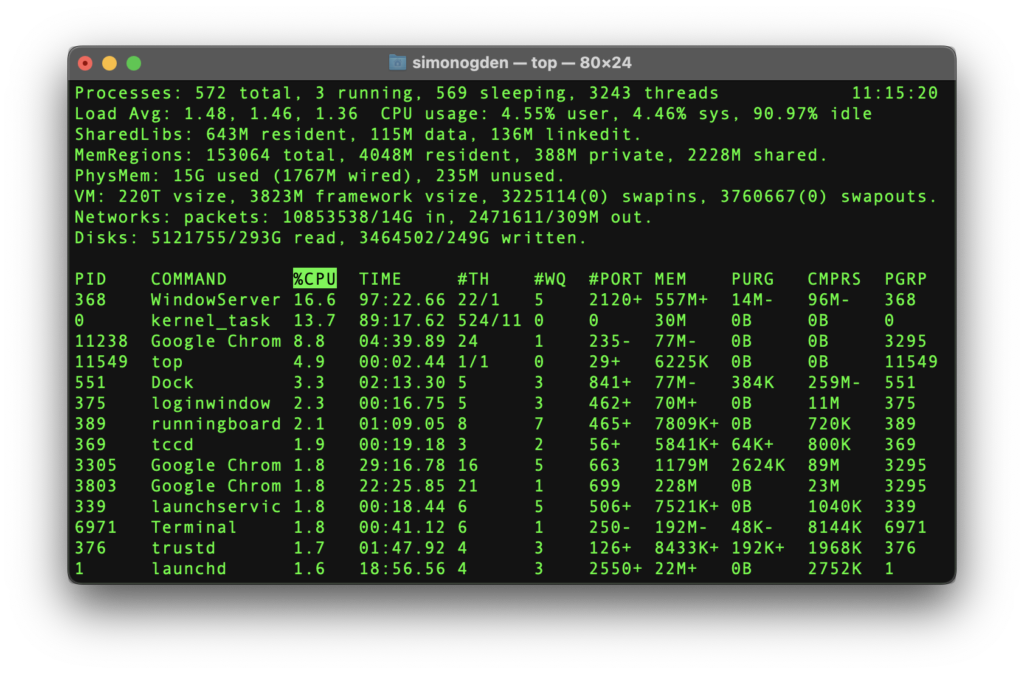
This gives us a whole host of information that could be useful for various reasons. However there is one reason that is probably most useful, which is the given PID number.
The PID number, or Process IDentification number, can be used in conjunction with other commands such as kill.
The top command produces continuous output, so to exit you can press control + C.
8. End Processes : kill
kill <pid>
The kill command is pretty self explanatory. It will terminate a program specified by its PID as the primary argument.
You can get the PID for a program that you want to kill by using either the top command or the ps command.
9. Open a File : open
open <file>
This is another very self explanatory command, but it is one that I didn’t know existed until very recently!
The open command quite simply opens a file. You can use it to open any file, even ones that are not compatible with the terminal. These will simply open in the GUI as if you clicked them.
This command could be useful if you want to quickly view files whilst navigating in the terminal. However it would become really valuable when used in script writing.
10. Edit a File : nano
nano <path/file>
Nano is an awesome terminal text editor, which is very useful for making edits to files. If you are editing configuration file variables then you will find this very useful!
Using the nano command without arguments will launch the editor with a blank file.
You can also edit a specific file by specifying the file path/name as the primary argument. If the file does not exist then it will be created so long as you save on quitting.
nano thequickbrownfox.txt
For more information about editing files with Nano, check out my article on editing files with the command line.
Thanks so much for visiting my site! If this article helped you achieve your goal and you want to say thanks, you can now support my work by buying me a coffee. I promise I won't spend it on beer instead... 😏