
Looking for a simple and easy to understand solution for a timed smart light or smart switch?
In this tutorial you can learn how to add a simple timer to any service in Home Assistant with user adjustable time.
With Home Assistant you can create a neat little slider in the user interface in just a few lines of YAML and then use it to make a timed switch for your smart lights or plugs. Awesome!
In this tutorial I will guide you step-by-step through the process of making a switch that turns off after a timer elapses.
If you are looking to schedule the control of switches using the clock then you might want to check out my tutorial on how to make an artificial sunrise instead, as it uses the date/time instead of a countdown timer.
Table of Contents
Prerequisite
For this tutorial we will assume that you have Home Assistant up and running already.
A very basic knowledge of configuration.yaml would also be advantageous, but we will cover as much detail as possible.
If you are completely new to Home Assistant then you should probably first check out my beginners guide to YAML, as well as my tutorials on automation and scripts.
We will also be using a very simple template to get the number of minutes from the user input.
Templates are a more advanced topic and it is not necessary to understand how they work in order to follow this tutorial.
However if you want to learn about templates then you can go check out my tutorial on simple templates.
Create the controls
In order to create our timer we first need a method to input the number of minutes or seconds that we want to delay before turning off the lamp.
We will also add a switch to activate or deactivate the timer function.
We can easily create an awesome control panel in the user interface that looks like this!

Create the number integration
First we need to create an instance of the input_number integration in the configuration.yaml file in order to store our timer value.
Go ahead and add a new instance of the integration called something like light_timer_minutes.
input_number:
  light_timer_minutes:
Name the slider
Next we will specify a name for our input, something like light timer will be fine but you can call if what you want.
input_number:
  light_timer_minutes:
    name: "Light Timer"
Add min/max values
We need to specify minimum and maximum values for the slider. Here you need to specify the desired range of minutes or seconds for your timer.
You must choose either minutes or seconds, but this will be specified in the automation.
input_number:
  light_timer_minutes:
    name: "Light Timer"
    min: 0
    max: 30
Specify step value
Finally we will specify the step value. This is the amount that the value will increment each time we move the slider.
For this example we will use 1, but if you wanted a longer duration such as 60 minutes you might want to specify something like 5 so that the slider increments in 5 minute intervals.
input_number:
  light_timer_minutes:
    name: "Light Timer"
    min: 0
    max: 30
    step: 1
Create the input boolean
A “boolean” is just a fancy way to describe something with a true or false state, something that can either be on or off. It it commonly used in computer programming.
Now that we have created our slider we will create a switch that can be used to enable or disable the timer. In order to do this we will create an instance of input_boolean.
input_boolean:
  light_timer_enabled:
Name the switch
Next we will name the switch something like light timer switch.
input_boolean:
  light_timer_enabled:
    name: "Light timer switch"
Set the initial condition
It is also possible to set the initial condition of the switch when Home Assistant first loads. I will set mine to off but you can choose either on or off depending on your preference.
input_boolean:
  light_timer_enabled:
    name: "Light timer switch"
    initial: off
Set the icon
Finally we will specify an icon from the MDI icons list. I have chosen the time lapse icon, but feel free to search the library and choose something else. Home Assistant supports mostly all of the MDI icons.
input_boolean:
  light_timer_enabled:
    name: "Light timer switch"
    initial: off
    icon: mdi:timelapse
Create the automation
Now that we have all of the YAML written to create the user interface, we can write the automation that drives the timer. We will create an automation instance within the configuration.yaml file.
If you already have the automation integration then simply add the code under your existing automation instances. Alternatively you can set up the automation in the graphical automation editor if you prefer.
Go ahead and create a new automation instance named something like light timer.
automation:
- alias: 'light timer'
Add the trigger
In this example we will add the timer function to a light entity, but you can apply it to many different functions simply by using a different service.
We need the automation to trigger when the light is switched on, therefore we will choose state as our platform and specify the light entity.
I will be using a light entity called light.treelamp but you should specify your own entity. We will set our trigger to fire when the state changes to on.
automation:
- alias: 'light timer'
  trigger:
    platform: state
    entity_id: light.treelamp
    to: 'on'
Add the condition
We only want our timer to turn off the light when the timer function is enabled. Therefore we will set a trigger condition and link it to the on/off switch we created earlier.
We will specify the entity_id associated with the condition as the switch. This means that the automation will only occur if the light_timer_enabled switch is turned on.
automation:
- alias: 'light timer'
  trigger:
    platform: state
    entity_id: light.treelamp
    to: 'on'
  condition:
  - condition: state
    entity_id: input_boolean.light_timer_enabled
    state: 'on'
Add the action
Finally we can add the actions! We will specify the first action as the timer delay and then the second action will turn the light off. When creating a list of multiple actions, they will occur sequentially.
Delay
First we will add the delay and add an attribute for the desired unit of time. For this example I am using minutes but you could also use seconds if you prefer.
Rather than set a constant value of delay time, we will use a template to fetch the data from the input slider we created earlier.
It is beyond the scope of this tutorial to cover the details of how templates work, but you can read more about it in my simple template tutorial.
automation:
- alias: 'light timer'
  trigger:
    platform: state
    entity_id: light.treelamp
    to: 'on'
  action:
  - delay:
      minutes: "{{ states('input_number.light_timer_minutes') | int }}"
Turn off the light
Finally we will add a service to turn off the light following the delay.
automation:
- alias: 'light timer'
  trigger:
    platform: state
    entity_id: light.treelamp
    to: 'on'
  action:
  - delay:
      minutes: "{{ states('input_number.light_timer_minutes') | int }}"
  - service: light.turn_off
    entity_id: light.treelamp
Adding to the user interface
Now we have completed all of the code we can add the controls to the user interface. Awesome! In order to do this we will need to configure the lovelace UI manually.
Create a new card
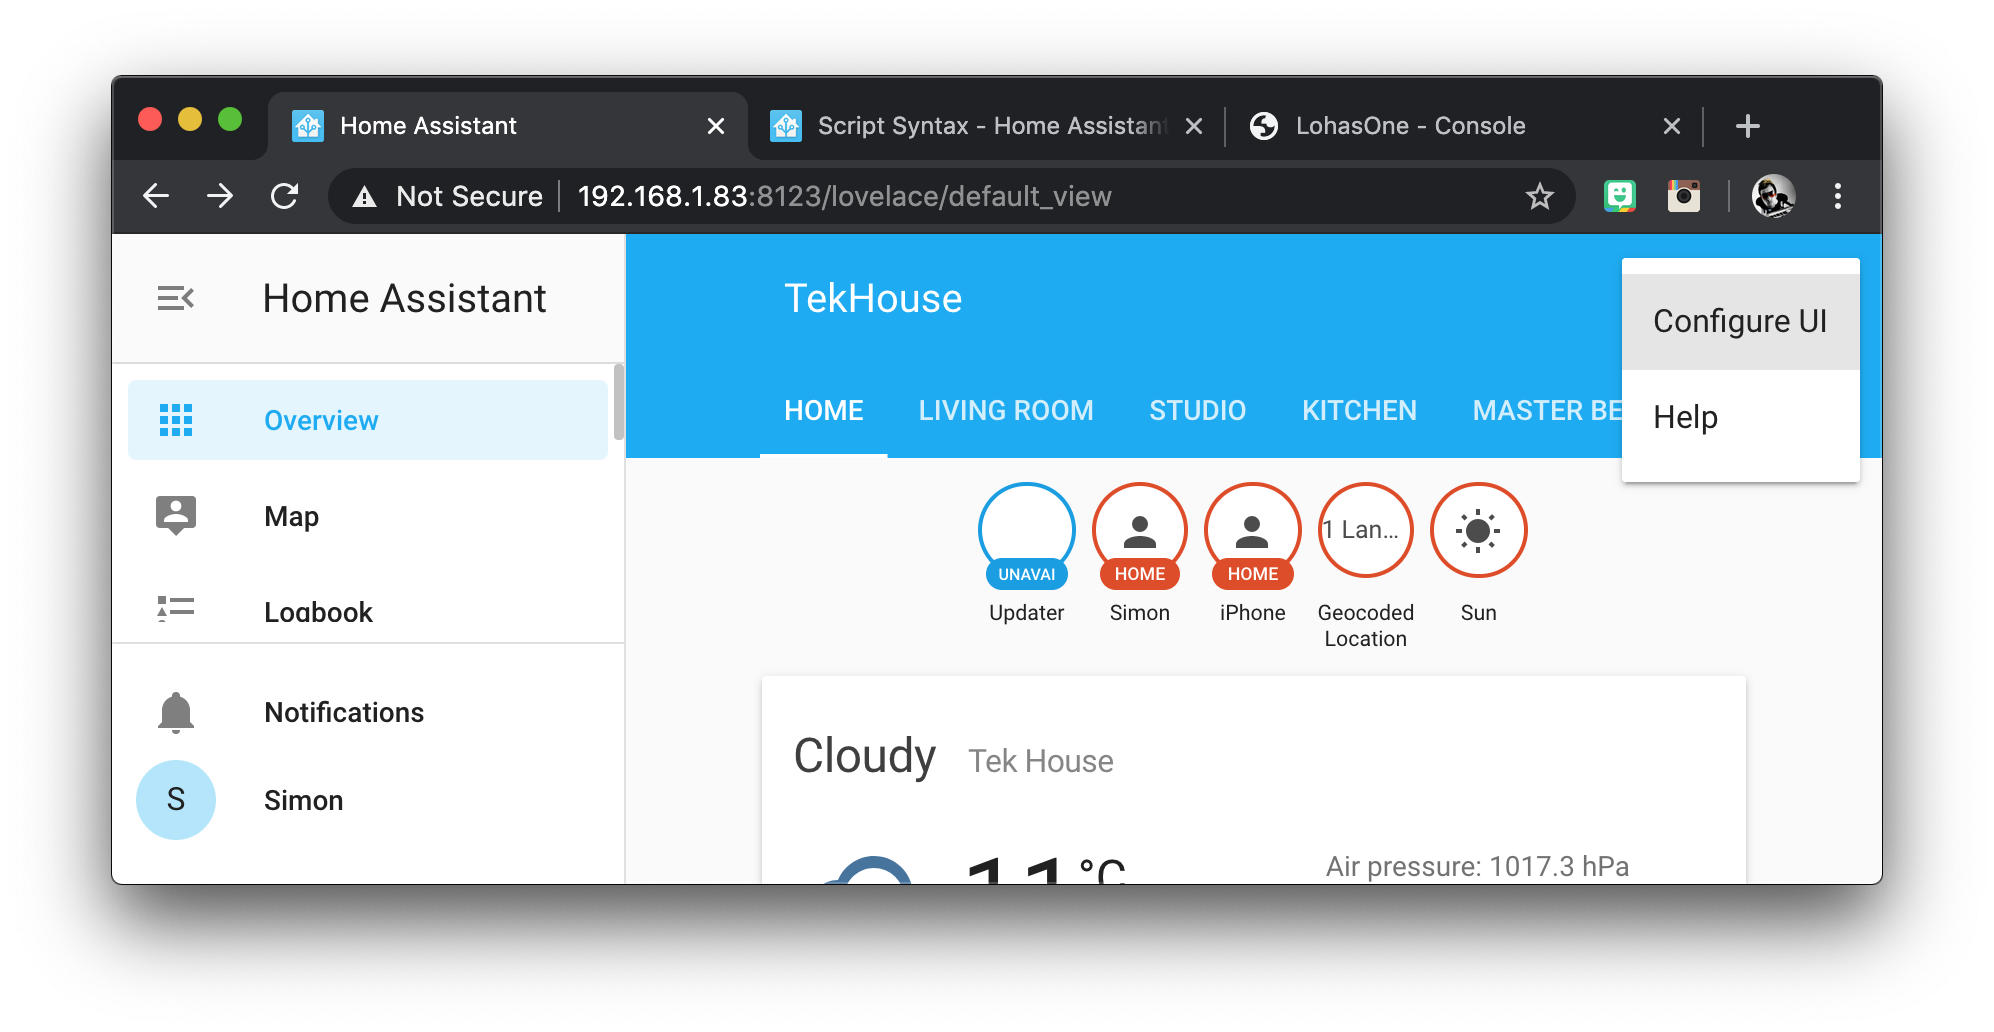
Head over to your overview page and go ahead and click on the three dots in the top right-hand corner of the screen and choose configure UI.
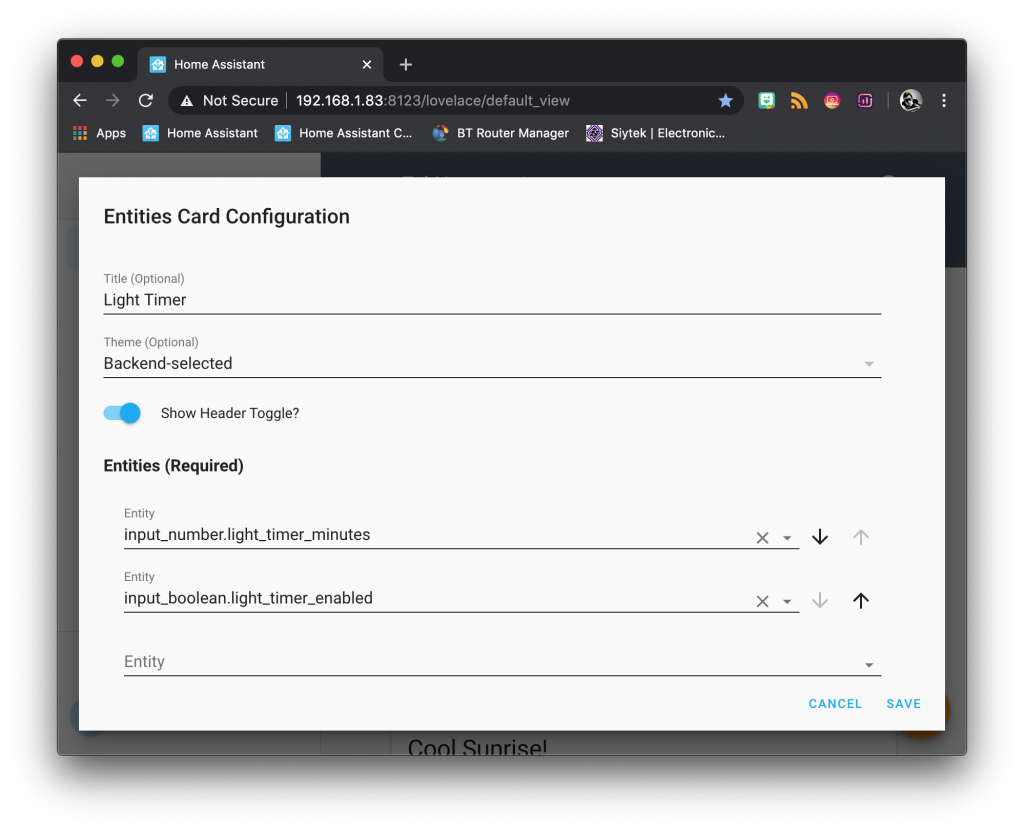
Once on the desired tab, click the orange circle with the plus towards the bottom right of the screen and then choose the entities card.

In the entities card configuration window, choose your prefered title, something like light timer will do nicely. Specify input_number.light_timer_minutes and input_boolean.light_timer_enabled in the list of entities.
Don’t forget to use the names that you chose if they are different. When you are done, go ahead and click save.
Conclusion
That’s it! You should now have a neat little light timer control in your user interface so go ahead and give it a try! In this tutorial we learnt how to create a basic timer and apply it to a light entity.
You can of course adapt the timer to start and trigger from any available service in Home Assistant. This tutorial simply aims to provide enough of an insight for you to be able to adapt the code as you please.
Why not go check out some of my other awesome Home Assistant tutorials and get some further inspiration for your super-smart home!
Thanks so much for visiting my site! If this article helped you achieve your goal and you want to say thanks, you can now support my work by buying me a coffee. I promise I won't spend it on beer instead... 😏


Exactly what I have been looking for. I have only been using Home Assistant for a month – am a noob. I wanted to control a pond pump and wrote the following automation but have been unable to get it to work. Once I get it to work I will advance to your automation. This is what i have done already – any ideas what my problem is? I have it set for 3 minutes for testing.
– id: ‘1592871707124’
alias: Fountain Timer
description: Turns off pump in 1 hour
trigger:
– entity_id: switch.sonoff_1000b7c31b
for: 3 minutes
from: ‘off’
platform: state
to: ‘on’
condition: []
action:
– data: {}
entity_id: switch.sonoff_1000b7c31b
service: switch.turn_off
Thanks,
Bob
Hey Bob, thanks for visiting! Sounds like a great idea, I also wanted to build a few garden automation projects plus some self-watering indoor plants. I am not sure about your “for: 3 minutes” and you could try something like this…
for:
…minutes: 3
I changed the time to the following:
for: 00:60:00
and it works fine. I am now working on loading you file.
Will get back to you.
Bob
Works great! Took awhile for me to get the spacing correct in the file.
Bob
Great news Bob! Glad to hear it 🙂
Thankyou so much for the timer info. I am very new to ha and not particularly savvy. What would the script look like if I wanted to set a timer to turn off on my bathroom light after being on for 10min, but only during certain hours. For example between 10pm and 6am everyday. Currently the bathroom light gets triggered by a sonoff sensor when my wife walks out of the bedroom but sometimes if she stays longer than 5 min, turns off the light manually, it turns on again when she returns to the bedroom. If that happens I need the light to turn off if it has been on for more than 10 min.
Also given I was this timer to execute all the time which config file should I use? Much appreciated. Jonathan
Hi Jonathan, glad it helped! If you want to limit the time that the light turns on, say between 10pm and 6am, you can do that by adding another condition to the automation, using the time: https://www.home-assistant.io/docs/scripts/conditions/#time-condition or even better you can specify night time hours (only when it is dark) using the sun: https://www.home-assistant.io/docs/scripts/conditions/#sun-elevation-condition