There is a totally free (and legal) way to get yourself a copy of Aseprite absolutely FREE. This guide will walk you through the process on Mac and yes, it works with the new M1 processors!
Ok it is not quite as tasty as free beer, but everyone loves something cool that’s totally free, right?
Aseprite has a slightly unorthodox licensing model that is a uncommon but not unique. I have already written a similar article for Fritzing, which has the same model.
There are several licenses that apply as the software makes use of different third party dependencies.
The source code is effectively open source and freely available to download and the project can be found on GitHub.
However where things differ is that the working binaries must be paid for. What this means is that unless you are prepared to go through the complex process of compiling the source code, you need to pay for the software.
The instructions for compilation can be somewhat vague, although to a seasoned developer this should be no problem to follow. This means developers can build the source for free without difficulty, whilst us mere mortals are left to pay for the binaries!
In this article we will walk through the compilation step by step on MacOS in order to build a totally FREE and legal copy of Aseprite that you can use by using the totally free source code that is available.
I will be walking through the process using an M1 Mac, but the process is also compatible with Intel, although at the time of writing I have not tested it with an Intel machine.
Ok, let’s get into it!
- Download Xcode
- Download the Aseprite Source Code
- Install Homebrew
- Install Cmake
- Install Ninja
- Download Skia
- Compilation
Step 1: Download Xcode
In order to build anything on Mac you generally need the Xcode developer tools installed. But don’t worry, it’s very simple to install them!
The only caveat is that the file size is huge, something over 10GB, so make sure you have a capable internet connection before you begin.
Simply head over to the App store, search for Xcode and install it. That’s all there is to it!

Step 2: Download the Aseprite Source Code
Next we need to download the Aseprite Source Code. The easiest way to do this is by using the git command in the Terminal.
First we need to decide on a temporary location where we will keep the downloaded files and build the source.
I have chosen to simply use the Desktop, but you can choose somewhere different, just make sure you amend the necessary file paths. If you are unsure, just copy the commands directly and use the Desktop too.
Go ahead and open a new Terminal window, then enter the following command to navigate to the Desktop.
cd ~/Desktop
Next you can enter the following code to download the latest source code from GitHub.
git clone --recursive https://github.com/aseprite/aseprite.git
Note that if you have just installed Xcode, you may first need to accept the Xcode licensing agreement before the git command will work.
Step 3: Install Homebrew
We also need to install a couple of other things in order to build Aseprite. The easiest way to install these dependencies is to use the package manager Homebrew.
If you don’t already have Homebrew installed, it is really simple to install.
Note that you may already have Homebrew installed! If so then you can skip this step.
First just head over to the website and then just copy the command under the install Homebrew section, circled in red below.
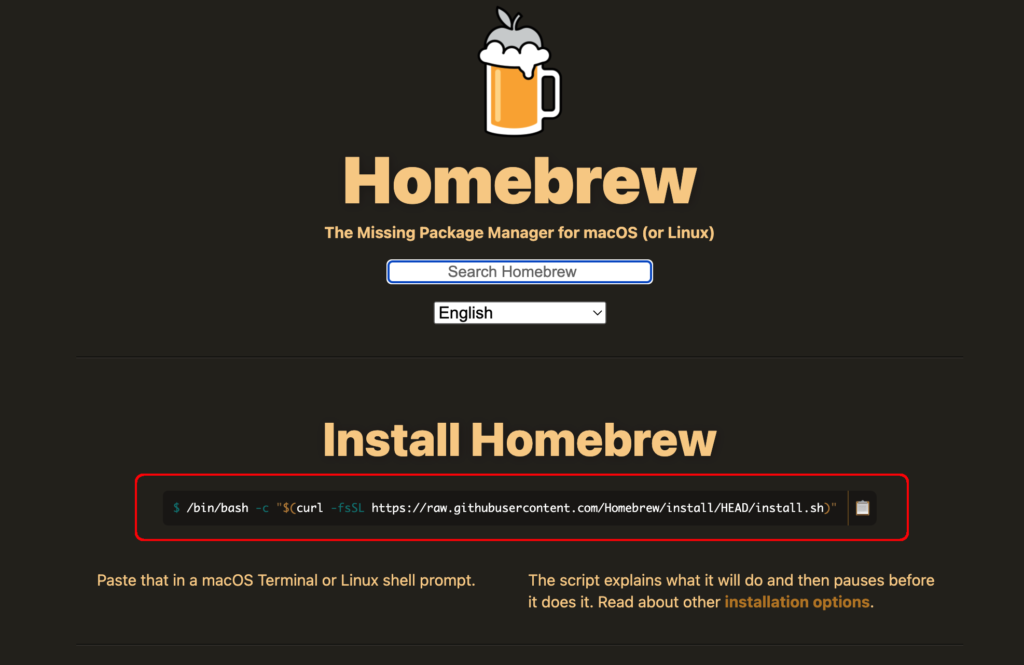
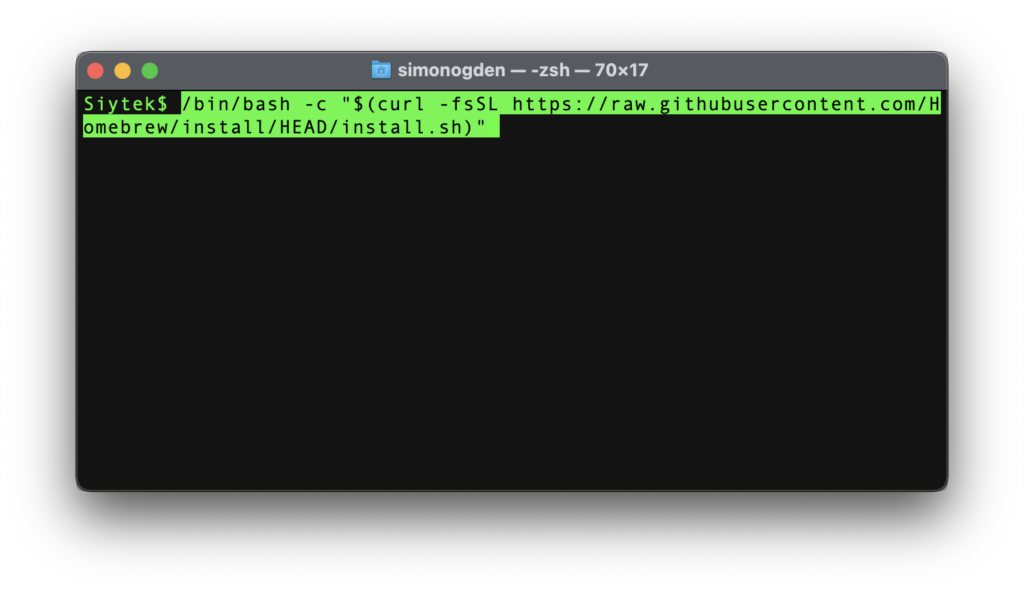
Then simply paste the command into the terminal and press enter. This will install Homebrew.
Once the script has finished there is one last thing you need to do in order to use Homebrew.
In order to add it to the shell (so it can be used in Terminal) you need to enter the following command. Simply copy the whole command below and paste it into the terminal and press enter.
echo 'eval "$(/opt/homebrew/bin/brew shellenv)"' >> /Users/simonogden/.zprofile
eval "$(/opt/homebrew/bin/brew shellenv)"
Note that the Homebrew installation requests that this is done at the end of the installation. If there are any problems with the commands above, try copying the commands from the end of the Homebrew installation in the terminal window.
Step 4: Install Cmake
Now that Homebrew is installed, it makes the next steps much easier!
Next we need to install Cmake. Simply enter the following command.
brew install cmake
Step 5: Install Ninja
We also need to install another tool called Ninja. Again Homebrew makes light work of this, just enter the following command.
brew install ninja
Step 6: Download Skia
The last thing that we need is a modified version of Skia, which is an open source 2D graphics library.
Head on over to the releases page on GitHub and choose the latest release at the top of the page. At the time of writing, Skia-m102.
You will need to download the correct version, depending on whether you want to compile on an Intel or M1 Mac.
Download Skia-macOS-Release-x64 if you want to compile for Intel Mac.
Download Skia-macOS-Release-arm64 if you want to compile for Apple Silicon.
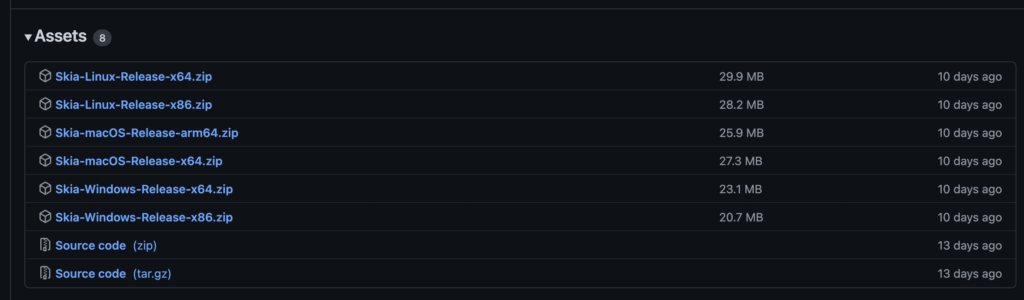
Once downloaded, move the .zip file to the desktop (or the folder you chose to keep files) and unzip it.
The extracted files will be placed into a new folder on the desktop. Rename this folder to skia (or you can change the path in the next step).
Step 7: Compilation
Ok we are almost ready to compile! Let’s just have a quick recap before we begin. You should have the following things ready…
- Cmake installed via the terminal command in step 4
- Ninja installed via the terminal in step 5
- A folder on the desktop (or your chosen folder) called
asepritecontaining the source code downloaded in step 2 - A folder on the desktop (or your chosen folder) called
skiacontaining the applicable modified Skia release downloaded in step 6
If you have everything in place, we can compile! First make sure you are on the desktop (or your chosen folder).
cd ~/Desktop
Next choose the correct code below depending on whether you are compiling for Intel or M1. Copy and paste the code into the terminal and hit enter to compile.
Don’t forget to update the paths if you changed them from ~/Desktop and you may also need to change the following to reflect your version of Mac OS:
-DCMAKE_OSX_DEPLOYMENT_TARGET=12.3 \
M1 Mac
cd aseprite
mkdir build
cd build
cmake \
  -DCMAKE_BUILD_TYPE=RelWithDebInfo \
  -DCMAKE_OSX_ARCHITECTURES=arm64 \
  -DCMAKE_OSX_DEPLOYMENT_TARGET=12.3 \
  -DCMAKE_OSX_SYSROOT=/Applications/Xcode.app/Contents/Developer/Platforms/MacOSX.platform/Developer/SDKs/MacOSX.sdk \
  -DLAF_BACKEND=skia \
  -DSKIA_DIR=$HOME/Desktop/skia \
  -DSKIA_LIBRARY_DIR=$HOME/Desktop/skia/out/Release-arm64 \
  -DSKIA_LIBRARY=$HOME/Desktop/skia/out/Release-arm64/libskia.a \
  -DPNG_ARM_NEON:STRING=on \
  -G Ninja \
  ..
ninja aseprite
Intel Mac
cd aseprite
mkdir build
cd build
cmake \
  -DCMAKE_BUILD_TYPE=RelWithDebInfo \
  -DCMAKE_OSX_ARCHITECTURES=x86_64 \
  -DCMAKE_OSX_DEPLOYMENT_TARGET=10.9 \
  -DCMAKE_OSX_SYSROOT=/Applications/Xcode.app/Contents/Developer/Platforms/MacOSX.platform/Developer/SDKs/MacOSX.sdk \
  -DLAF_BACKEND=skia \
  -DSKIA_DIR=$HOME/Desktop/skia \
  -DSKIA_LIBRARY_DIR=$HOME/Desktop/skia/out/Release-x64 \
  -DSKIA_LIBRARY=$HOME/Desktop/out/Release-x64/libskia.a \
  -G Ninja \
  ..
ninja aseprite
Running Aseprite
The code may take a few moments to compile so sit tight! Once the compilation has finished, you will find the executable program in the following directory.
~/Desktop/aseprite/build/bin
Just run the aseprite file!
Conclusion
With a little time and effort it is not so difficult to build Aseprite from the freely available source code!
Not only have you got yourself a free program that would have otherwise cost you a little money, but you have also learned something in the process!
However if you enjoy the program and use it a lot, maybe it’s worth supporting the developers and purchasing a copy to help support the project – by the way that’s not an affiliate link 🙂
Thanks for reading and hope this article helped you! If you enjoyed learning about compiling, you should try something a little more challenging next!
Thanks so much for visiting my site! If this article helped you achieve your goal and you want to say thanks, you can now support my work by buying me a coffee. I promise I won't spend it on beer instead... 😏

nice trying to follow it now
Hi, I have done the steps but at the end when compiling I get this–>
CMake Warning (dev):
Policy CMP0042 is not set: MACOSX_RPATH is enabled by default. Run “cmake
–help-policy CMP0042” for policy details. Use the cmake_policy command to
set the policy and suppress this warning.
MACOSX_RPATH is not specified for the following targets:
zlib
This warning is for project developers. Use -Wno-dev to suppress it.
— Generating done
CMake Generate step failed. Build files cannot be regenerated correctly.
Afnans-MacBook-Air:build arifulhoque$ ninja aseprite
Do you know why this is, any help would be nice!
Sincerely,
Ariful
I’ve done the steps that are listed here but I kept getting the same result.
CMake Warning:
Ignoring extra path from command line:
“..”
CMake Error: The source directory “/Users/[REDACTED]/build/build/build/build/build” does not appear to contain CMakeLists.txt.
How do I fix this.
For those who are receiving errors, the code in this article is WRONG. They duplicated ‘Desktop’ in one of the lines. The correct code is:
cd aseprite
mkdir build
cd build
cmake \
-DCMAKE_BUILD_TYPE=RelWithDebInfo \
-DCMAKE_OSX_ARCHITECTURES=x86_64 \
-DCMAKE_OSX_DEPLOYMENT_TARGET=10.9 \
-DCMAKE_OSX_SYSROOT=/Applications/Xcode.app/Contents/Developer/Platforms/MacOSX.platform/Developer/SDKs/MacOSX.sdk \
-DLAF_BACKEND=skia \
-DSKIA_DIR=$HOME/Desktop/skia \
-DSKIA_LIBRARY_DIR=$HOME/Desktop/skia/out/Release-x64 \
-DSKIA_LIBRARY=$HOME/Desktop/skia/out/Release-x64/libskia.a \
-G Ninja \
..
ninja aseprite
I tried and tested this myself and it works.
Remember to change Deployment Target number to the version of your mac (so I would change 10.9 to 13.3.1 as I am on Ventura)
Well spotted Dale! I never tested the x86_64 version as I don’t have an Intel Mac, so this typo managed to slip through. I have now corrected the article.