Did you know that Home Assistant can give your doorbell super powers?
Proximity sensors are so last season!
Get your doorbell to recognise the person at the door and send you a notification telling you who is there. Or what about presence detection using your existing security cameras?!
With the Facebox integration you can give Home Assistant the power of facial recognition from any camera in your setup.
When Home Assistant recognises a person on camera, you can trigger any custom automation you like. Impressive!
Table of Contents
Prerequisite
You should have Home Assistant installed and running and a basic understanding of YAML including how to edit configuration.yaml. You should also understand how to use a service and entity within Home Assistant.
If you are new to Home Assistant or you are not yet familiar with editing YAML files then you should definitely check out my beginners tutorial on YAML first. I would also recommend taking a look at my other tutorials on automation and scripts.
You will also need an x86 based machine with Docker as the Facebox container will not run on ARM processors (unfortunately no Raspberry Pi).
Ideally you will need an incoming video feed from a camera, such as an IP camera. A generic camera entity will work just fine. You can test Facebox just using a picture on your computer though, so don’t worry if you don’t have a camera yet.
Need a cheap security camera? Check this out!
If you are already running your Home Assistant server on an x86 machine (NUC, recycled laptop, full-blown server etc..) then you can just use the same machine.
If you are running Home Assistant on Raspberry Pi then you can simply run Facebox on your computer. This is a great way to try out the system and if you like it enough, perhaps you can decide to upgrade to an NUC system.
Note that you can still run your Home Assistant server on Raspberry Pi, you just need to run Facebox on a seperate computer and link it over your network.
Facebox topologies
There are several topologies that could be adopted in order to run Facebox, depending on your hardware setup. Take a look at the diagrams below and choose the one that is most suitable for your setup.
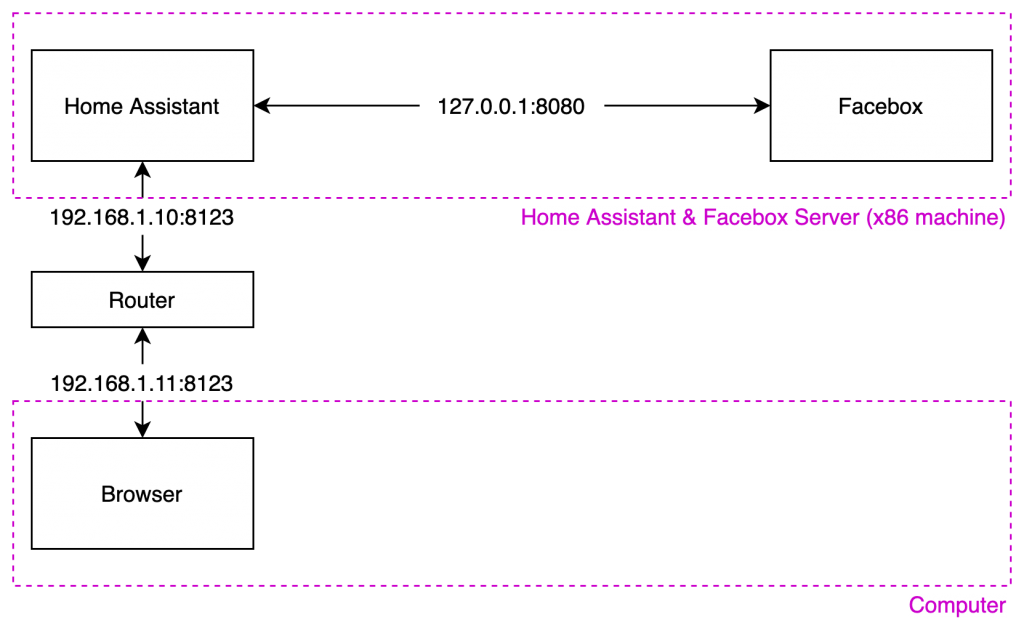
Facebox & Home Assistant together
The easiest way to integrate Facebox and Home Assistant is just to run Facebox on the same computer as Home Assistant. However the computer must be x86 compatible, therefore this method is not suitable for systems running Home Assistant on Raspberry Pi.
If you run Facebox on the same machine as Home Assistant, you can simply use the internal local IP address 127.0.0.1 with the Facebox port 8080 when referencing Facebox in Home Assistant.
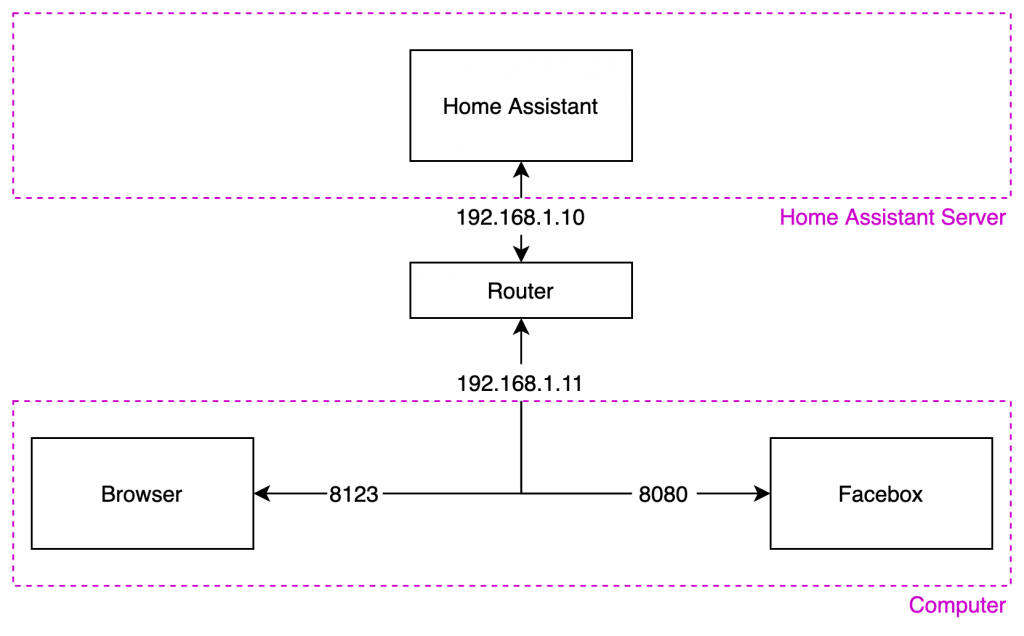
Facebox running on a computer
If you are running your Home Assistant on Raspberry Pi and you don’t have a spare computer to use for Facebox, you can run it on your normal desktop machine or laptop.
When referencing Facebox in the Home Assistant configuration, simply use the local IP address from your computer with the Facebox port 8080. You will still be able to access your Home Assistant user interface using the designated port, 8123 by default.
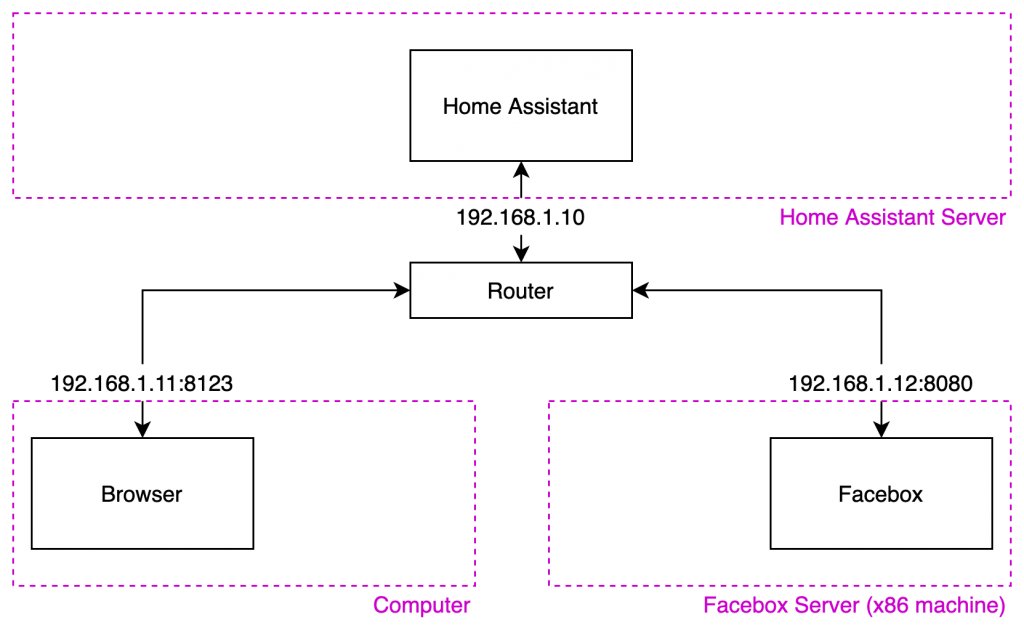
Facebox on a seperate server
Perhaps you have Home Assistant running on a Raspberry Pi and already have another x86 server on your network for other applications. It is possible to have both the Home Assistant server and Facebox server running on seperate machines on the network.
Just reference Facebox in Home Assistant using the local IP address for the machine you choose to use for Facebox, with the port 8080. You can connect to the Home Assistant server with any other machine as usual.
Configure Facebox
Once you have chosen and suitable topology the next thing to do is install Docker.
If you have chosen to run Facebox on the same machine as Home Assistant and Docker is already installed, feel free to skip ahead to setting up a Machinebox account.
Install Docker
The easiest way to use Docker on Mac or Windows is to download and install Docker Desktop. Linux users should follow the instructions for their chosen flavour of Linux.
If you are installing a machine specifically for Facebox, I would recommend going with Debian or Ubuntu Linux (sans the GUI) for the operating system.
Linux
The installation procedure is well documented on the Docker website. Choose from one of the following flavours of Linux to open the installation instructions in a new window:
I also have a tutorial here for installing Docker Engine that you can check out if you need any further help.
Mac OS X
You can download Docker Desktop for Mac from the Docker website. Once downloaded just mount the .dmg file and then drag Docker to the applications folder.
Windows
You can download Docker Desktop for Windows from the Docker website. Once downloaded just follow the installation wizard.
Setup Machinebox account
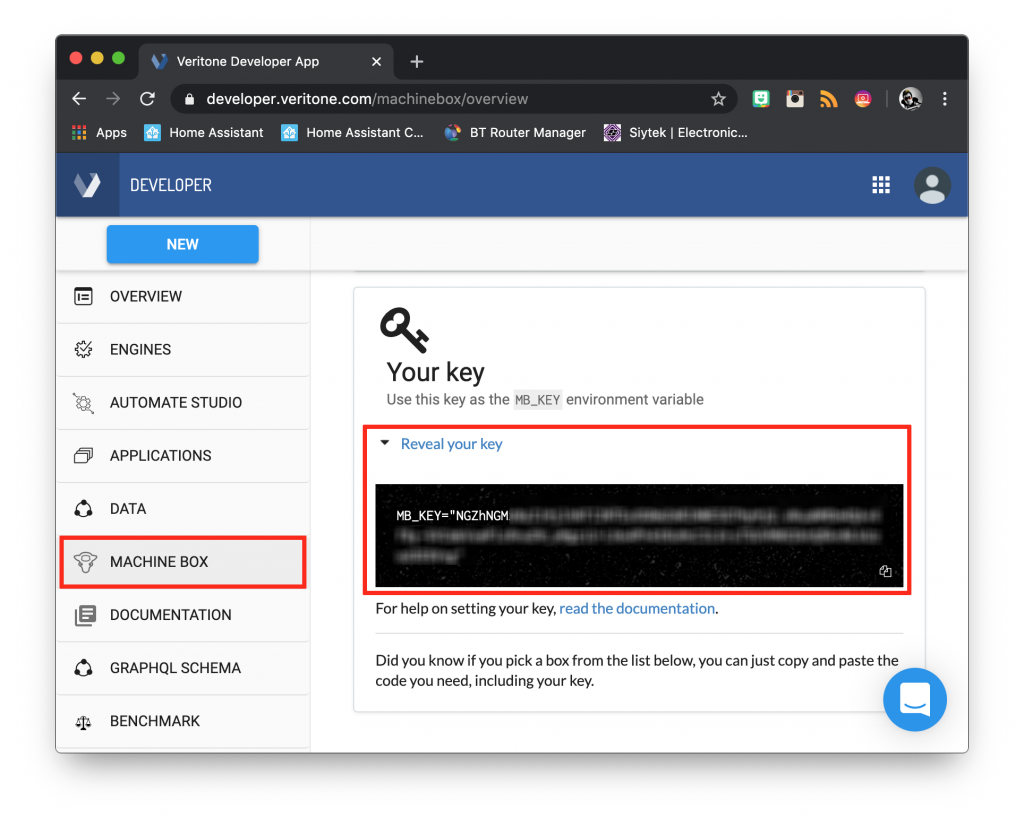
Once you have Docker installed on your server, you will need a Machinebox key in order to run Facebox. In order to get your key, you will need to create a free Veritone account.
Upon verifying your email and logging into your Veritone account, click Machinebox from the sidebar and scroll down to reveal your key. You might want to copy and paste the key to a text file temporarily as we will need it in the next step.
Run Docker container
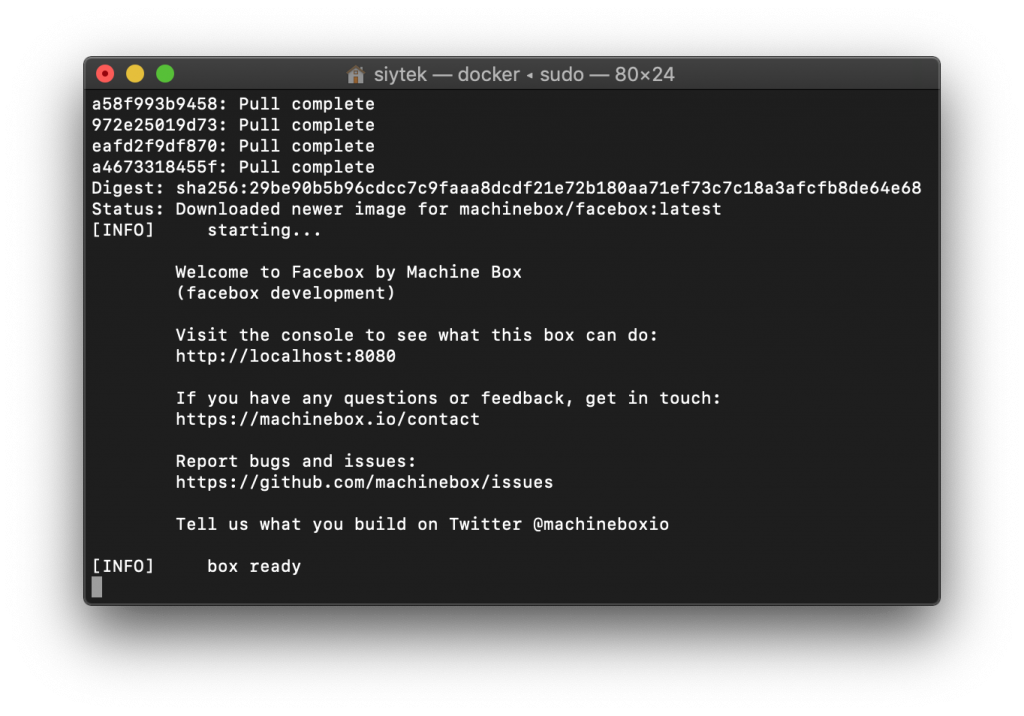
With Docker installed and your Machinebox key, we are now finally ready to launch Facebox on the server! Go ahead and open a terminal/command line window and enter the following, replacing <your-MB-key> with the key you just obtained from your account.
sudo docker run --name=facebox --restart=always -p 8080:8080 -e "MB_KEY=<your-MB-key>" machinebox/facebox
The docker container will be downloaded and run on your system, if everything was successful then you will be given the [INFO] box ready message.
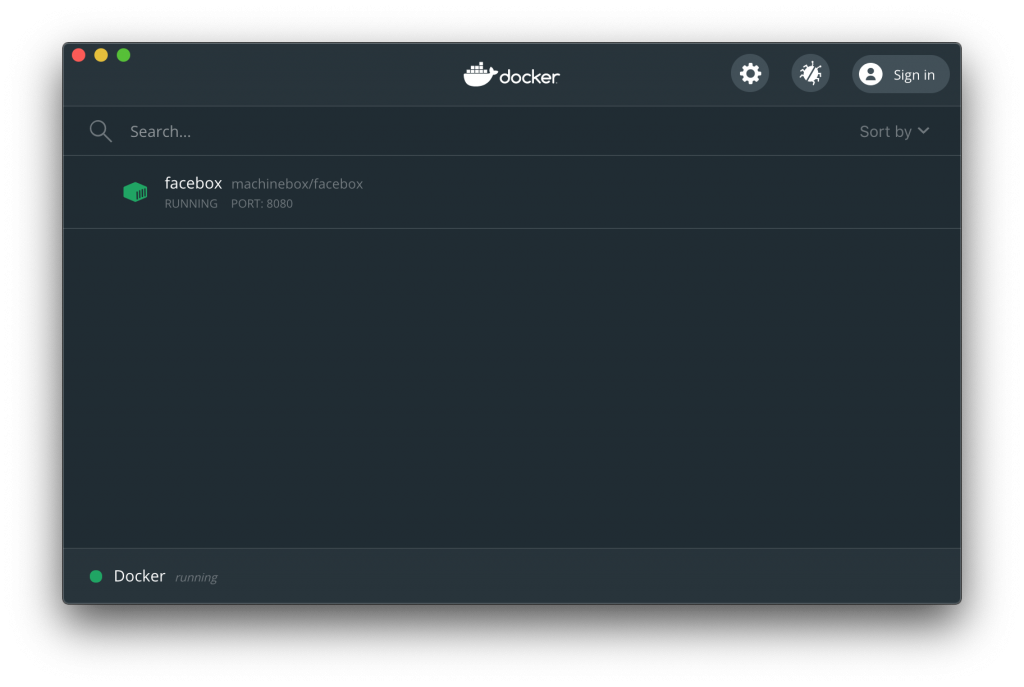
If you are running Docker Desktop, you can open up the dashboard and check that the container is running.
Configure Home Assistant
Now that Facebox is up and running we can set up Home Assistant. There are several things that are required. We need to add Facebox using the image processing integration and then supply a picture for scanning using the camera integration.
Home Assistant includes a camera platform called local_image that allows us to turn a still image into a camera entity. We will setup a new camera using this platform to test Facebox.
Once the connection between Facebox and Home Assistant has been confirmed, we can switch to using a different camera entity. It is not essential that you have a camera entity for testing Facebox.
For this tutorial I will be using a Raspberry Pi camera connected to a remote Raspberry Pi. If you would like to configure a spare Pi and camera as a remote IP camera for Home Assistant, check out my tutorial on how to add a Raspberry Pi RTSP camera stream to Home Assistant.
Adding camera local image
In order to test Facebox we will add the provided test image as camera entity in Home Assistant. This will allow us to present the image to Facebox via the API to check that the connection is working.
Go ahead and download the following image, then save it to your /config/www/ directory (using Samba). If you don’t have the www folder in your config directory, you can just create it.

Next add we need to add the local_file platform to the camera integration. This will create a camera entity called camera.local_file.
camera:
  - platform: local_file
    file_path: /config/www/image.jpg
Add image processing integration
Go ahead and open up the configuration.yaml file. First we need to add the Facebox platform to the image_processing integration.
image_processing:
  - platform: facebox
Next we need to specify the IP address and port of the Facebox server. If you have installed Facebox on the same machine as your Home Assistant server, you can use the local IP address 127.0.0.1.
Otherwise you should specify the local IP address of the machine hosting Facebox.
image_processing:
  - platform: facebox
    ip_address: 127.0.0.1
    port: 8080
Lastly we need to specify the picture source using a camera entity. For testing we will use our camera.local_image entity. Once you have completed the code, save the file and restart Home Assistant.
image_processing:
  - platform: facebox
    ip_address: 192.168.1.83
    port: 8080
    source:
      - entity_id: camera.local_file
        name: local_file_cam
Add Facebox to user interface
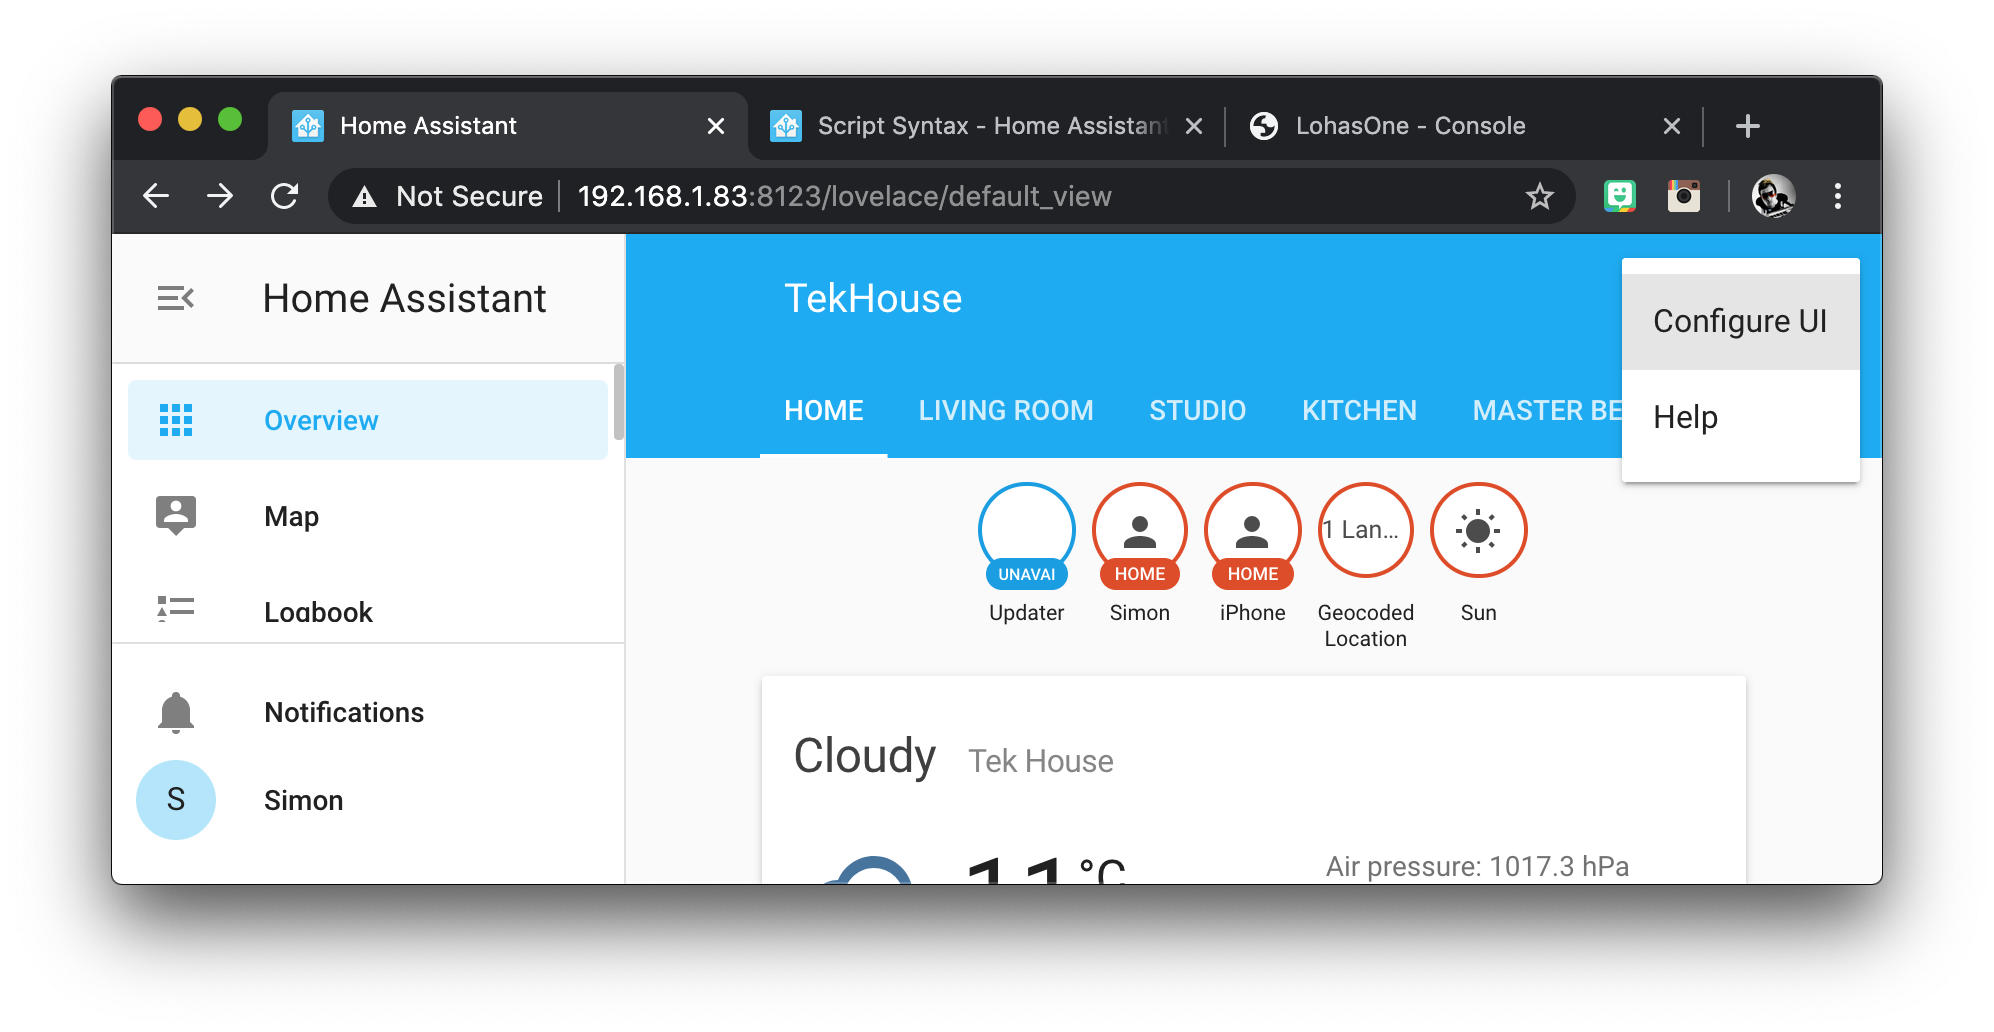
Now that we have our test image and integration configured, we can add them to the user interface and see if Facebox is working. From the overview page, click on the three dots and then configure UI in the top right-hand corner of the page.
This will switch on the UI editor mode. I will create a new tab called Facebox for the cards but you can put them anywhere you like.
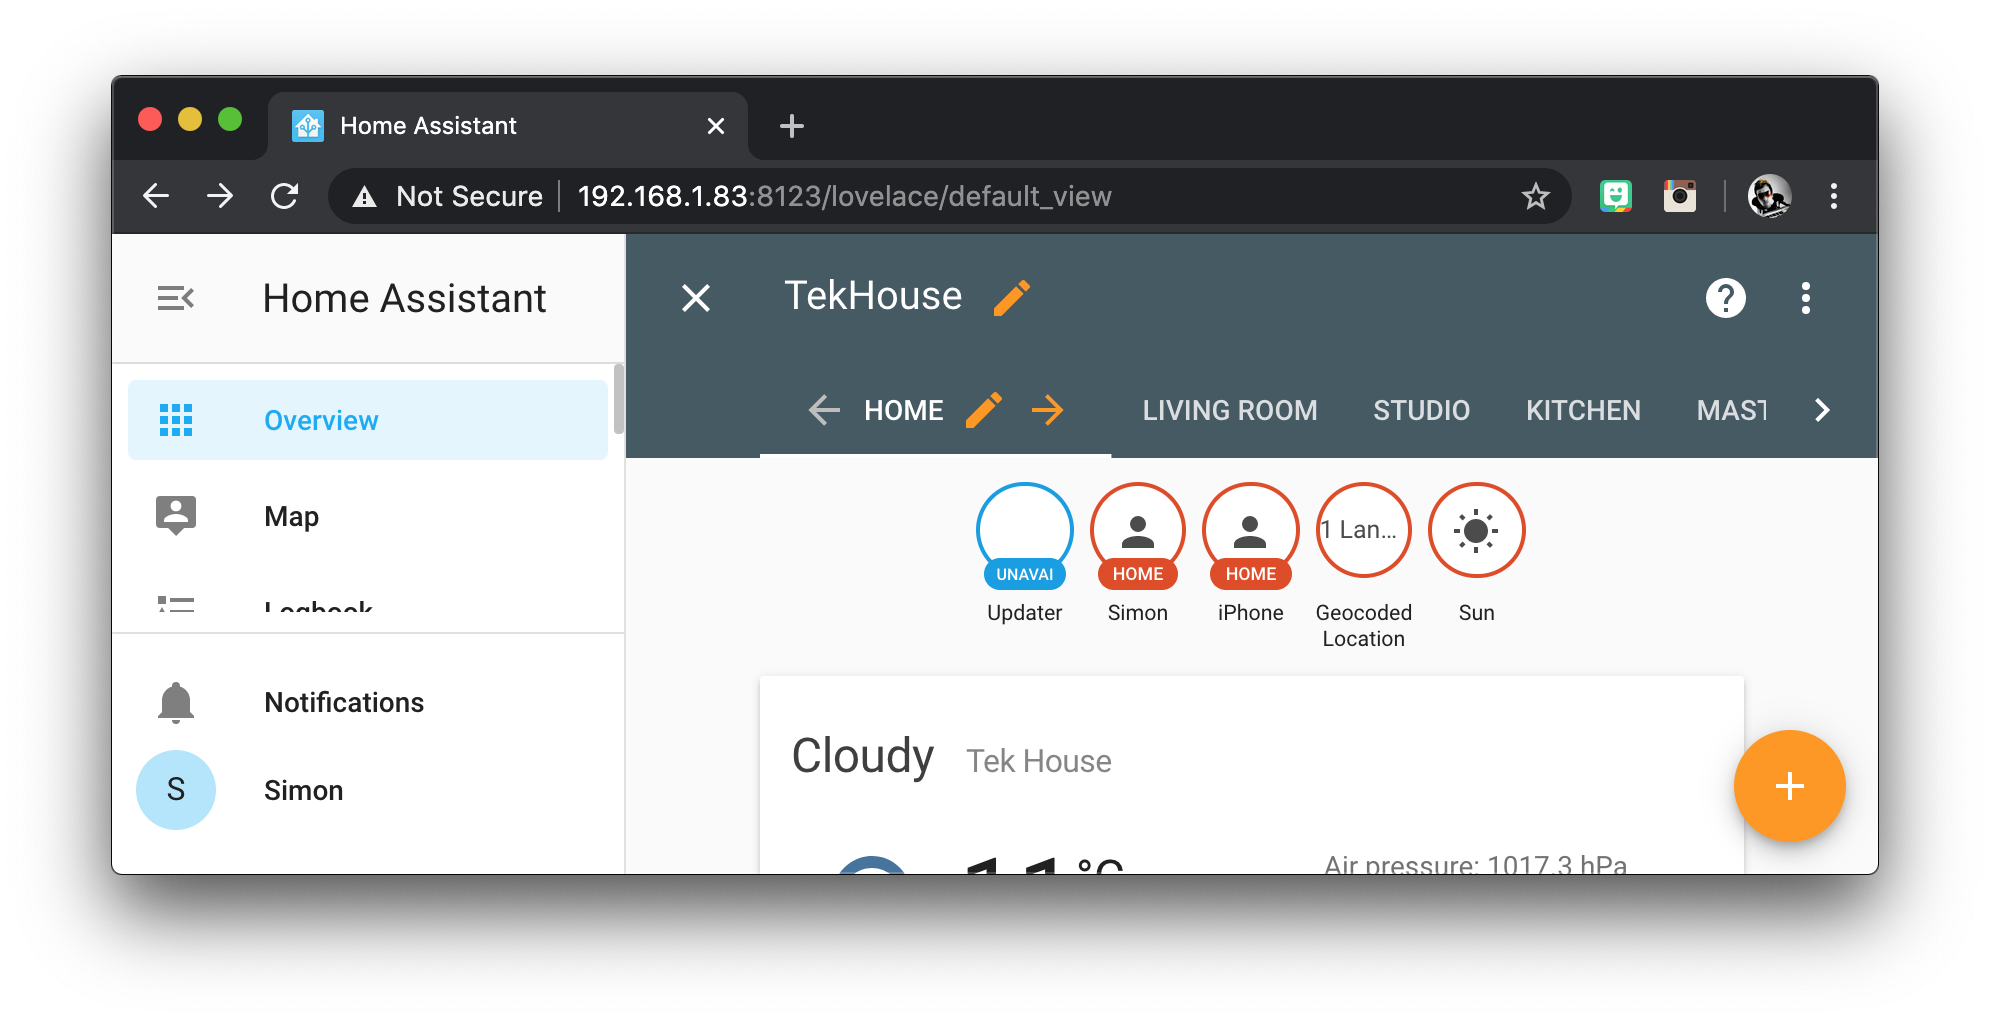
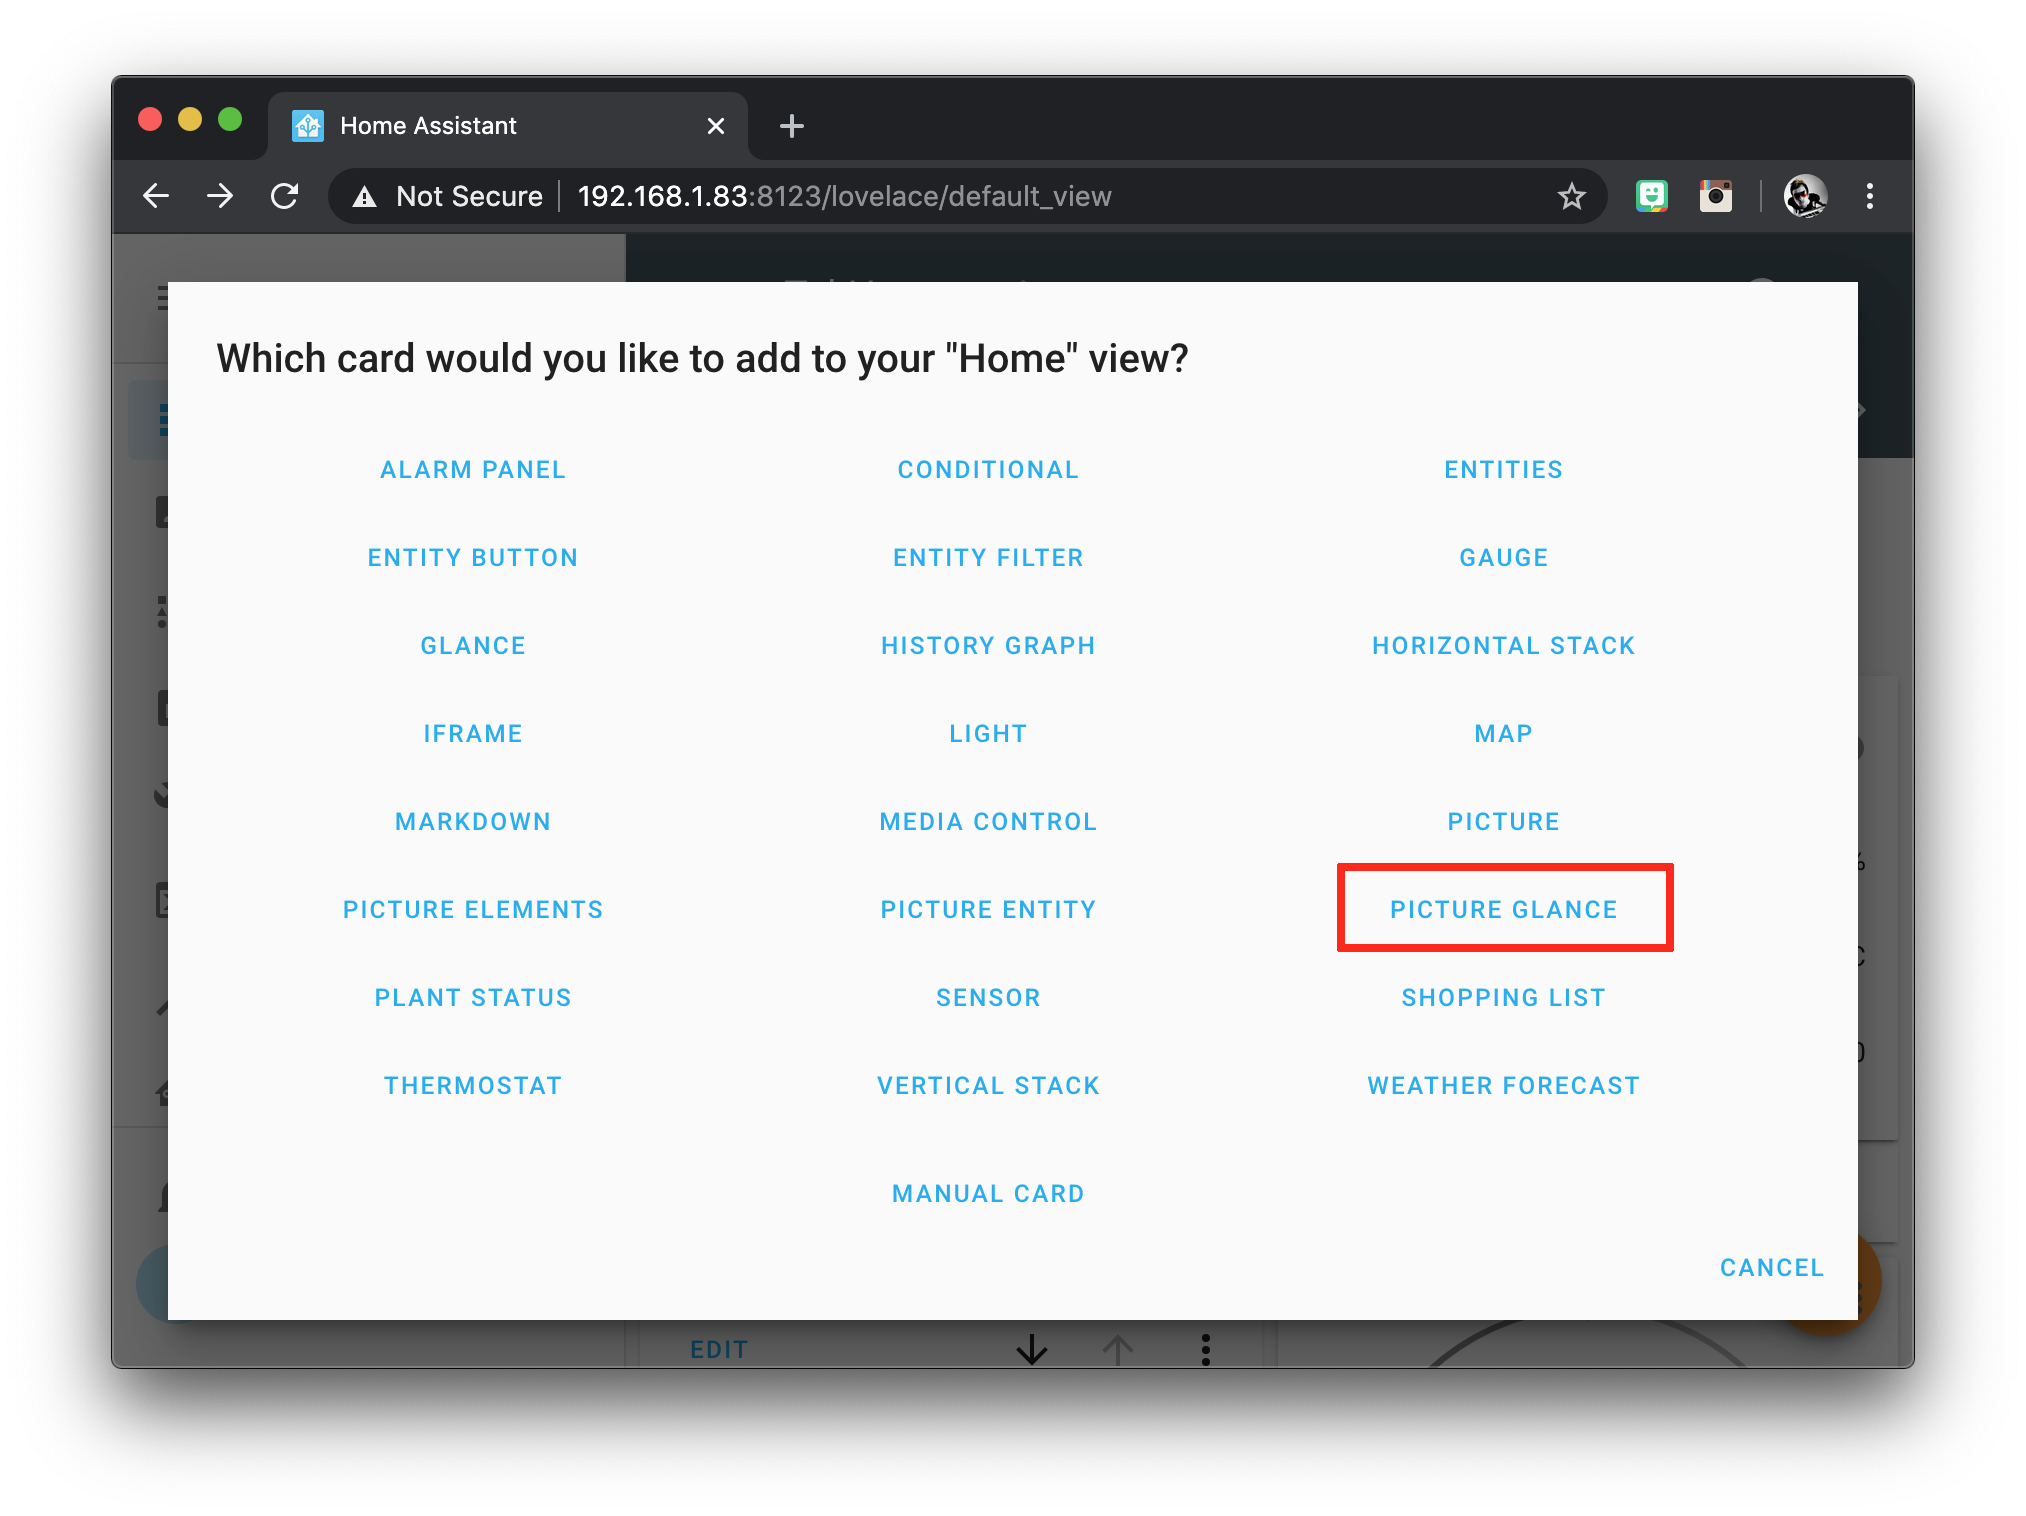
Once on the desired tab, click the orange circle with the plus towards the bottom left of the screen and then choose the picture glance card.
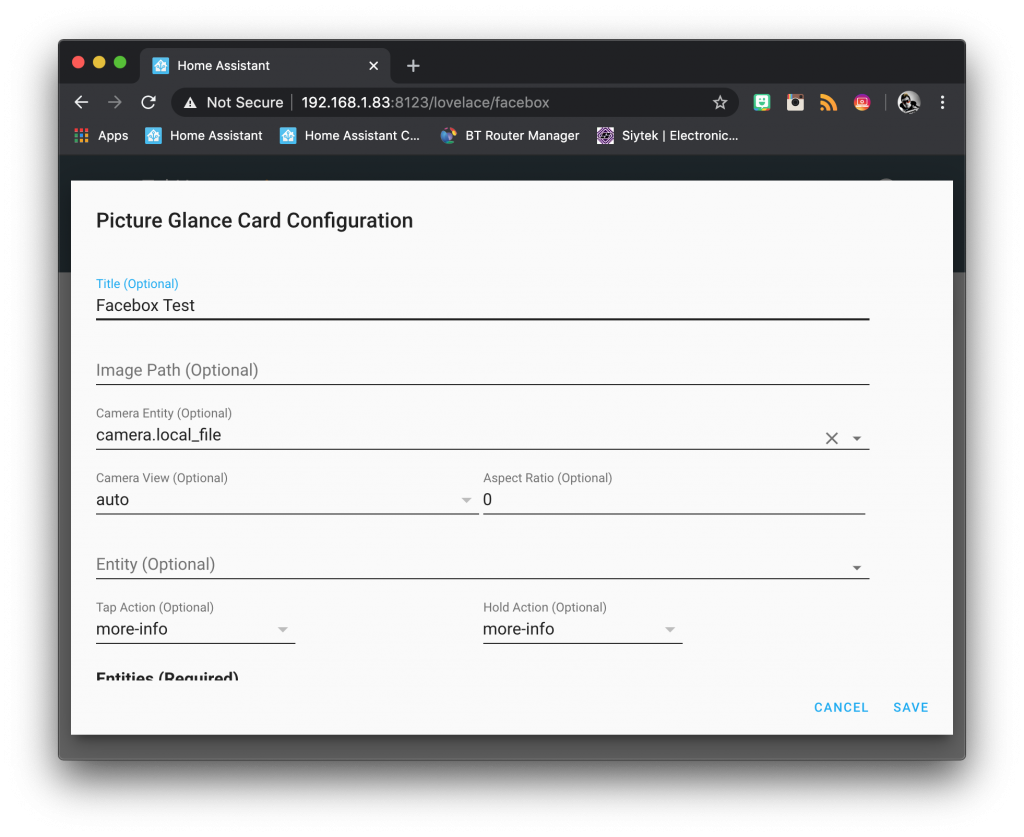
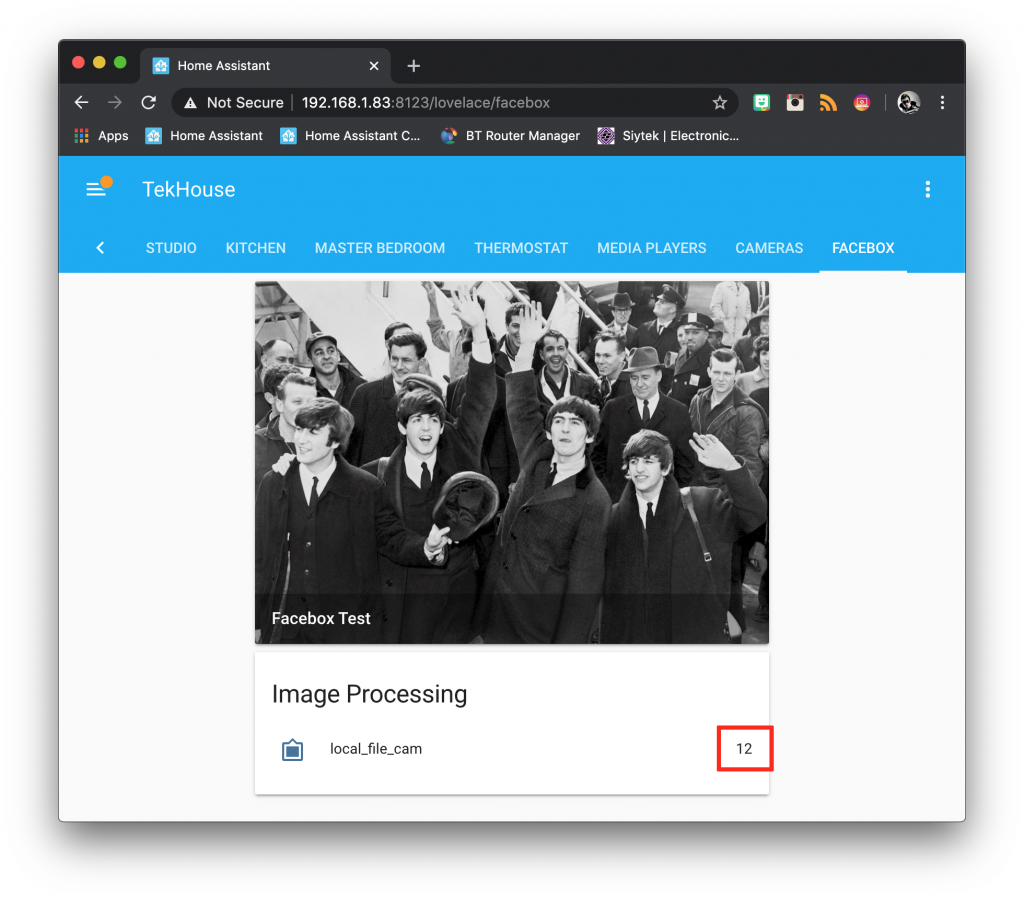
Enter a name for the card, something like Facebox Test. Choose camera.local_file as the camera entity. Click save once done and you should now see the test image in the user interface.
Next we need to add an entities card for the image processing elements. Enter a name for the card, something like Image Processing. Add the image_processing.local_file entity to the entities list and click save.
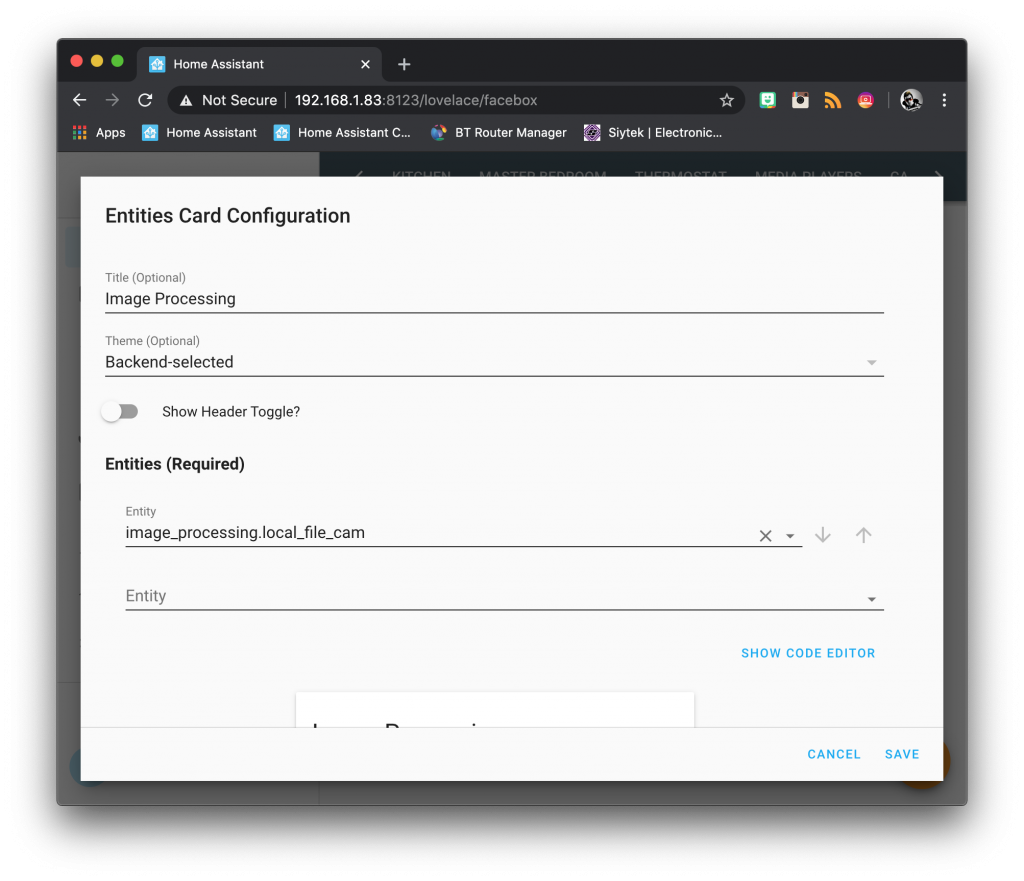
Now you should be able to see the test image and also the number of matched faces.
Facebox should recognise a total of 12 faces in the test image. If you see 12 matches then your Facebox integration is working correctly!
Using a camera live feed
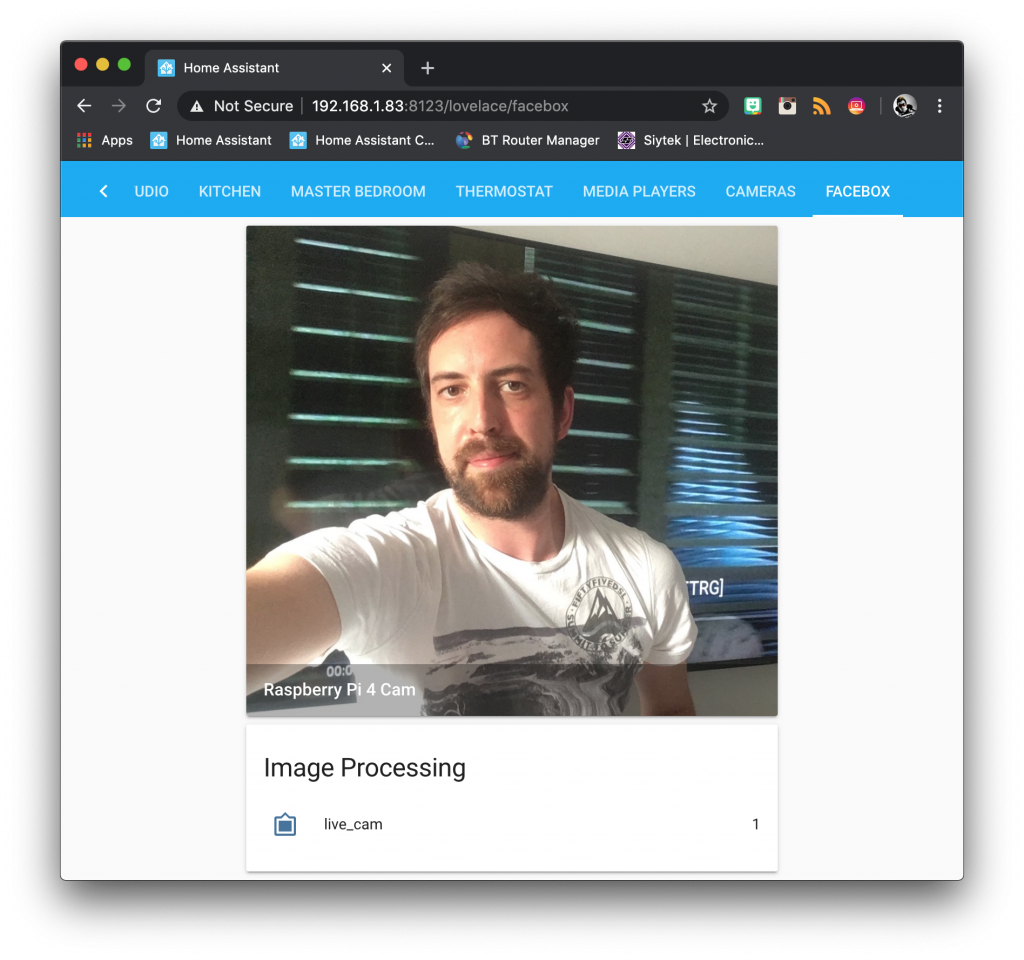
Now that we have confirmed that our Facebox setup works we can switch the camera.local_image entity for a camera entity with a live feed.
I am using a remote Raspberry Pi camera called camera.raspi4 but you should choose a camera entity from your own setup.
image_processing:
  - platform: facebox
    ip_address: 192.168.1.83
    port: 8080
    source:
      - entity_id: camera.raspi4
        name: live_cam
Now here is the exciting part! When you jump in front of the camera, watch the number of faces detected change from 0 to 1!
Learning faces
Now that our Facebox integration is successfully recognising faces we can teach it the identities of different people.
This will allows us to trigger different automations when different people are recognised.
Learning with Home Assistant
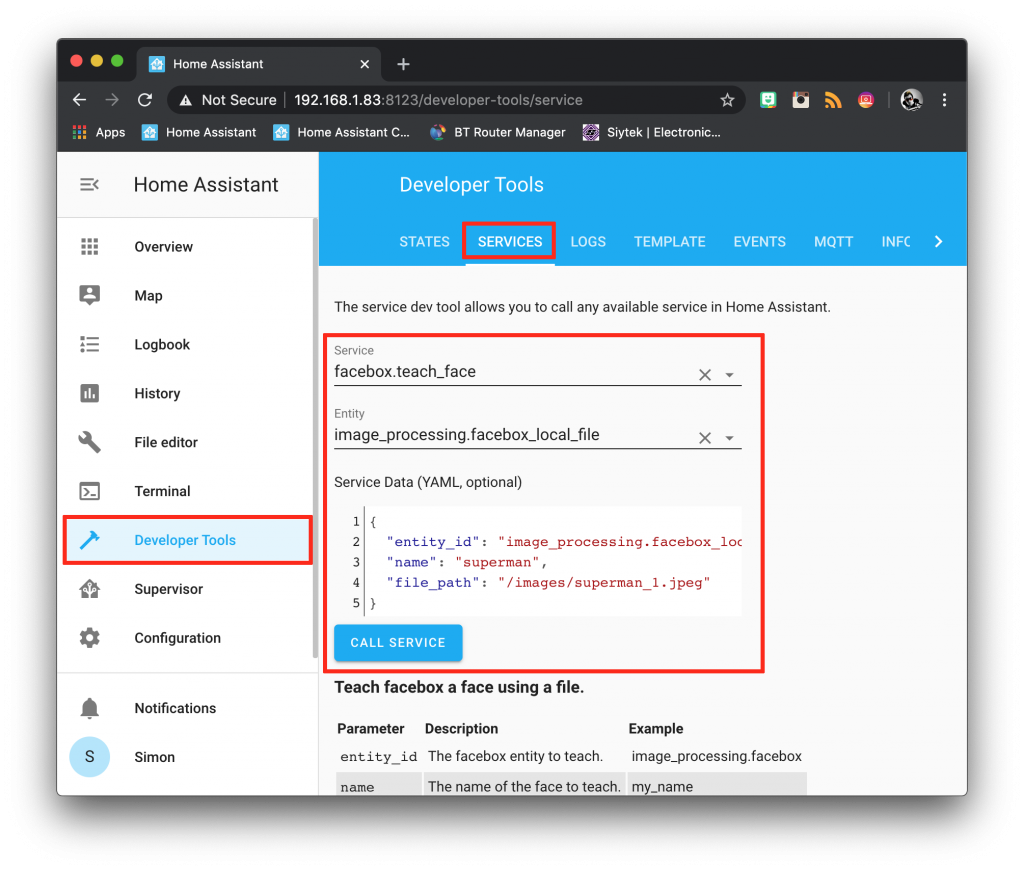
It is supposedly possible to learn a face from within Home Assistant, however after many attempts I was unable to get this to work. If you want to try it, you need to use the service facebox.teach_face.
You can try it using developer tools > services tab.
{
  "entity_id": "image_processing.facebox_local_file",
  "name": "superman",
  "file_path": "/images/superman_1.jpeg"
}
Learning with Facebox UI
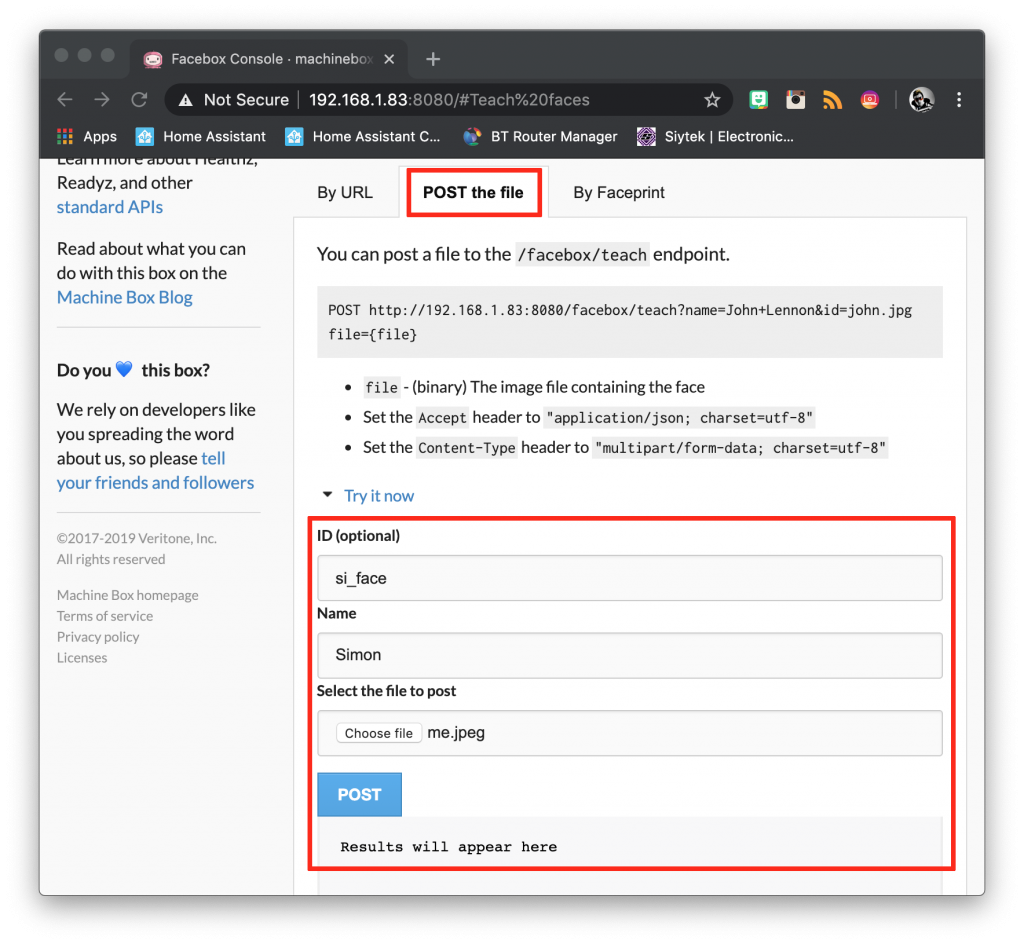
The alternative way to learn faces which did work for me was using the Facebox user interface. This can be accessed by pointing your browser to the following address, replacing <facebox-server-ip> with the IP address of your Facebox server.
http://<facebox-server-ip>:8080/#Teach%20faces
Choose the POST the file method, enter an ID and name for the person, then upload a picture of the face that you want to teach. Click the post button and wait a moment for the face to be analysed. The result will appear in the box below.
The recognition algorithm is superb, but not perfect. I found sometimes a face could not be detected, even with what looked to be a very clear picture.
You may need to try a few pictures to get it to work. Once you get a picture that can be successfully learnt, the recognition is usually very good.
Testing facial recognition
Once you have successfully taught Facebox the identity of a face (I will assume you are teaching your own face to start with), you can test to see if works so go ahead and jump in front of your camera!
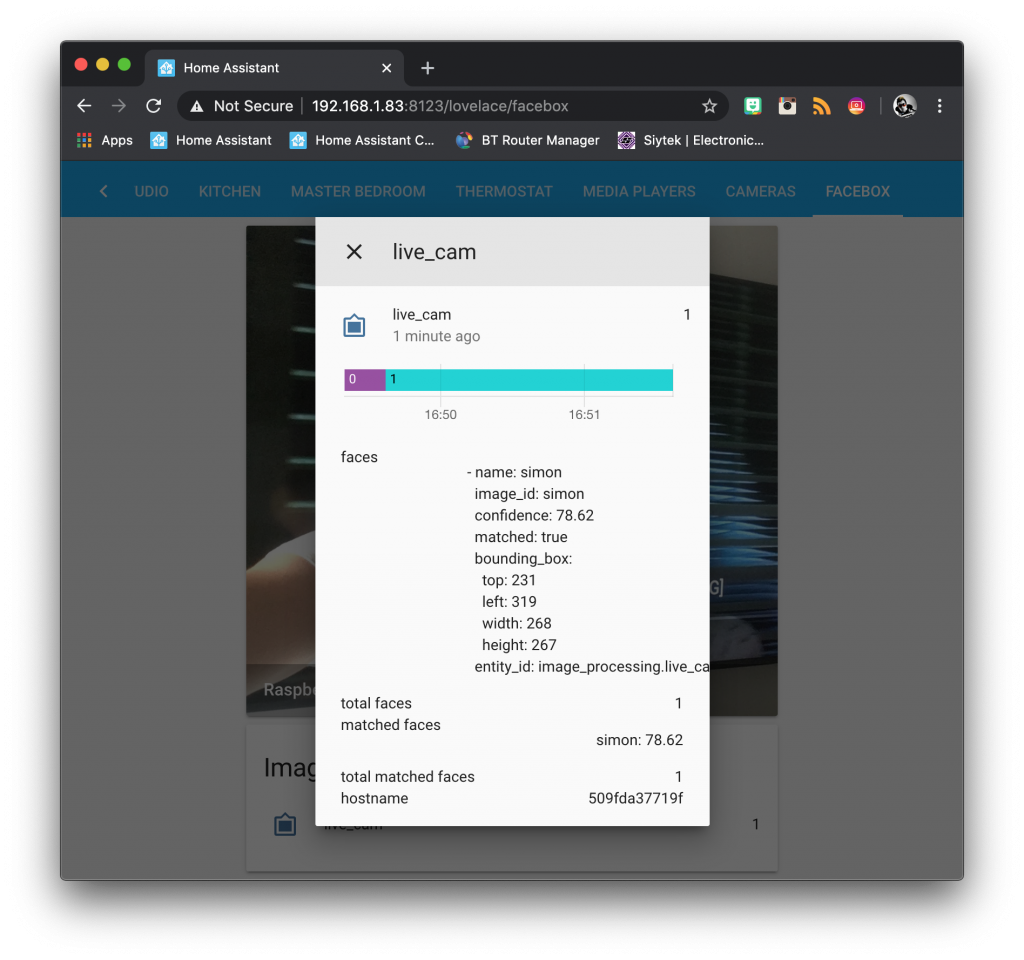
Once you see the number of recognised faces change from 0 to 1, click the icon on the image processing card and you will be able to see the results.
If the face is successfully identified, the matched attribute will be true and there will be a confidence score.
Create an automation
So now that we are able to perform facial recognition, how can we use it? It is possible to create an automation that is fired when a face is recognised by using specifying the event type as image_processing.detect_face within the event platform.
The following automation will trigger when a face is detected with the name “simon.” This is the name that we specified during the learning process.
 - alias: Si recognised
   trigger:
     platform: event
     event_type: image_processing.detect_face
     event_data:
       name: 'simon'
   action:
    - service: light.turn_on
      entity_id: light.treelamp
Conclusion
The Facebox integration is a little challenging to install as there are quite a number of steps required to get it working. However once added to Home Assistant it adds functionality that is just superb!
I am genuinely excited to spend some more time with this integration and it is well worth the effort to get it up and running.
Why not check out my tutorial about using a remote Raspberry Pi as a streaming camera to help you expand your new Facebox setup. Alternatively go check out some of my other awesome Home Assistant tutorials!
Thanks so much for visiting my site! If this article helped you achieve your goal and you want to say thanks, you can now support my work by buying me a coffee. I promise I won't spend it on beer instead... 😏


Hello Siytek,
I did everything as instructed but I do not see image_processing as an entity in Home assistant. What did I miss?
Thanks in advance.
Me too!
Hello Siytek,
home assistant is not recognizing image_processing as an entity. How do I fix that?
Facebox is running fine.
Thanks is advance.
Hey Nacho, welcome back! Sorry for the delay, I spend less time with the smart home during the summer months 🙂 did you solve your problem? Can you post your code? eg..
image_processing:
– platform: facebox
ip_address: 192.168.1.83
port: 8080
source:
– entity_id: camera.local_file
name: local_file_cam
Hi Siytek, I made it.
Thanks for sharing it here.
Cheers.
Very glad to hear it Nacho, well done 🙂
How?