
Smart home artificial intelligence may sound like something from the future, even in today’s modern times.
However the future is here!
Person, object and facial detection are easily accessible from the Home Assistant platform!
In this tutorial we will walk through the process of setting up the Deepstack artificial intelligence platform, in order to detect the number of people in a room.
If you are looking for next level presence detection, keep reading…!
Table of Contents
Prerequisite
You should have Home Assistant installed and running and a basic understanding of YAML including how to edit configuration.yaml. You should also understand how to use a service and entity within Home Assistant.
If you are new to Home Assistant or you are not yet familiar with editing YAML files then you should definitely check out my beginners tutorial on YAML first. I would also recommend taking a look at my other tutorials on automation and scripts.
You will also need an x86 based machine with Docker. It is possible to run Deepstack on Raspberry Pi but due to the limited processing power, you need to use an Intel Neural Compute Stick.
If you are already running your Home Assistant server on an x86 machine (NUC, recycled laptop, full-blown server etc..) then you can just use the same machine.
If you are running Home Assistant on Raspberry Pi then you can run Deepstack on your Linux or Windows 10 computer. This is a great way to try out the system and if you like it enough, perhaps you can decide to upgrade to an NUC system.
Please note that the Deepstack Docker container is optimised for Linux and Windows 10. You may experience issues trying to run it under other versions of Windows or on Mac OS X.
Deepstack topologies
There are several topologies that could be adopted in order to run Deepstack, depending on your hardware setup. Take a look at the diagrams below and choose the one that is most suitable for your setup.
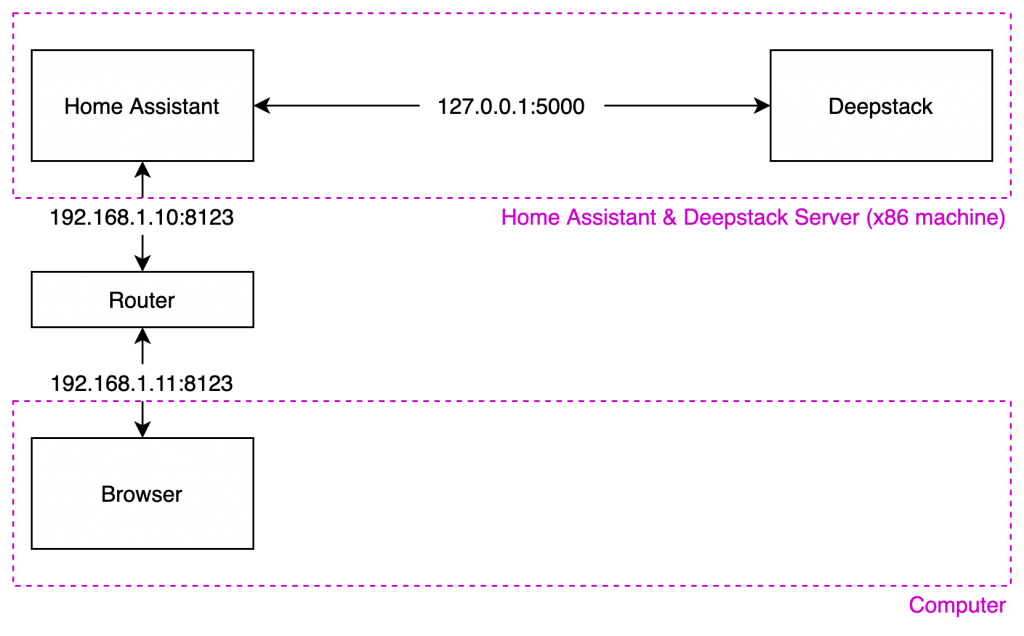
Deepstack & Home Assistant together
The easiest way to integrate Deepstack and Home Assistant is just to run Deepstack on the same computer as Home Assistant.
If you run Deepstack on the same machine as Home Assistant, you can simply use the internal local IP address 127.0.0.1 with the Facebox port 5000 when referencing Deepstack in Home Assistant.
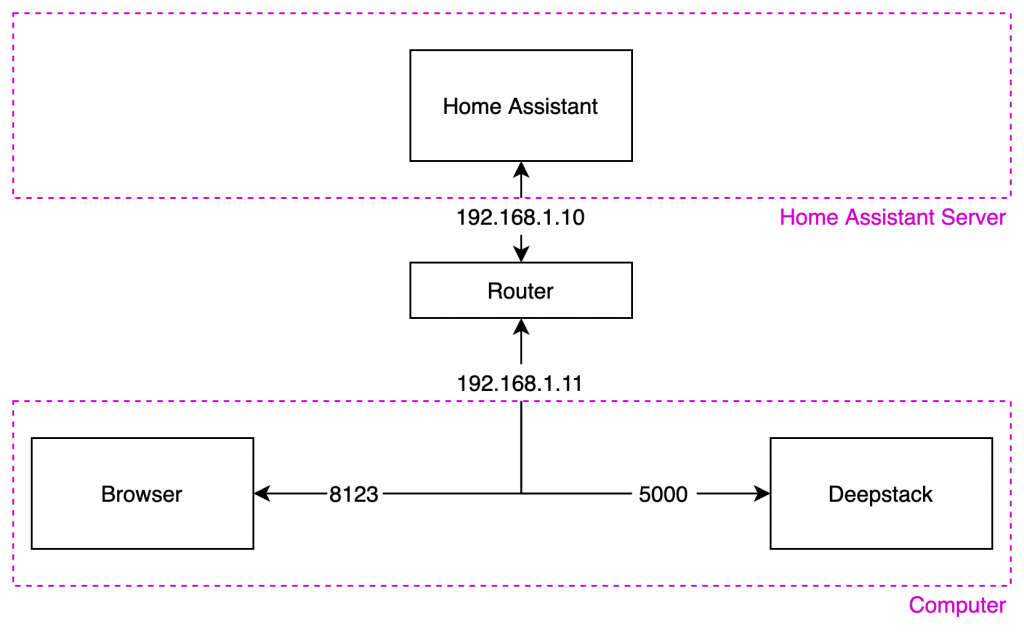
Deepstack running on a computer
If you are running your Home Assistant on Raspberry Pi and you don’t have a spare computer to use for Deepstack, you can run it on your normal desktop machine or laptop.
When referencing Deepstack in the Home Assistant configuration, simply use the local IP address from your computer with the Deepstack port 5000. You will still be able to access your Home Assistant user interface using the designated port, 8123 by default.
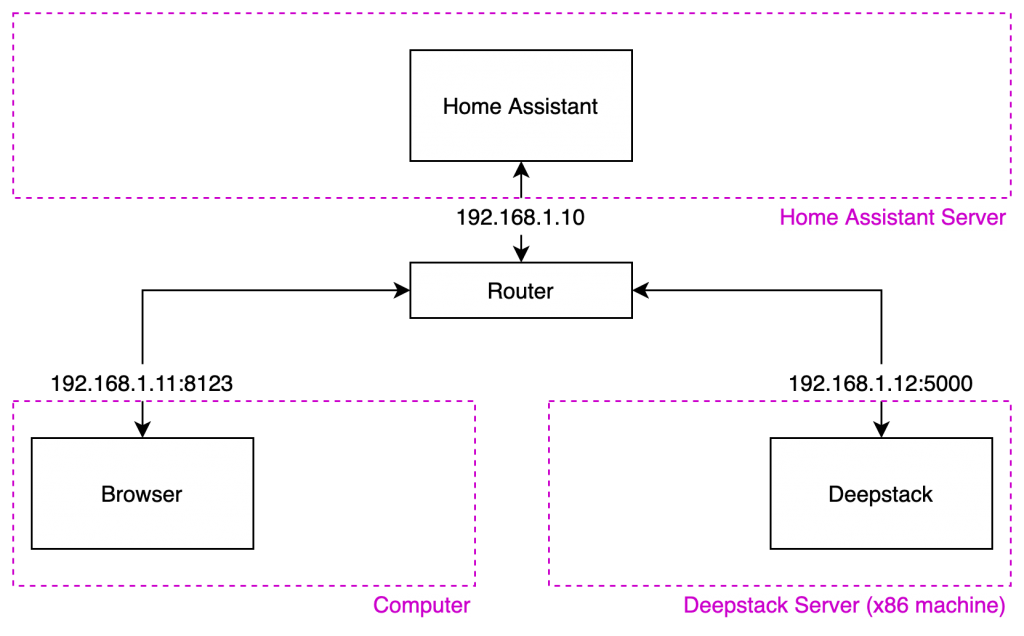
Deepstack running on a seperate server
Perhaps you have Home Assistant running on a Raspberry Pi and already have another x86 server on your network for other applications. It is possible to have both the Home Assistant server and Deepstack server running on seperate machines on the network.
Just reference Deepstack in Home Assistant using the local IP address for the machine you choose to use for Deepstack, with the port 5000. You can connect to the Home Assistant server with any other machine as usual.
Configure Deepstack
Once you have chosen and suitable topology the next thing to do is install Docker. If you have chosen to run Deepstack on the same machine as Home Assistant and Docker is already installed, feel free to skip ahead to running the Docker container.
Install Docker
The easiest way to use Docker on Mac or Windows is to download and install Docker Desktop. Linux users should follow the instructions for their chosen flavour of Linux.
Mac OS X
You can download Docker Desktop for Mac from the Docker website. Once downloaded just mount the .dmg file and then drag Docker to the applications folder.
Windows
You can download Docker Desktop for Windows from the Docker website. Once downloaded just follow the installation wizard.
Linux
The installation procedure is well documented on the Docker website. Choose from one of the following flavours of Linux to open the installation instructions in a new window:
Run Docker container
Once you have Docker installed on your host system, we need to pull the latest Docker image.
sudo docker pull deepquestai/deepstack
Note that if you have an NVIDIA GPU, it is possible to boost the speed considerably by installing the NVIDIA Deepstack container instead.
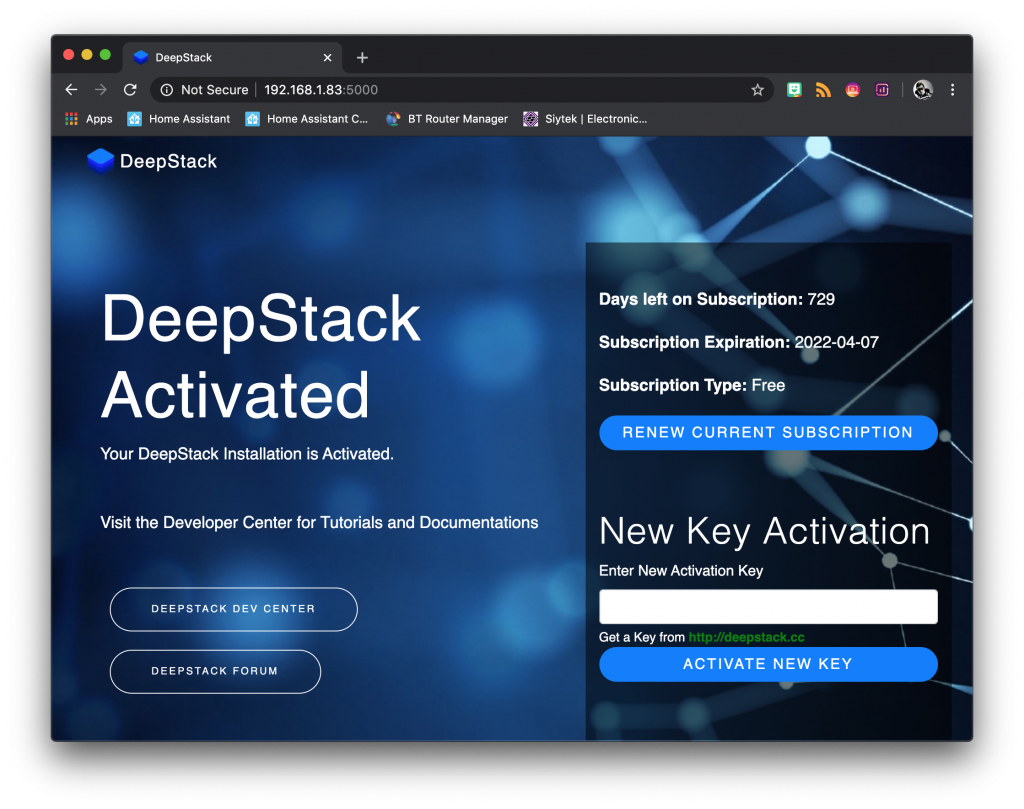
Activating the Deepstack API
First we need to head over to the Deepstack website in order to create a free account and get an authorization key. The basic free account gives unlimited access for a single installation.
Once we have the authorization key we can run Deepstack. We must run it without any recognition first in order to enter the authorization key.
sudo docker run -v localstorage:/datastore -p 5000:5000 deepquestai/deepstack
Once Deepstack is running, point your browser to the following address and replace <your-ip> with the IP address of your Deepstack server.
http://<your-ip>:5000
You will be presented with the Deepstack activation key section so go ahead and enter the activation key from your Deepstack account.
Now that Deepstack has been activated we must stop the Deepstack container and restart it with vision detection activated.
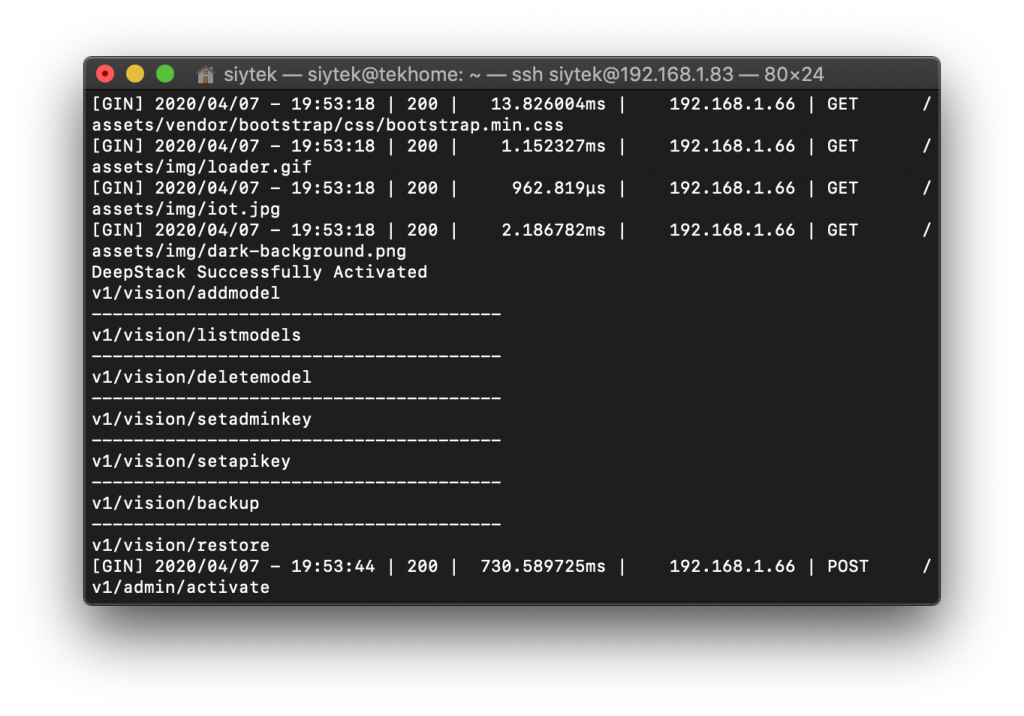
First we need to find the container ID of the Deepstack Docker container. Go ahead and enter the following command.
docker ps -l
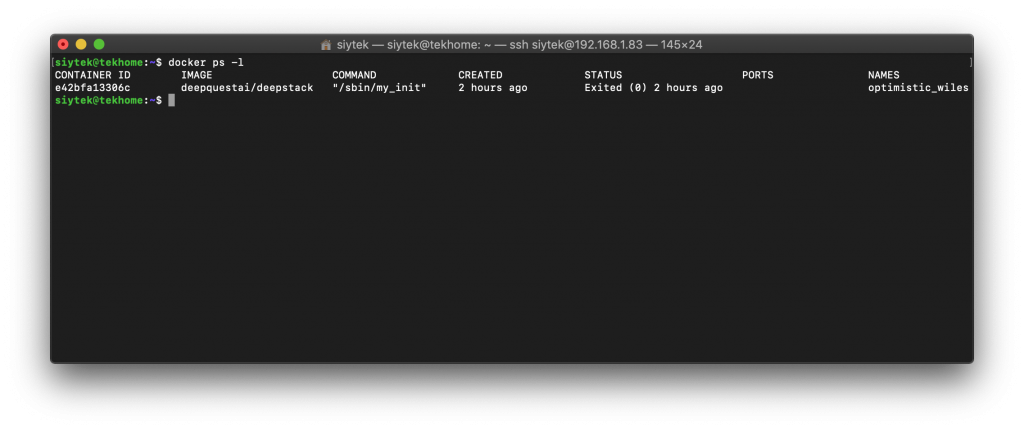
You should see the image “deepquestai/deepstack” and corresponding container ID. In my case the container ID is e42bfa13306c.
We can stop the container with the following command, replacing <container-id> with your own container ID.
docker stop <container-id>
Now we can restart the Docker container with vision detection. Go ahead and enter the following command, replacing <auth-key> with your own Deepstack authorization key.
docker run -e VISION-DETECTION=True -e API-KEY="<auth-key>" -v localstorage:/datastore -p 5000:5000 --name deepstack -d deepquestai/deepstack:noavx
Deepstack should now be running in the background of your host system so we can move on to the configuration of Home Assistant. Awesome!
Configure Home Assistant
At the time of writing (HA version 0.106.6) the Deepstack component is not yet officially part of Home Assistant, therefore we must manually add it.
If you do not already have the custom_components folder in your config directory, go ahead and add it.
/config/custom_components
Next head over to the Hass-Deepstack Github repository and download the .zip file and extract it. Go ahead and move the custom_components/deepstack_object folder into your Home Assistant config/custom_components folder.
Now you should have the following folder in your Home Assistant directory.
/config/custom_components/deepstack_object
Once you have copied the folder, go ahead and restart Home Assistant.
Adding camera local image
In order to test Deepstack we will add a test image as camera entity in Home Assistant. This will allow us to present the image to Facebox via the API to check that the connection is working.
You can use this image or try another if you prefer. Go ahead and save it as /config/www/image.jpg (using Samba). If you don’t have the www folder in your config directory, you can just create it.

Next add we need to add the local_file platform to the camera integration. This will create a camera entity called camera.local_file.
camera:
  - platform: local_file
    file_path: /config/www/image.jpg
Add image processing integration
Go ahead and open up the configuration.yaml file. First we need to add the Deepstack platform to the image_processing integration.
image_processing:
  - platform: deepstack_object
Next we need to specify the IP address and port of the machine running Deepstack, as well as the authorization key.
image_processing:
  - platform: deepstack_object
    ip_address: 192.168.1.83
    port: 5000
    api_key: d3f*****-****-****-****-************
Next we will specify a scan interval. This is the number of seconds between each refresh, bearing in mind that lower numbers may dramatically consume system resources.
Note that you do not need to specify a scan interval if you only wish to scan manually, such as when a proximity sensor is triggered.
image_processing:
  - platform: deepstack_object
    ip_address: 192.168.1.83
    port: 5000
    api_key: d3f*****-****-****-****-************
    scan_interval: 5
Next we will specify a list of targets we wish to detect. For this example we will include person.
image_processing:
  - platform: deepstack_object
    ip_address: 192.168.1.83
    port: 5000
    api_key: d3f*****-****-****-****-************
    scan_interval: 5
    target:
      - person
Finally we will select a camera entity to monitor. For this example we will use the camera.local_file that we created earlier.
image_processing:
  - platform: deepstack_object
    ip_address: 192.168.1.83
    port: 5000
    api_key: d3f*****-****-****-****-************
    scan_interval: 5
    target:
      - person
    source:
      - entity_id: camera.local_file
        name: deepstack_person_detector
Once all the code is added to configuration.yaml, go ahead and restart Home Assistant. A full list of configuration variables can be found on the Github page.
Add Deepstack to user interface
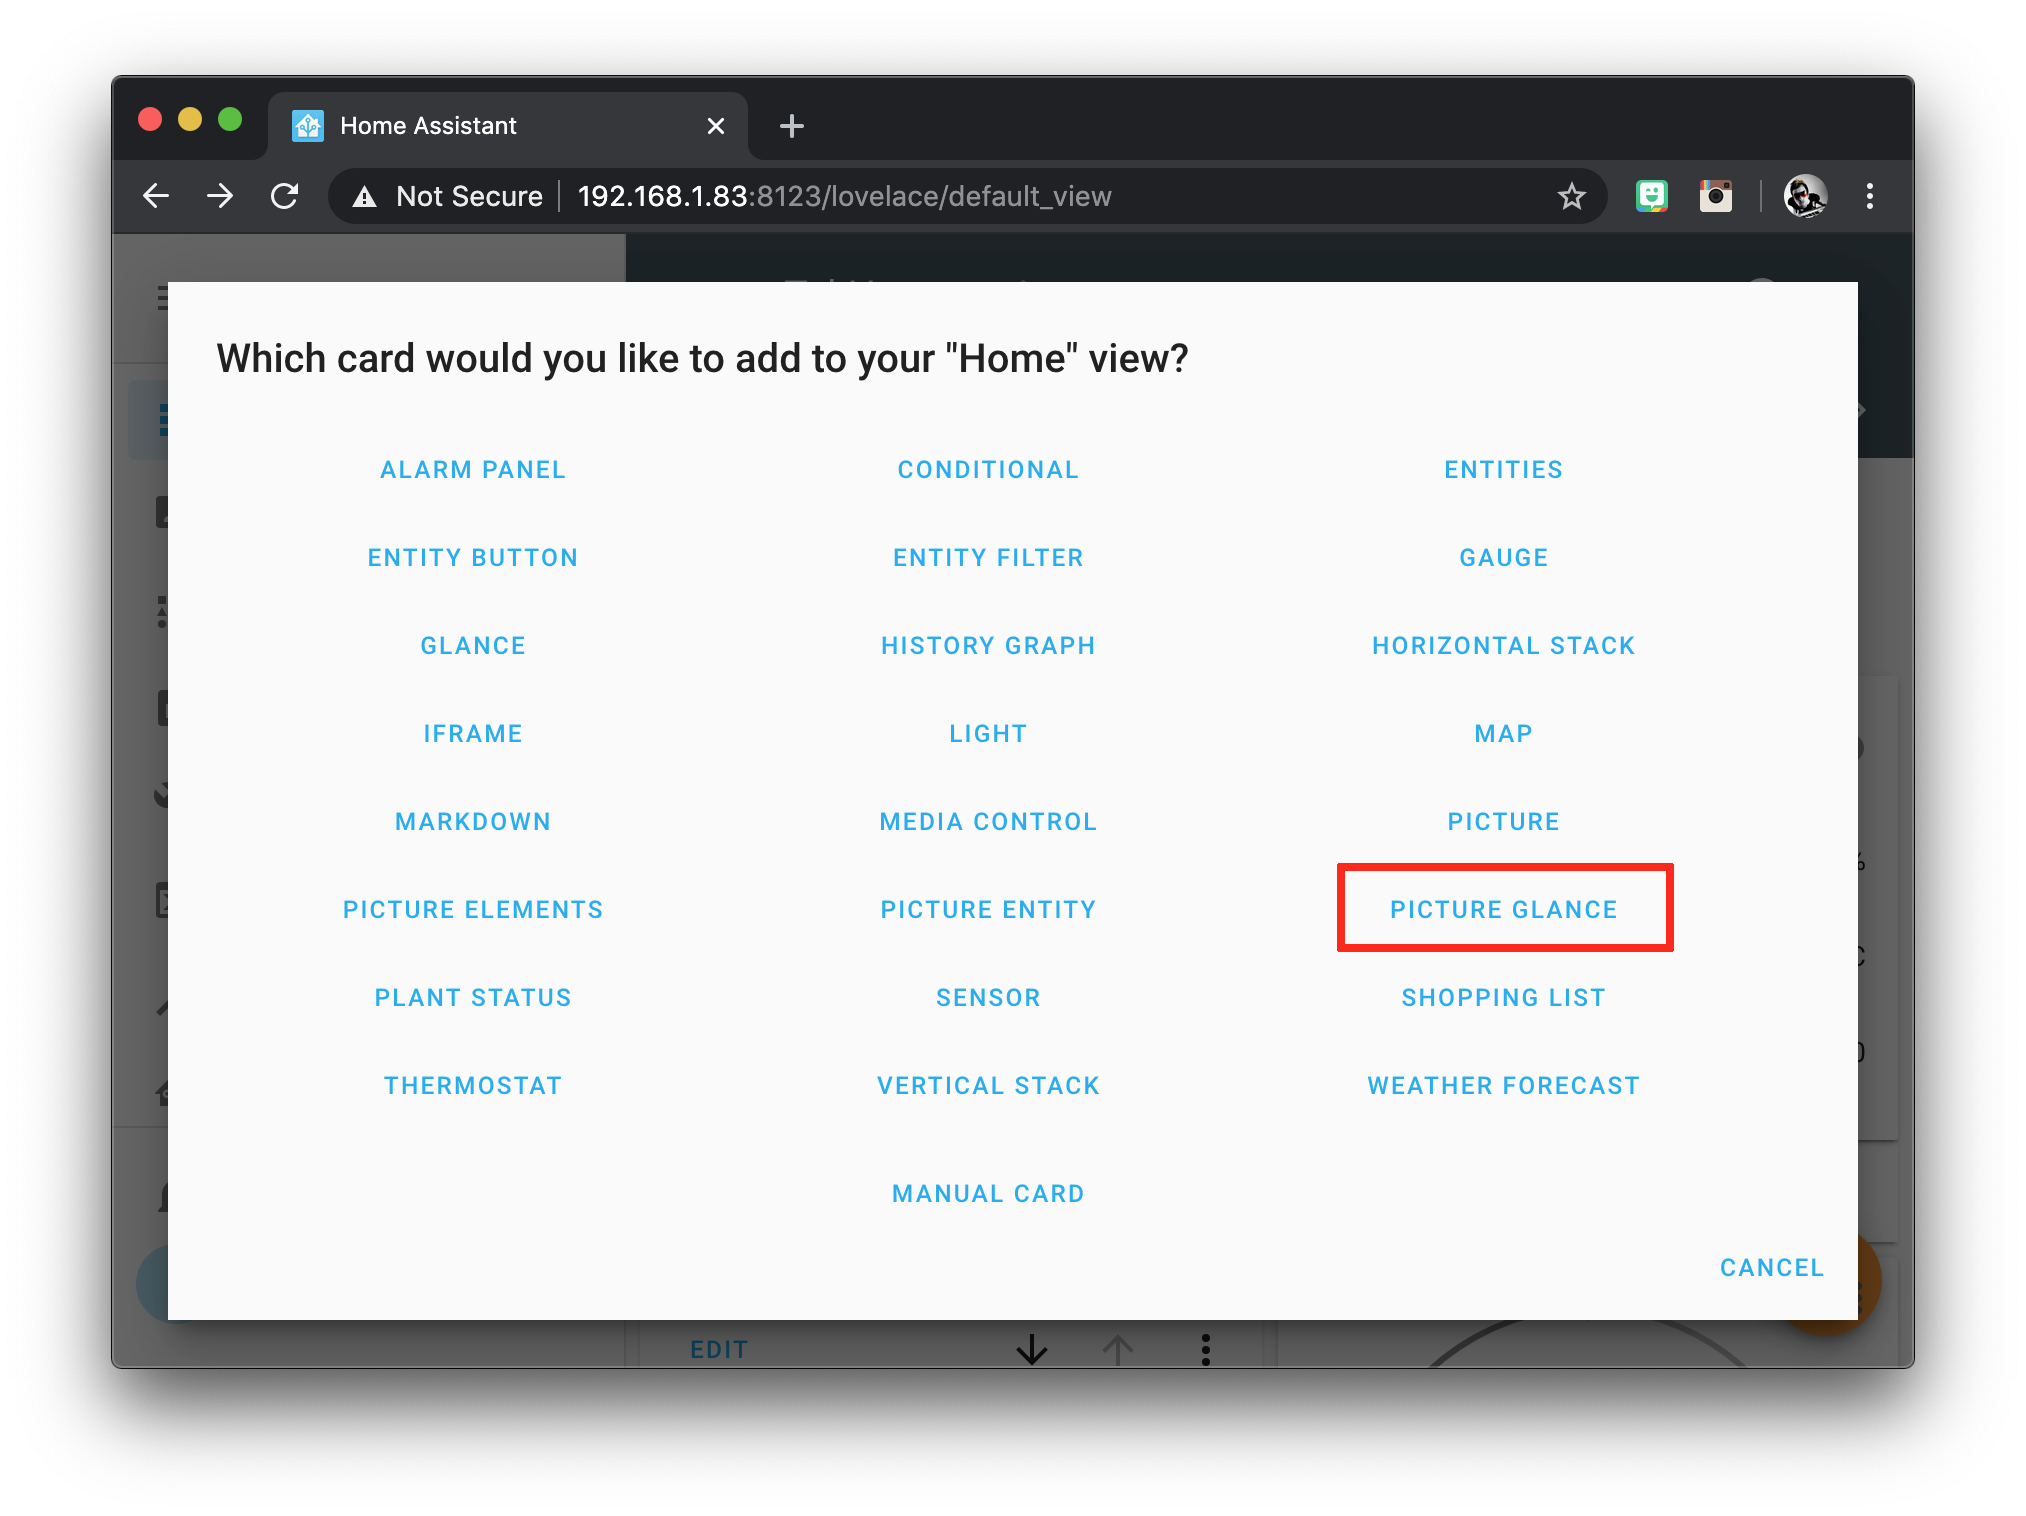
Now that we have our test image and integration configured, we can add them to the user interface and see if Deepstack is working. From the overview page, click on the three dots and then configure UI in the top right-hand corner of the page.
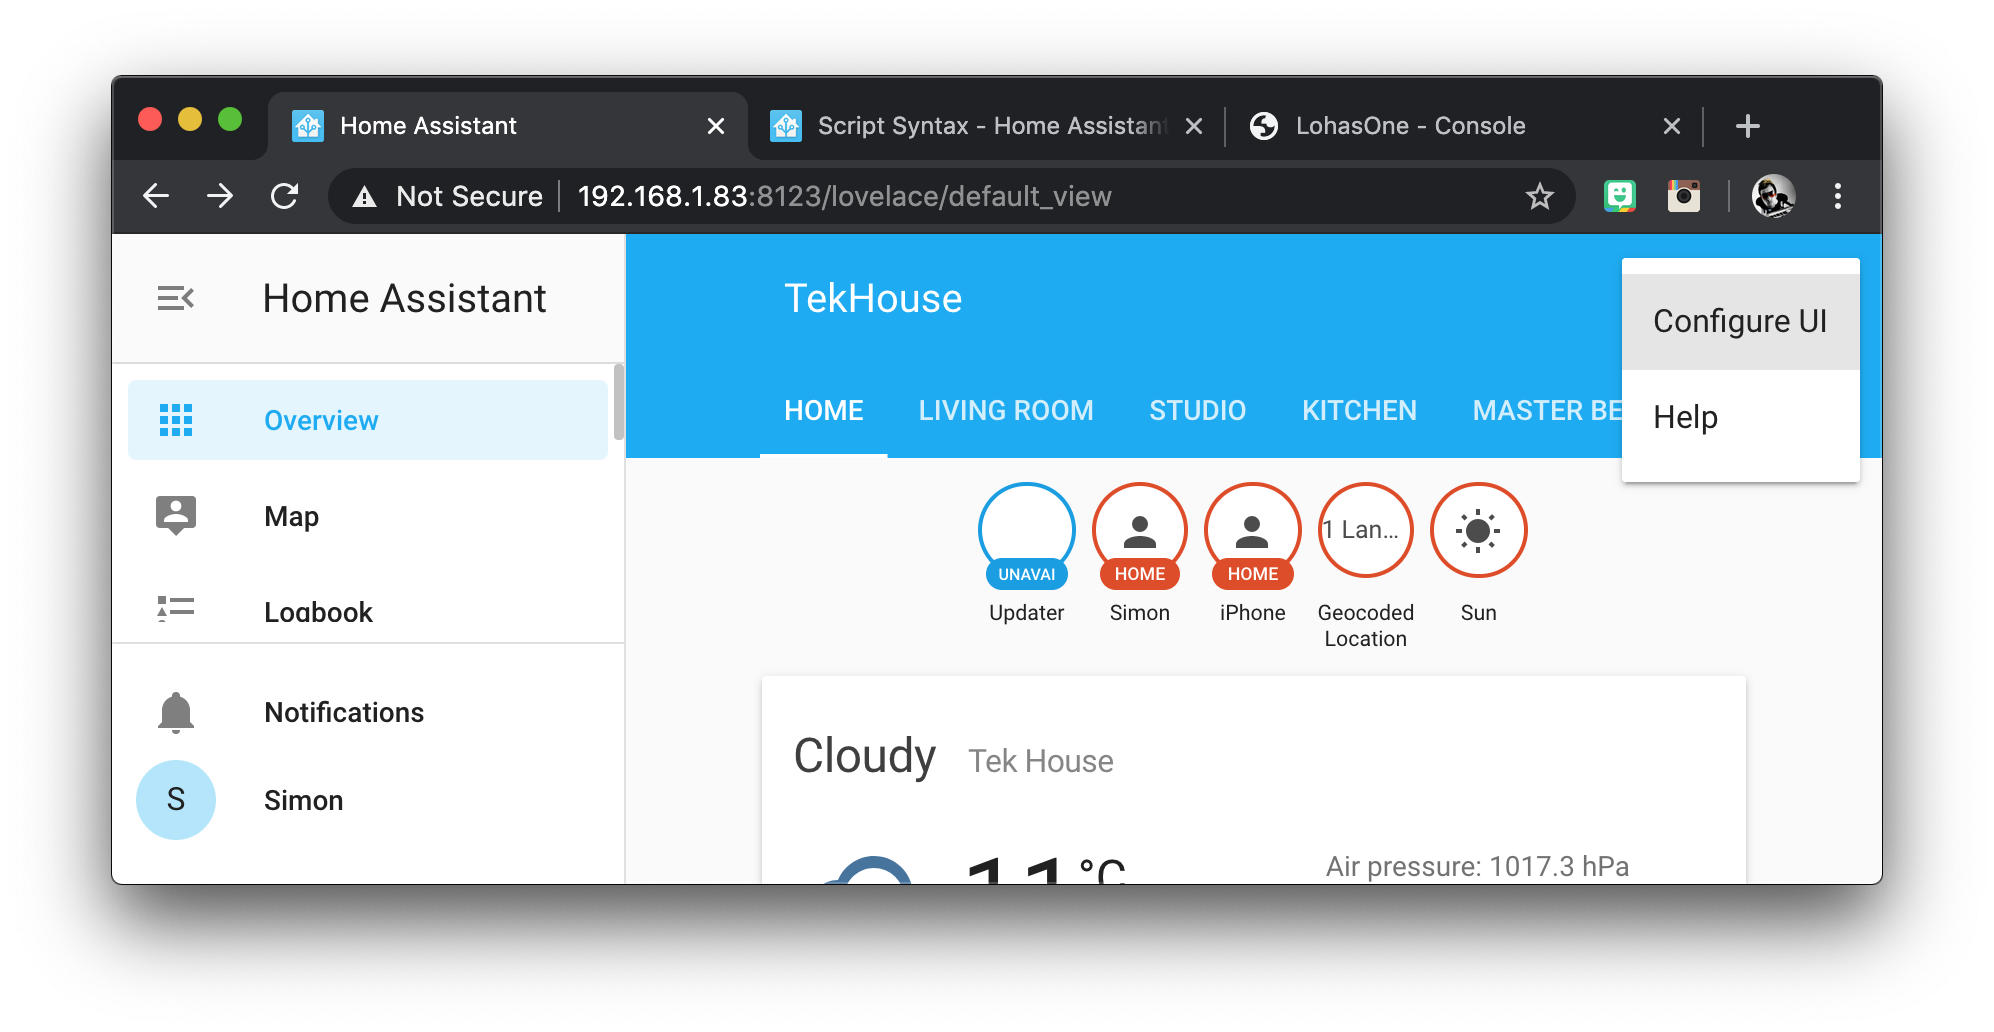
This will switch on the UI editor mode. I will create a new tab called Deepstack for the cards but you can put them anywhere you like.
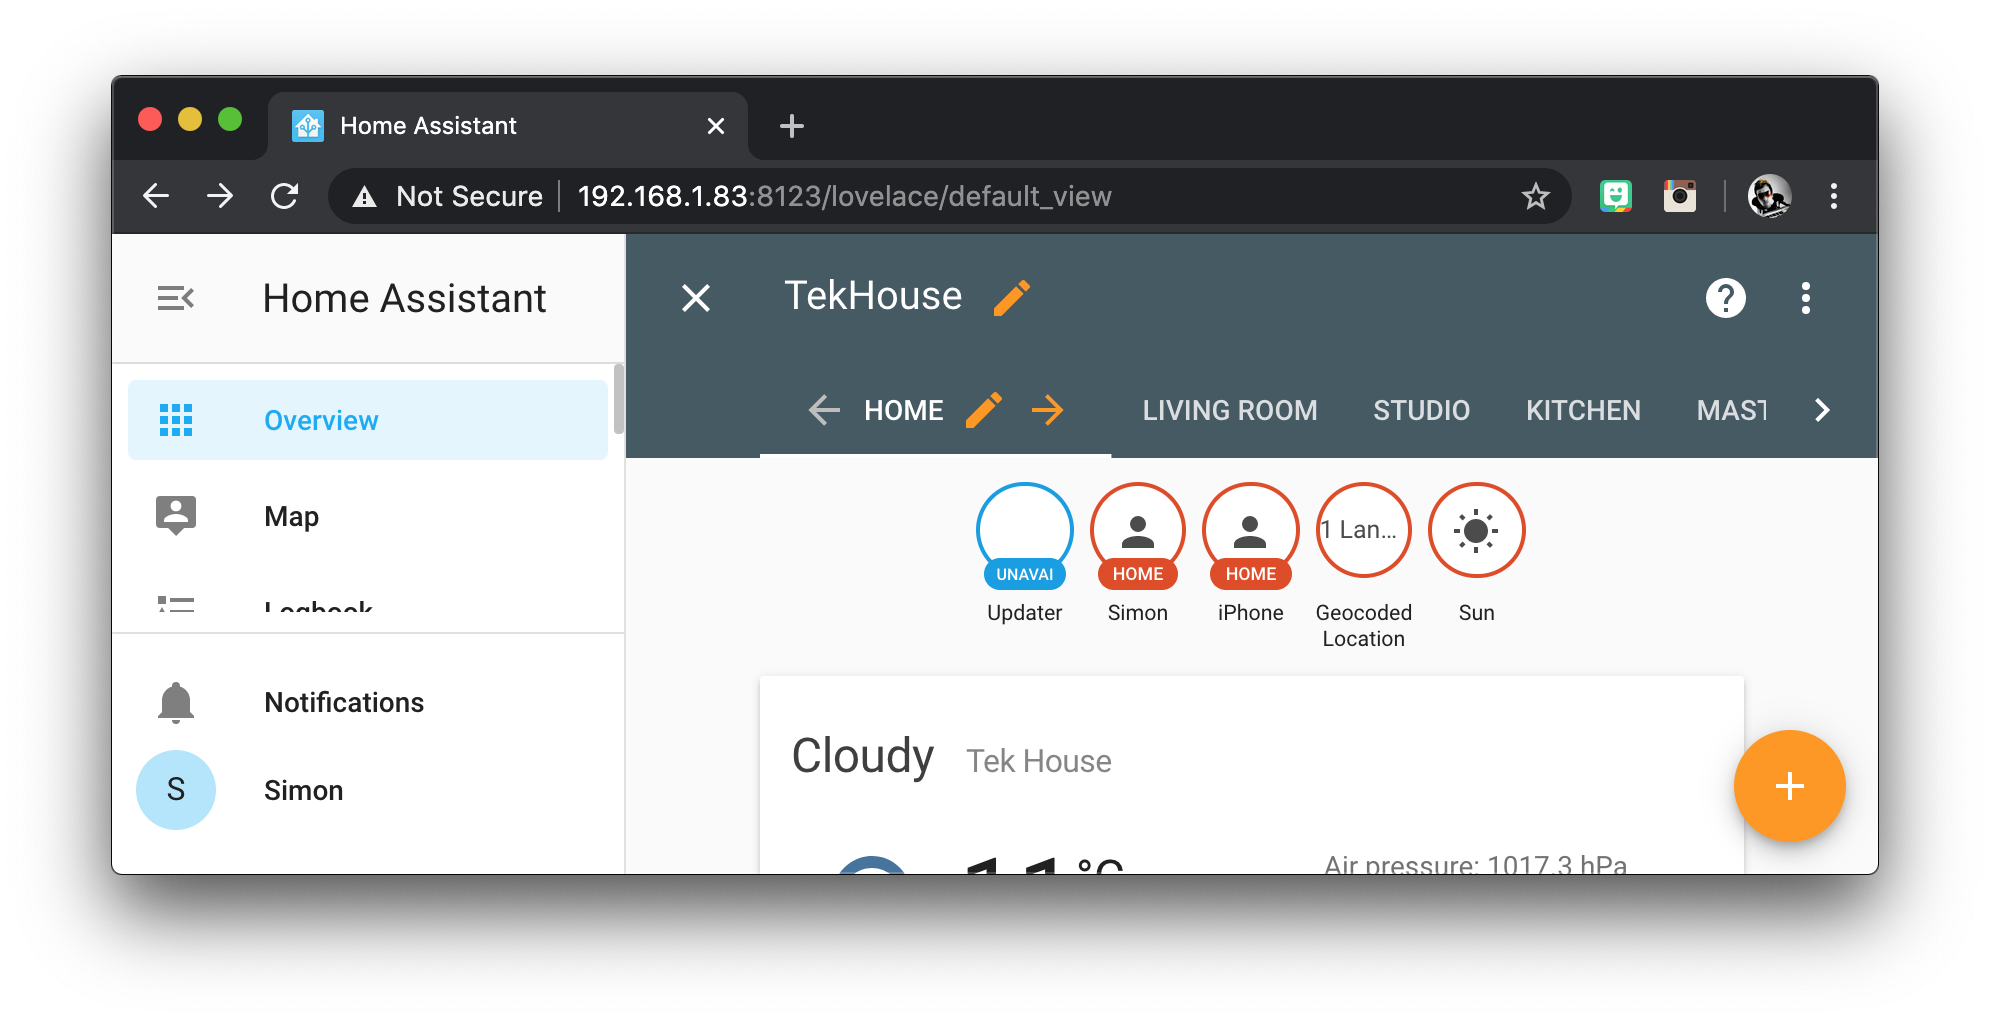
Once on the desired tab, click the orange circle with the plus towards the bottom left of the screen and then choose the picture glance card.
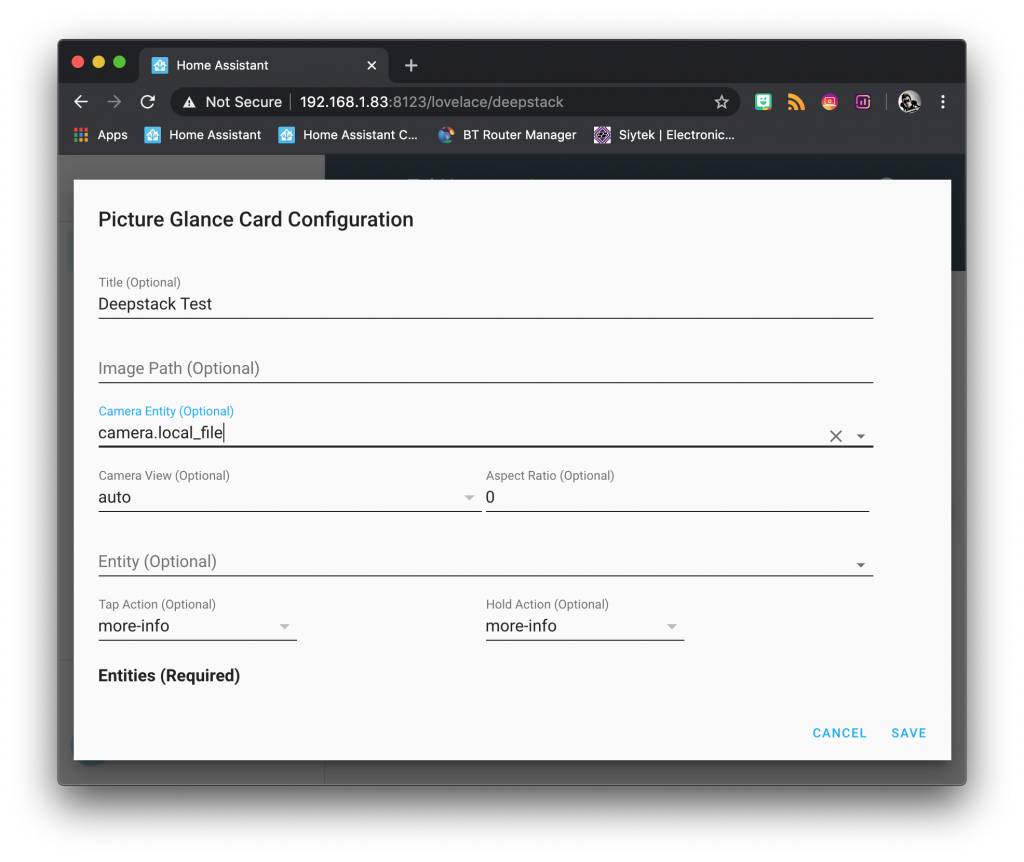
Enter a name for the card, something like Deepstack Test. Choose camera.local_file as the camera entity. Click save once done and you should now see the test image in the user interface.
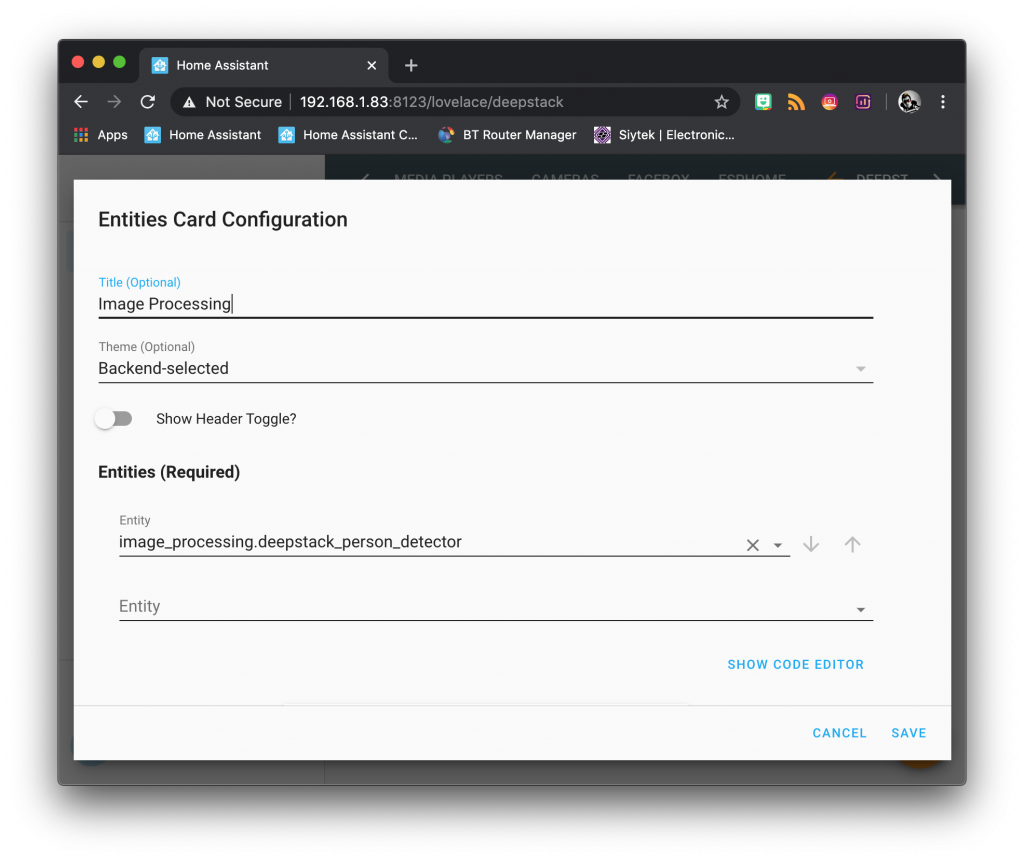
Next we need to add an entities card for the image processing elements. Enter a name for the card, something like Image Processing. Add the image_processing.deepstack_person_detector entity to the entities list and click save.
Now you should be able to see the test image and also the number of people detected. Deepstack should recognise a total of 6 faces if you are using this image.

Create an automation
So now that we are able to perform object detection, how can we use it?
It is possible to create an automation that is fired when a person is recognised by using specifying the event type as deepstack.object_detected within the event platform.
The following automation will trigger when a person is detected.
- alias: Si recognised
  trigger:
    platform: event
    event_type: image_processing.detect_face
    event_data:
      object: person
  action:
   - service: light.turn_on
     entity_id: light.treelamp
There are also additional parameters that can be specified under the event_data.
- Confidence: the confidence score between 0 and 1.
- Box: the bounding box of the object defined as (y_min, X_min, y_max, x_max).
- centroid: the center of the bounding box defined by coordinates (x,y).
Both the bounding box and centroid can be used to determine whether a specified object is detected within a certain ROI (region of interest).
Conclusion
Machine learning is a fascinating topic and as we have discovered in this tutorial, even the most basic setup can add a exciting potential functionality to a smart home.
You should now have the basic Deepstack system integrated into your Home Assistant setup so you can start to develop some creative uses for this new found AI functionality. If you have a spare Pi lying around, why not check out this tutorial so you can learn how to turn it into a remote IP camera for Deepstack!
Alternatively why not check out some of my other awesome Home Assistant tutorials!
Thanks so much for visiting my site! If this article helped you achieve your goal and you want to say thanks, you can now support my work by buying me a coffee. I promise I won't spend it on beer instead... 😏


Great tutorials.
Can we use this and facebox? If no which has better result?
Great job by the way
Hey Chris, thanks for visiting! Yes you can run Facebox and Deepstack together if you have the horsepower to do so. Interestingly when using the pic from my Deepstack tutorial, Facebox only recognises 5 faces. This is because the one lady has her face turned to the side.
And there lies the pros and cons to both. Deepstack recognises an object and not just the face, therefore my intention is to use it for presence detection (number of people in a room). Facebox can only detect a face, but has the additional ability to identify the face, great for using your doorbell cam to automatically unlock your door (if you trust the system enough!)
Also you can run Deepstack in object detection or facial detection mode but I don’t think they play well together, although I didn’t invest much time in trying to get them to run together. Facebox and Deepstack object detection mode working for me 🙂
Has anyone managed to run DeepStack on a pi using the neural USB stick.
I’ve got it installed and setup through the webpage, but it doesn’t seem to work when I send it an image ?
It’s probably something obvious !
Hi Syitek, here I am again!
Do you know if we have to pay for the basic plan to get this working?
My home assistant is not detecting objects (in my case persons).
I did exactly as you exposed here step-by-step, but API is not calling.
Thanks again.
Hey Nacho! Unless they changed something recently, as far as I know you shouldn’t have to pay for anything and I did not pay for any premium services to get all of this to work.
Doesn’t look like there have been any recently updates at the source, so I assume everything should still work ok. Maybe you might find some further information to help you at https://github.com/robmarkcole/HASS-Deepstack-object
Hello Siytek,
I checked it and saw this at the end:
“Development
Currently only the helper functions are tested, using pytest.
python3 -m venv venv
source venv/bin/activate
pip install -r requirements-dev.txt
venv/bin/py.test custom_components/deepstack_object/tests.py -vv -p no:warnings”
Am I supposed to follow it?
Thanks again mate.
Hey Nacho, not entirely sure about this, at which step in the tutorial did you get this message? You could try following it and see if it helps. Failing that, perhaps ask the question to Robmarkcole, the developer of the Deepstack integration. You can find the official page here: https://github.com/robmarkcole/HASS-Deepstack-object and there is a big thread about it where you can discuss it here: https://community.home-assistant.io/t/face-and-person-detection-with-deepstack-local-and-free/92041/20
Let me know if you make any progress with it, would be great to know if there is something I can add to the tutorial to help others 🙂
Hi
I installed Docker, Deepstack and i configured home assistant but i dont know what i need write on IP_address and Port
I write IP address : localhost and port : 5000 but on home assistant connexion fail ! (I see IP adress deepstack container on docker 172.17.0.1). My home installed on Rasperry and IP adress on my network is 192.168.1.xx
Can you help me to resolve my problem ?
Regards
Hi, I have installed Docker, and Deepstack containers and run very well. I have configured Home assistant, but i have problem HTTP connexion and python error with my parameters
IP adress : localhost
Port : 5000
My Home assistant is installed via Raspberry with IP adress 192.168.1.xx and i see IP adress on Dockers for Deepstack 127.17.0.1.
Anyone can help me ?
Regards
Hi, thanks for visiting! Please can you post your errors/log?
Hi
Why do you cancel my post ?
Regards
GH LOMBARD
Your post was not cancelled. All comments must be approved first to avoid spam. I get huge volumes of spam comments, most of it is blocked by blacklisting but some get through and I must delete manually 🙂