
Looking to automatically execute commands on a Raspberry Pi or Linux machine from within Home Assistant? This step-by-step guide will teach you how to send shell commands to any other machine on your network. This is a very powerful tool!
If you are running Home Assistant inside a Docker container, you can also use this method to execute commands outside of the container on the main machine by using SSH.
Prerequisite
You should have Home Assistant installed and running and a basic understanding of YAML including how to edit configuration.yaml. You will also need the SSH & Web Terminal add-on installed.
If you are new to Home Assistant or you are not yet familiar with editing YAML files then you should definitely check out my beginners tutorial on YAML first.
I would also recommend taking a look at my other tutorials on automation and scripts.
A basic understand of Linux terminal commands would also be advantageous as there is quite a lot to do in the terminal! Don’t worry if you are still learning, everything is detailed here and you can just copy and paste the commands.
There are three locations where we will need to type commands:
- Main System Terminal – This is the prompt on your main computer (usually the one with a browser that you use to access the Home Assistant GUI).
- Home Assistant Terminal – You can either use the Terminal add-on or you can SSH in with your main system terminal.
- Remote Terminal – This is the remote Linux system that we wish to control via Home Assistant. You can either work directly on the machine’s command line or SSH in with your main terminal.
In order to make things clearer in the tutorial, I used colored highlighting to differentiate between which terminal the commands need to be typed in to.
Main System Terminal
These commands should be typed at your main system prompt
Note that I am using Mac OS on my main computer so I will be using the built-in terminal.
If you are using Windows then you can use a terminal program like PuTTY or you could install a Linux Shell.
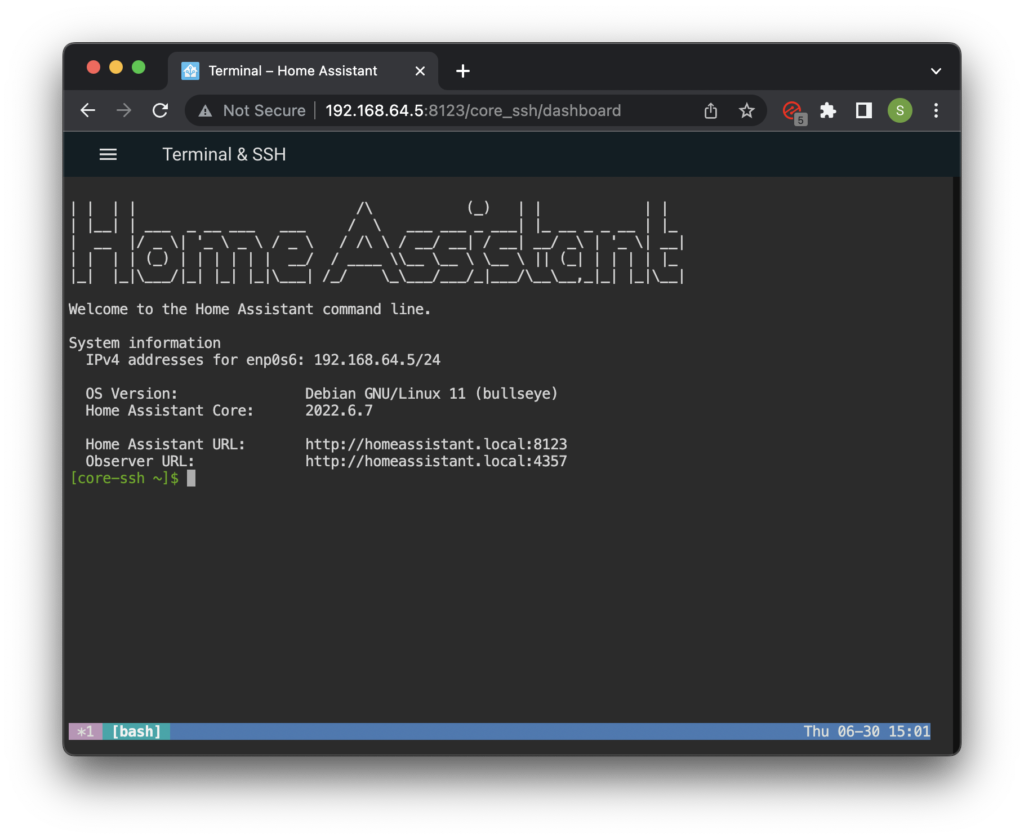
Home Assistant Terminal
The easiest way to access Home Assistant command line is to use the Terminal & SSH add-on, available from the add-ons store.
Note that if you cannot see Terminal & SSH in the add-on store, you need to go to your profile and turn on advanced mode.
These commands should be typed at the Home Assistant prompt.
Remote Terminal
For this tutorial I shall be using a Linux Virtual Machine (called Debian 11 VM) as the remote host that I wish to control.
However you will likely want to control an actual physical machine in a remote location, for example a remote Raspberry Pi. The process for a VM and remote hardware is exactly the same.
These commands should be typed at the remote host / external container promt.
Executing a shell command
In most cases Home Assistant installations run from within a Docker container. This makes the installation process much easier and allows Home Assistant to run alongside other systems with no disruption or conflict.
When executing shell commands in Home Assistant, the execution will occur from the bash shell within the container and not the main system shell.
For some applications it may be adequate to execute commands from the Home Assistant CLI, however the real power of this integration comes when you combine it with SSH.
This allows you to take control of remote Linux-based machines or the main local system shell if you have one available.
Add the shell integration
First we will add the following basic shell command to create a new file within the Home Assistant container in order to demonstrate the basic use of the integration.
touch text.txt
To assign this terminal command to a function in Home Assistant, first we will add the shell integration to our configuration.yaml file.
Then we will create a new shell command called my_first_shell_command.
shell_command:
  my_first_shell_command: touch test.txt
Triggering a shell command
This will add a new service in Home Assistant called shell_command.my_first_shell_command, which we can call from anywhere that can trigger a service. To test this we will add the following script.
script:
my_first_shell_command_script:
sequence:
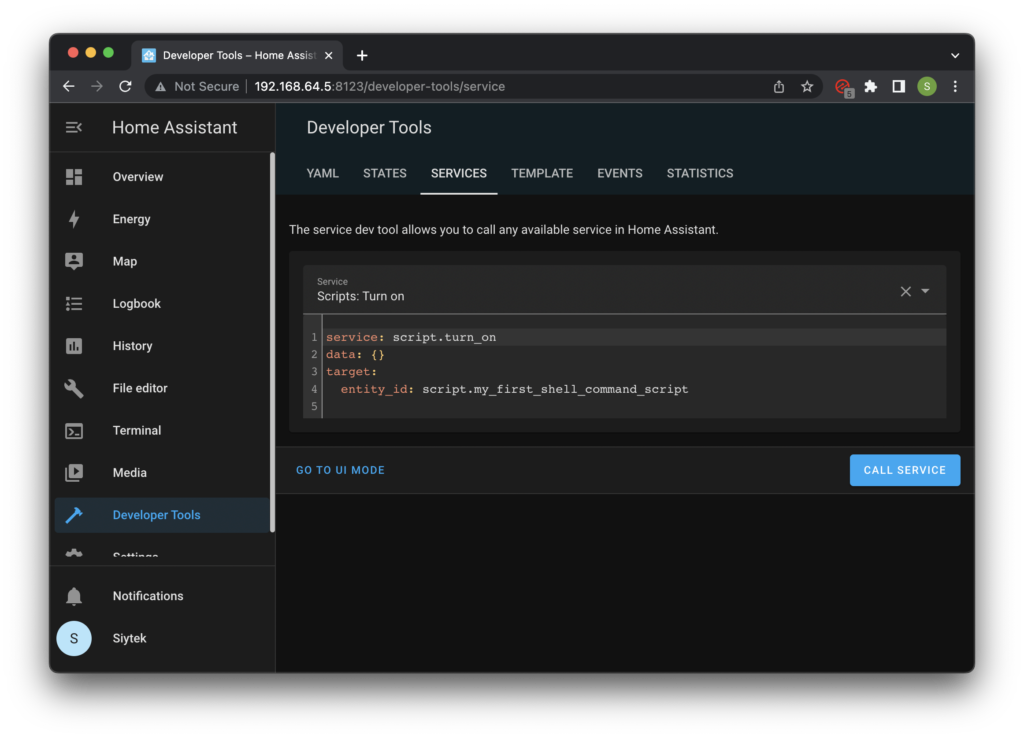
service: shell_command.my_first_shell_commandNow click on developer tools from the sidebar and goto the services tab. Switch into YAML mode and enter the following:
service: script.turn_on
data: {}
target:
  entity_id: script.my_first_shell_command_script
Lastly click the call service button to execute the script.
Checking that the command executed
Now we need to access the Home Assistant terminal. You can either do this by using your system terminal to connect to Home Assistant or by using the web terminal in Home Assistant.
If you wish to use the web terminal, simply click on terminal from the sidebar to open up the terminal. If the option is missing from the sidebar, you will need to install the terminal in the add-ons store.
If you wish to connect with your system terminal, go ahead and enter the following command replacing your-homeassistant with the IP address of your Home Assistant server. You can also specify the port if different from the default value of 22 .
ssh root@your-homeassistant -p 22
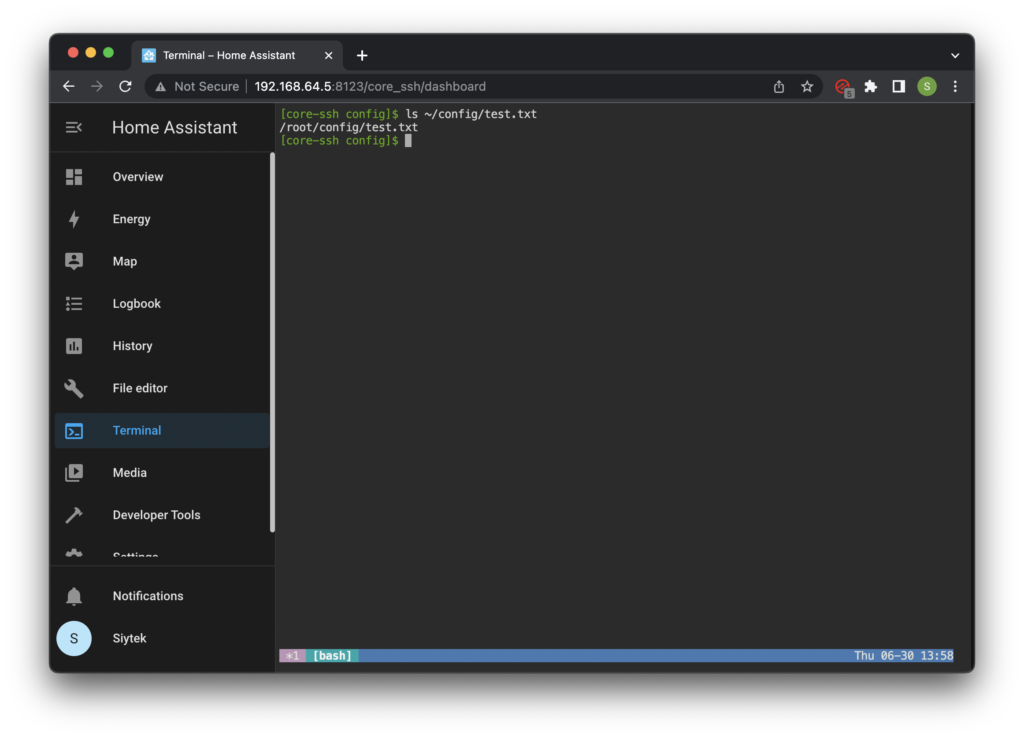
Once at the Home Assistant command prompt, enter the following command to confirm that the file test.txt has been created.
ls ~/config/test.txt
If the file has been successfully created then the path and filename should be echoed. This indicates that the service we created in Home Assistant has executed the shell command. Awesome!
Setup SSH
There are some limitations to using the Home Assistant shell and you will find that there is no package manager, so you are limited to the built in commands.
It is possible to SSH to external shell prompts from Home Assistant, which is very useful! You can SSH to any remote machine and perform commands.
Alternatively if you are running Home Assistant in a container on a larger system like a Linux server, you can SSH out of the Home Assistant container and into the main system shell.
Create a key
In order to do this we must setup key based authentication and disable password access on the remote machine. First go ahead and enter the following command into the terminal.
ssh-keygen
This command will create a new key within the Home Assistant container. I would recommend that you leave all of the options blank, just press enter on each one without typing anything.
We do not want to set a password or it will prevent the automation from working.
Once the key has been created you should be presented with an output similar to the following.
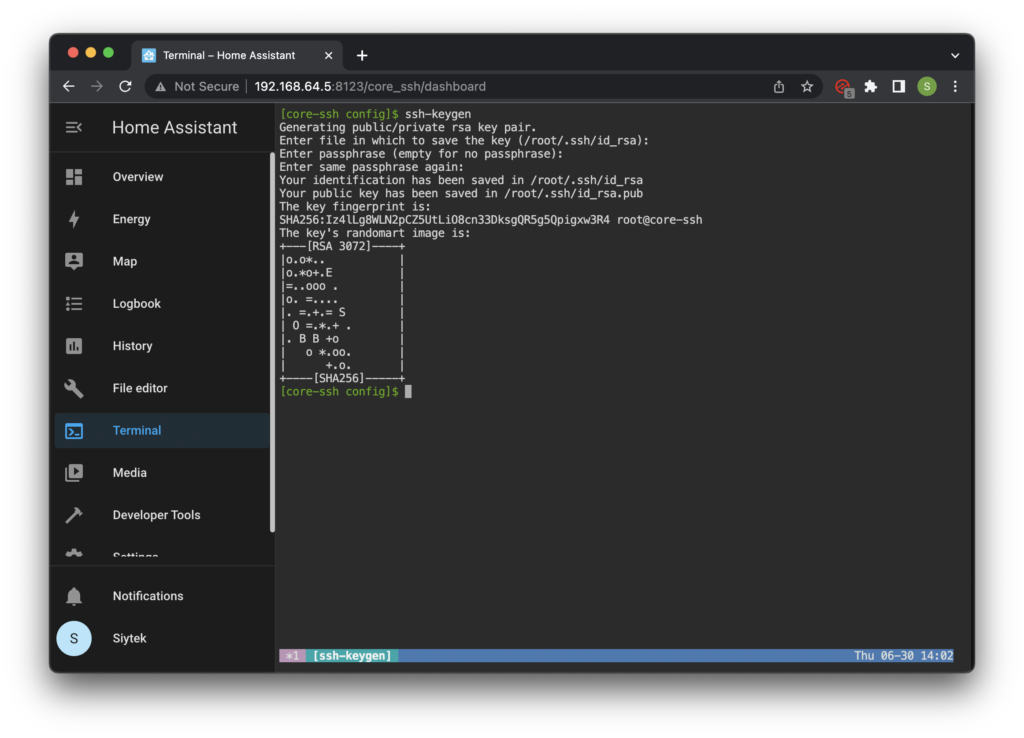
Your identification has been saved in /your_home/.ssh/id_rsa.
Your public key has been saved in /your_home/.ssh/id_rsa.pub.
The key fingerprint is:
a9:49:2e:2a:5e:33:3e:a9:de:4e:77:11:58:b6:90:26 username@remote_host
The key's randomart image is:
+--[ RSA 2048]----+
|     ..o         |
|   E o= .        |
|    o. o         |
|        ..       |
|      ..S        |
|     o o.        |
|   =o.+.         |
|. =++..          |
|o=++.            |
+-----------------+
Add the key to the remote machine
Now that we have a key on the system, we must add it to the remote system in order to allow a secure passwordless connection. There are several ways that we can do this.
The easiest way is to use ssh-copy-id as described in the next section. If you have problems with this you can skip ahead to the next section and manually copy the key instead.
Add the key with ssh-copy-id
The easiest way to copy the key is by using the ssh-copy-id tool. In order to copy this simply enter the following command, with your own user name and remote IP address.
ssh-copy-id username@remote_IP
If you are warned about the ECDSA key fingerprint, just type yes to continue. You will also be prompted for the remote user password. Once the tool has completed you should now be able to login to the remote system without a password.
ssh username@remote_IP
Manually adding the key
If you are unable to use the ssh-copy-id tool to copy the key to the remote machine, you can log in to the remote machine and copy the key across manually.
Copy the key with external terminal
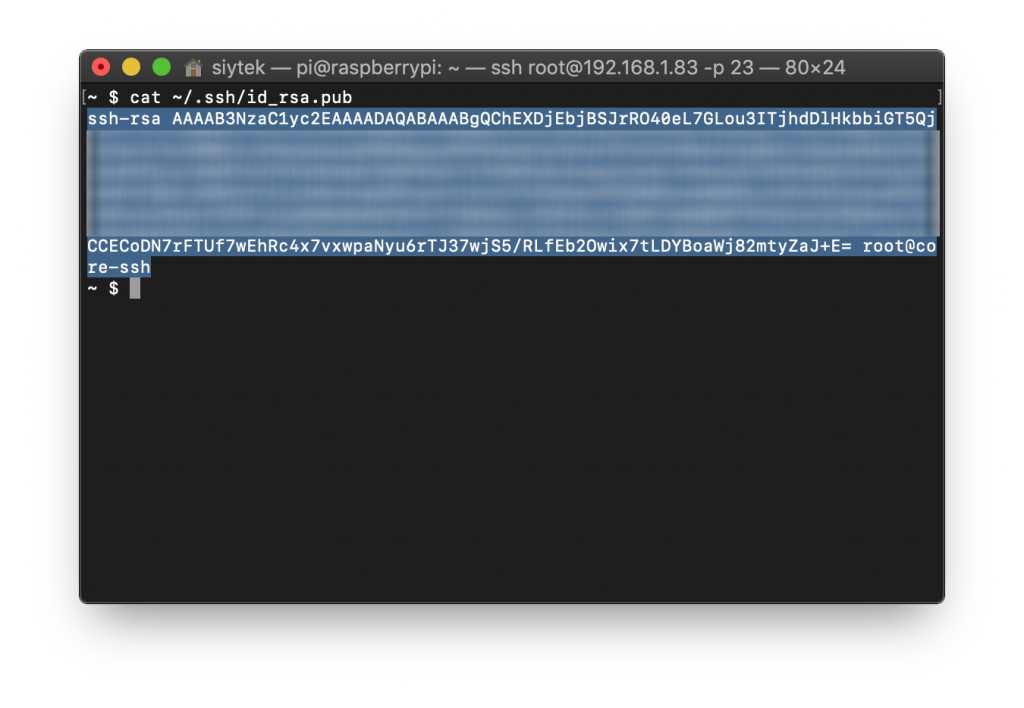
If you are using an external terminal program the easiest way is to echo the key in the terminal and just copy it from the terminal.
cat ~/.ssh/id_rsa.pub
This command will echo your key in the terminal so you can copy the key to the clipboard. Make sure that you copy the correct portion as shown in the screenshot below.
Copy the key with Home Assistant web terminal
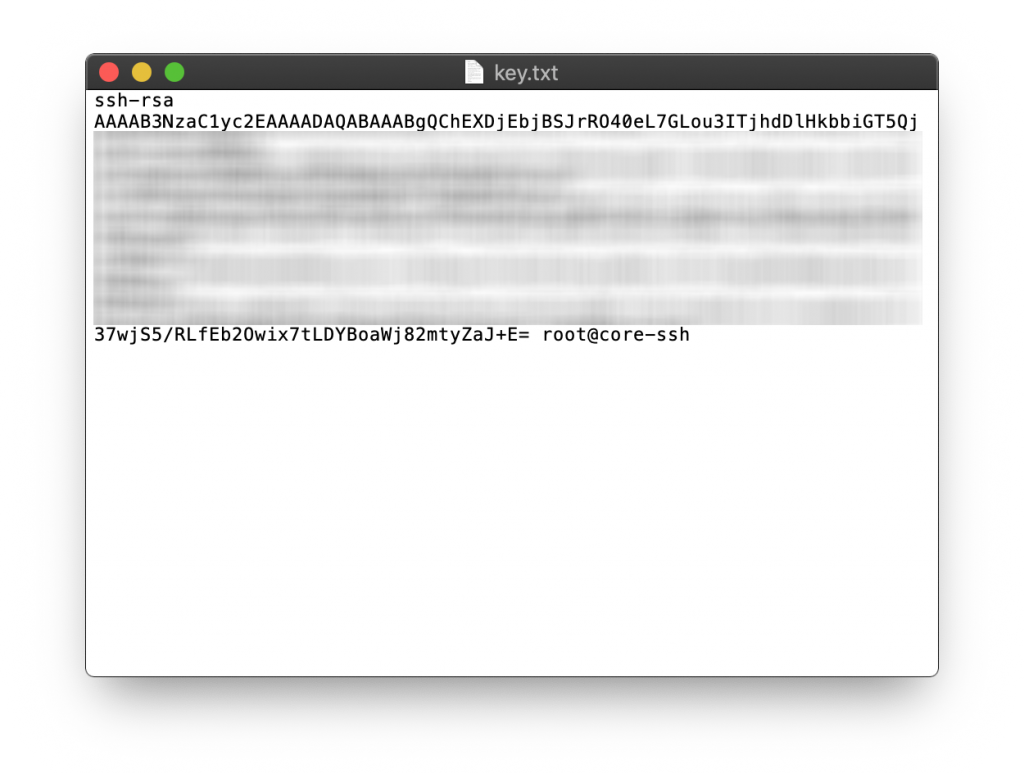
If you are using the Home Assistant web terminal then it is not possible to copy the text from the terminal window. Instead we can copy the key to a text file and place it in the config directory.
cp ~/.ssh/id_rsa.pub ~/config/key.txt
Now you can access the file key.txt using Samba on your main system. Go ahead and copy the key from the text file. Make sure you copy only the key characters and not any spaces or blank lines below.
Adding the key to the remote system
Now that we have the key copied to the clipboard we can add it to the remote system. Go ahead and connect to your remote system with SSH from your main system terminal.
ssh username@remote_IP
Once you arrive at the remote system command prompt, first we will create a new environment variable containing the key.
export key="paste your key here"
Now we can run the following command to add the key to the remote system.
echo $key >> ~/.ssh/authorized_keys
Testing the key
Now we have created a key and added it to the remote system we should be able to log in to the the remote system bash prompt from the Home Assistant terminal without entering a password.
ssh username@remote_IP
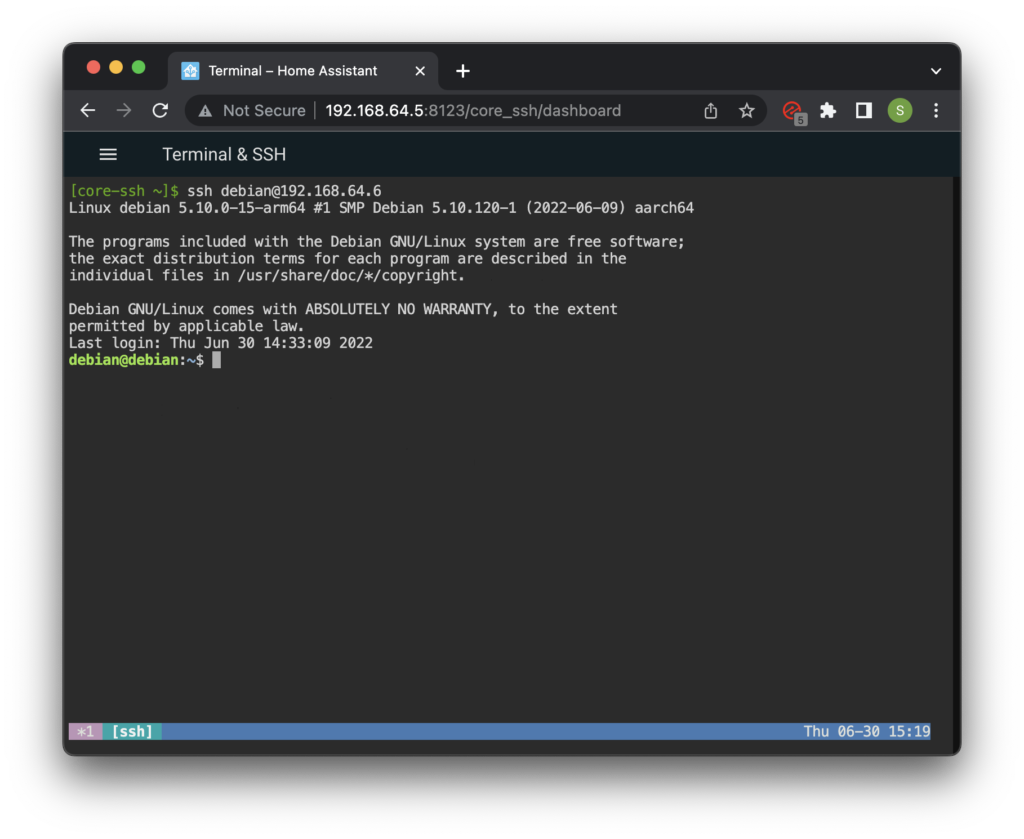
Once you have confirmed that the remote system can be accessed, simple type exit to return to the Home Assistant CLI.
exit
Configure Home Assistant
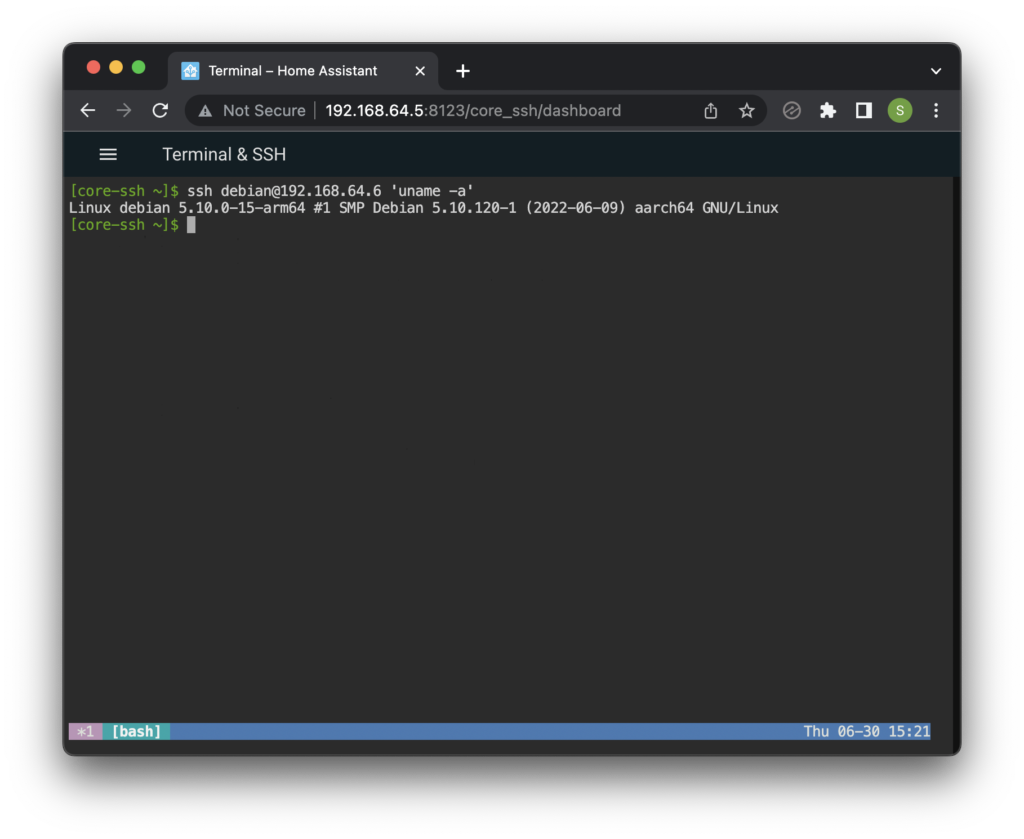
Now that we have passwordless access to our remote device, we can execute commands on the remote system using SSH and the output will be returned in our Home Assistant terminal. Awesome!
Don’t forget to replace the username and IP address with the ones relevant to your own system.
ssh [email protected] 'uname -a'
This will send a command to the remote system which will return the remote system details, confirming that everything works ok.
Create a remote bash script
If you wish to execute a simple command like the one above then it is perfectly acceptable to use the syntax above in the Home Assistant shell integration.
However it is beneficial to place more complex commands or strings of commands inside a bash script on the remote machine.
We can call the bash script on the remote machine from Home Assistant. Go ahead and log in to the remote machine by enterting the following command.
ssh username@remote_IP
Create a new script
From the command prompt of the remote machine enter the following command to create a new file and open the nano text editor.
nano ~/sys_maintenance
We can go ahead and enter the following sample script. This script will perform any necessary system updates on the remote machine and write the date and time to a log file.
#!/bin/bash

echo "Updating..."
apt-get -qq update

echo "Upgrading..."
apt-get -y -qq upgrade

echo "Cleaning..."
apt-get -y -qq autoremove
apt-get -qq autoclean

echo "Writing to log..."
dt=$(date '+%d/%m/%Y %H:%M:%S');
echo $dt > sys_maintenance.log

echo "Done!"
When you have copied the code across to the new file, press ctrl + X to close the text editor and save the file. Once back at the command line we need to make the file executable.
chmod +x sys_maintenance
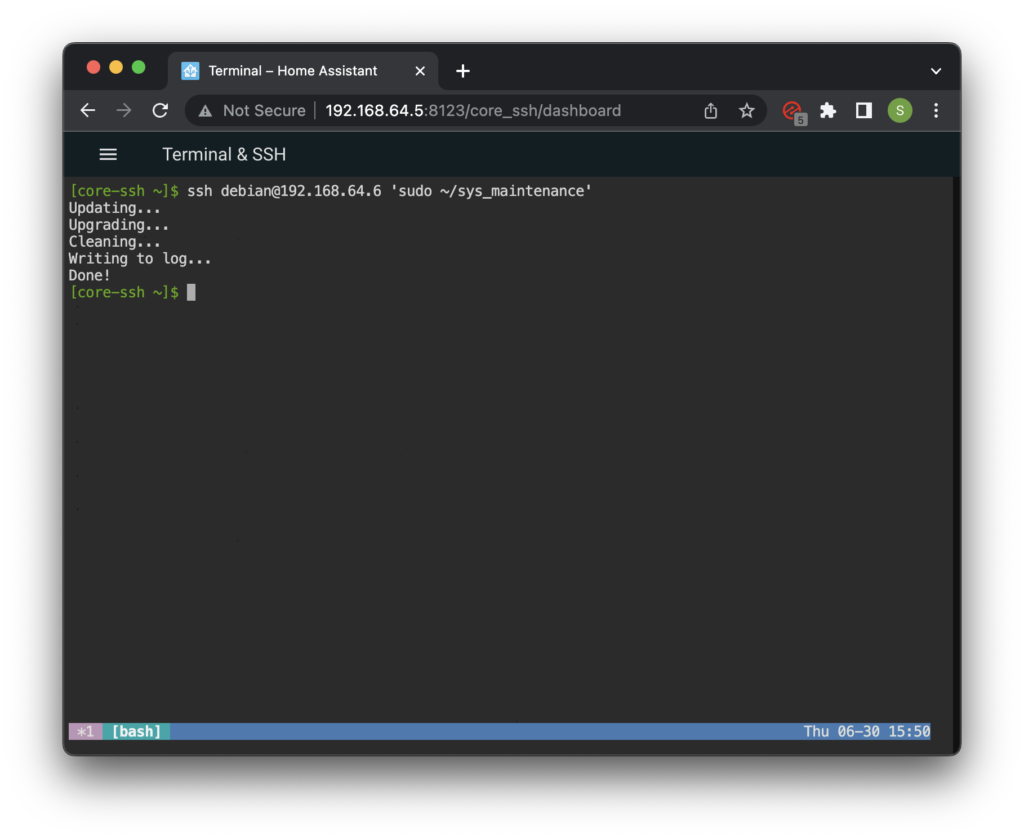
Test the script
Now type exit to return to the Home Assistant CLI. We can test the script by calling it remotely with SSH. Note that you may need to add the username on the remote machine to its native sudoers file.
ssh username@remote_IP '~/sys_maintenance'
The script will execute on the remote machine and the output will be printed in the Home Assistant terminal.
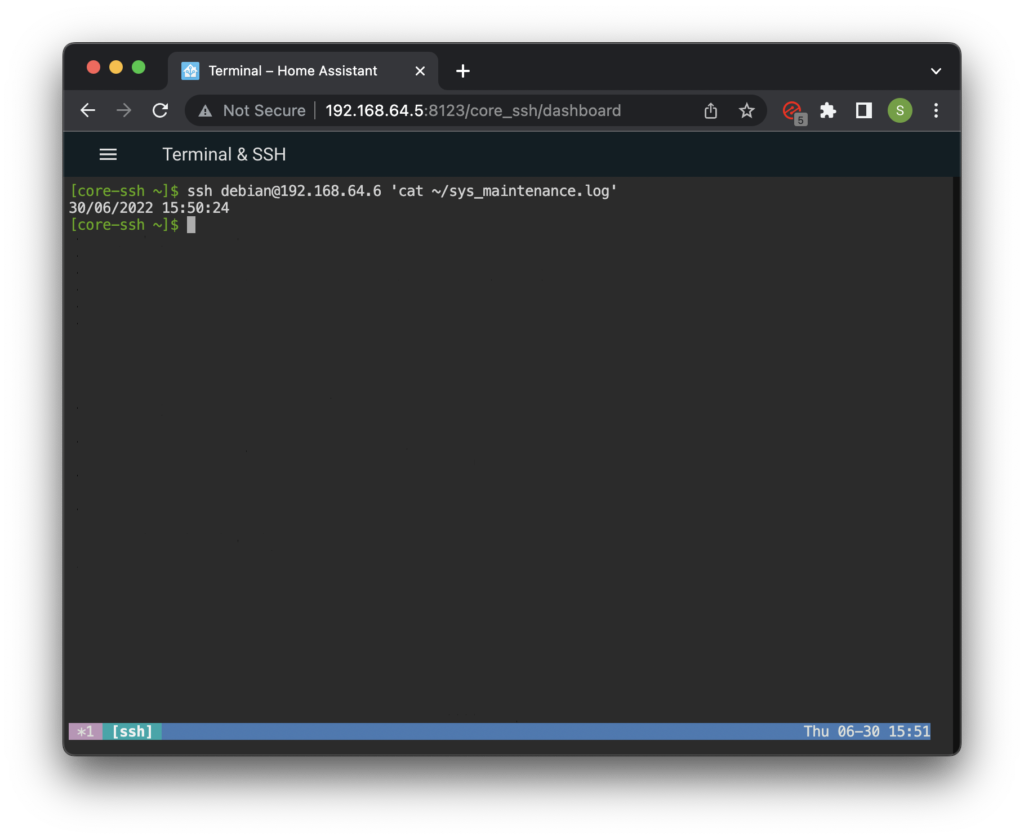
Reading the log
We can also read the raw log file on the remote system to see when the system maintenance script was last run.
ssh username@remote_IP 'cat ~/sys_maintenance.log'
Running the remote script from Home Assistant
In order for Home Assistant to be able to log in to the remote system independently of the terminal we need to copy the key to the config/ssh directory. From the terminal simply enter the following command.
cp ~/.ssh/id_rsa ~/config/ssh
Now we can finally execute the remote bash script in Home Assistant! We simply add the SSH command to the shell integration that we created earlier.
We also need to add some arguments that tell Home Assistant which key to use. Don’t forget to replace username and remote_IP with the relevant values for your remote host. This will create a new service that we can use to fire the remote script.
shell_command:
  linux_maintenance: ssh -i /config/ssh/id_rsa -o 'StrictHostKeyChecking=no' username@remote_IP '~/sys_maintenance'
Service trigger button
In order to trigger the new shell command service with a button in the user interface, we will create a script in Home Assistant.
shell_command:
  linux_maintenance: ssh -i /config/ssh/id_rsa -o 'StrictHostKeyChecking=no' username@remote_IP '~/sys_maintenance'

script:
 system_maintenance_linux:
   alias: Linux System Maintenance
   sequence:
     service: shell_command.linux_maintenance
Fetching the log
We can also create a sensor using the command_line platform. This sensor will fetch the date from the sys_maintenance.log file and store it within its state.
shell_command:
  linux_maintenance: ssh -i /config/ssh/id_rsa -o 'StrictHostKeyChecking=no' username@remote_IP '~/sys_maintenance'

script:
 system_maintenance_linux:
   alias: Linux System Maintenance
   sequence:
     service: shell_command.linux_maintenance

sensor:
  platform: command_line
  name: Linux Last Updated
  command: ssh -i /config/ssh/id_rsa -o 'StrictHostKeyChecking=no' username@remote_IP 'cat ~/sys_maintenance.log'
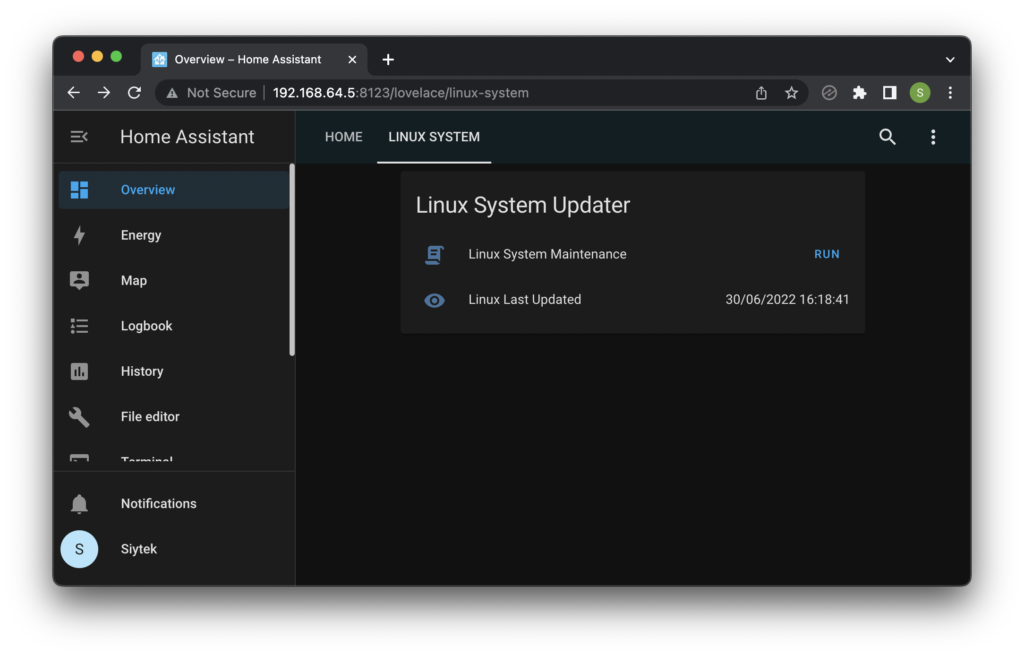
Adding to the User Interface
So now we have two shell commands setup in Home Assistant, one to perform remote system maintenance and another to fetch the log. We can go ahead and add them to an entities card.
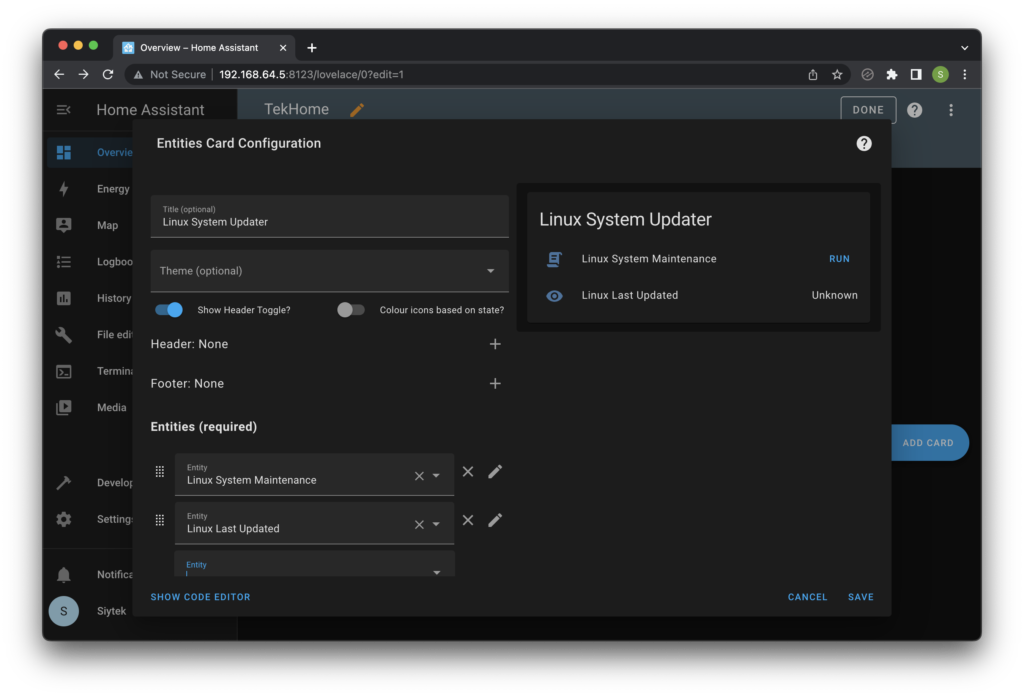
Pressing the execute button will update the remote Raspberry Pi system and the last update will be reported back. Awesome!
Conclusion
The shell command and command line integrations are without a doubt some of the most powerful integrations available in Home Assistant. They open up a whole world of possibilities!
You should now be able to integrate remote bash scripts into Home Assistant, allowing almost unlimited control of any Linux-based remote device!
Congratulations if you made it to the end! Why not grab a nice beverage and get stuck in to some more of my awesome Home Assistant tutorials!
Article Updates
June 2022 : Tested on Mac M1 and Mac OS 12.4. Screenshots updated to latest frontend, version 20220601.0. Fixed table of contents. Minor adjustments to article information to match newer version of Home Assistant.
Article first published April 8th 2020.
Thanks so much for visiting my site! If this article helped you achieve your goal and you want to say thanks, you can now support my work by buying me a coffee. I promise I won't spend it on beer instead... 😏


