Compiling your first C++ program in Ubuntu couldn’t be easier using the following 4 easy steps!
This article will cover everything you need to know to get started:
- Step 1: Check the compiler version
- Step 2: Create a C++ file
- Step 3: Compile the code with G++
- Step 4: Executing the new program
Ubuntu is an excellent alternative to Windows and one that is certainly suited to developers.
Did you know there are now as many as 40 MILLION Ubuntu desktop users?
If you are using Linux then you are among the likes of Nasa, Google, CERN and the US Department of Justice.
There are many reasons to choose Linux as your OS for developing, one of the most beneficial being that it is open source.
Ubuntu is one of many available flavours of Linux but it is often chosen for its attractive looking graphical user interface. If you like to work in a visually pleasing environment but are not planning to code c++ on Mac OS, Ubuntu is the ideal choice!
Comparing different flavours of Linux certainly deserves its own post, but that is beyond the scope of this article. However it is worth mentioning that Ubuntu is based on Debian, making it not only pretty to look at but also an excellent choice for programming.
In this article we will cover how to get started with C++ programming in Ubuntu.
Table of Contents
- Should I use Ubuntu for Programming?
- Does Ubuntu Have C++?
- How Do I Compile and Run C++ on Ubuntu?
- What’s Next?
Should I use Ubuntu for Programming?
Ubuntu is an excellent choice for programming! Here are 7 reasons why you should choose Ubuntu for programming C++
- Linux is trustworthy and safe. The regular bug fixes made by programmers and developers reduces security threats.
- Linux is free and open-source. Developers can potentially save a lot of money in licensing!
- Linux offers a variety of distributions to consumers (flavors). Linux can be tailored and optimized by users to suit their needs. The flexibility that Linux offers enables users to work more productively.
- Users can enable Windows apps to run on Linux by using open-source software like Wine. Wine is typically used by gamers, however the Wine database also contains a sizable array of productivity tools.
- Linux users have more control over their updates and are not likely to be disturbed by computer restarts that a Windows user may face.
- Linux functions considerably more quickly and smoothly than Windows. Users of Linux have access to additional free memory and hard disk space. Lower Use of Central Processing (CPU).
- Linux has a huge support base. There are plenty of places to go for answers, tips and ideas like here on siytek.com!
Does Ubuntu Have C++?
Ubuntu does not have a C++ bundled within the standard installation, however it is very easy to add C++ to Ubuntu.
It costs nothing to install the basic tools required for programming in C++ and this guide will make the setup process straightforward and very easy for beginners.
How Do I Get C++ on Ubuntu?
In order to get up and running with C++ programming on Ubuntu, we simply need a C++ compiler and method of writing the code.
The easiest way to write the actual code is by using one of the basic terminal text editors, but more on that later.
The other tool we will need is the compiler, which takes the code that you have written and turns it into an executable file.
The compiler that we will be using in this tutorial is called G++ which is specifically for compiling C++ code.
G++ is part of GCC, the GNC Compiler Collection.
GCC was originally designed to be a compiler for the GNU operating system. The GNU system was created to be completely free software, in the sense that it respects the user’s autonomy.
Front ends for C, C++, Objective-C, Fortran, Ada, Go, and D, as well as libraries for these languages (libstdc++,…), are also included in the GNU Compiler Collection.
Does Ubuntu Come With G++?
The standard installation of Ubuntu does not come with G++ installed by default, however it is very easy to install from the Terminal.
In order to install G++ we simply need to open the Ubuntu terminal and enter the following:
sudo apt install g++
How Do I Compile and Run C++ on Ubuntu?
Now that you have a basic grasp on the minimum requirements we can take a look at building our first program.
We will assume that you have now installed G++ via the Ubuntu terminal as explained in the previous section.
For this first exercise we will compile a ‘hello world’ example using the most basic and fundamental tool, the terminal.
How Do I Compile C++ in Ubuntu Terminal?
In order to compile C++ using the Ubuntu terminal, use the following steps:
- Open the Terminal application from the applications menu, accessible using the icon in the bottom left-hand corner.
- First, check the compiler version.
- Create a new C++ file and write your code.
- Compile your code using G++.
- Execute your program.
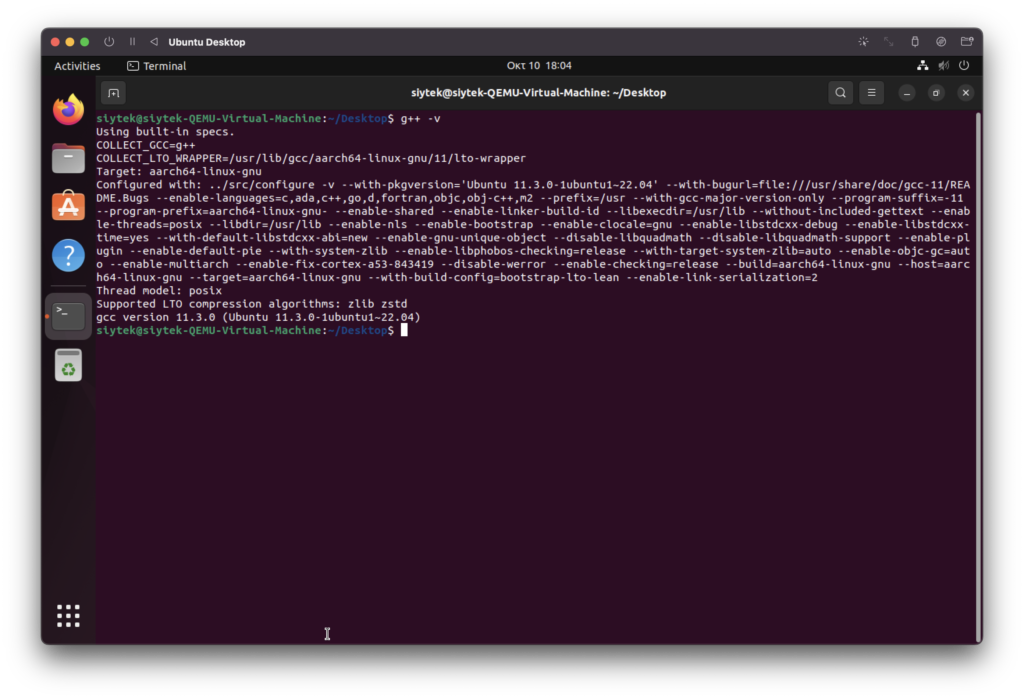
Step 1: Check the compiler version
First we can check the compiler version in order to ensure that it has been installed correctly.
We can do this using the following command.
g++ -v
The terminal should return some jargon, with the GCC version stated at the end. If you see this information then you are good to go!
Step 2: Create a C++ file
Next we need to make a C++ file containing the code we wish to compile. For simplicity we will use the home directory but you can use any location that you prefer.
cd ~
Next we can create a new file and open it in the Nano text editor. This is a text editor that runs right in the terminal!
If you haven’t used text editors in terminal yet you might want to check out this article. Alternatively you can use a GUI text editor if you prefer, such as Atom.
nano hello.cpp
We will use the file extension .cpp to indicate that it is C++ application source code.
When the editor opens, enter the following code. Once you have entered the code, save and close the file.
#include <iostream>

int main () {
        std::cout << "Hello World!\n";

        return 0;
}
Step 3: Compile the code with G++
Now it’s time for the fun part!
First make sure you are still in the directory where you saved your hello.cpp file. Then you can use the g++ command to compile the code into an executable file.
We will first enter the g++ command, followed by the -o flag and then the name that we want to give the executable file, then followed by the name of the source code file we wish to compile, in this case hello.cpp.
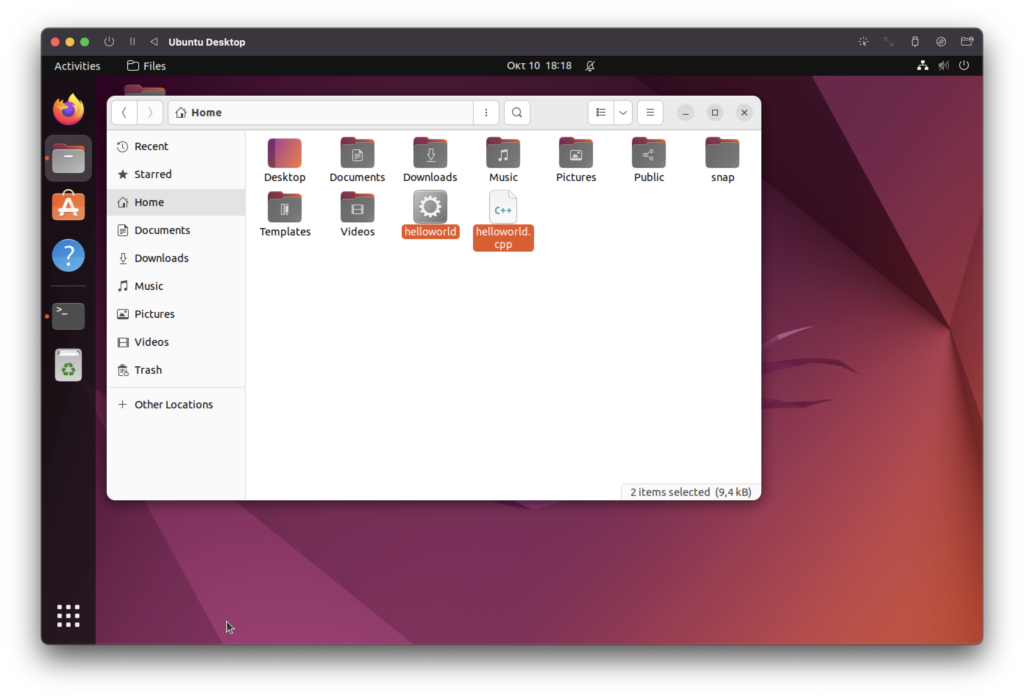
g++ -o ./helloworld ./hello.cpp
This will create the file helloworld in the current directory. If you check in the GUI you should see both files there.
Step 4: Executing the new program
Congratulations! You just officially built your first executable program!
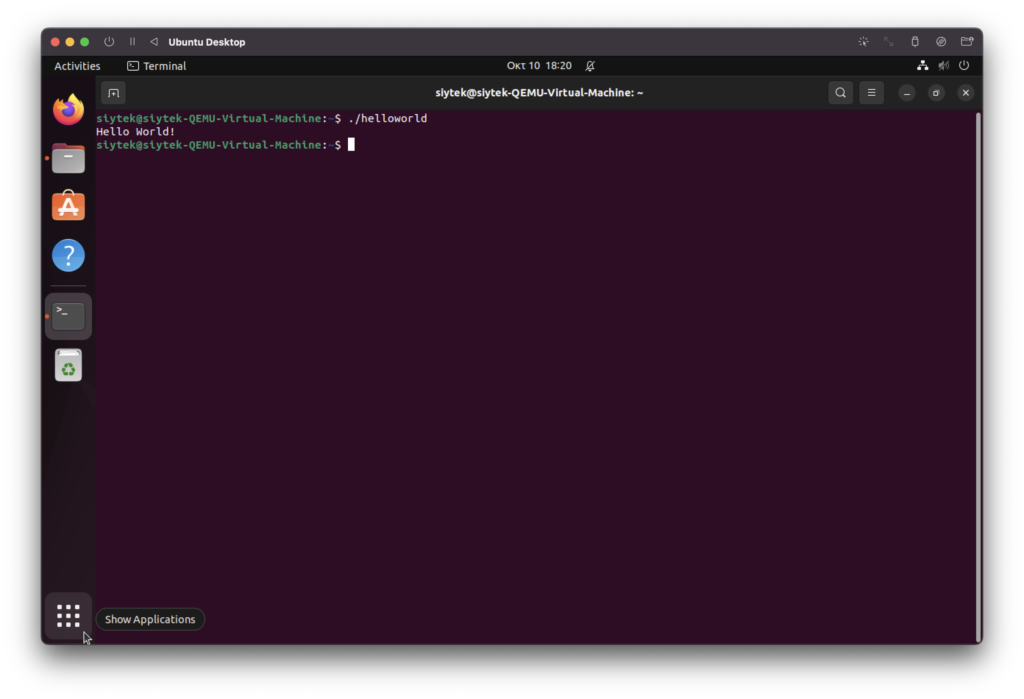
In order to execute your new program, simply type the following command into the terminal.
./helloworld
On execution the program will print the text “hello world!” in the terminal.
How Do I Compile C++ in Ubuntu Using an IDE?
In the previous section we learned how to compile C++ using the Ubuntu terminal and a text editor.
However as your projects progress you will likely want to use a dedicated editor in order to keep your projects well organised.
In order to do this we will use an Integrated Development Environment, or IDE.
The purpose of the IDE is to tie all of the necessary tools together into one software package and provide a means to organise your project.
Codelite is a great IDE to use when starting out with C++ programming in Ubuntu. It is open source and completely free.
How Do I Install Codelite on Ubuntu?
You can install Codelite from the terminal using the following command.
sudo apt install codelite
How to Install Build-Essential?
Before we jump in and start a project in Codelite, we will also need some other essential build tools.
This package includes the complete GCC C compiler and also make, which we will need when moving over to the IDE.
These can be installed with the following terminal command.
sudo apt-get install build-essential
Once you have installed Codelite and build-essential, you can go ahead and open Codelite.
How Do I Run Codelite on Ubuntu?
In order to run Codelite on Ubuntu, simply open the terminal and enter the following command.
codelite
You can also access Codelight from the menu bar by clicking on its icon.

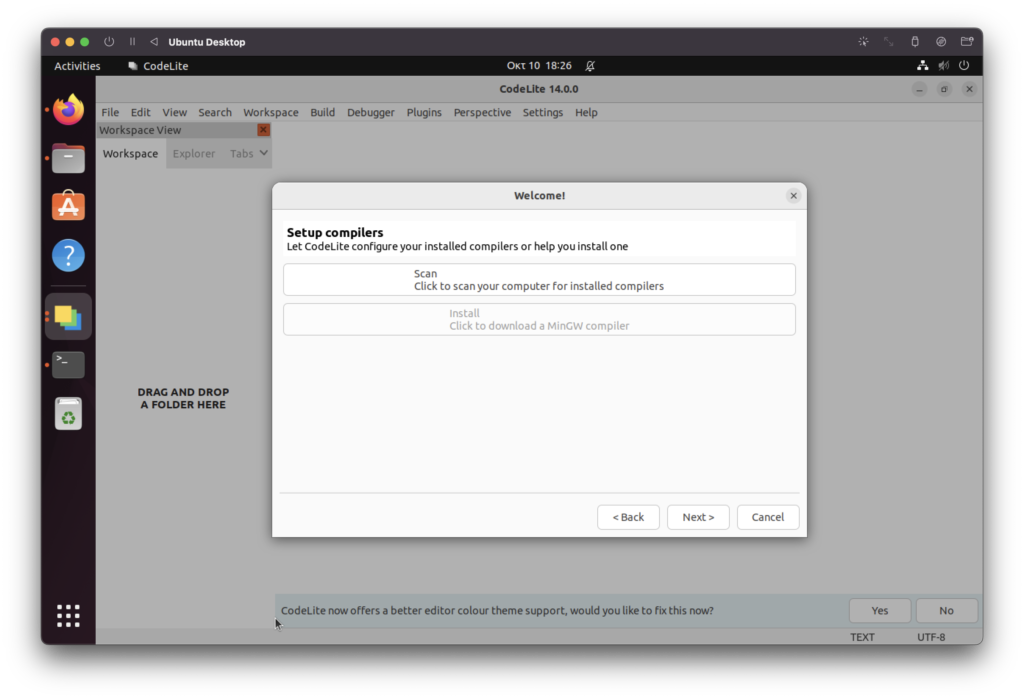
When Codelite first opens it will offer to run a Wizard to help with setup. You can go ahead and use it to scan for GCC, which you already have installed.
First you can choose the type of development that you wish to do. You can go ahead and choose C++ here.

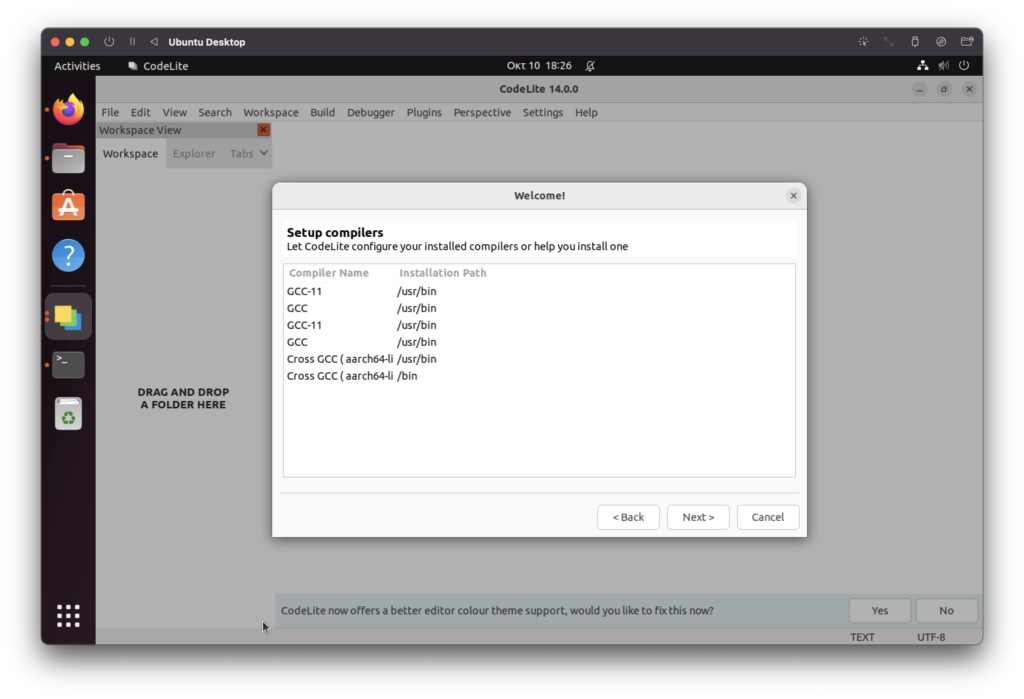
Next you will be given the option to scan for existing compilers. Go ahead click Scan.
Codelite should detect and configure your existing installation of GCC, which we installed earlier.
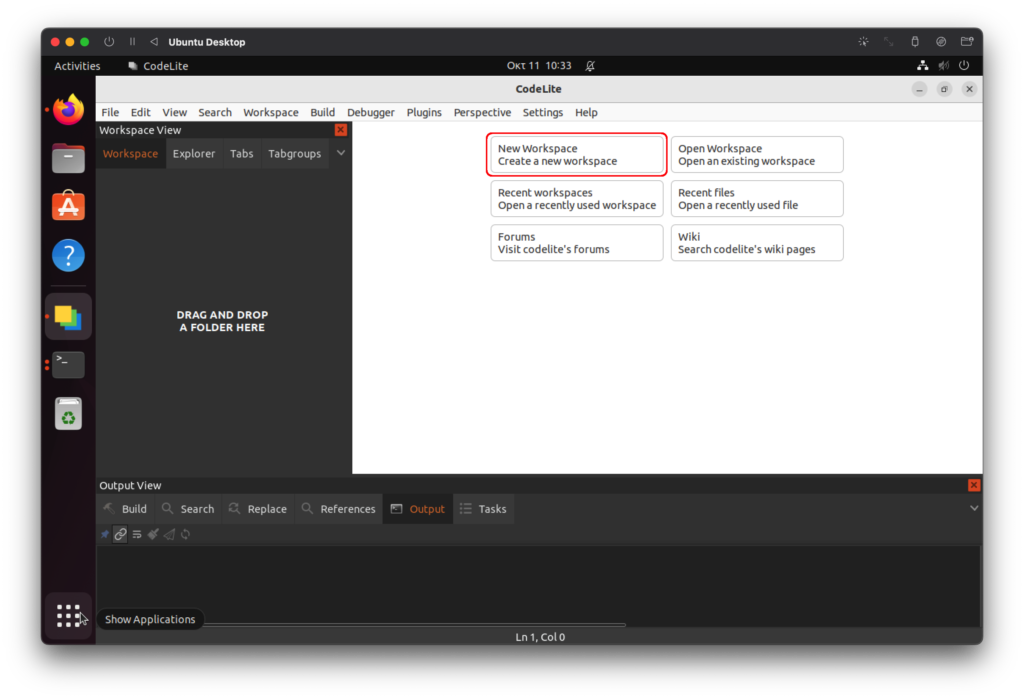
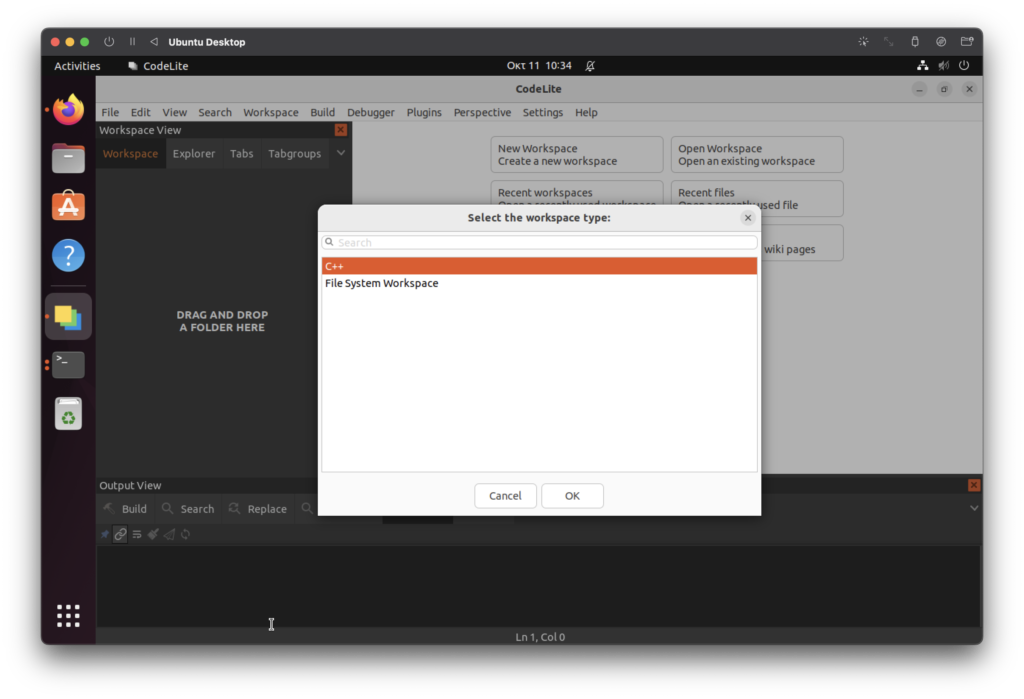
Once the Wizard is complete you will be taken to the main screen where you can begin a new workspace. Go ahead and click New Workspace.
Choose C++ as the workspace type.
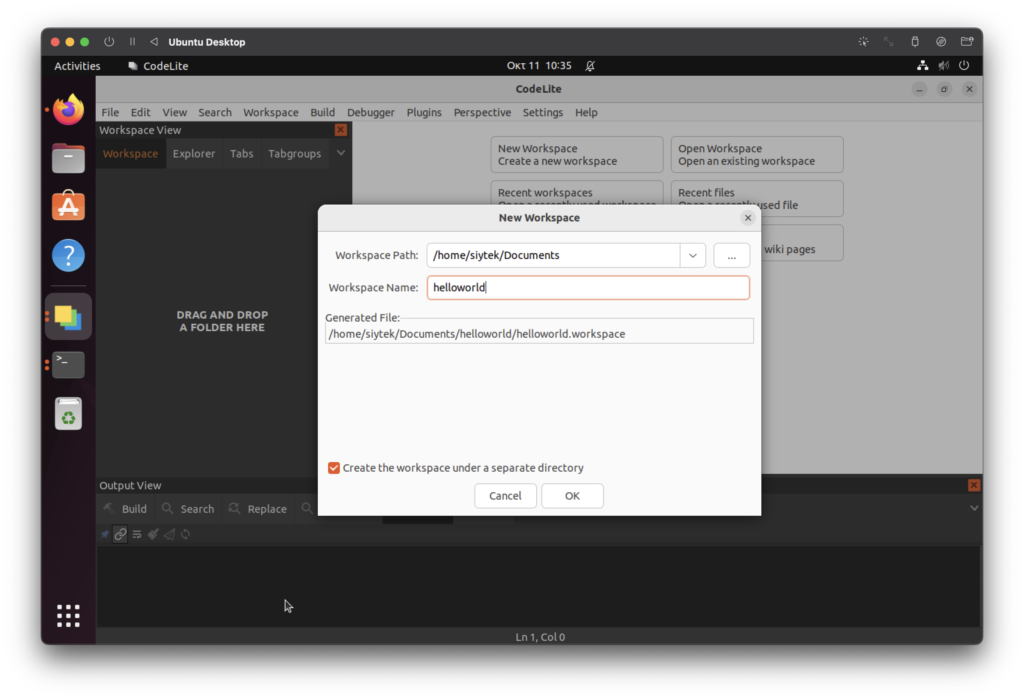
Choose a desired location to locate the workspace and then give the workspace a name. In this case we will call the workspace helloworld.
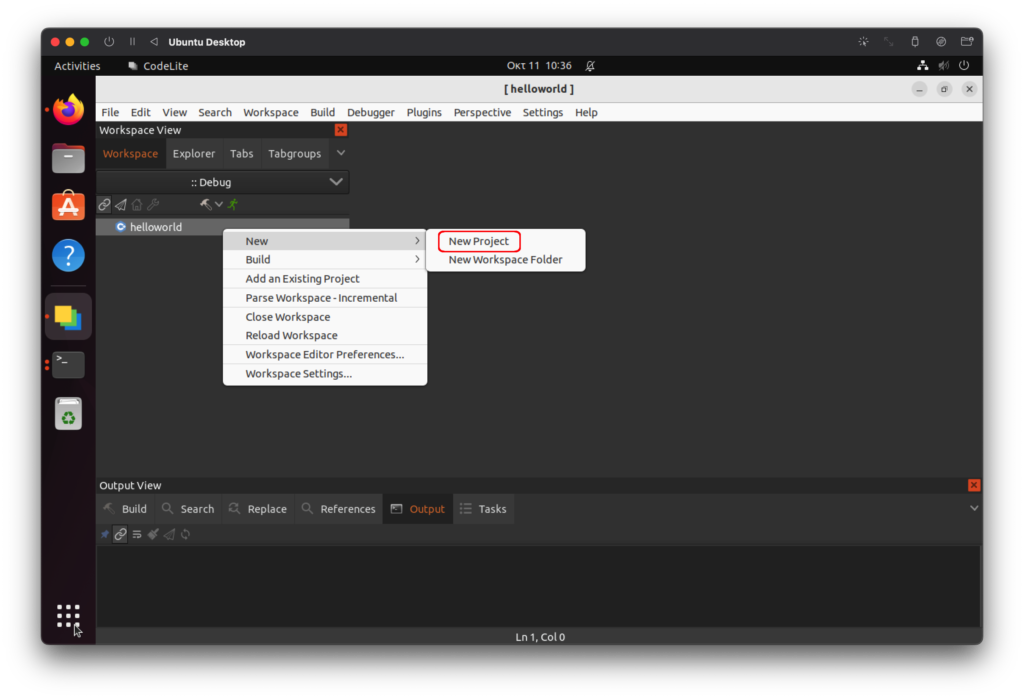
Once the workspace has been created, right-click it in the sidebar and choose New > New Project.
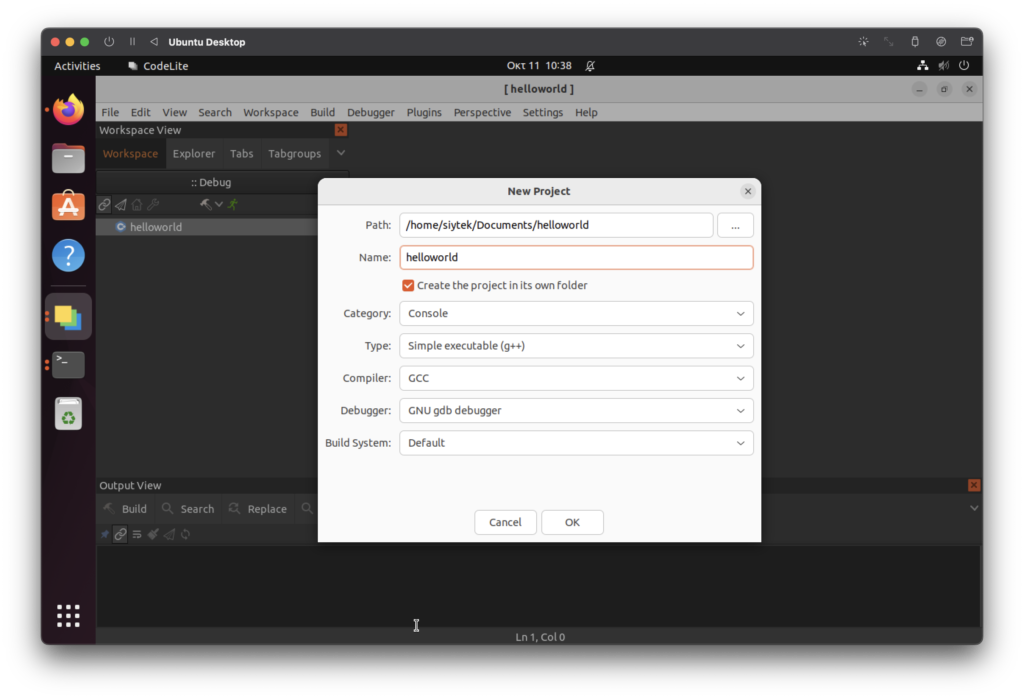
Next we need to configure the project with the following settings:
- Name – enter a name of your choice, for this example we will use helloworld.
- Category – Console.
- Type – Simple executable (g++)
- Compiler – GCC
- Debugger – GNU gdb debugger
- Build System – Default
Once you have created the project, go ahead and open main.cpp from the directory tree in the left-hand sidebar menu by double clicking it.
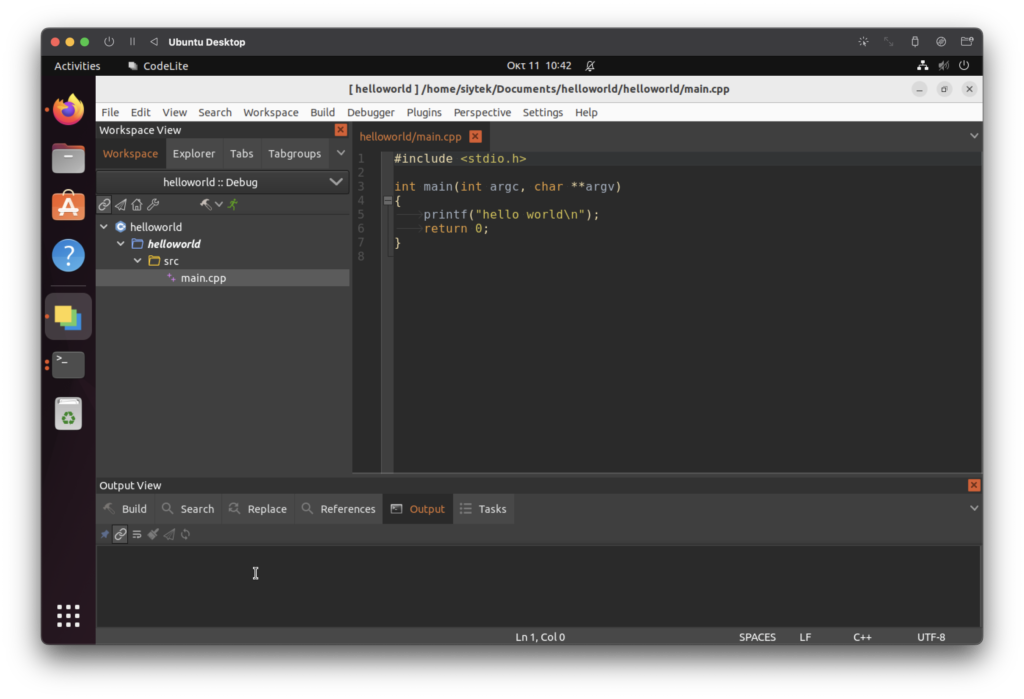
The helloworld example should already be entered into the main.cpp file.
#include <stdio.h>

int main(int argc, char **argv)
{
	printf("hello world\n");
	return 0;
}
Now that we have finished installing Codelite and configuring our first example project, we are ready to build!
How Do I Run a Program in Codelite?
In order to run our program we need to build our Codelite workspace.
First we need to ensure that the necessary tools are installed using the build-essential installer as explained in the previous part of this tutorial.
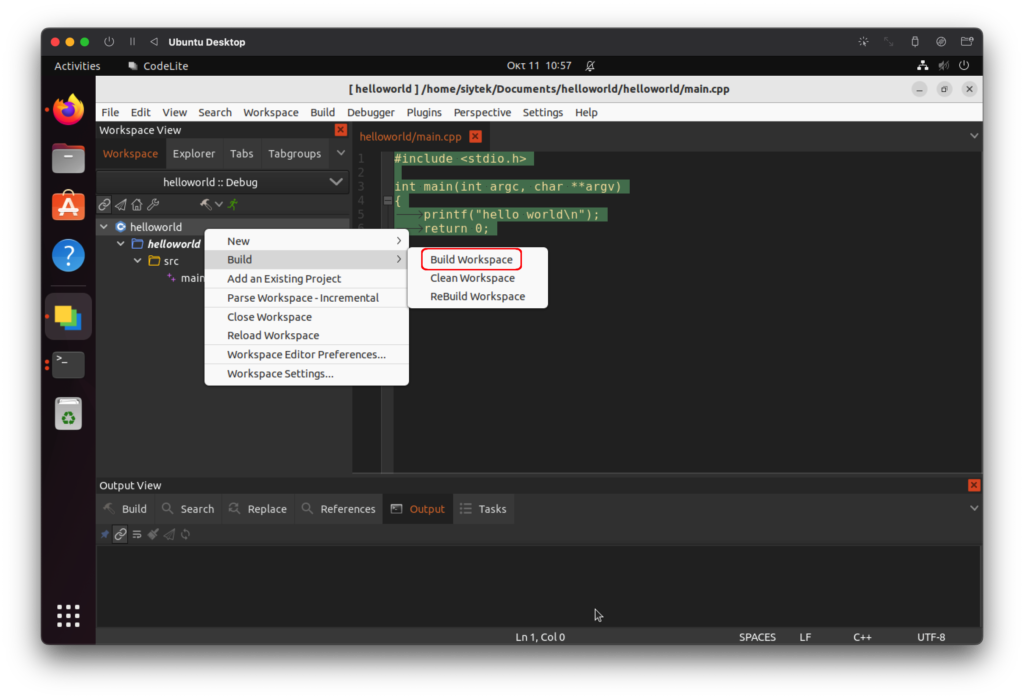
Next go ahead and right click the helloworld workspace and choose Build > Build Workspace.
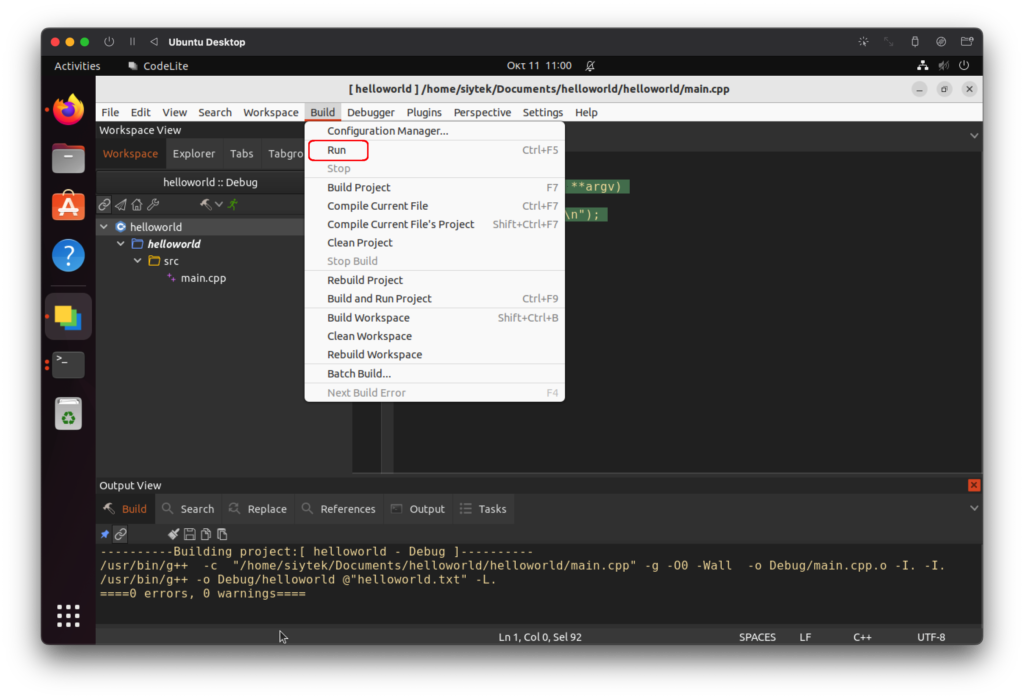
You should see the following output in the build output console, with 0 errors and 0 warnings.

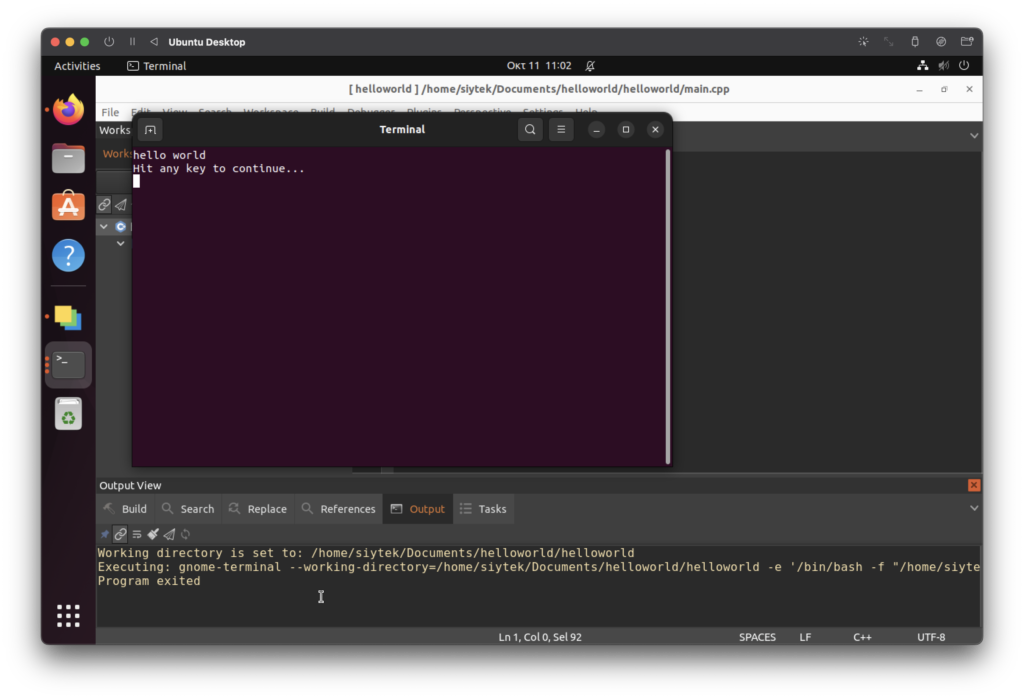
Lastly we can choose Build > Run in order to run our project.
You may be prompted as to whether you wish to build the project, here you can just choose execute as we have already built the project.
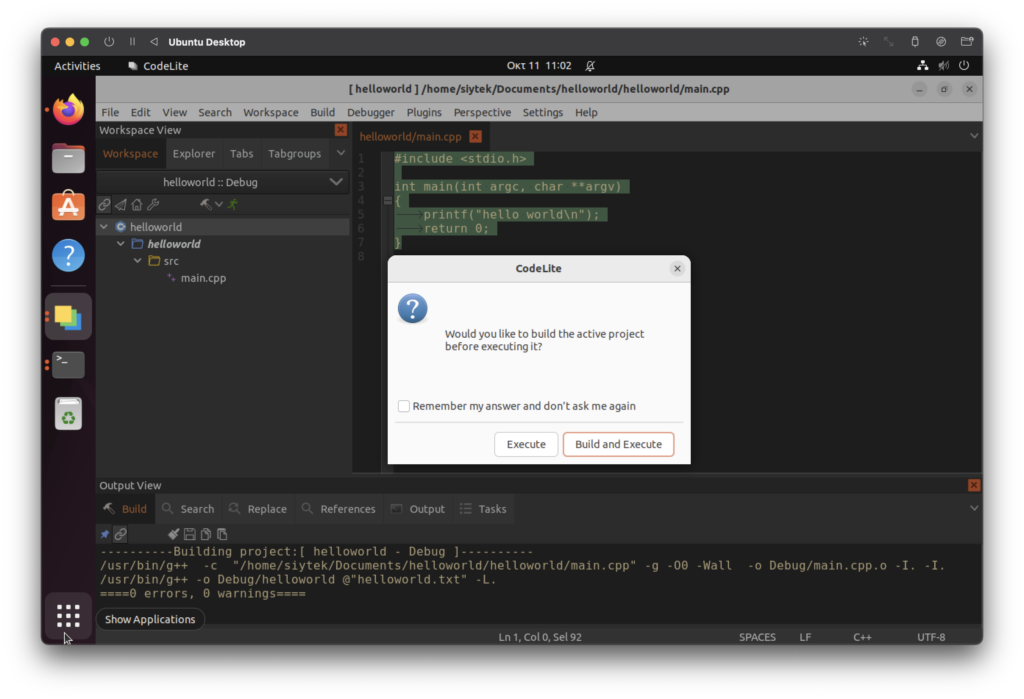
If everything was configured correctly a terminal window will open and the code will execute. Awesome!
What’s Next?
In this tutorial we have discovered how to quickly and easily compile and run a C++ program in Ubuntu.
The terminal is very quick and convenient and great for beginners, but using an IDE such as Codelite will ultimately be a better option as projects become more complex.
Thanks for visiting and be sure to check out some of my other Linux tutorials!
Thanks so much for visiting my site! If this article helped you achieve your goal and you want to say thanks, you can now support my work by buying me a coffee. I promise I won't spend it on beer instead... 😏