
If you are looking to build your own web server for the purpose of running WordPress, Debian Linux is an excellent choice due to its stability, security, and extensive package management system.
As a renowned open-source operating system, Debian provides a solid foundation for hosting web applications like WordPress.
In this comprehensive guide, we will walk you through the step-by-step process of setting up WordPress on the Debian 12 operating system.
By the end of this guide, you’ll be equipped with the knowledge required to create your own self-hosted, dynamic and feature-rich website using WordPress on Debian 12!
- Why Debian is a Good Choice for Running WordPress
- Prerequisites
- Setting Up a LEMP Stack (NGINX, MariaDB, PHP)
- Configuring MariaDB for WordPress
- Installing WordPress
- Configuring NGINX for WordPress
- Setting up Your Domain Name
- Troubleshooting
- Check Nginx Configuration
- Verify PHP-FPM Configuration
- Check PHP Version and Extensions
- Review WordPress Configuration
- Verify Database Connectivity
- Check File Permissions
- Investigate Error Logs
- Disable Plugins and Themes
- Clear Caches
- Test on Different Browsers and Devices
- Update Software
- Consult WordPress Community and Documentation
- Conclusion
Why Debian is a Good Choice for Running WordPress
Debian is a great choice of Linux distribution for running WordPress due to several reasons:
- Stability: Debian is known for its exceptional stability. It undergoes rigorous testing and has a release cycle that focuses on providing a reliable and secure operating system. This stability ensures that your WordPress website can run smoothly without unexpected crashes or system failures.
- Security: Security is a critical aspect of running any website, and Debian excels in this area. It has a dedicated security team that actively maintains and updates the operating system with security patches and fixes. Additionally, Debian’s emphasis on open-source software helps in identifying and addressing vulnerabilities promptly.
- Package Management: Debian offers a robust package management system that simplifies the installation and management of software packages, including WordPress and its dependencies. The extensive Debian package repository provides access to a wide range of software, ensuring easy installation and updates for WordPress and related components.
- Community and Support: Debian has a vibrant and supportive community of users and developers. The community provides extensive documentation, forums, mailing lists, and other resources to assist users in troubleshooting issues and finding solutions. The availability of reliable support helps ensure a smooth WordPress experience on Debian.
- Flexibility and Customizability: Debian offers flexibility in terms of software choices and configurations. You have the freedom to select different web servers (such as Apache or NGINX), databases (such as MySQL or MariaDB), and PHP versions according to your specific needs and preferences. This flexibility allows you to optimize your WordPress setup for performance and compatibility.
Debian’s stability, security focus, robust package management, supportive community, and flexibility make it an excellent choice for running WordPress.
It provides a reliable and secure foundation for hosting your website, allowing you to focus on creating and managing your WordPress-powered content without worrying about the underlying operating system.
Prerequisites
This tutorial assumes that you have already installed Debian on your chosen system. You can download Debian for free from the official website. Click here to download the Debian installation image.
You can also run Debian in a virtual machine on other host operating systems such as macOS or Windows.
Using a virtual machine to run Debian in order to run WordPress is an excellent way to run WordPress locally as it all of the dependencies of the system are contained and managed within a separate containerized solution.
If you would like to run WordPress locally on macOS, click here to learn how to install Debian on Mac and then continue following this tutorial.
All of the additional dependencies that are required to run WordPress on Debian will be covered in this guide.
Setting Up a LEMP Stack (NGINX, MariaDB, PHP)
A LEMP stack is a combination of software that forms the foundation for running websites and web applications. LEMP stands for Linux (the operating system), NGINX (the web server), MariaDB (the database server), and PHP (the scripting language).
Note that the LEMP stack can also be referred to as the arguably more correct ‘LNMP’ stack.
However the weird world of information technology enthusiasts has adopted LEMP as an alternative to LAMP, which is the same stack only using Apache web server rather than NGINX.
In the context of running WordPress, a LEMP stack provides the necessary components for hosting and running a WordPress website.
Linux serves as the stable operating system, NGINX handles the web server functions, MariaDB manages the database where WordPress stores its data, and PHP executes the dynamic code that powers WordPress.
NGINX acts as the mediator between the user’s browser and the WordPress application, handling incoming requests and serving the WordPress-generated content back to the user.
As we already have Debian Linux installed, the ‘L’ portion of our LEMP stack is already implement. We will therefore now focus on installing the ‘EMP’ part of the stack.
Logging In As The Super User
As mostly all operations in this tutorial require superuser privileges, we will complete all steps as the superuser. The first thing we need to do is login as the superuser.
su -
We should also make sure that our Debian system is up to date before we begin:
apt update && apt upgrade -y
Installing NGINX
NGINX is very easy to install from the Debian command line, simply enter the following command:
apt install nginx -y
Once the files have copied, we need to start the NGINX system service:
systemctl start nginx
systemctl enable nginx
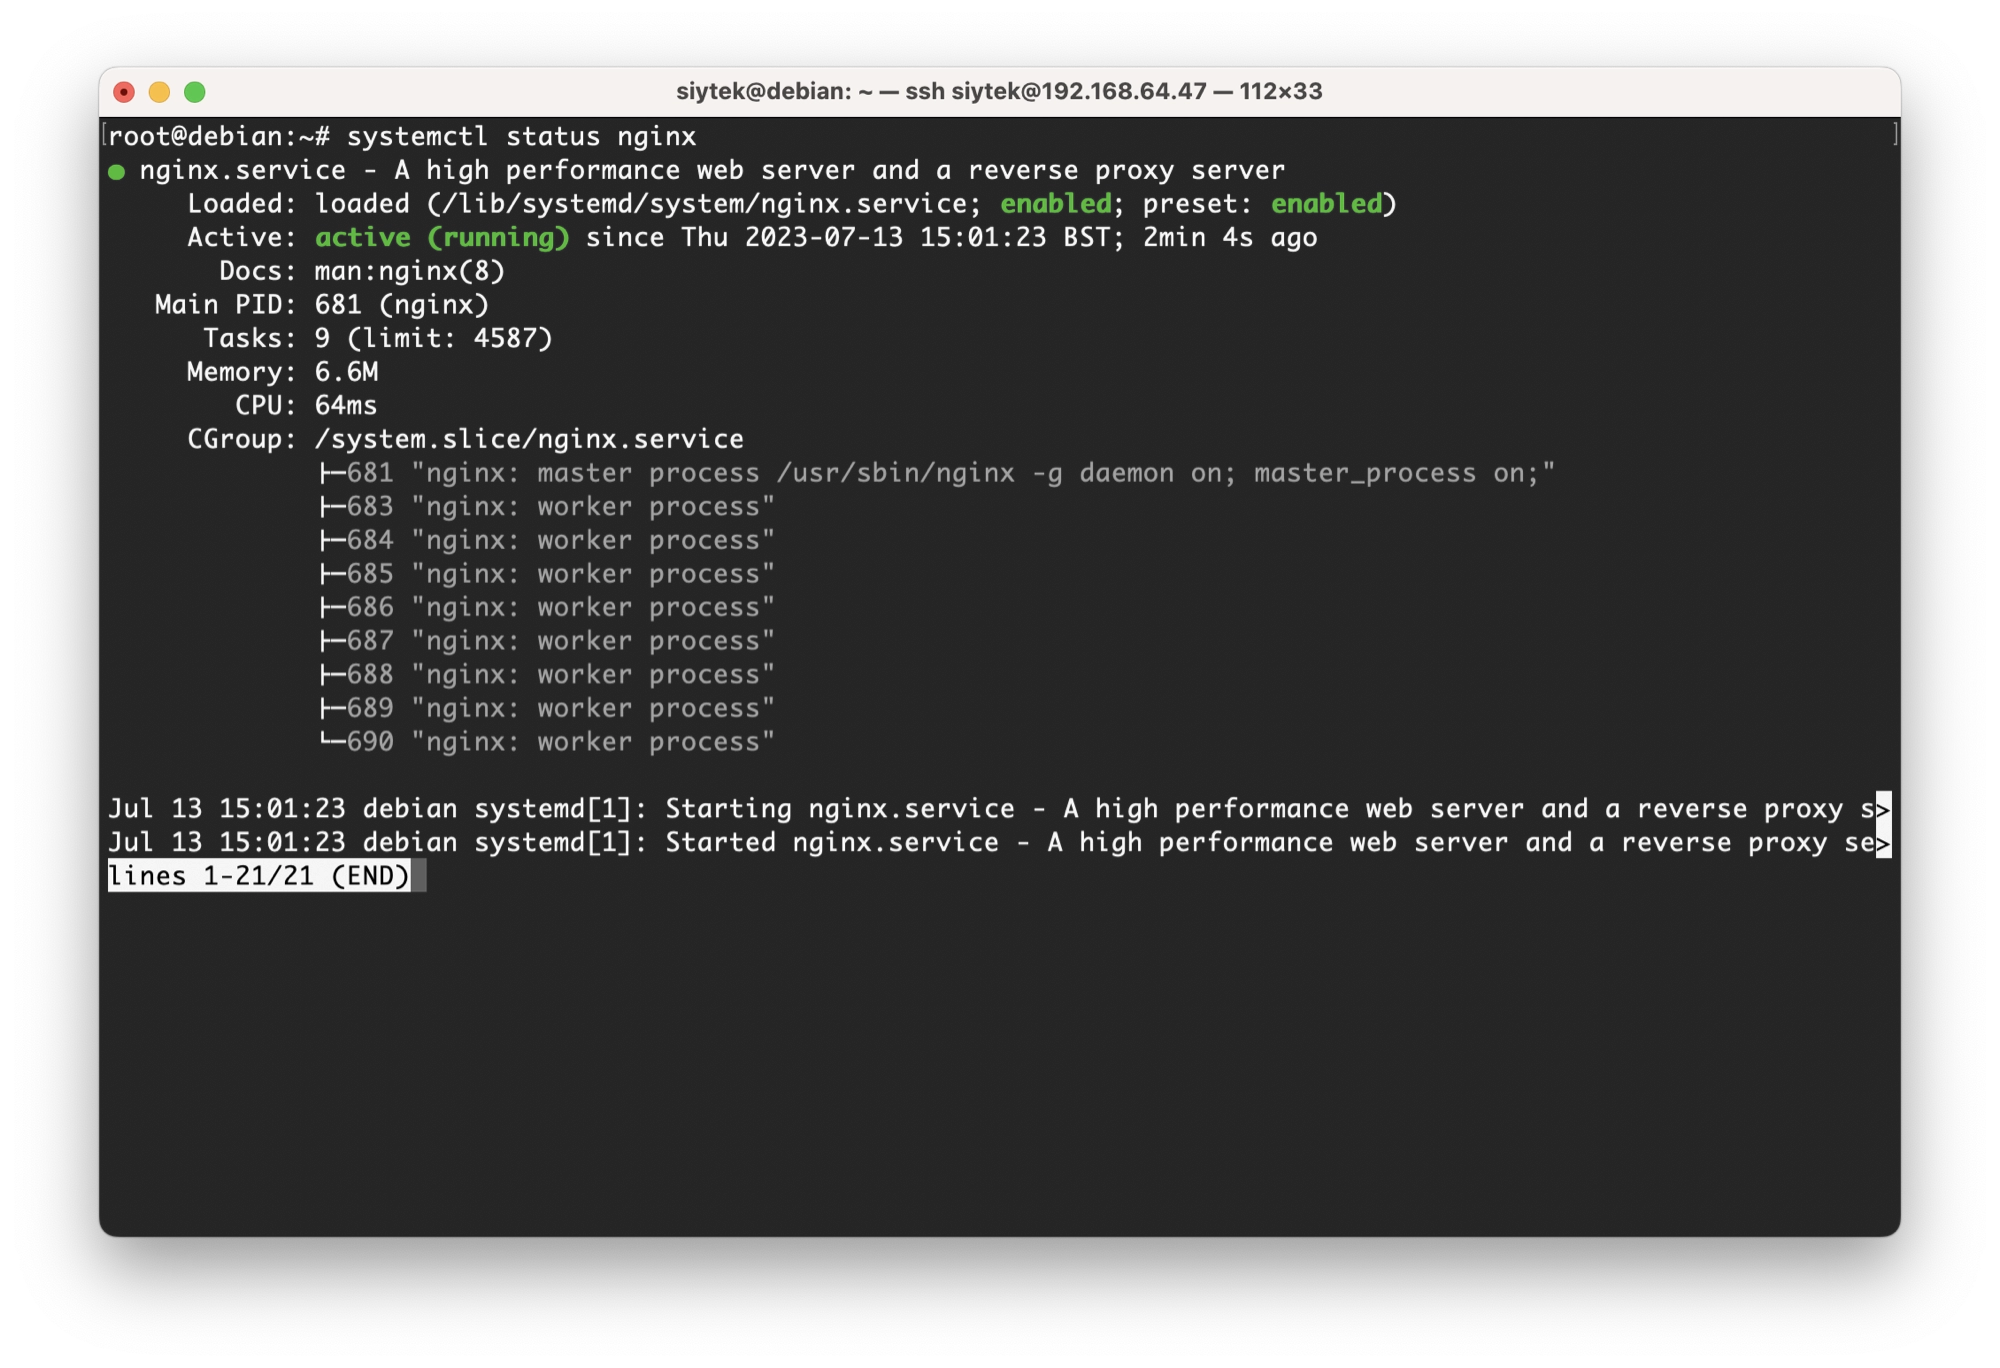
Next, we can verify that NGINX has started successfully with the following command:
systemctl status nginx
The output of the command should look as follows:
Installing MariaDB
In this section we will install and configure the database, MariaDB. First, let’s install MariaDB:
apt install mariadb-server mariadb-client -y
Once the files have copied, we need to start the MariaDB system service:
systemctl start mariadb
systemctl enable mariadb
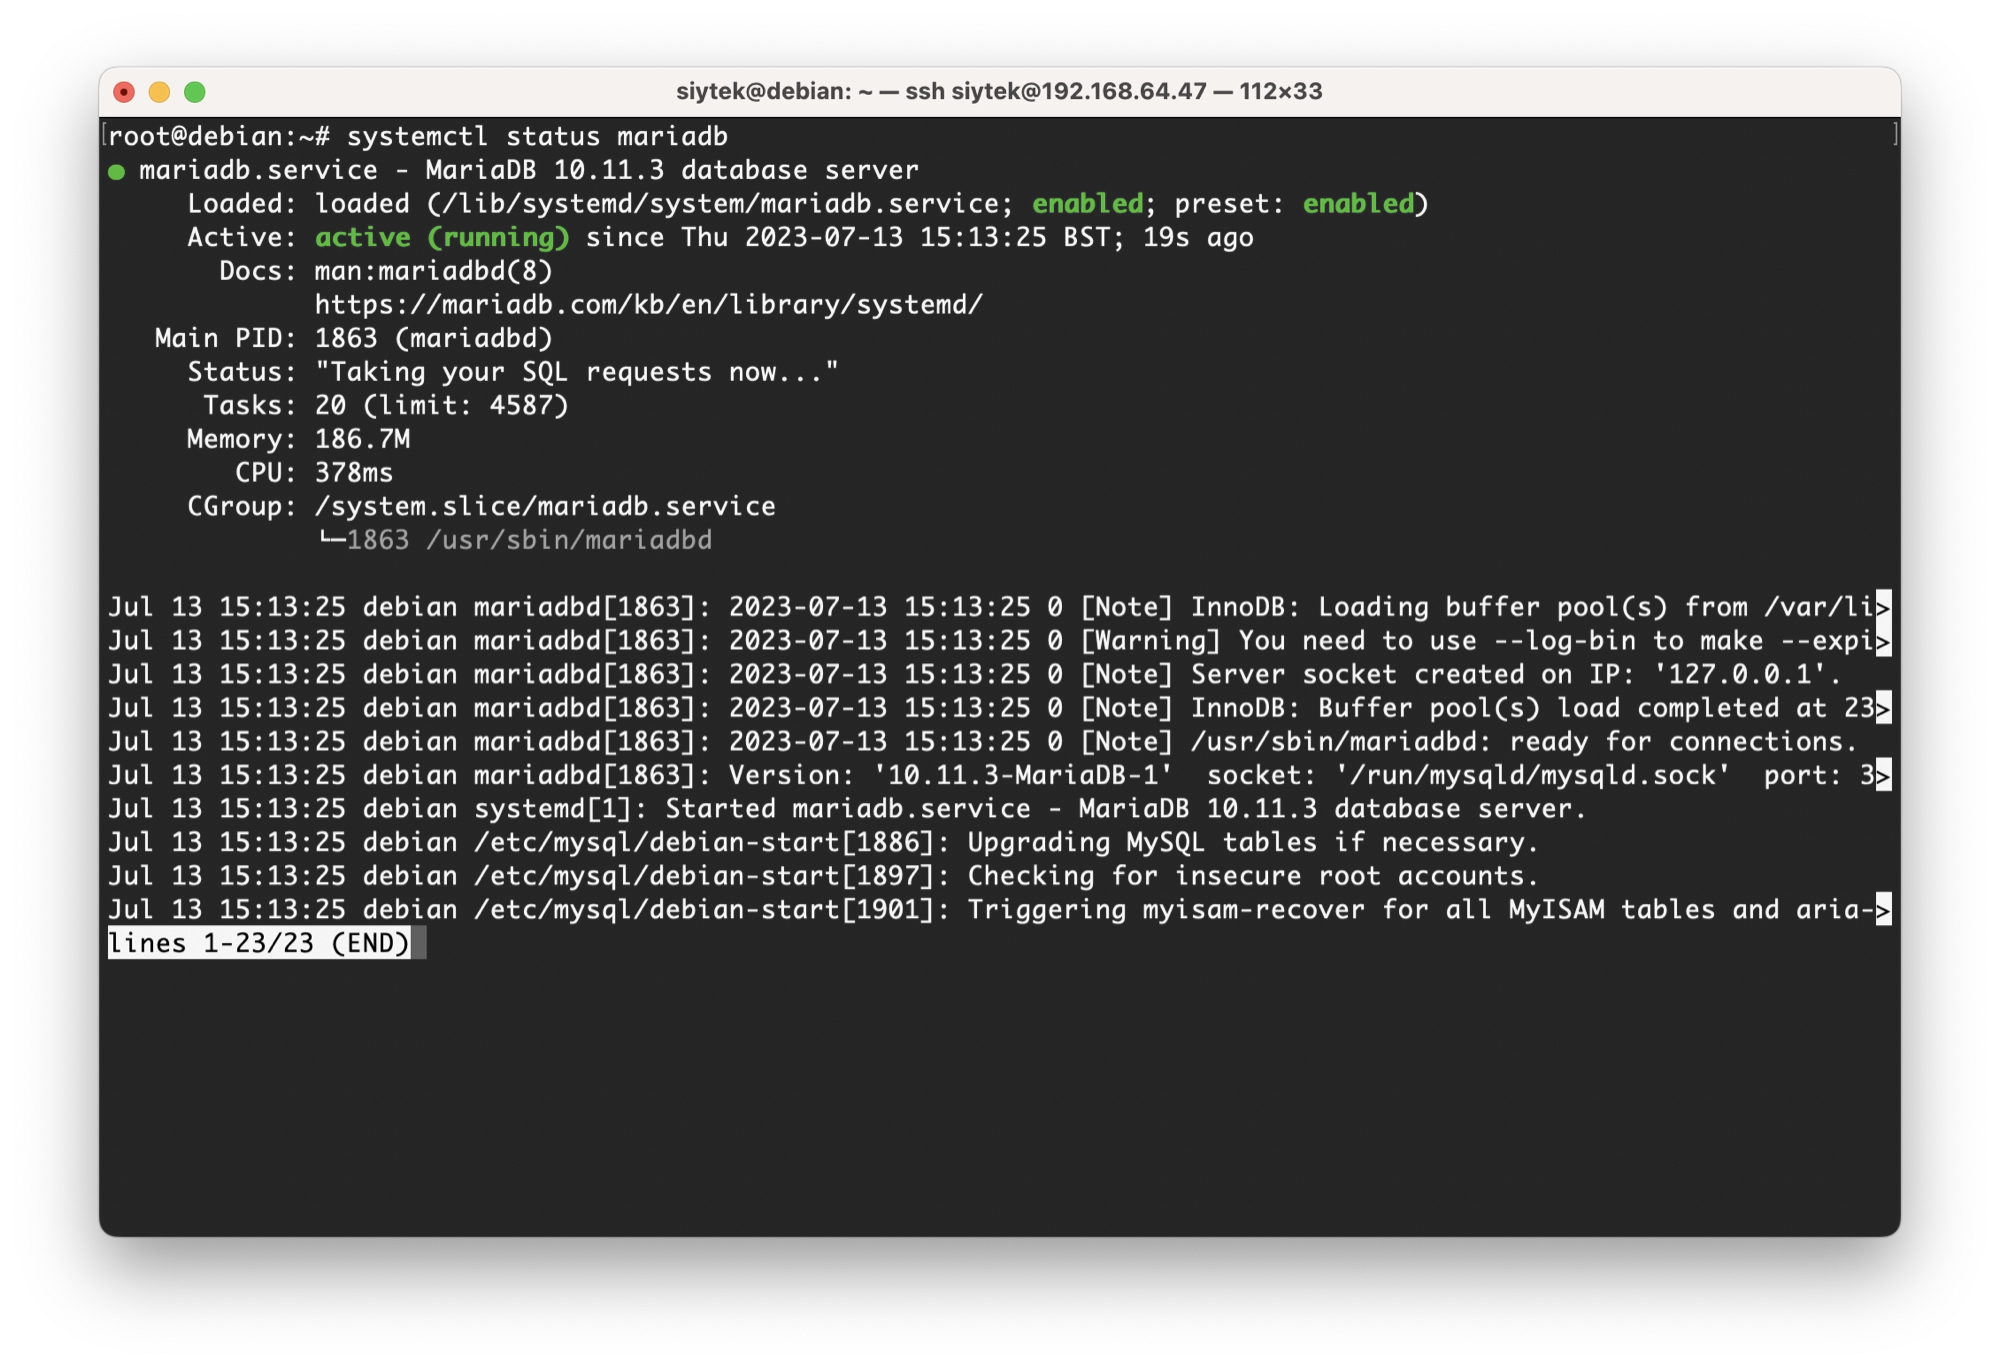
Next, we can verify that MariaDB database has started successfully with the following command:
systemctl status mariadb
The output of the command should look as follows:
Securing MariaDB
MariaDB is now installed and running, however the out-of-the-box settings are not very secure. We can secure MariaDB by using the mysql_secure_installation script.
In order to execute the script, first run the following command:
mysql_secure_installation
Upon execution of the script, you will be required to complete a series of steps. Use the following to get the most secure configuration:
- Enter current password for root (enter for none):
enter your root password - Switch to unix_socket authentication?
Y - Change the root password?
Y, and enter a new password - Remove anonymous users?
Y - Disallow root login remotely?
Y - Remove test database and access to it?
Y - Reload privilege tables now?
Y
Once the script has finished, restart the database to apply the changes:
systemctl restart mariadb
Installing PHP
The last component that we need to install in our LEMP stack is PHP.
There are many dependencies required for PHP but thankfully we can install everything with a single command:
apt install \
	php \
    php-curl \
    php-fpm \
    php-bcmath \
    php-gd \
    php-soap \
    php-zip  \
    php-mbstring \
    php-mysqlnd \
    php-gd \
    php-xml \
    php-intl \
    php-zip \
    -y
Once PHP and the dependencies have finished installing, you can verify that the installation was completed correctly using the following command:
php -v
The output should confirm the version of PHP that has been installed:

Configuring MariaDB for WordPress
Now that MariaDB is installed and configured, we can create a new database for our WordPress installation.
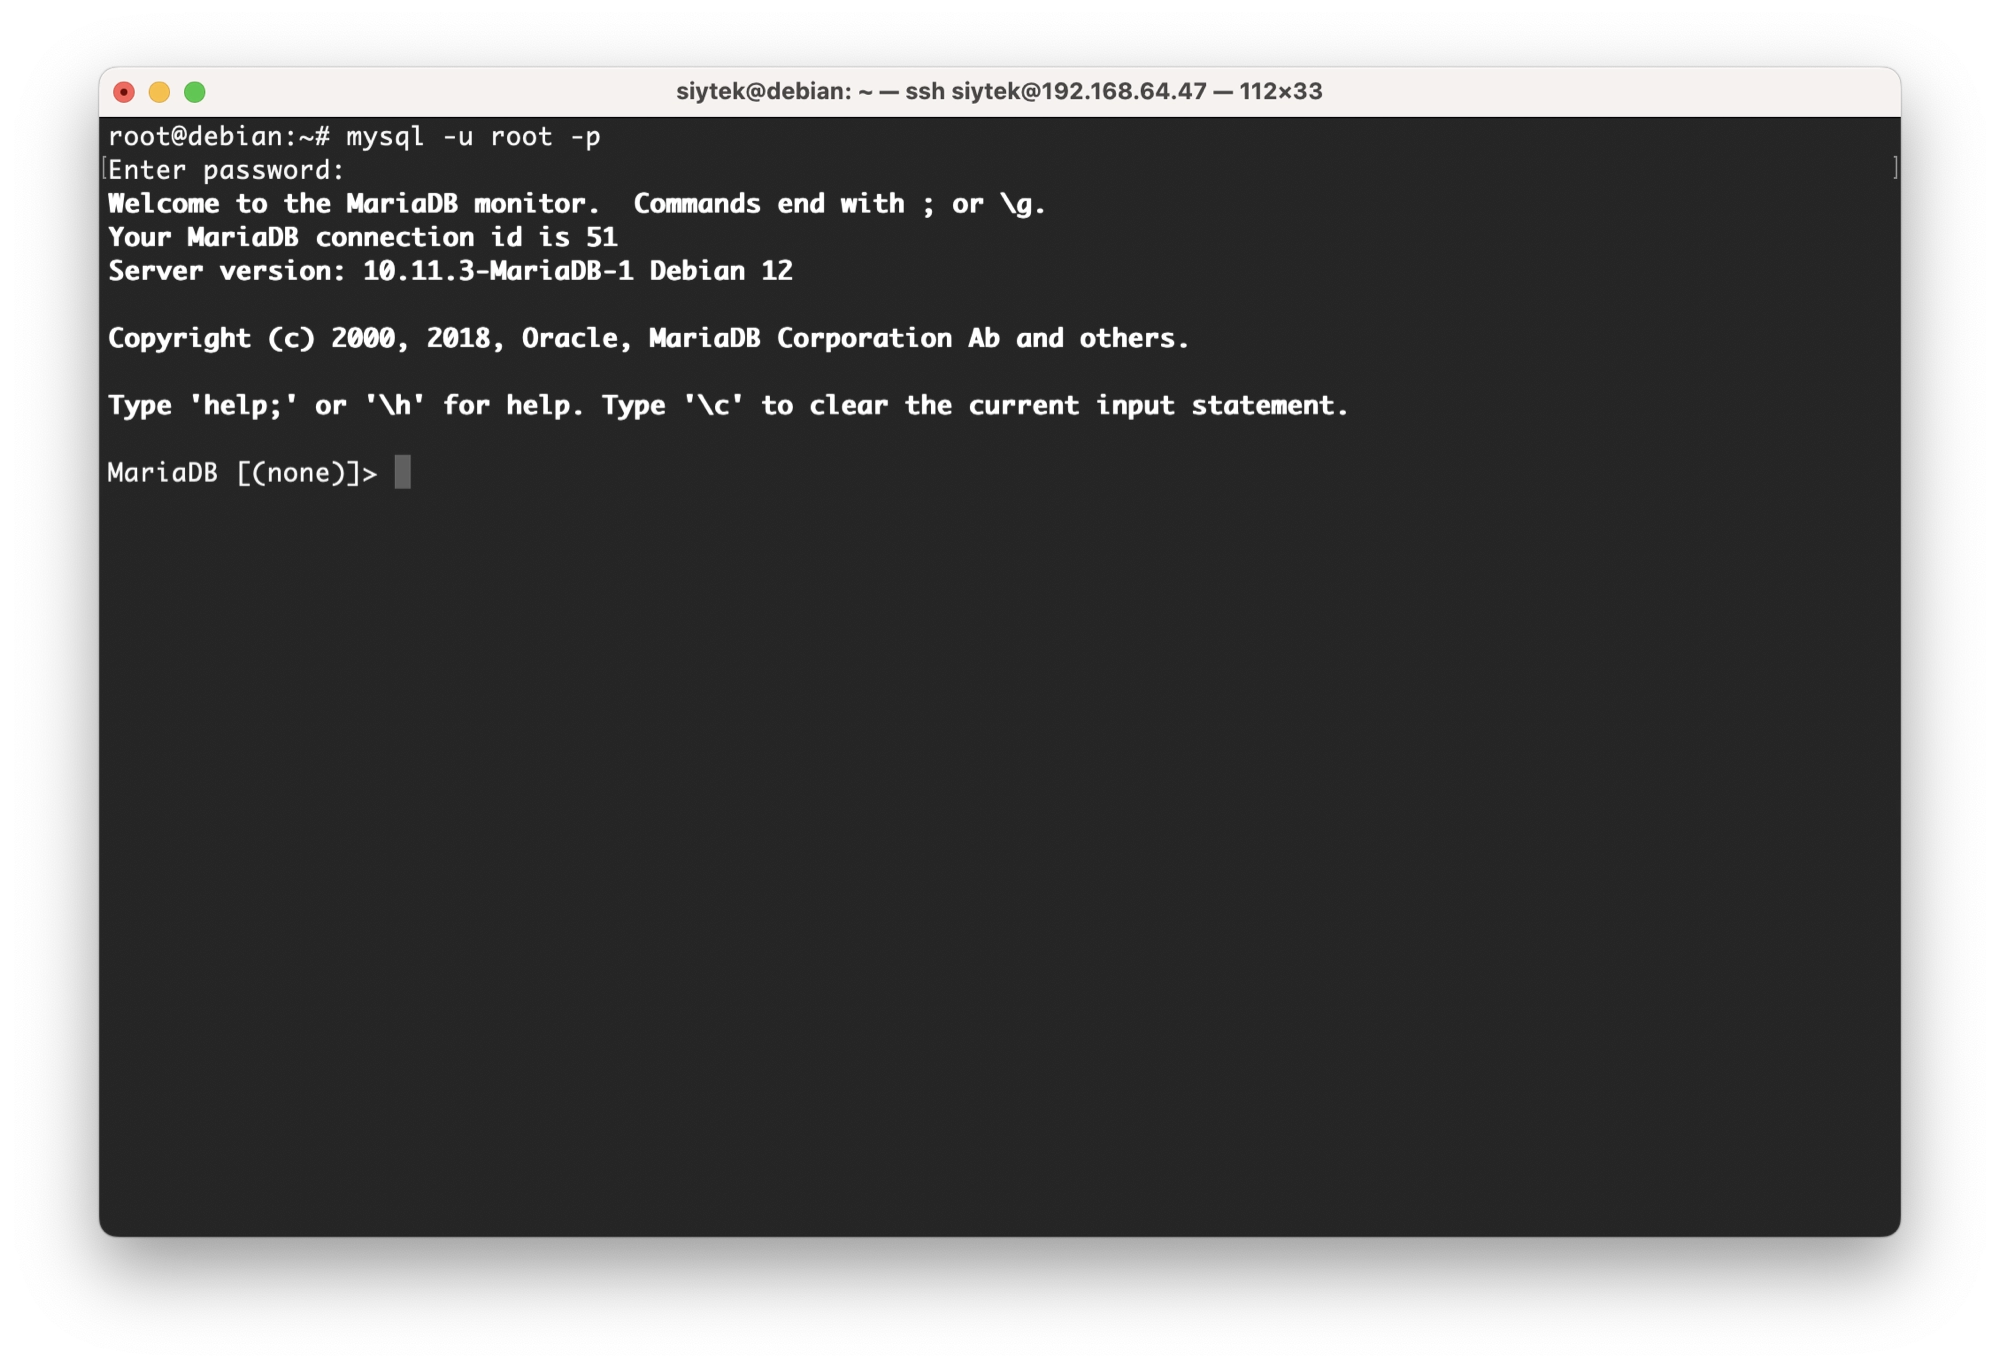
In order to do this, we first need to login to MariaDB as root, using the password created during the execution of the mysql_secure_installation script:
mysql -u root -p
Once logged in, you will be taken to the MariaDB prompt: MariaDB [(none)]>
From the MariaDB prompt, first lets create a new database called wp_database:
CREATE DATABASE wp_database;
Next we need to grant privileges to the user wp_user for the wp_database database. Be sure to change the value for password in order to keep your system secure.
GRANT ALL PRIVILEGES ON wp_database.* TO 'wp_user'@'localhost' IDENTIFIED BY 'password';
Lastly we can apply the changes and exit MariaDB:
FLUSH PRIVILEGES;
EXIT
Installing WordPress
Now that we have sucesfully installed our LEMP stack, the next step is to install WordPress.
Downloading WordPress
WordPress is supplied in a .zip file so the first thing we need to do is ensure that the unzipping utility is installed:
apt install unzip -y
Next, enter the following command to download and unzip the latest version of WordPress:
wget https://wordpress.org/latest.zip && unzip latest.zip -d /var/www/html/
Setup the WordPress Configuration File
Now that we have installed the WordPress files, we need to edit the WordPress configuration file in order to give WordPress access to the database that we created earlier.
WordPress looks for a file called wp-config.php in order to load the configuration, but by default this file does not exist.
We need to create the wp-config.php manually by copying the supplied wp-config-sample.php, file:
cp /var/www/html/wordpress/wp-config-sample.php /var/www/html/wordpress/wp-config.php
We will leave the wp-config-sample.php unchanged in order to serve as a backup of the default configuration settings. Now we can edit the configuration file that we just created:
nano /var/www/html/wordpress/wp-config.php
Towards the beginning of the wp-config.php file, locate the following code:
// ** Database settings - You can get this info from your web host ** //
/** The name of the database for WordPress */
define( 'DB_NAME', 'database_name_here' );

/** Database username */
define( 'DB_USER', 'username_here' );

/** Database password */
define( 'DB_PASSWORD', 'password_here' );
We need to amend the values to match the credentials we chose when configuring MariaDB. Amend the code to the following, ensuring that you replace password with the password that you chose yourself:
// ** Database settings - You can get this info from your web host ** //
/** The name of the database for WordPress */
define( 'DB_NAME', 'wp_database' );

/** Database username */
define( 'DB_USER', 'wp_user' );

/** Database password */
define( 'DB_PASSWORD', 'password' );
Once done, press ctrl + X to exit the editor and press ‘Y’ to save the file.
The last thing we need to do is change the ownership of the of the WordPress directory to a user and group that is used by NGINX:
chown -R www-data:www-data /var/www/html/wordpress/
Configuring NGINX for WordPress
Now that WordPress is installed and configured, we can configure NGINX. This will allow us to actually access WordPress using a browser.
In order to access our WordPress installation from within our local area network, without needing to set up a domain name, we are going to need to know our local area network IP address.
You can find this easily by entering the following command. Make a note of your IPv4 address (for example, 192.168.64.47):
hostname -I
Next, we will create a new configuration file for NGINX. Enter the following command to open the file editor, noting that the file should be empty:
nano /etc/nginx/conf.d/wordpress.conf
Next, copy and paste the following configuration and replace <your-ip-address> with the local network IP address of your system:
server {
    listen 80;
    server_name <your-ip-address>;
    root /var/www/html/wordpress;
    index index.php;

    location / {
        try_files $uri $uri/ /index.php?$args;
    }

    location ~ \.php$ {
        include snippets/fastcgi-php.conf;
        fastcgi_pass unix:/var/run/php/php8.2-fpm.sock;
        include fastcgi_params;
        fastcgi_intercept_errors on;
    }
}
Once done, press ctrl + X to exit the editor and press ‘Y’ to save the file.
Once the configuration file has been created, we will need to restart NGINX:
systemctl restart nginx
That’s it! You should now be able to enter the IP address for your local machine into your browser address bar and access the WordPress onboarding process.

Setting up Your Domain Name
Now that you have WordPress working locally, you may want to opt to assign a domain name to your server.
The process can differ depending on many factors, such as who your domain is registered with and how your network is configured. However here is a general overview of the steps that you need to take:
Domain Registration and DNS Configuration
- Register your domain name with a domain registrar of your choice.
- Access the domain registrar or DNS provider’s control panel.
- Create an A record (Address record) that associates your domain name with your server’s external IP address. Set the A record’s value to the external IP address of your server. This allows DNS servers to route requests for your domain to that IP address.
Port Forwarding
- Access your router’s configuration settings.
- Set up port forwarding rules to forward incoming traffic on port 80 (HTTP) and/or port 443 (HTTPS) to the local IP address of your server.
- This ensures that external requests on these ports reach your server.
Firewall Configuration
- Adjust the firewall rules on your server (e.g., iptables) to allow incoming connections on port 80 and/or 443, depending on your web server configuration.
- This allows the web server to receive and respond to incoming HTTP and/or HTTPS requests.
Nginx Configuration
- Create a new configuration file specific to your domain. You can use the following command to create and open the file in a text editor:
- Replace
your-domainwith your actual domain name, without the “www” prefix.
nano /etc/nginx/conf.d/your-domain.conf
- In the new configuration file, paste the following Nginx configuration:
- Replace
your-domain.comandwww.your-domain.comwith your actual domain name.
  server {
      listen 80;
      server_name your-domain.com www.your-domain.com;
      root /var/www/html/wordpress;
      index index.php;

      location / {
          try_files $uri $uri/ /index.php?$args;
      }

      location ~ \.php$ {
          include snippets/fastcgi-php.conf;
          fastcgi_pass unix:/var/run/php/php8.2-fpm.sock;
          include fastcgi_params;
          fastcgi_intercept_errors on;
      }
}- Save the file and exit the text editor.
- Restart Nginx to apply the changes:
sudo systemctl restart nginx
DNS configuration ensures that your domain name points to your server’s IP address, port forwarding enables external traffic to reach your server, firewall configuration allows incoming connections, and the Nginx configuration sets up the virtual host for your domain, enabling the server to handle requests for that domain.
Note: Ensure that your server’s DNS resolution is correctly configured so that it can resolve the domain name to the local IP address when accessed from within the server.
This is usually done by ensuring the /etc/hosts file includes an entry mapping your domain name to the local IP address.
Troubleshooting
Here are some common troubleshooting tips for WordPress on a LEMP server setup:
Check Nginx Configuration
- Verify that the Nginx configuration for your WordPress site is correct. Ensure the server block is properly defined with the correct
rootdirectory,server_name, and other relevant directives. - Use the
nginx -tcommand to check for any syntax errors in the Nginx configuration.
Verify PHP-FPM Configuration
- Ensure that the PHP-FPM service is running and properly configured.
- Check the PHP-FPM configuration file (e.g.,
/etc/php/8.2/fpm/php-fpm.conf) for any errors or misconfigurations.
Check PHP Version and Extensions
- Confirm that you have the correct PHP version installed and that it meets the minimum requirements for your WordPress version.
- Check that the necessary PHP extensions and modules are enabled, such as
mysqli,gd,curl, andmbstring.
Review WordPress Configuration
- Double-check the
wp-config.phpfile for correct database credentials, including the database name, username, and password. - Ensure that the
DB_HOSTvalue is set to the correct database host (oftenlocalhostor127.0.0.1).
Verify Database Connectivity
- Test the database connection by attempting to connect to the database using the database credentials specified in the
wp-config.phpfile. - Ensure that the MySQL/MariaDB service is running and accessible.
Check File Permissions
- Verify that the file and directory permissions for your WordPress installation are correctly set.
- Ensure that the web server user (often
www-datafor Nginx) has proper read and write permissions to the WordPress files and directories.
Investigate Error Logs
- Check the Nginx error log (
/var/log/nginx/error.log) for any relevant error messages related to your WordPress site. - Review the PHP-FPM error log and the PHP error log (
/var/log/php8.2-fpm.logand/var/log/php_errors.log, respectively) for any PHP-related errors.
Disable Plugins and Themes
- Temporarily deactivate all plugins and switch to a default WordPress theme (such as Twenty Twenty-One) to identify if any plugins or themes are causing conflicts or errors.
Clear Caches
- If you have any caching mechanisms (e.g., Nginx cache, object cache plugins), clear or disable them to ensure they are not causing issues.
Test on Different Browsers and Devices
- Verify if the issue is specific to a particular browser or device. Test your site on different browsers (Chrome, Firefox, Safari) and devices (desktop, mobile) to isolate the problem.
Update Software
- Ensure that you are using the latest versions of WordPress, themes, and plugins. Outdated software can sometimes lead to compatibility issues and security vulnerabilities.
Consult WordPress Community and Documentation
- Seek help from the WordPress community forums or official documentation. Often, other users may have encountered similar issues and found solutions.
Conclusion
In this comprehensive article, we have provided a detailed guide on setting up a LEMP server on Debian 12 Linux.
We covered the step-by-step installation of NGINX web server, MariaDB database, and PHP, along with the process of installing and configuring WordPress.
Now that you have completed the setup, you possess the knowledge and tools to create and manage your own WordPress server.
With this newfound expertise, you can establish a locally hosted WordPress staging server for seamless development of new websites.
Alternatively, you might explore the option of hosting your website on your own network, giving you greater control and flexibility.
Harness the power of this knowledge to unlock the full potential of WordPress, taking your web development and hosting capabilities to new heights. Happy building and hosting!
Thanks so much for visiting my site! If this article helped you achieve your goal and you want to say thanks, you can now support my work by buying me a coffee. I promise I won't spend it on beer instead... 😏


hi there! this is the furthest i have got with WordPress and Bookworm!
having a re-direct issue with nginx:
root@x/home/x# systemctl restart nginx
Job for nginx.service failed because the control process exited with error code.
See “systemctl status nginx.service” and “journalctl -xeu nginx.service” for details.
root@x:/home/x# nginx -t
nginx: the configuration file /etc/nginx/nginx.conf syntax is ok
nginx: configuration file /etc/nginx/nginx.conf test is successful
systemctl status nginx.service = nginx.service: Control process exited, code=exited, status=1/FAILURE
journalctl -xeu nginx.service=The job identifier is 1796 and the job result is failed.
if i go to the ip, i get the Apache2 Debian Default Page
if i go to ip/wordpress/index.php – wordpress works
#how do i get nginx to redirect?