
Terminal is a powerful tool that is often overlooked by most Mac users. Sure it’s widely used by developers, but did you know it can be really useful for normal users too?!
Recently I set out on a quest to put together a series of articles detailing my favourite top 50 Mac terminal commands.
To wrap up my 50 recommendations, I wanted to conclude with 10 miscellaneous commands that I think you should know! The final 50th command is a bit of a wildcard, so be sure to check it out… 😉
1. Get Website Updates
If you are not familiar with RSS, it is basically a computer-readable summary of a particular webpage or news outlet.
This means that you can use an RSS client program to keep a track of updates on your favourite sites, so long as they publish an RSS feed.
WordPress publishes RSS by default, for example you can find the RSS feed for this site here:
https://siytek.com/feed
Each time a new article is published here, a new entry is made on the feed. You can use a client to monitor this feed and get updated as to when new content is published here!
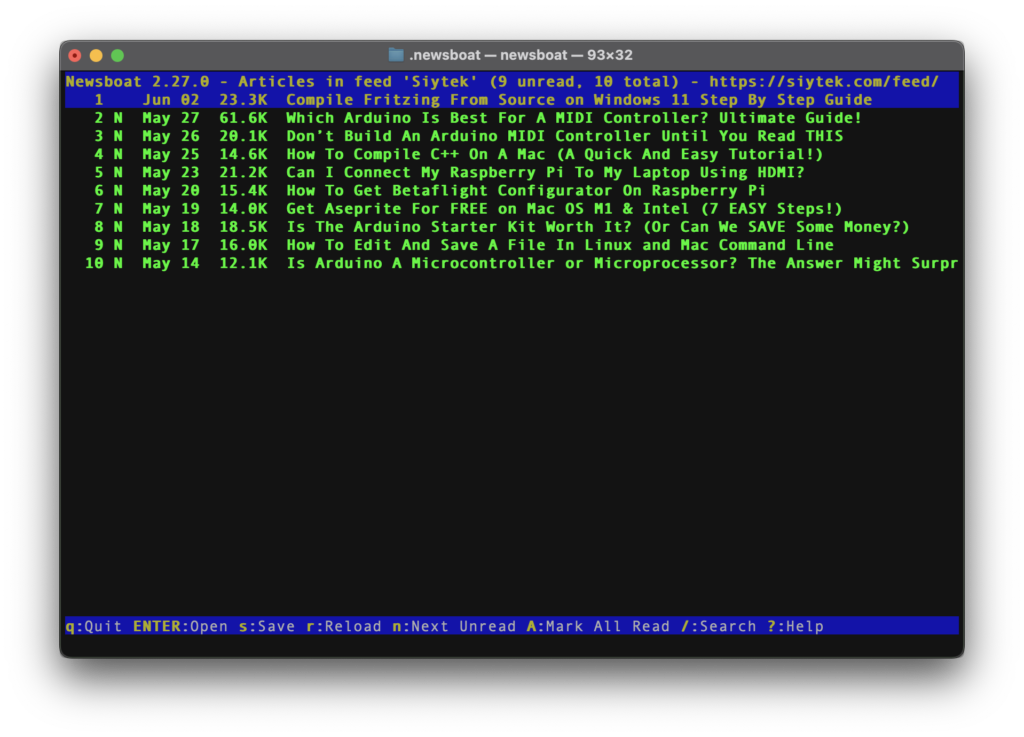
There is also a very cool RSS reader for terminal called Newsboat, giving you a very lightweight way to read this site and many other sites. This would be especially useful when the internet connection is poor. You can install Newboat using brew:
brew install newsboat
Once you have installed it, you will need to add each site you wish to view to the urls file. You can either do this manually with nano:
nano ~/.newsboat/urls
or you can append the file directly with the following command:
echo "https://<RSS Feed URL here>" >> ~/.newsboat/urls
For example you can add the RSS feed for this site with the following command:
echo "https://siytek.com/feed/" >> ~/.newsboat/urls
Then simply launch Newsboat by typing newsboat at the command prompt. Here you can select any of the sites that you entered in the urls file and choose from any of the latest posts to read.
2. Get The Weather Report
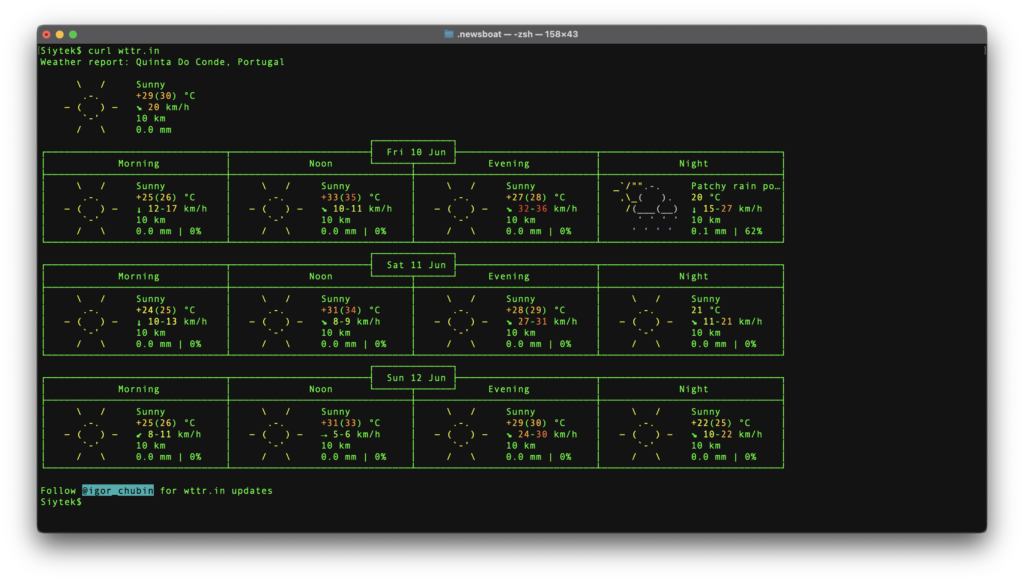
There is an awesome ASCII weather app that resides online, which is accessible by the curl command. This website prints a weather report in the terminal using ASCII characters and uses your IP address for location, very cool!
curl wttr.in
Note that the location will be incorrect if you are using a VPN! You will also need a terminal window large enough to display the output correctly.
3. Clear The Terminal: clear
clear
A very simple but useful command that I have yet to mention in any previous lists of terminal commands is clear, which simply clears the terminal screen.
This command is certainly useful after running scripts or programs that produce a lot of output.
It is also sometimes beneficial to clear the screen prior to running such programs or scripts in order to clearly see their output.
Simply type the command for a nice clean terminal screen!

4. Useful Serial Terminal : screen
screen <port> <baud>
It is possible to use the built-in screen command to connect to external hardware. This is particularly useful for connecting to RS232 / USB serial devices.
If you are using Arduino or similar, this is an extremely useful tool as it can be used as a serial monitor or to send data to an external device over a serial connection.
First use the following command to see a list of available devices:
ls /dev/tty.*

Then you can choose a serial devices from the list and substitute into the placeholder of the command above along with the desired baud. In this example the command will connect to the serial terminal of a Wemos D1 Mini.
screen /dev/tty.usbserial-1130 9600
5. Modify File Permissions: chmod
chmod <permissions> <file/folder>
When using systems that are derived from Unix, such as Linux or Mac OS, it is often necessary to work with file and folder permissions.
Sometimes you will need to modify permissions in order to get something to work as intended. This is especially true for power users, or users who need to work in the terminal.
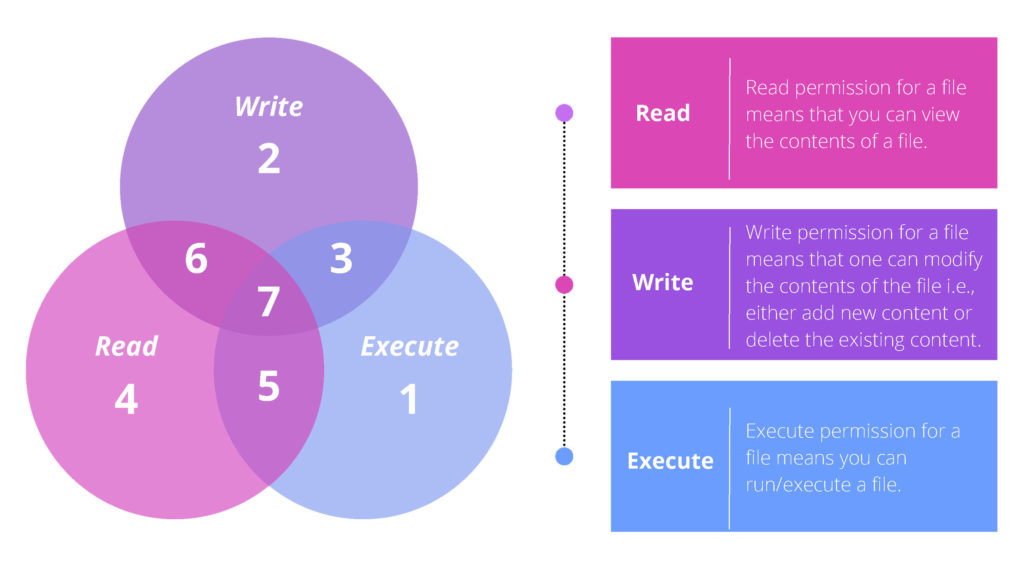
The <permissions> placeholder should be replaced with a three digit number. The first digit represents permissions for the file owner, the next for the user group and the last for everyone.
The number for each permission should be between 0 and 7, depending on whether read, write or execution is required for that particular group. A setting of 0 will grant no permissions and therefore no access to the file.
A group can be set to one or more of read, write or execute. The following diagram shows which number corresponds with each of the desired settings.
As an example we can set the following permissions for a sample file in the home directory:
chmod 740 ~/sample.sh
This command will set the permissions for the file sample.sh in the home directory.
The file owner will have full permission to read, write and execute the file. Groups will only have permission to read the file and everyone outside of this will not have access to the file.
Sometimes the quickest solution to a permissions issue is just to set the file to have full permissions, no matter what user is trying to access it.
chmod 777 <path/file>
However use this wisely and do not perform this command on a file that contains something that should not be viewed by other users!
The topic of permissions is quite large and goes beyond the scope of this article. For further information there is a good article here that explains in more detail.
6. Clear Browsing Cache: mDNSResponder
Have you ever been on a website that was updated or switched servers, but your Mac kept directing you to the previous site?
This is frequently due to your computer’s DNS cache being out of date and not being updated with the new domain resolution.
Fortunately, emptying your Mac’s DNS cache and allowing it to look up domains on the external DNS service instead is a simple fix. Just enter the following commands:
sudo killall -HUP mDNSResponder
sudo killall mDNSResponderHelper
sudo dscacheutil -flushcache
Alternatively you can enter all of these in one by putting them on one line separated by semicolons:
sudo killall -HUP mDNSResponder ; sudo killall mDNSResponderHelper ; sudo dscacheutil -flushcache
7. Won’t You Please, Please Help Me? : whatis
whatis <command>
If you are looking for further information on another command, you may be aware that you can type <command> --help and in may cases you will be given some information about the command.
You can also use the whatis command, which differs slightly in that it describes what the command does rather than how to use it.
You can also use man <command> to display the manual for a particular command. This means that you have three commands at your disposal that will give you plenty of information when you need to know about something in terminal:
<command> --help
whatis <command>
man <command>
8. Compare Two Files: opendiff
opendiff <file 1> <file 2>
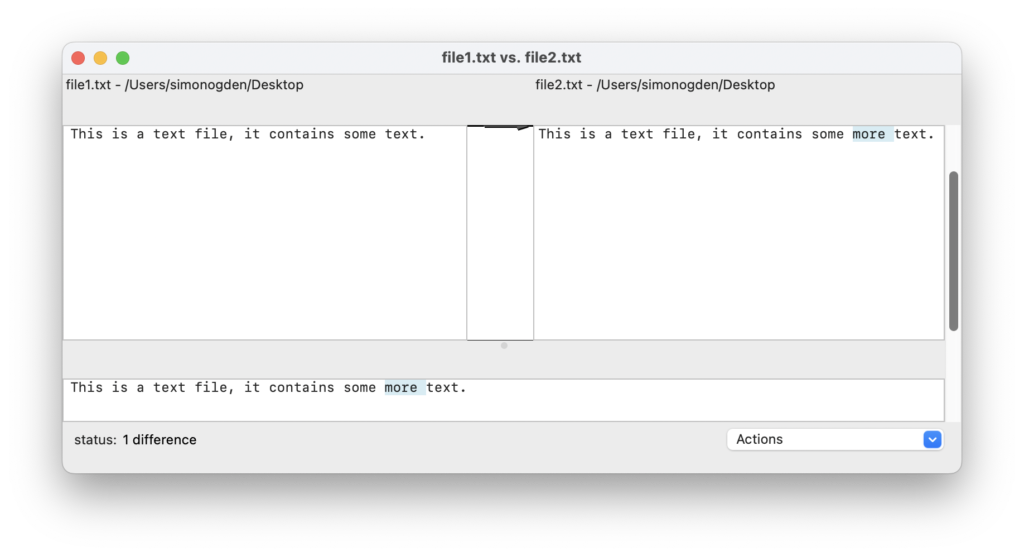
Have you ever needed to compare two files and resorted to installing an app or simply comparing the two files side by side and observing the differences?
The opendiff command is a superior approach to compare two files of the same kind, and it’s integrated into every Mac.
In this example we will open and compare two different text files. You can specify the location and filename, or like in the example below you can just specify the file name and it will try to open the files from the current directory:
opendiff file1.txt file2.txt
9. Join GitHub : git
git <command> <arguments>
GitHub is a fantastic resource and it is likely you will have already come across it if you have used terminal for any length of time.
It is basically a version control system that allows users to manage projects online, such as software development but also into other areas that require version control on files.
There are many many many cool projects that you can access and many of my articles here make use of it.
If you haven’t joined yet then I would recommend getting a free account and installing git for the command line.
You can install git for the command line using brew:
brew install git
For further information, check out the Wiki.
10. Create Your Own Command!
If you are still hungry for new terminal commands, perhaps its time to take a break, you know, see some friends? No? Ok, in which case, why not get started in creating your own terminal commands!
To demonstrate, we will create the siytek command to load this website in a browser.
To create a new command we need to add an alias to either the ./bash_profile or ./zprofile files, depending on the shell you are using.
You can open the file with a text editor and add an alias manually, or you can use the following command.
echo "alias siytek='open https://siytek.com'" >> ~/.zprofile
source ~/.zprofile
If you are using an OS older than Catalina, you should add to the ./bash_profile file instead:
echo "alias siytek='open https://siytek.com'" >> ~/.bash_profile
source ~/.bash_profile
If you want to build your own command, you can structure the alias like this:
echo "alias <alias name>='<command> <argument>'" >> ~/.zprofile
Once you have added something to ~/.zprofile you must reload it in order for it to take effect. This is done with the source command:
source ~/.zprofile
Don’t forget to substitute /.zprofile with /.bash_profile if you are using the bash shell (OS versions before Catalina).
Thanks so much for visiting my site! If this article helped you achieve your goal and you want to say thanks, you can now support my work by buying me a coffee. I promise I won't spend it on beer instead... 😏


dont work