You may already know that the ubiquitous ESP8266 is designed to connect to WiFi, but did you know it can also act as a web server?
In this tutorial you will learn how to turn a Wemos D1 Mini into a web server using the Arduino IDE. If you prefer using Python then you can also use MicroPython, check out this tutorial instead.
This is a basic implementation which is suitable for beginners or anyone who wants a quick and easy web server running on their ESP8266.
Prerequisite
For this tutorial you will need:
- An ESP8266 compatible board
- The latest Arduino IDE
- A USB cable to connect the board to your computer.
For the ESP8266 board I usually recommend the Wemos D1 Mini as it is compact and surprisingly cheap, check the latest price on Amazon here.
If you didn’t use an ESP8266 with Arduino before then you will need to configure the Arduino IDE to program ESP8266. I would recommend reading through this tutorial first, which explains how to add ESP8266 to the Arduino IDE.
How To Make A Web Server using Arduino and ESP8266
The ESP8266 is a very powerful little chip and it is especially easy to use when using the Arduino IDE and programming language to program it.
Making a simple web server is super-simple!
But why might we want to do this?
Why Use the ESP8266 to Make a Web Server?
There are a number of reasons why you might want to serve a web page using ESP8266. For example, it can be really useful to be able to access settings and information on your ESP8266 remotely using a browser.
You can do lots of cool stuff such as display sensor values on your ESP8266 web pages or have buttons that you can access and click in the browser to control functions in your ESP8266 application.
This article will teach you how to serve a basic web page from ESP8266. Let’s get started!
Setting Up an ESP8266 Web Server
First, open the Arduino IDE and create a new project. The new project template begins by providing placeholders for the setup and loop functions.
void setup() {
  // put your setup code here, to run once:

}

void loop() {
  // put your main code here, to run repeatedly:

}
Including ESP8266 Libraries Required for the ESP8266 Web Server
Next, we want to do is add some includes in order to link the necessary libraries. We will be using the ESP8266 library, which is not a standard library that comes with the Arduino IDE.
In order to use the ESP8266 library, you first need to add ESP8266 to Arduino. If you haven’t added the ESP8266 boards to Arduino yet, see this tutorial, which will explain how to do that.
We will include the ESP8266WiFi and ESP8266WebServer libraries from the ESP8266 library. Add the following include statements to the very beginning of the project, before the setup function.
#include <ESP8266WiFi.h>
#include <ESP8266WebServer.h>
Defining ESP8266 Web Server WiFi credentials
Next we will specify the WiFi credentials that we wish to use. The ESP8266 will use these credentials to connect to your desired WiFi network.
You will need to replace YOUR SSID and YOUR PASSWORD with the WiFi network name (SSID) and WiFi password that you use to connect to your WiFi network.
Add the following lines after the include statements that you added at the beginning of the project.
// Set WiFi credentials
#define WIFI_SSID "YOUR SSID"
#define WIFI_PASS "YOUR PASSWORD"
Create a new web server
We now need to create a new instance of ESP8266WebServer. This means that we need to reference the ESP8266 library in order to fetch the “blueprints” for the web server. In object oriented programming, these blueprints are called a class.
When we create a new instance of the ESP8266WebServer class, we are effectively taking a copy of the blueprints from the library and customizing them to use in our application.
In order to create a new instance of the ESP8266WebServer class, add the following line of code after the WiFi credentials.
// Create a new web server
ESP8266WebServer webserver(80);
The ESP8266WebServer class requires that we pass a value for the port that we wish to use, in this case 80. Ports are required in order to direct the flow of network traffic to the correct application.
When entering a web site address into a browser, you generally don’t need to specify a port. This is because web browser traffic almost always uses port 80 and the browser adds it automatically.
Therefore if we use port 80 for our ESP8266 web server application, we will be able to access the ESP8266 using a browser without having to specify a port.
Using ESP8266 to Handle Web Page Requests
When the ESP8266 web server receives a request from a browser, it will trigger a particular function depending on the request. In order to handle the requests, we should write these functions in our program.
We can write these functions however we prefer, depending on how we want our web server to behave.
Handling the ESP8266 Root Web Page Request
The root web page is the page that will be loaded when just the ESP8266’s address is typed into the browser address bar. The name of the function that is called when the root web page is requested is rootPage.
We will create a function called rootPage and place a command within the function that handles the request.
// Handle Root
void rootPage() {
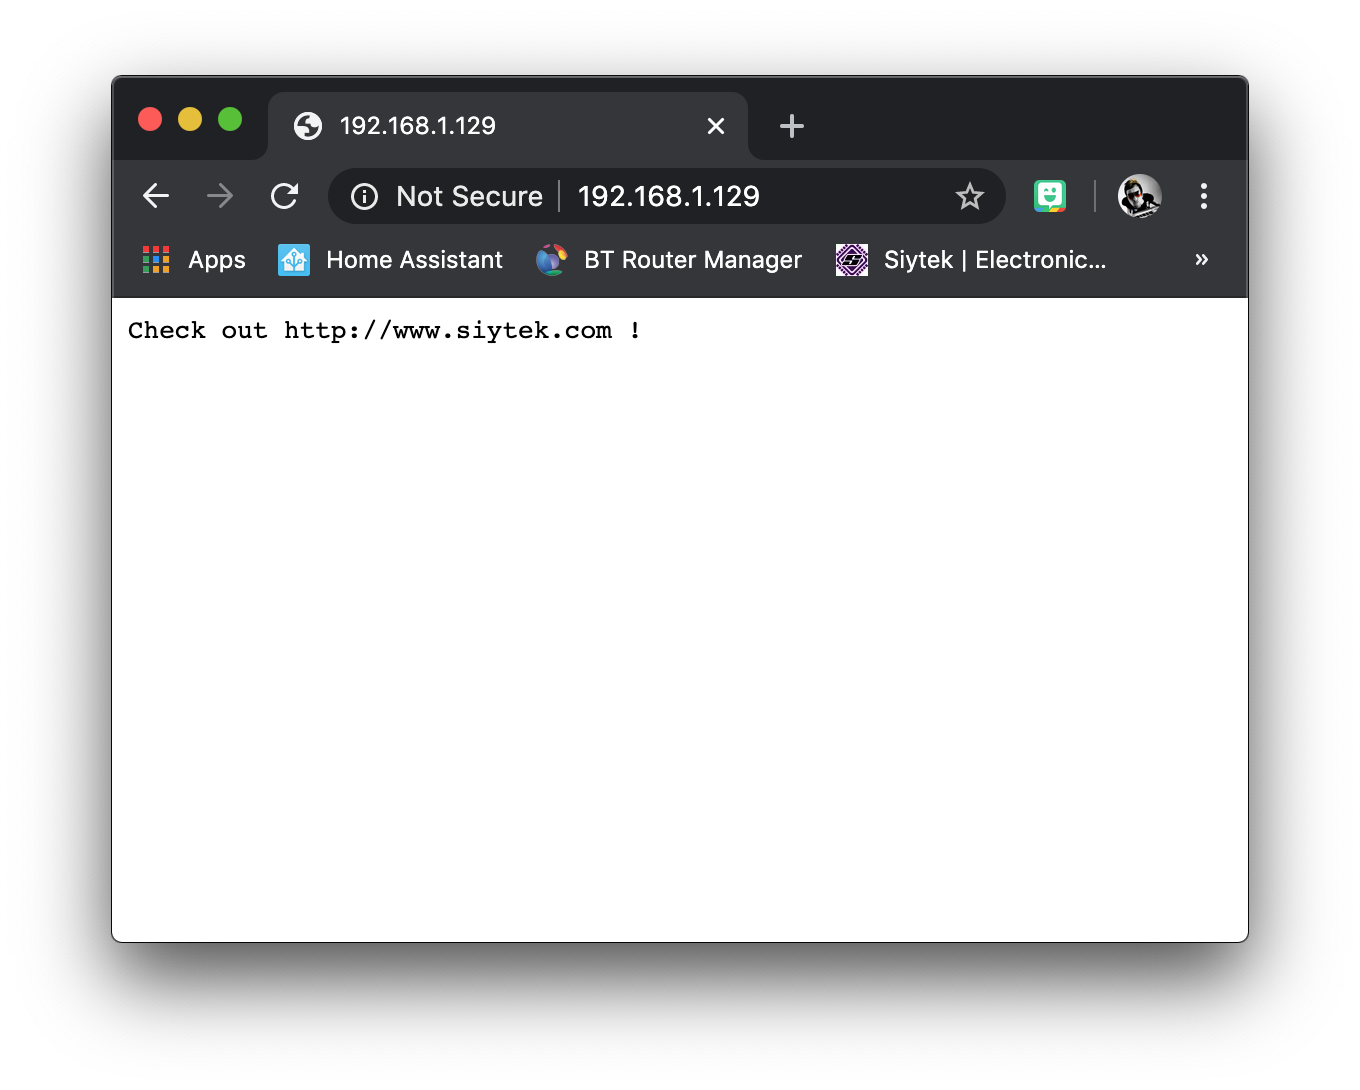
webserver.send(200, "text/plain", "Check out https://siytek.com!");
}The command within the function is a message that the ESP8266 sends back to the browser and it is executed when the rootPage function is called.
The command passes 3 variables, which will be sent back to the browser:
- The status code “200” – this signifies that everything is ok.
- The content type “text/plain” – indicates to the browser what format the data is in.
- The data to be sent.
The end result will be the message “Check out https://siytek.com!” displayed in plain text. You can of course also send HTML in order to render a proper web page.
Handling the ESP8266 404 Error Page Not Found
Next, we will define a function that will be called when a client tries to navigate to a page that does not exist. In this case we need to signal to the browser that the page cannot be found by sending a 404 error code.
We will also send a “404: Not found” plain text message to display in the browser window. Like with the root page, it is also possible to send HTML, but we will keep things simple for now.
Add the following notfoundPage function after the rootPage function.
// Handle 404
void notfoundPage(){
  webserver.send(404, "text/plain", "404: Not found");
}
Monitoring the ESP8266 Web Server Using the Serial Port
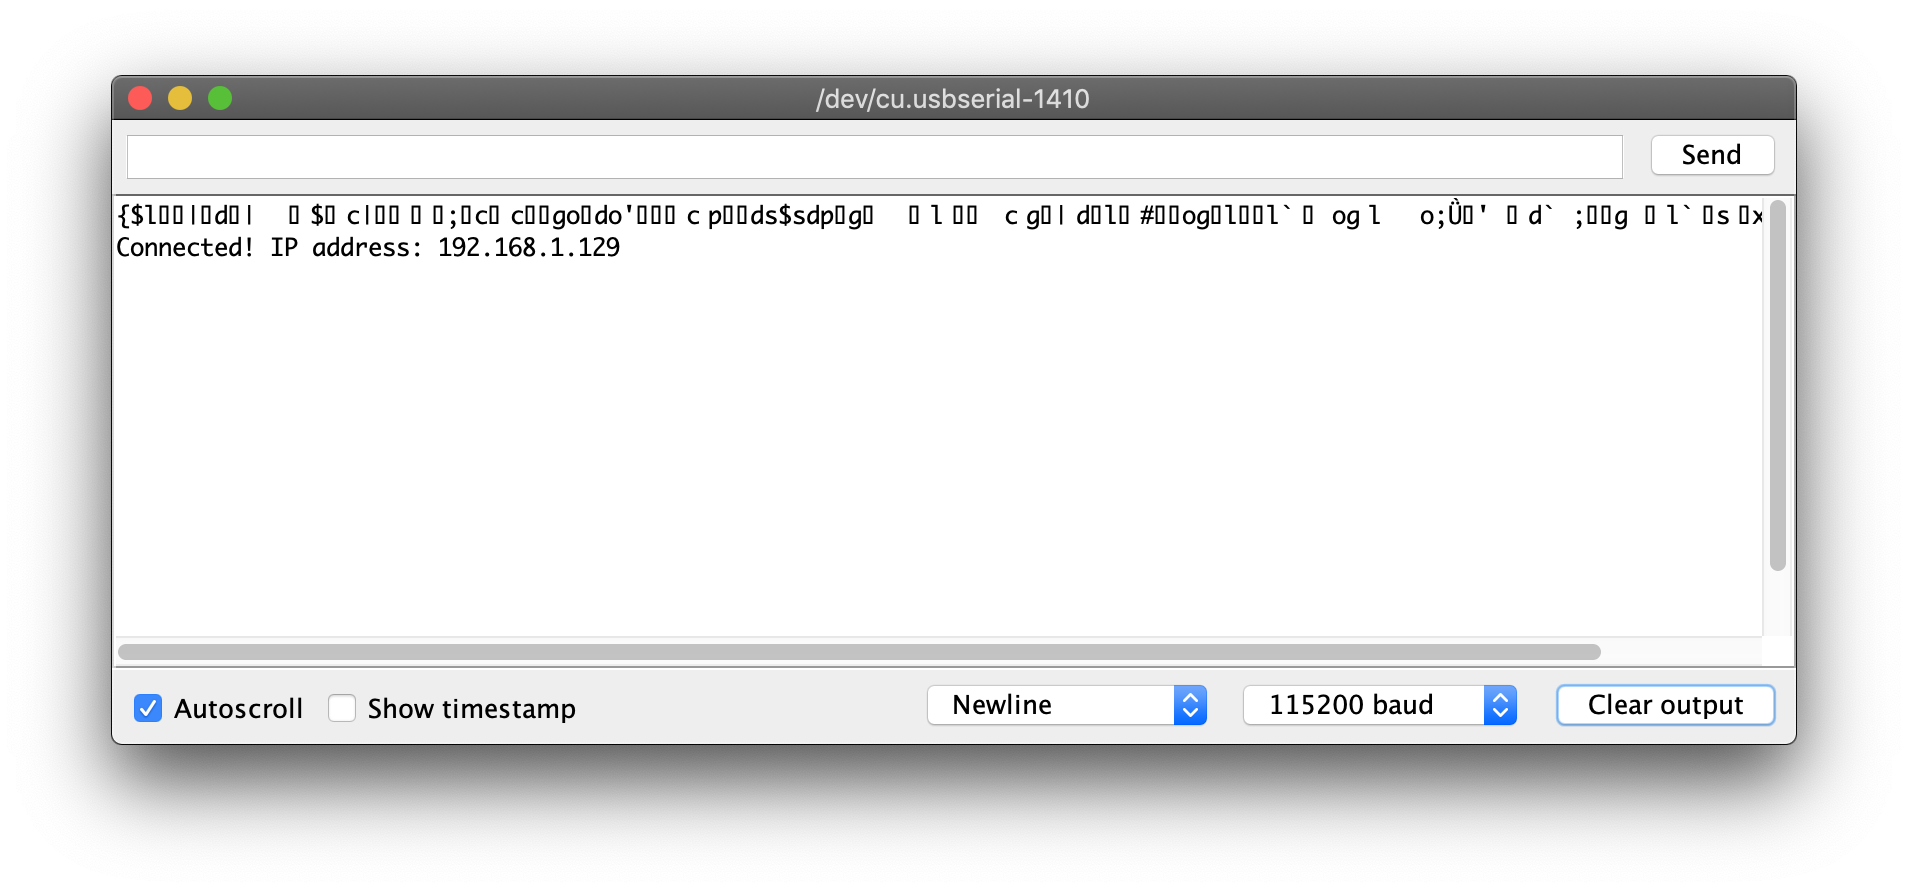
In order to monitor the status of our web server, we will use the serial port. This will allow us to debug information back to Arduino, so we can check that the web server is working correctly.
We will use the serial port monitor to receive messages stating that the web server has sucesfully connected to WiFi, including reporting the IP address that it was assigned by the router.
Firstly, we will begin the serial port with the specified baud rate of 115200. The baud rate does not matter too much, we just need to make sure the serial monitor in the Arduino IDE has a matching baud rate, in order to receive the messages correctly.
Add the following code inside the void setup() function.
void setup()
{
  // Setup serial port
  Serial.begin(115200);
  Serial.println();
}
Connecting the ESP8266 to WiFi
Now we can begin the WiFi connection using the credential definitions that we specified at the beginning of the program.
After we start the WiFi connection we will put the program into a continuous while loop that iterates until a flag called WL_CONNECTED is set. This flag will be set by the web server when the ESP8266 is sucesfully assigned an IP address.
As soon as the WL_CONNECTED flag is set, the while loop will exit and we can print the IP address to the serial console.
We can then make a note of the IP address, so that we can use it in the browser address bar in order to navigate to web pages hosted on the ESP8266.
  //Begin WiFi
  WiFi.begin(WIFI_SSID, WIFI_PASS);
  while (WiFi.status() != WL_CONNECTED) { delay(100); }

  // WiFi Connected
  Serial.print("Connected! IP address: ");
  Serial.println(WiFi.localIP());

}
Starting the ESP8266 Web Server
Now we are ready to start the ESP8266 web server!
First we will pass a reference to the root and 404 error functions that we created earlier to the web server instance. This will tell the web server instance which functions should be called during these events.
We can then issue a command that will start the web server instance.
// Start Web Server
  webserver.on("/", rootPage);
  webserver.onNotFound(notfoundPage);
  webserver.begin();

}
Listening for HTTP Requests
Lastly, we need to add a command within the continuous loop function that will repeatedly check for incoming client requests. Upon receiving a request, the web server will then handle it as we defined in the earlier functions.
// Listen for HTTP requests
void loop(void){
  webserver.handleClient();
}
Testing the ESP8266 Web Server
Now that the code is completed, we are ready to test the web server! Here is the complete example code for reference:
#include <ESP8266WiFi.h>
#include <ESP8266WebServer.h>

// Set WiFi credentials
#define WIFI_SSID "YOUR SSID"
#define WIFI_PASS "YOUR PASSWORD"

// Create a new web server
ESP8266WebServer webserver(80);

// Handle Root
void rootPage() {
  webserver.send(200, "text/plain", "Check out https://siytek.com !");
}

// Handle 404
void notfoundPage(){
  webserver.send(404, "text/plain", "404: Not found");
}

void setup()
{
  // Setup serial port
  Serial.begin(115200);
  Serial.println();

  //Begin WiFi
  WiFi.begin(WIFI_SSID, WIFI_PASS);
  while (WiFi.status() != WL_CONNECTED) { delay(100); }

  // WiFi Connected
  Serial.print("Connected! IP address: ");
  Serial.println(WiFi.localIP());

  // Start Web Server
  webserver.on("/", rootPage);
  webserver.onNotFound(notfoundPage);
  webserver.begin();

}

// Listen for HTTP requests
void loop(void){
  webserver.handleClient();
}
You can now go ahead and upload the sketch, then open the serial monitor window. Don’t forget to change the baud rate to 115200 in necessary, in order to match what was specified in the program.
Once you have the serial monitor open, press the reset button on the board and wait a few moments. When the ESP establishes a connection to the network, it will print the IP address to the serial window.
Now go ahead and point your browser to http://<your-ip-address> and marvel at your new super-tiny web server!
Conclusion
In this tutorial we have seen that it is possible to build a simple web server in the Arduino IDE using an ESP-based device. The aim of this tutorial was to make the process as simple as possible in order to help you understand the basics.
You should be able to further this example and produce a more complex page using HTML, even including links that control the GPIO pins!
Alternatively if you want to try something a little different, why not check out my tutorial that explains how to use webhooks to send email from an ESP-based device. Also, did you know that you can flash your device over WiFi too? Check out this tutorial to learn how!
Article Updates
Aug 10th 2023 : Code descriptions improved and minor edits to the article. Featured image updated. TOC added.
Article first published March 16th 2020.
Thanks so much for visiting my site! If this article helped you achieve your goal and you want to say thanks, you can now support my work by buying me a coffee. I promise I won't spend it on beer instead... 😏