
If you are using Home Assistant then no doubt you have heard of ESPHome, but what is it?
How can it benefit you and how can it be added to Home Assistant?
This in-depth tutorial covers everything you need to know, so let’s get started!
ESPHome is a powerful bit of software that allows custom firmware to be compiled for smart home devices that use the ESP platform without complex programming.
If you are looking to design your own smart home device using an ESP-based board like the Wemos D1 Mini, you are going to love it!
All of the device configuration and firmware flashing is handled by an easy step-by-step wizard, you just complete the form and the software does the rest.
To configure your device, simply write a simple YAML file, just like with you do in Home Assistant!
Table of Contents
ESPHome vs Tasmota
You may have also heard of or even be already using Tasmota in your Home Assistant setup. Tasmota is a superb piece of firmware that you can use on your ESP8266 devices for cloud-free and instantaneous smart home control. So why might you choose ESPHome instead?
ESPHome offers additional functionality through its ability to be configured using YAML. You can create onboard automation and more sophisticated integrations for Home Assistant.
ESPHome is ideal if you are developing your own device, want additional on-board functionality or if you don’t want to use MQTT.
Tasmota is more of a set and forget solution. It is ideal for basic bulbs, switches and relays. You can automate the configuration process using serial commands making it very quick and easy.
Flashing and configuration is made very easy when done with the Tasmotizer tool. It does however lack the functionality offered by ESPHome.
My advice would be to try both and see which you prefer! The firmware is easily interchangeable. Once you either Tasmota or ESPHome installed on your device, you can switch between them using over the air (OTA) flashing.
For more information, check out my comparison guide.
Prerequisite
You should have Home Assistant installed and running and a basic understanding of YAML including how to edit configuration.yaml.
If you are new to Home Assistant or you are not yet familiar with editing YAML files then you should definitely check out my beginners tutorial on YAML first. I would also recommend taking a look at my other tutorials on automation and scripts.
You will also need an ESP device such as the Wemos D1 Mini or ESP32 board and a method of programming it. Usually the boards have an on-board USB port so simply connect it to your computer.
Installing ESPHome
There are two parts to ESPHome, the configuration tool and the firmware. The easiest way to use ESPHome with Home Assistant is to use the ESPHome add-on. However YAML files can be manually written and added to the device using the terminal.
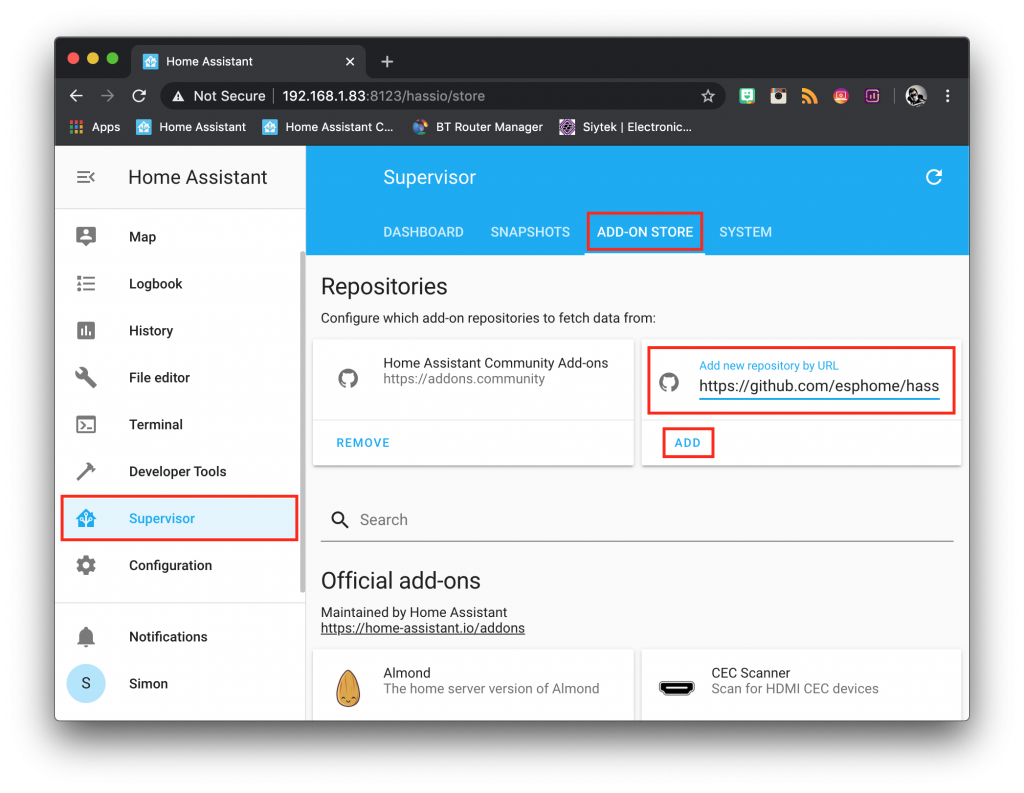
Add Github repository
In order to add the Home Assistant add-on, click supervisor on the sidebar menu, click the add-on store tab and add the Github address for ESPHome.
https://github.com/esphome/hassio
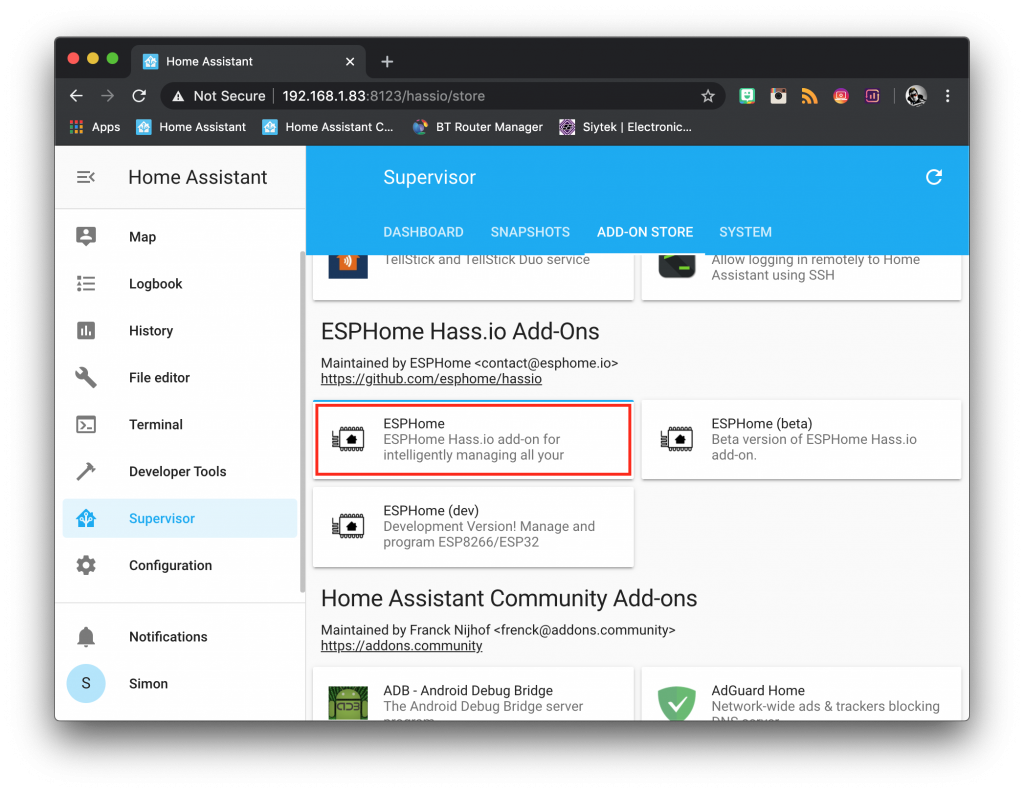
Install ESPHome
Once you have added the repository, scroll down the page and you should find that ESPHome is available in the add-on list. Go ahead and click on it to open up the settings page.
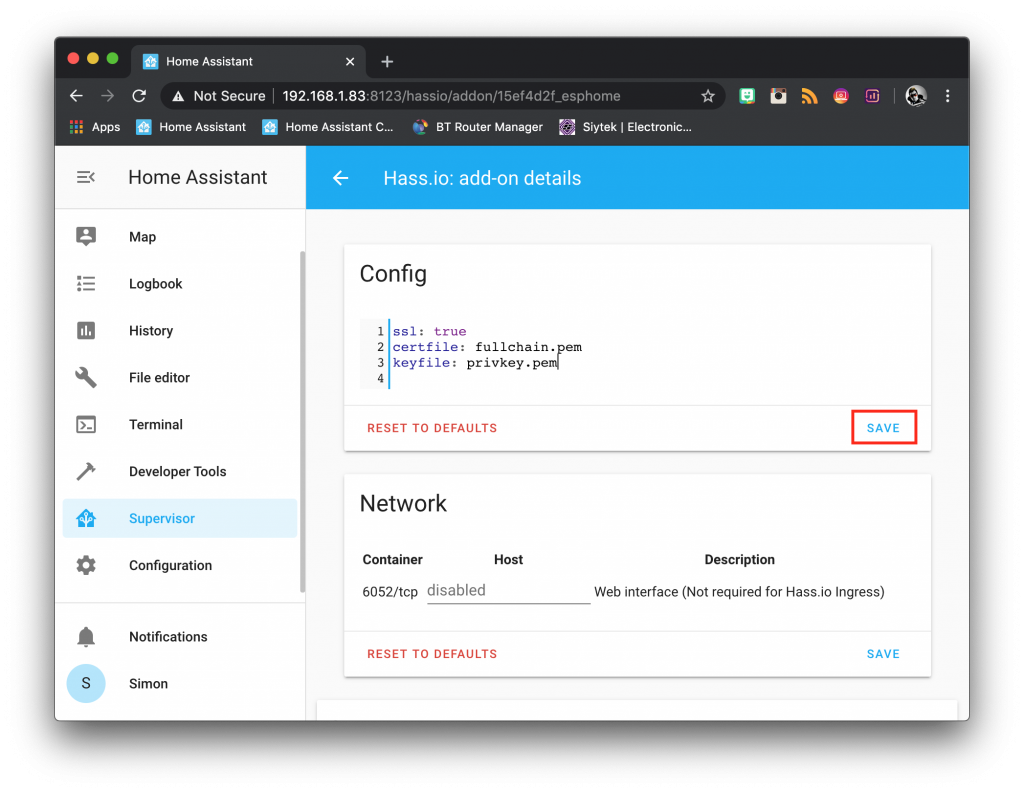
From the settings page click install and wait for the installation to complete. Once complete, scroll down the page to find the config section and add the following code.
Add SSL config options
If you are using SSL to access Home Assistant, set SSL to true. Otherwise set it to false. Once you have added the code, click save.
ssl: true
certfile: fullchain.pem
keyfile: privkey.pem
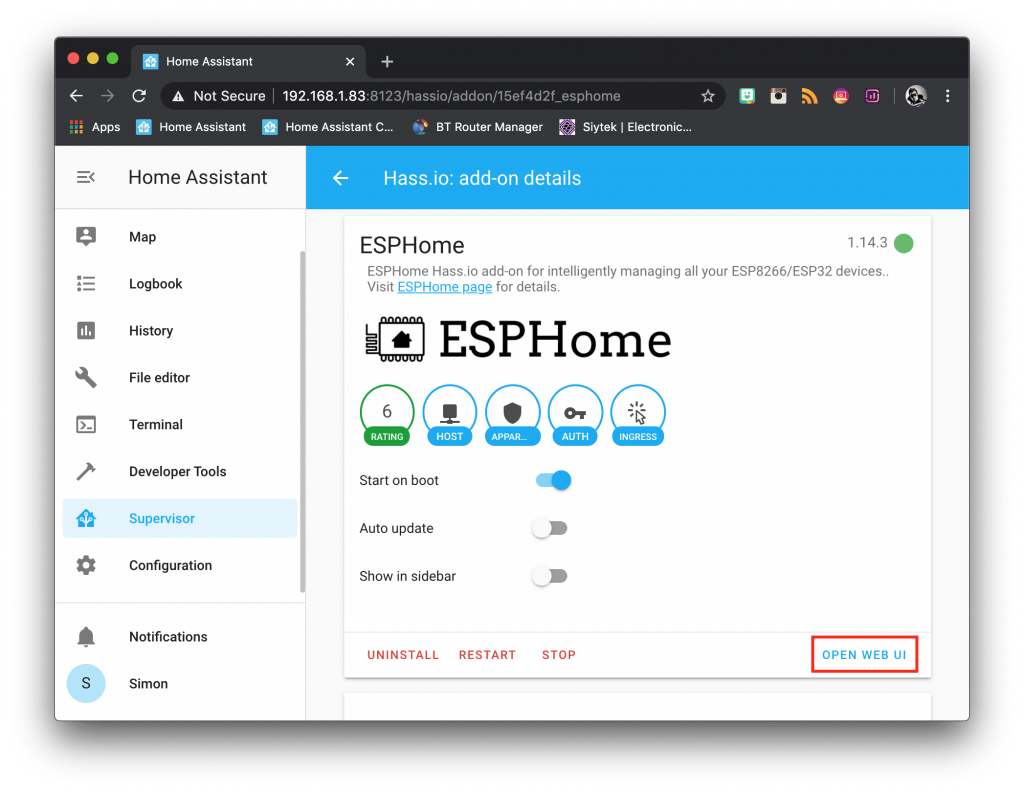
Open UI editor
Once you have saved the config, head back up to the top of the page and start the add-on. When the add-on has started you should see the option to open the UI editor.
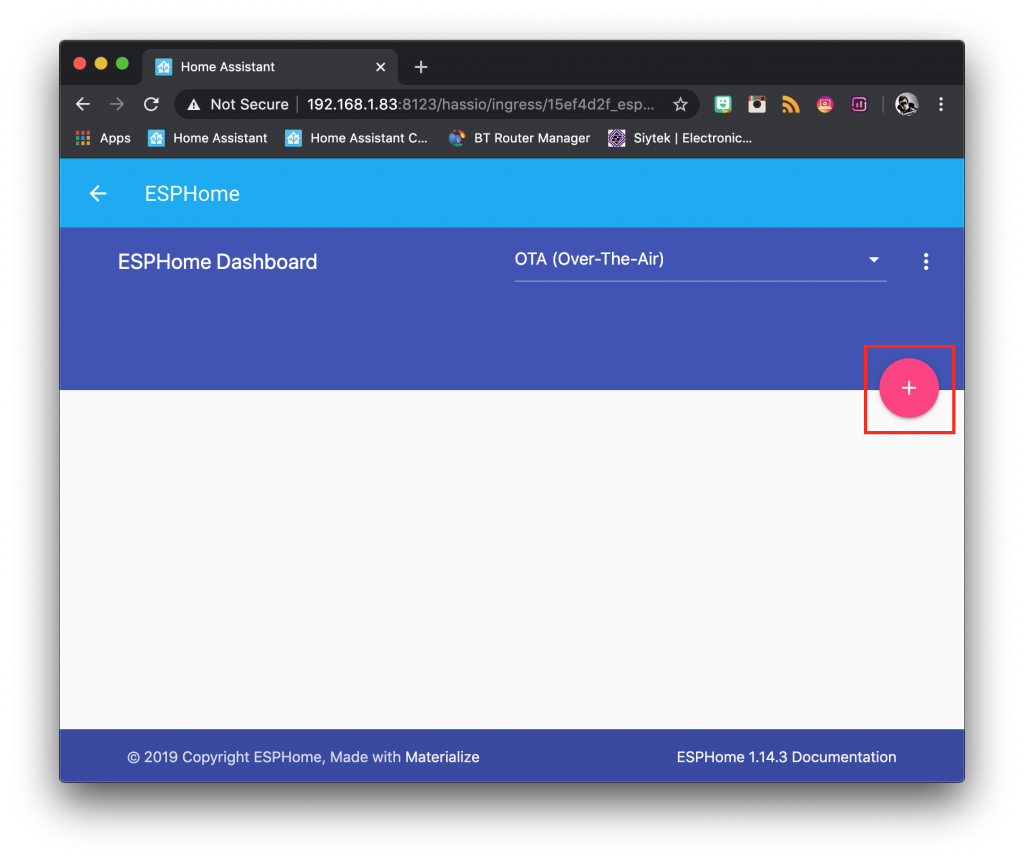
Adding a device
The web interface is very well made and easy to use, we will start by adding a new device. Go ahead and click on the plus icon to begin the add device wizard.
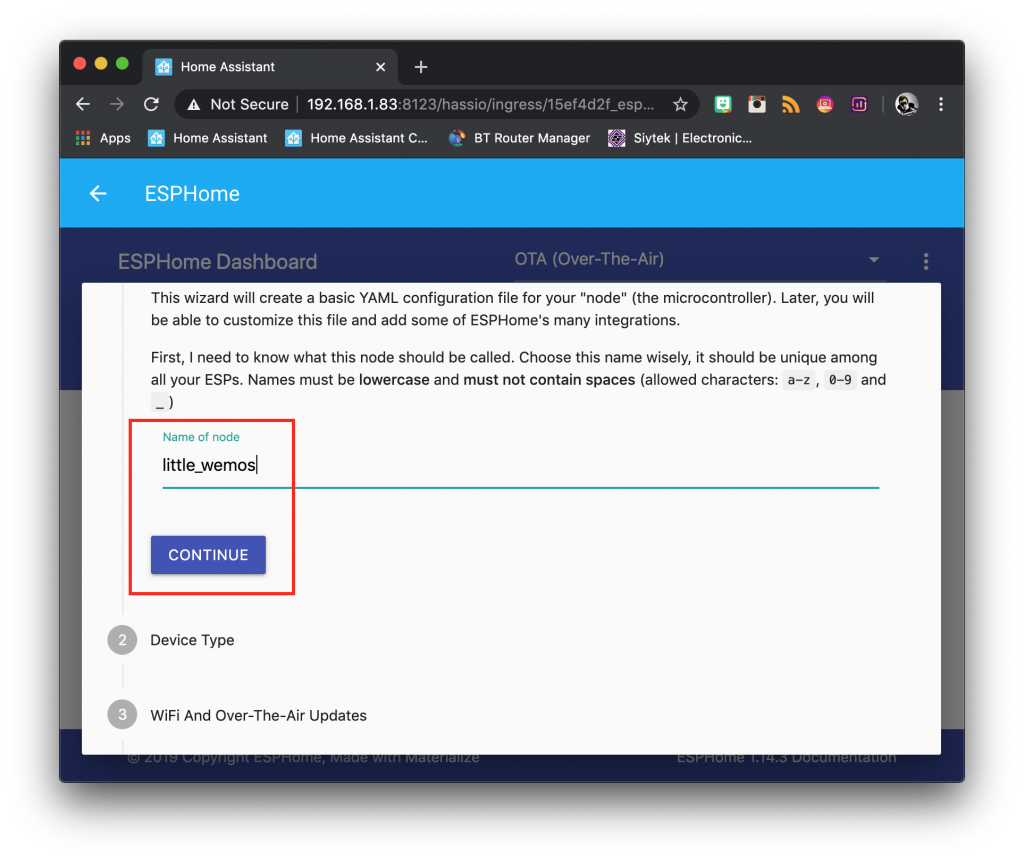
Naming our first node
First we need to give our device a name using only lowercase characters. For this example I will name the device little_wemos but you can choose any name you like.
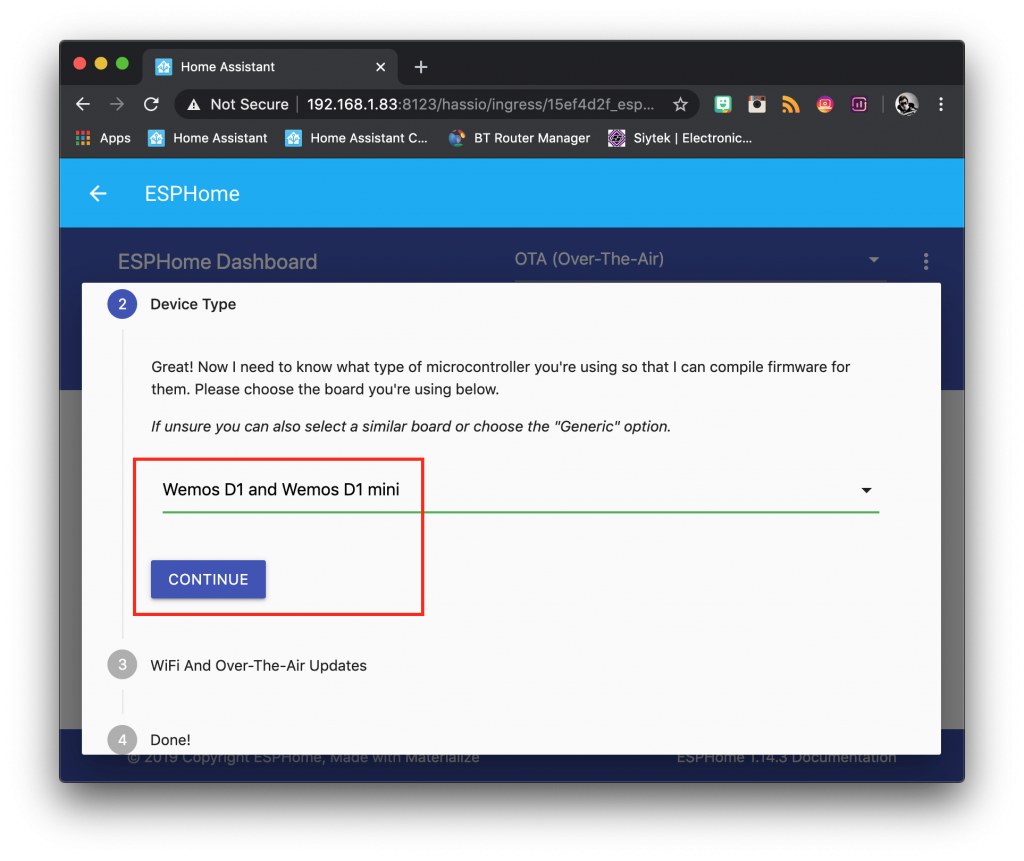
Choose the board type
Next we need to choose the correct board. As I am using a Wemos D1 Mini for this tutorial, I will choose the Wemos D1 Mini option. You should choose the correct option for your board, or choose Generic if it is not in the list.
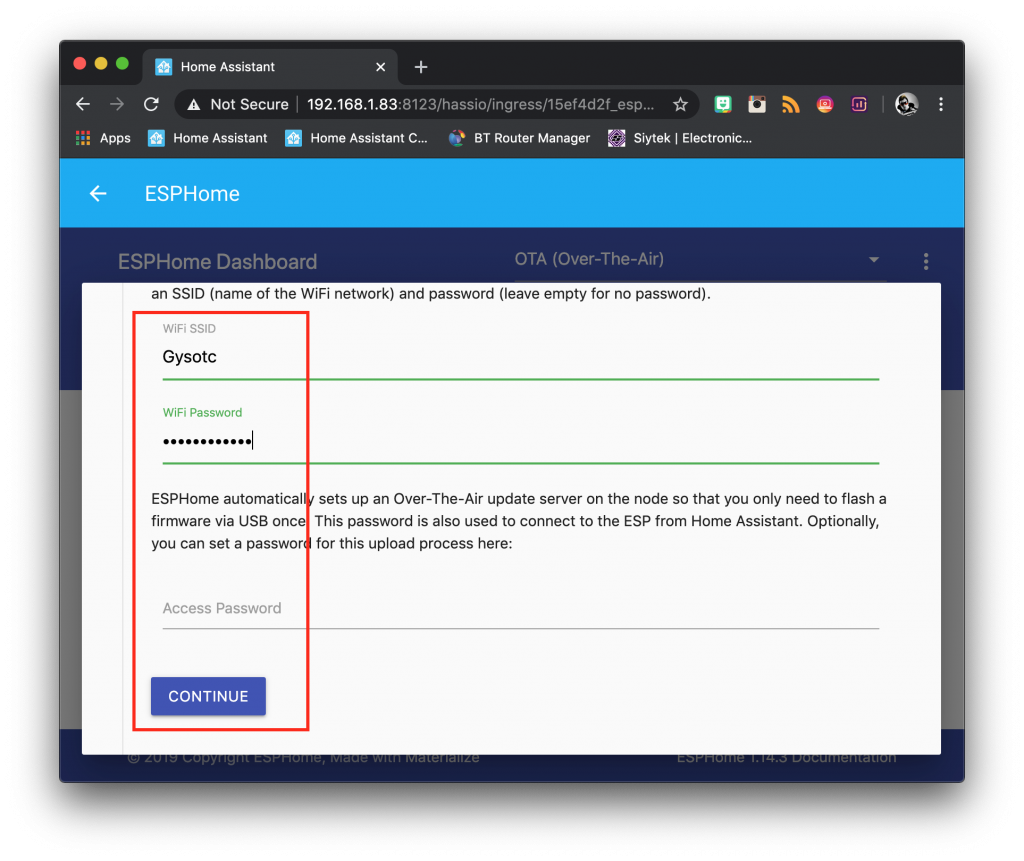
Enter WiFi credentials
Enter the SSID and password of your WiFi network. If you wish to set an additional password for future OTA firmware updates, you can set the access password too.
Once you have entered your credentials click submit and your device will be added to the UI. The wizard will then prompt you to select a port.
Flash the device
Depending on your configuration, the port for your new device may or may not be available in the drop down menu at the top for ports. Thankfully there is a method to handle either circumstance.
Serial port is available
If your device is connected directly to your Home Assistant server and you are not running it inside of a Docker container, you should see the serial port for the device available in the dropdown list.
Go ahead and choose your serial port, then click the upload button. Although we did not configure the device yet this will add the basic firmware, giving the device the ability to be flashed OTA.
You only need to flash the device once with the serial port and future flashing can be done OTA.
After the device has finished flashing, click stop to return to the main screen and you can skip ahead to configuring a device.
Only OTA (over-the-air) option is available
If you are accessing a remote Home Assistant server and you have your device connected to your local computer, or if you have your device connected to your Home Assistant server but you are running it in a Docker container without adding the port permissions, you will likely see only the option to flash OTA (over the air).
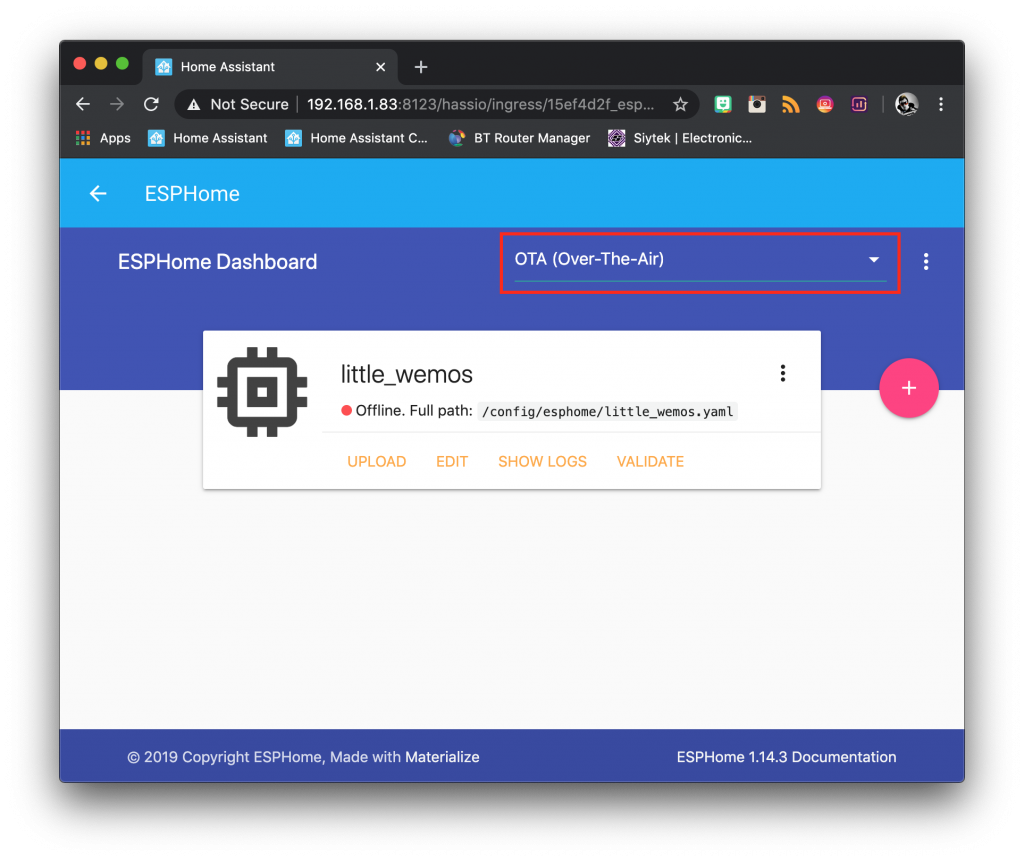
In order to be able to flash our device OTA we must first flash the device with the ESPHome firmware with a cable. This only needs to be done once and afterwards you will be able to flash directly from your Home Assistant server using the OTA connection.
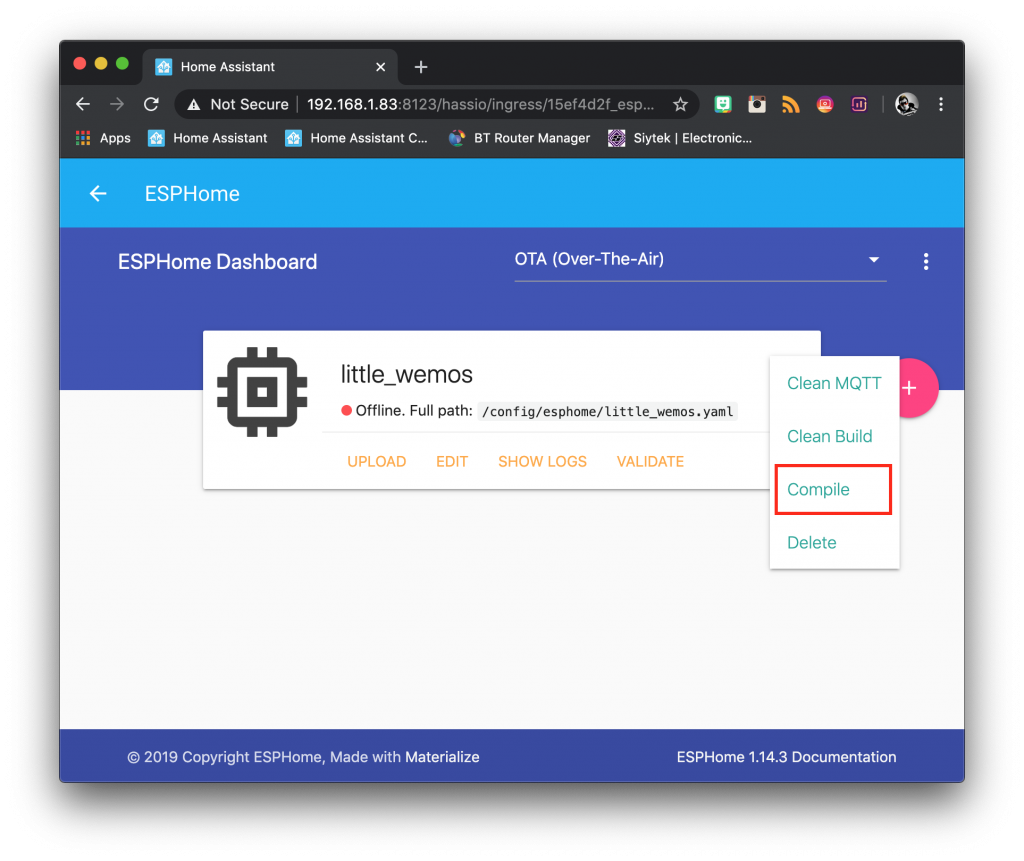
First go ahead and click on the three little dots to the right-hand side of the device, then click compile.
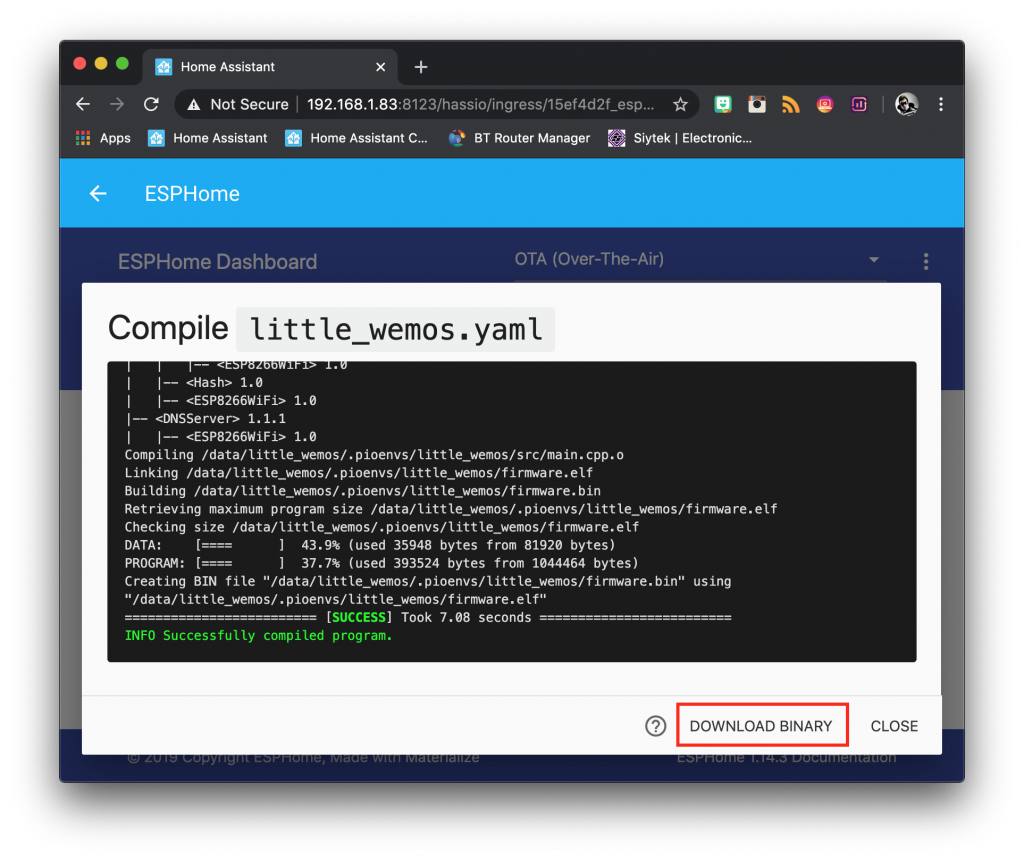
Once the compiling operation has completed, go ahead and click download binary. This will download a .bin file in your browser.
Now that we have the .bin file saved to our local computer, we can use the ESPHome flashing tool to flash it to our device. Go ahead and download the latest release of the ESPHome flashing tool for your operating system.
Once you have the ESPHome flashing tool, open it up and connect your device to the USB port of your local computer. You should see the device serial port in the serial port drop down menu, but if not just click the refresh button to the right-hand side of the text box.
Also you need to click browse and navigate to the .bin file that you downloaded from Home Assistant. Once you have your port and .bin file selected, click flash ESP and wait for the process to complete.
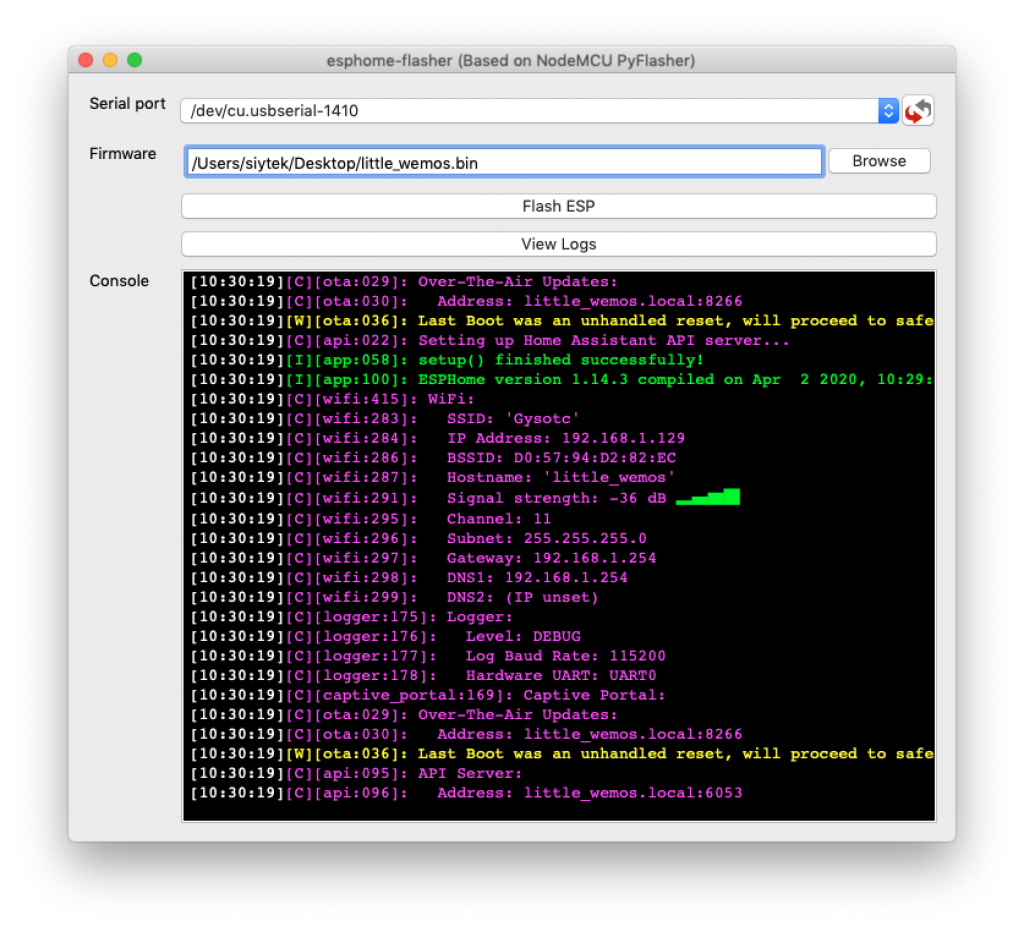
If everything was successful you will see the WiFi details returned from the device, including the SSID of your network and the assigned IP address. Awesome!
Configuring a device
At this stage we now have a device configured with the basic firmware flashed. This means we can flash directly from the Home Assistant server using the OTA method. If the serial port is available then feel free to choose either option.
Next we will create an example device using the light component in ESPHome. We will add a control in Home Assistant that will allow us to control the onboard LED. For the Wemos D1 Mini we will be using pin D4, however you should choose the correct pin for your ESP board.
Create a configuration
Let’s create a basic configuration, first go ahead and click edit from the menu of the device.
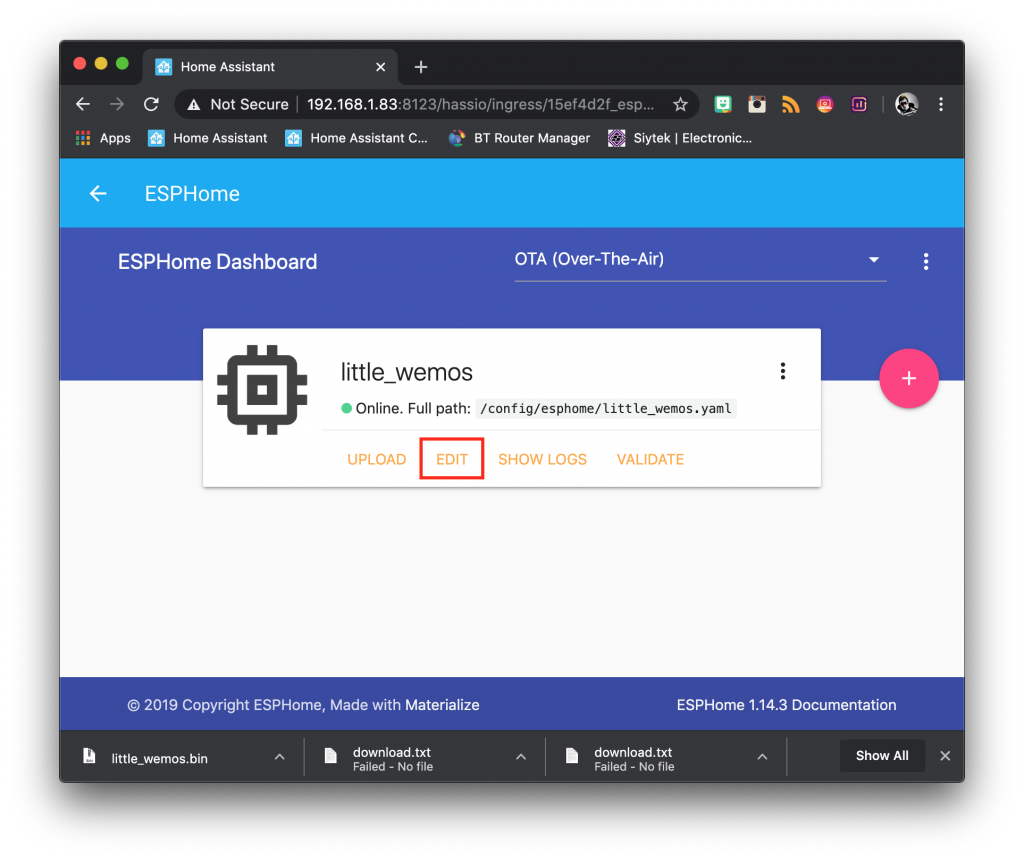
You will be presented with the YAML file currently configured for your device. We need to add the additional configuration to the bottom of the file.
Add light component
First we need to specify a light component using the monochromatic platform. This means that our light will be a single colour dimmable light.
light:
  - platform: monochromatic
Next we need to add a friendly name for the light, this is what will appear in Home Assistant. We also need to specify an output reference, which we will use to tie the light to a physical output on the ESP board.
light:
  - platform: monochromatic
    name: "Wemos LED"
    output: output_component1
Add output component
Now we need to tie the light component to a physical output using the output component. In order to do this we will add the esp8266_pwm platform and specify an id to match the output from the light component.
light:
  - platform: monochromatic
    name: "Wemos LED"
    output: output_component1

output:
  - platform: esp8266_pwm
    id: output_component1
Next we need to specify the correct pin that we wish to control. The onboard LED is connected to D4 on the Wemos D1 Mini but you should choose the correct pin for your board.
You may also need to invert the pin too if you find that the LED is on when turned off and off when turned on.
light:
  - platform: monochromatic
    name: "Wemos LED"
    output: output_component1

output:
  - platform: esp8266_pwm
    id: output_component1
    inverted: true
    pin: D4
Awesome! That is everything we need so go ahead and click save, then upload to add the new firmware to your ESP device!
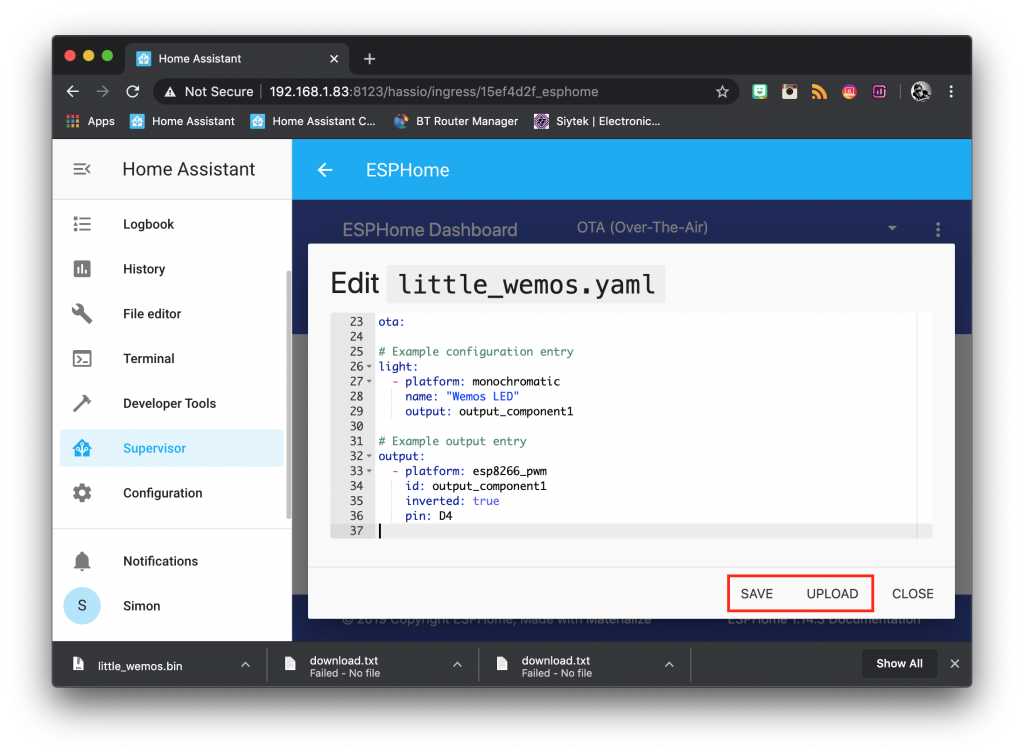
Upload firmware
Once the firmware has uploaded you should get a notification in Home Assistant stating that a new device has been found. Alternatively you can navigate to to integrations manually via the configuration button on the sidebar. Locate your device and click configure.
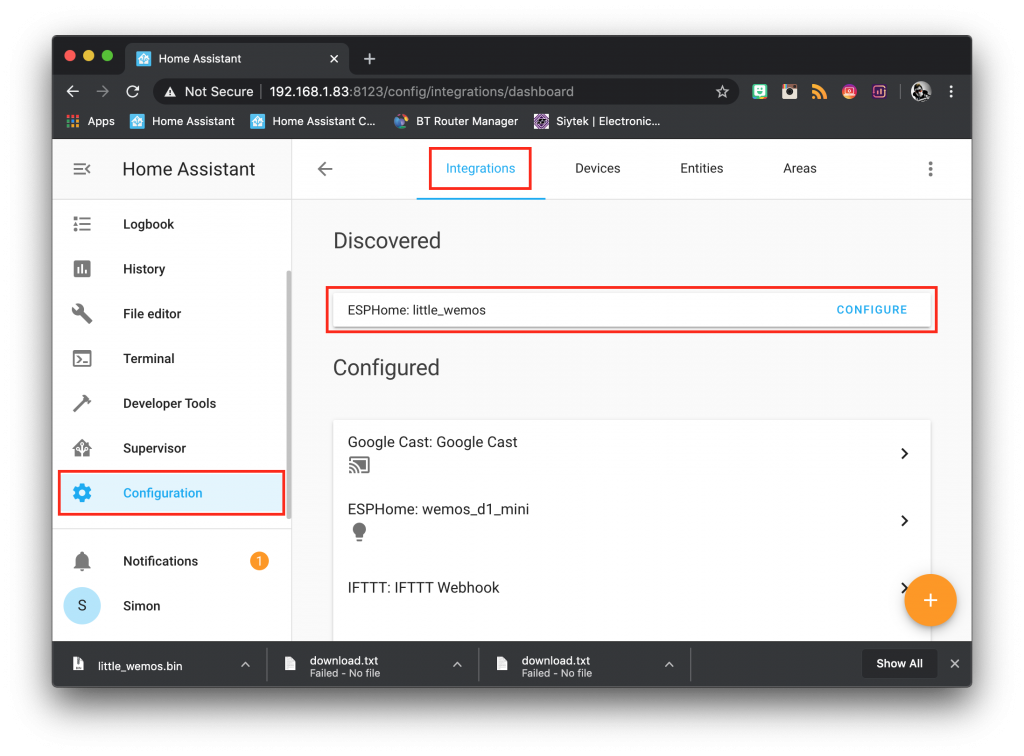
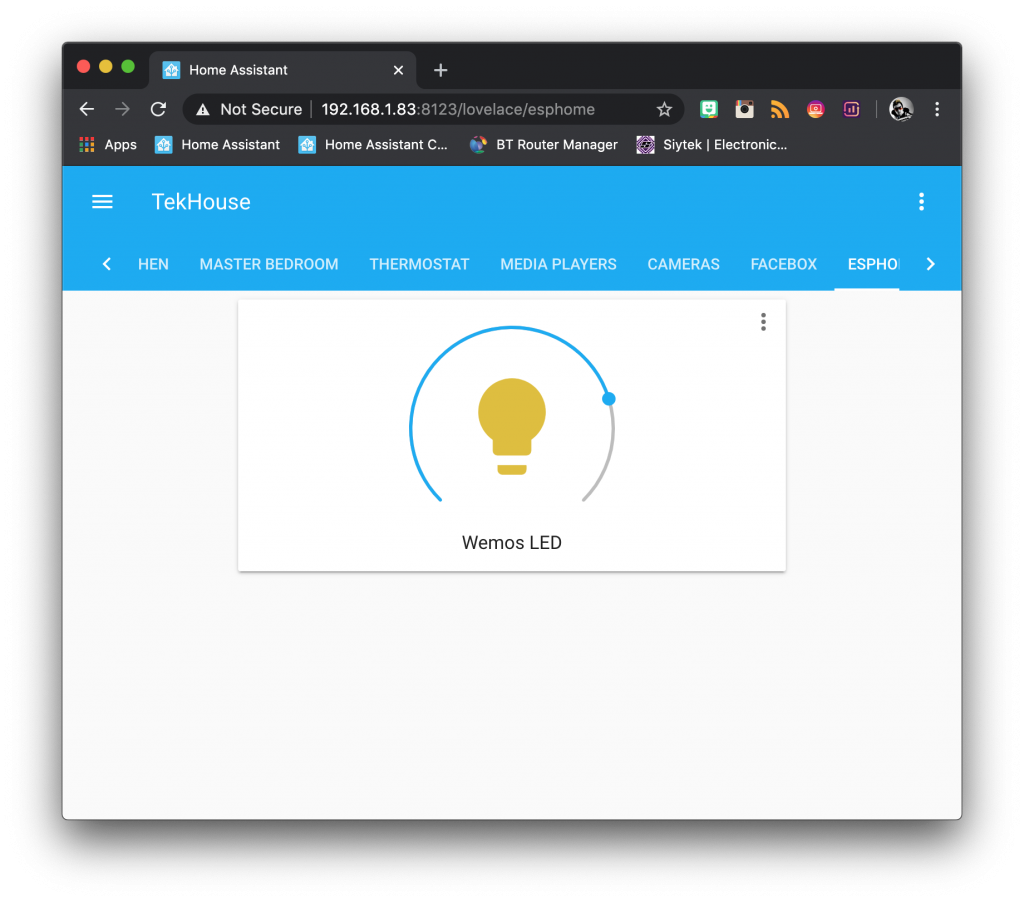
Once configured your device will appear under the list of configured devices. From here you can navigate to the device page and add your device to the lovelace user interface.
Go ahead and try out your new ESPHome device! You should be able to turn on the LED as well as control the brightness!
Conclusion
ESPHome is a very powerful and well-made tool that all Home Assistant enthusiasts should have in their toolbox! If you are already familiar with YAML and the Home Assistant configuration then learning ESPHome is a breeze.
The integration with Home Assistant is simple and easy to use, allowing time to be spent on developing a device rather than trying to get the integration to work. I would definitely recommend giving ESPHome a try!
So why not go check out some of my other awesome Home Assistant tutorials to get some inspiration for your next ESPHome device!
Thanks so much for visiting my site! If this article helped you achieve your goal and you want to say thanks, you can now support my work by buying me a coffee. I promise I won't spend it on beer instead... 😏


