Looking for a way to add or expand the digital inputs and outputs on your Home Assistant server? Perhaps you have used up all of your Raspberry Pi GPIO pins and would like to expand the available IO pins?
Once way to do this is to connect an Arduino to the USB port and make the IO pins available in Home Assistant.
This is a great way to expand your existing Raspberry Pi GPIO pins.
It also provides a way to add IO pins to a system that does not have any IO as standard, such as an NUC or Linux box build.
Table of Contents
Prerequisite
You should have Home Assistant installed and running and a basic understanding of YAML including how to edit configuration.yaml. You should also understand how to use a service and entity within Home Assistant.
If you are new to Home Assistant or you are not yet familiar with editing YAML files then you should definitely check out my beginners tutorial on YAML first. I would also recommend taking a look at my other tutorials on automation and scripts.
You will also need an Arduino board, a USB cable and the Arduino IDE installed on your system. If you don’t yet have the Arduino IDE, head over to the website and download the latest version.
Flash Arduino
The first thing we need to do is flash the Firmarta firmware onto Arduino. This firmware allows external devices to control Arduino over the serial port.
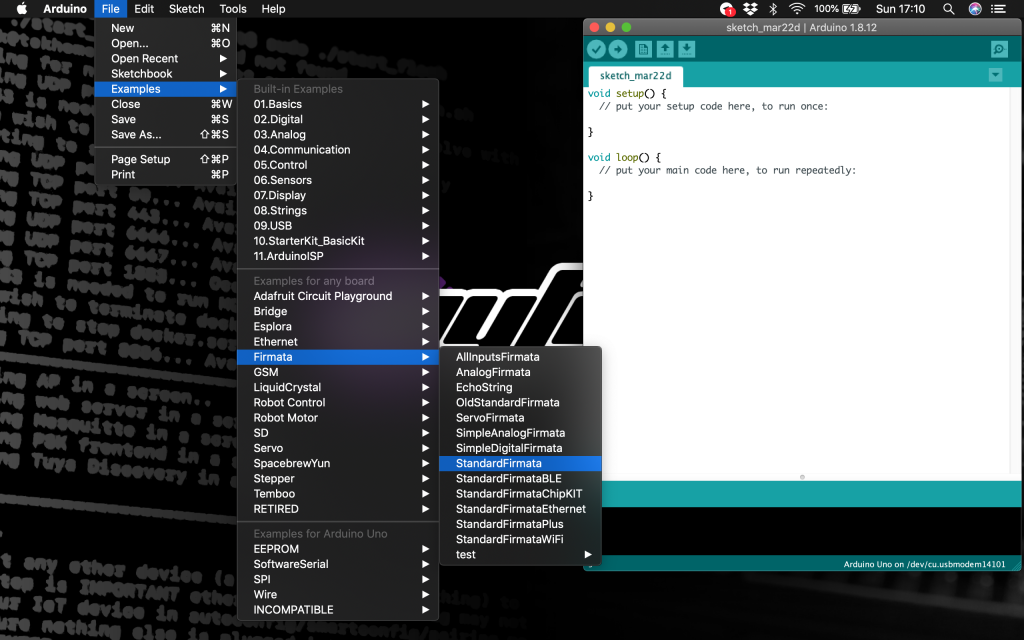
Connect your Arduino to the computer with a USB cable and open up the Arduino IDE. Click on file > examples > Firmata > StandardFirmata to open the Firmata firmware in the IDE.
Make sure you have the correct board and port selected from the tools menu. If you need help with this, check out the Arduino getting started guide.
Once you have the correct board and port selected, go ahead and upload the Firmata sketch to your Arduino.
Now that we have have the Firmata firmware loaded on to our Arduino we need to disconnect it from the computer and plug it into our Home Assistant server.
Raspberry Pi users who are using the standard Home Assistant image should be able to skip ahead to configuring Home Assistant.
Setup Linux
If you are using Home Assistant on a Linux based system such as Ubuntu server and you are using a Docker container, you will need to carry out the next steps in order to give your user and the Docker container access to the serial port.
Find the serial port
If you have a single genuine Arduino board connected then it is likely the name of the serial port will be /dev/ttyACM0. However we need to confirm this in order to correctly configure Home Assistant.
From the terminal of the Home Assistant server type the following command.
ls /dev/ttyACM*
The terminal should return the full name of the port. If it is not returned then you can try the following command.
ls /dev/ttyUSB*
In either case if you have more than one result returned, you can run the command with and without the Arduino connected. The result that disappears and reappears depending on whether the Arduino is connect is the correct name of the port.
Add user to group
First we need to create a group called lock. Go ahead and enter the following command.
sudo groupadd lock
Then we need to add our user name to the groups lock and dialout with the following command. Replace USER-NAME with the username that you use to log into Linux.
sudo usermod -a -G dialout,lock USER-NAME
Create serial port rule
We also need to create a udev rule for the serial port. First go ahead and create a new file with the following command. It will open in the Nano text editor as a new file, but you can use vi or another editor if you prefer.
sudo nano /etc/udev/rules.d/99-serial.rules
Next we need to add the following rule to the file. You should change the port if your port is named differently (non-Genuine Arduino boards for example).
KERNEL=="ttyACM[0-9]*",MODE="0666"
Copy and paste it into Nano and then press ctrl + X to exit, followed by ‘y‘ to save the changes. Once you are back at the command prompt, go ahead and reboot your machine. After rebooting we are ready to configure Home Assistant.
Setup Home Assistant
Now that we have Arduino connected, Firmata installed and the other prerequisites implemented we can add the integration to Home Assistant.
Add the Arduino integration
Go ahead and open up your configuration.yaml file in the file editor and add the following integration. Then save the file and restart Home Assistant.
arduino:
  port: /dev/ttyACM0
Genuine Arduino boards will appear as ttyACM0, however if you are using a clone board the name may be different. If you are using Linux or some variation of a Docker installation you should have the port information from this section.
If you are using a Raspberry Pi with the standard installation image, you will need to SSH to the debug prompt. From there you can check the devices by typing the following command.
ls /dev/tty*
If you have more than one result returned, you can run the command with and without the Arduino connected. The result that disappears and reappears depending on whether the Arduino is connect is the correct name of the port.
Controlling Arduino
With everything setup it is possible to either switch the state of digital pin between on and off with Home Assistant. You can also read the analog value on one of the analog pins.
To control a digital output pin we can map the pin to a switch entity. To read the value of an analog pin we can map the pin to a sensor entity.
Adding a switch
In the configuration.yaml file we simply need to add the following code to the switch integration to map a pin to a switch entity.
switch:
  - platform: arduino
    pins:
      1:
        name: arduino_pin_1
In order to map more pins we can just add them to the list. Lets add the LED pin, which is digital pin 13.
switch:
  - platform: arduino
    pins:
      1:
        name: arduino_pin_1
      13:
        name: arduino_led
Once we have saved the configuration.yaml file and restarted Home Assistant, we should have two new switch entities.
switch.arduino_pin_1
switch.arduino_led
Now we can use the switch.turn_on and switch.turn_off services to turn on and off these digital pins. Awesome!
Adding a sensor
To read any of the analog pins on our Arduino board we need to map them to a sensor entity. We can do this by adding the following code to our configuration.yaml file.
sensor:
  - platform: arduino
    pins:
      1:
        name: arduino_A0
Again we can map more pins by adding them to the list.
sensor:
  - platform: arduino
    pins:
      0:
        name: arduino_A0
      1:
        name: arduino_A1
      2:
        name: arduino_A2
Once we have saved the configuration.yaml file and restarted Home Assistant, we should have three new sensor entities.
sensor.arduino_A0
sensor.arduino_A1
sensor.arduino_A2
The state of each of these sensors will be a numerical value between 0 and 1023 which represents the voltage on the analog pin, 0 to 5 volts respectively.
Conclusion
In some specialist cases it may be desirable to have some general purpose input/output pins connected directly to our Home Assistant server.
Linking an Arduino via the USB cable provides a simple and convenient way to achieve this.
Arduino is a fantastic platform that has revolutionized the electronics industry and given rise to the maker community!
For more inspiration, why not check out some of my other cool Arduino projects!
Thanks so much for visiting my site! If this article helped you achieve your goal and you want to say thanks, you can now support my work by buying me a coffee. I promise I won't spend it on beer instead... 😏


Can you do binary sensor with this?
HI
Sorry to bother, i just find out that it didn’t work for me. Issue is this command ( sudo groupadd lock) is not recognized by ha terminal. Im running ha on rasspbery 3b+
hope u share some light on this problem
best
rob