Do you want the latest version of Fritzing for Windows absolutely free of charge? This tutorial will teach you how to build the latest version of Fritzing from source code, which is still freely available from Github.
This tutorial is specifically for Windows users. If you are using Mac or Linux, you can follow this guide instead.
So, what exactly is the point of building Fritzing from the source code? Fritzing used to be a community-driven, free-to-download project, but at some point they imposed a donation requirement for downloading the application.
However as the program still remains an open source project, the source code is still freely available to download at no cost.
Therefore it is possible for us to download the source code absolutely free of charge and then use a few tools to compile it into a working program. Exactly the same program that you would otherwise be paying for.
I will mention up front that although the process is quite straight forward, there are some large file downloads required and it will take a little time.
If you don’t have the time or effort to invest in compiling Fritzing from source or if you want to support the project, you might be better off just paying a small fee to download it.
For everyone else, let’s get into it!
- Prerequisite
- Download Visual Studio
- Download Qt
- Install Git
- Clone the Fritzing Source and Parts
- Download the Latest Version Of Boost
- Download and Install CMake
- Download and Build Libgit2
- Launch Fritzing in Qt
- Build a Packaged Version
- Conclusion
Prerequisite
You will need a Windows-based computer capable of running Qt and Visual Studio. Don’t worry if you have never heard of either of those, we will get to that.
A fairly modern basic computer should do just fine. I would recommend using Windows 11 as this is what will be used for this tutorial. However it should work just fine with Windows 10 too.
I would also advise that you begin with a decent internet connection in order to download Qt and Visual Studio. These are the two primary tools that we need to build Fritzing from source and are both large downloads.
Therefore the first thing we should do is get those downloads going if you don’t already have the two tools required.We can complete some other tasks whilst we wait for the downloads to complete.
Step 1: Download Visual Studio
Downloading Visual Studio is completely free and quite simple. However Visual Studio is a huge package and it would be crazy to download everything!
We only need to download the components required for building Fritzing. First go ahead and download the online installer from the Visual Studio download page.
During the installation you will get the opportunity to add the necessary components. It is also possible to add and remove components later from the Tools > get new tools and features menu in Visual Studio.
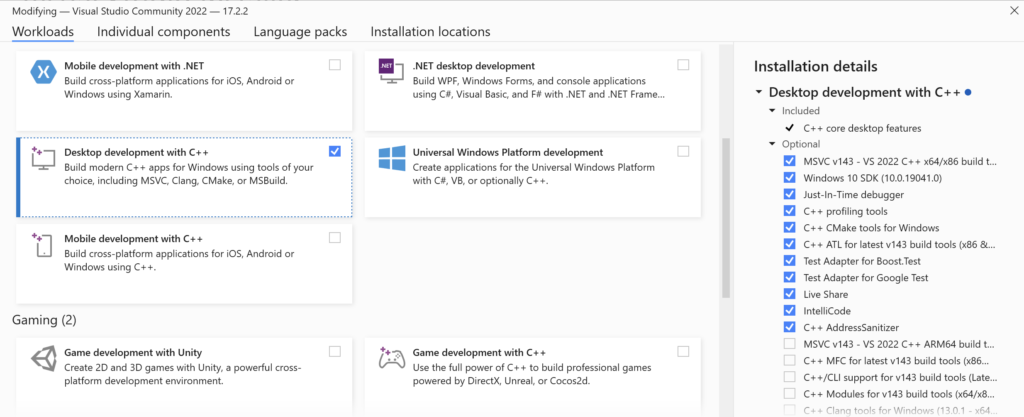
First we need to make sure that we install Python 3.
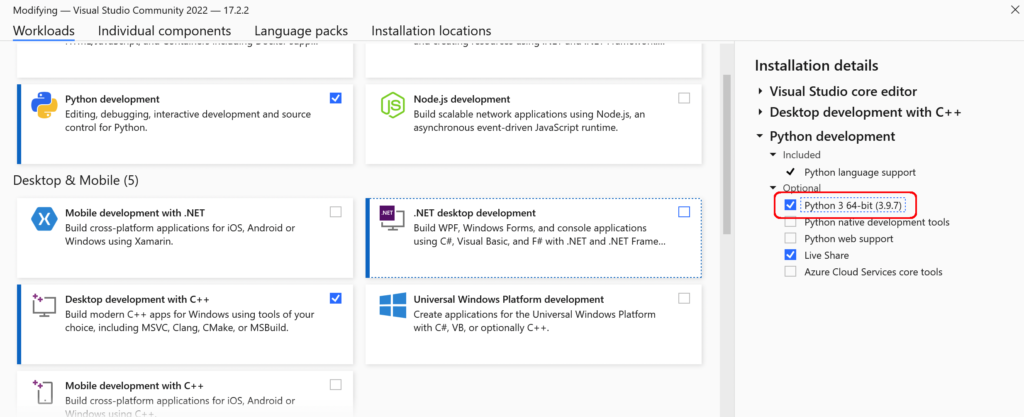
Next we need to make sure Desktop development with C++ is installed, with the components shown in the following screenshot.
Step 2: Download Qt
Qt is a tool that is used for designing apps that can be executed on any major platform, such as Windows, Linux and Mac OS.
This is the beautify of Qt, it makes cross-platform development easier.
Fritzing has been developed using Qt, making it available for multiple platforms and possible to develop by developers using different operating systems.
In order to build Fritzing, we will need Qt. Thankfully for our usage it is totally free to download and easy to install!
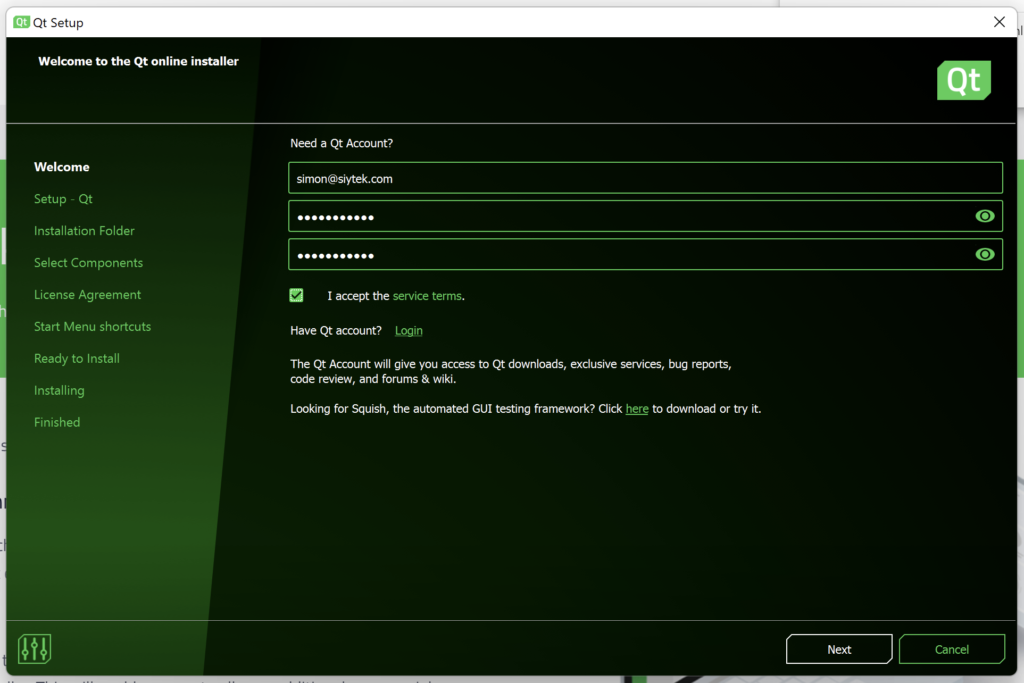
Go ahead and download the online installer and follow the onscreen instructions. You will need to sign up for an account, but it only takes a moment and it is totally free.
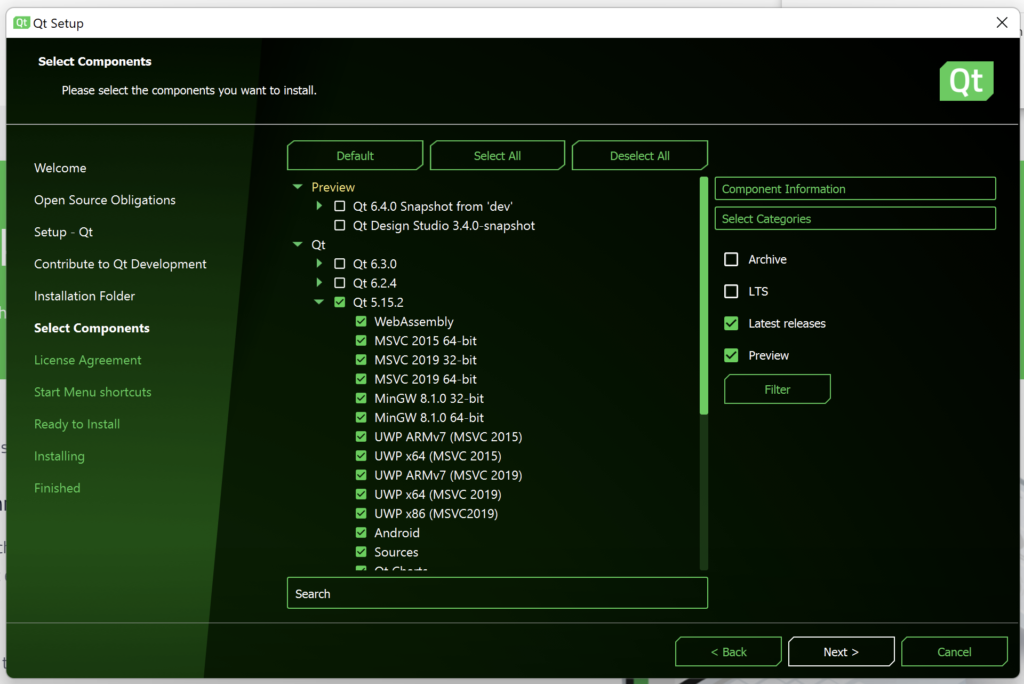
*** IMPORTANT: You will need to install the correct version of Qt.
At the time of writing, the official build guide states that Fritzing should be built with Qt version 5.15.2. Therefore this is the version we should install under the select components stage of the installation.
Step 3: Install Git
The source code for Fritzing can be found on Github, a website that is dedicated to source code version control.
The easiest way to utilise source code and other project assets found on Github is to use the command line tools.
Go ahead and download Git for Windows. Once it has downloaded you can install it.
Step 4: Clone the Fritzing Source and Parts
Once you have installed Git and Visual Studio has finished installing, we can get the latest version of the Fritzing source code.
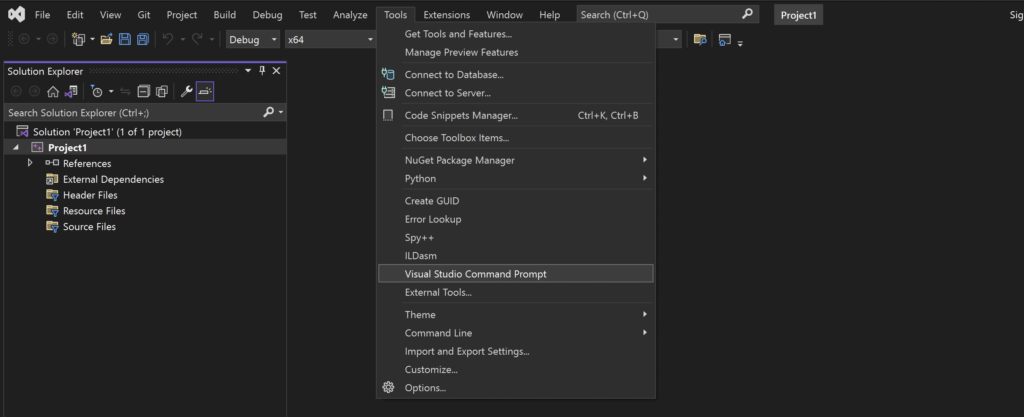
Go ahead and open Visual Studio (from the Start Menu) and create a new project so that you are taken to the main screen.
From here we can access the command prompt by clicking Tools > Visual Studio Command Prompt.
When the command prompt opens we will need to create a temporary Fritzing directory, where we will gather together everything required to build Fritzing.
In my case I will create a directory within the main user directory, just for simplicity. You can choose a different location, just make sure you amend the path as necessary.
If you are unsure, use the same path as used in this tutorial, the directory is only temporary anyway.
Change to the directory where you wish to create your temporary Fritzing build directory.
cd c:\Users\<your user name>
From here on I will use my own username, you should replace it with your own.
cd c:\Users\siytek
Then create a new folder called fritzing.
mkdir fritzing
Next we need to enter the newly created folder.
cd fritzing
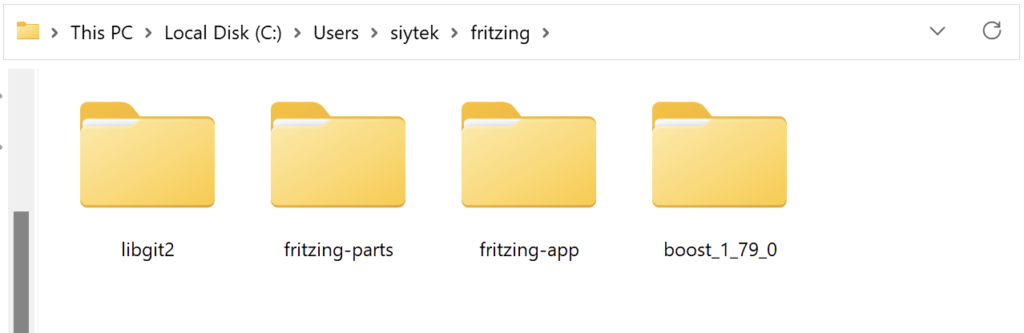
Lastly we can clone both the Fritzing app source code and the Fritzing parts library to this folder with the following two commands.
git clone https://github.com/fritzing/fritzing-app.git
git clone https://github.com/fritzing/fritzing-parts.git
These two commands will create two new sub-folders in our Fritzing build directory containing the necessary source files.
Step 5: Download the Latest Version Of Boost
Next we need to download a series of libraries that are used for building Fritzing. These libraries are called Boost and are provided free of charge.
First, head over to the download page for Boost. Go ahead and download Boost for Windows in .zip format.
Once the download has completed, we need to extract it to our Fritzing build directory. It will create a new a new subdirectory alongside our existing fritzing-app and fritzing-parts directories.
Step 6: Download and Install CMake
Another tool that we will require to build the source is CMake. This is very easy to install, simply download the Windows version from the download page.
Once downloaded, simply run the installer to install CMake.
Step 7: Download and Build Libgit2
The last component that we require is Libgit2. First head over the Github releases page and download the latest source.zip file.
Once the file has downloaded, unzip it into the Fritzing build directory, alongside the other subfolders that we have already created.
After the extraction we need to amend the name of the folder by removing the version information. We need to rename the folder to libgit2 in order for Qt to be able to recognise the files in there.
In order to use libgit2 we also need to compile the source first. This can be done from the Visual Studio command line using cmake, which we installed earlier.
From the Fritzing build directory, enter the libgit2 folder.
cd libgit2
Next we need to create a build folder for libgit2. Qt will recognise the folder build64 so we can go ahead and create it, then change into that directory.
mkdir build64
cd build64
Lastly we can execute the following two commands in order to build libgit2.
cmake ..
cmake --build . --config Release
Step 8: Launch Fritzing in Qt
We should now have a Fritzing build folder that contains subfolders libgit2, boost_x_xx_x, fritzing-parts and fritzing app.
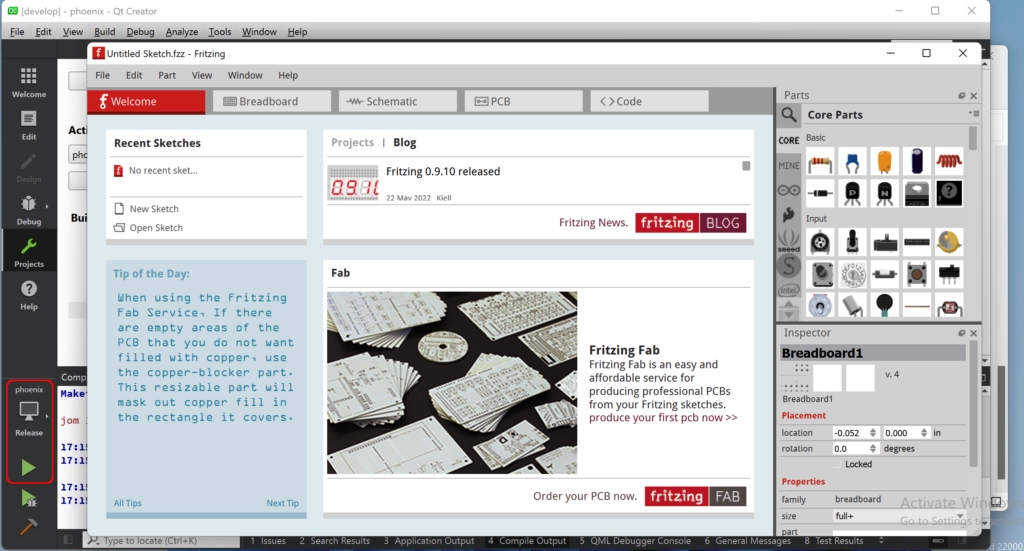
At this stage we are ready to open Fritzing in Qt. From Windows explorer, open the fritzing-app directory and double-click the phonex.pro file to open the Fritzing project in Qt.
After Qt configures the project at first run it will take you to the main screen. Click the projects button on the left-hand tool menu.
Under Build & Run in the left-hand menu, locate Desktop Qt 5.15.2 MSVC2019 64bit and click Run to bring up Run Settings in the right-hand main screen.
We will need to enter some arguments into the command line arguments section;
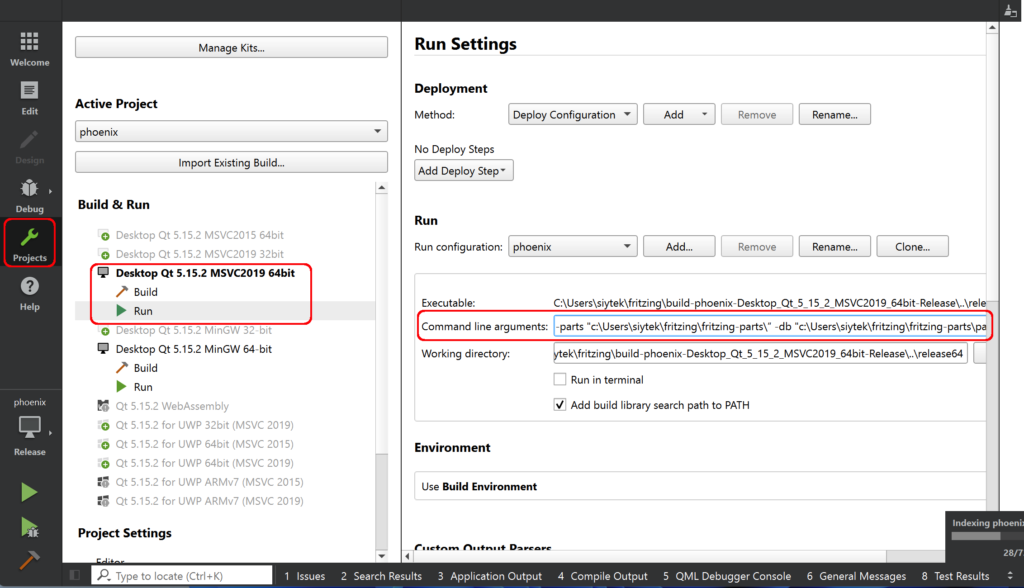
For the first time that we run Fritzing from Qt we will need to enter the following arguments.
-f “c:\Users\siytek\fritzing\fritzing-app\” -parts "c:\Users\siytek\fritzing\fritzing-parts\” -db "c:\Users\siytek\fritzing\fritzing-parts\parts.db"
Following the first successful run within Qt, we can remove the ‘-db’ argument as the database only needs to be generated once during the first run.
Now we are finally ready to run Fritzing for the first time!
In the left-hand toolbar at the bottom, change the version to release and click the play button (large green triangle). If everything has been successful, this will launch Fritzing!
Now that we have run Fritzing successfully, go ahead and amend the command line arguments to the following.
-f “c:\Users\siytek\fritzing\fritzing-app\” -parts "c:\Users\siytek\fritzing\fritzing-parts\”
If you got this far, congratulations! However this is not the final step, as we are still running Fritzing inside of the Qt development environment. We still need to make it deployable.
Step 9: Build a Packaged Version
Once we have Fritzing up and running in Qt we can build a packaged version. This is the version that you would normally download, which can run independently of the development environment.
There is a handy script packaged within the fritzing-app source directory called release_fritzing.bat and you can find it in the following location.
C:\Users\<your user name>\fritzing\fritzing-app\tools
Unfortunately this script does not work directly ‘out of the box’ and needs a little modification. At the time of writing it is somewhat out of date.
Right-click the release_fritzing.bat file, click show more options and then click edit in order to open the script in Notepad.
If you did not install Git in the standard location, you will need to change the following path to reflect your chosen installation location.
set PATH=%PATH%;"C:\Program Files (x86)\Git\bin";
The next line I needed to modify was related to the version of MSVC used. In the case of this tutorial (in the Qt setup) it was the 2019 version.
We need to amend the following part of the script to reflect this as well as the correct Qt path. Replace ‘2017’ with your version and change the QTBIN parameter to the correct path as follows.
    ) ELSE IF %3==2019 (
        set QTBIN=C:\Qt\5.15.2\msvc2019_64\bin
Now the script has been edited, go ahead and save it, then close Notepad and go back to the Visual Studio command prompt.
We will need to execute the release_fritzing.bat in order to package Fritzing. The script needs to be run with three parameters; version number, number of bits and Visual Studio version (year).
release_fritzing.bat [release ver] [bits] [Vis. Studio year]
From the Visual Studio command prompt, navigate to the folder containing the script.
cd c:\Users\<your user name>\fritzing\fritzing-app\tools
Then execute the script with the three variables. The version does not matter so much, we will enter 0.9. We will build the 64-bit version. Lastly using 2019 will correctly set our QTBIN parameter that we edited in the script.
release_fritzing.bat 0.9 64 2019
Once the script has completed, you will have a fully functioning release version of Fritzing!
You will find the outputted files in the following directory. Enjoy!
C:\Users\<your user name>\fritzing\release64\deploy
Conclusion
Building Fritzing is not so difficult but it does require quite a number of steps in order to complete.
It can be a very rewarding experience when you have successfully build Fritzing from source! …and things always taste better when they are free 🙂
Compiling software can be a great learning experience. However if you use Fritzing a lot and find it useful, you should consider supporting the developers as it is not so expensive to buy a compiled version.
For other interesting guides about compiling code, go ahead and check out my other DIY compilation tutorials!
Thanks so much for visiting my site! If this article helped you achieve your goal and you want to say thanks, you can now support my work by buying me a coffee. I promise I won't spend it on beer instead... 😏

With the steps described above, you do not build the latest version of Fritzing (even not the latest version available at the date this article has been published). This is because you do not switch the branch after cloning fritzing-app repository. The default branch is “develop” which is a bit outdated (from September 2022). For the code from latest release (0.9.10), you need to switch to branch “main”. And with this code base, the above described steps are not sufficient anymore. Latest code requires two more dependencies to be downloaded and built separately: quazip and ngspice. Also the file quazipdetect.pri has to be patched to fit to the folder structure of the quazip package. Then I had to separately generate the UI header files because the overall build process didn’t care and failed. Unfortunately I still didn’t succeed to build without errors yet, I still have unresolved symbols from libgit2 (I don’t know if it is caused by an incompatible version, I downloaded and built the latest one).
Finally managed to build the application after adding some required Windows libraries as linker dependencies to the phoenix.pro file (this solved the errors of unresolved symbols which where actually required by libgit2).
Ahh very interesting J.R, thanks for all the detailed information. I had no idea about the Fritzing version. I imagine the best course of action will be for me to produce a new compilation guide that covers what you have explained. I have been meaning to do a YouTube video to go with this post, so doing a new post and video together would be ideal. Thanks again for taking the time to share the info.
bruh you should update qt installation part and tell us which packages to download i was almost accidentally downloaded 50 gb of packages while installing qt
Thanks anon, a 2023 version of this article is probably overdue, will add it to my to-do list
Thanks managed to compile it and make it run stand alone ,even if this post is slightly out of date , one dependancy needed to be fixed .
All seems to be working . 🙂
Hi,
did you manage to create a new version of your tutorial which covers all current dependencies? Would love it!