If you already have a functioning UTM virtual machine running on your Mac, you may be wondering how you can increase the disk size of the guest operating system.
This is usually necessary when you fill the virtual hard disk on the guest operating system. Even if your physical hard drive has plenty of space, the virtual hard disk does not automatically increase in size to fill more space on your physical drive.
The process necessary for increasing the size of the virtual drive can be broken down into two steps:
- Occurs on the host OS – Increase the size of the virtual drive in UTM, which is usually a file stores on the host operating system.
- Occurs on the guest OS – Edit the partitions in the guest operating system and expand the file system into the newly created space.
The guest operating system is not usually ‘aware’ that it is running in a virtual machine. Therefore the hard drive appears to the guest operating system as an actual physical drive.
When the virtual drive file size is increased using the tools in UTM, the guest operating system simply perceives a physical drive that has ‘magically’ increased in size.
Depending on the guest operating system, you will then need to follow a process in order to make use of the raw disk space that has been added.
This usually involves either creating a new partition in the new raw space, or expanding the existing partition into this space.
you may find yourself running out of disk space even though your physical Mac OS disk has plenty of room.
Prerequisite
You will need to have UTM installed and a functioning virtual machine with either a Windows or Linux operating system installed.
The process of increasing the disk size in UTM is the same for both operating systems so both Windows and Linux users should complete the first step.
Once the virtual disk size has been increase, the guest operating system will see the size increase but you will then need to either increase the existing partition primary to fill the space, or create a new partition.
This process needs to be completed within the guest operating system and is therefore different for Windows and Linux. Choose the appropriate step depending on your operating system:
How to Change a UTM Virtual Disk Size
You can change the size of a virtual disk in UTM using the following steps:
- If the virtual machine is running, first stop it by shutting down the guest operating system.
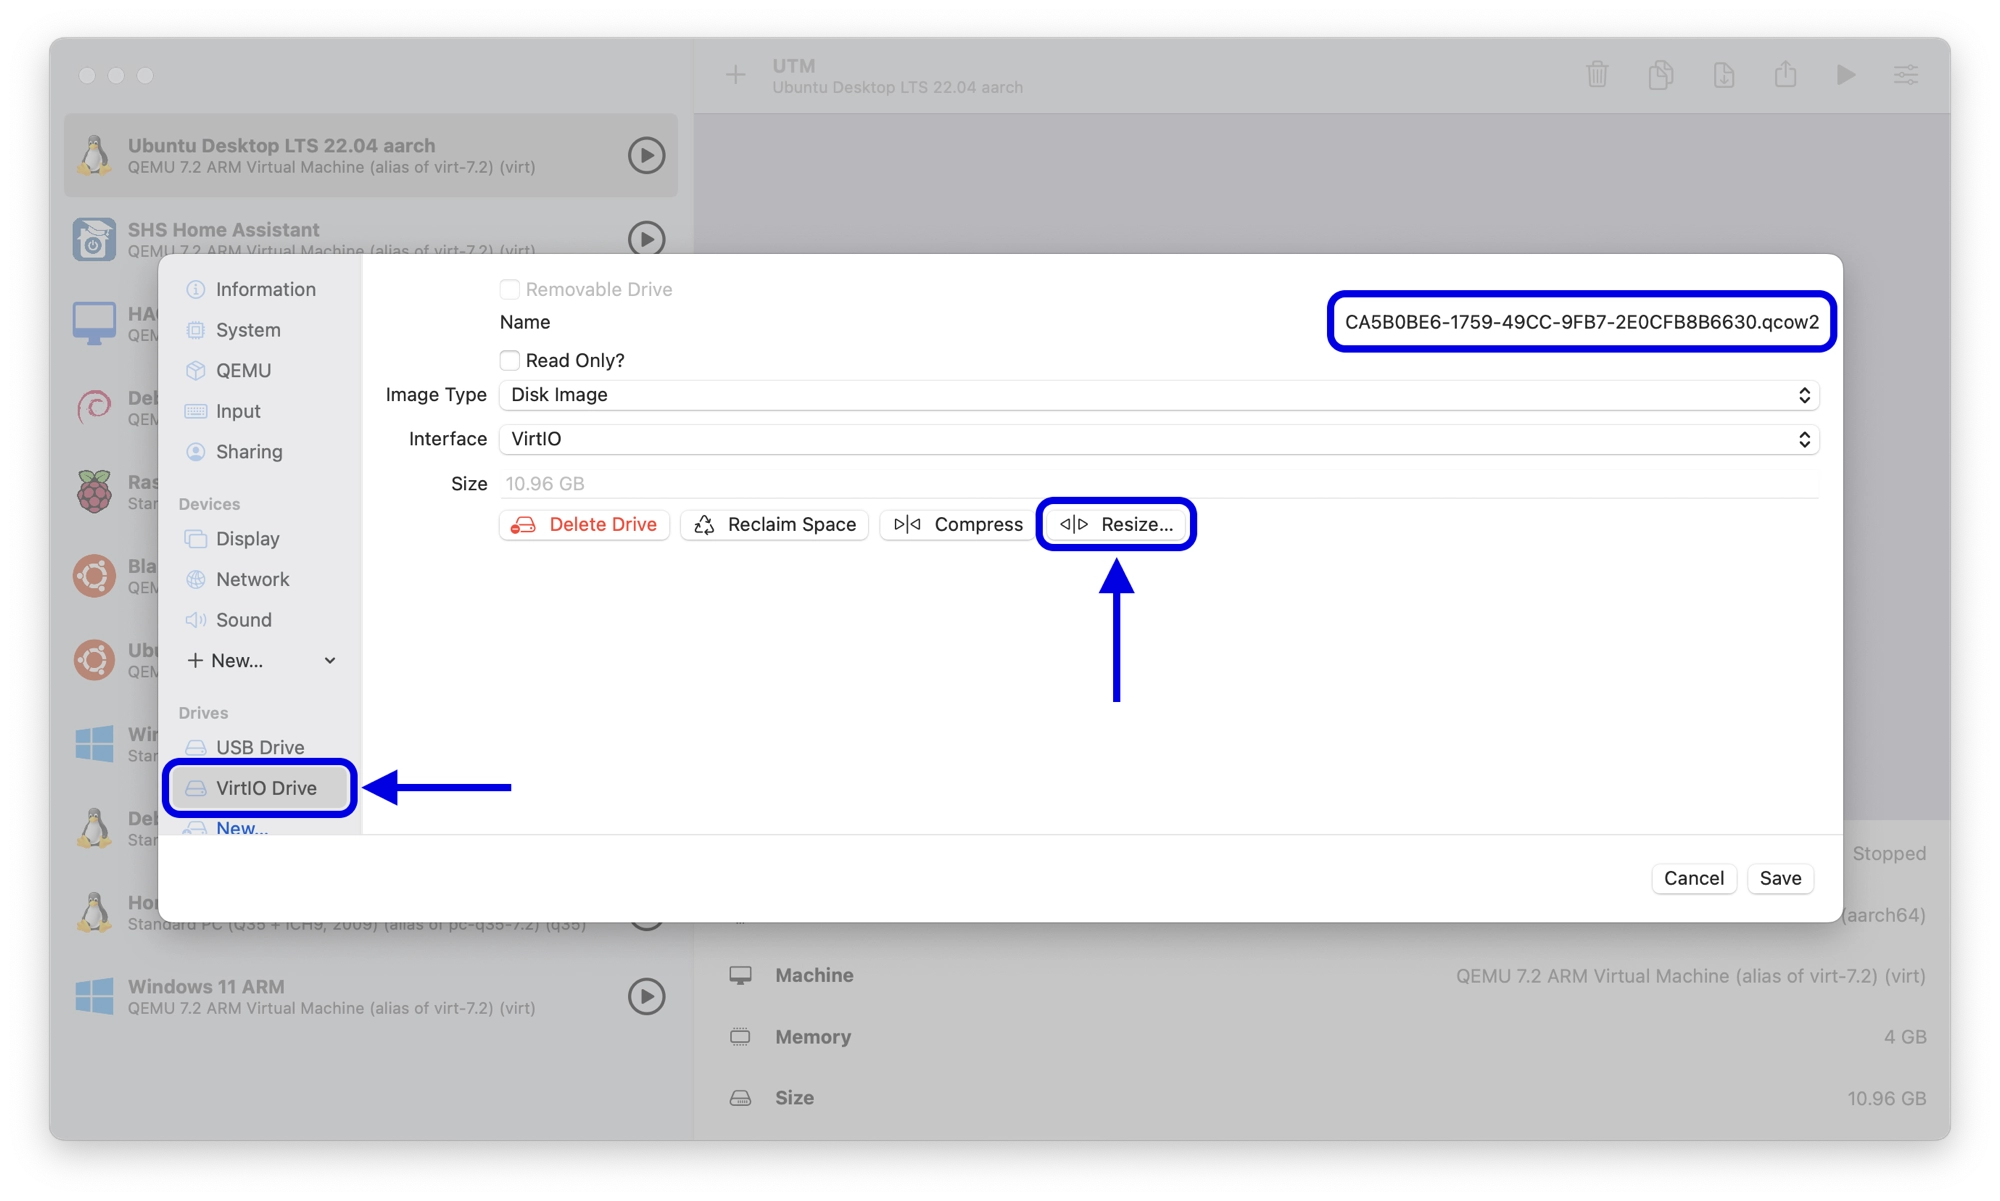
- Right-click the virtual machine in the left-hand sidebar of the main UTM screen and then click edit.
- Under the drives section in the left-hand sidebar, click the main disk. This is most likely a VirtIO drive and will have a .qcow2 file associated with it. This is the file that holds the data kept on the virtual drive.
- Click the Resize… button and enter the size that you would like to resize the drive to.
- Click the Resize button to resize the drive.
How to Expand the Partition
Once you have resized the drive using UTM in the Mac OS host operating system, you will need to either extend the primary partition or create a new partition to fill the newly created space.
This process is different for Windows and Linux guest operating systems:
Expanding a Windows Partition
In order to expand your C: drive into the newly created space, complete the following steps:
- Boot up your Windows virtual machine and log in.
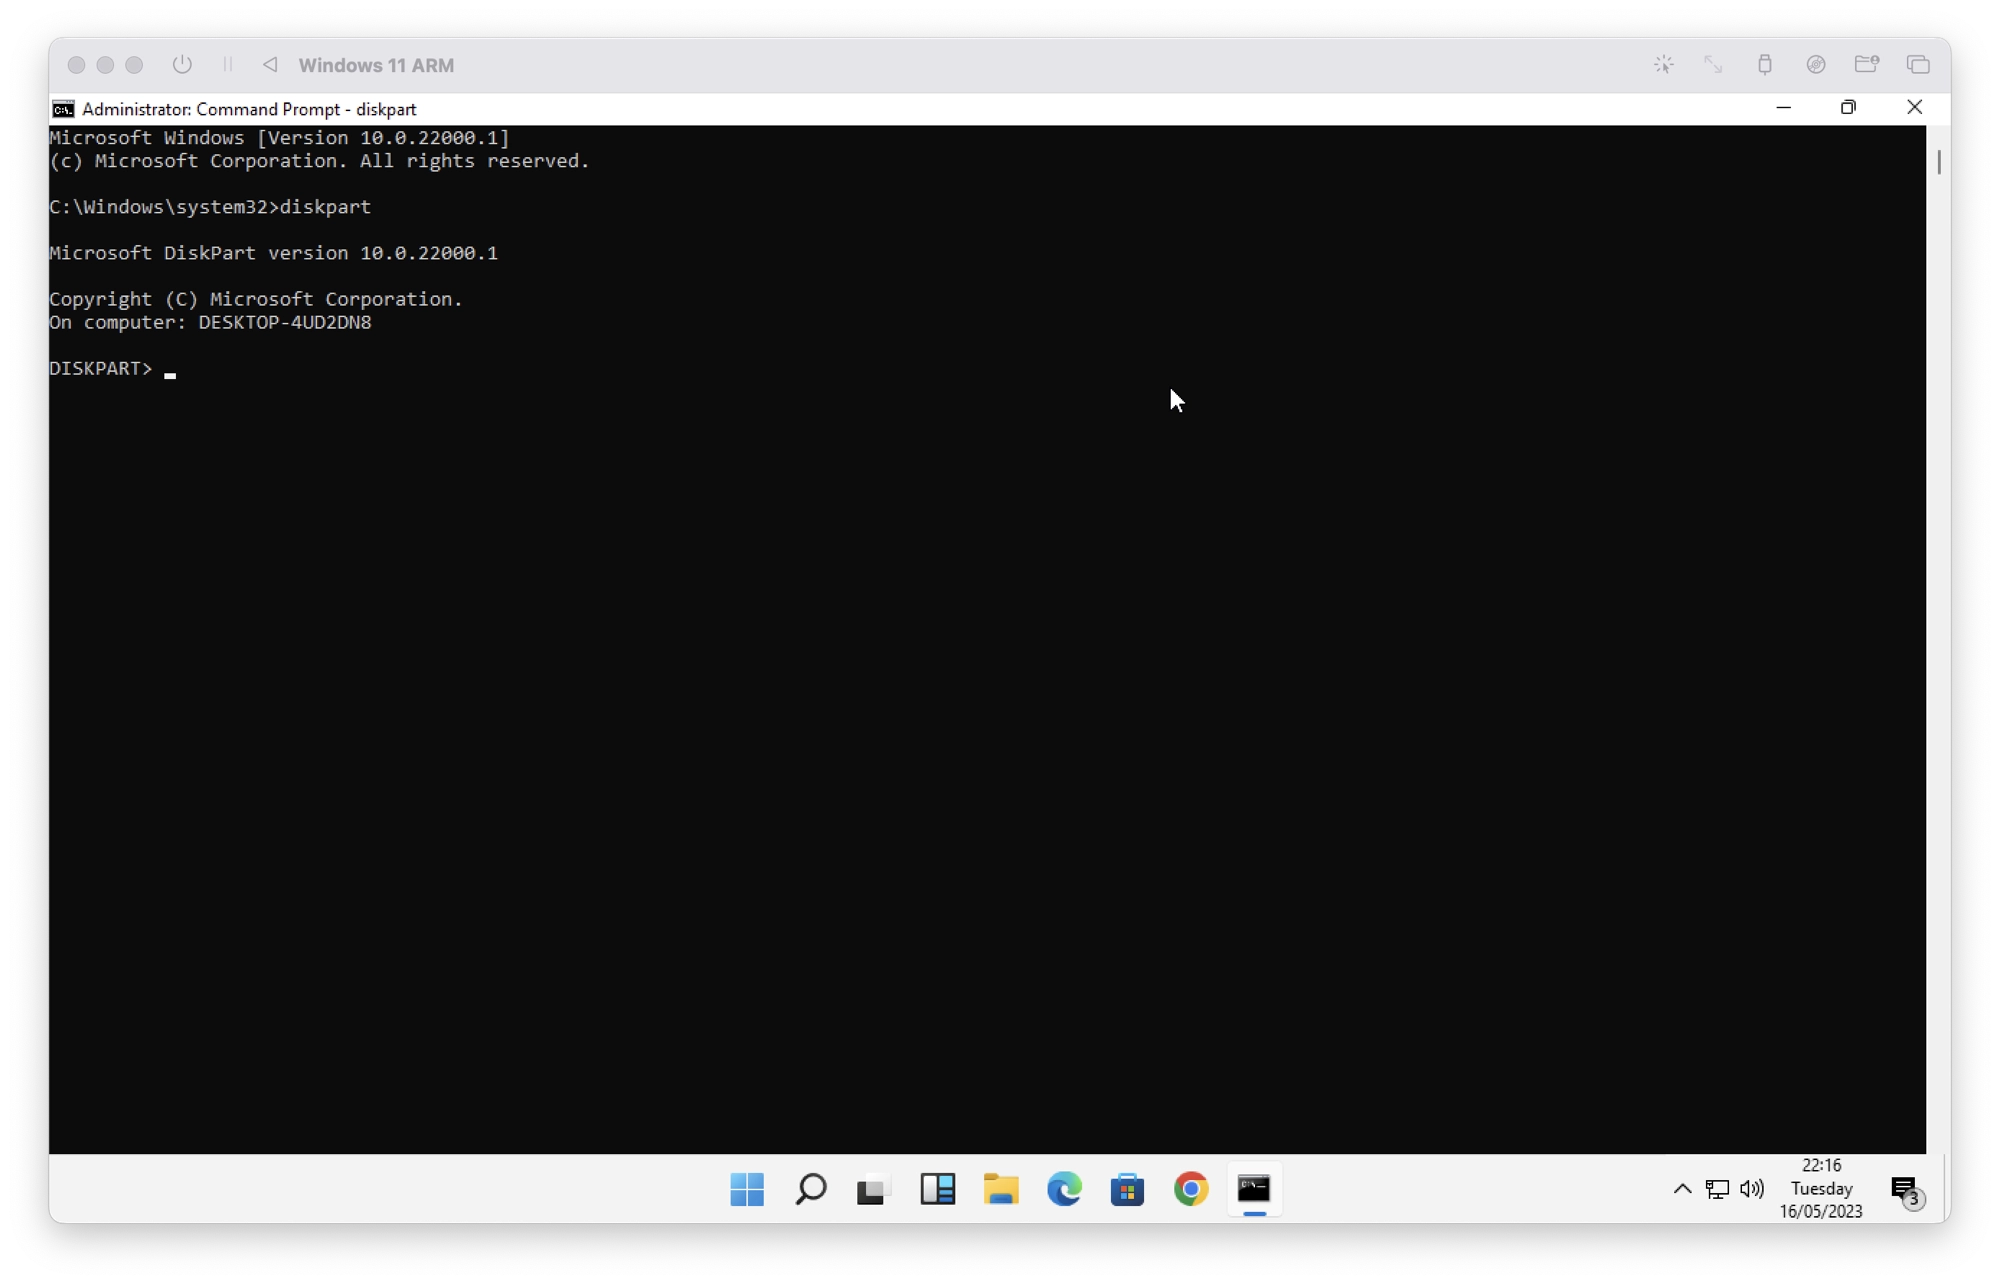
- Right-click the start button and click command prompt (admin).
- At the command prompt, type the command
diskpart. This will take you to theDISKPART>prompt:
- Enter the command
list diskto list detected disks. Note the reference number for the main disk, for exampledisk 0. - Enter the command
select disk 0, replacing the number with the number of your disk if necessary. - Enter the command
list partitionto show all of the partitions for the disk. - First, you may need to remove the recovery partition in order to allow the main partition to expand. Enter the command
select partition #, replacing # with the partition number for the recovery partition. - Enter the command
delete partition overrideto remove the recovery partition. - Next, enter the
list volumecommand to list the volumes and find the volume # associated with the C drive:

- Enter the command
select volume #replacing the # with the volume number of your C drive. In this example, volume2. - Enter the command
extendin order to extend the volume to fill the newly created disk space. - Open the file explorer and navigate to This PC. You should now see that the size of the C drive has increased to fill the newly created space on the virtual disk.
Expanding a Linux Partition
In order to use newly created disk space in Linux, we will need to expand the partition and file system in the newly created space. This process can differ depending on the version of Linux that you are using.
Note that this process is quite lengthy the first time that you run through it. However once you understand the principle, you will be able to repeat the process much quicker and easier.
Note that although it is not essential, I would recommend connecting to your Debian VM using SSH in the Mac terminal. This can make copying and pasting commands easier:
You can find your Debian IP address by typing hostname -I at the Debian command prompt.
Use the following command in the Mac terminal to open an SSH session to Debian:
ssh <your-user-name>@<your-debian-IP-address>
Debian Linux
- If you are using a GUI, open a new Terminal window.
- Sign in as the root user using the command
su - - Ensure that everything is up to date by entering the command
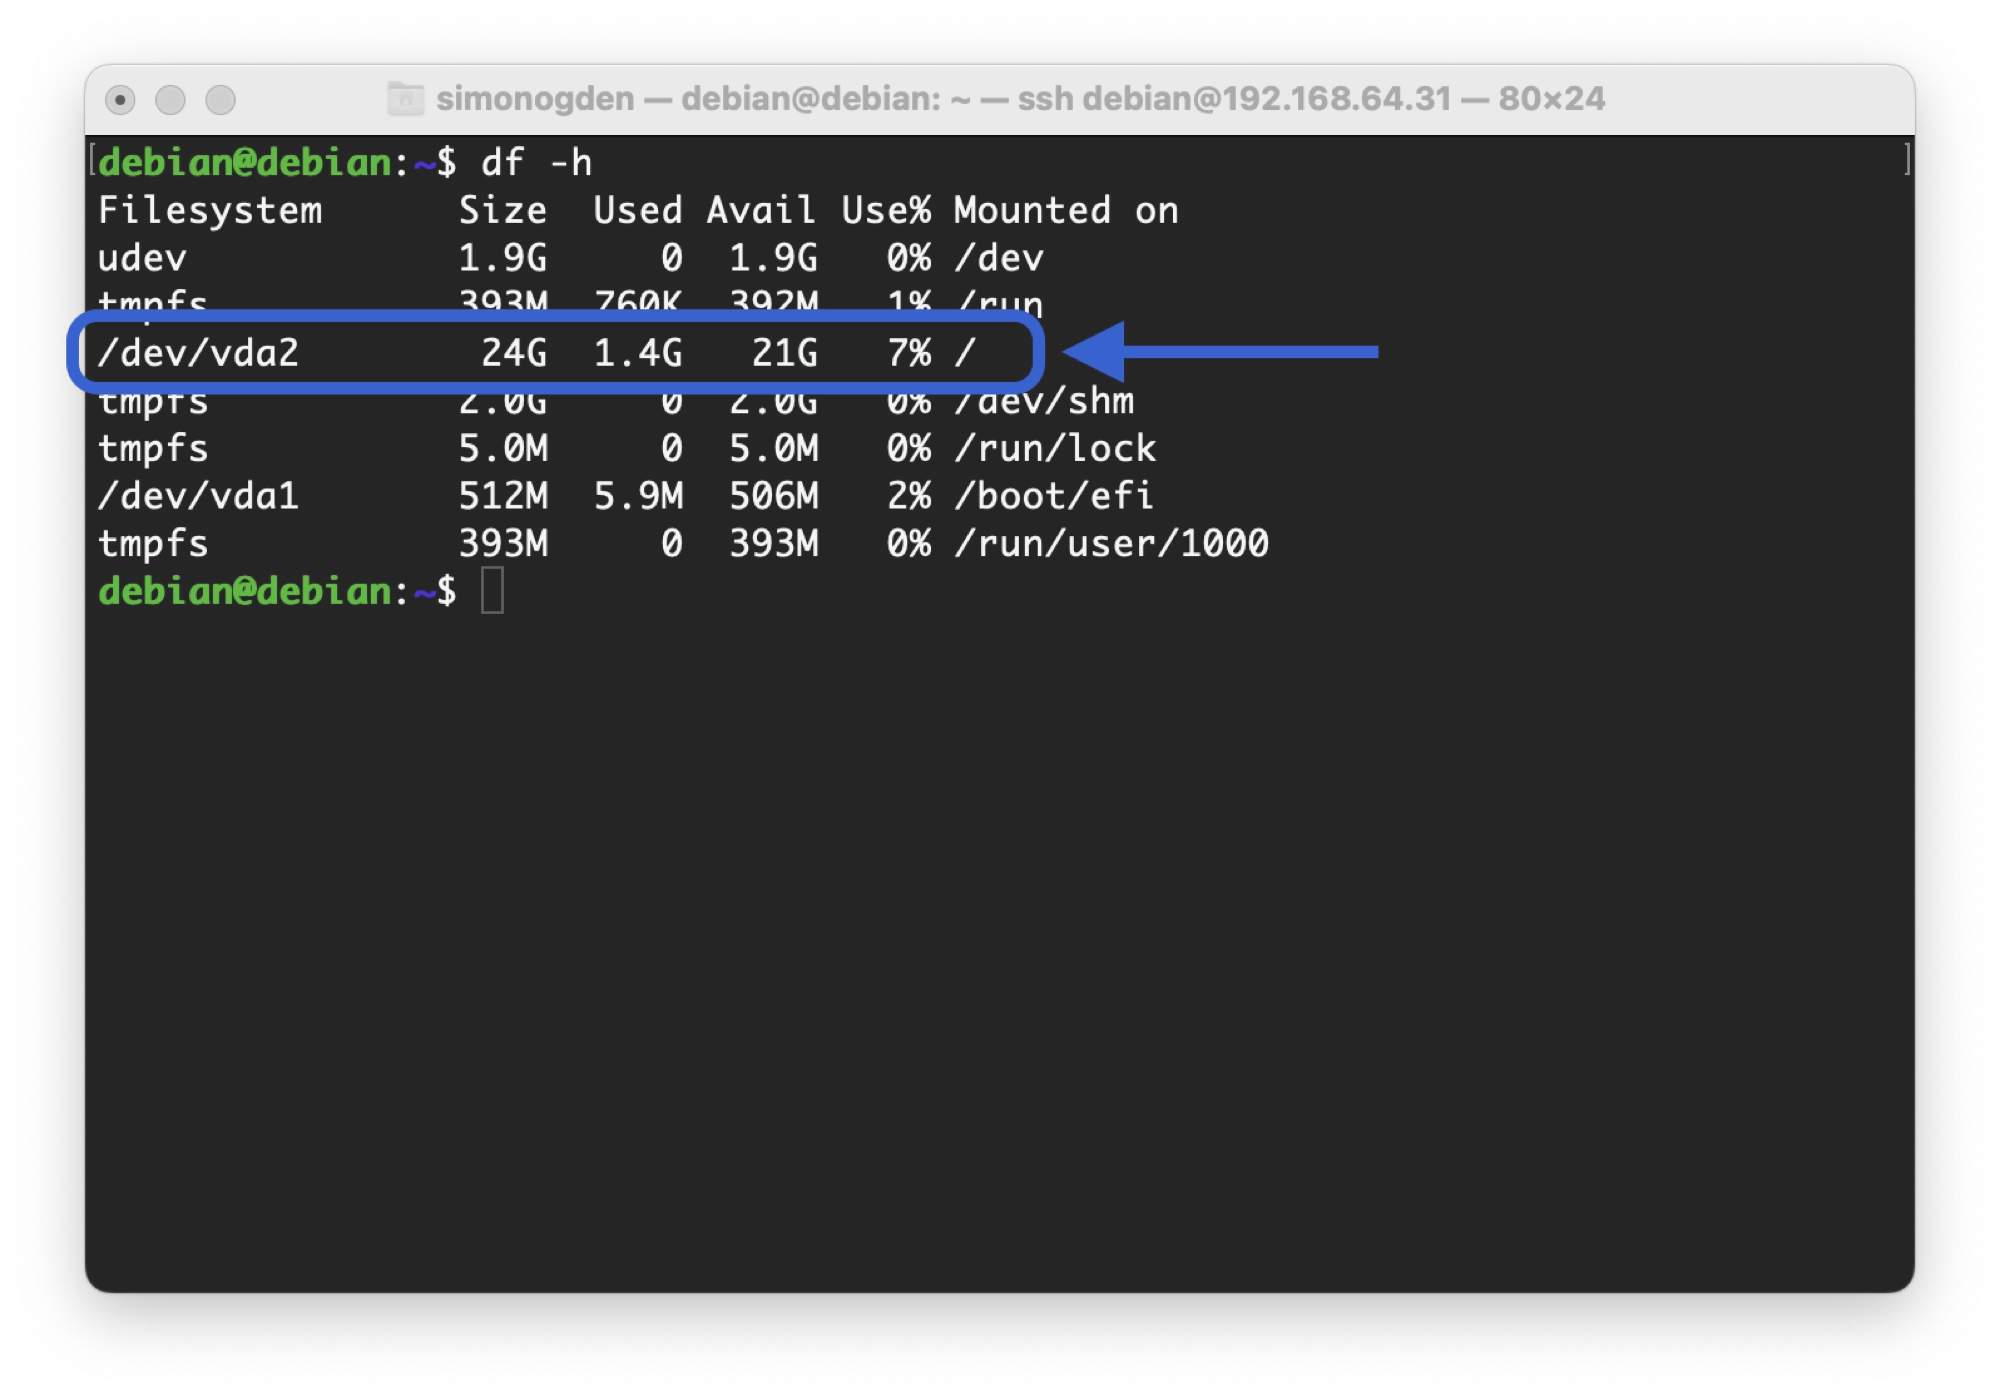
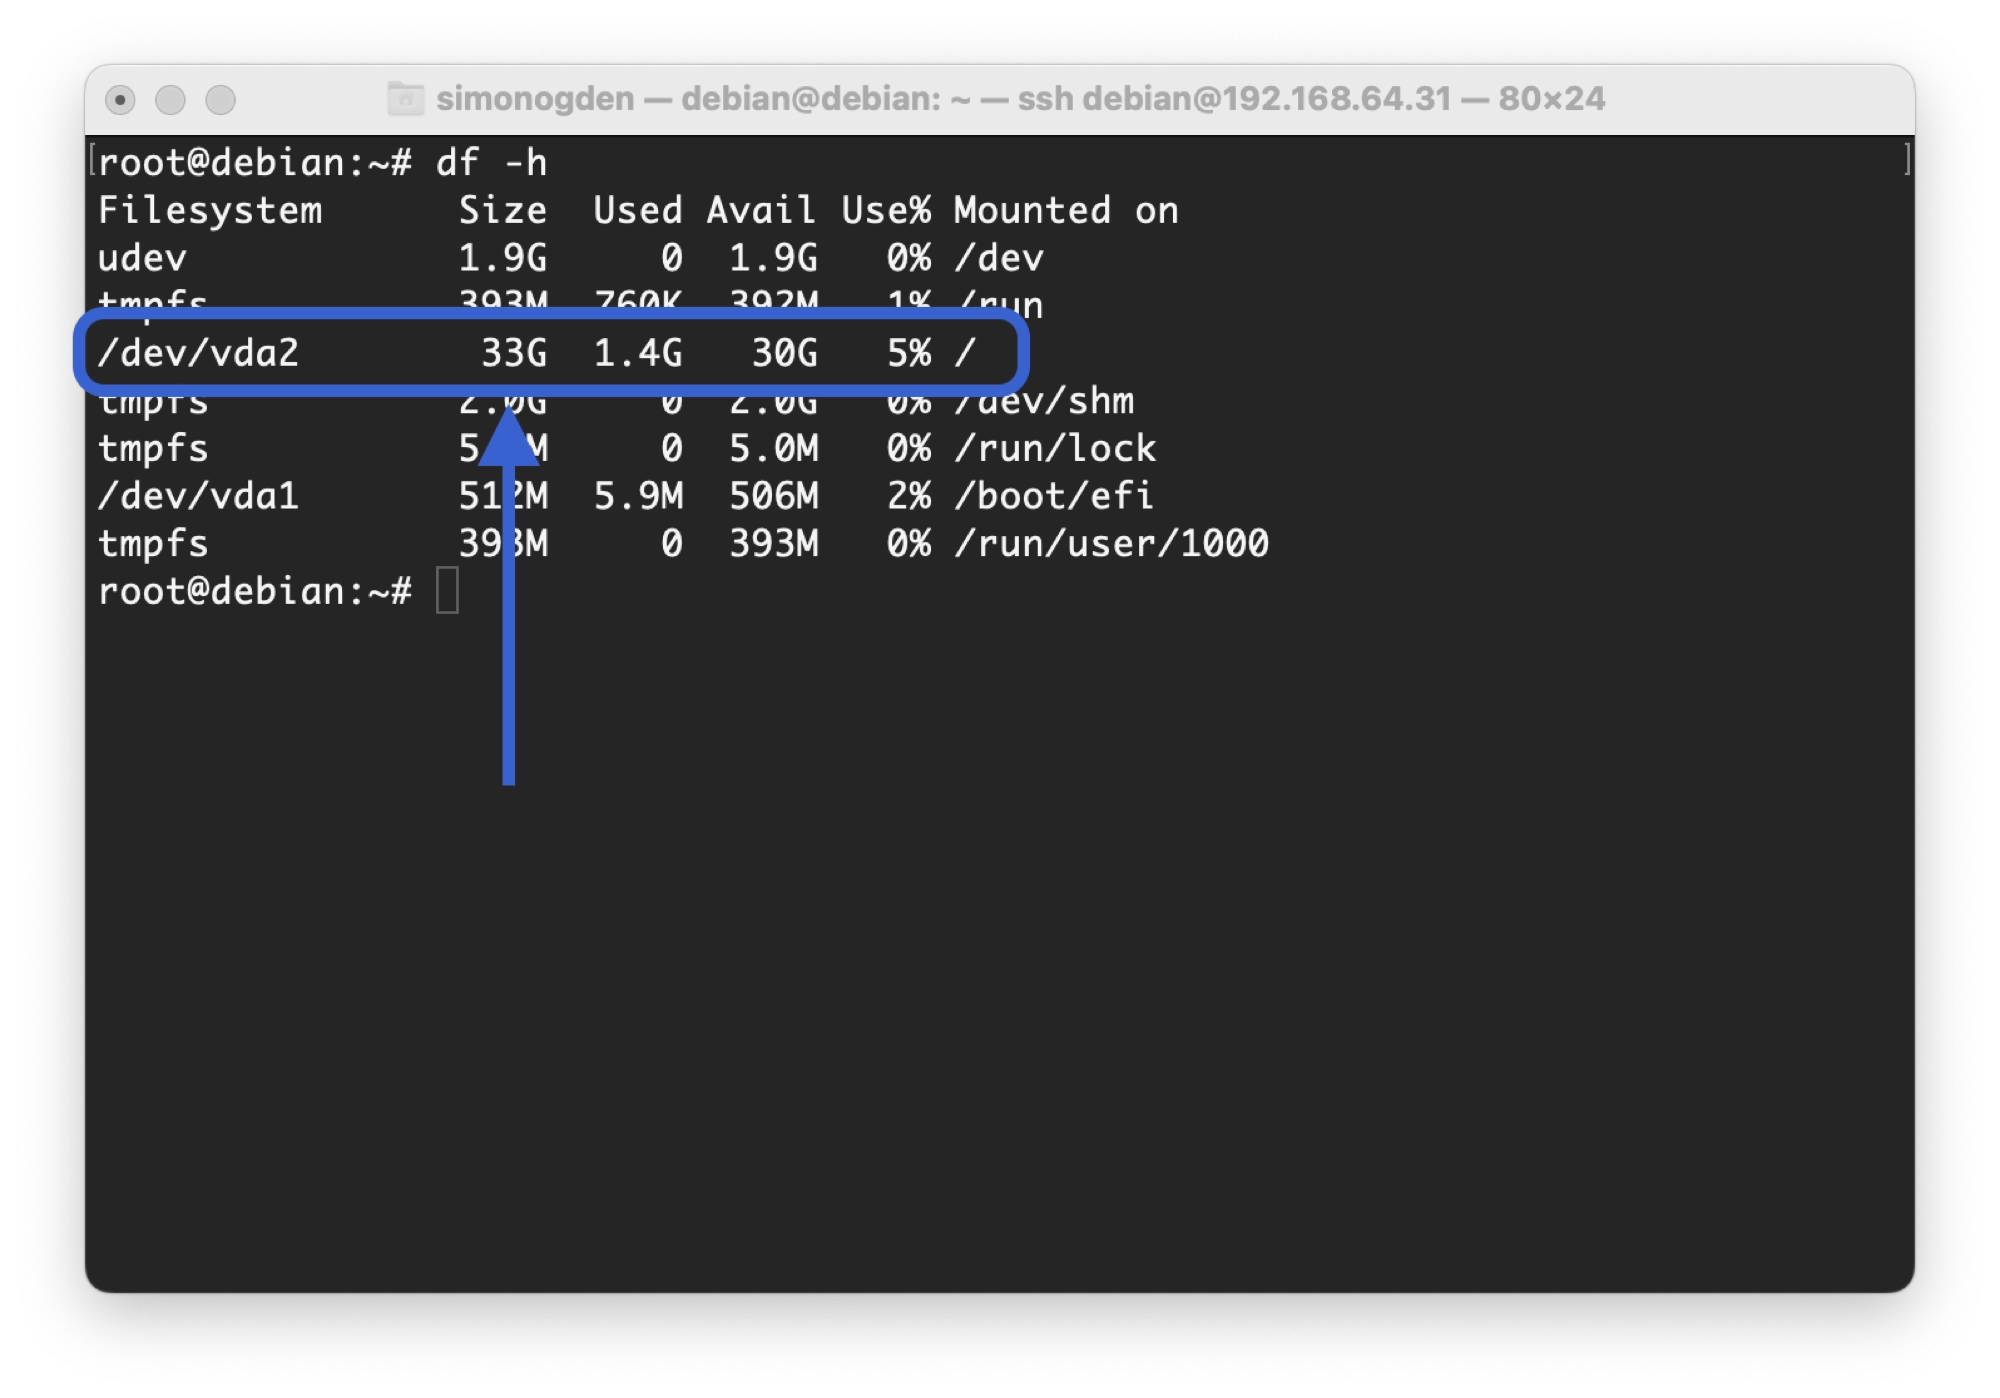
apt-get update && apt-get upgrade -y - First, check the file system that you have with the command
df -h. - Identify the system partition that has the root folder “/” mounted. In this example,
/dev/vda2.
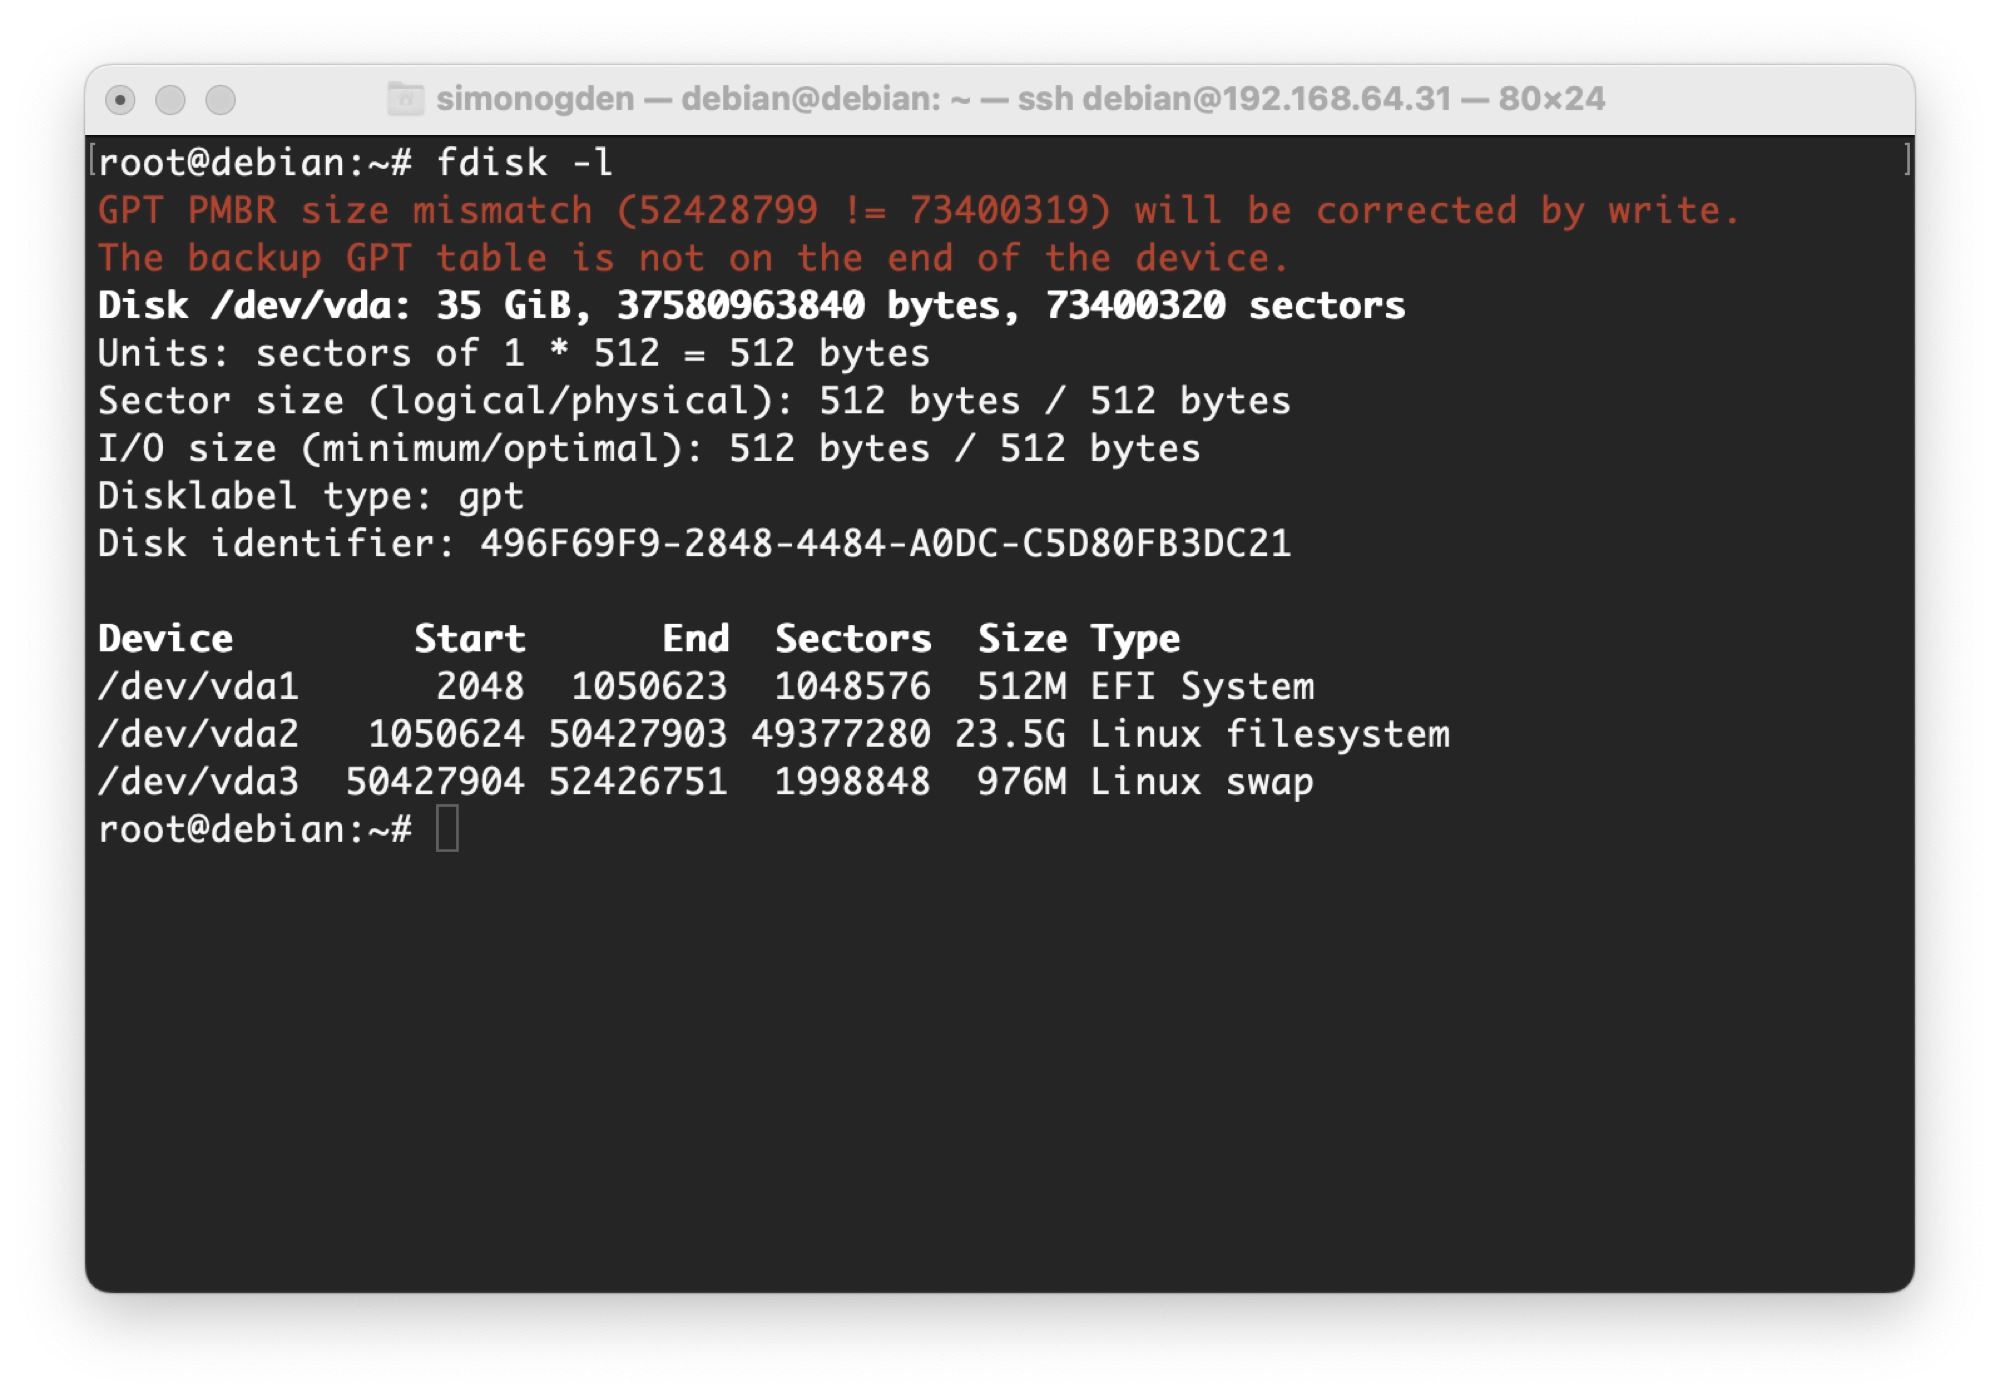
- Run the command
fdisk -lto list disk information. Note the size mismatch error, which is good as it indicates that Debian recognises the increase in virtual disk size.
You can also see here that the virtual hard drive /dev/vda is showing 35G. This is the size that we have resized this disk to using UTM for this example.
The goal is to resize the main system partition /dev/vda2 to fill the newly created space on the disk. Before we do this we will first need to move the swap partition /dev/vda3 to the end of the disk.
Moving the swap partition
- First we need to disable the swap file, enter the command
swapoff -a - Next, start fdisk on your primary disk with the command
fdisk /dev/vda, replacingvdawith your device if different. - Type
pto display the partition information. Make a note of the total number of disk sectors (in this example, 73400320) and total number of sectors in the swap partition (in this example/dev/vda3, which is 1998848 sectors).
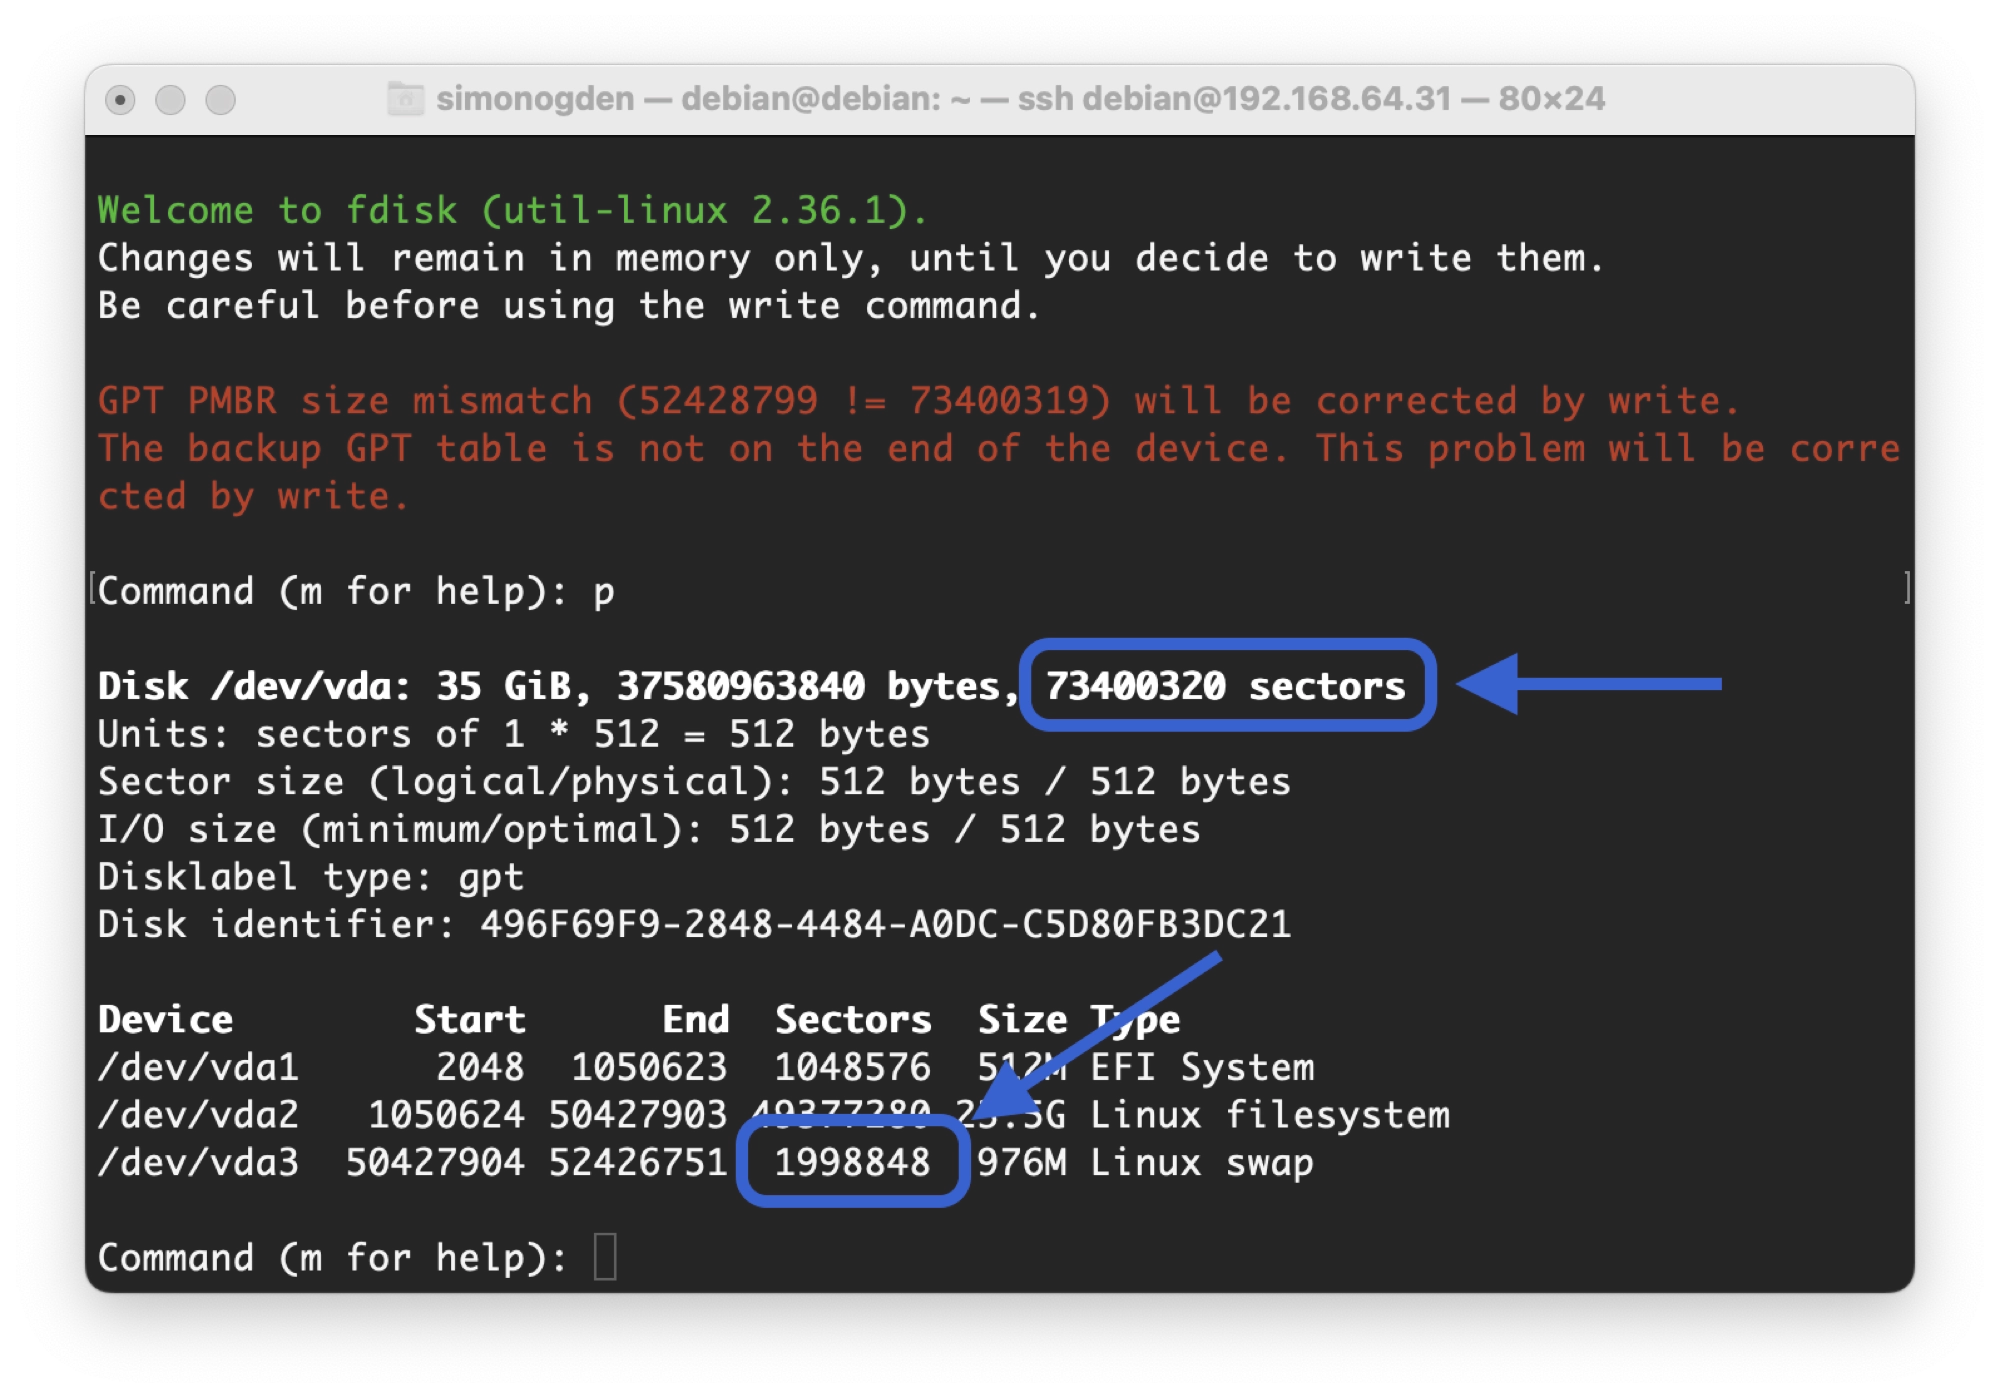
- Next, deduct the number of sectors in the swap file from the total number of sectors and make a note of the result. This will be the location that we will move the start of the swap partition to. For this example it looks like this: 73400320 – 1998848 = 71401472
- Now we can delete the existing swap partition. Enter
dat the prompt to delete a partition. - Enter the partition number for the swap file, in this example it is partition
3. - Enter
pat the prompt to list disk partitions again. You should now see that the swap partition has been removed. - Now we can re-create the swap partition. Enter
nto create a new partition. - Enter the partition number the same as the previous swap partition number. In this example it is partition
3. - Enter the first sector, where the partition will begin. This should be the value that you calculated in step 10, in this example 71401472.
- Leave the next prompt blank and press enter to choose the default value, which will be the last available sector on the disk. This will create a swap partition the same size as before, only it will be at the end of the newly enlarged disk.
- You may notice that the partition created is of the type linux file system. Next we need to change this type to a swap partition. To change the type, type
tat the prompt. - Enter the swap file partition number, in this example it is partition
3. - You will be prompted to enter a partition type or alias, here type
swapto change the type to a swap partition. - Type
pat the prompt to list the partitions. You should now see that the swap partition again, it should be of the type linux swap and checking the start and end sectors should show the partition at the end of the newly resized disk.

- Next, save the changes by typing
wat the prompt. This will take you back to the main command prompt. - Next we need to create a new swap. Enter the command
mkswap /dev/vda3, changing the swap partition as necessary. In this example it is/dev/vda3. The output of this command will show you the UUID for the partition, we will need it for the next step. - Edit the fstab file by entering the command
nano /etc/fstab. - Edit the UUID under the swap partition, replacing it with the UUID from step 23. You will find the correct UUID under the line
# swap was on /dev/vda3 during installation. Pressctrl + Xto save and close the file and return to the command prompt. - Enter the command
nano /etc/initramfs-tools/conf.d/resumeto edit the resume file and replace the UUID with the UUID from step 23. Pressctrl + Xto save and close the file and return to the command prompt. - Update initramfs by entering the command
update-initramfs -u - Enable the swap file by entering the command
swapon /dev/vda3replacing with your partition as necessary.
Expanding the primary partition
Now that the swap partition has been moved to the end of the disk, we can resize the primary partition to fill all of the remaining space on the disk.
- Now we are ready to extend the primary partition to fill the newly created space. Start fdisk on your primary disk with the command
fdisk /dev/vda, replacingvdawith your device if different. - Type
pat the prompt to display the current partitions. The primary partition in this example is/dev/vda2but you should replace as necessary if your system is different (see step 5 to locate the primary partition). - First, we need to delete the current primary partition. Type d at the prompt to delete a partition and then enter the partition number, in this example it is partition
2.
Note that you should not lose the data on the partition when deleting it, however it would be wise to create a backup first. Changes will not be applied until the w command is executed.
- Next, type
nat the prompt to create a new partition. We will recreate the primary partition filling the entire free space. Enter the primary partition number, in this example it is partition2. - Leave the next two prompts blank and press enter on both. This will select the default values, creating a primary partition of the maximum possible size.
- Important: when prompted to remove the signature, enter
Nso that your data is retained. - Type p at the prompt to show the partition information. You should now see that the primary partition is filling all of the remaining space. The size should now also reflect that of your newly sized disk.
- Type
wto write the changes and exit fdisk. - Enter the command
reboot nowto reboot the system.
Resize the filesystem
The last thing we need to do is expand the Debian file system in to the newly extended primary partition.
- Log back into Debian and then login as root using the command
su - - Enter the command
resize2fs /dev/vda2, replacing the partition reference as necessary. - Now when you enter the command
df -hyou should notice that the primary root partition has been expanded into the newly created disk space. This completes the process and you can now enjoy a larger disk on your Debian operating system!
Thanks so much for visiting my site! If this article helped you achieve your goal and you want to say thanks, you can now support my work by buying me a coffee. I promise I won't spend it on beer instead... 😏


Thank you very much! I increased the UTM Virtual Machine Disk Size. Guide very clear and precise
Thank you very much! I increased the UTM Virtual Machine Disk Size. Guide very clear and precise
How to increate the VM disk size for macos guest VM?