Home Assistant can send email and you might be surprised at just how useful this lesser known feature of Home Assistant can be!
Home Assistant can send fully featured emails with HTML formatting and it can even include attachments!
There are no shortage of ways that you can set Home Assistant up to send a notification, however email is probably the most bulletproof way to get those notifications across.
Perhaps you are working and your boss wouldn’t be too happy if he saw you receiving Telegram notifications from Home Assistant? No problem! Have Home Assistant write you a polite message and send it to your work email address.
Prerequisite
You will of course need Home Assistant installed and running plus4 a basic understanding of YAML including how to edit configuration.yaml.
If you are new to Home Assistant or you are not yet familiar with editing YAML files then you should definitely check out my beginners tutorial on YAML first. I would also recommend taking a look at my other tutorials on automation and scripts.
You will also need an email account that allows you to use the outgoing SMTP mail server.
In this tutorial we will use Google’s mail service Gmail. If you are not already using Gmail you can create a completely free account for Home Assistant to use.
You are also free to use a different email provider but mileage may vary. You will need to consult the technical support offered by the particular provider in order to get the address of the SMTP server.
Setting up the SMTP Provider
Before we can begin setting up email notifications in Home Assistant we first need to get the necessary settings for the SMTP provider.
If you are using your own SMTP provider then you will need to consult the necessary guidance for that particular provider.
The easiest way to set this up is to use a free Gmail account, which can be accessed with your Google account. You might want to set up a seperate one just for Home Assistant.
I will assume that you have a Gmail account ready and that you are already logged in.
Get the SMTP Server Details
In order to use the Gmail Outgoing SMTP server we will need to know the details. These can be found within the Gmail support pages.
At the time of writing, the server details are as follows:
- Address: smtp.gmail.com
- Requires SSL: Yes
- Requires TLS: Yes (if available)
- Requires Authentication: Yes
- Port for SSL: 465
- Port for TLS/STARTTLS: 587
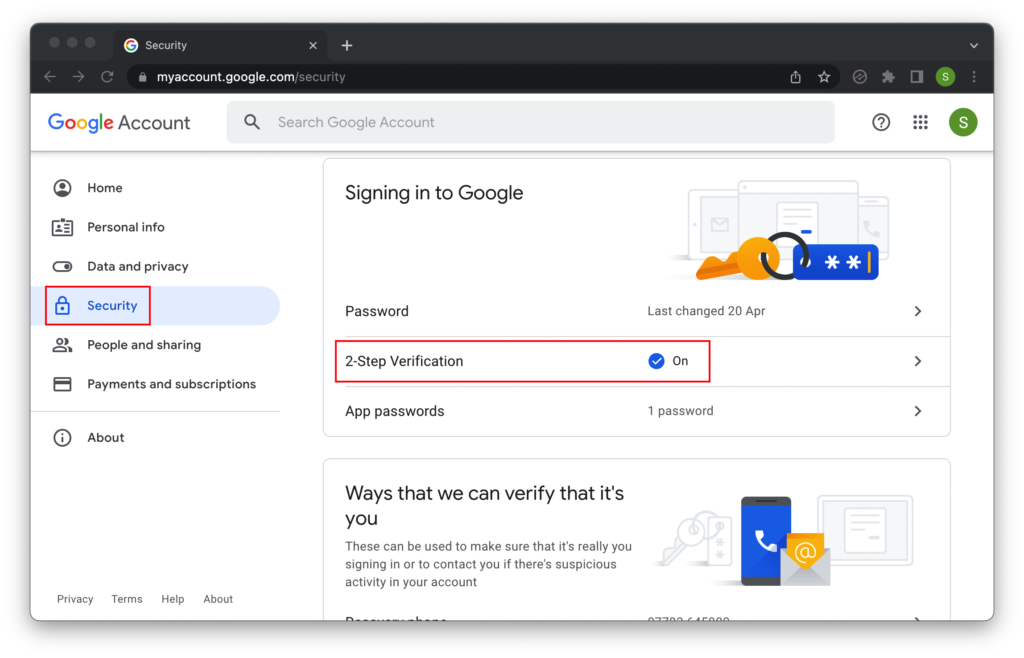
Enable 2-Factor Verification
Google has some security measures in place that prevent the use of the SMTP server unless you have 2-factor verification enabled.
First, go ahead and log in to your Google account, then head to the main account page.
Click security and locate the option for 2-factor verification. If you do not have 2-factor verification enabled then follow this Google guide which explains how to enable it.
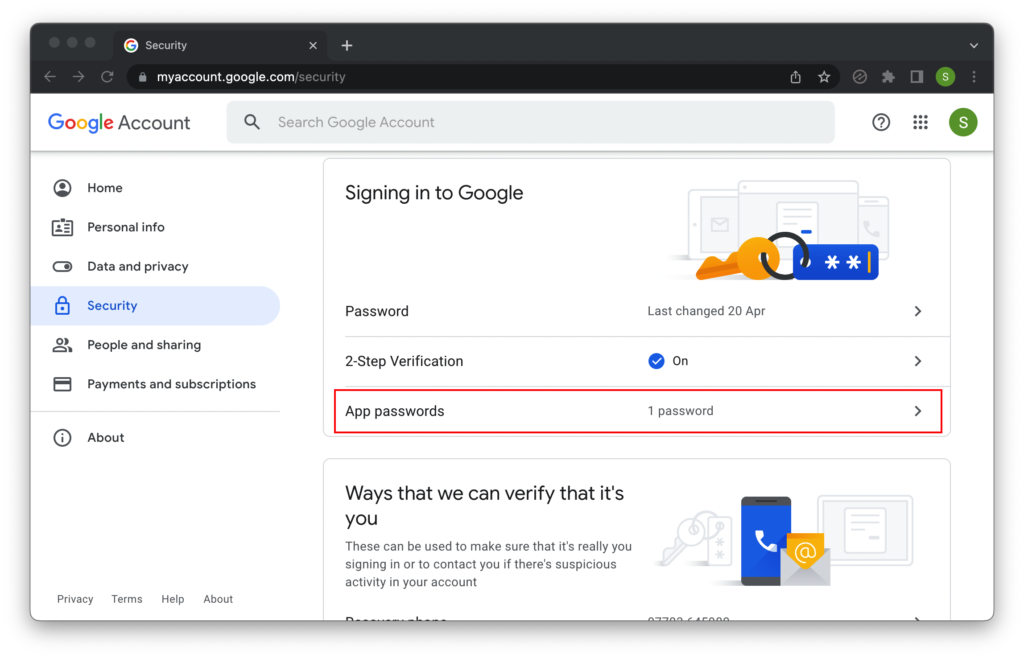
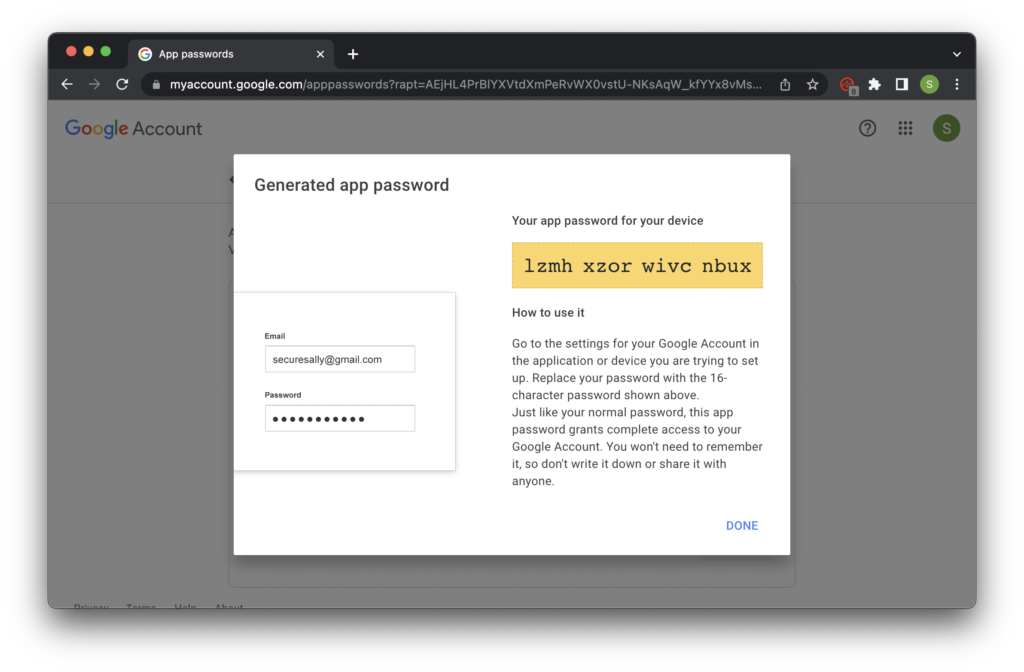
Create an App Password
Once you have enabled 2-factor verification click on app passwords in order to create a new app password. You may need to re-enter your Google account password for an additional security measure.
Next, click select app and choose other (custom name). Enter the name Home Assistant and click generate.
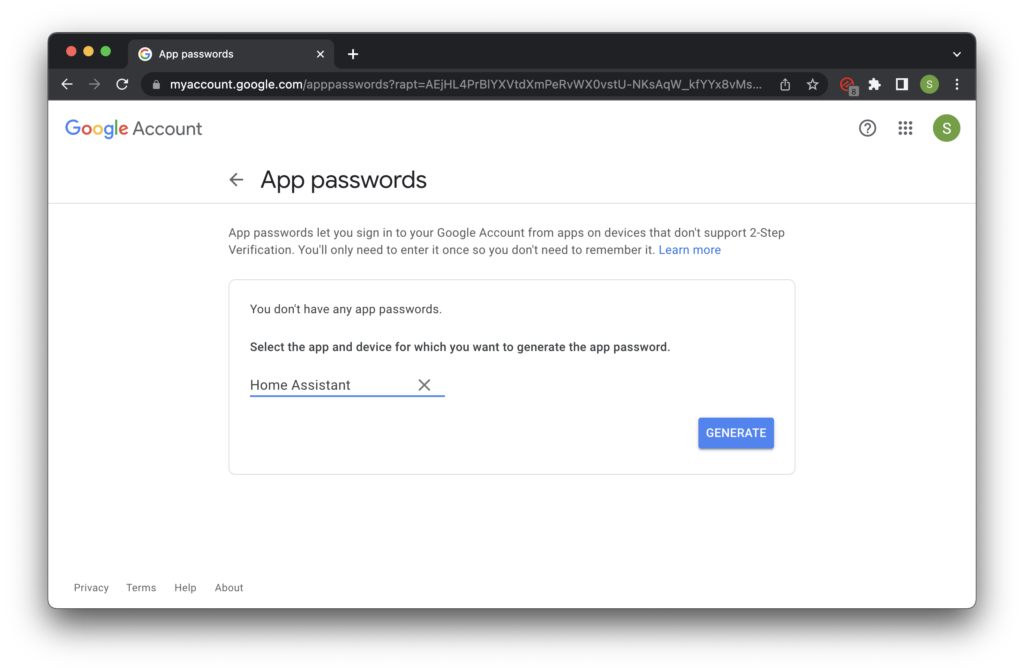
A pop-up window will open with a new 16-character password. When we create an email notification instance in Home Assistant we will use this password instead of our main Google account password.
Note that once you click done the password will disappear and you will not be able to see it again, so make sure you copy it now and optionally you may want to write it down or paste it into a text editor to use it later.
If you do close the password without making a note of it, simply repeat the process to create a new password.
Configure Home Assistant
Now that we have our SMTP server details handy and we have configured Gmail, we can add a notification service to Home Assistant.
In order to do this we will need to edit the configuration.yaml file. If you are unsure how to do this, check out this guide first.
Create a notification
First let’s add the following notification to the configuration.yaml file. You will need to amend the code and add your own username, password and recipient addresses.
Ensure that you use the password that we created in the previous section and not your the main password for your Google account.
Once you have added the following code to configuration.yaml you will need to restart Home Assistant using the server controls.

notify:
  - name: "test_email"
    platform: smtp
    server: "smtp.gmail.com"
    port: 587
    timeout: 15
    sender: "<your-username>@gmail.com"
    encryption: starttls
    username: "<your-username>@gmail.com"
    password: "lzmhxzorwivcnbux"
    recipient:
      - "[email protected]"
      - "[email protected]"
    sender_name: "Home Assistant"
Send an email with Home Assistant
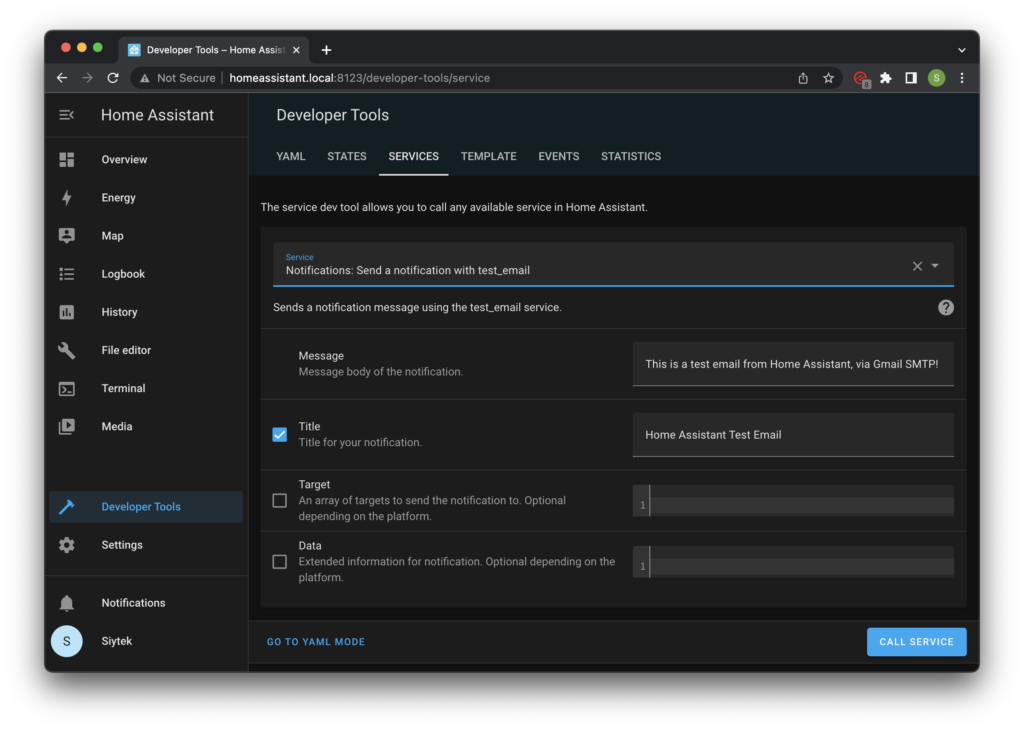
Now that we have everything configured we can finally get Home Assistant to send an email! First we can test the service by going to the services selection in developer tools.

In the dropdown menu for services you should now be able to locate the notify.test_email service that we have created. Go ahead and select it.
Enter a short text into the message and title fields of the service and then go ahead and click call service.
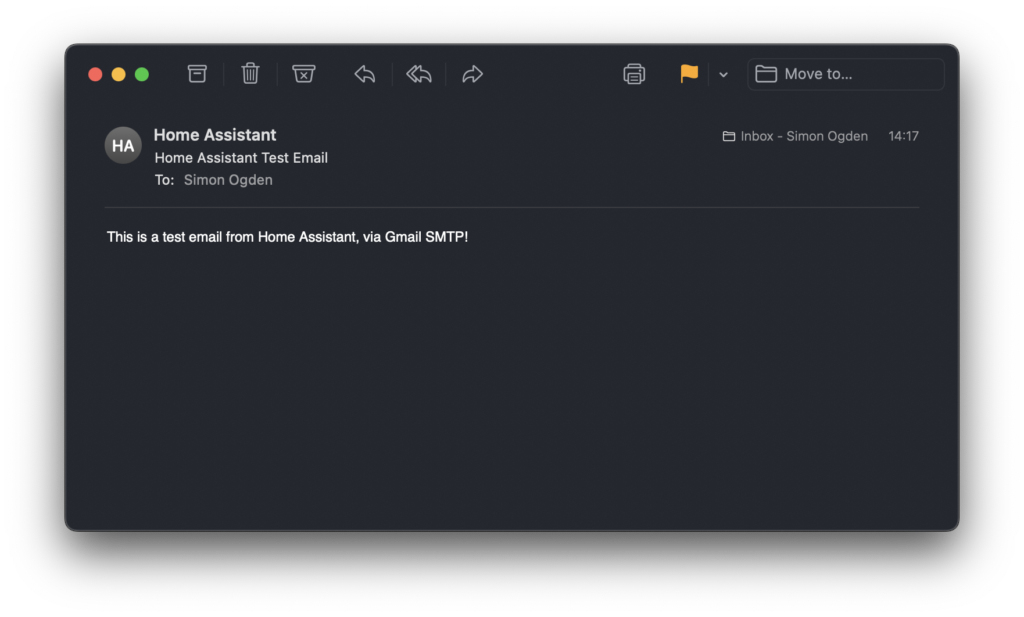
If everything has been configured correctly you should receive an email from Home Assistant shortly!
Send an email from Home Assistant with HTML formatting
At this stage we should have successfully managed to receive a very basic text only email from Home Assistant. So what about adding some formatting?
It is also possible to send HTML email from Home Assistant, allowing us full control of the email layout.
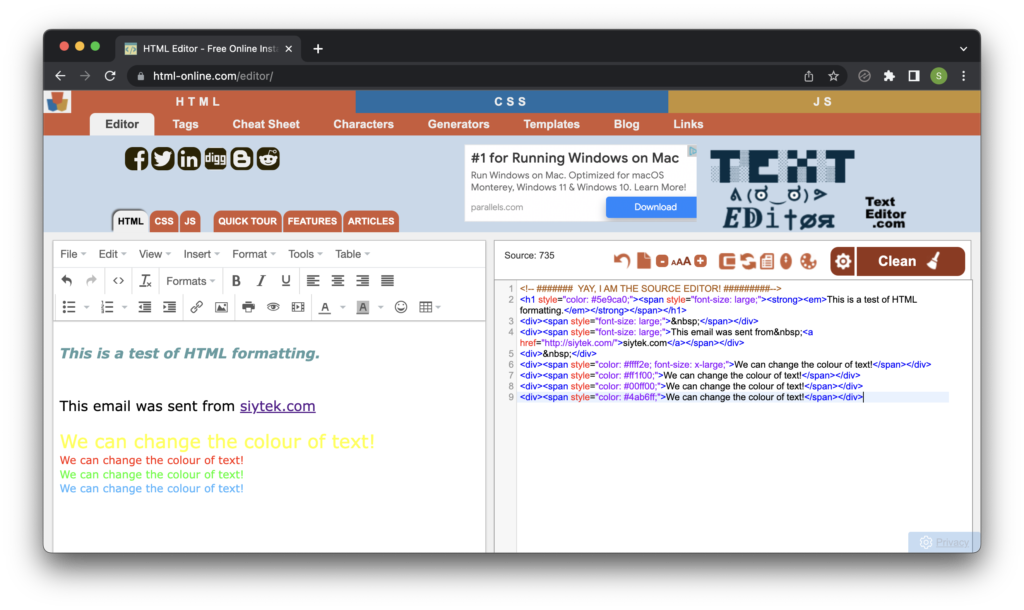
You will need to create your HTML formatted email using the editing method that you prefer. You can do this in raw code if you feel comfortable enough to do so.
Another method is to use a free and simple online HTML generator, such as this one. Create a message on the left hand box and the HTML will be generated in the right hand box.
Once finished, copy the HTML that has been generated from the right hand box.
Now back over in Home Assistant on the services tab, click the button at the bottom to switch into YAML mode.
We can edit the YAML directly in order to add the HTML that we have just generated. Note that you may need to adjust the spacing to be correct. The HTML should appear green in the editor.
service: notify.test_email
data:
message: This is a test email from Home Assistant, via Gmail SMTP!
title: Home Assistant Test Email
data:
html: >
<!-- ####### YAY, I AM THE SOURCE EDITOR! #########-->
<h1 style="color: #5e9ca0;"><span style="font-size: large;"><strong><em>This is a test of HTML formatting.</em></strong></span></h1>
<div><span style="font-size: large;"> </span></div>
<div><span style="font-size: large;">This email was sent from <a href="http://siytek.com/">siytek.com</a></span></div>
<div> </div>
<div><span style="color: #ffff2e; font-size: x-large;">We can change the colour of text!</span></div>
<div><span style="color: #ff1f00;">We can change the colour of text!</span></div>
<div><span style="color: #00ff00;">We can change the colour of text!</span></div>
<div><span style="color: #4ab6ff;">We can change the colour of text!</span></div>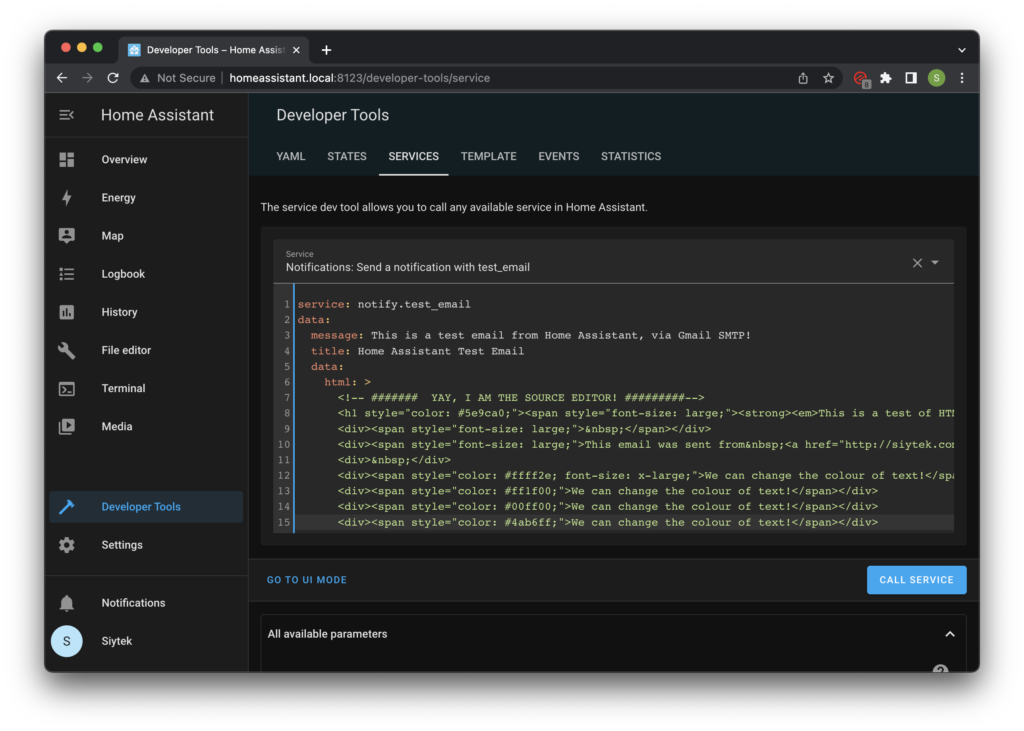
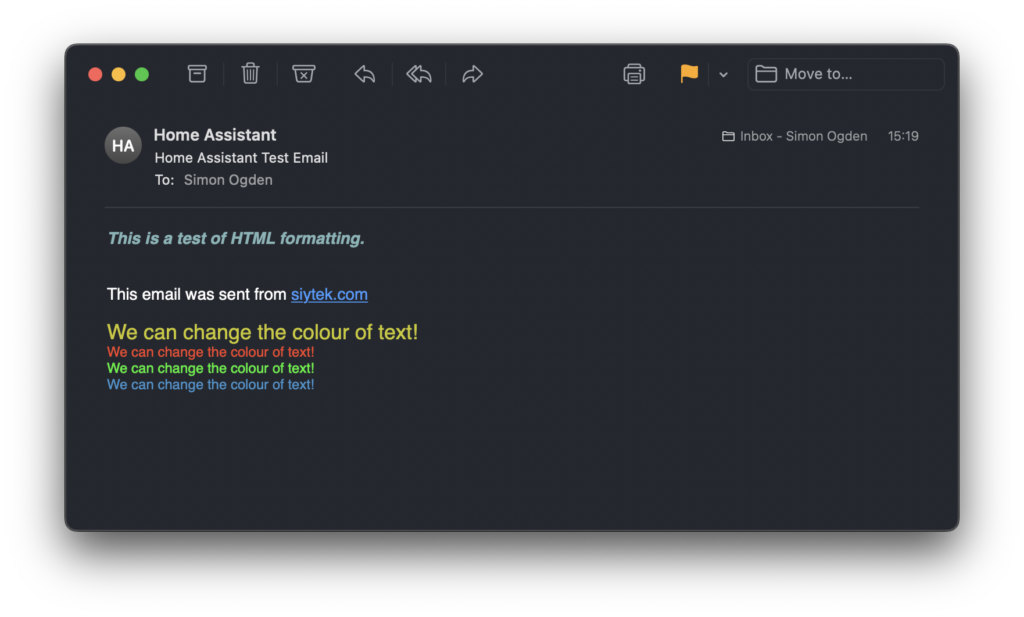
Once you have added the HTML in the YAML editor go ahead and click call service in order to send the email.
In a couple of moments you should receive another email from Home Assistant but this time with the HTML formatting. Awesome!
Conclusion
There are many ways to send notifications from Home Assistant, but if you are looking for a bulletproof and simple method, email is a great choice.
In a world of mobiles, apps and messenger programs it is nice to see the original form of digital communication standing strong and still so widely used!
If you enjoyed this tutorial, be sure to check out some of my other awesome Home Assistant tutorials!
Thanks so much for visiting my site! If this article helped you achieve your goal and you want to say thanks, you can now support my work by buying me a coffee. I promise I won't spend it on beer instead... 😏


There is no place to set up an App Password after 2-factor authentication has been turned on. Google has evidently made some changes.