
Looking to integrate Alexa into Home Assistant as a media player? Want Alexa to read back custom notifications?
The Alexa Media custom component makes it possible and this guide will walk you through the setup process.
Adding this custom component to Home Assistant will allow your Alexa device to appear as a media player entity in Home Assistant.
It will also give you a notify service, allowing you to produce custom audible notifications. Awesome!
Table of Contents
Prerequisite
For this tutorial we will assume that you have Home Assistant up and running already. A very basic knowledge of configuration.yaml would also be advantageous, but we will cover as much detail as possible.
If you are completely new to Home Assistant then you should probably first check out my beginners guide to YAML, as well as my tutorials on automation and scripts.
You will also need an Amazon account and an Alexa device such as the Echo Dot. If you have not yet setup your device, go ahead and set it up with the official iOS or Android app.
Install Alexa Media
At the time of writing Alexa Media is a custom component. This means it is not officially part of Home Assistant, therefore we must manually add the files. But don’t worry, its really simple.
There are three ways that we can install Alexa Media. The easiest way is to use the Home Assistant Community Store, HACS. Alternatively you can install it manually with either of the two following methods.
Install with Samba
If you have Samba files sharing setup, the easiest way is to simply download the files and copy them to the config/custom_components directory.
Download the latest release
First head over to the Alexa Media releases page, download the latest .zip file and unzip it.
Copy to your config directory
Next we will need to create a custom components directory if you don’t already have it.
config/custom_components/alexa_media
Go ahead and copy all of the files from the unzipped archive into this folder, then restart Home Assistant.
Install with Terminal
If you don’t have access to your config directory with Samba then you can use the terminal instead. Go ahead and open the terminal and make sure you are in the config directory.
cd ~/config
Clone the repository
Next we need to clone the Alexa Media repository. This will create a new directory called alexa_media_player and download all of the files.
git clone --branch master https://github.com/custom-components/alexa_media_player
Add the custom_components directory
If you don’t already have a custom components directory, go ahead and create it. We then need to create a directory for the Alexa Media component.
mkdir ~/config/custom_components
Move the necessary files
Now we can move the necessary files from the downloaded Git repository to the custom components folder.
mv ~/config/alexa_media_player/custom_components/alexa_media/ ~/config/custom_components/
Remove the unnecessary files
We only need some of the files from the Git repository, therefore we can remove the remaining files.
rm -r ~/config/alexa_media_player/
Thats it! We can go ahead and restart Home Assistant.
ha core restart
Add the integration in Home Assistant
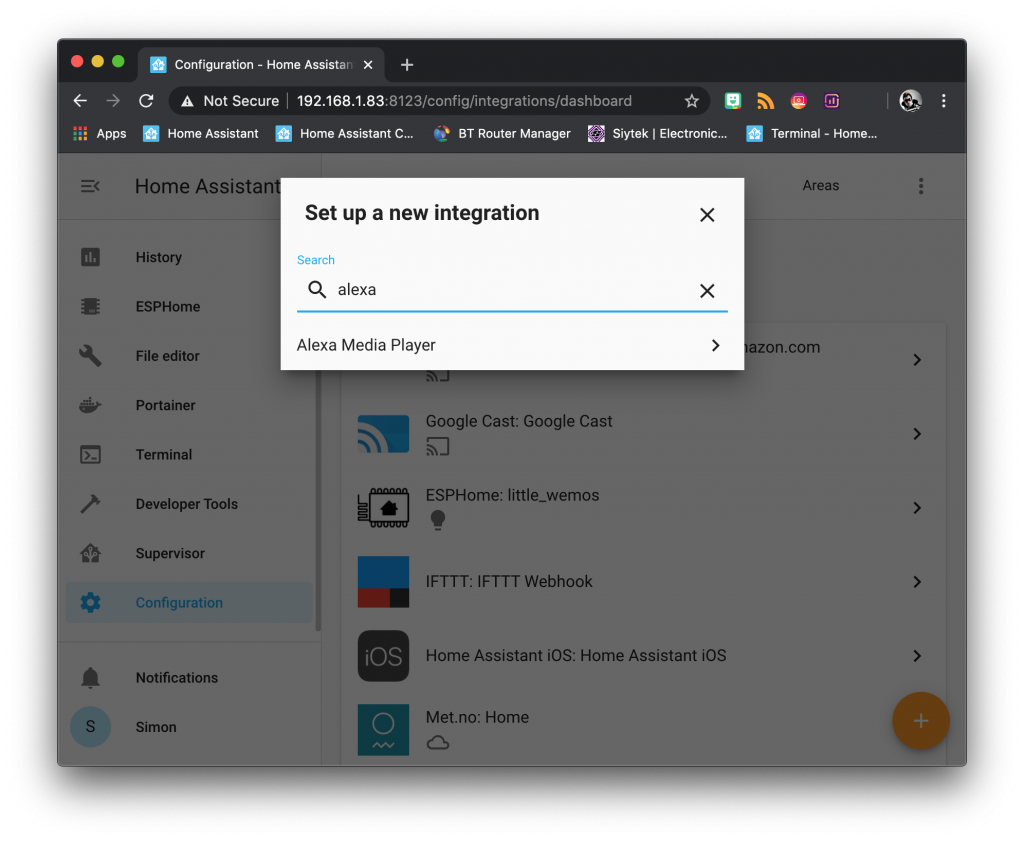
Now that the files have been added we should have the option to add the integration. Click configuration in the sidebar and then click integrations.
Click the orange circle with the plus symbol in the bottom right-hand corner to add a new integration and search for Alexa Media Player.
You will need to enter your Amazon username and password. Change the domain to your local Amazon domain and enter your device name in the section for included devices.
You can add more than one Alexa device by separating them with a comma (no spaces).
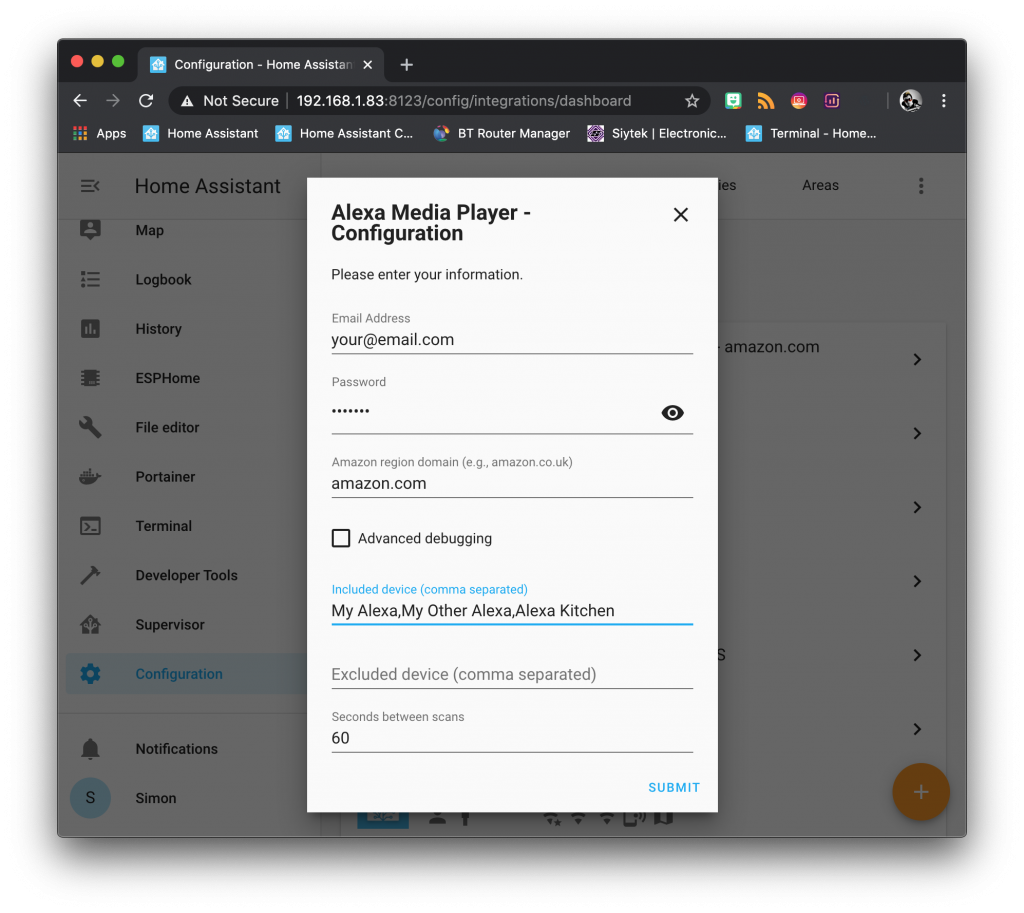
Once you have completed the form, go ahead and click Submit. You may need to fill out a captcha to confirm you are not a robot.
Testing Alexa Media
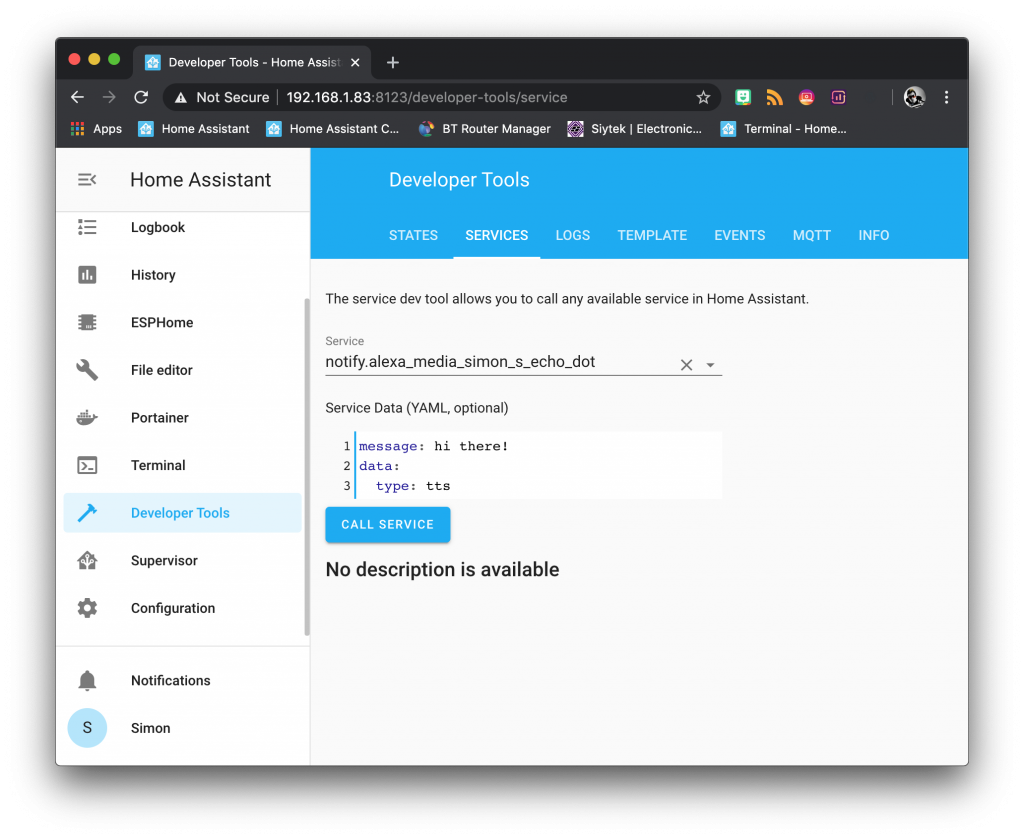
Now that we have configured the Alexa Media component, we can go ahead and try it out! Click on developer tools on the sidebar and then click the services tab.
In the service text box, enter notify.alexa_media_your_device_name and fill out the service data as follows.
message: hi there!
data:
  type: tts
Click on call service and your Alexa device should read back the message.
Feel free to alter the message text to try different phrases, but it can be quite funny entering certain phrases so don’t get too sidetracked!
Create a TTS Interface
Now that we have our integration working, we can create a simple interface in the Home Assistant UI.
In order to do this we will need to add a couple of things to the configuration.yaml file.
Create a text input
First we need to create a text input, which will allow us to add a text box to the user interface.
input_text:
  text1:
    name: Text To Speech
    initial: Say something...
Create a TTS script
We will also need to create a script that will take our text and convert it into a text to speech notification.
We will create a new script that uses the notify platform.
We can use a data template in order to fetch the text from the text box that we created and pass it through as the notification we wish to have Alexa read.
  alexa_speak:
    alias: "Alexa TTS"
    sequence:
      service: notify.alexa_media_simon_s_echo_dot
      data_template:
        data:
          type: tts
        message: "{{ states('input_text.text1') }}"
Add to the user interface
Once the code for the entities has been added we will need to restart Home Assistant, then we will be able to add the new entities to the UI.
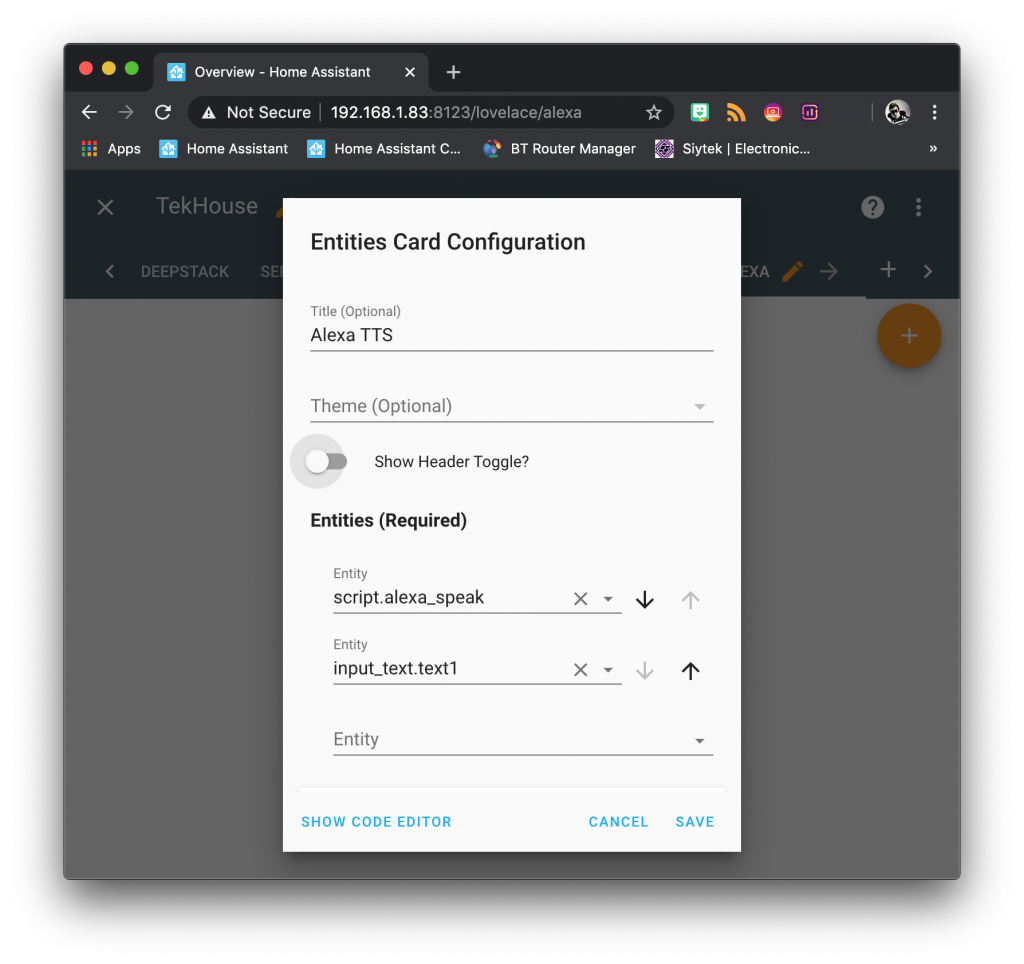
In order to do this go ahead and click overview in the sidebar, then click the three dots in the top right-hand corner and choose configure UI.
You can click the orange circle with the plus icon to add a new card. Go ahead and select the entities card.

Go ahead and give your card a name, something like Alexa TTS will do nicely. You can also turn off the header toggle as we will not need it.
Add the entities script.alexa_speak and input_text.text1. Don’t forget to adjust the names if you changed them to something different in the code. Once you are done, click save.
That’s it! We now have a simple interface that we can use to send text to Alexa.
You should be able to expand on this to create some more exciting integrations with Alexa TTS.

Conclusion
The Alexa Media custom component is a very useful addition to Home Assistant for Alexa users.
It is fairly straightforward to setup and the information in this tutorial should provide you with enough to get started on your own more elaborate customisation!
Now that you have Alexa Media up and running, why not add your Spotify account and setup an automation to playback music through Alexa via Home Assistant!
Alternatively check out some of my other awesome Home Assistant tutorials!
Thanks so much for visiting my site! If this article helped you achieve your goal and you want to say thanks, you can now support my work by buying me a coffee. I promise I won't spend it on beer instead... 😏


Is it possible to add a drop down input that would allow you to select between echo devices to sent the command to?