
With ESPHome we can easily turn the analogue input (ADC) pin into a touch switch with a bit of clever software configuration and no external components!
This switch can be used like any other switch in Home Assistant and has toggle functionality.
This is by no means a solution that will replace a dedicated capacitive touch switch, such as the touch pads found on the ESP32, however considering we are just recycling an ADC pin the results are rather good!
Table of Contents
Prerequisite
For this tutorial we will assume that you have Home Assistant up and running already. A very basic knowledge of configuration.yaml would also be advantageous, but we will cover as much detail as possible.
If you are completely new to Home Assistant then you should probably first check out my beginners guide to YAML, as well as my tutorials on automation and scripts.
You will also need to configure the ESPHome add-on in Home Assistant and have a compatible ESP device such as the Wemos D1 Mini, you can check out this good deal on a pack of them over at Amazon.
If you haven’t installed the ESP Home add-on yet, go ahead and check out my tutorial on how to add ESPHome to Home Assistant.
Configure ESPHome
The principle of this configuration is based upon the fact that the voltage read by the ADC increases by a miniscule amount when the pin is touched.
You can connect your switch plate directly to the pin, or just use a bare wire if you like.
We will create a sensor that reads the ADC pin and then use a binary sensor to turn the analogue reading into an binary on/off state.
This state can then be fed to a toggle switch. Either the binary state or toggle state can be used in Home Assistant.
Add a new device
First you should add a new device in ESPHome if you have not done so already.
When your new device is available in the user interface, go ahead and click edit and you should be presented with something like the following template.
Note that the parameters will reflect your device configuration.
esphome:
  name: little_wemos
  platform: ESP8266
  board: d1_mini

wifi:
  ssid: "MyWiFiRouter"
  password: "************"

  # Enable fallback hotspot (captive portal) in case wifi connection fails
  ap:
    ssid: "Little Wemos Fallback Hotspot"
    password: "************"

captive_portal:

# Enable logging
logger:

api:

ota:
Add the ADC Pin
The first thing we need to add to our code is the analogue to digital convertor pin.
We will set this up as a sensor using the adc platform. By specifying an update rate of 100ms, new values will be read from the pin every 100 miliseconds.
The difference in voltage when touching the pin is miniscule, therefore we also need to amplify the result using a multiplication factor of 100.
I am using a Wemos D1 Mini, therefore I will specify pin A0 as this is the ADC pin.
If you are using a different board then you should change this to suit the board.
esphome:
  name: little_wemos
  platform: ESP8266
  board: d1_mini

wifi:
  ssid: "MyWiFiRouter"
  password: "************"

  # Enable fallback hotspot (captive portal) in case wifi connection fails
  ap:
    ssid: "Little Wemos Fallback Hotspot"
    password: "************"

captive_portal:

# Enable logging
logger:

api:

ota:

sensor:
  - platform: adc
    pin: A0
    name: "Touch Switch ADC"
    id: touch_switch_adc
    update_interval: 100ms
    filters:
    - multiply: 100
Adding a switch
Next we will create a switch for the output which will toggle when the ADC pin is touched. Note that we need to set the optimistic parameter to true so that the reported status is immediately updated.
esphome:
  name: little_wemos
  platform: ESP8266
  board: d1_mini

wifi:
  ssid: "MyWiFiRouter"
  password: "************"

  # Enable fallback hotspot (captive portal) in case wifi connection fails
  ap:
    ssid: "Little Wemos Fallback Hotspot"
    password: "************"

captive_portal:

# Enable logging
logger:

api:

ota:

sensor:
  - platform: adc
    pin: A0
    name: "Touch Switch ADC"
    id: touch_switch_adc
    update_interval: 100ms
    filters:
    - multiply: 100

switch:
  - platform: template
    name: "Touch Switch"
    id: touch_switch
    optimistic: true
Adding a global variable
In the next section we will need to use a global variable to store the state of the switch. Therefore we will add a bool to globals.
esphome:
  name: little_wemos
  platform: ESP8266
  board: d1_mini

wifi:
  ssid: "MyWiFiRouter"
  password: "************"

  # Enable fallback hotspot (captive portal) in case wifi connection fails
  ap:
    ssid: "Little Wemos Fallback Hotspot"
    password: "************"

captive_portal:

# Enable logging
logger:

api:

ota:

sensor:
  - platform: adc
    pin: A0
    name: "Touch Switch ADC"
    id: touch_switch_adc
    update_interval: 100ms
    filters:
    - multiply: 100

switch:
  - platform: template
    name: "Touch Switch"
    id: touch_switch
    optimistic: true

globals:
 - id: t_sw_bool
   type: bool
Adding a binary sensor
In order to tie the ADC input to the switch, we need to use a binary sensor configured with the template platform.
esphome:
  name: little_wemos
  platform: ESP8266
  board: d1_mini

wifi:
  ssid: "MyWiFiRouter"
  password: "************"

  # Enable fallback hotspot (captive portal) in case wifi connection fails
  ap:
    ssid: "Little Wemos Fallback Hotspot"
    password: "************"

captive_portal:

# Enable logging
logger:

api:

ota:

sensor:
  - platform: adc
    pin: A0
    name: "Touch Switch ADC"
    id: touch_switch_adc
    update_interval: 100ms
    filters:
    - multiply: 100

switch:
  - platform: template
    name: "Touch Switch"
    id: touch_switch
    optimistic: true

globals:
 - id: t_sw_bool
   type: bool

binary_sensor:
  - platform: template
    id: touch_switch_pressed
    name: "touch switch pressed"
Now the clever bit! We will use lambda to add some C++ code that test whether the value of the ADC reading is greater than 1.
You may need to tweak this value depending on the board you are using.
If the touch switch is pressed and the value is above 1 then we will test whether or not the global variable t_w_bool is true or false.
If t_w_bool is false then we will toggle the switch and set t_w_bool to true.
This prevents the switch rapidly toggling, as the lambda code will continuously loop whilst the switch is held down.
When the switch is released the t_w_bool value is returned to false so that the toggle action is able to occur again when the switch is pressed again.
esphome:
  name: little_wemos
  platform: ESP8266
  board: d1_mini

wifi:
  ssid: "MyWiFiRouter"
  password: "************"

  # Enable fallback hotspot (captive portal) in case wifi connection fails
  ap:
    ssid: "Little Wemos Fallback Hotspot"
    password: "************"

captive_portal:

# Enable logging
logger:

api:

ota:

sensor:
  - platform: adc
    pin: A0
    name: "Touch Switch ADC"
    id: touch_switch_adc
    update_interval: 100ms
    filters:
    - multiply: 100

switch:
  - platform: template
    name: "Touch Switch"
    id: touch_switch
    optimistic: true

globals:
 - id: t_sw_bool
   type: bool

binary_sensor:
  - platform: template
    id: touch_switch_pressed
    name: "touch switch pressed"
    lambda: |-
      if (id(touch_switch_adc).state > 1) {
        if (id(t_sw_bool) == false){
          id(touch_switch).toggle();
        }
        id(t_sw_bool) = true;
        return true;
      } else {
        id(t_sw_bool) = false;
        return false;
      }
Configure Home Assistant
Now that the YAML configuration is finished, we can go ahead and flash the device.
If you need some guidance with this then go check out my tutorial on setting up ESPHome with Home Assistant.
Once we have flashed the device, all of the components created in ESPHome should automatically be available in Home Assistant once you have added the new device.
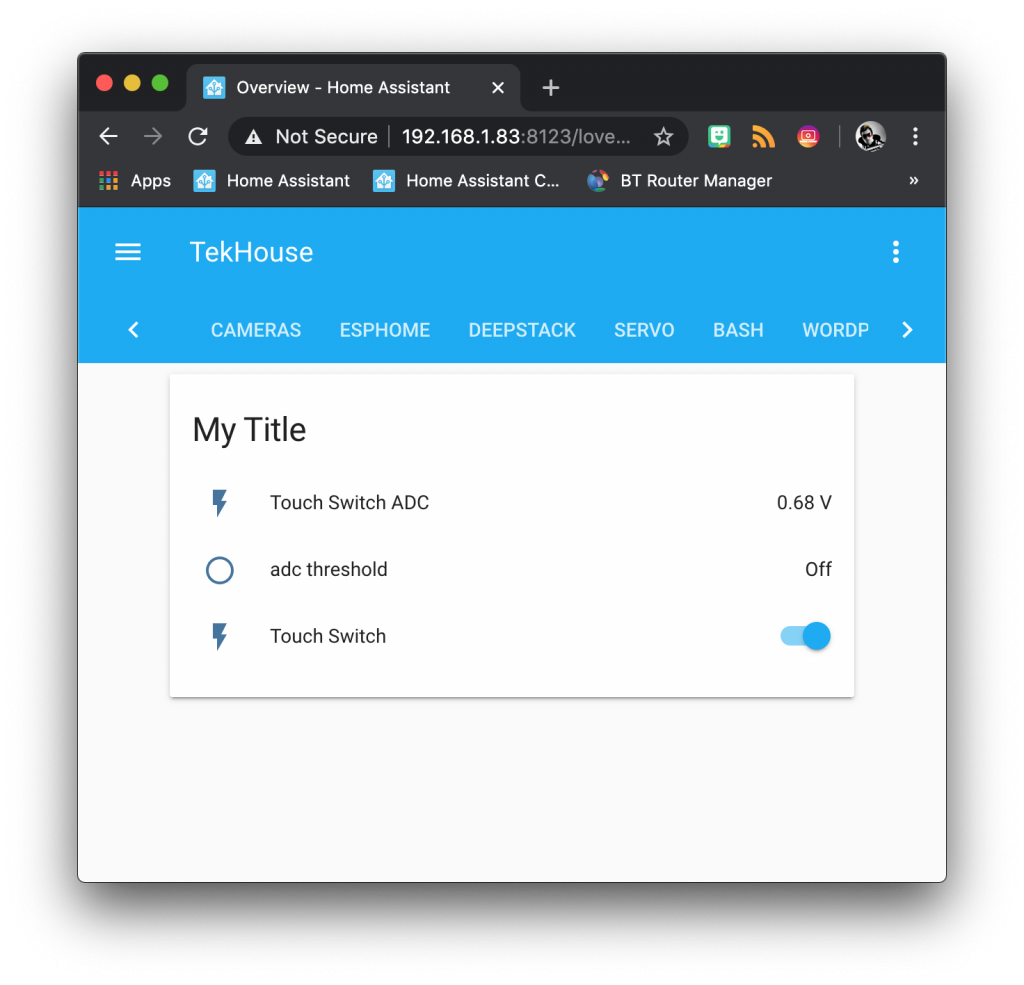
To test the configuration we will create a new entities card in the user interface and add the following entities.
- sensor.adc
- binary_sensor.adc_threshold
- switch.touch_switch
This will create a new card with the raw analogue to digital reading.
It will show a voltage value but the unit of measurement is not relevant here. If you need to change the threshold, observe the values here when the switch us touched and not touched.
You can edit the binary sensor lambda as necessary.
Now you can go ahead and touch the switch (or just a bare wire attached to the ADC pin).
The ADC threshold should change to the on state when you touch the switch. The touch switch should toggle each time you touch it.
Conclusion
This is an interesting use for the solitary ADC pin found on ESP8266 devices, I do like the fact that it requires no components!
It is functional although not perfect and sometimes fails to trigger.
However it is a good demonstration of what can be done with the more advanced features of ESPHome, such as lambda.
Now you have completed this quick ESP8266 tutorial, why not take a look at some of my other ESPHome tutorials.
You can also check out some of my other awesome Home Assistant tutorials too!
Thanks so much for visiting my site! If this article helped you achieve your goal and you want to say thanks, you can now support my work by buying me a coffee. I promise I won't spend it on beer instead... 😏


Thanks man for this example. This helped me with my doorbell making it ‘smart’ using esp-12f. I read out the voltage from the wireless chime receiver (already tried decoding with 433 rf receiver, but could not get any reading) So my solution : connected the a0 (adc) pin of the esp to a led on the the chime which goes on when the doorbell rings. The voltage increases with a peak and changed the state to match the value which I receive when the doorbell rings. It turns the switch. Now i get a notification in home assistant when someone’s at the door.
Thank you
No worries, thanks for visiting! 🙂