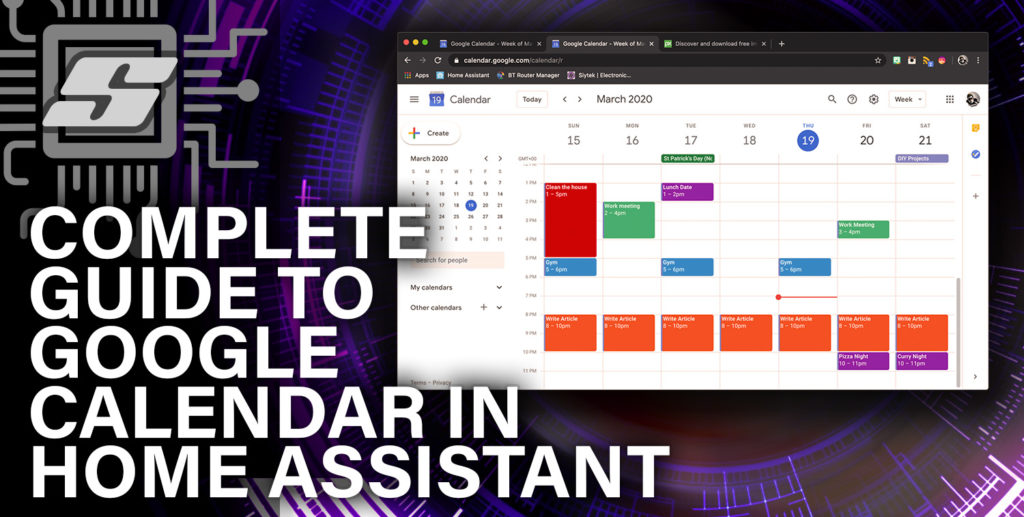
Wouldn’t it be great if you could control all of your Home Assistant automation with Google Calendar?
With just a few simple steps we can link Google Calendar to our entire home automation setup!
In this tutorial we will learn how to connect Google Calendar with Home Assistant and use it as a way to schedule any event in our home automation setup.
This is an awesome way to control a thermostat or schedule lighting and a must have for those who like the seamless experience of using Google products.
Prerequisite
You should have Home Assistant installed and running and a basic understanding of YAML including how to edit configuration.yaml.
You should also understand how to use a service and entity within Home Assistant.
If you are new to Home Assistant or you are not yet familiar with editing YAML files then you should definitely check out my beginners tutorial on YAML first.
I would also recommend taking a look at my other tutorials about automation and scripts.
You will also need to sign up for a free Google account if you don’t already have one.
How to set up Google Calendar API and get an OAuth token
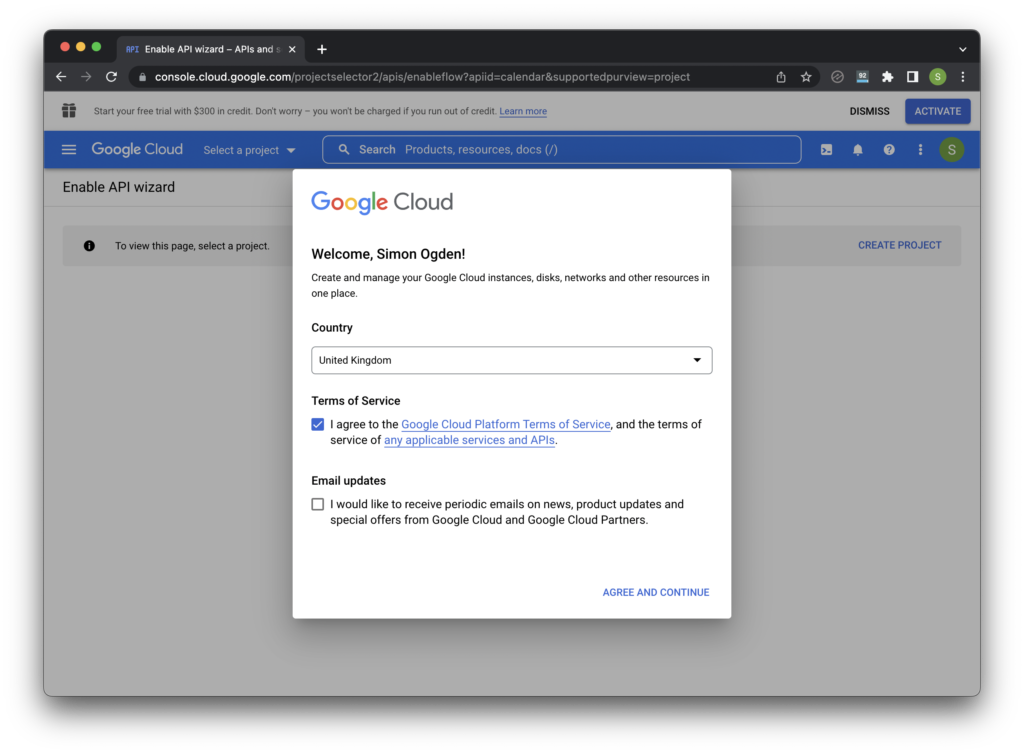
In order to link our Google calendar to Home Assistant, we will need to obtain a user ID and key from Google Developer Console.
This can seem a little daunting at first but we will skip past mostly all of the complex options just so we can grab the client ID and client secret.
All you need to do is follow the simple steps in this guide using your standard Google account.
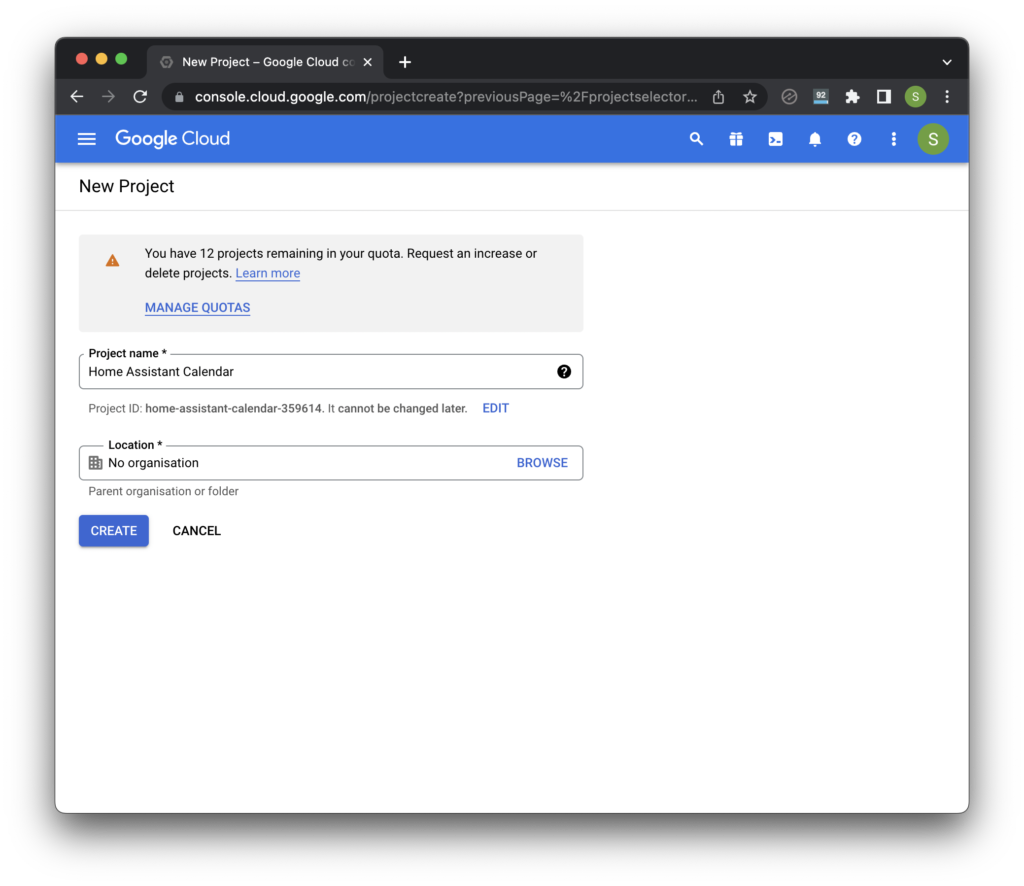
Create a new project
First we need to head over to the Google Developer Console. You may need to first select your country and agree to the terms and conditions:
Next click the button to create a new project. Enter a project name such as Home Assistant Calendar and click create.
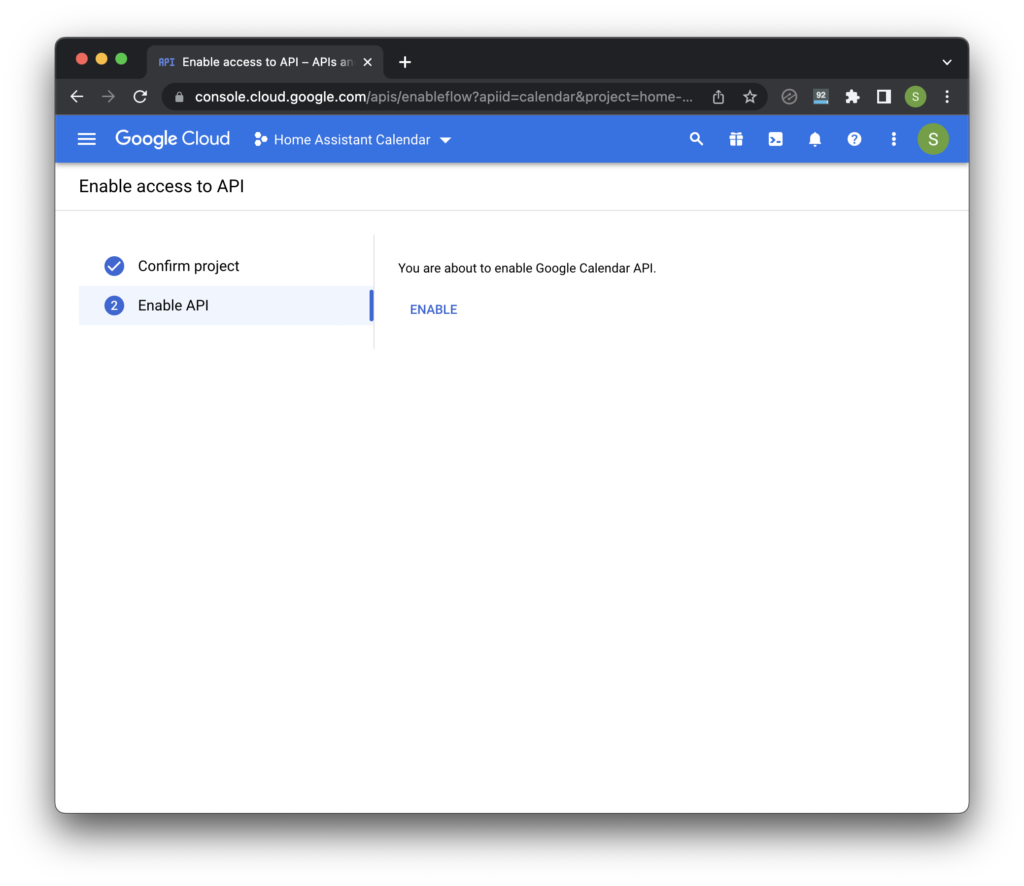
On the next screen, click next.
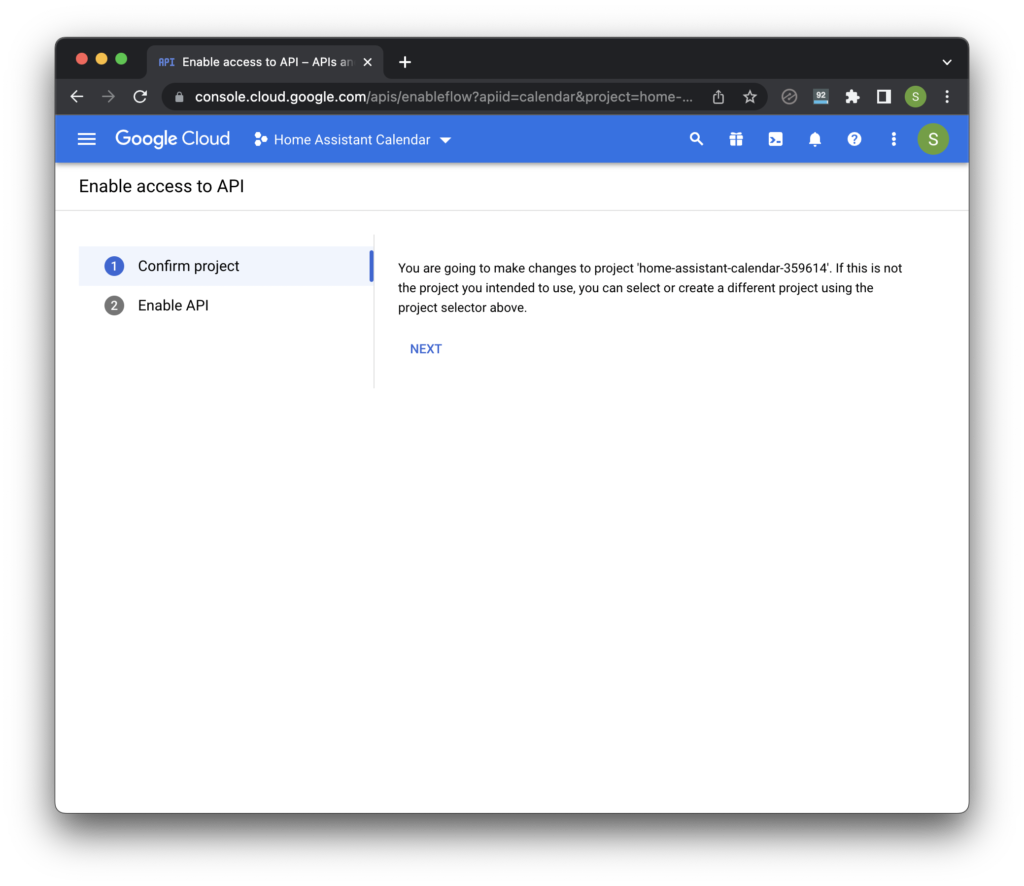
On the next screen, click enable.
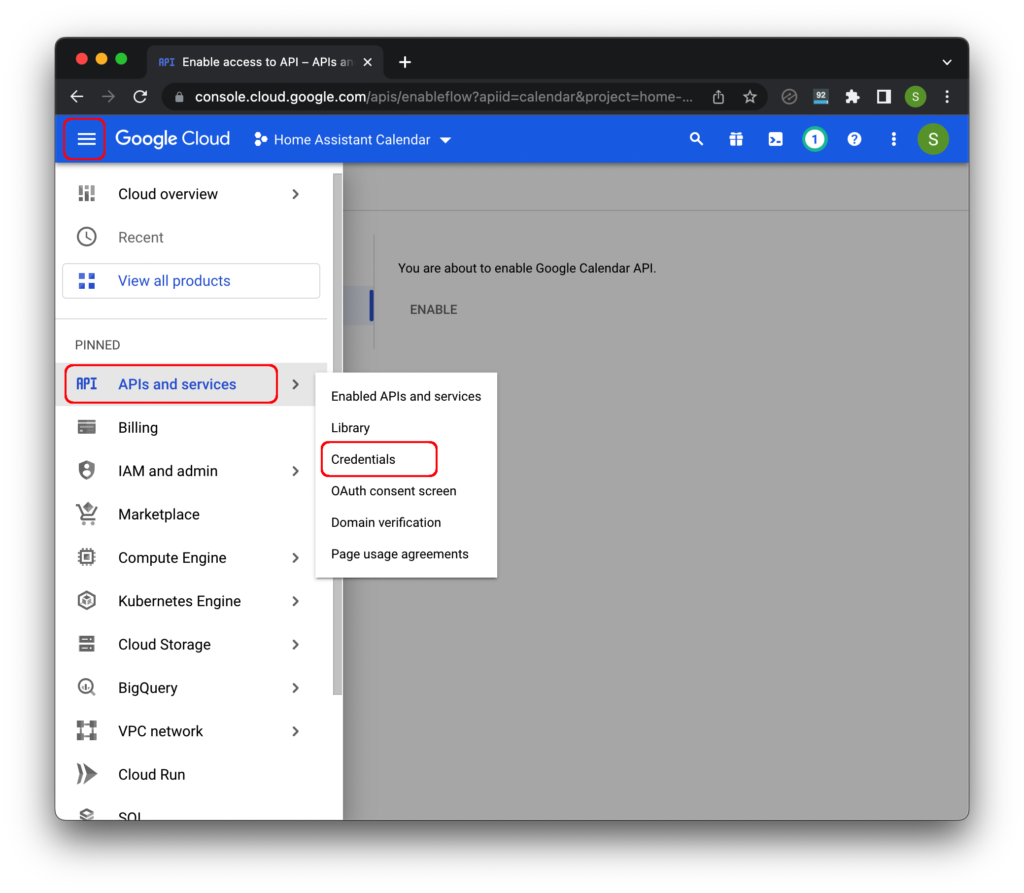
Click the icon in the top right of the page to open the burger menu and navigate to APIs and services > Credentials.
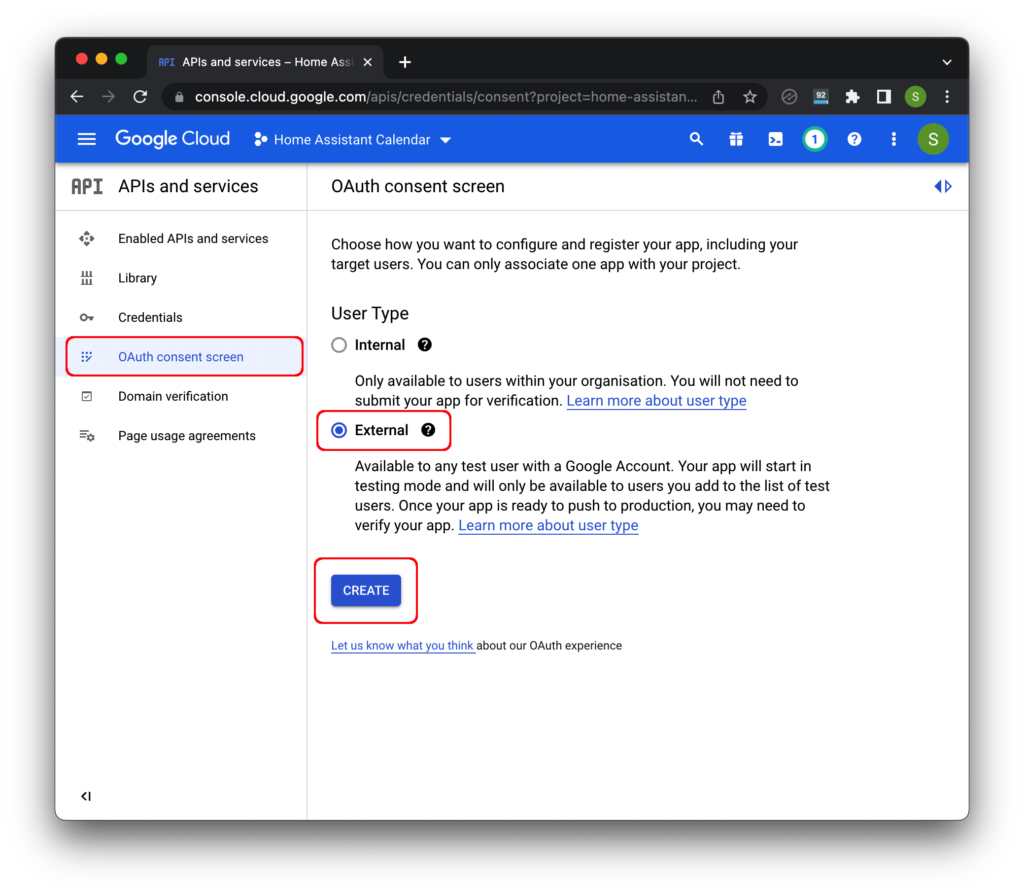
Click the OAuth consent screen option in the left-hand sidebar, choose external and then click create.
You don’t need to fill in all of the information on the next screen.
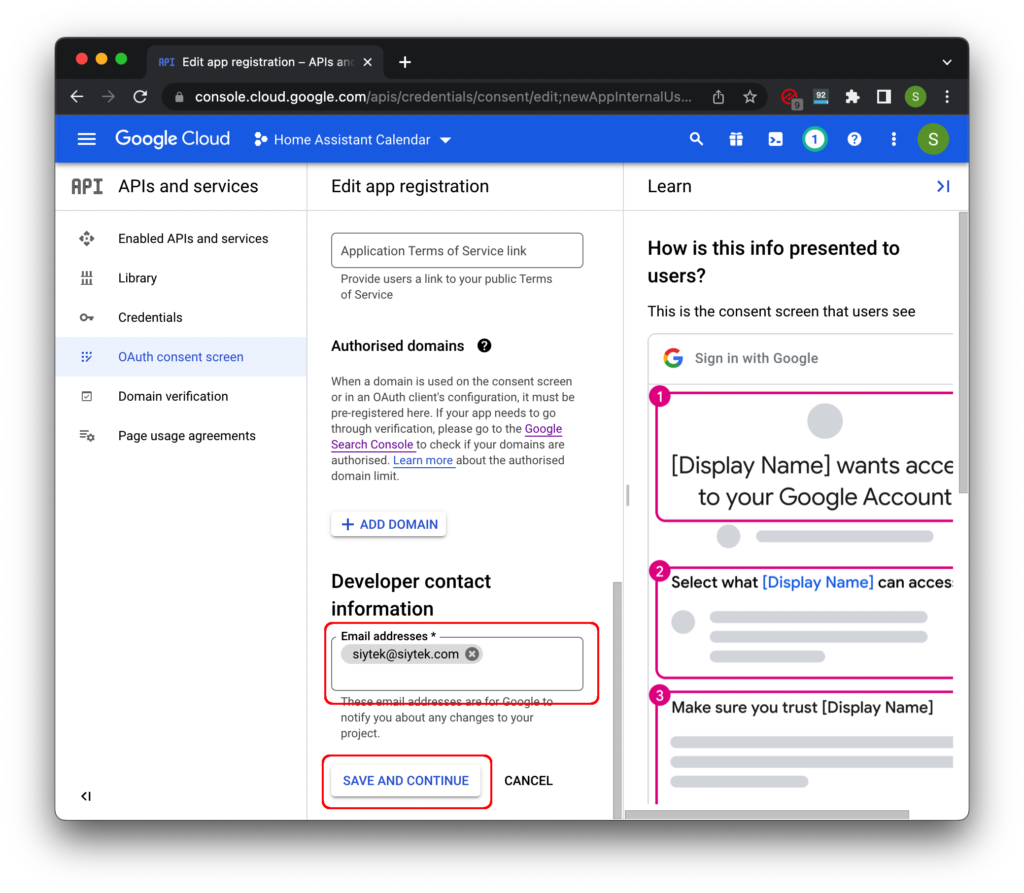
Just enter an App name, such as Home Assistant and choose your email address from the user support email dropdown box.
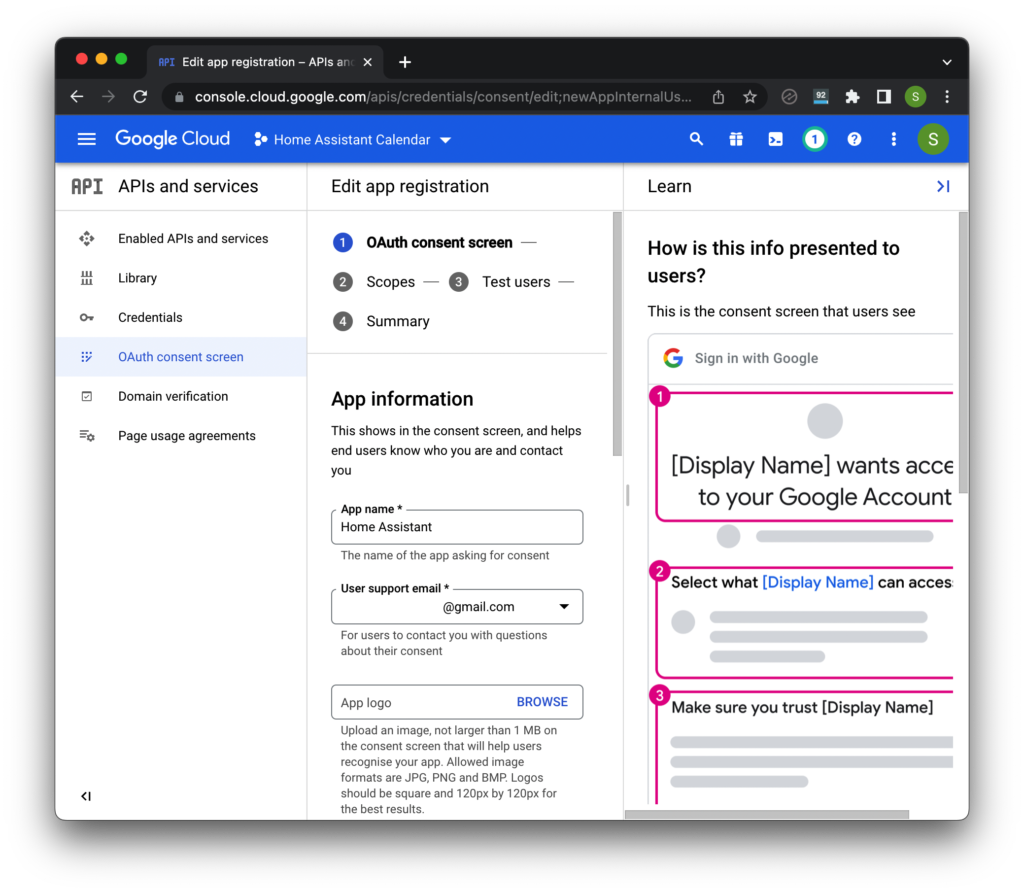
Then scroll down to the bottom of the page and enter an email address in the developer contact section. You can use the same email address as above if you prefer.
Then click save & continue.
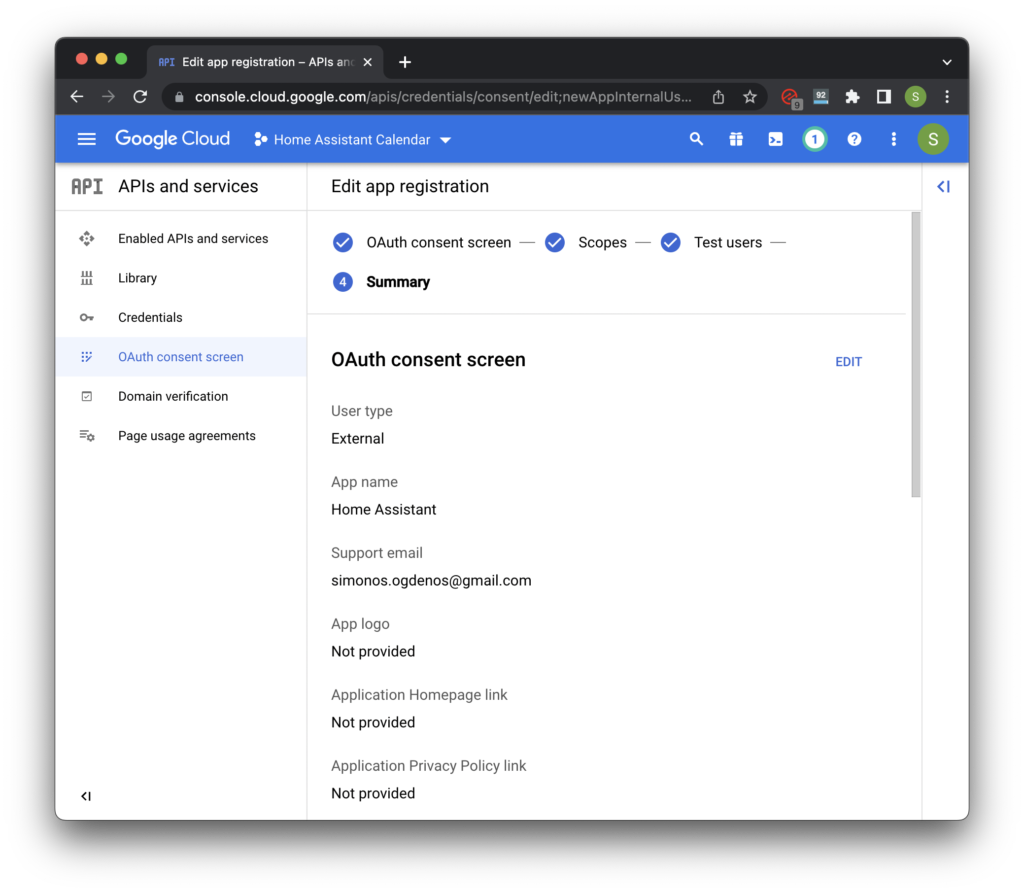
On the next two pages you do not need to fill anything out, so scroll to the bottom and click save & continue on both pages.
This will take you to the final summary screen. Scroll to the bottom and click back to dashboard.
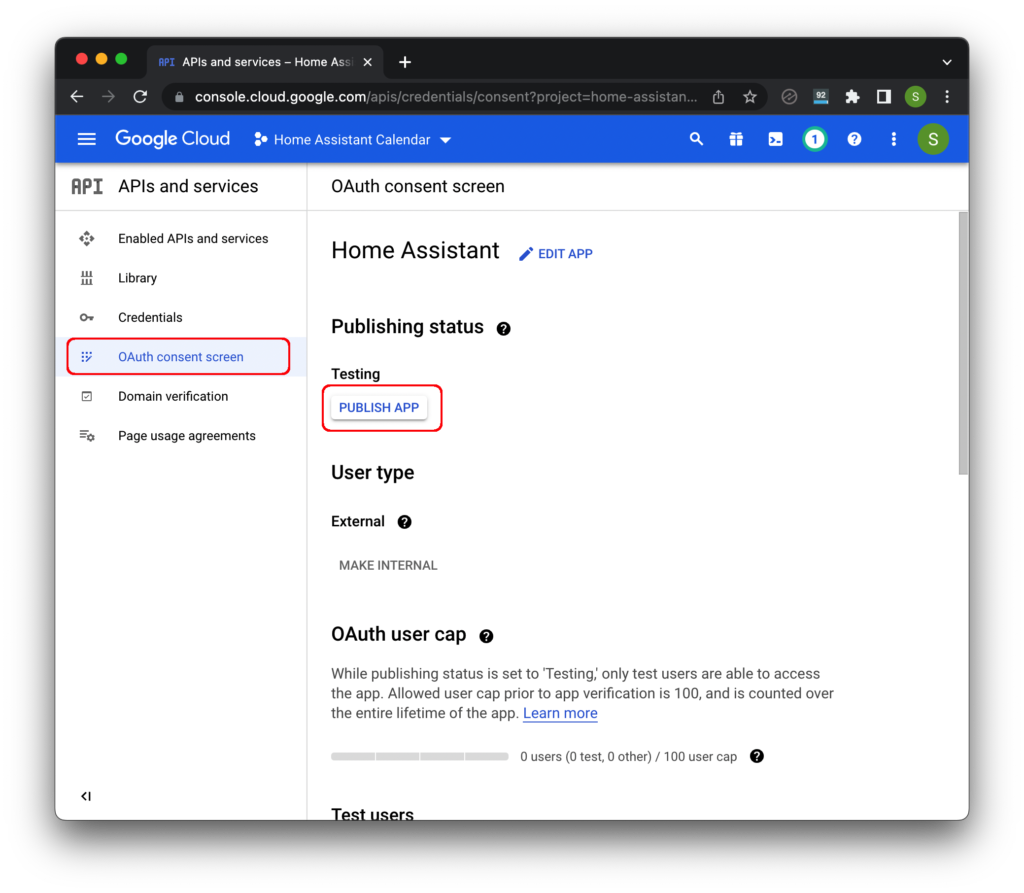
Back on the OAuth consent screen you will need to click publish app and then confirm. This is to prevent the authorisation token expiring every 7 days.
Setup credentials
Next choose credentials from the left-hand menu, then choose create credentials followed by the option for OAuth client ID.

Choose TVs and Limited Input devices for the Application type. Enter a name such as Home Assistant OAuth.
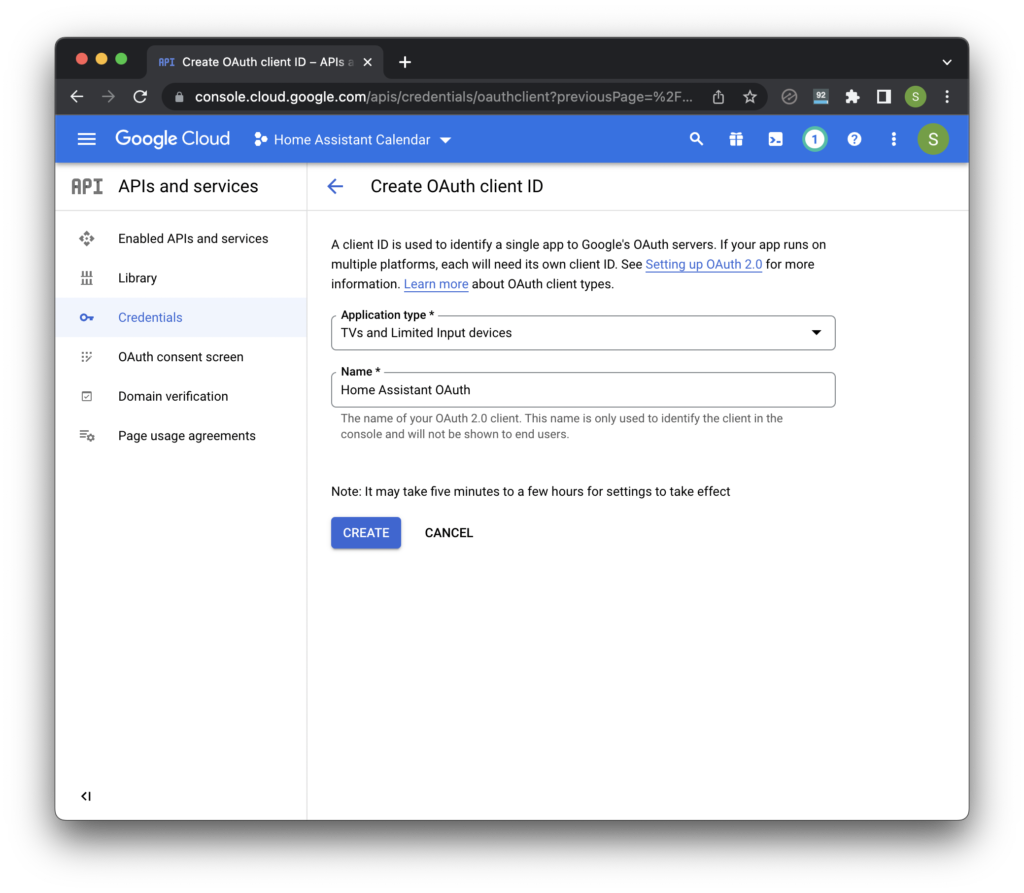
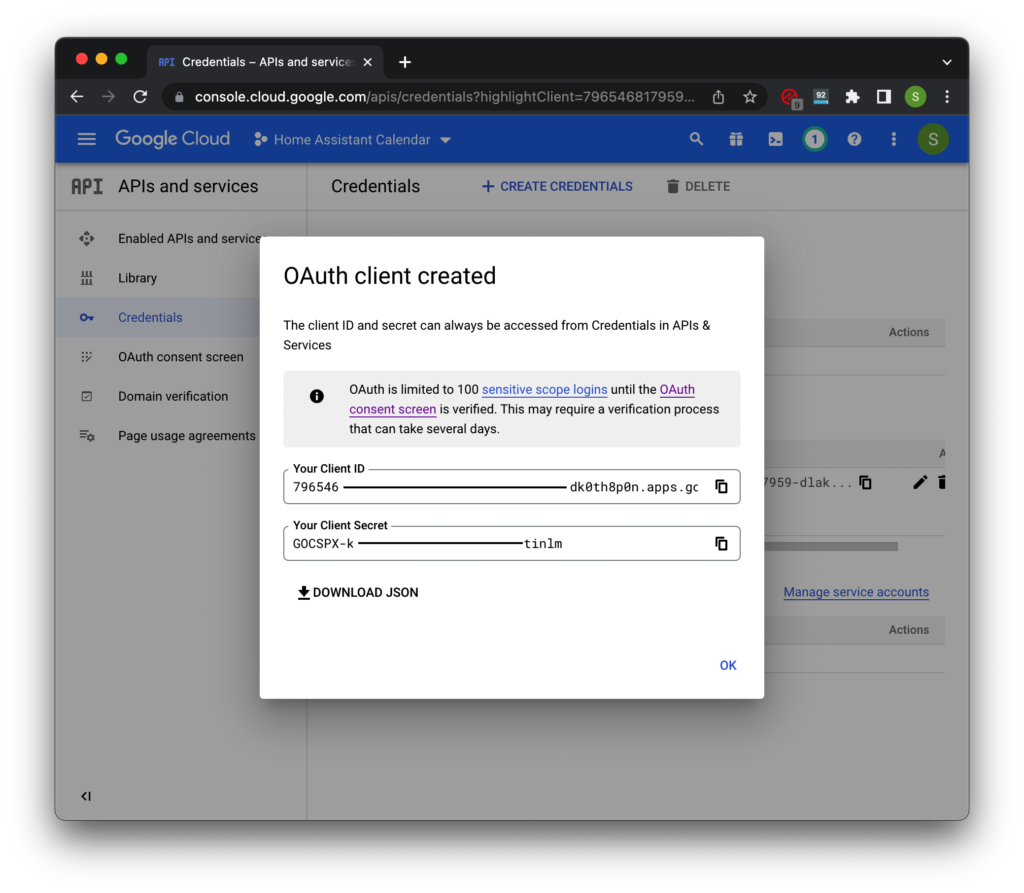
Next click the create button to create the OAuth credentials.
You will need to write down or copy and paste your Client ID and Client Secret into a text editor for later use.
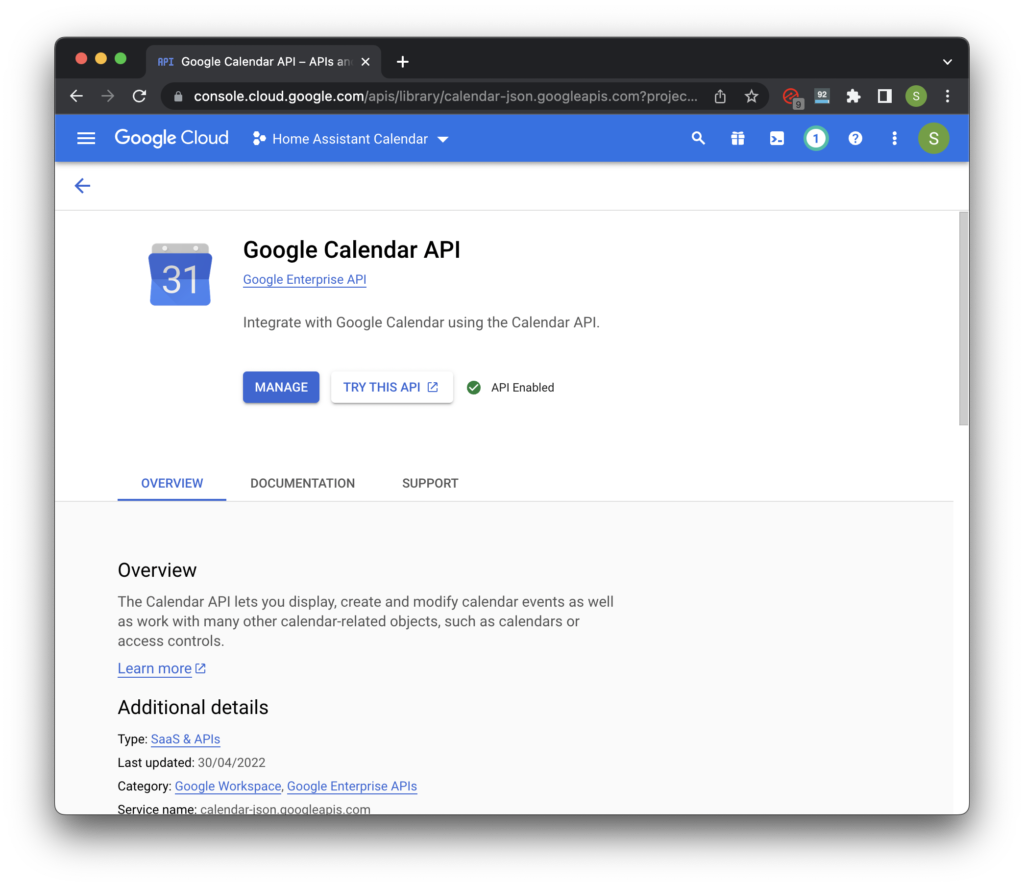
Lastly we need to check if Google Calendar API has been enabled. Click library from the left-hand sidebar.
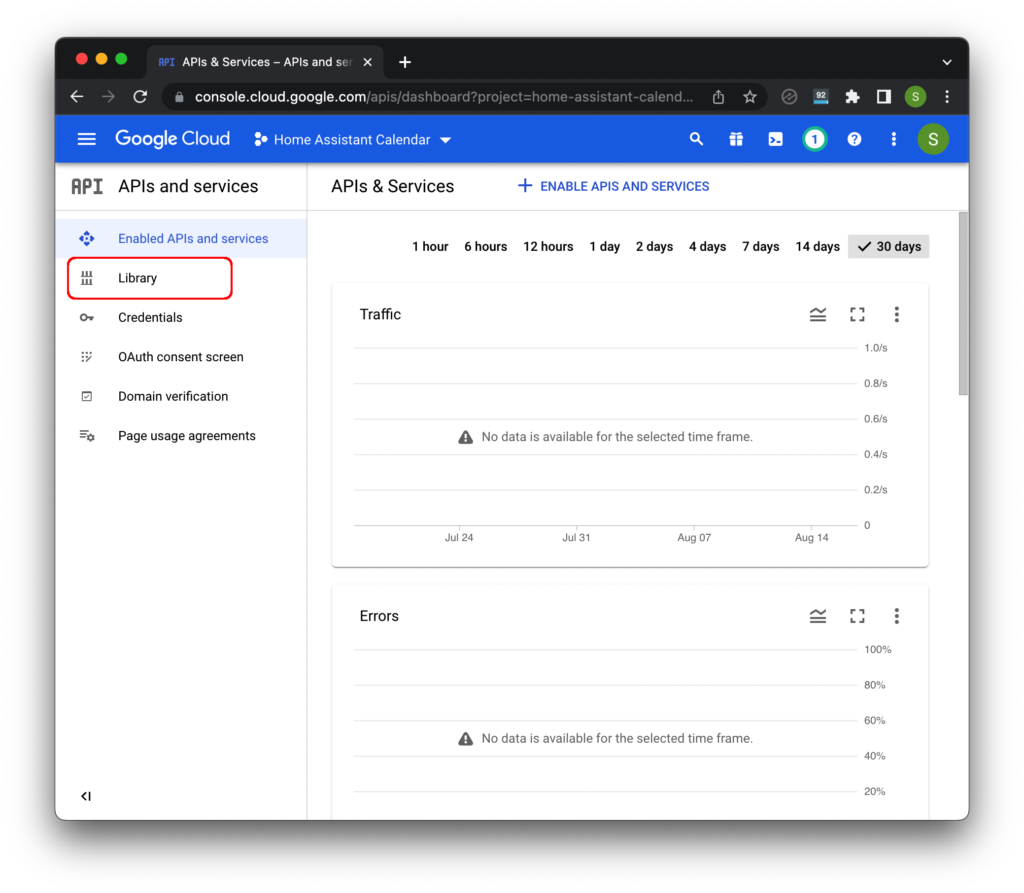
Use the search bar at the top to find Google Calendar API, open it and check that there is a green tick with API Enabled written.
Awesome! We are done with Google Developer console so you can go ahead and close it.
Now we can move on to the fun part, setting up Home Assistant!
Setup Google Calendar in Home Assistant
There is now a calendar integration available for Home Assistant.
This makes it really easy to set up Google Calendar with Home Assistant once you have your OAuth token from the previous section.
How to add Google Calendar integration to Home Assistant using Google Calendar integration
Home Assistant can now automatically add the Google Calendar integration, just click the button below:

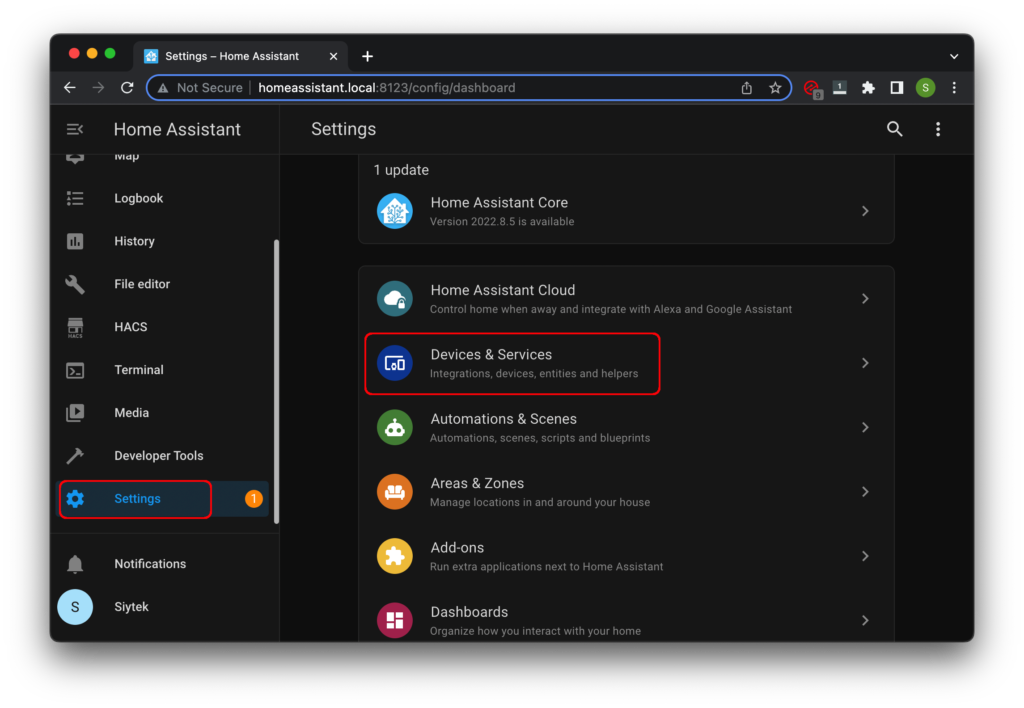
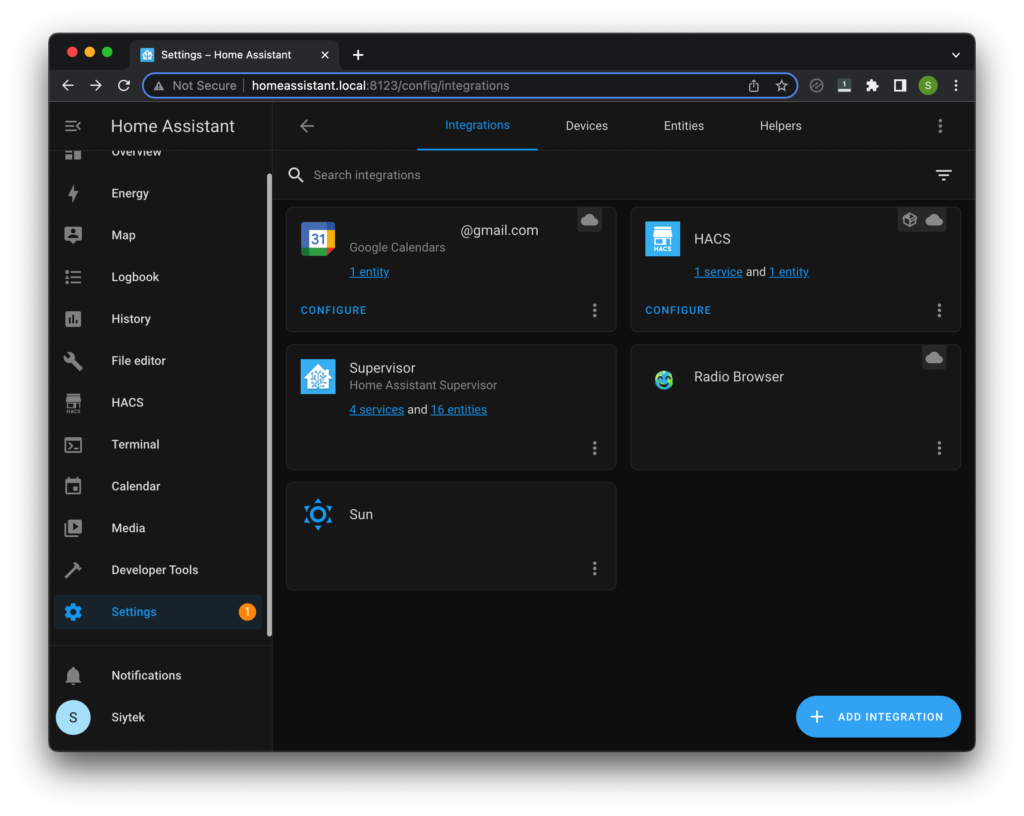
It is also very easy to do this manually. First click settings on the left-hand sidebar, then click devices & services.
Next choose the integrations tab at the top and click the add integration button in the bottom right corner of the screen.
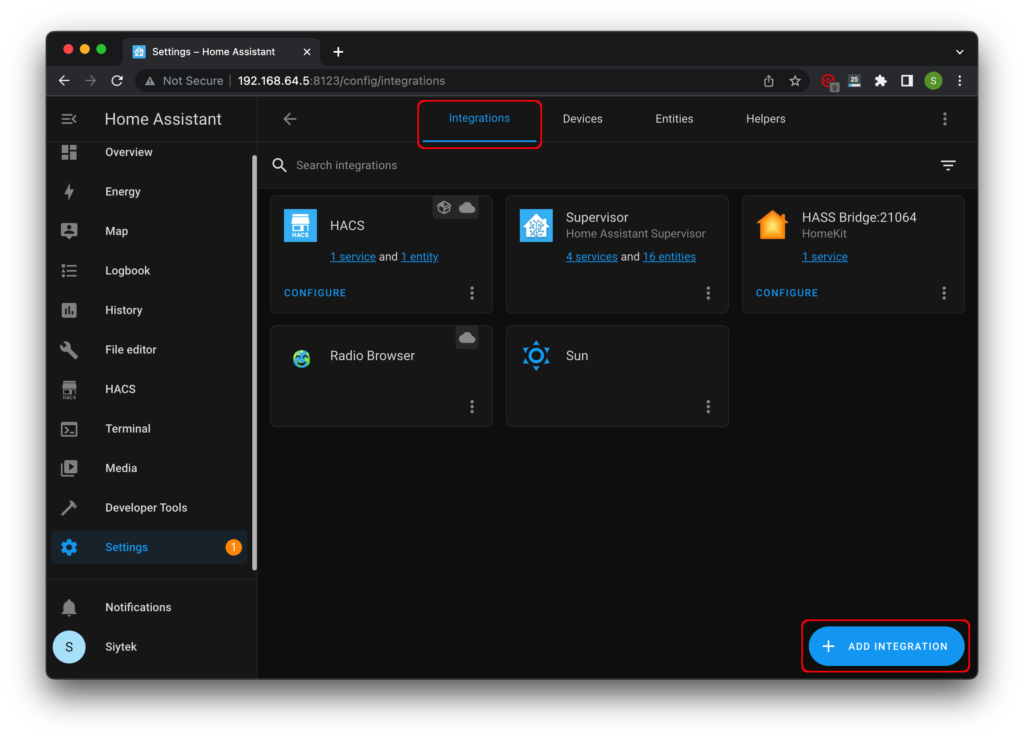
Search for and then click Google Calendars.

How to set up Home Assistant Google Calendar Integration
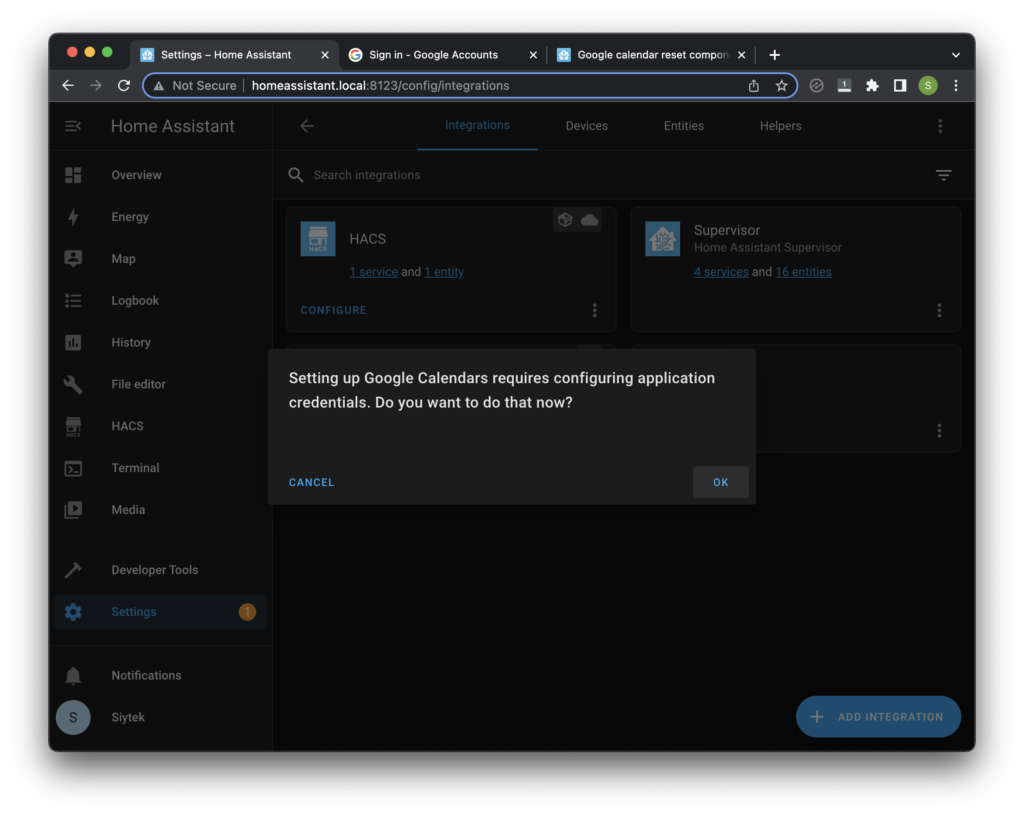
Once the Google Calendar integration has been added, next we will need to set it up.
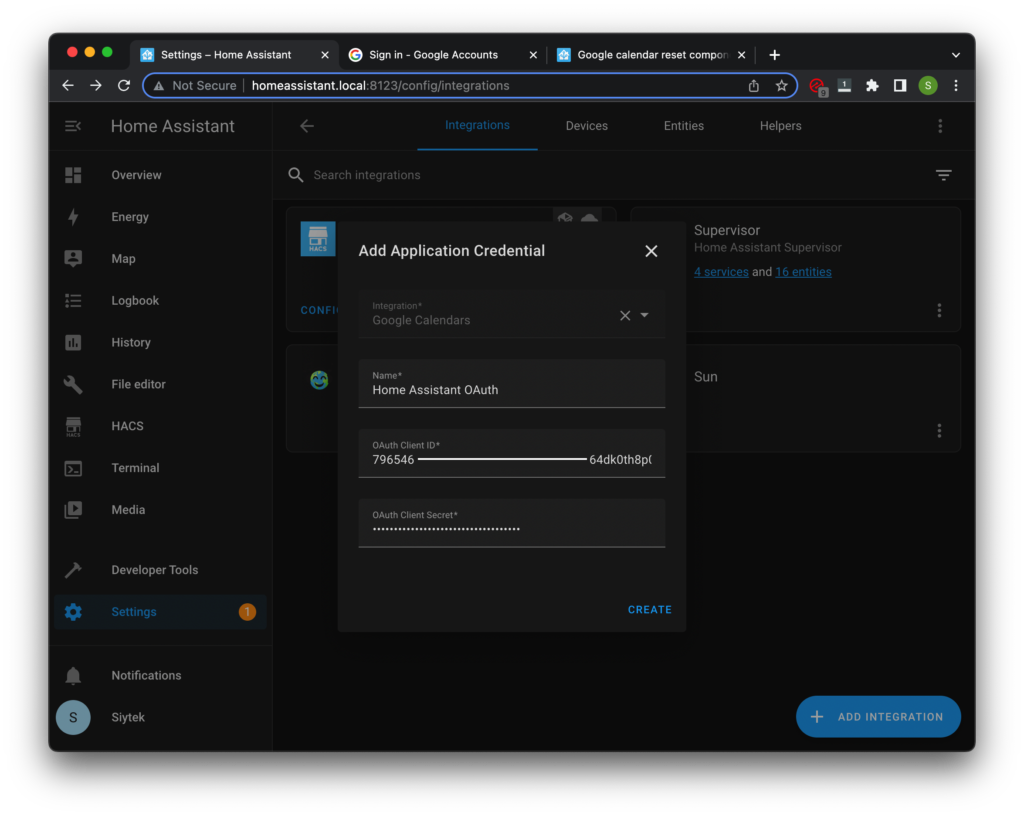
When you first add the integration you will be given a chance to enter your OAuth token details that you wrote down earlier.
Go ahead and enter the OAuth details and then click create.
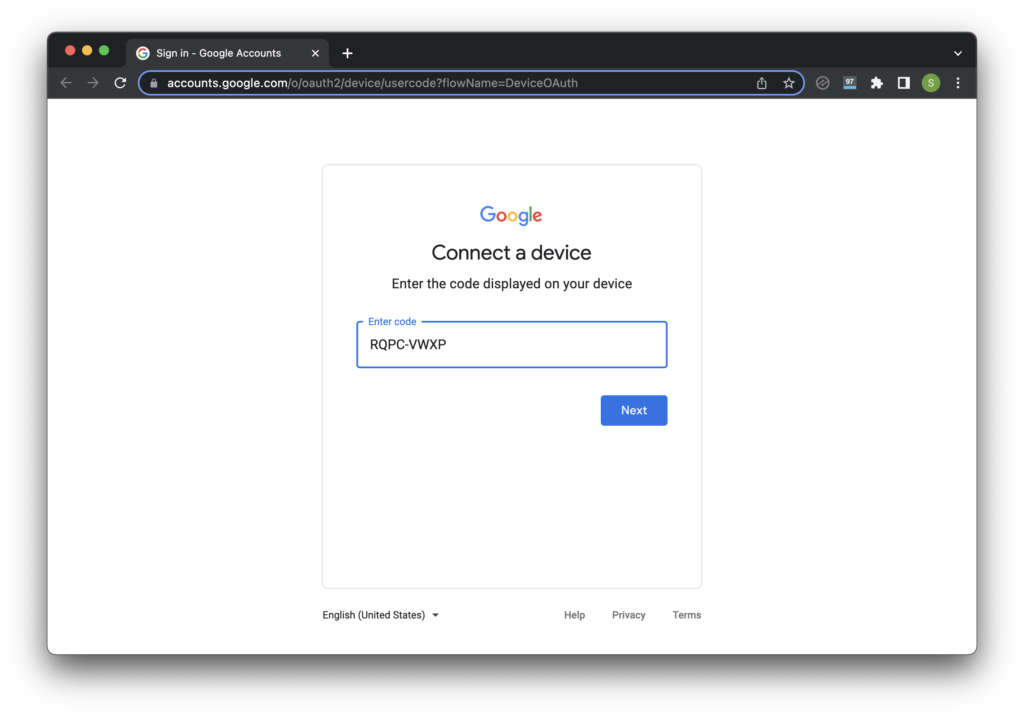
The next screen will prompt you to visit https://www.google.com/device and enter the code displayed on the screen.

On the connect a device page, enter the code given by Home Assistant. Note that there is only a short time to do this before the code changes.
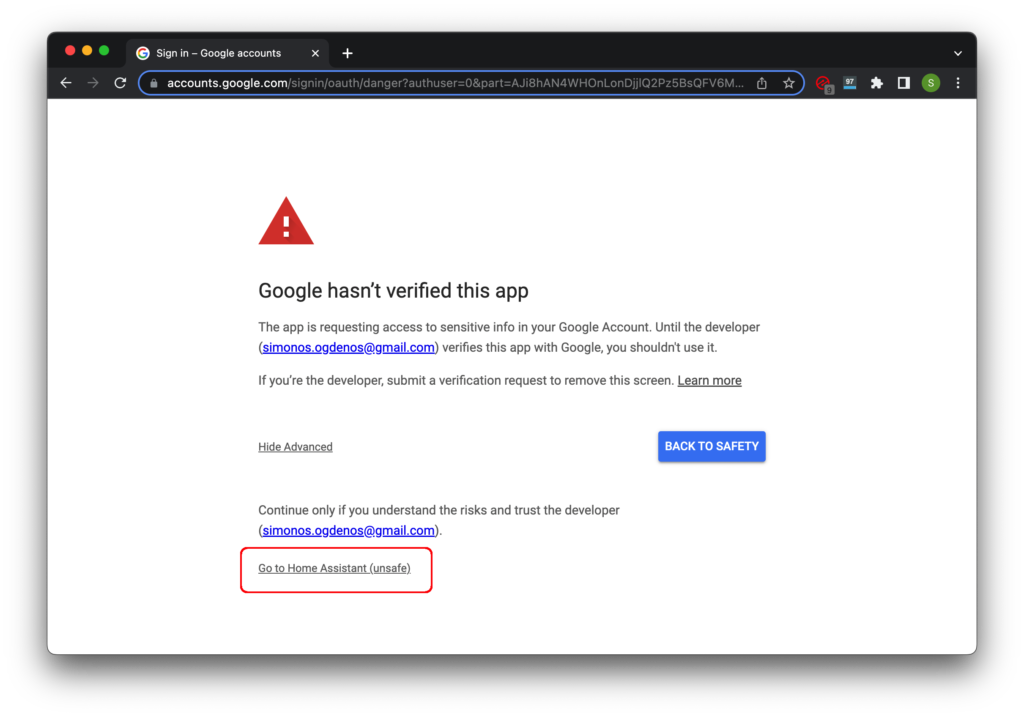
Google will warn you that the app hasn’t been verified. This is because we only just created this app ourselves for connecting Google calendar to Home Assistant.
Click to show advanced options and then click Go to Home Assistant (unsafe). Note that it is not unsafe! 🙂
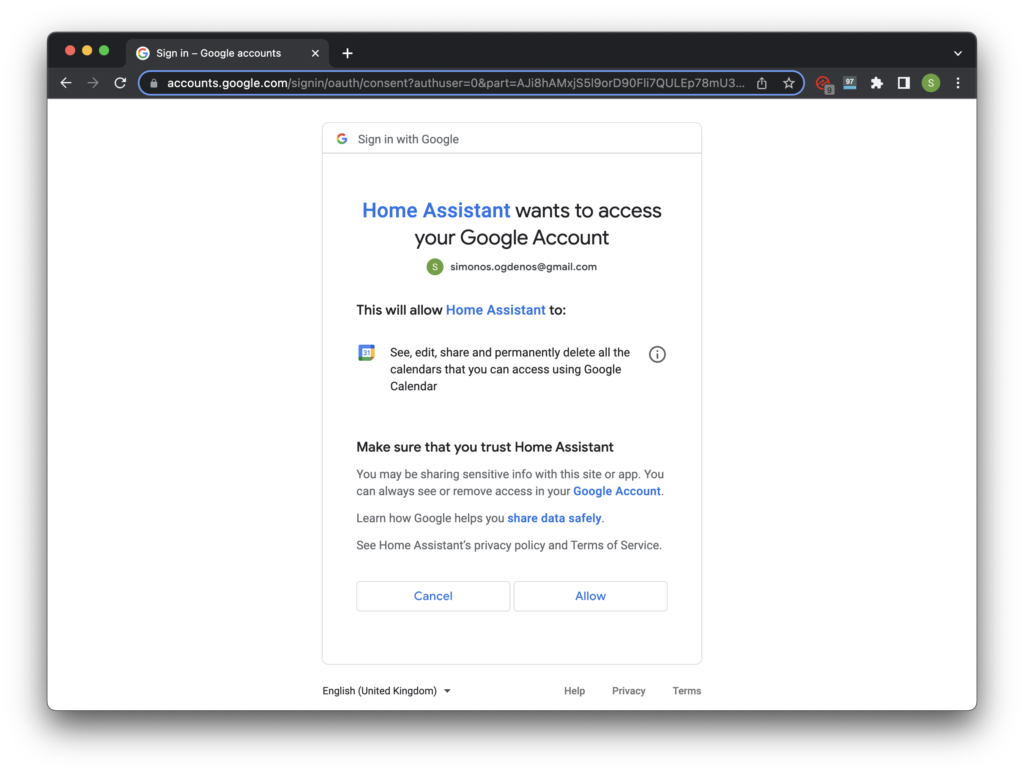
You will then see the familiar Google account authorization screen, go ahead and click allow.
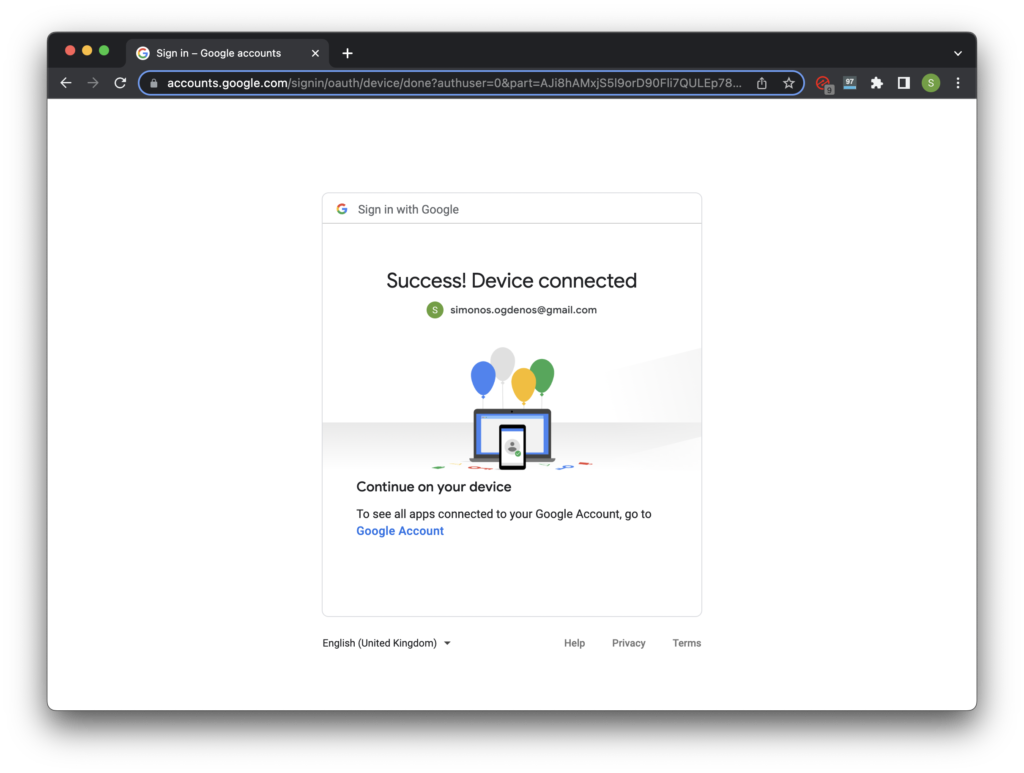
Finally if all went well you will get a success, device connected screen. Awesome!
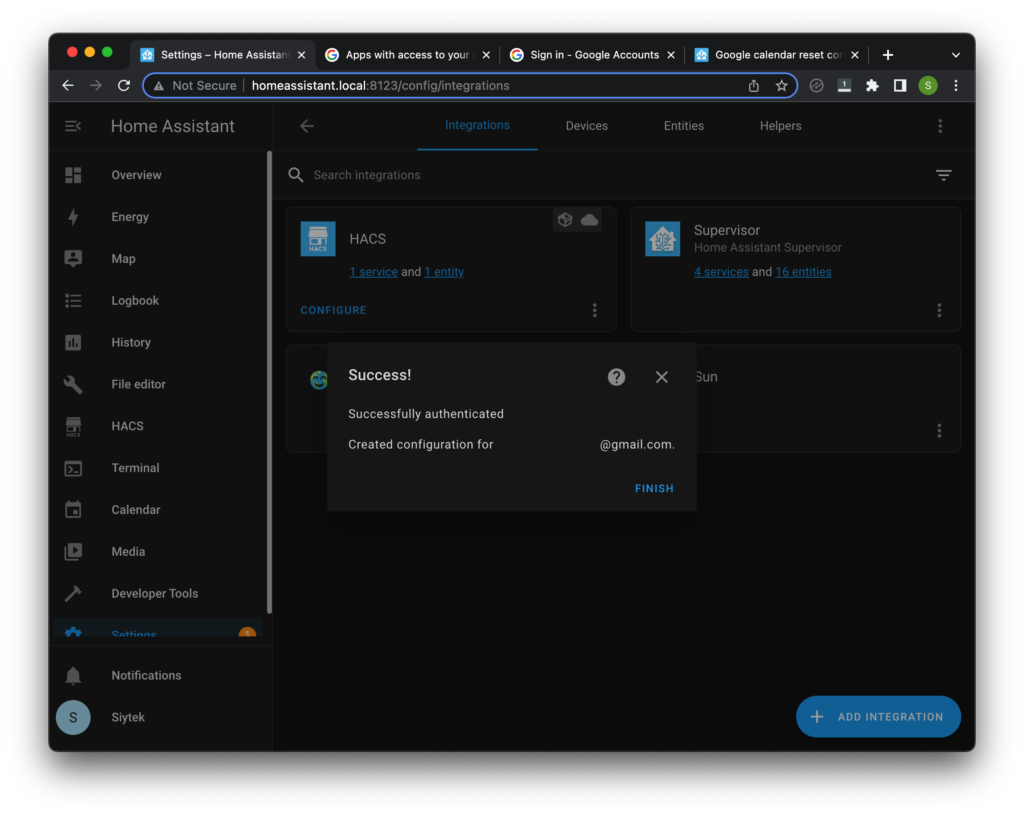
The Google Calendar Integration should now be showing under the integrations tab.
How to use Google Calendar in Home Assistant
Google Calendar is represented as a calendar entity in Home Assistant.
Your calendar named MyAwesomeCalendar will appear as an entity in Home Assistant called calendar.MyAwesomeCalendar.
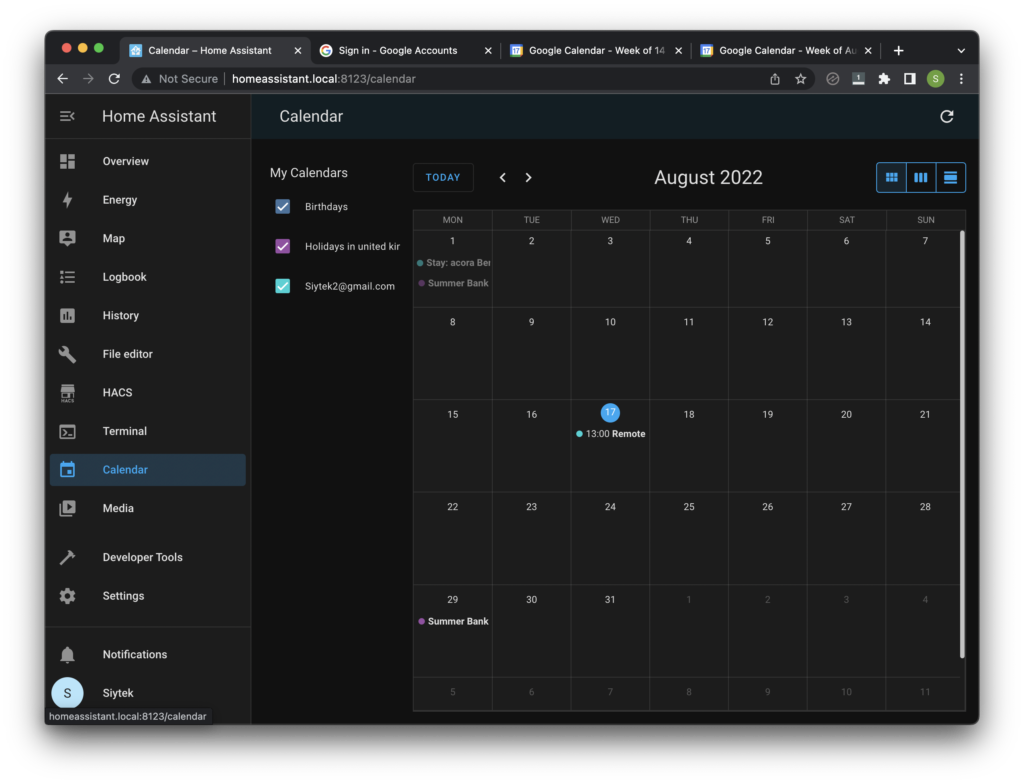
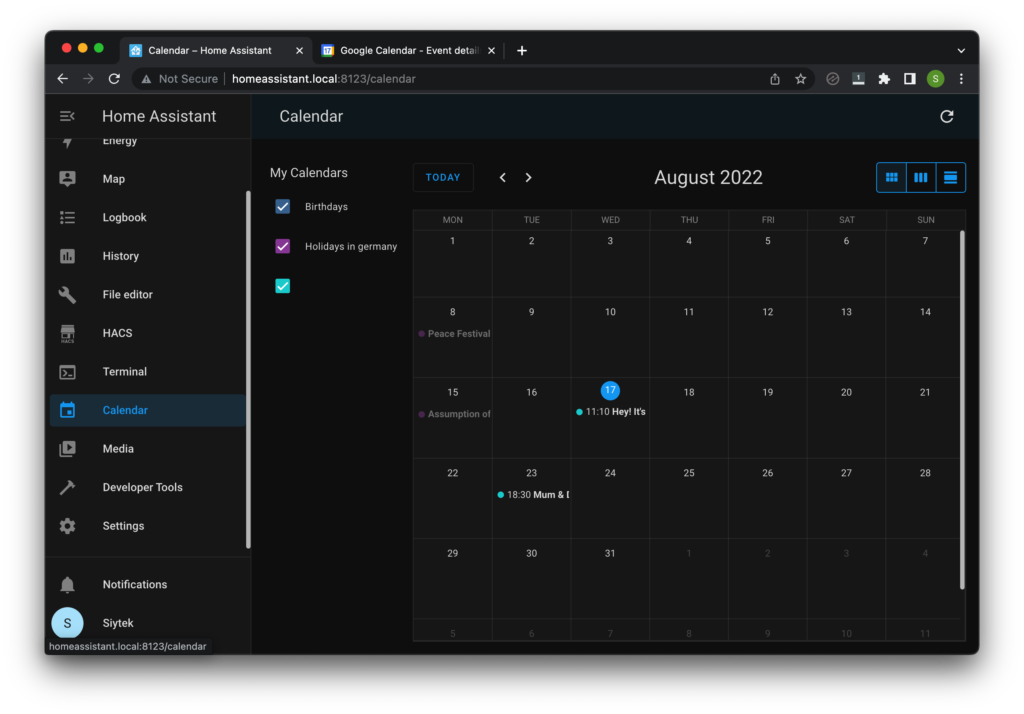
The calendar module in Home Assistant, accessible from the left-hand side bar, will synchronize with your Google calendar.
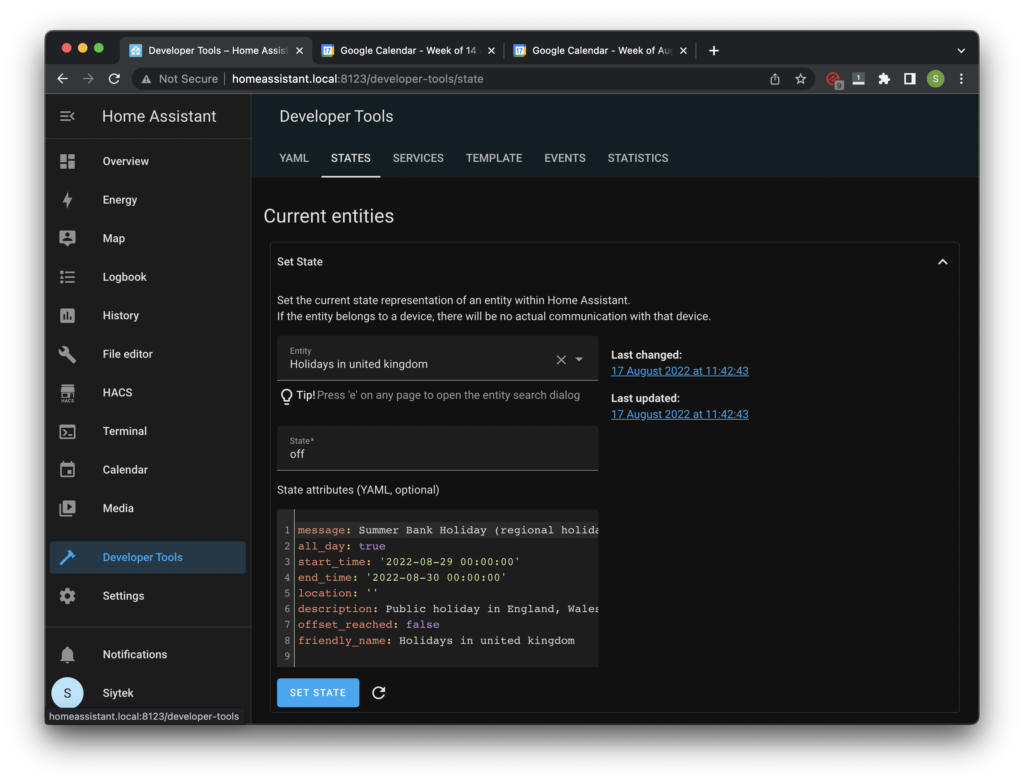
If you inspect the calendar entity you will notice that the entity state attributes relate to the next event in the calendar.
For example in my calendar shown above there is an event on the 29th called ‘Summer Bank Holiday‘ in the calendar ‘Holidays in the United Kingdom.’
If we look at the entity for this calendar, we will see that the attributes match this event:
How to Create Home Assistant Calendar Event Automations
Google Calendars can be utilized with automations, which are displayed on the calendar dashboard. The calendar dashboard can be found by clicking calendar on the left-hand sidebar.
Instead of using the entity state for automations, a calendar trigger is significantly more adaptable, has fewer restrictions, and is suggested for automations.
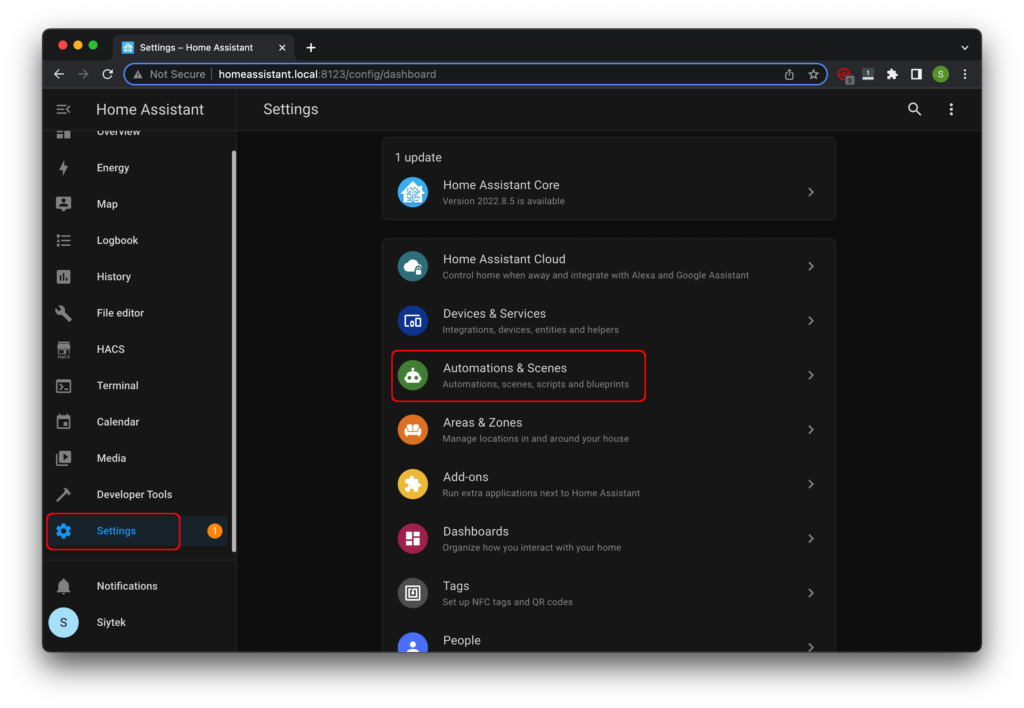
In order to make a new calendar automation, go ahead and open automations by clicking settings in the left-hand sidebar and then Automations & Scenes.

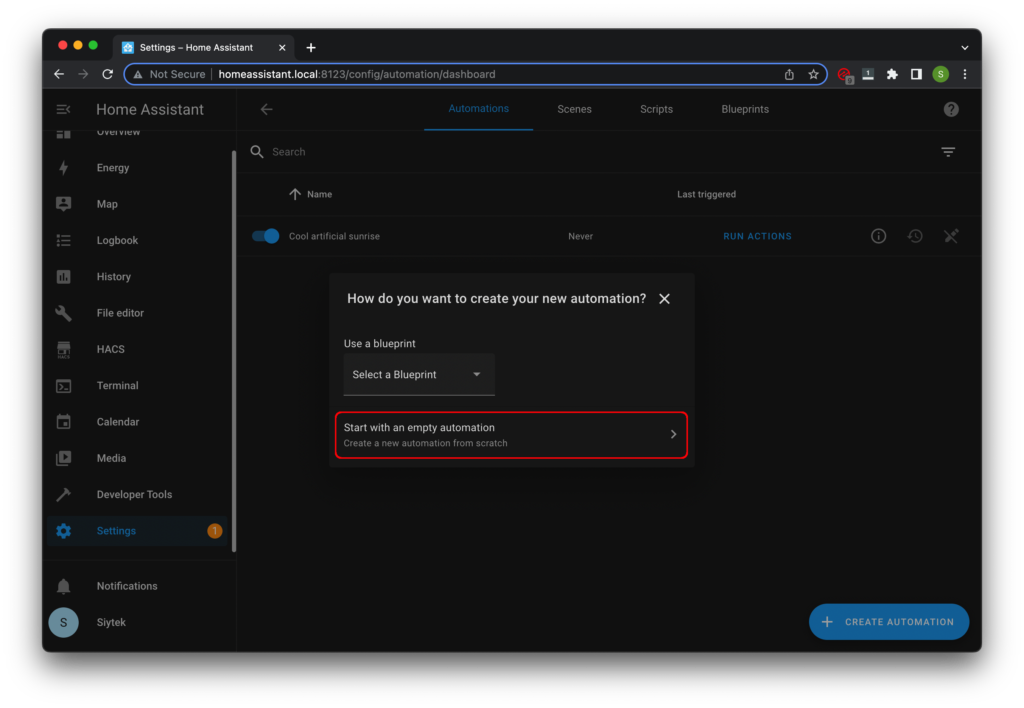
In the bottom right of the screen click create automation in order to create a new automation.

A box will open asking you how you want to create a new automation, choose start with an empty automation.
To ensure the trigger can fire when numerous events start at once, calendar triggers should generally avoid using automation mode single (e.g. use queued or parallel instead)
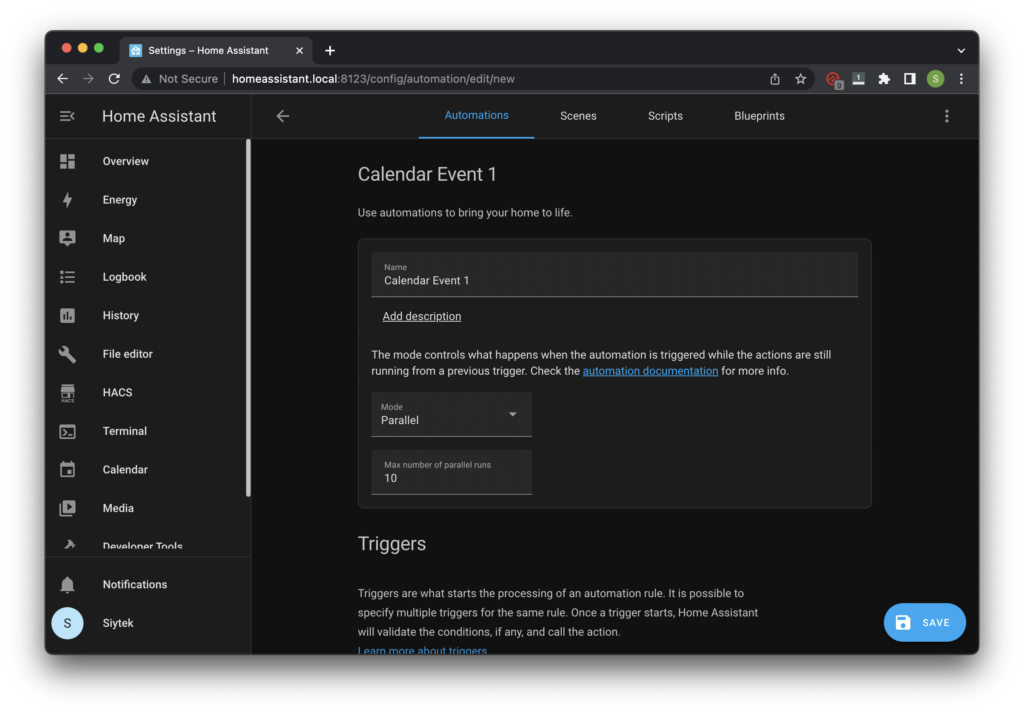
Give your automation a name and choose the automation mode.
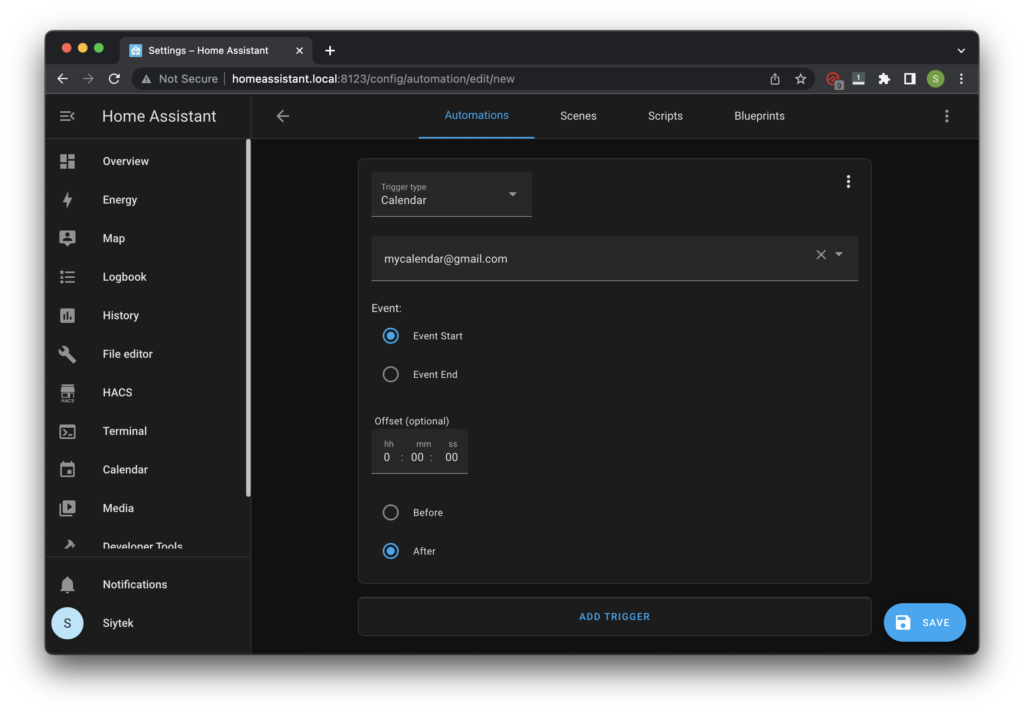
Once you have named your automation, scroll down to triggers and choose Calendar in the trigger type.
In order to link the automation to a specific calendar event, we can use conditions.
Create a new condition with the type set to state. You can use any of the calendar entity attributes, but here we will set the attribute to message.
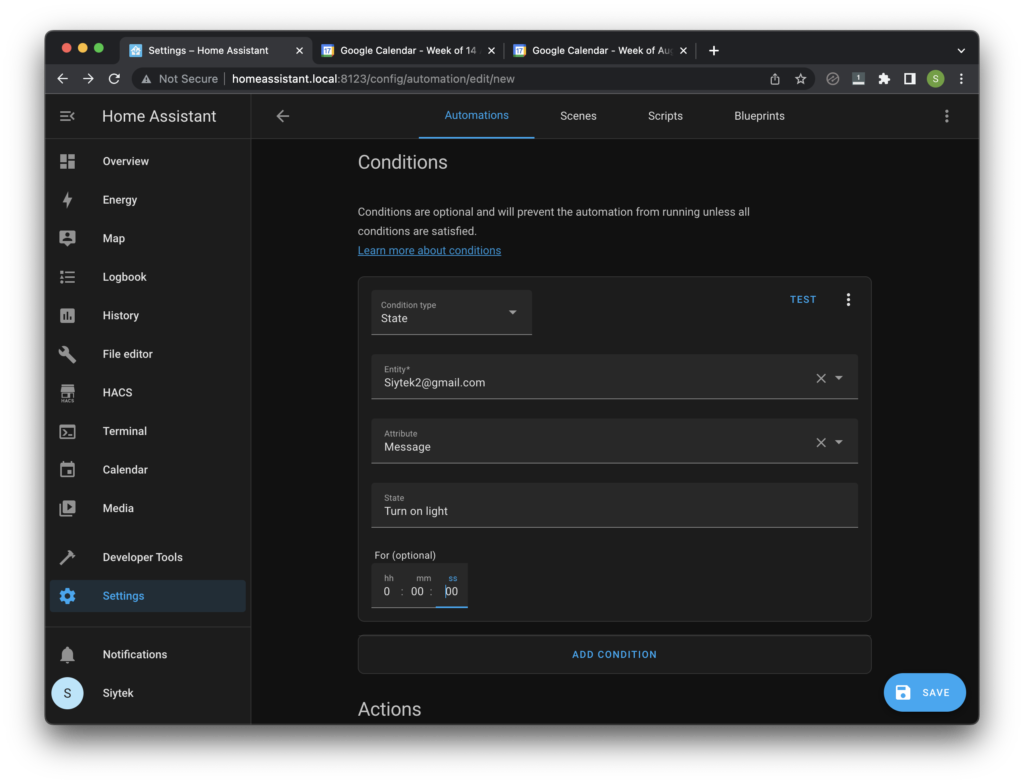
Setting this condition will cause the automation to fire only when a calendar event occurs where the message in the calendar event matches the message specified in the condition.
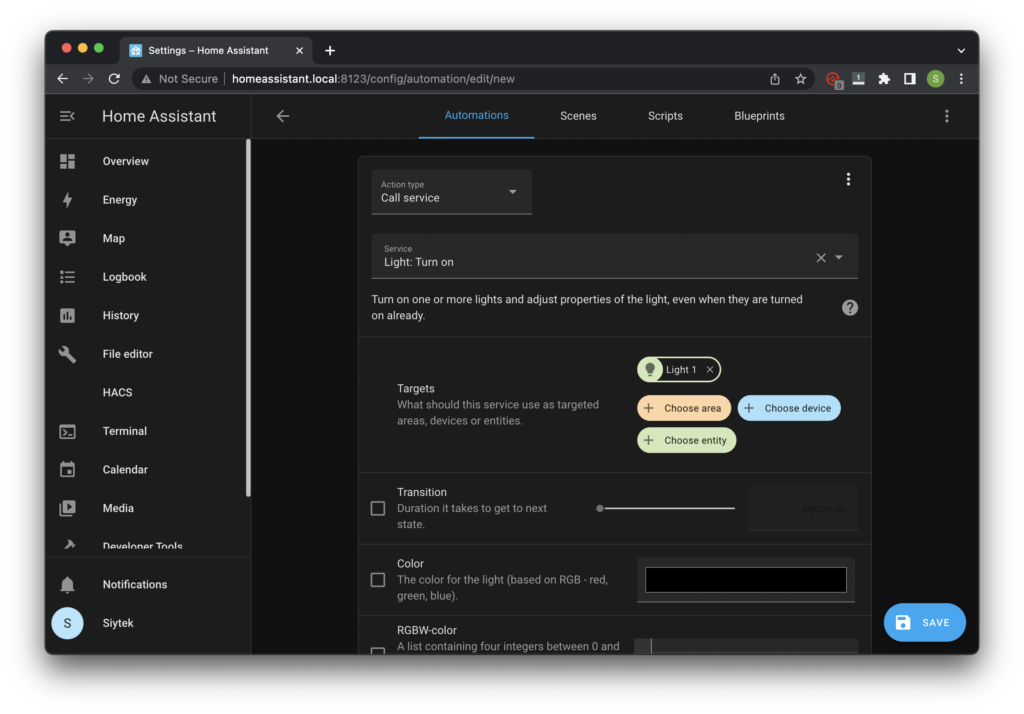
Lastly scroll down to actions and create the desired actions for the automation.
In this example I have chosen call service and used light: turn on with the entity light 1, but you can be as creative as you like here with automations!
How to Create Home Assistant Calendar Event Automations in YAML
It is also possible to create calendar event automations directly in YAML. You can add the YAML directly to configuration.yaml or to automation.yaml.
Here is an example of a calendar event automation:
automation:
alias: Calendar notification
trigger:
- platform: calendar
event: start
entity_id: calendar.MyGoogleCalendar
action:
- service: persistent_notification.create
data:
message: "You have an event in your calendar!"
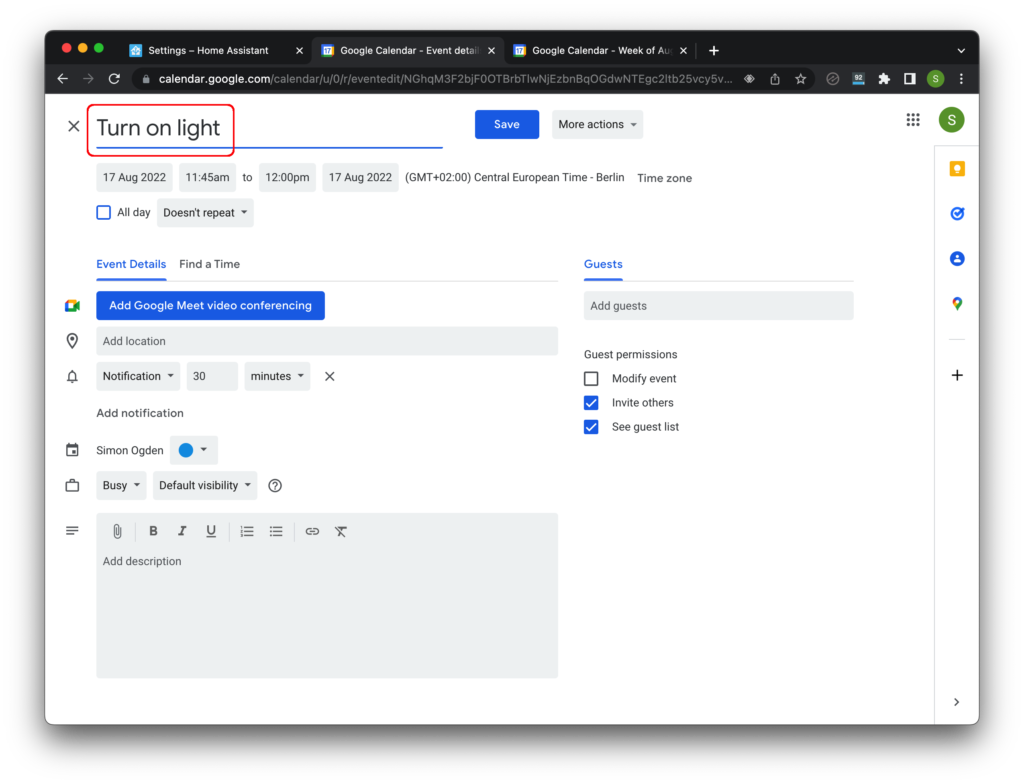
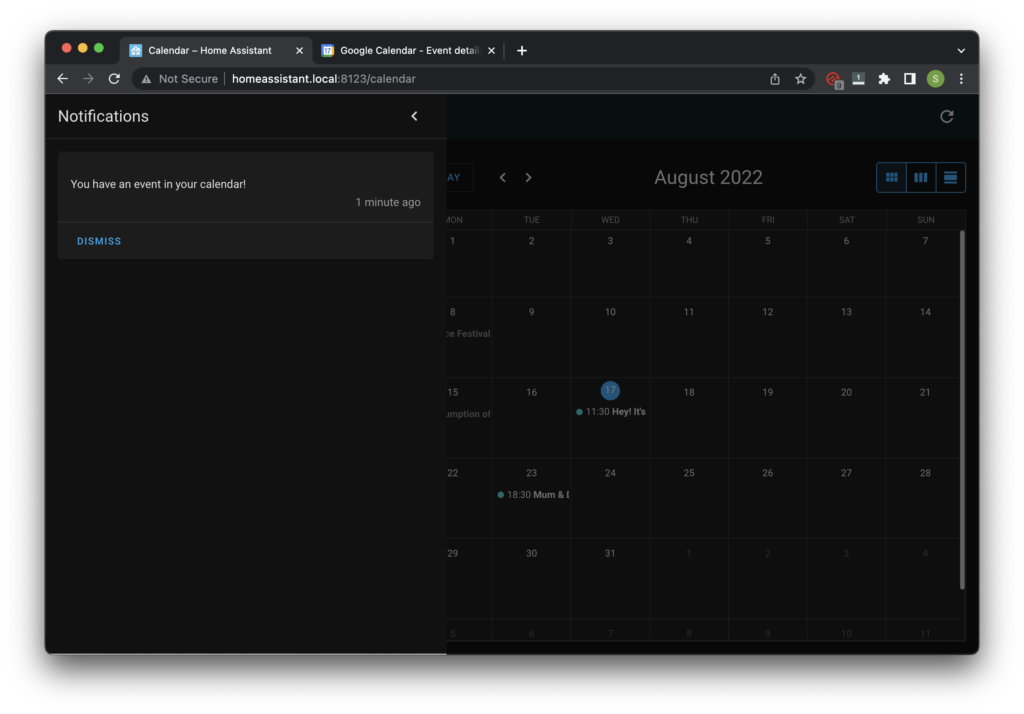
mode: queuedIn order to test this we can create a new event in Google Calendar.
You should notice the new event synchronize with the calendar dashboard in Home Assistant.
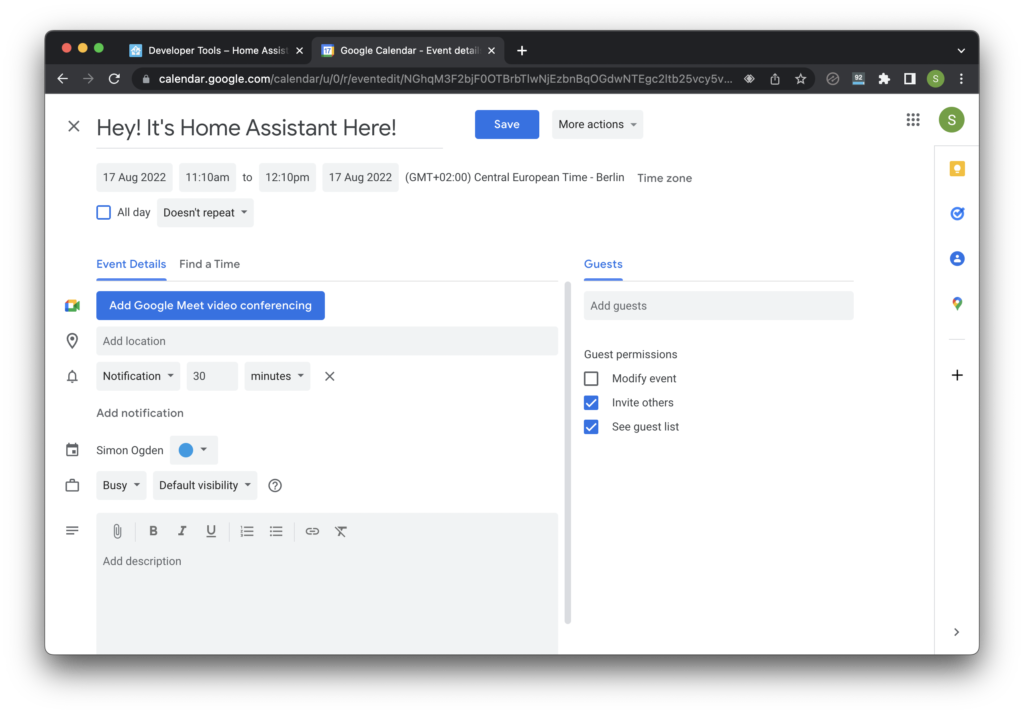
When the event is reached the action is triggered. In this case a simple notification is generated just to demonstrate but you can be as creative if you like with the actions!
How to edit google_calendars.yaml (legacy)
This is not the recommended method and is not compatible with newer Home Assistant features. However I have left it here as legacy documentation for those who might be interested. Everyone else should skip this section.
Older versions of Home Assistant it was possible to edit calendars using google_calendars.yaml, which would have been created in the Home Assistant root directory.
This is no longer the case and the file must be created manually.
Go ahead and open up google_calendars.yaml from your config directory.
You should notice that at least one entry should have been added to the file. A basic entry will look something like this.
- cal_id: [email protected]
  entities:
  - device_id: sensor_name
    name: Sensor Name
    track: true
Each calendar can have a list of device_id attributes, which correspond to a sensor in Home Assistant. We can then use these sensors in the usual manor to link the calendar to any automations or scripts that we want to write.
Don’t worry if it sounds a little confusing, it will make sense when we cover an example.
Note that you should not change the value cal_id as this is the reference used to link the sensors to the calendar.
The device_id is the name that we will use to reference the sensor and it falls within the calendar entity. The name attribute is the desired friendly name and the track attribute tells Home Assistant whether or not to create a sensor for the particular item.
To link a particular event from our calendar to a Home Assistant automation, we can create a binary_sensor for the calendar event using the search attribute. This allows us to search for a particular calendar event and produce an ‘on’ state during the event.
Let’s say for example that on Friday at 8pm it is pizza night. First we will create an entry in our calendar for “pizza night.”
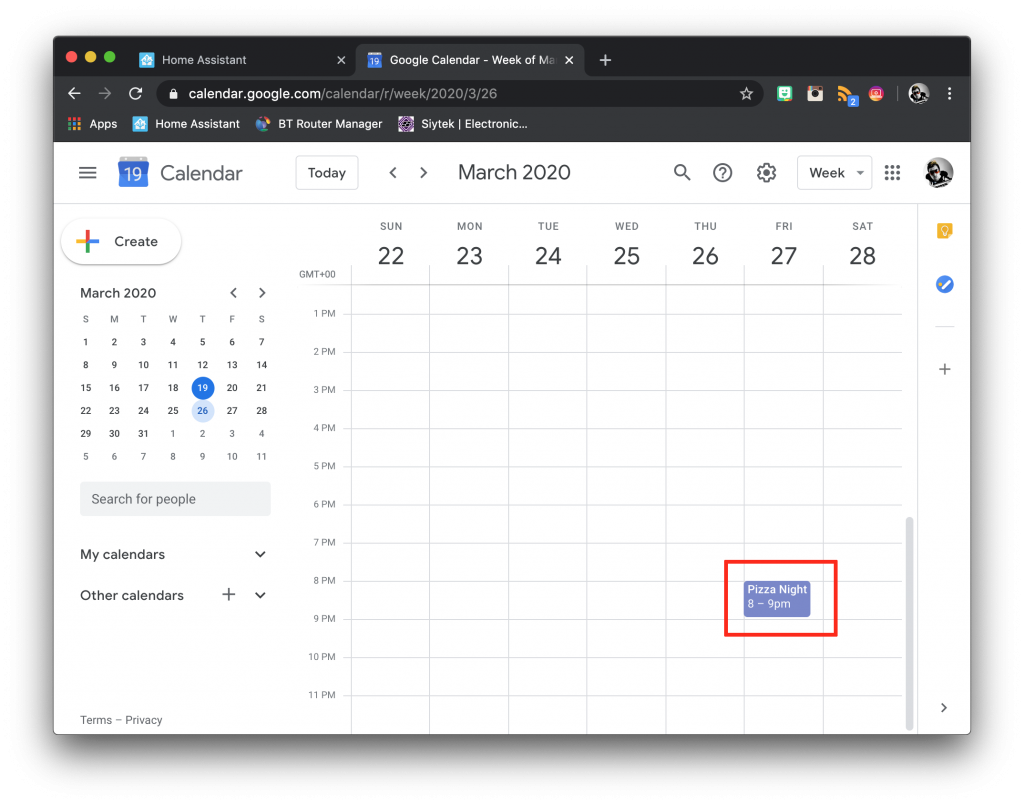
Now we can add the following device_id to our google_calendar.yaml with a search attribute that will test for this event. Note that we should include a hash symbol before the search term as well as using quotes.
- cal_id: [email protected]
  entities:
  - device_id: calendar_gmail_com
    ignore_availability: true
    name: [email protected]
    track: true
  - device_id: test_pizza
    name: Pizza Night
    track: true
    search: "#Pizza Night"
This will create a binary_sensor in Home Assistant called calendar.test_pizza. The state of this binary sensor will be ‘off’ unless the calendar reaches an event containing the search term “pizza night.”
Let’s create a second binary sensor for an additional event. As I am currently writing an article, I will add a binary sensor to test for “write article.”
- cal_id: [email protected]
  entities:
  - device_id: calendar_gmail_com
    ignore_availability: true
    name: [email protected]
    track: true
  - device_id: test_pizza
    name: Pizza Night
    track: true
    search: "#Pizza Night"
  - device_id: test_write_article
    name: Write Article
    track: true
    search: "#Write article"
Now if we click developer tools from the sidebar and goto the states tab, we can search for calendar entities. Here we can see the two binary sensors that we just created.
As you can see the binary sensor calendar.test_write_article is ‘on’ as this event is currently active in my calendar.
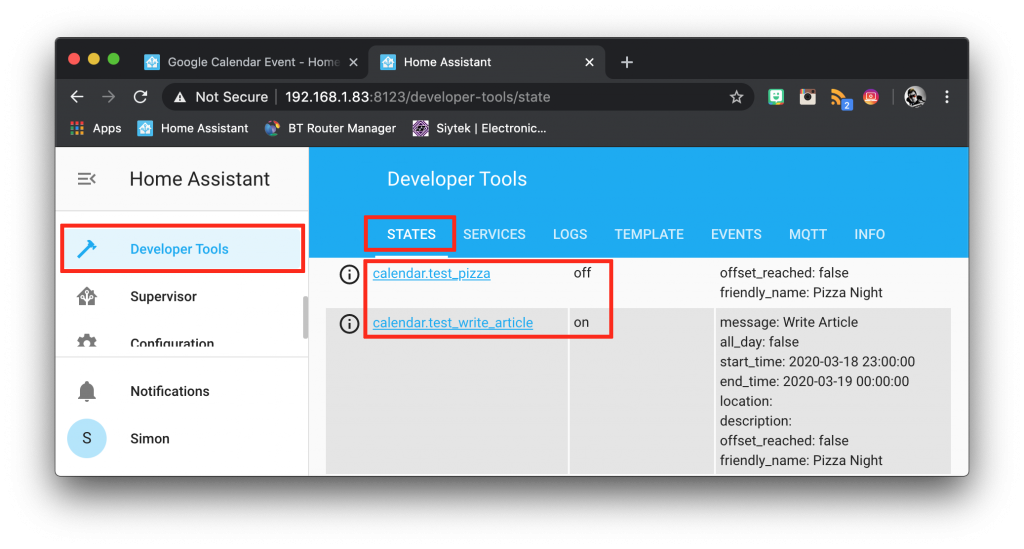
Sadly the binary sensor calendar.test_pizza is currently ‘off’ because it is not yet pizza night. However when my calendar reaches this event, the state will change to ‘on’ and I will be ordering pizza! If you live in the USA you can even automate ordering a Domino’s!
How to add event automation to a Google Calendar in Home Assistant (legacy)
So now that we have our calendar integrated into Home Assistant and we have learnt how to link an event, how do we make use of it? We simply create an automation using any of the calendar sensor entities.
When I write an article in the office, I like to set the mood by turning off the main light and switching on the lamps. I also like to play a particular playlist on Spotify whilst I work.
We can automate all of this using our new calendar entity, so in my example the office prepares itself automatically each time I am scheduled to write.
I already have a script setup called script.office_writing which triggers my Spotify playlist and sets the desired lighting. So let’s write an automation to trigger these events from the calendar.
  - alias: 'Calendar event: write article'
    trigger:
      platform: state
      entity_id: calendar.test_write_article
      to: 'on'
    action:
      service: script.turn_on
      entity_id: script.office_writing
Adding this under the automation integration or to the automation.yaml will cause the script to be triggered once the event is reached in Google Calendar!
This example is of course unique to my routine but it should give you the necessary information to build your own desired event trigger.
How to add a calendar event to a Google Calendar in Home Assistant (legacy)
It is also possible to add an event to Google calendar by using the service google.add_event. As a minimum we need to specify the cal_id of our calendar and also a sumary, which acts as the description.
However we can also specify other attributes that will appear in the calendar event. Let’s look at an example script which can add an event to our calendar.
add_to_calendar_house_party:
    alias: Schedule a house party
    description: 'It's time to party!'
    sequence:
        - alias: Trigger calendar add event
          service: google.add_event
          data:
            cal_id: [email protected]
            summary: title of the event
            description: description of the event
            start_date_time: 2020-03-10 20:00:00
            end_date_time: 2020-04-10 02:00:00
            start_date: "2020-03-10
            end_date: "2020-03-10
            in: "days":2
Note that you should use start_date_time and end_date_time, or start_date and end_date, or specify in as the number of days from now that you would like to add the event.
Conclusion
The Google Calendar integration in Home Assistant gives us a powerful yet simple way to schedule anything in Home Assistant. In this tutorial we have learnt all of the necessary basics to integrating the calendar and utilising events.
There are endless possibilities for combining the calendar integration with your Home Assistant setup. Here are just a few ideas you may want to consider!
- Movie night every friday? Get Home Assistant to automatically dim the lights and control your media player.
- Link your Home Assistant thermostat integration so you can schedule your heating and air conditioning with Google Calendar.
- Automate your lights to come on when you get home from work or when you begin your morning routine.
- Schedule any automation or script with the Google Calendar interface, such as boiling the kettle in the morning or watering the plants.
- Schedule any trigger in IFTTT along with your favorite automations using webhooks.
- Use Apple Home and Siri to add events to your Google calendar.
Article Updates
Aug 16th 2022 : Tested on Mac M1 and Mac OS 12.4 Home Assistant Core 2022.8.5. Screenshots updated to latest frontend, version 20220601.0. Fixed broken links in table of contents. Some additions to article information.
Article first published March 18th 2020.
Thanks so much for visiting my site! If this article helped you achieve your goal and you want to say thanks, you can now support my work by buying me a coffee. I promise I won't spend it on beer instead... 😏


I had already setup the google calendar and followed your write up to add a similar sensor and it worked. What I don’t find is good documentation on it (https://www.home-assistant.io/integrations/calendar.google/). I assume what every is allowed in sensors is allowed here? (https://www.home-assistant.io/integrations/sensor/ does give much info.) Were you able to find more information on setting up sensors? What is allowed and what isn’t? On the search again, I do know where to find how to do. Why is #needed? Are wildcards allowed? I.e “#Pizza*”. Can tasks also be added?
Hi Bill, I have only read the documentation that you mentioned. I assume that the sensor created is the same as any other standard sensor but with the associated attributes for calendar (pulled from the developer tools > states tab)
message: Pizza Night
all_day: false
start_time: 2020-03-27 20:00:00
end_time: 2020-03-27 21:00:00
location:
description: Pizza Night
offset_reached: false
friendly_name: Pizza Night
I am not sure about why the hash symbol is required, but if I remember correctly it did not work without it. I didn’t try a wildcard either but if I get chance I will look into both of these a little further, would be good info to add to this article. Thanks for your comment and for reading the article!
I always get concerned on undocumented things working / not working. This means they can change at anytime without any notification (i.e. breaking changes). My biggest issue with HA has been the lack of documentation and the lack of control of the documents. As an open source software system it is understandable, but adding revisions and revision dates on all releases should be a minimum.
I totally understand, and also the platform also changes so quickly! I share your concern as I worry about information I provide here going out of date quickly, although I am keeping an eye on the Github releases page. I do however believe that HA will reach a point in its level of maturity where things settle a bit, I think maybe when more functionality has moved to GUI. I guess we will have to wait and see, and for now at least there is great community support!
Thanks for this interesting article! I’m pretty new to HA and I wonder if it is possible to apply the condition also to a part of the event text. I’ve searched the net and tried a few things, but nothing has worked so far.
Is there a way to integrate Tasks from the Google Calendar into HA? It looks like only Events are supported.