Looking to get the FULL Home Assistant experience on your Mac? This article will teach you the best way to run a fully-featured Home Assistant supervised on Apple silicon (ARM ‘M’ processors).
This detailed step by step guide will walk you through the entire process of creating a virtual machine using UTM, installing Debian Linux command line and then using the supervised installation script to install Home Assistant.
The process is fairly straightforward, although there are quite a number of steps and it may take some time and patience.
This guide will teach you step by step how to run supervised Home Assistant on a Mac. This will give you a fully featured version of Home Assistant, including the add-ons store.
This method is suitable for anyone who wants to run supervised Home Assistant on Apple hardware or wants to run Home Assistant on a Mac that they also use day to day.
- A Newer Article is Available!
- Selecting an .iso image
- Choose Hardware Settings
- Finalize Your Home Assistant VM
- Choose a Language and Country
- Configure The Keyboard
- Mount the Installation Media
- Load Installer Components
- Configure Network
- Create a User Account
- Configure The Clock
- Partition Disks
- Install the Base System
- Configure the Package Manager
- Select and Install Software
- Install GRUB Bootloader
- Finish the Installation
- Backup network settings
- Home Assistant Supervised Installation
- Launch Home Assistant on Boot Using Automator
Prerequisite
First it is important to understand that there are two primary parts that make up Home Assistant; Core and Supervisor.
Most of the Home Assistant functionality is included within the Home Assistant Core, however there are certain features (most notably the add-on store) that are included when running supervisor.
The supervisor also adds background functionality and ensures that Home Assistant Core runs correctly.
Therefore in general I would advise running Home Assistant supervised. This means Home Assistant Core and Home Assistant Supervisor are bundled together in your build, in order to make the complete “Home Assistant” package.
In addition to this there is also a dedicated Home Assistant operating system that can dramatically simplify a build.
Supervisor, Core and Home Assistant OS are combined to make a pre-configured image that works flawlessly on the target hardware.
Home Assistant provides a series of images that can be loaded directly on to a target. Raspberry Pi is probably the most commonly known system that makes use of a simple installation. However not all systems can be configured as easily.
The following diagram shows three different possibilities for a Home Assistant installation.
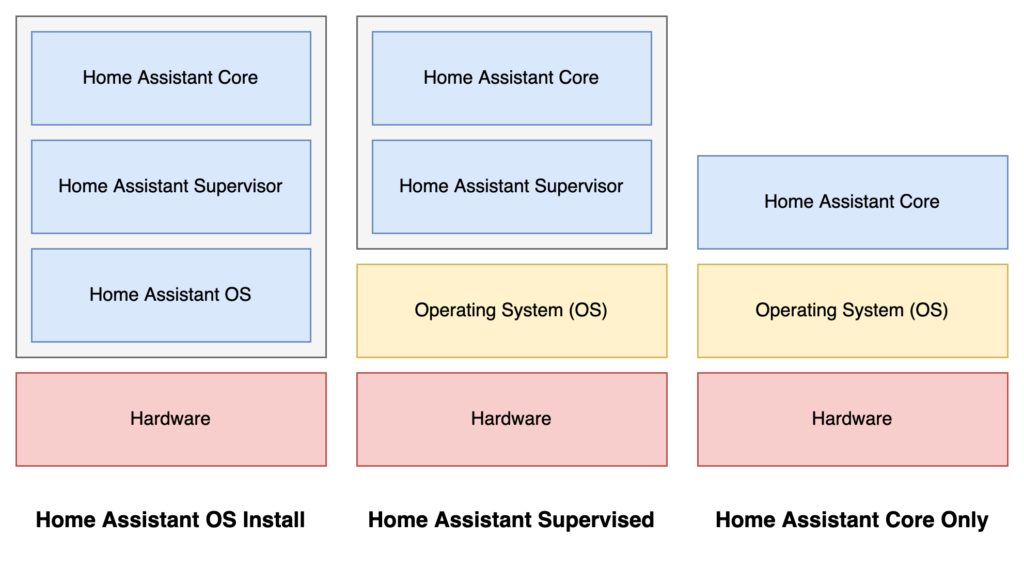
As per the stack on the far right of the image above, it is possible to run Home Assistant Core natively on Apple Mac, even on an M1-based machine.
However the caveat is that it lacks the features of supervised Home Assistant, as only the Home Assistant Core can be run in this way.
Therefore the installation we are most interested in is shown in the center of the diagram above, the Home Assistant Supervised installation sitting on top of the host OS.
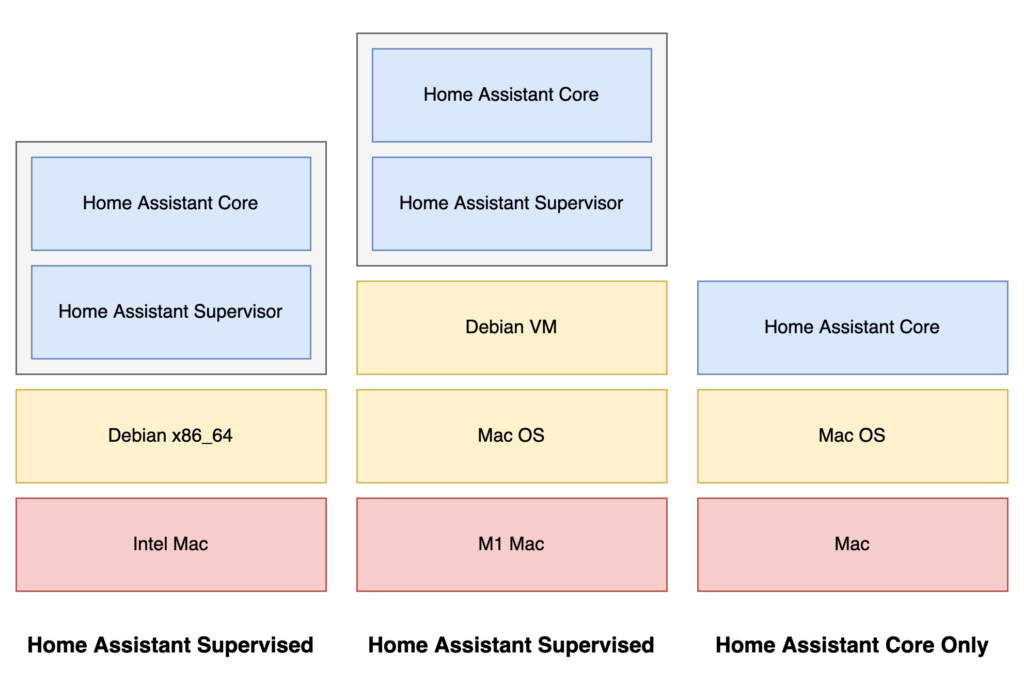
In order to run Home Assistant Supervised, we will create a virtual machine to run Debian command line on top of Mac OS. This is necessary as there is not a native Mac OS version available.
At the time of writing it is not yet possible to run Debian Linux natively on M1 Mac, therefore we will use a virtual machine called UTM.
If you are using Intel Mac hardware and you want to install Debian natively on Bootcamp, feel free to attempt that instead. However I now only have access to M1 hardware so I am unable to test the method.
Download UTM & Debian
We are going to need two major components in order to set up our Home Assistant build on Mac:
- The Debian 11 Installation image.
- M1 Mac users download the arm64 architecture.
- Intel Mac users should download the amd64 architecture.
- UTM Virtual machine. You can download this free of charge, but there is also a paid version on the app store if you want to support the developers.
Debian should download as an .iso disk image, go ahead and save this somewhere where you can easily access it.
Once UTM has downloaded, move it to applications and go ahead and open it.
Install and Configure UTM for a Debian VM
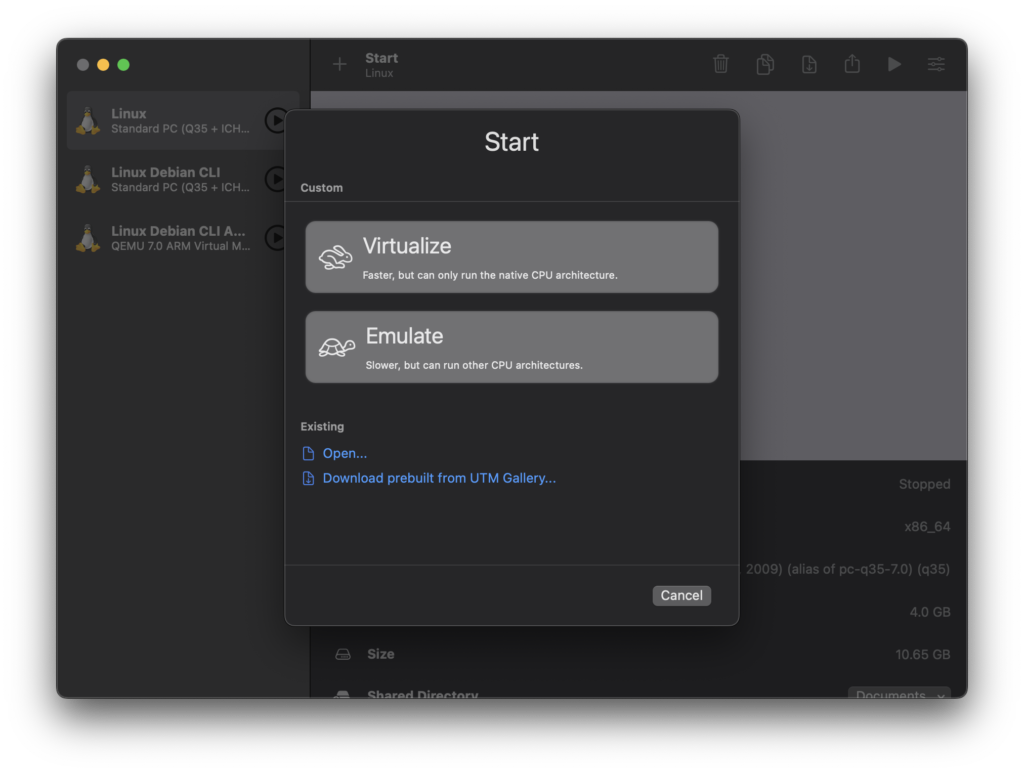
Once we have UTM installed and running, we can begin creating our virtual machine for running Home Assistant. To create a new virtual machine, click file > new…
Then select the Virtualize option, followed by Linux.
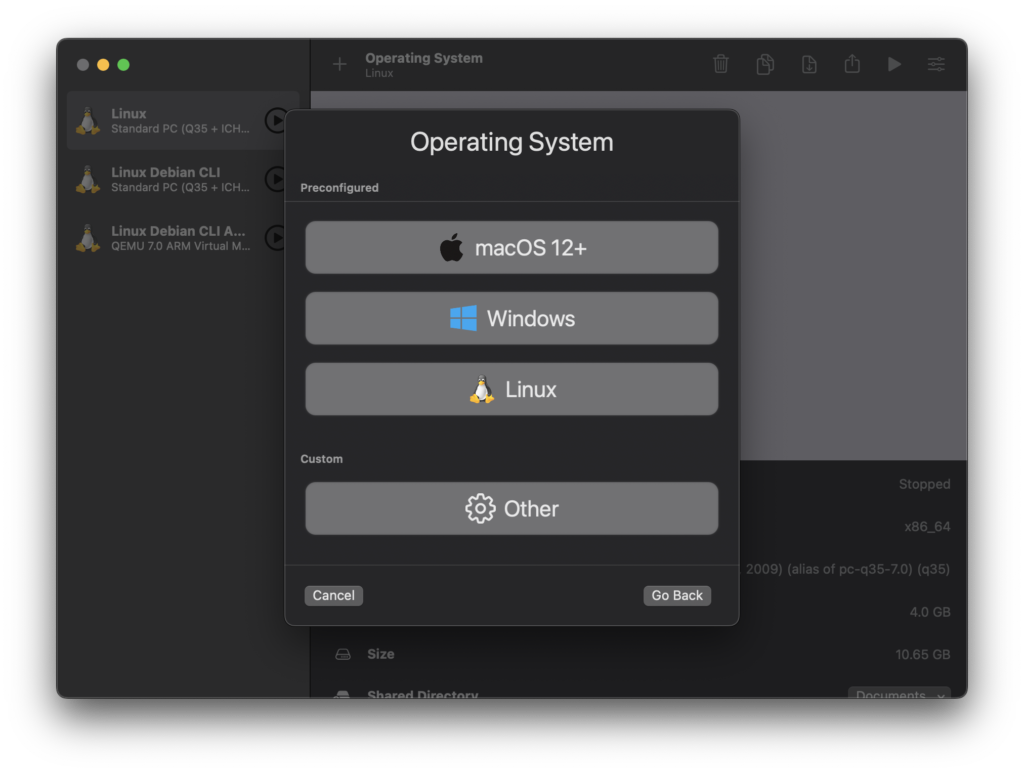
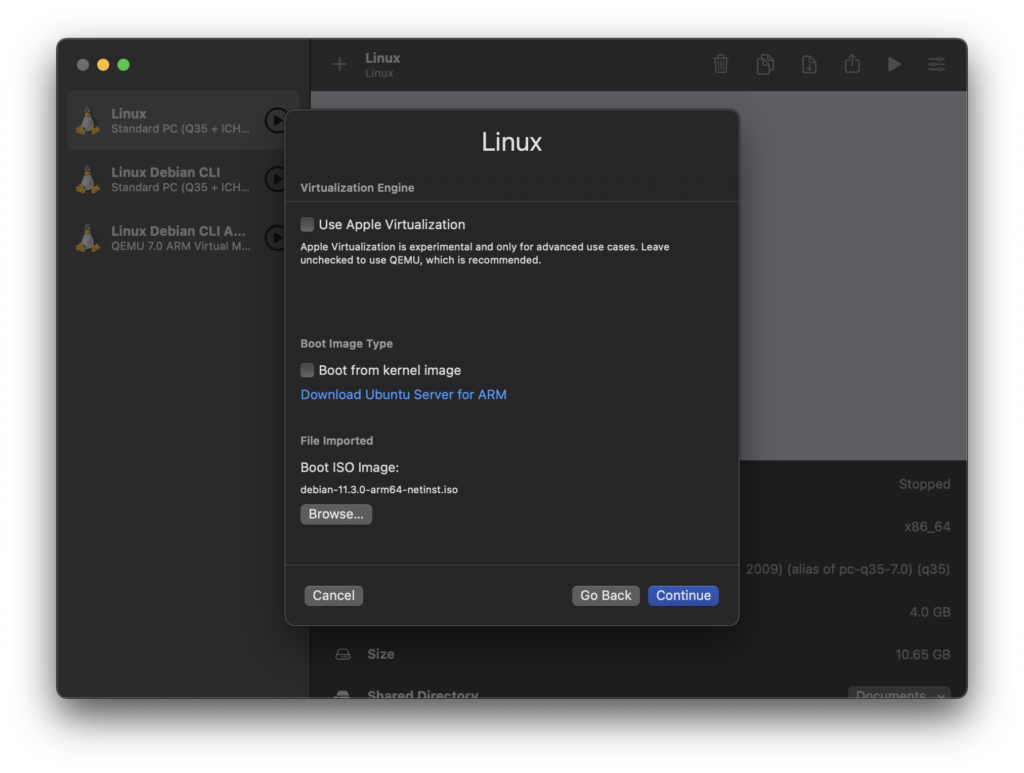
Selecting an .iso image
Next, select the .iso image of the Debian installer that you downloaded earlier by clicking the browse button. The file name should appear just above the browse button. Then click continue.
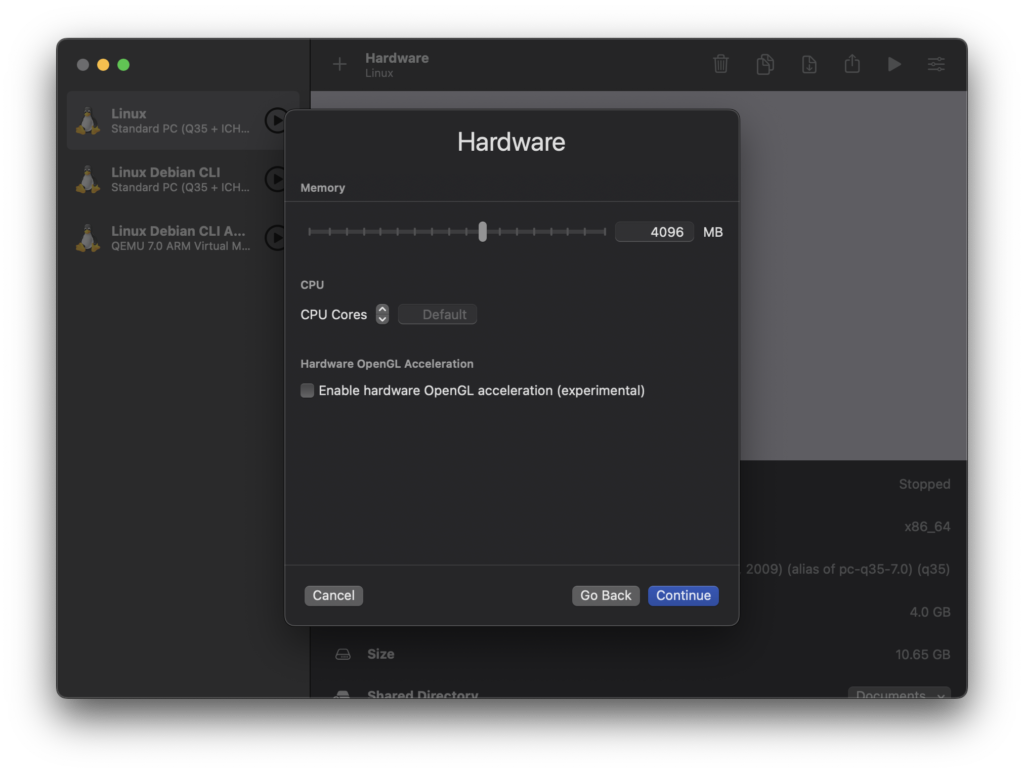
Choose Hardware Settings
On the next screen you can select how much RAM and how many CPU cores you wish to use. This will be dependant on what you want to run on your Home Assistant build.
If you are unsure, you can leave them as default as they can always be adjusted later depending on your requirements.
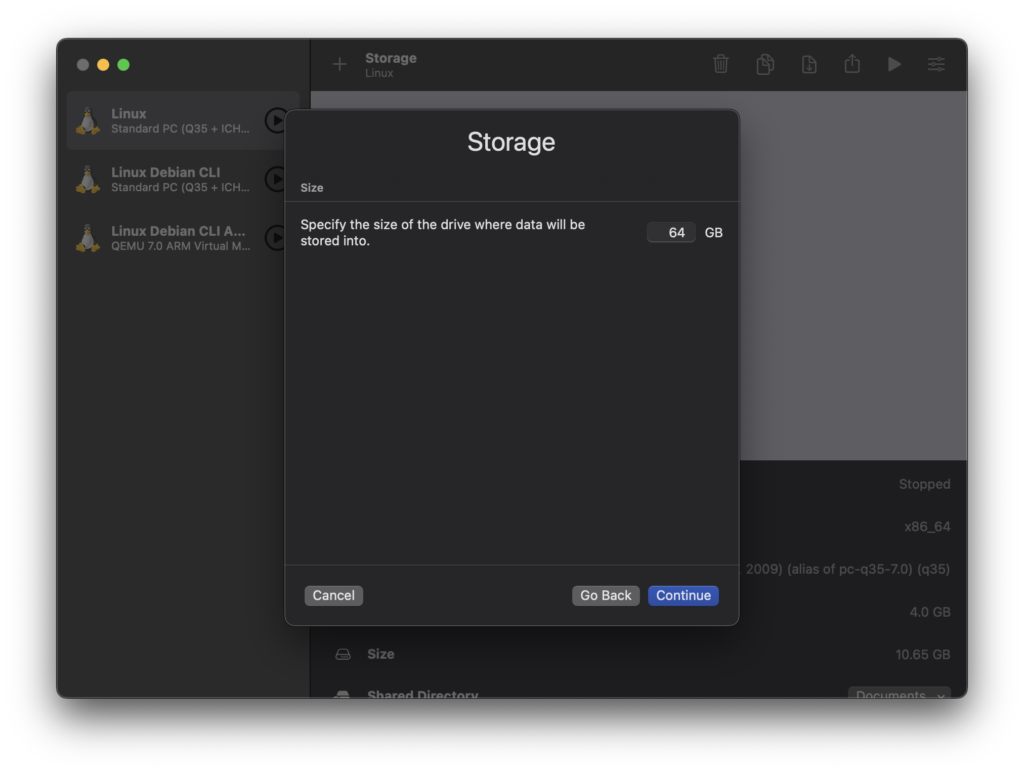
Finalize Your Home Assistant VM
You can skip past the next screen about a shared folder and then enter a name for your virtual machine on the final summary screen.
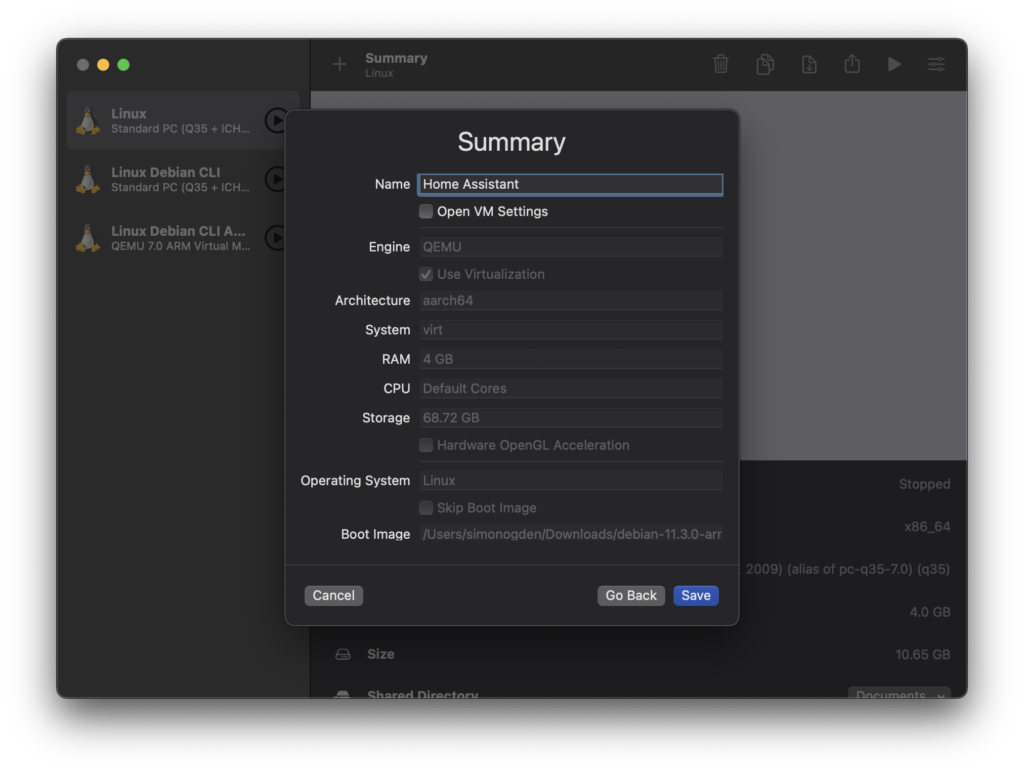
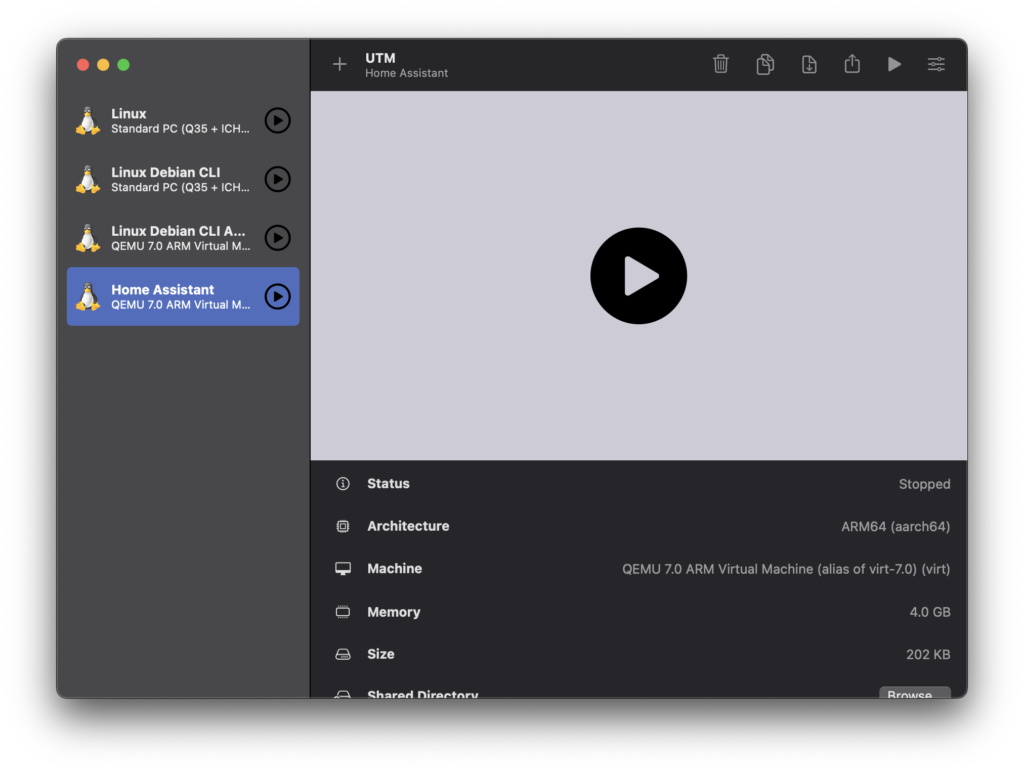
Clicking save will add your new virtual machine to the main screen left-hand sidebar. Here I already have a couple of Linux VMs, you may only have a single one for Home Assistant.
Go ahead and select the virtual machine, you can press either of the play button icons to start the machine.
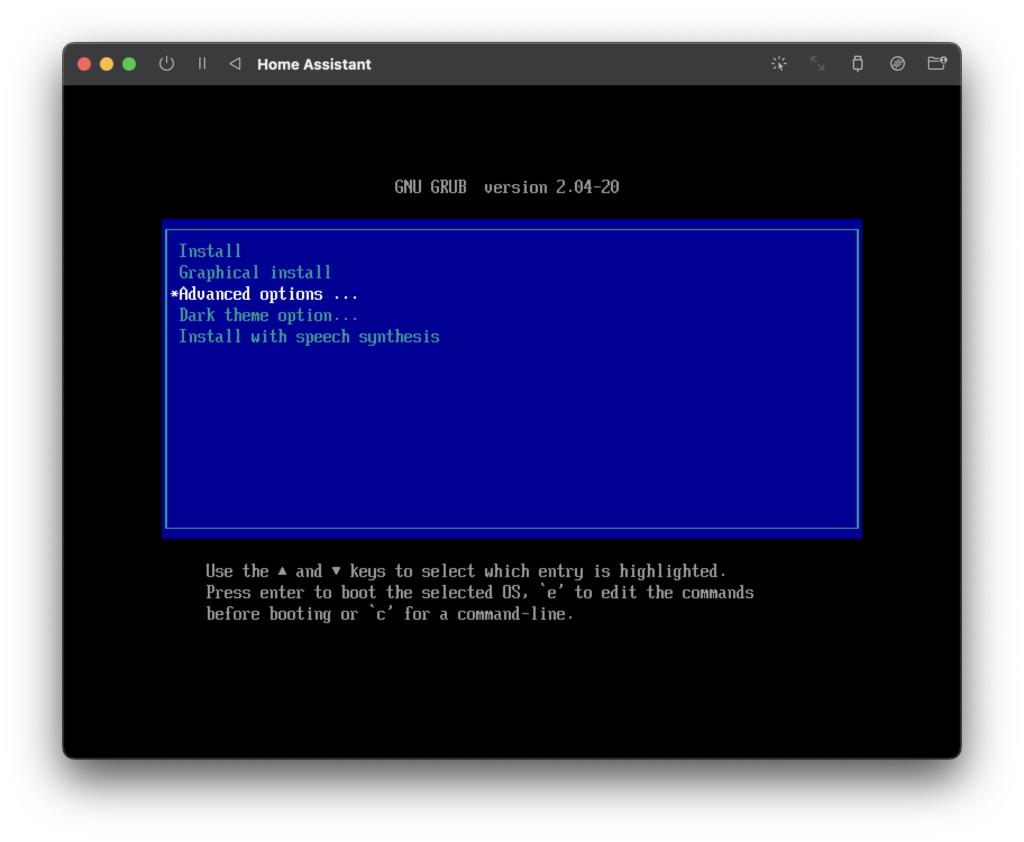
Install Debian 11 Bullseye Command Line Only on UTM
Once your VM boots up you will be taken to a GRUB options menu. Go ahead and scroll down to advanced options and press enter.
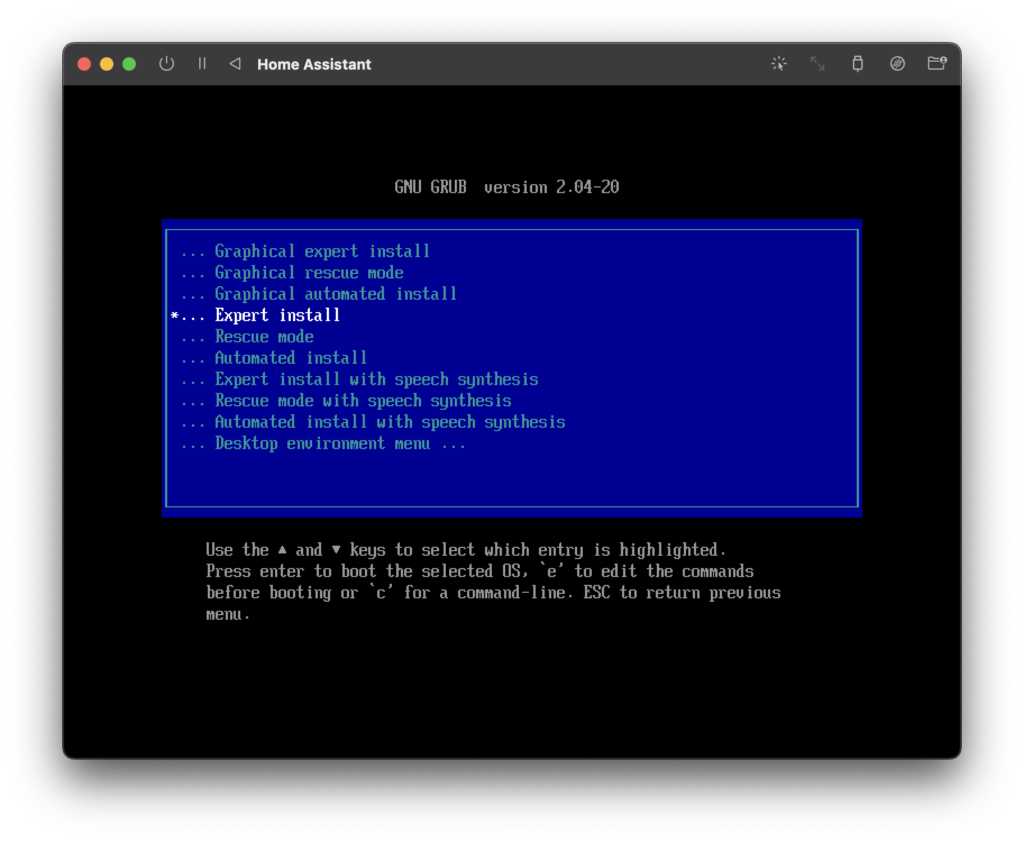
Next, scroll down to expert install and press enter. The reason we are using the expert installer is that we do not want to install a GUI.
We simply want to install a command line version of Debian in order to run Home Assistant server. All of the graphical options for Home Assistant will eventually be accessible through the web browser.
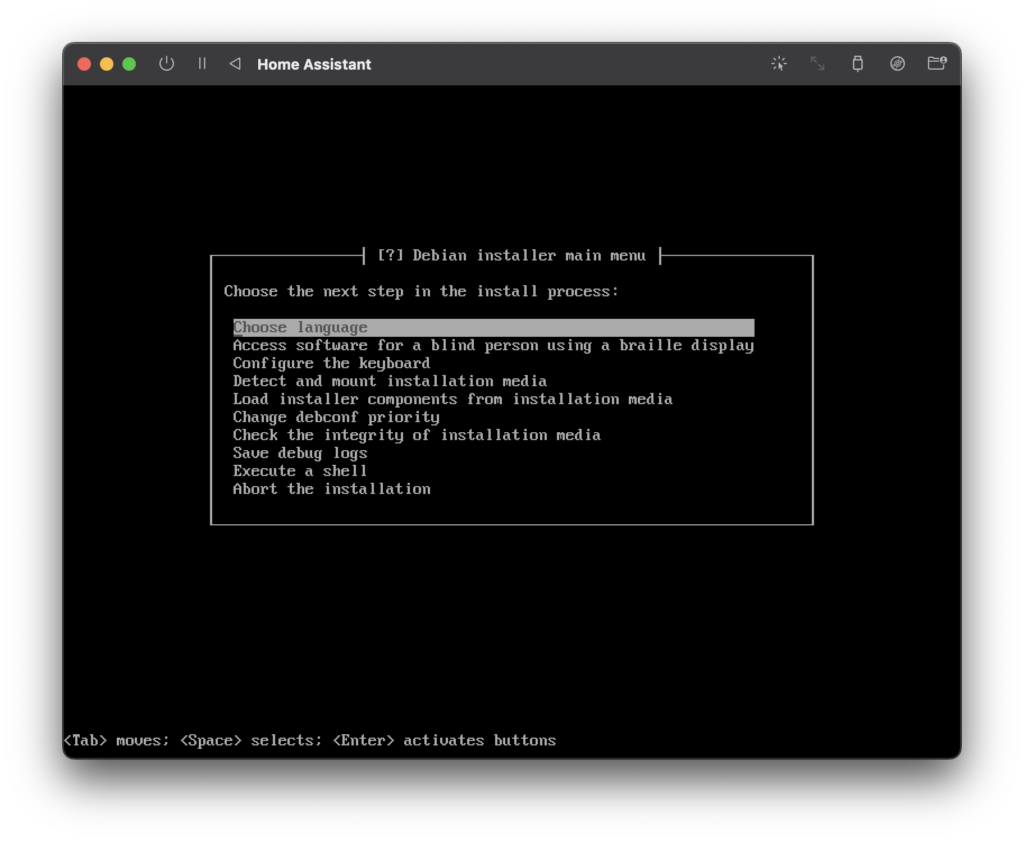
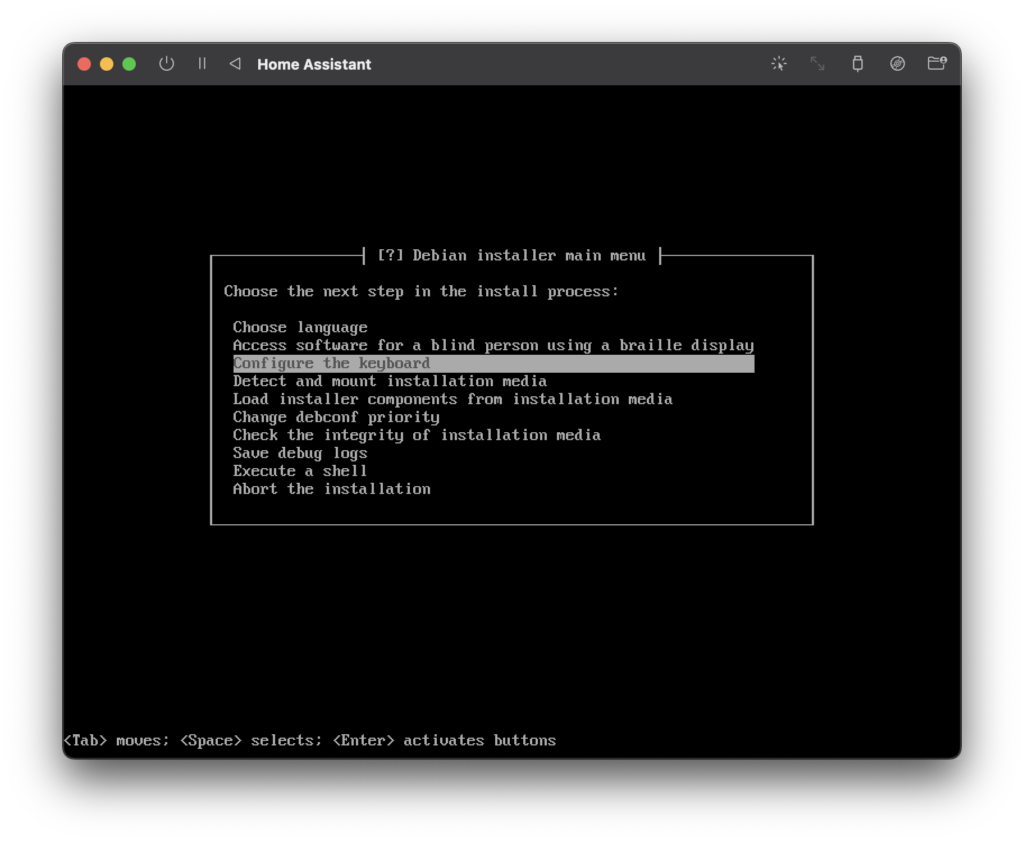
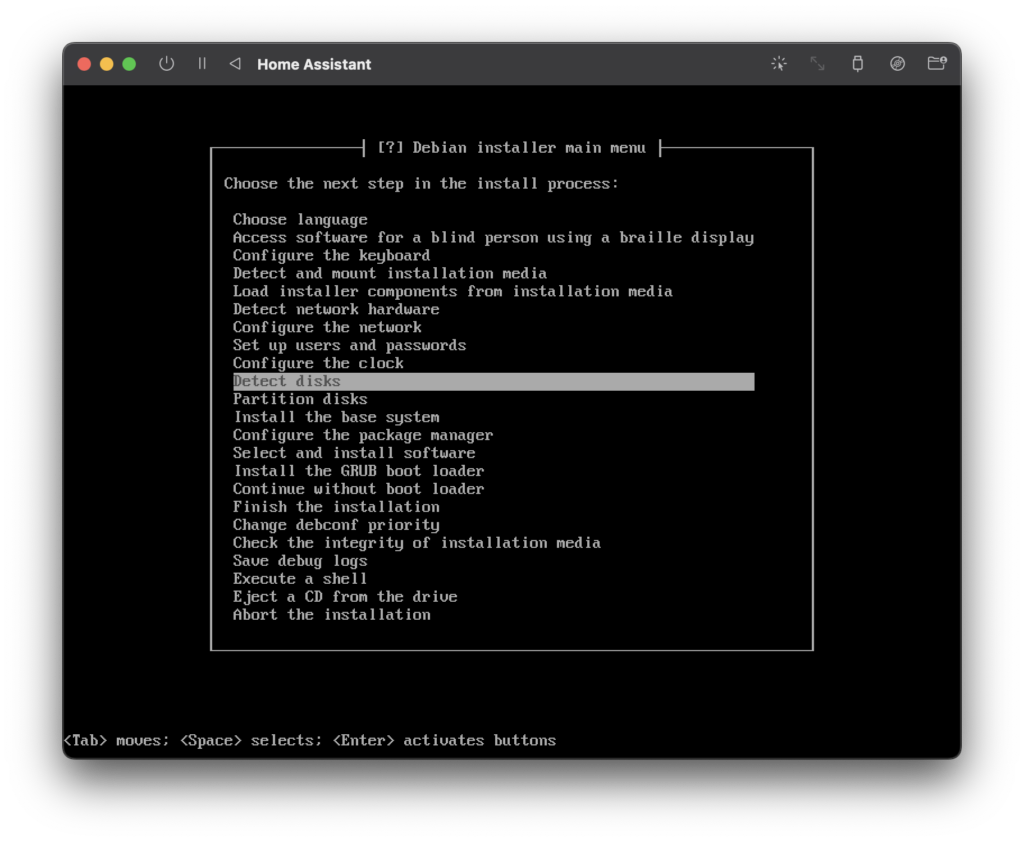
This will begin the expert installation process. We need to select each item from the list to run the configuration, however you can skip over any accessibility options that you may need.
Choose a Language and Country
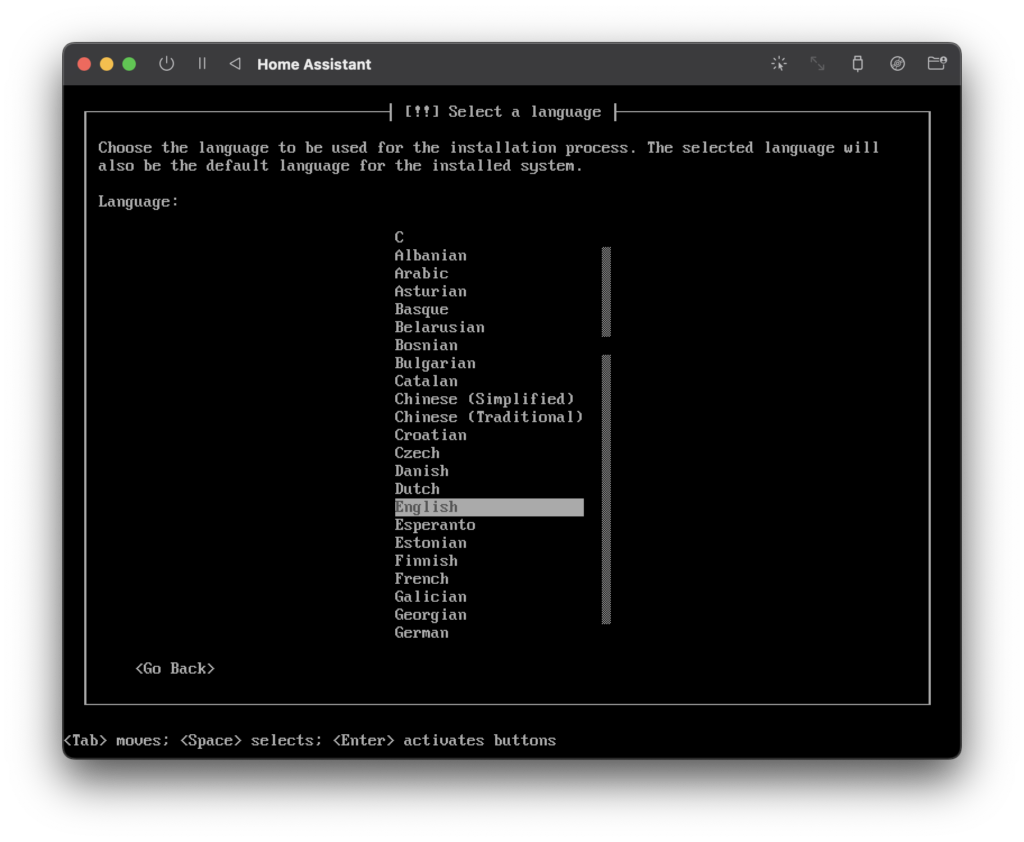
First we will select choose language.
First choose the installation and main system language.
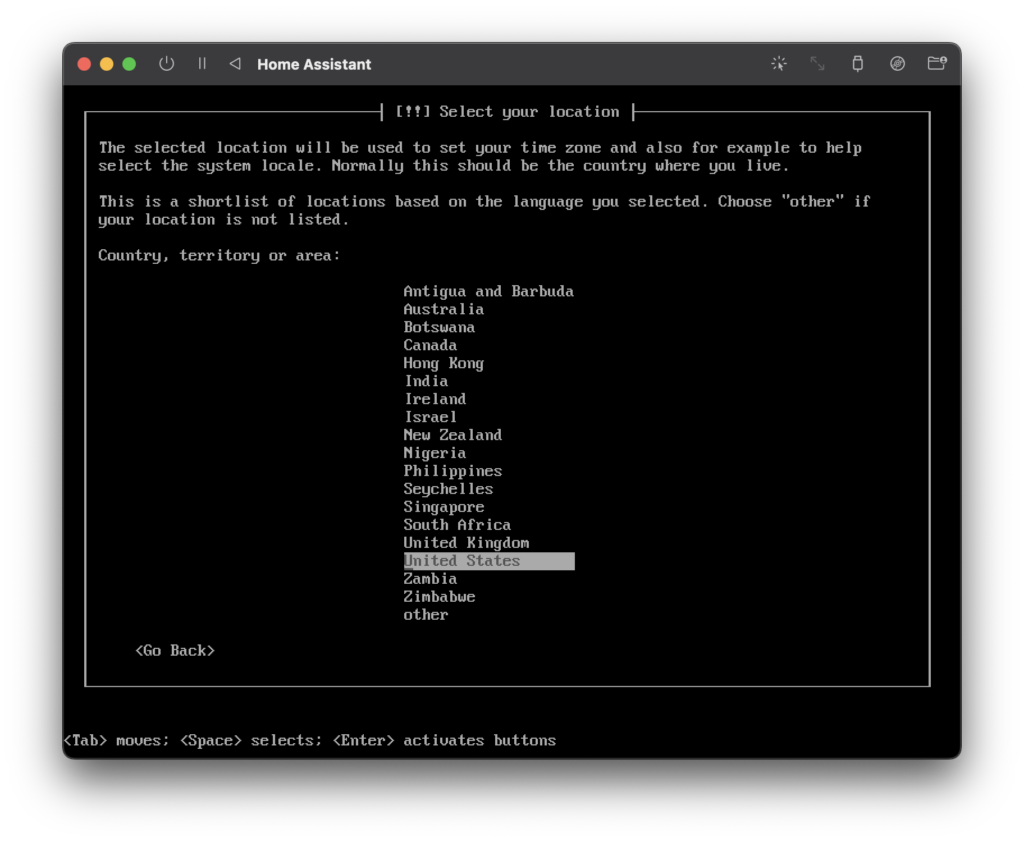
Next choose the country that the system will be located, most likely your country of residence.
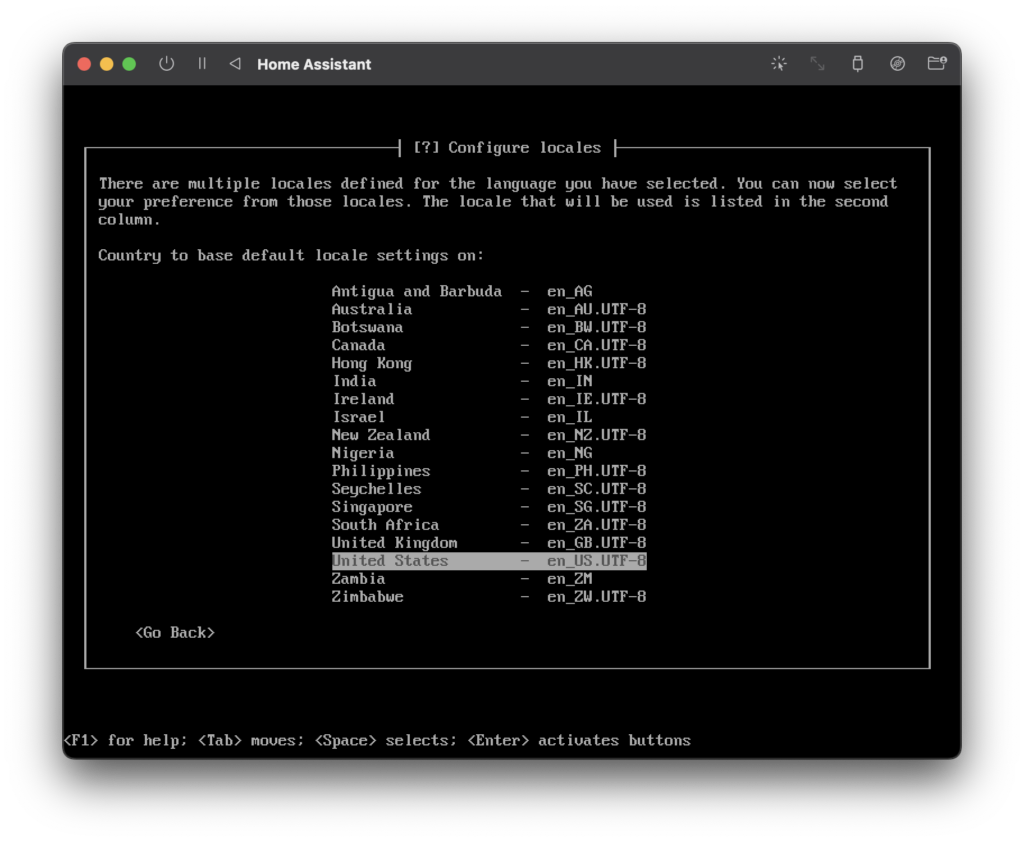
You may also need to select the locale related to your language of choice.
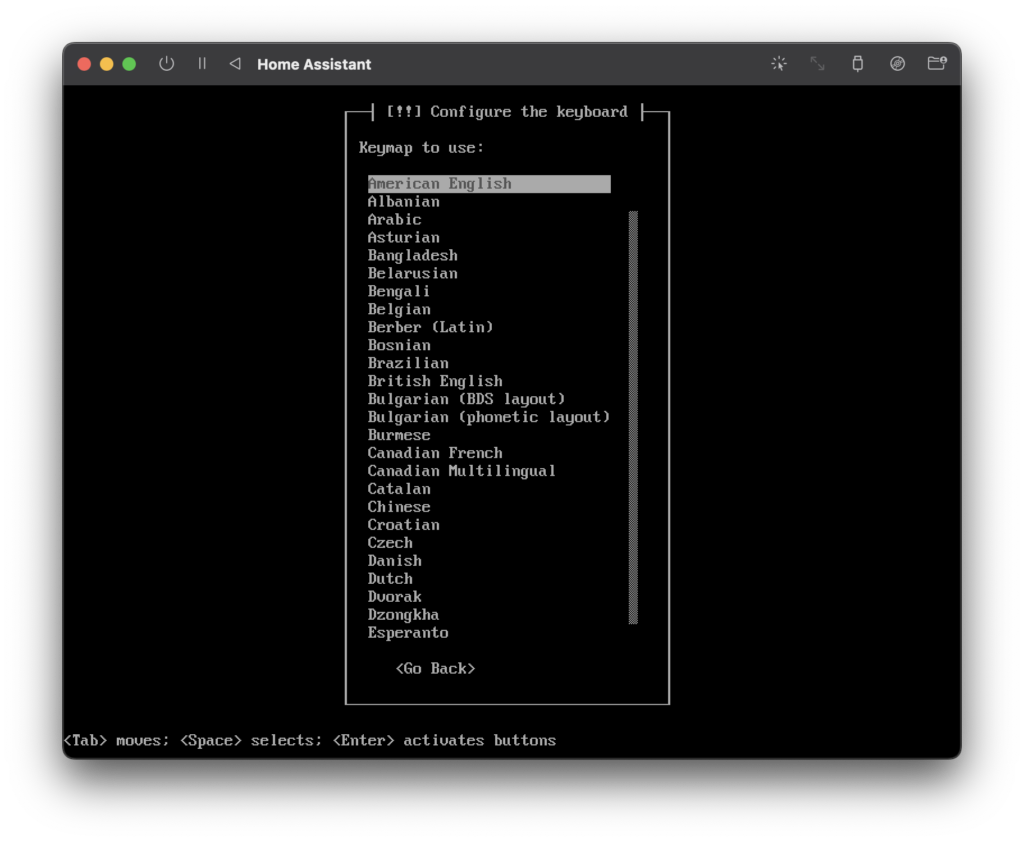
Configure The Keyboard
Next we will configure the keyboard. If your Mac has an English keyboard you may find that selecting American English a better choice as Apple keyboards tend to mimic the american layout (@ on the number 2 key for example).
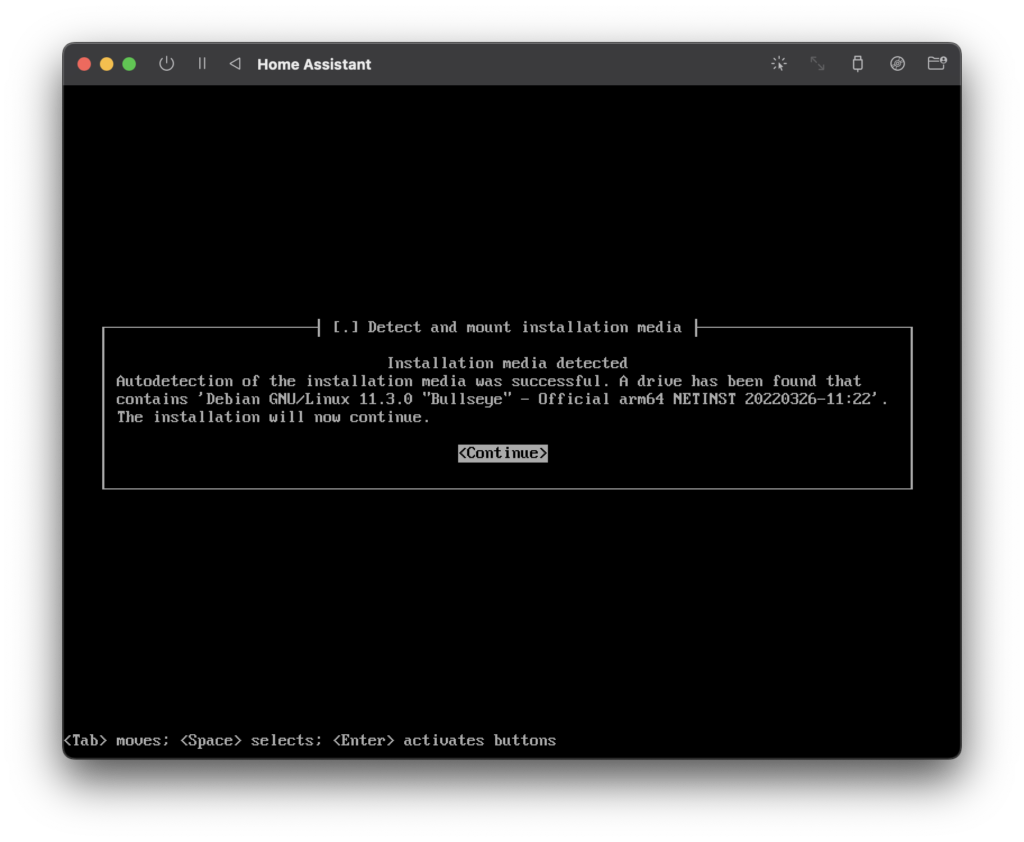
Mount the Installation Media
Next we will detect and mount the installation media.
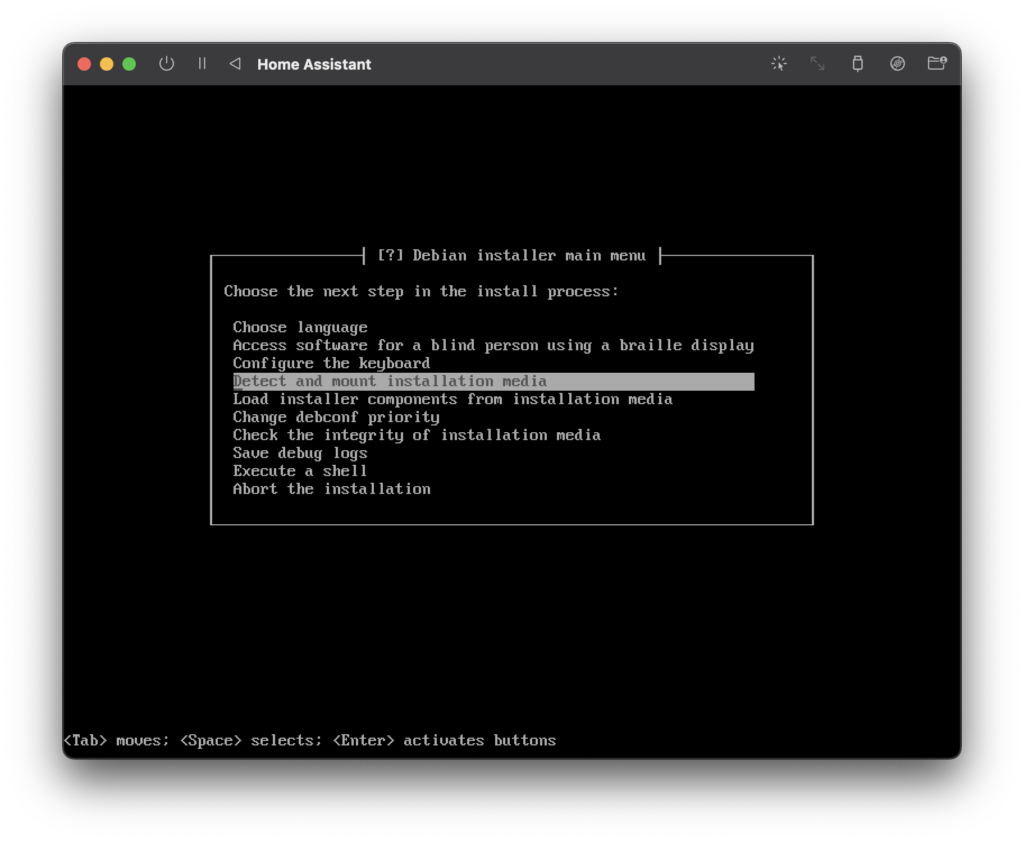
The installer will detect this as a USB, which is provided by UTM in the form of a virtual drive. Simply press continue.
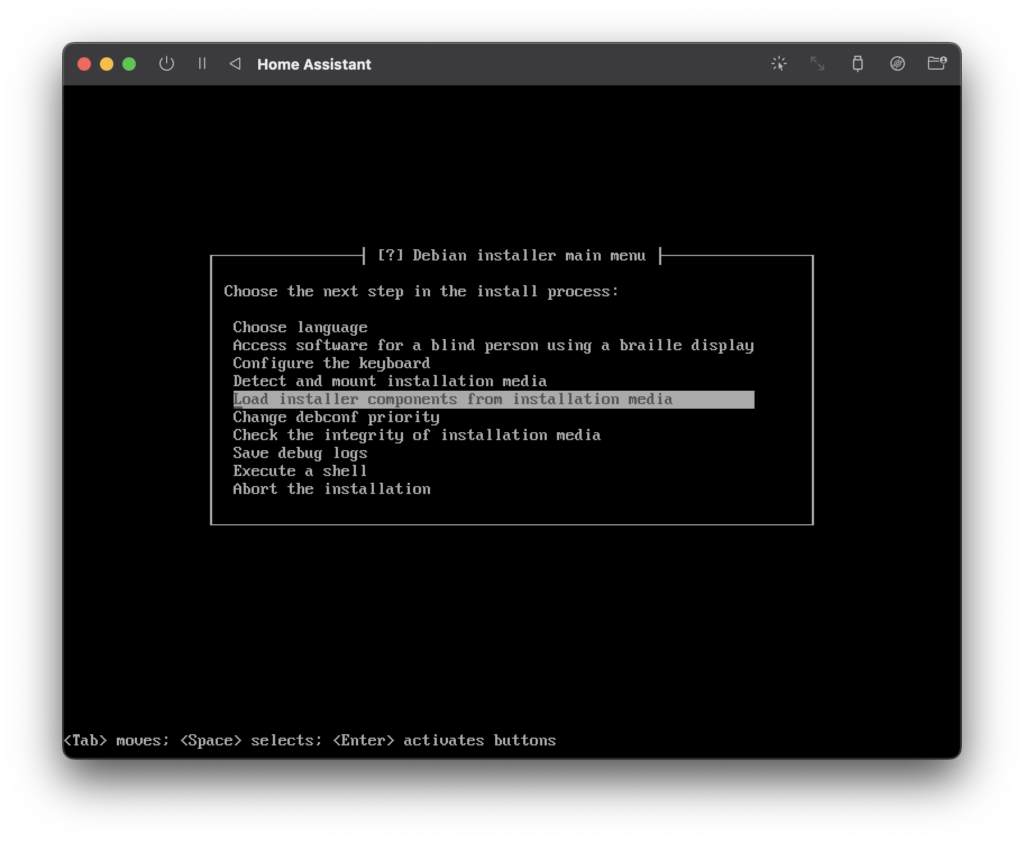
Load Installer Components
Next we will load install components from the installation media. You will be given the opportunity to add some modules but you can skip past this and click continue.
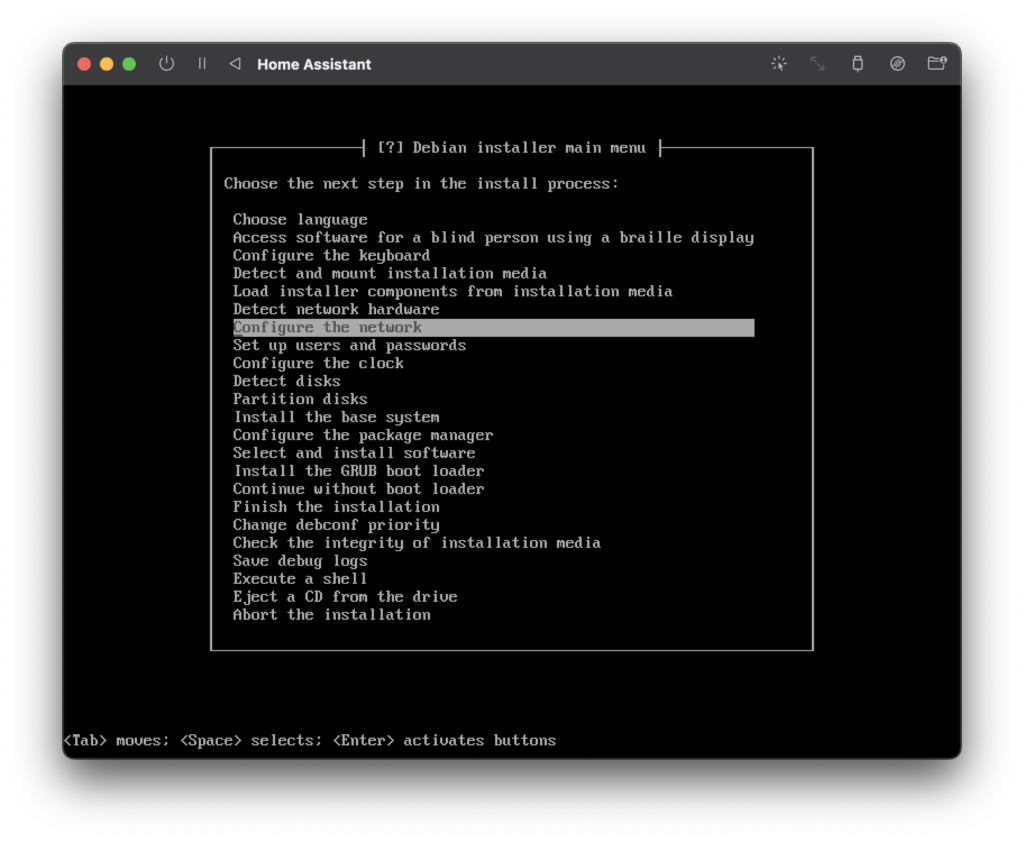
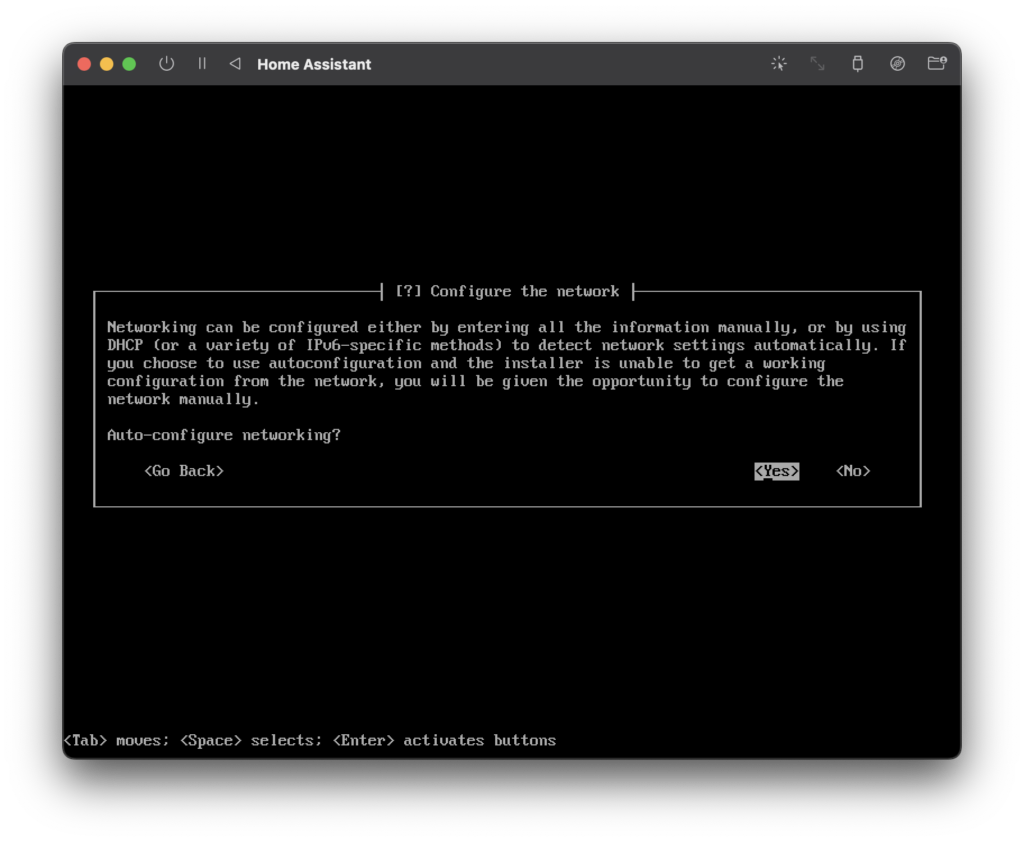
Configure Network
Click on configure network and choose yes for auto configure.
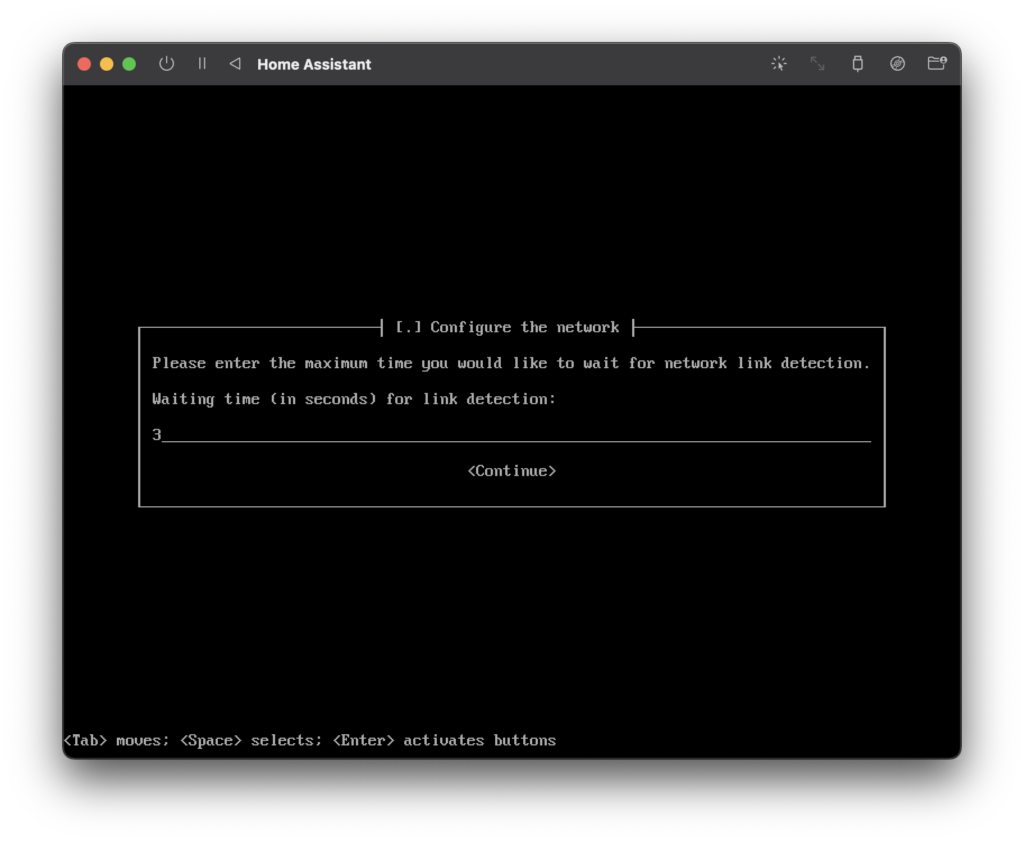
Leave the default wait time as 3 seconds and click continue. As we are using UTM there should be no problems for the installer to detect the correct network settings.
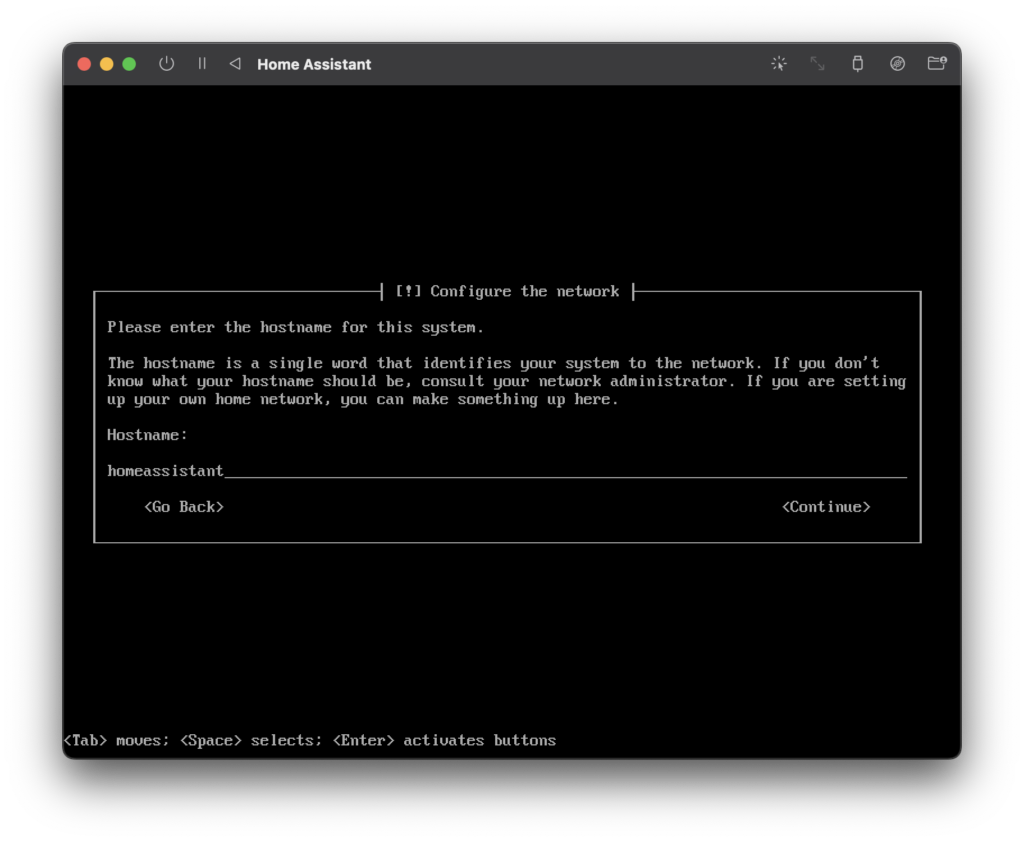
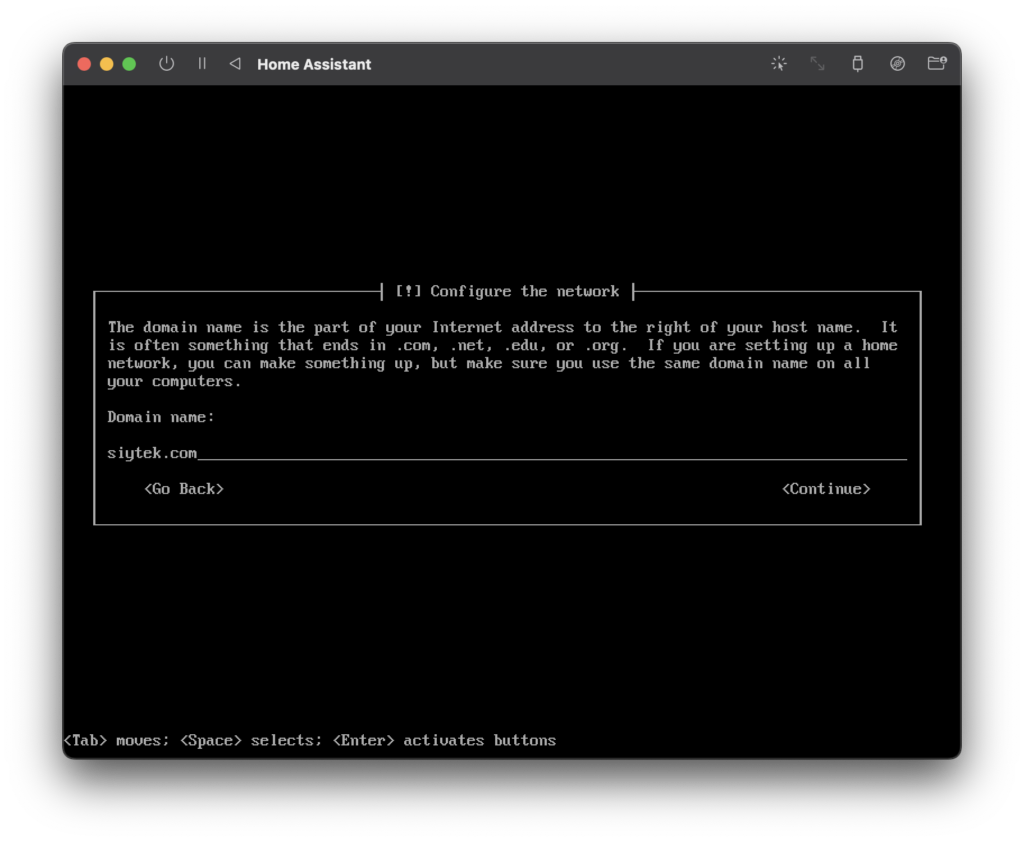
Next we can choose a hostname and domain name. If you don’t have a domain name, just make something up.
Create a User Account
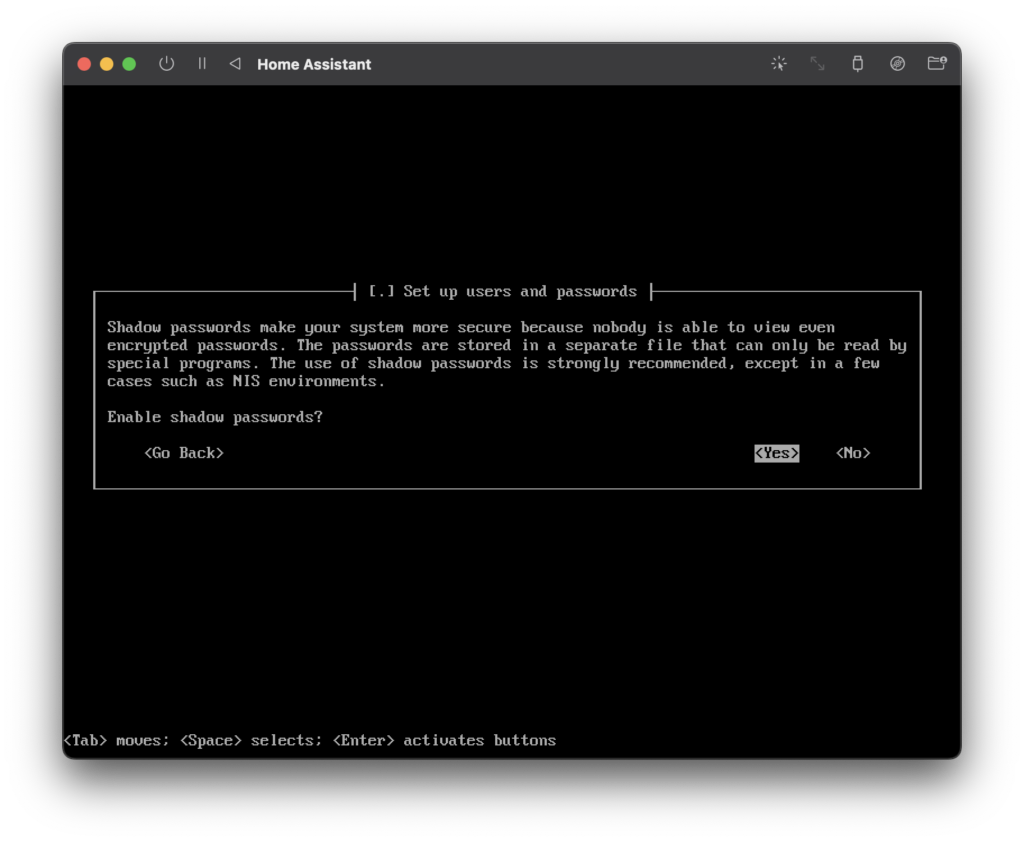
Next we can set up a username and password for the system.

At first you will be given the choice to enable shadow passwords. You can choose the yes to enable shadow passwords, as recommended by the installer.
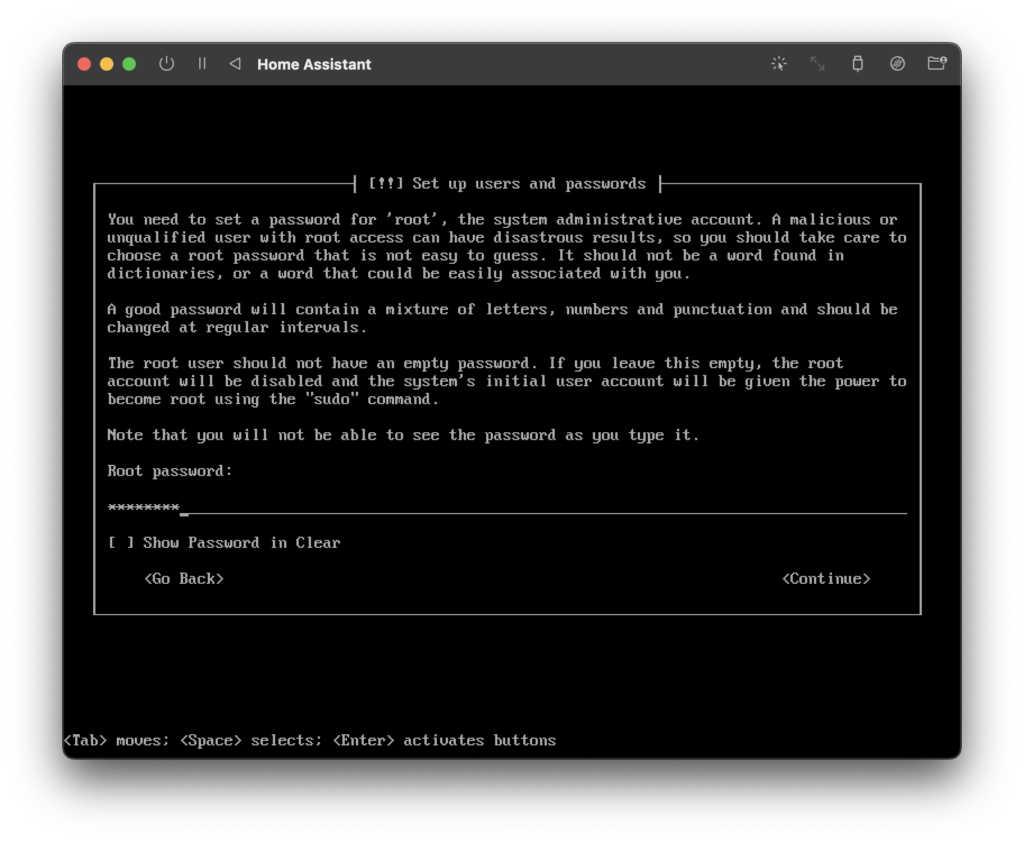
Choose yes for allow login as root. On the following screen, set the root password to your own preference.

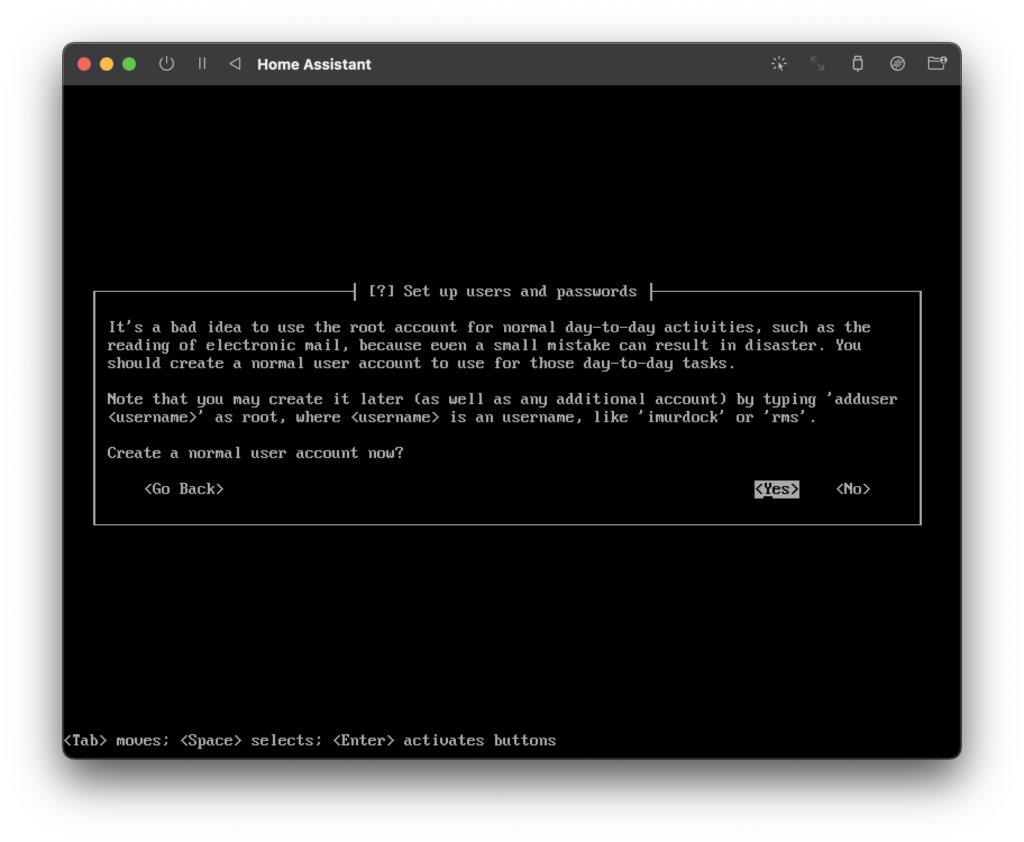
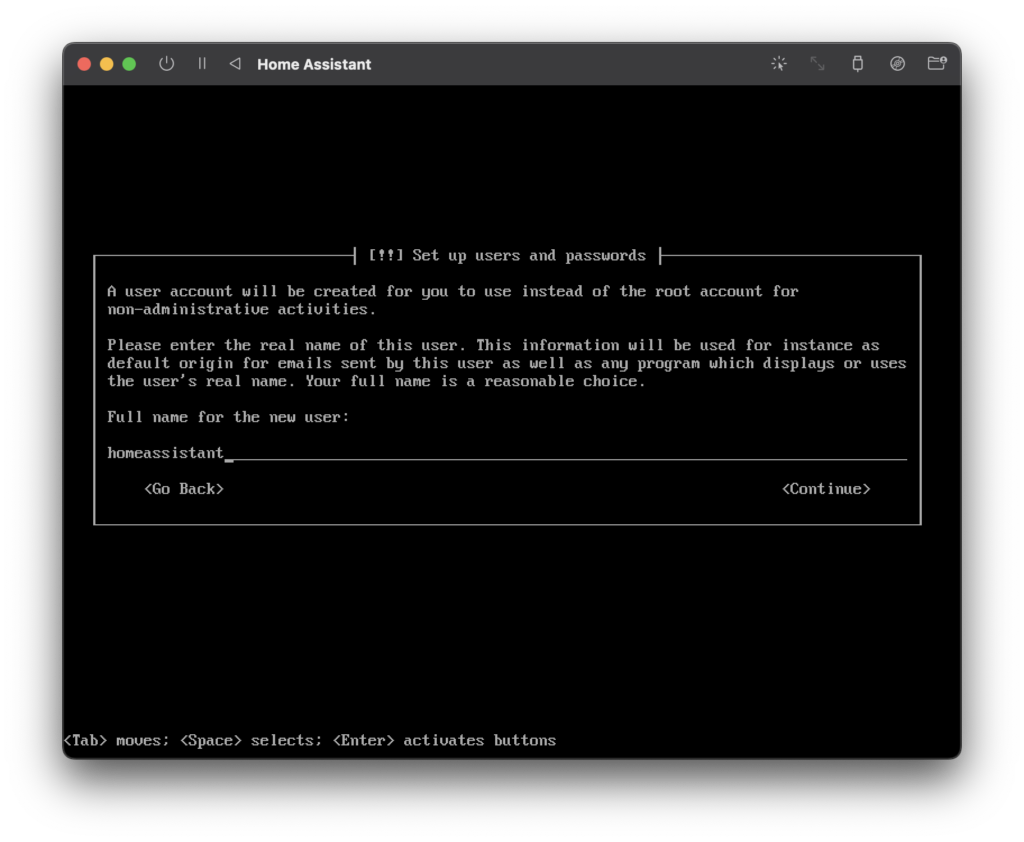
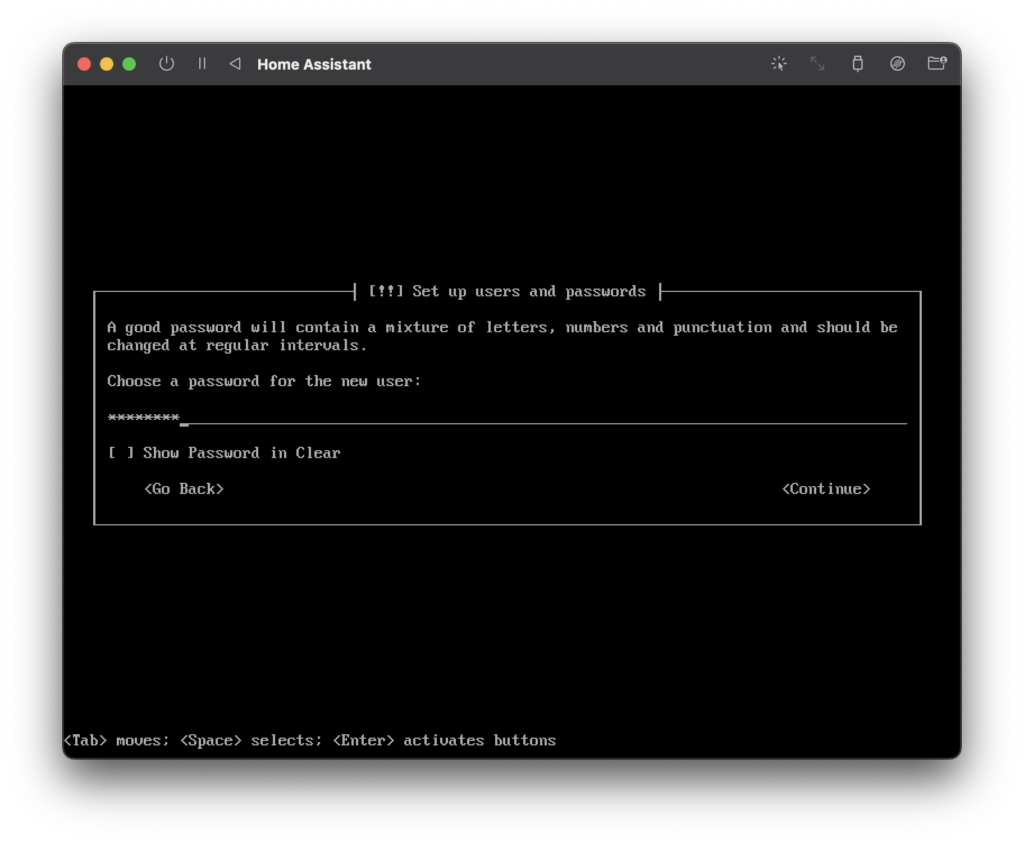
Once the root password has been set, create a standard user account by choosing yes. Then choose a username and password.
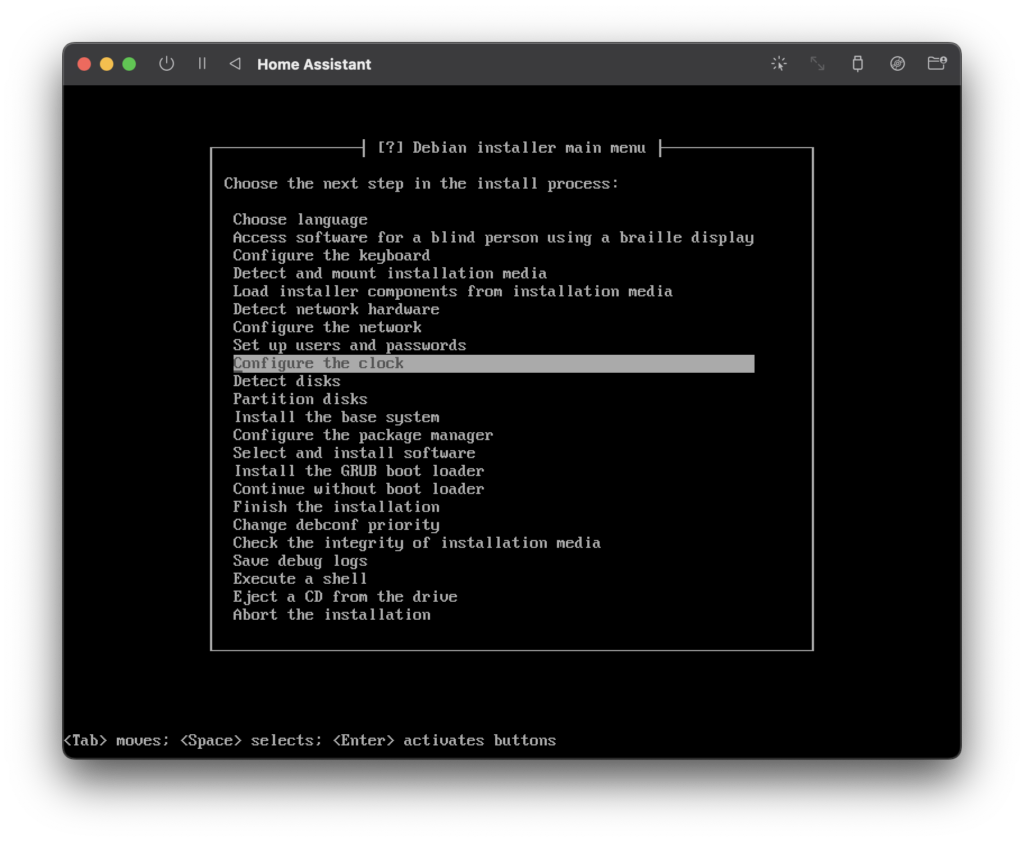
Configure The Clock
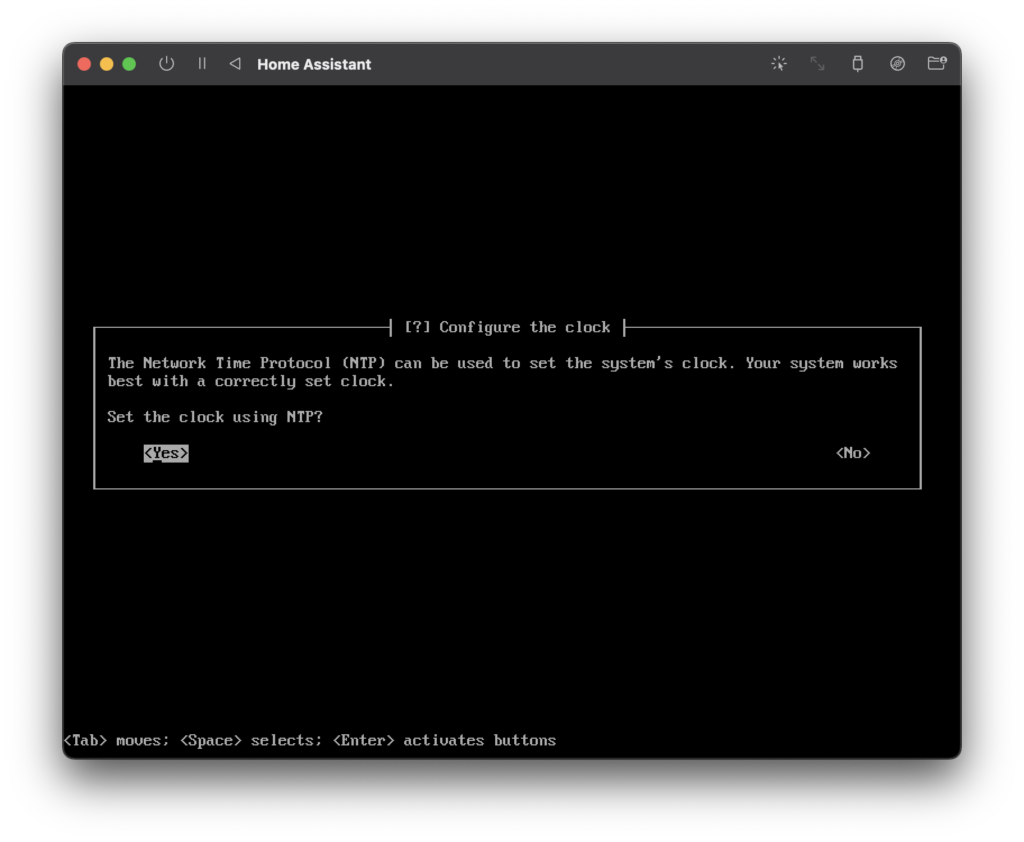
Next up we will configure the clock.
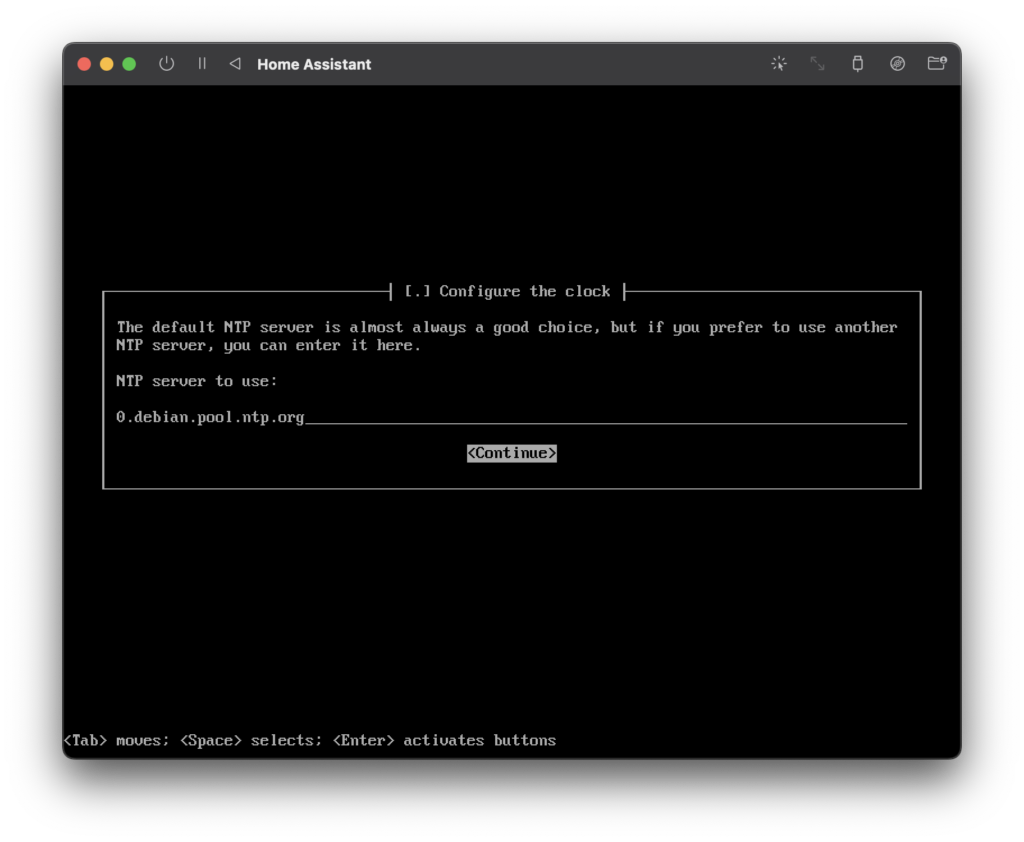
We should choose yes to allow NTP to set the clock. You can use the default server provided so just choose continue.
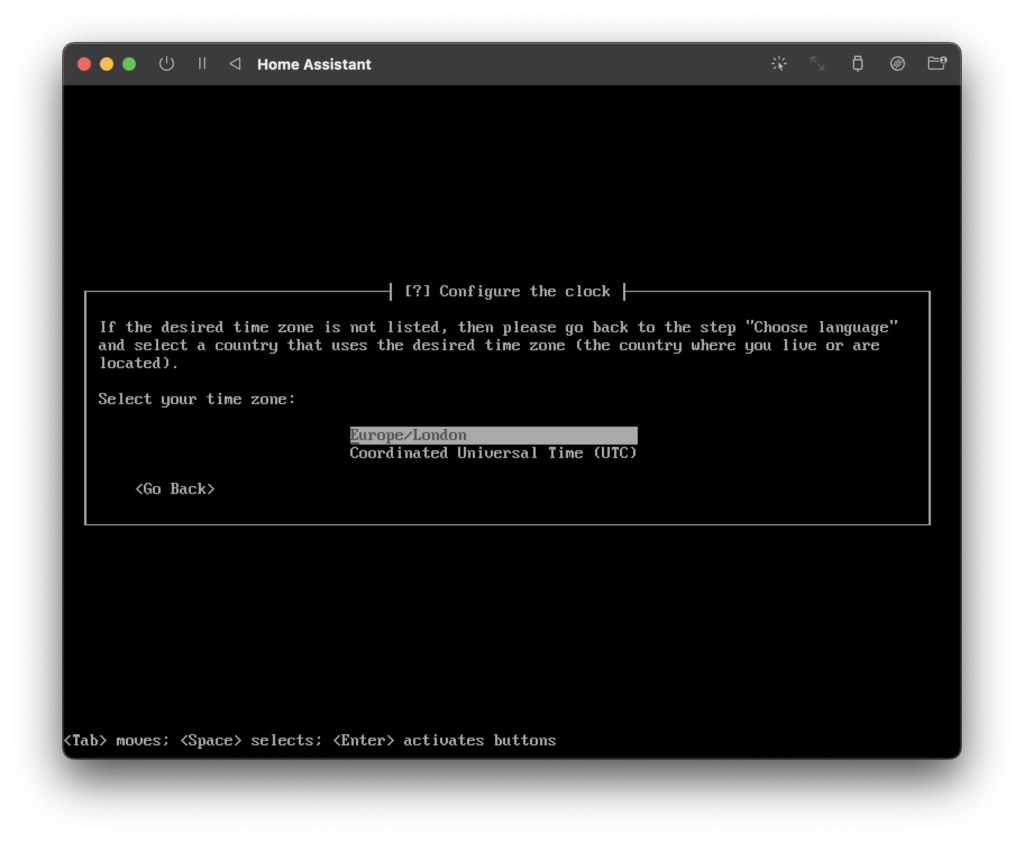
Next we can set the correct timezone.
Partition Disks
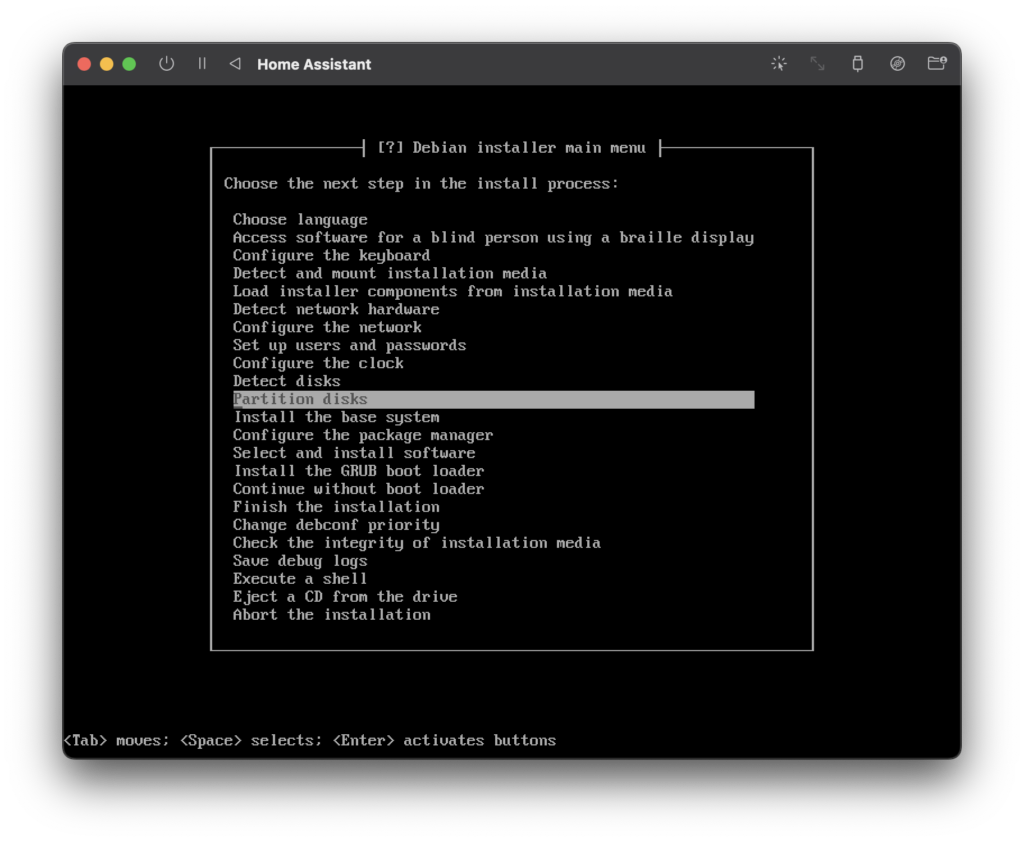
Once the clock has been configured, it is time to configure the disk for installation. First choose detect disks and once complete, choose partition disks.
For a basic configuration just complete the following steps. However you are welcome to deviate if you require a different configuration.
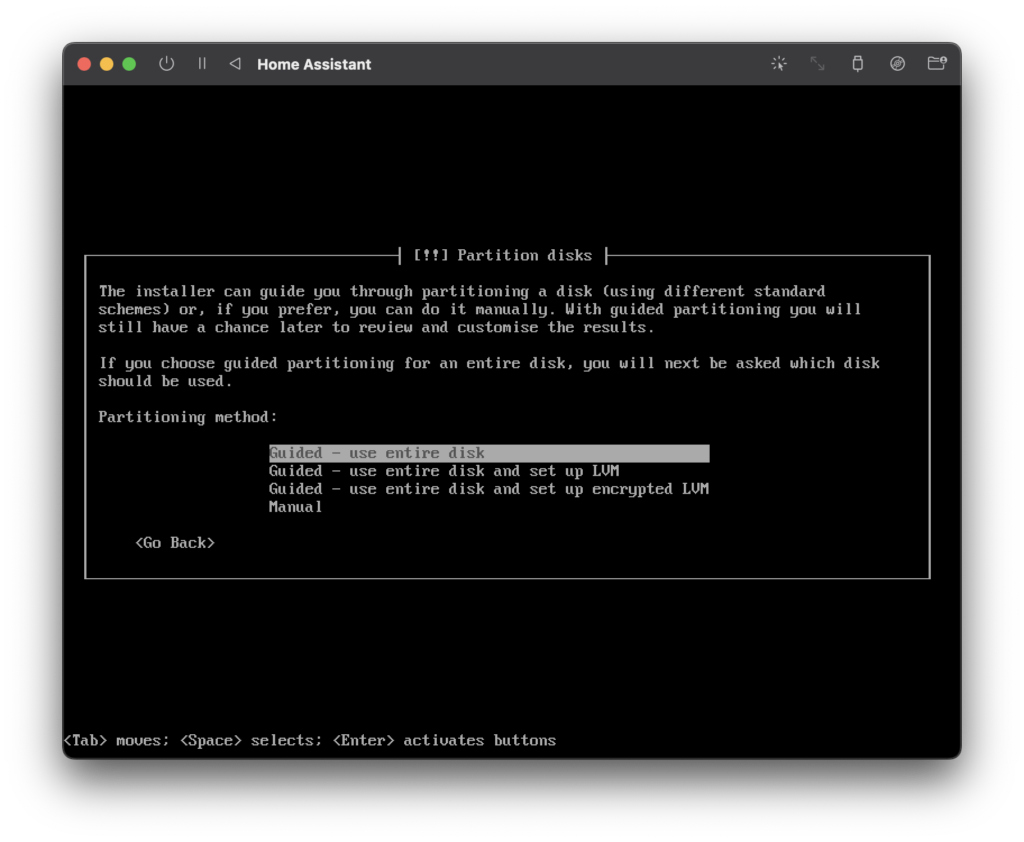
Choose guided – use entire disk and then select the partition.

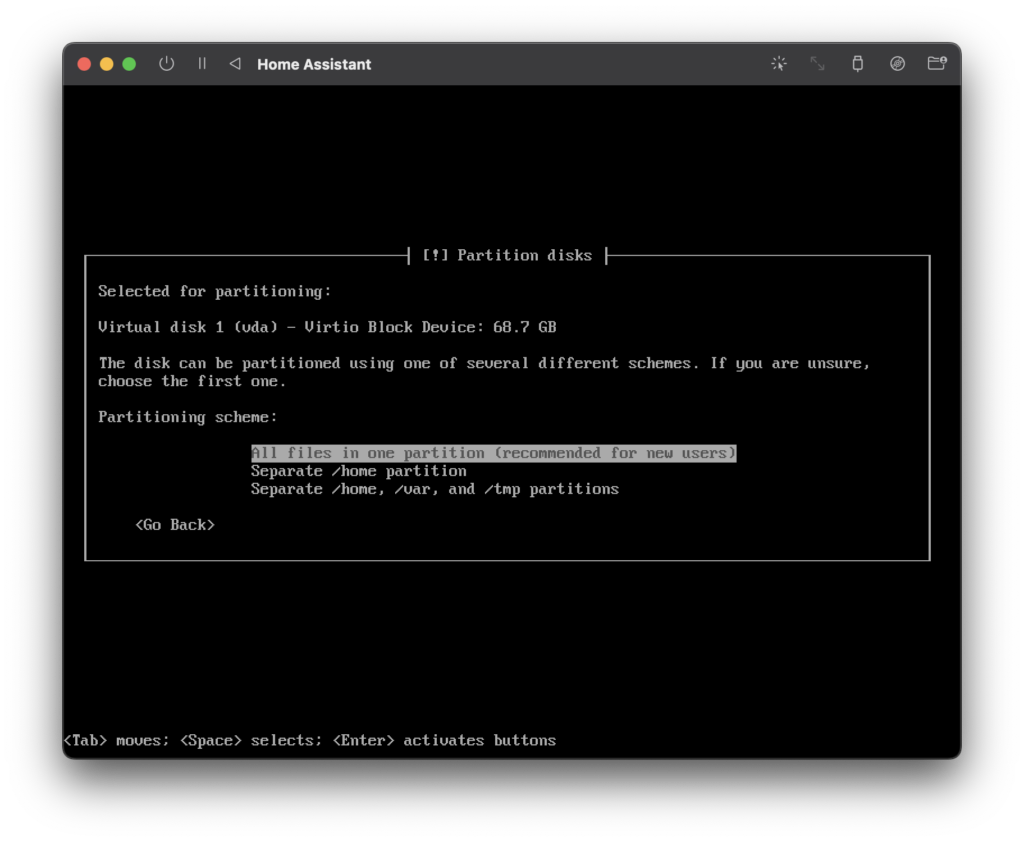
Choose all files in one partition (recommended for new users).
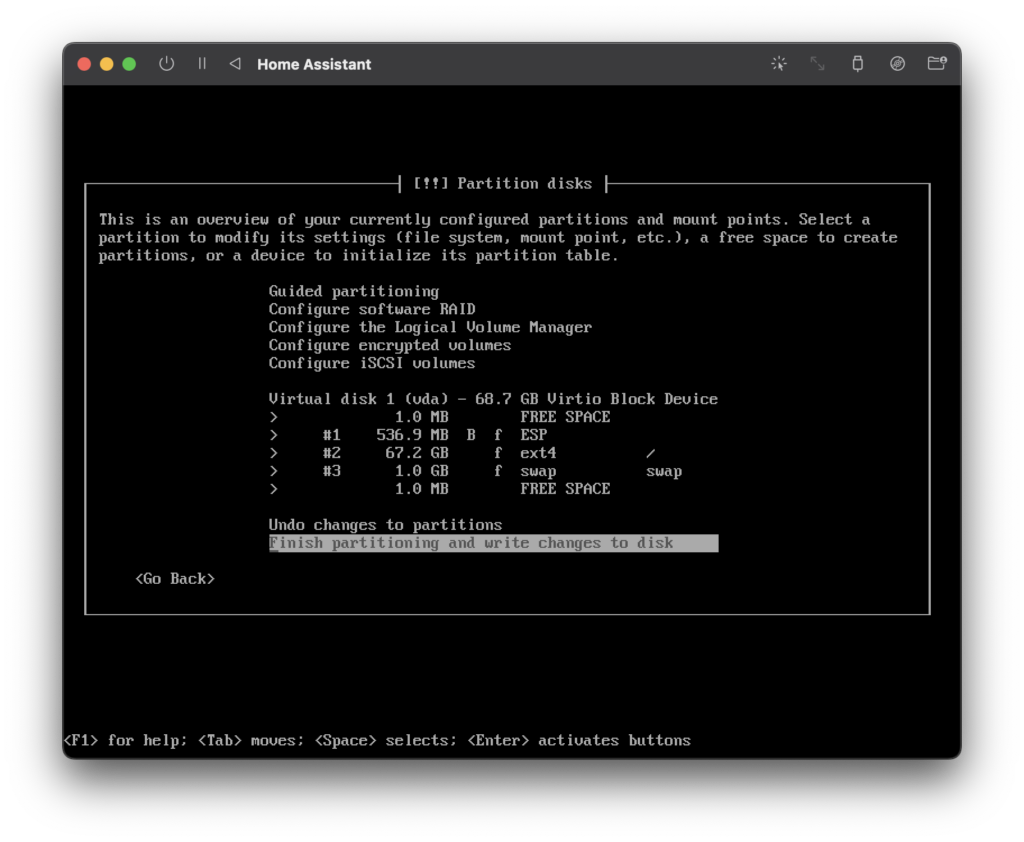
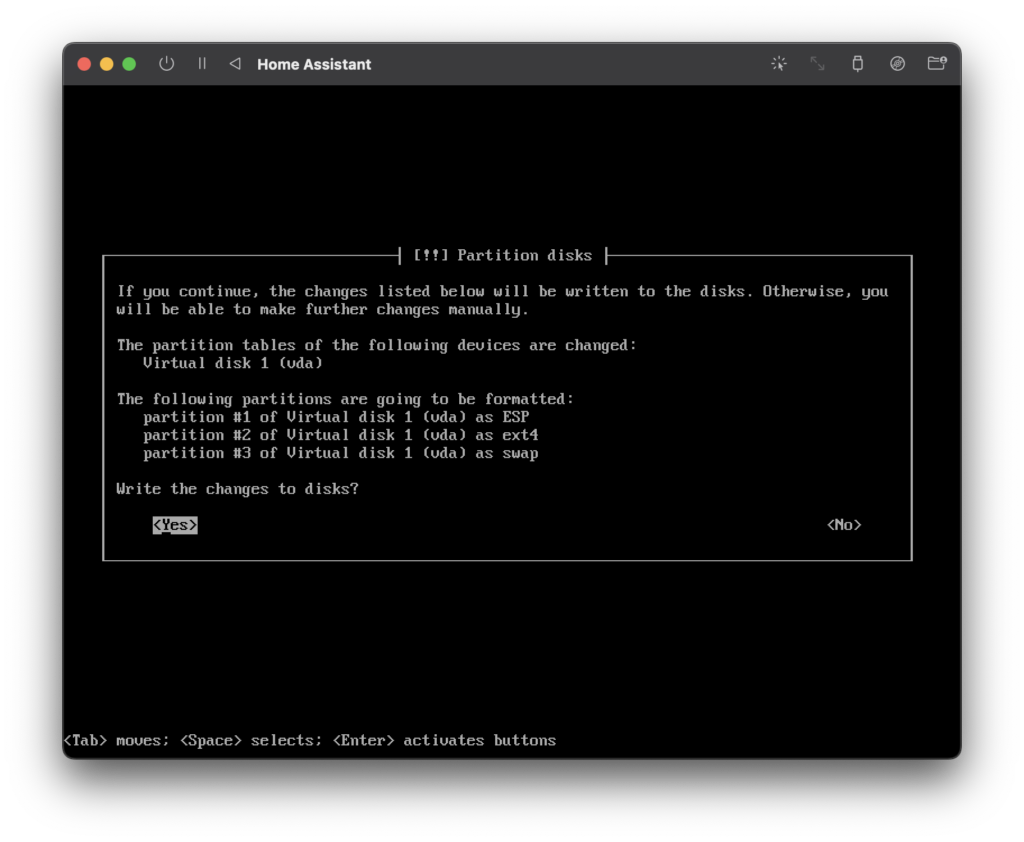
Then you can finish partitioning and write changes to disk.
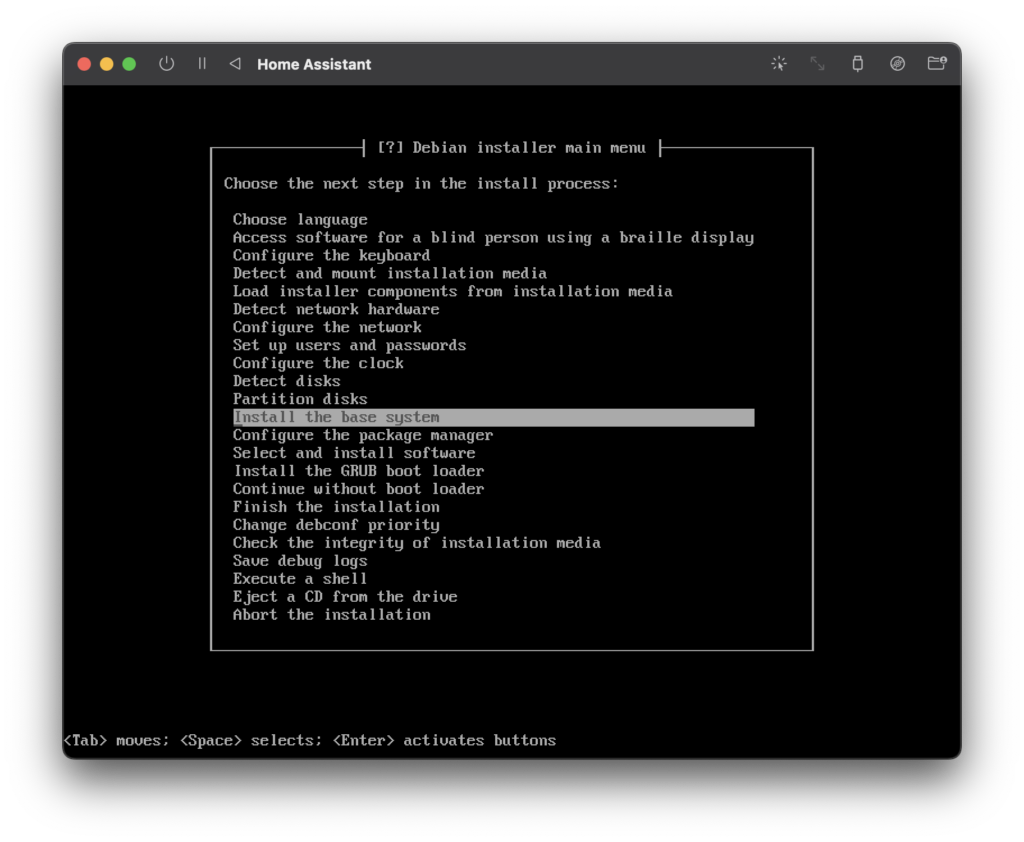
Install the Base System
Next, go ahead and install the base system.
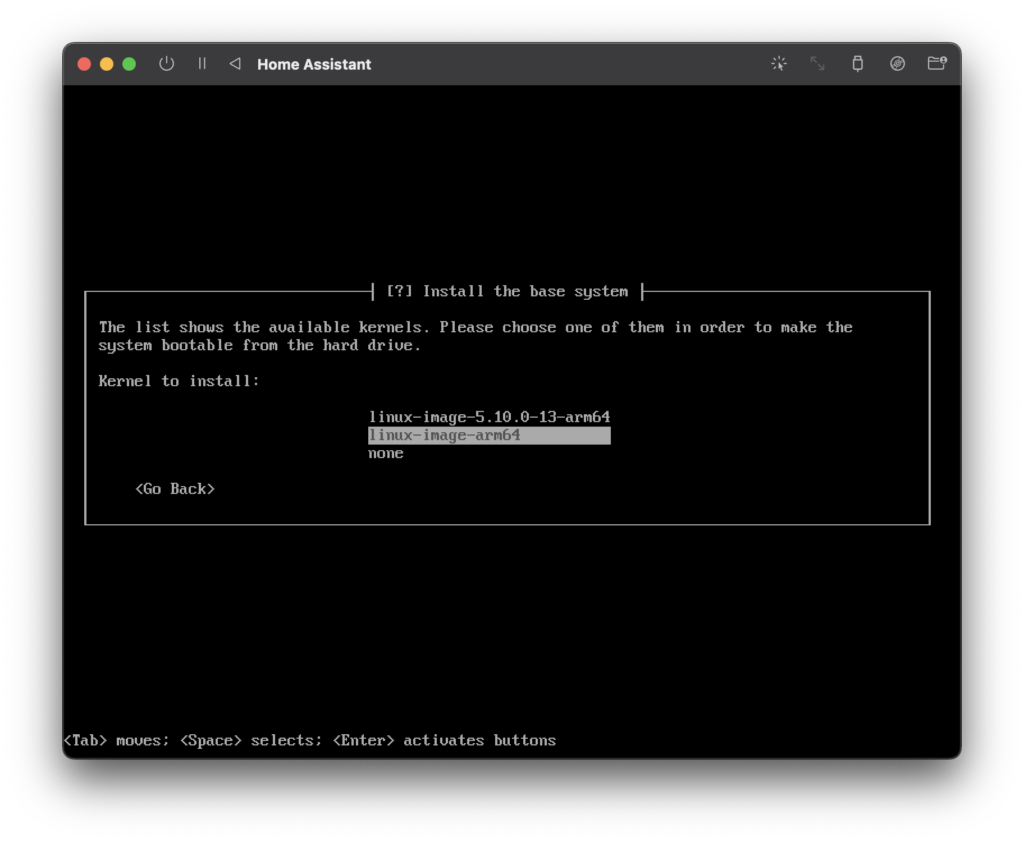
Choose the linux-image-arm64 kernel (likely to be different if you are using the amd64 architecture build).
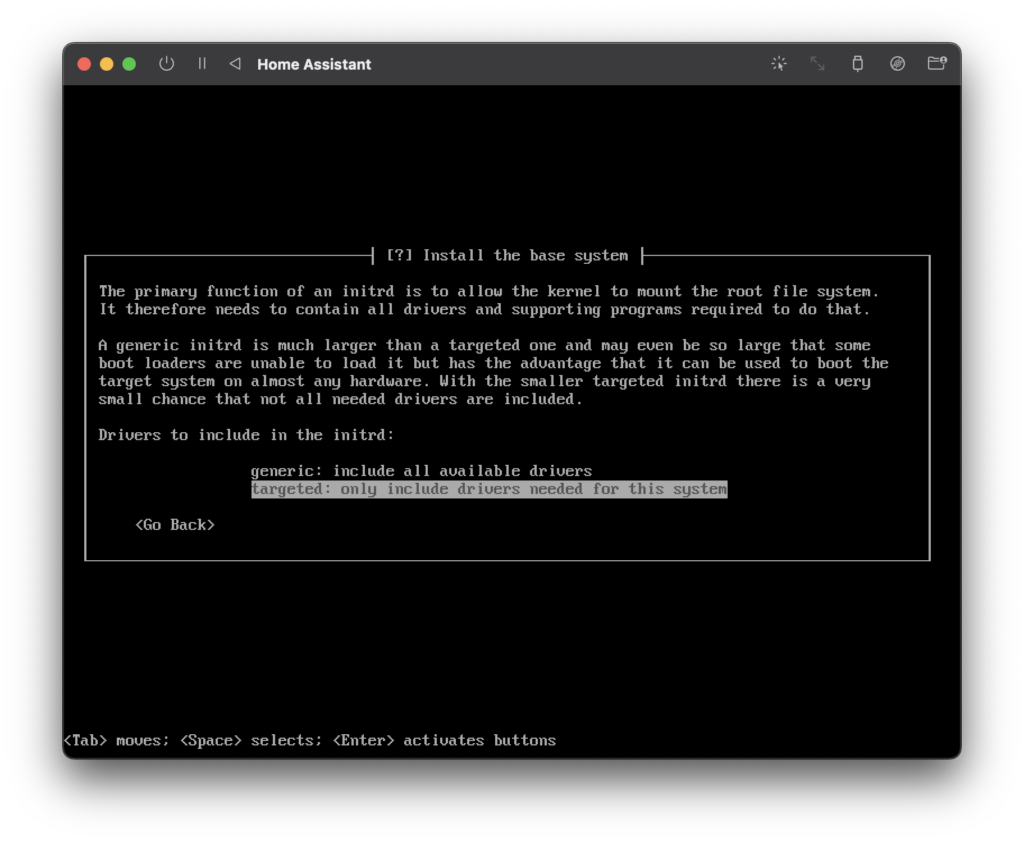
Choose targeted: only include drivers needed for this system, it should work ok with UTM.
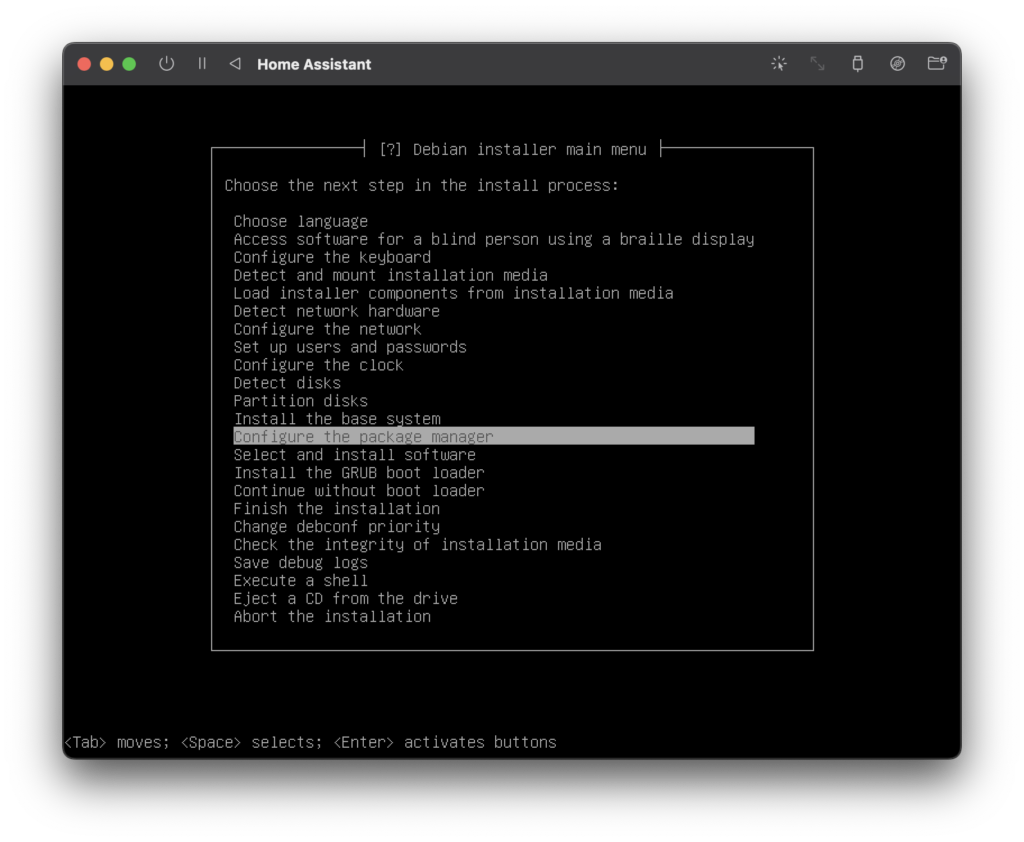
Configure the Package Manager
Next we will configure the package manager.
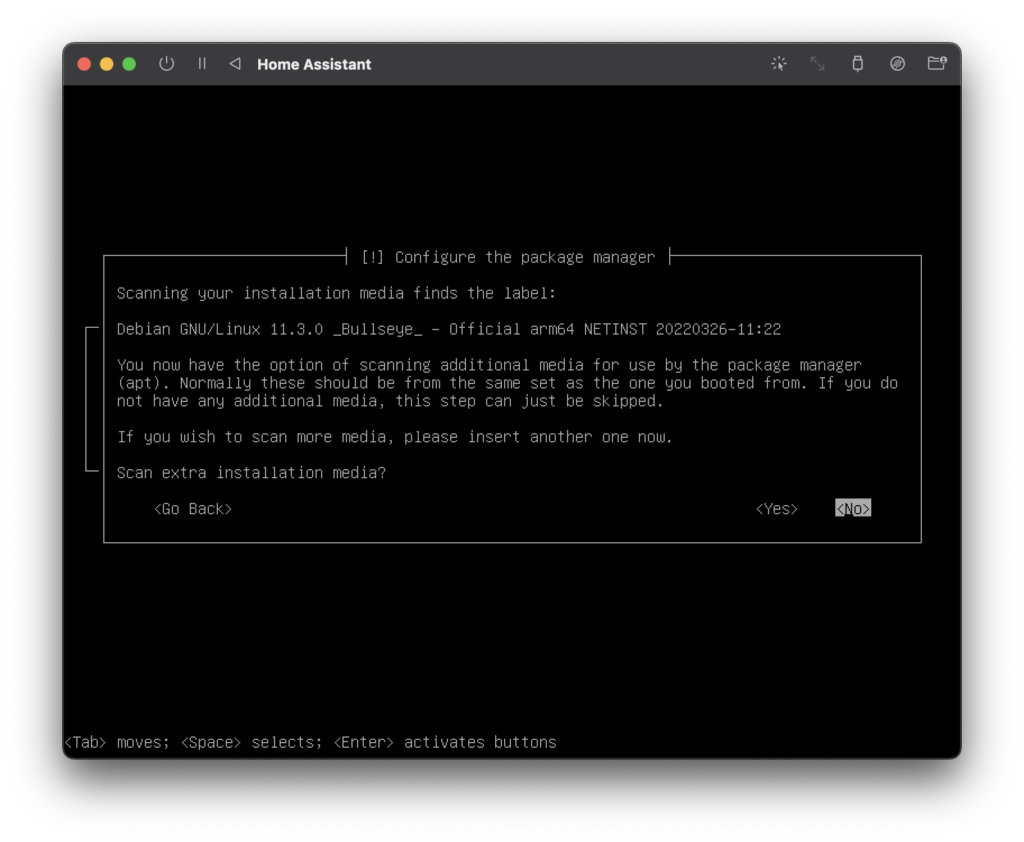
We don’t need to include an additional media for package manager, go ahead and select no.
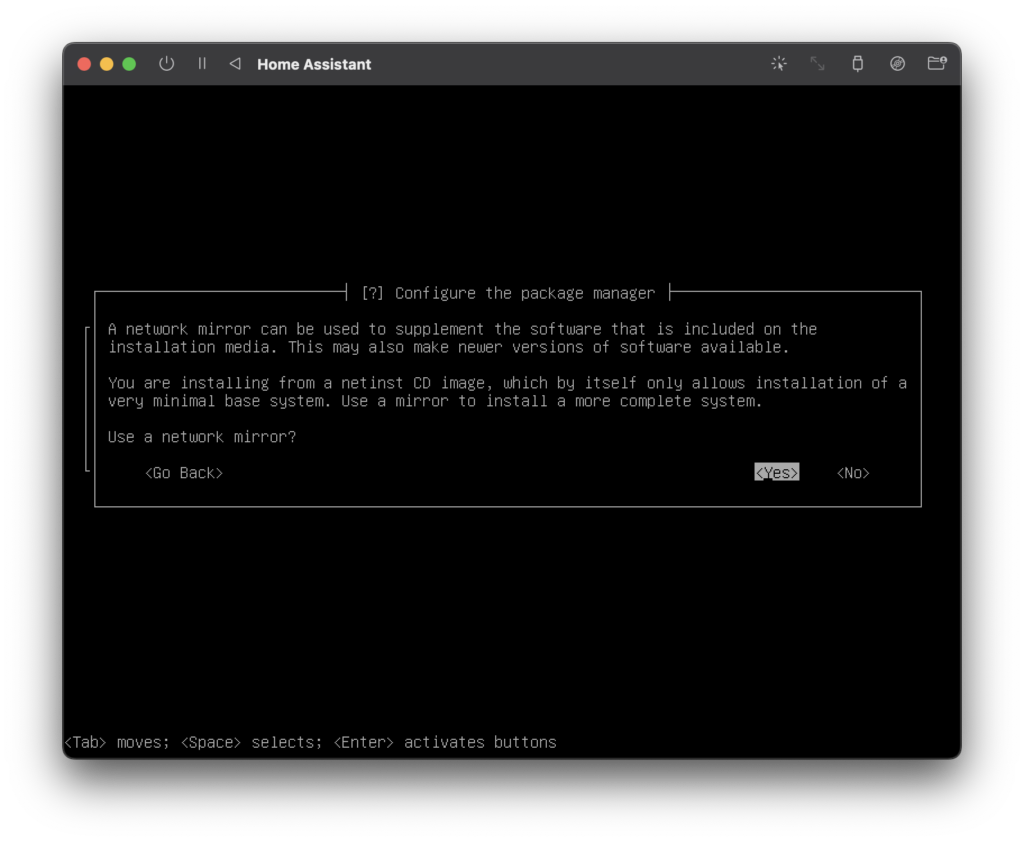
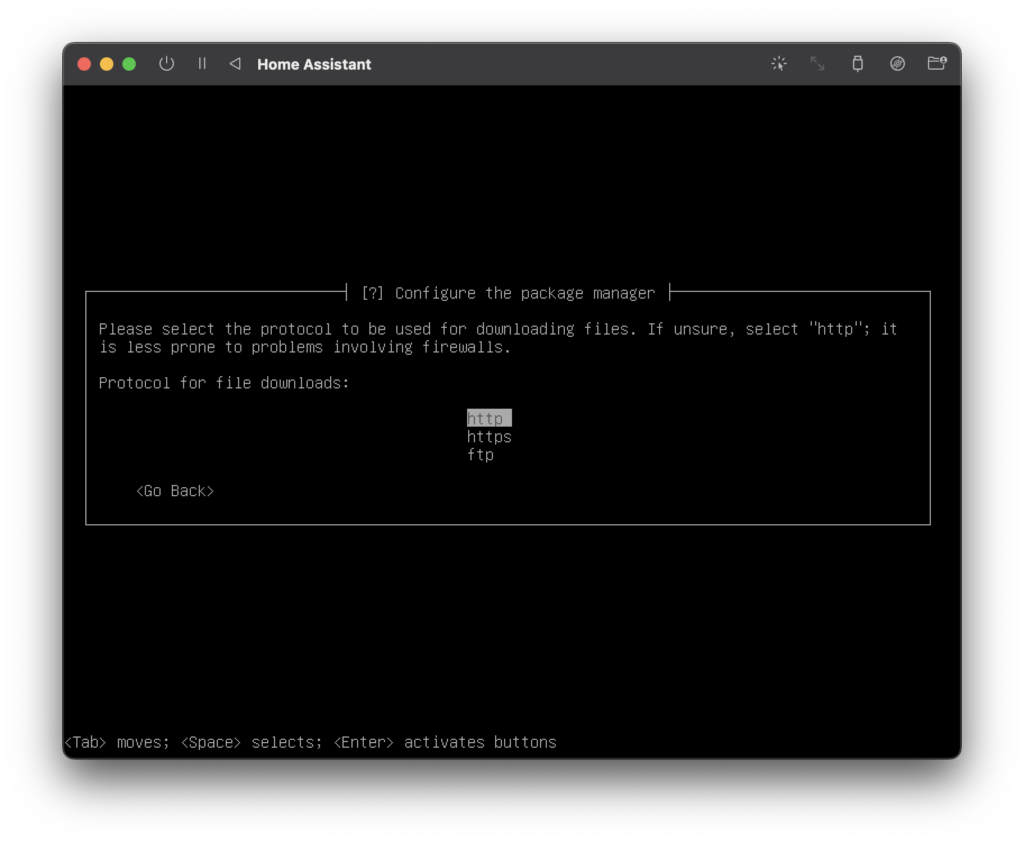
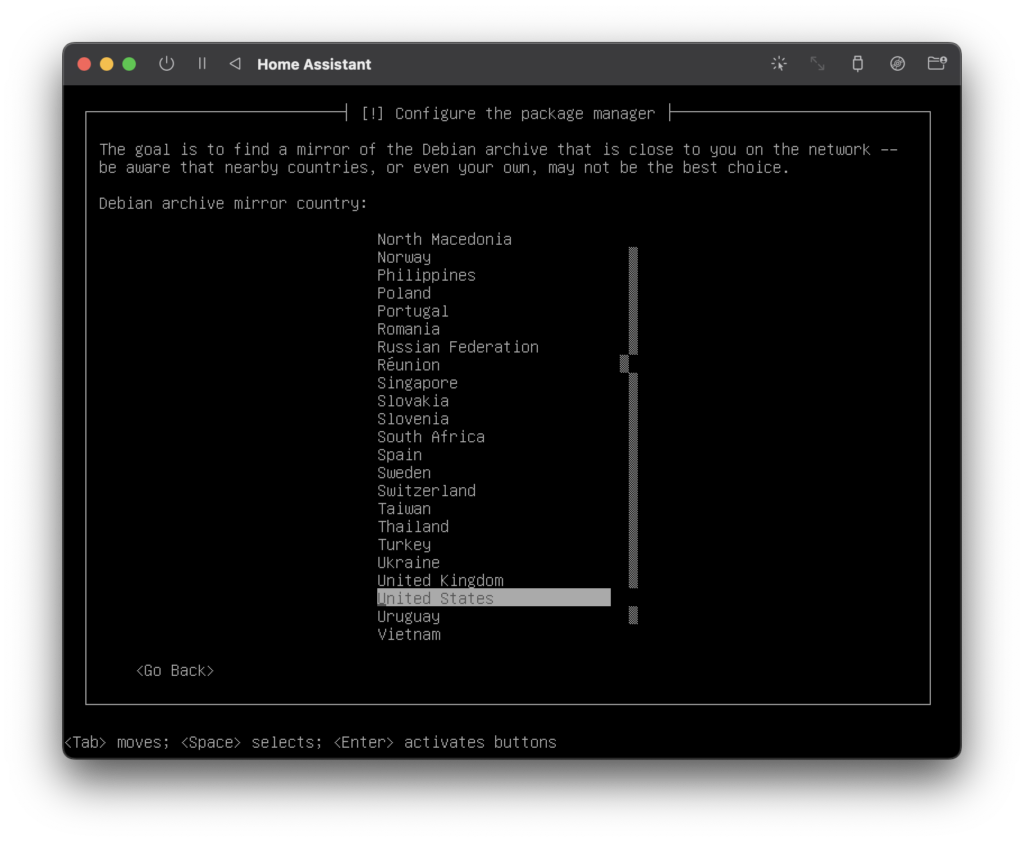
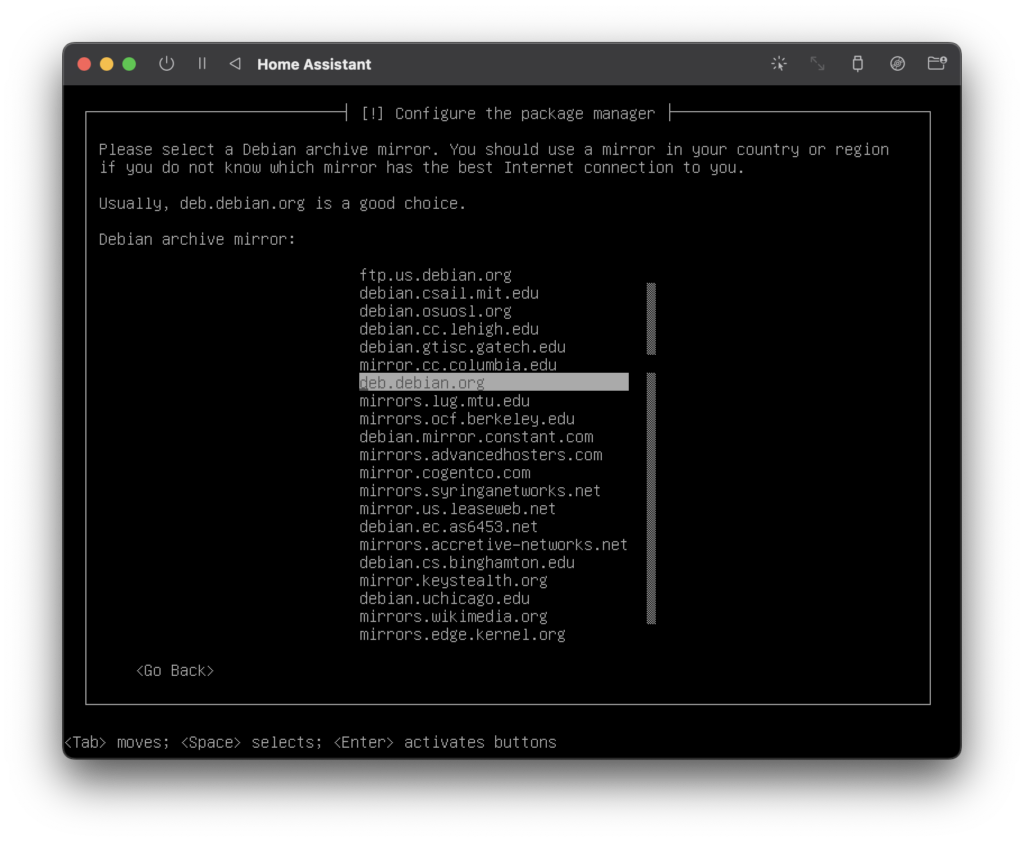
We need to use a network mirror, so go ahead and choose yes. Choose http as the protocol, choose your location and then choose the selected mirror.
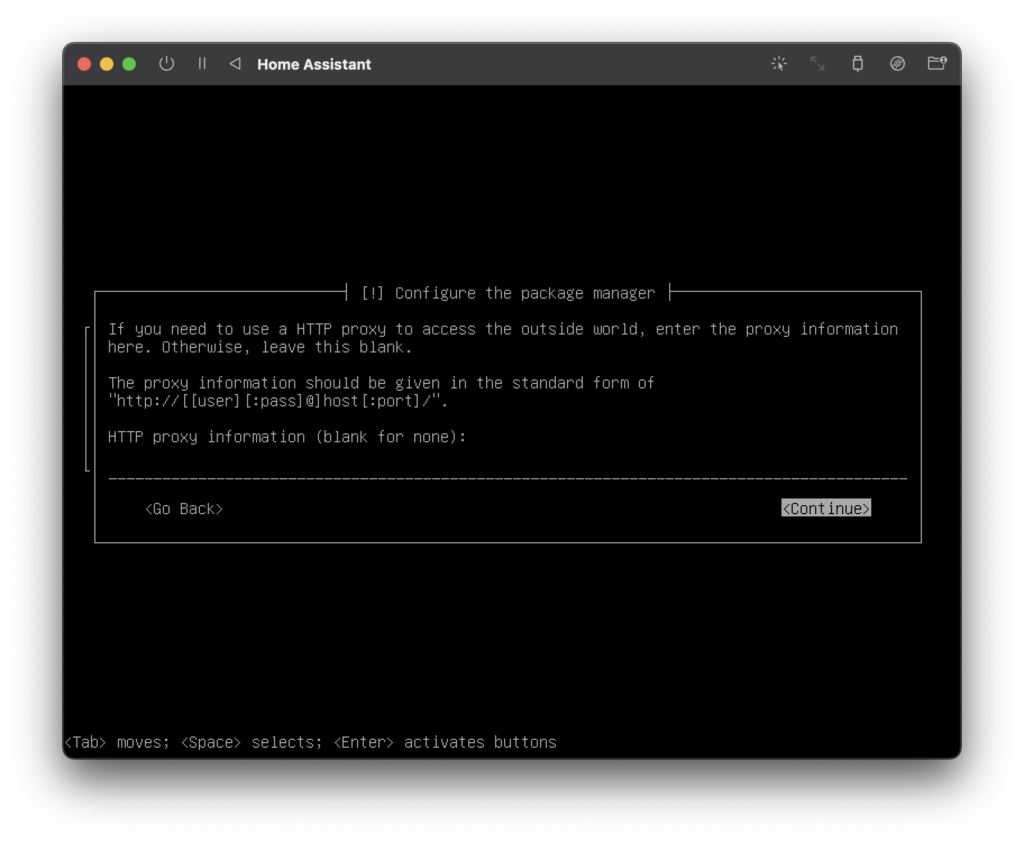
We can leave proxy blank as we are using UTM, which is providing a virtual network bridge.
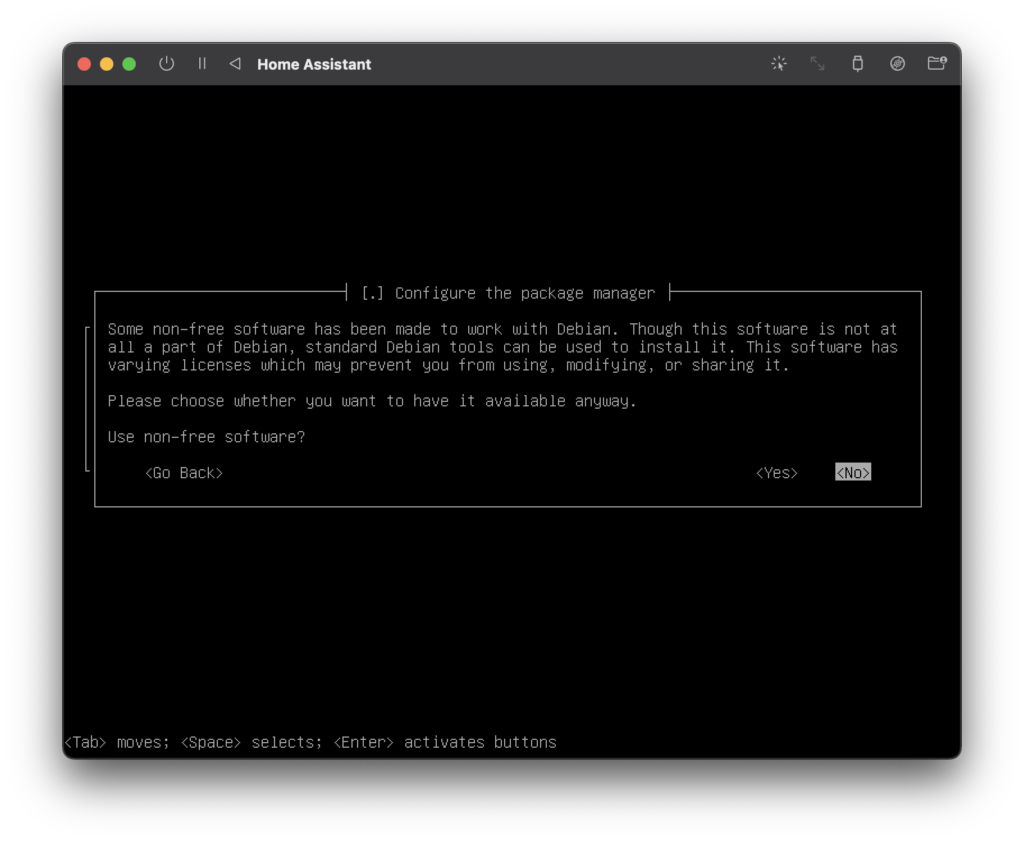
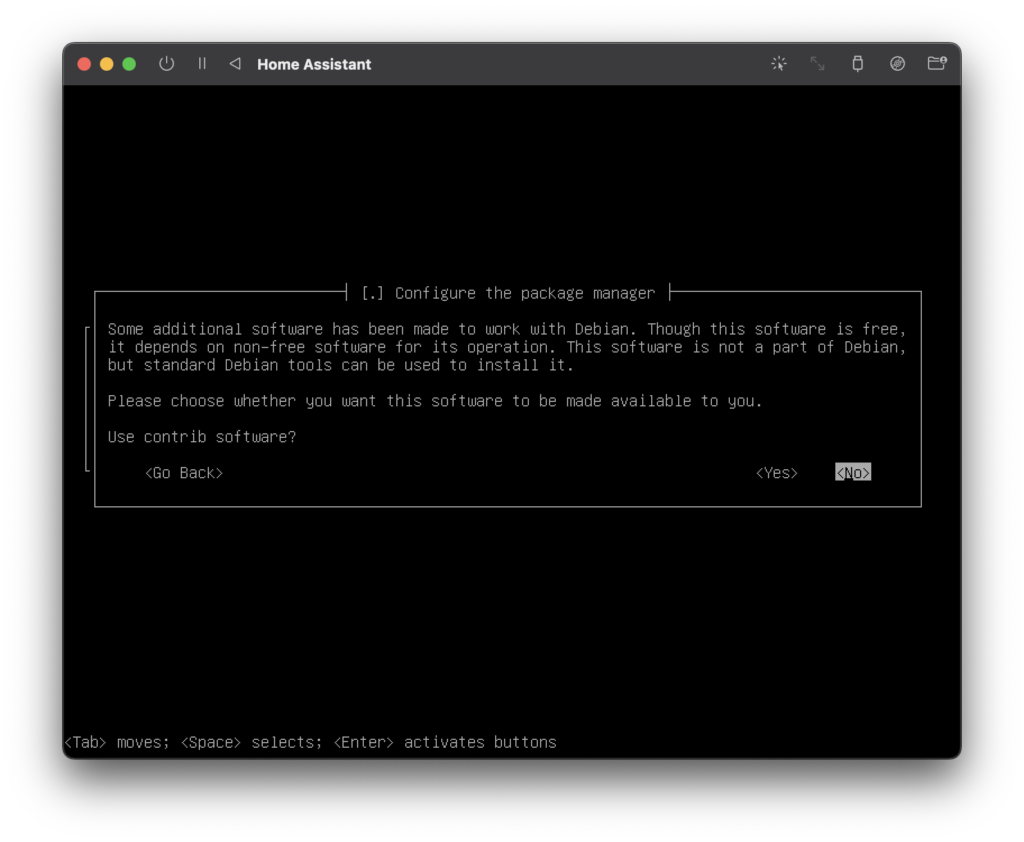
We don’t need non-free software, nor free software that is dependent on it so go ahead and choose no for both of those.
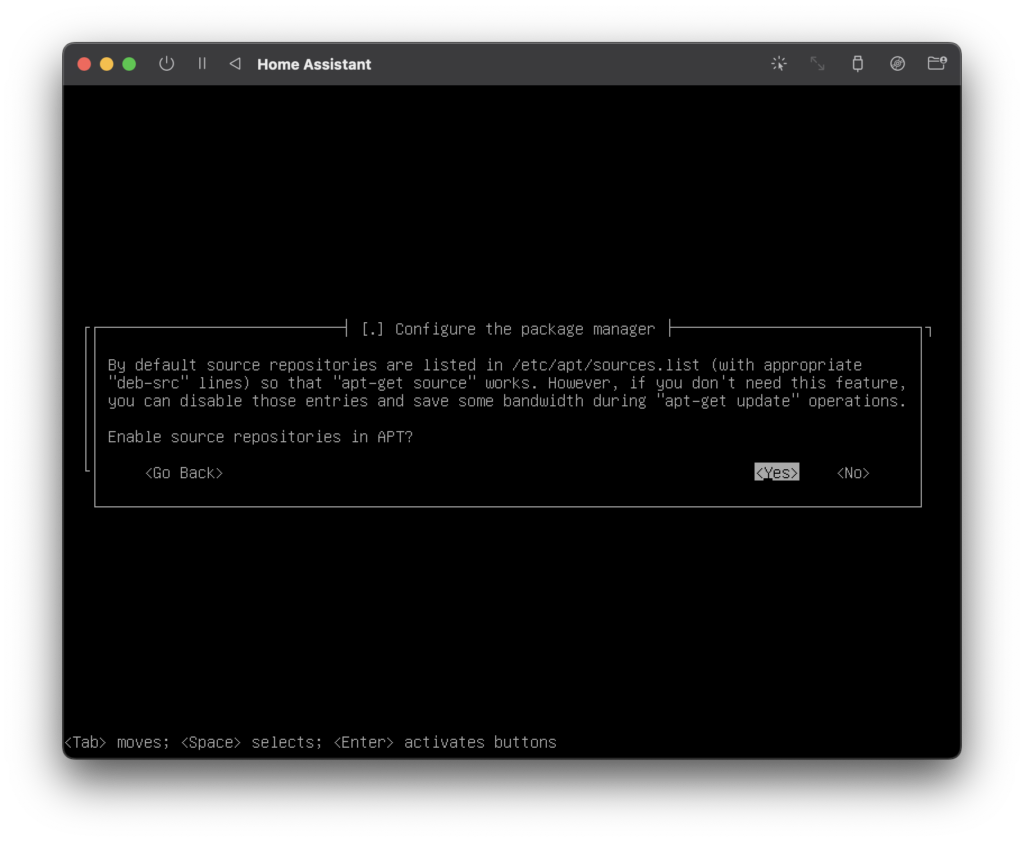
We need to enable source repositories in APT, so go ahead and choose yes.
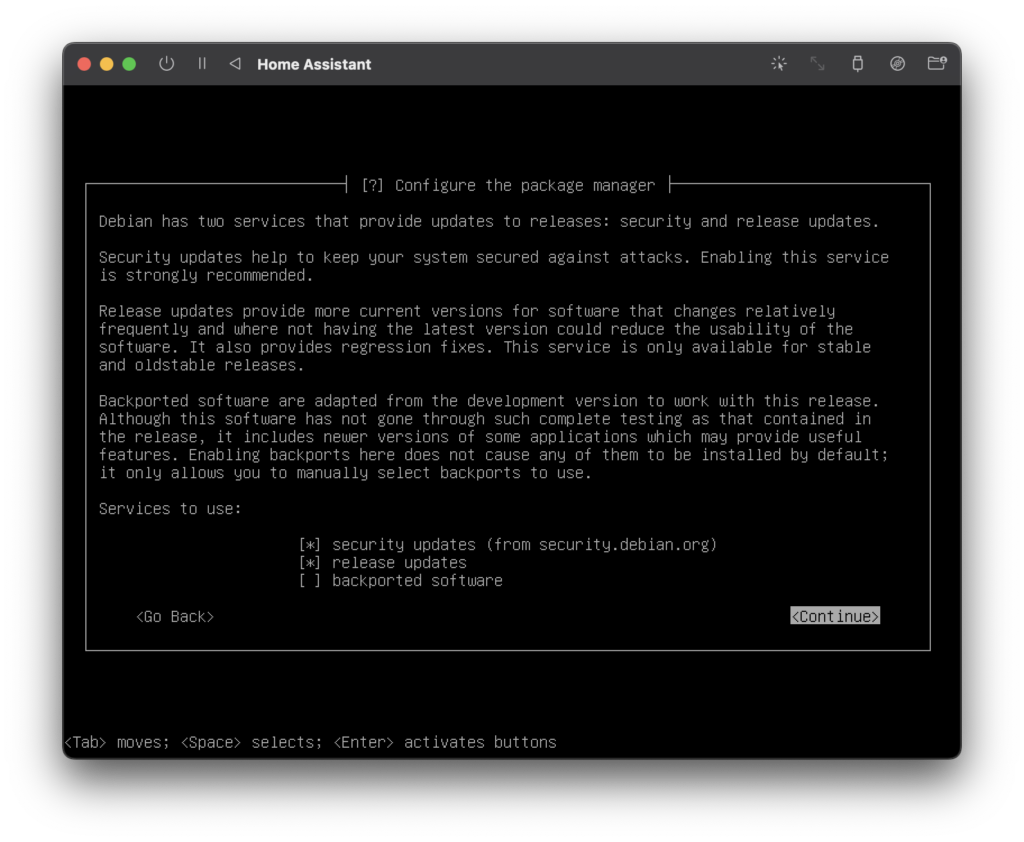
You can leave the default services select, just click continue.
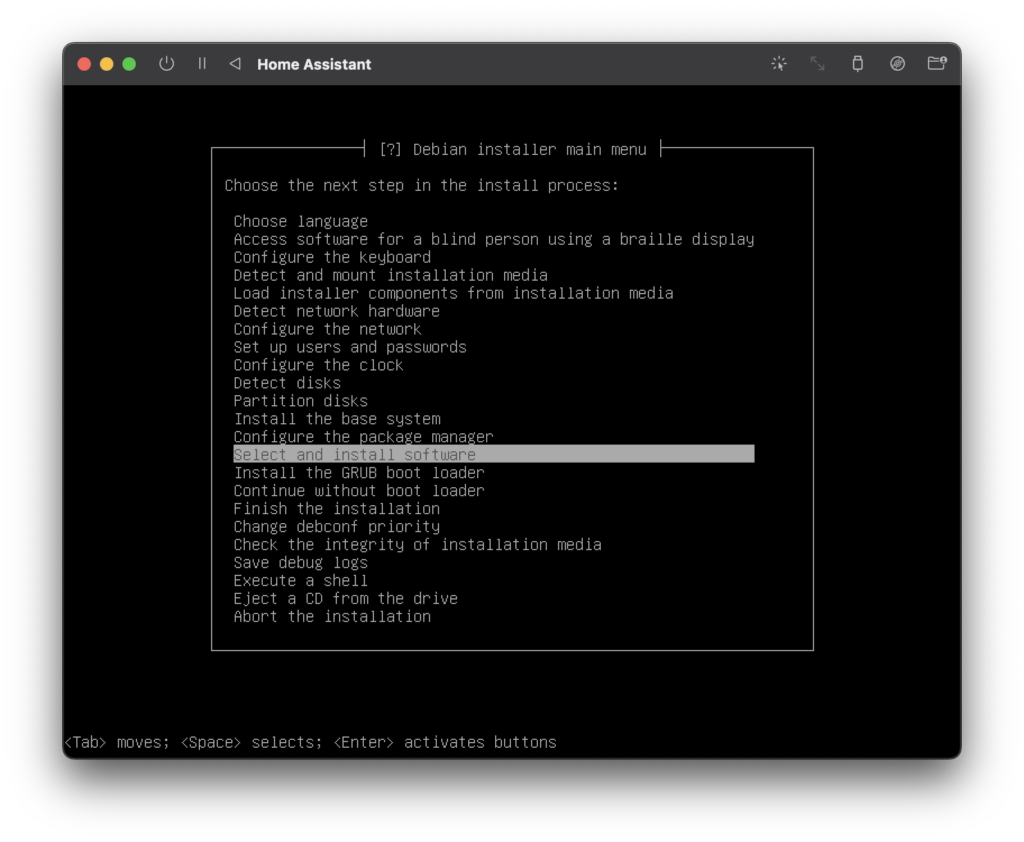
Select and Install Software
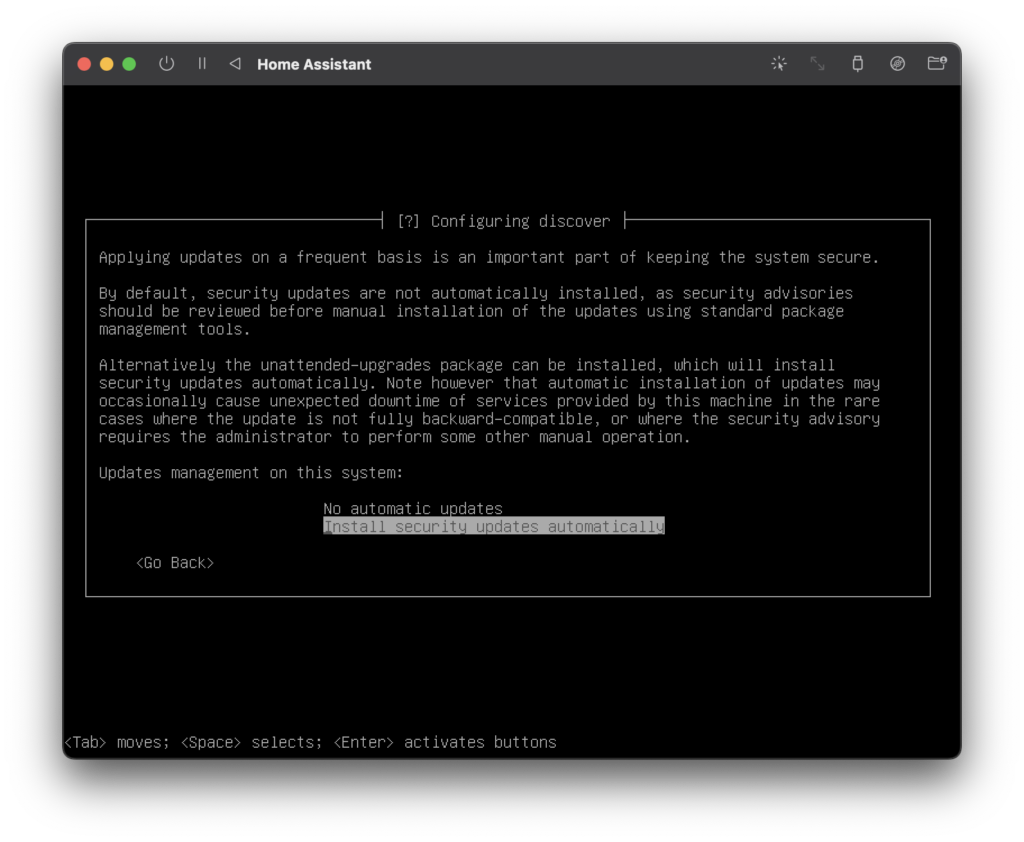
Next we can select and install software. This is useful as we wish to make a minimal build for Home Assistant only.
Choose whether or not to install security updates depending on your preferences.
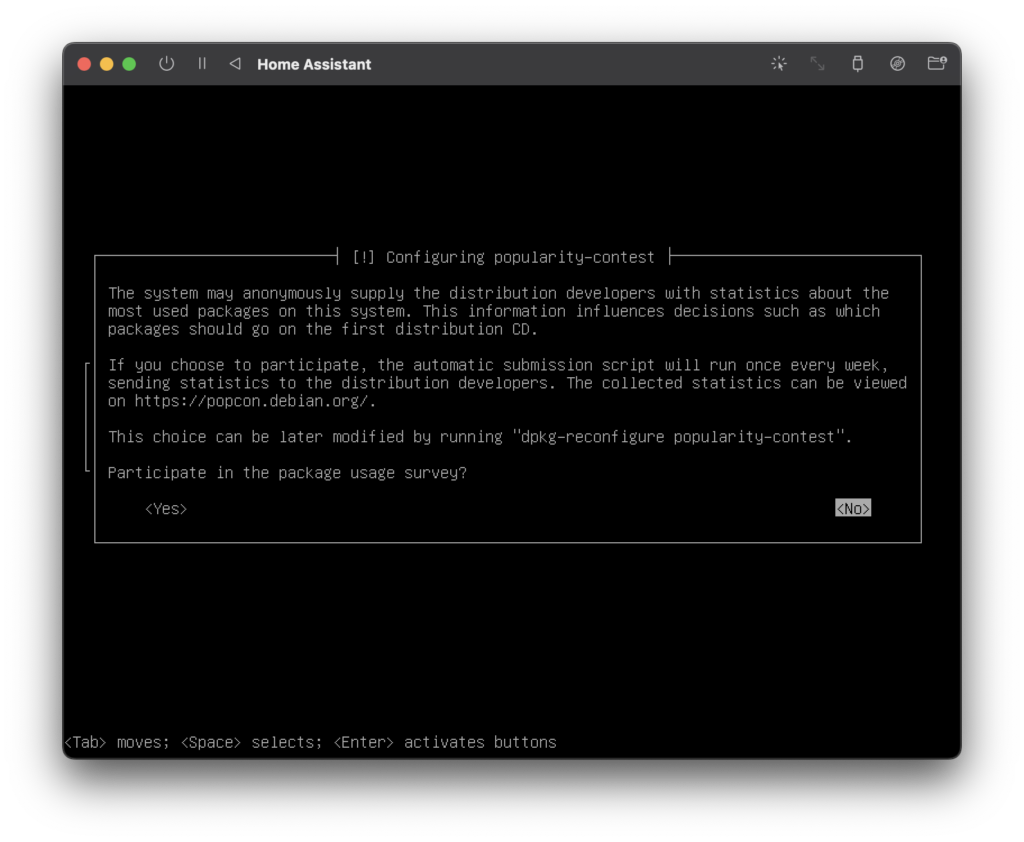
Choose whether or not to provide usage statistics to the developers based upon your own preference. If in doubt, just choose no.
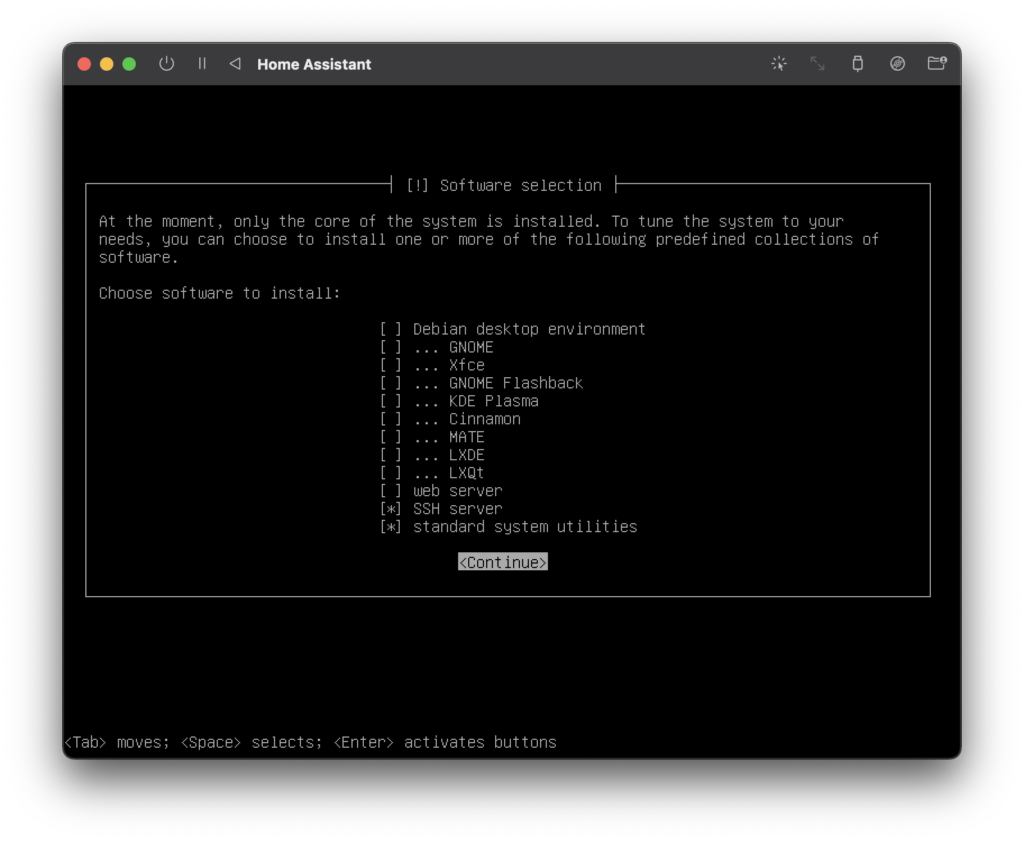
On the software selection screen, the defaults are correct. We wish to install SSH server and standard system utilities. Amend as necessary and click continue.
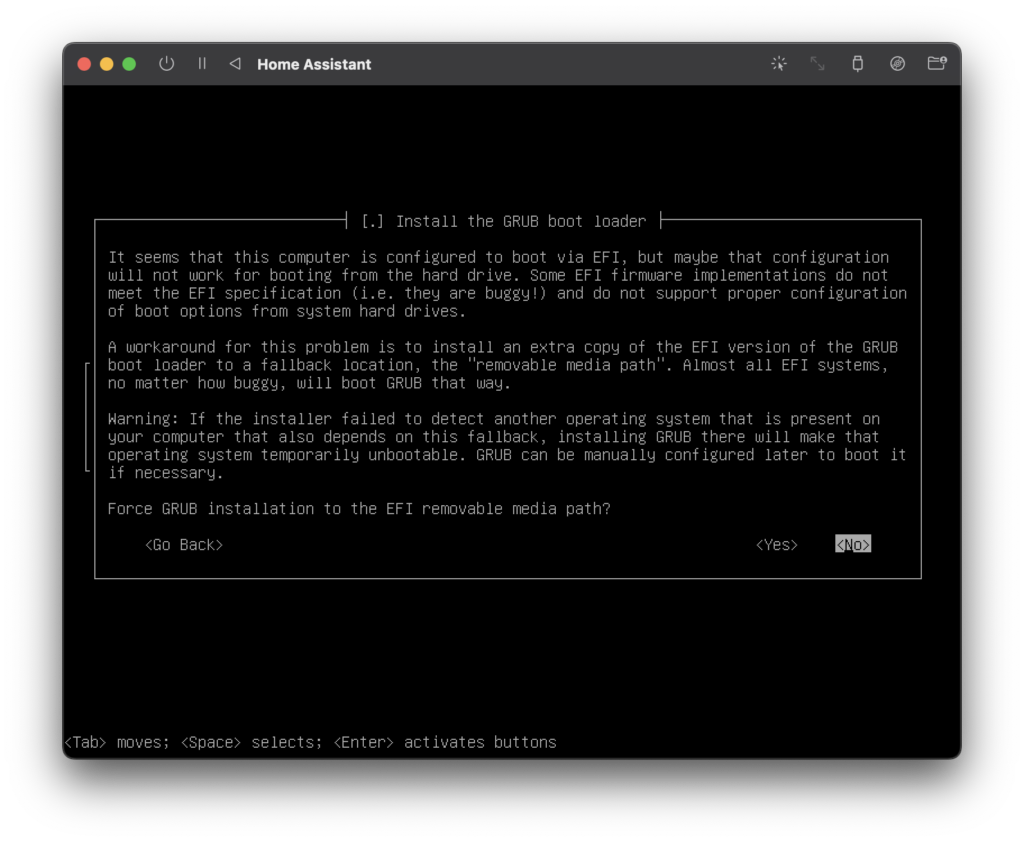
Install GRUB Bootloader
Next we will install the GRUB bootloader.
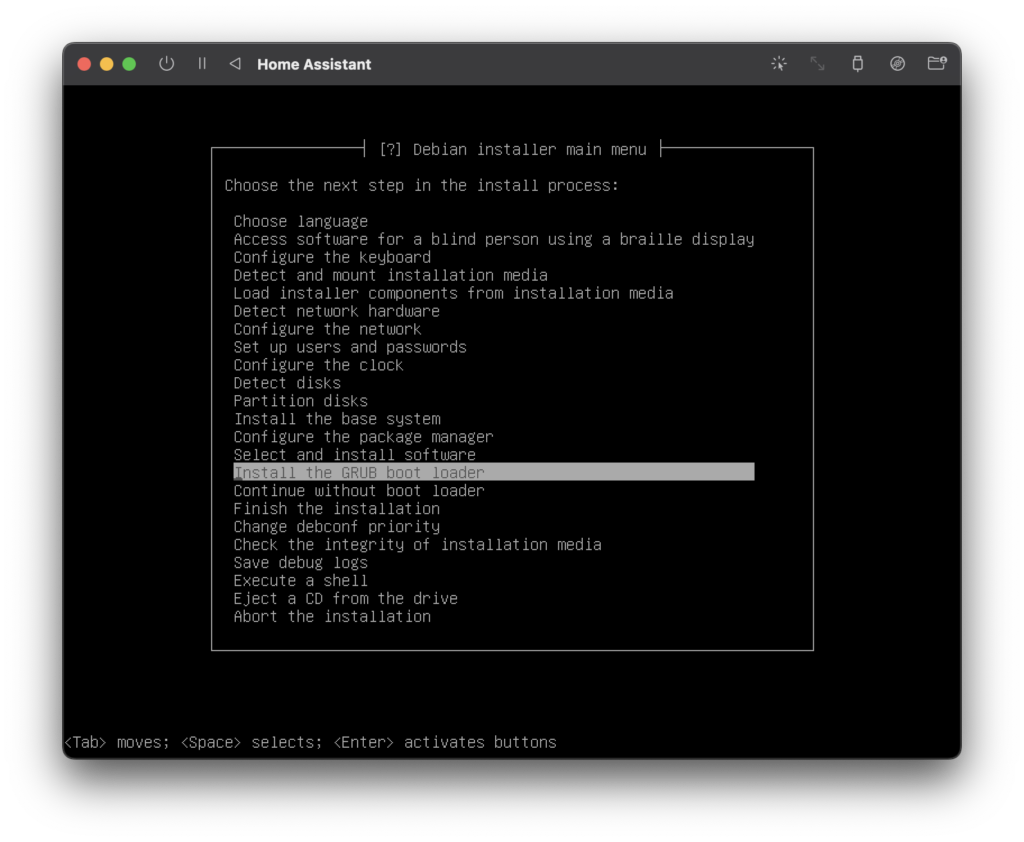
We don’t need to force GRUB to install to the EFI removable media path, go ahead and choose no.
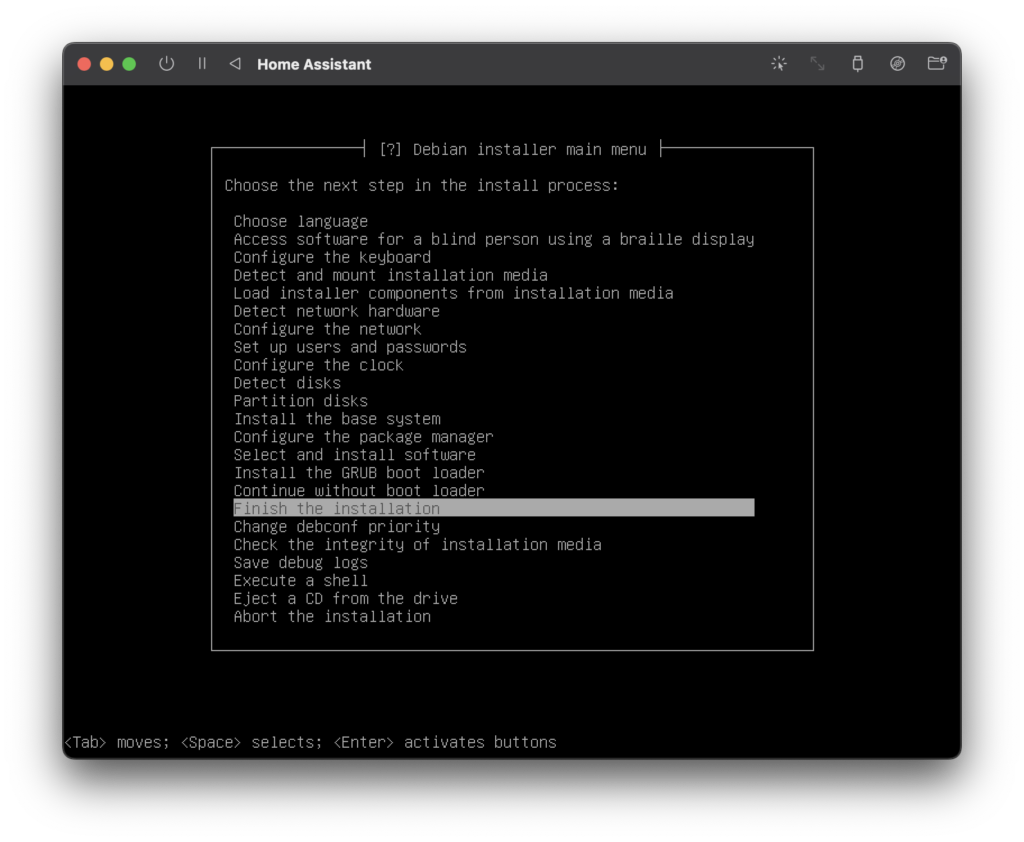
Finish the Installation
Lastly we can choose to finish the installation.
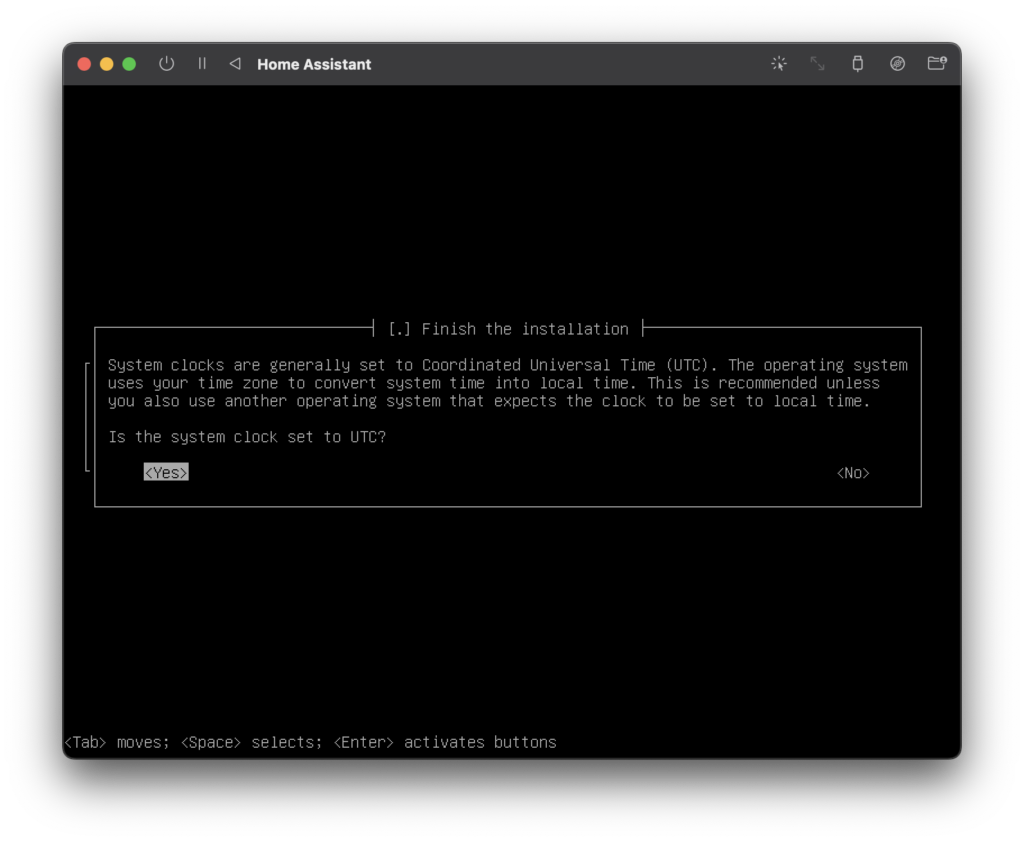
Set the system clock as per your own configuration, however most likely it is set to UTC, so go ahead and choose yes.
The installation is now complete and you will be given an opportunity to remove the installation media. You must complete this before clicking continue.
On the main UTM screen, drop down the removable media and choose to remove it. The note on the right should change to (empty).
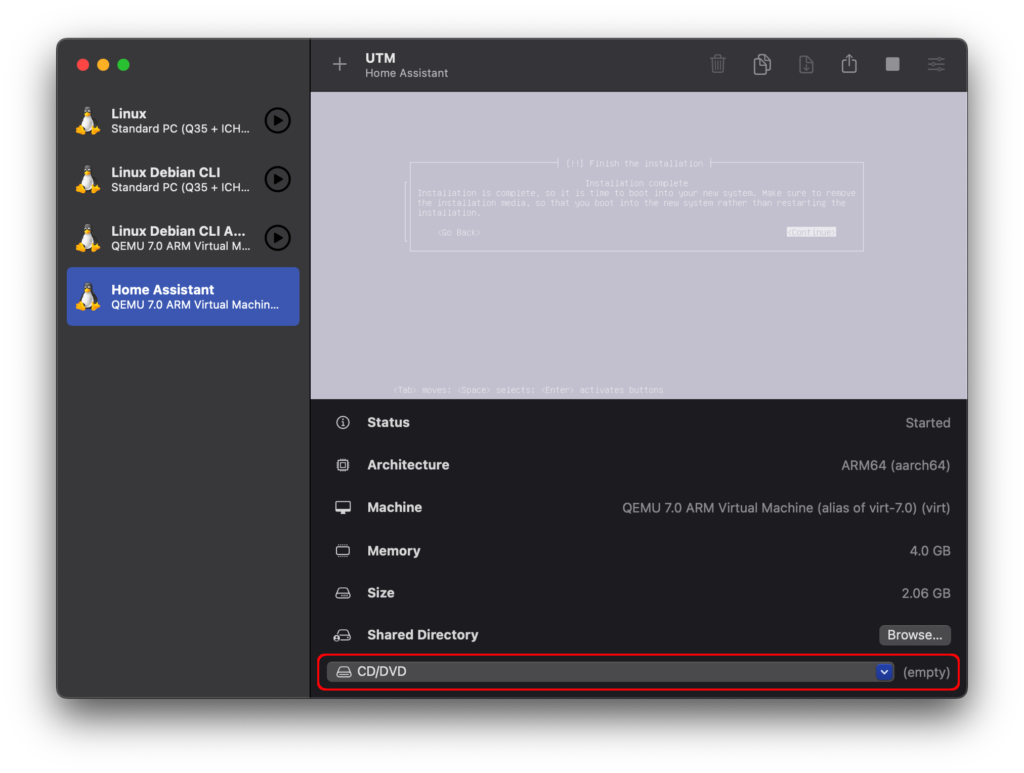
Once the installation media has been removed, you can click continue to finish the installation.

The virtual machine will reboot and after a couple of moments, you will be taken to the Debian login. Use the user details you chose earlier to log in to the command prompt.
How To Install Home Assistant on UTM Running Debian
At this stage you should have a working virtual machine running Debian command line. The next step is to install Home Assistant.
For the first few tasks we need to be logged in as root, which we can do with the following command.
su -
You will need to enter the credentials that you chose during installation.
Backup network settings
After attempting this build several times prior to writing this article, I found that installing Home Assistant caused problems with the network configuration.
Therefore the first I would recommend doing is to backup the network configuration settings file using the following command.
cp /etc/network/interfaces /etc/network/interfaces.bak
Home Assistant Supervised Installation
We will be using the Home Assistant supervised installer, which is found over on GitHub. I have linked it in case you need to reference it for any reason.
Install Dependencies
First go ahead and install the dependencies with the following command.
apt install \
apparmor \
jq \
wget \
curl \
udisks2 \
libglib2.0-bin \
network-manager \
dbus \
lsb-release \
systemd-journal-remote
-y
Install Docker-CE
Next we will install Docker-CE with the following command.
curl -fsSL get.docker.com | sh
Install OS-Agent
We also need to install OS-Agent from GitHub releases. Go ahead and visit the latest releases download page.
There are quite a few packages available, you need to choose the correct one for your build. If you are building on Debian arm64 (for M1 Mac) then you should choose the _aarch64.deb package.
The easiest way to get it via the Debian command line is with wget. Right-click the package and copy the link address, then use this address with the wget command.
wget <OS-agent URL>
For example, at the time of writing the current version is 1.2.2, therefore the command would be as follows.
wget https://github.com/home-assistant/os-agent/releases/download/1.2.2/os-agent_1.2.2_linux_aarch64.deb
Once the package has downloaded, we can install it with dpkg followed by the package name.
dpkg -i os-agent_1.2.2_linux_aarch64.deb
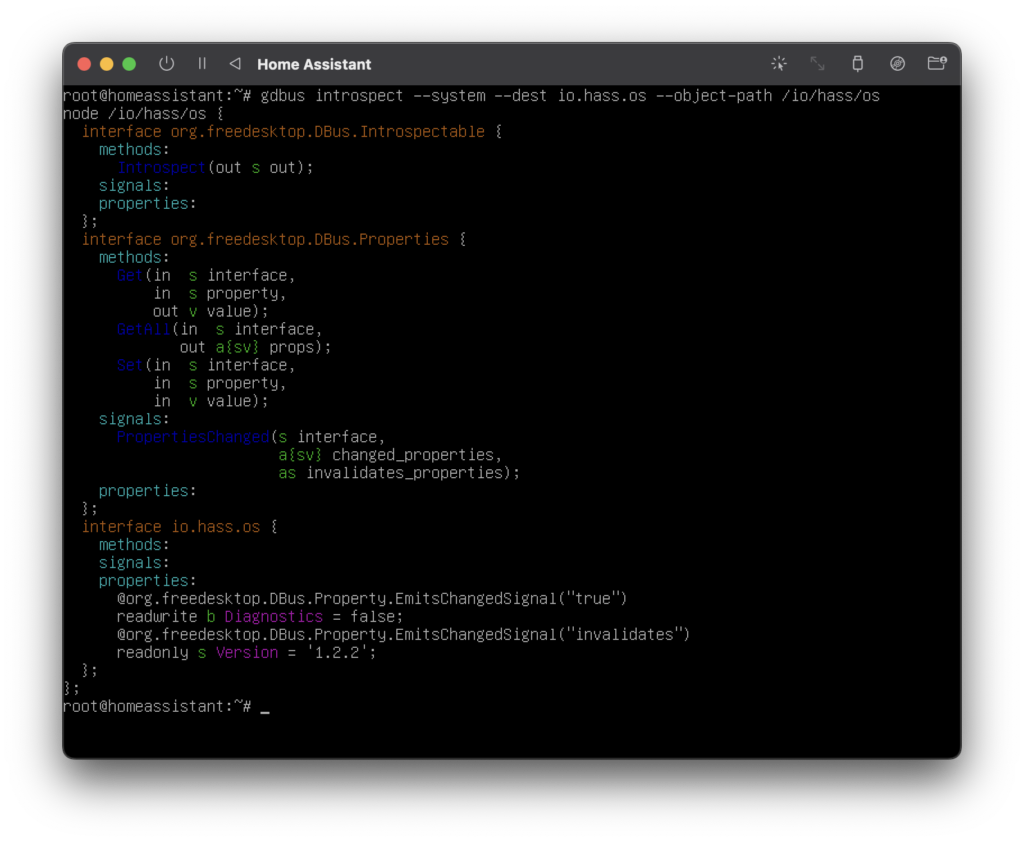
Once complete, you can test the installation with the following command.
gdbus introspect --system --dest io.hass.os --object-path /io/hass/os
This command should not produce and error. The output should look something like the following.
Home Assistant Supervised Debian Package Installation
The last thing remaining to do is install Home Assistant. This can be done with the Home Assistant supervised debian package.
First we can go ahead and download the package using wget.
wget https://github.com/home-assistant/supervised-installer/releases/latest/download/homeassistant-supervised.deb
Once the download has completed, we can install it with dpkg.
dpkg -i homeassistant-supervised.deb
How to fix the systemd-resolved error
If you are getting installation issues relating to systemd-resolved, this could be due to bug in version 1.5.0 of the installation script.
In this case, you can work around the problem by using the following command to install Home Assistant:
sudo dpkg -i --ignore-depends=systemd-resolved homeassistant-supervised.deb
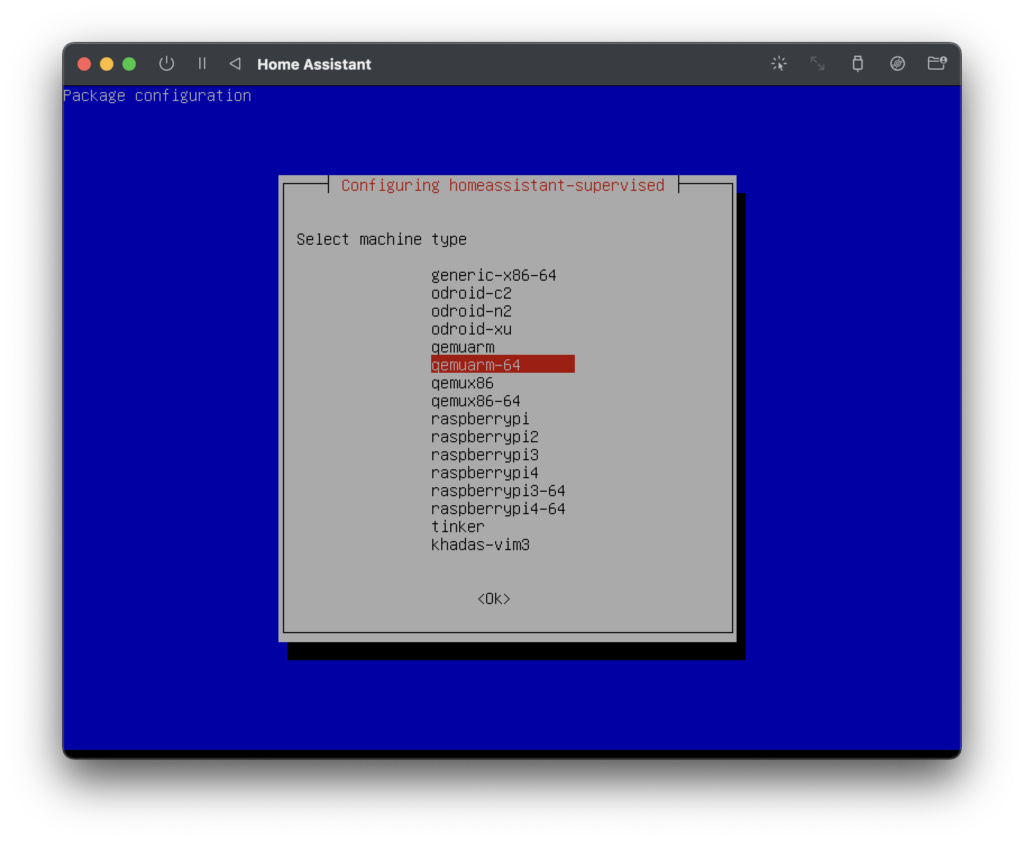
Choose a machine type
You may need to select a machine type. For M1 Mac builds running Debian arm64, choose qemuarm-64.
Once the installation has completed, Home Assistant will start up but it will take a few minutes before we can access it.
The IP address of our Home Assistant server is given at the end of installation, in my case 192.168.64.5:8123.

In order to check that the installation was successful, go ahead and visit the IP address using a browser.
http://<your-ip-address>:<your-port>
So in my case it would be as follows.
http://192.168.64.5:8123
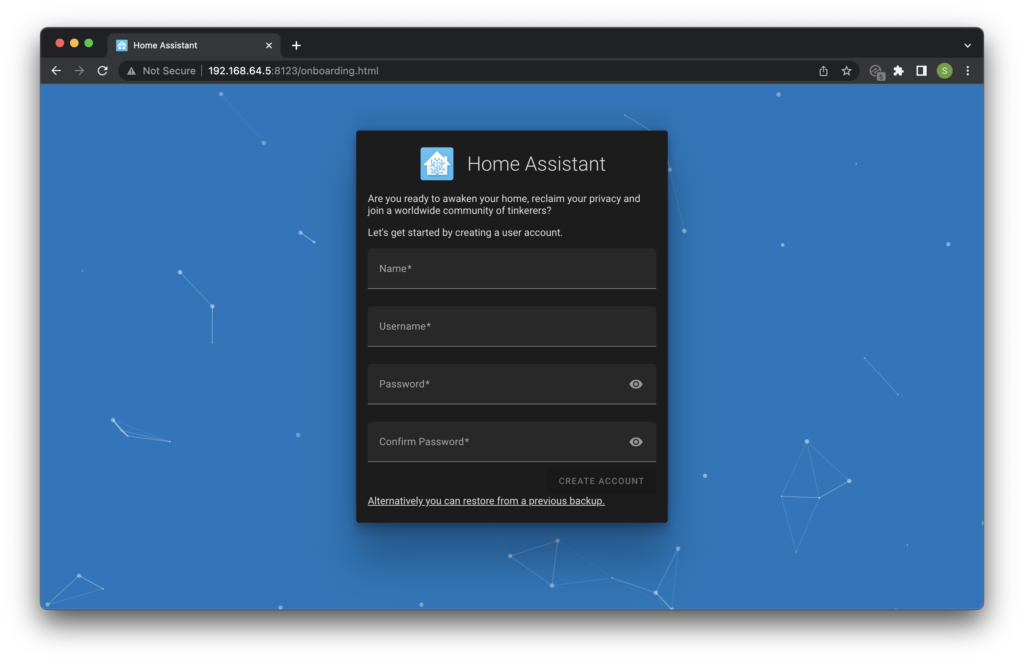
If you get the onboarding screen, awesome!
However we should also check that the server can withstand a reboot. This caused me several problems on previous attempts to get this to work.
Go ahead and reboot the server with the following command.
reboot now
Fixing Network Interface Problems
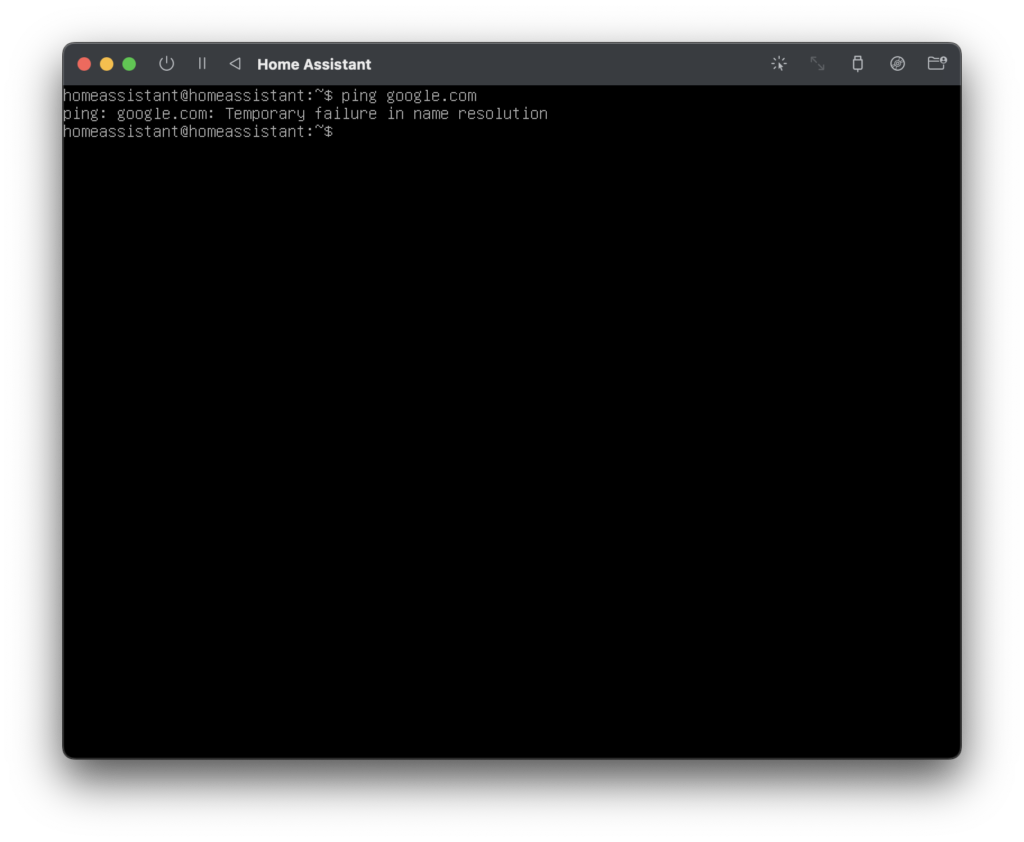
At the time of writing, when the server is rebooted I find that it no longer has a working network connection. You can check this by logging in and attempting to ping Google.
ping google.com
If you receive a name resolution error, it means that the network settings have been corrupted by the Home Assistant installation.
The problem seems to be that /etc/network/interfaces gets overwritten in the Home Assistant installation process.
However this is very easy to fix using the backup that we created earlier. First log back into the superuser account following the reboot.
su -
Next we will restore the /etc/network/interfaces file which we made a backup of earlier.
mv -f /etc/network/interfaces.bak /etc/network/interfaces
Once we have restored our backup, we can reboot the system.
reboot now
After reboot, everything should be back to normal! You should once again be able to access your Home Assistant server in your web browser.
How To Get UTM to Launch Home Assistant on Boot
If you are planning on using Apple hardware for a Home Assistant server, you are probably going to want to have Home Assistant boot when Mac OS has loaded.
UTM does not directly have the ability to launch during boot, however there is a function that we can use to achieve this.
It is possible to control some of the functionality of UTM by using the URL scheme utm://
We can combine this with the terminal command open in order to take control of UTM with the Mac OS terminal.
open "utm://start?name=<your-virtual-machine>"
You will need to replace <your-virtual-machine> with the name of your virtual machine (using URL encoding).
For example my Home Assistant virtual machine in UTM is called “Home Assistant,” therefore the command will be as follows.
open "utm://start?name=Home%20Assistant"
Note that the space needs to be replaced with %20 as per the requirements for URL encoding.
There are also other commands that are possible to access from the terminal in the same way, you can see a full list here.
Launch Home Assistant on Boot Using Automator
You may not know this already but you have a really cool little program called Automator that comes built into the Mac OS operating system, which you can use to automatically start Home Assistant when your Mac boots up.
As the name suggests, it can be used to automate many different tasks. We will use it to turn a shell script into an application that we can load on boot.
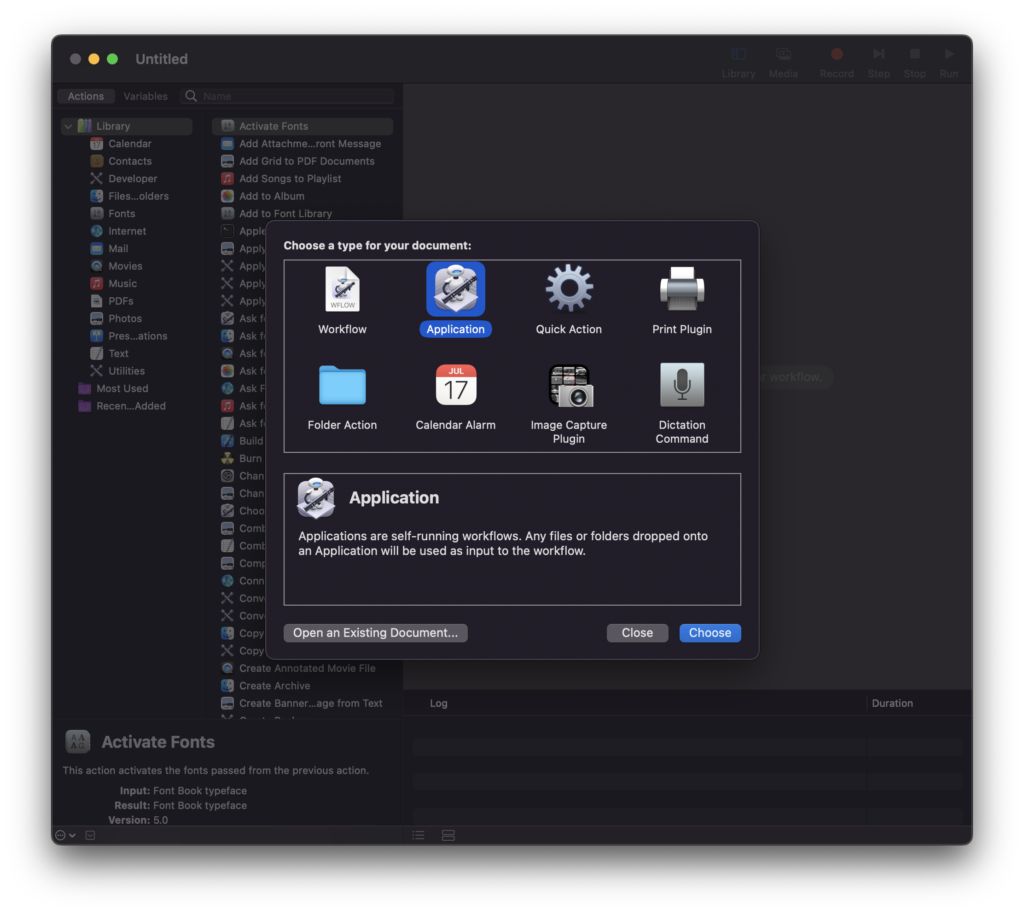
You can find Automator in the applications folder, or simply use Spotlight to find it. Go ahead and open it and create a new file.
When you create a new file, you will be asked what type of file you wish to make. Choose application.
On the main screen, on the far left-hand sidebar, select the library. Next, scroll down the main list of library items and locate Run Shell Script.
Double click Run Shell Script and it will be added to the main window as shown in the following screenshot.
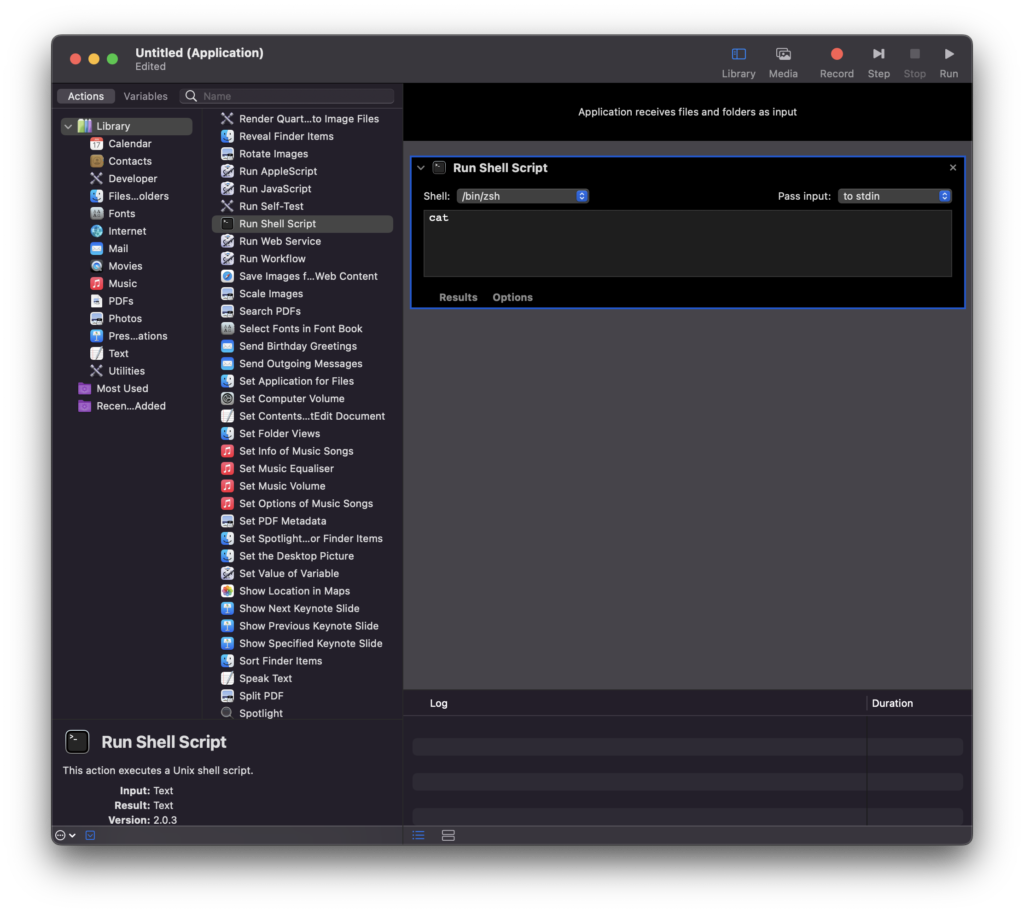
Now we need to add the following code to the script. Don’t forget to replace the name of the VM in the command with whatever you named your Home Assistant VM.
#!/bin/zshopen "utm://start?name=Home%20Assistant"

Now click File > Save… in order to save your application. Give it a name like utmboot and save it somewhere, such as your documents folder.
The file that we just saved is actually an .app file, a Mac OS executable application. If you wish to test it you can simply double click it and it should directly launch your Home Assistant VM in UTM. Awesome!
Next, open System Preferences > Users and Groups. Click the padlock in the lower left and enter your password in order to unlock the settings.
With your current user selected, choose the Login Items tab and click the “+” at the bottom to add a new application. Go ahead and add the new application that we just created, utmboot.
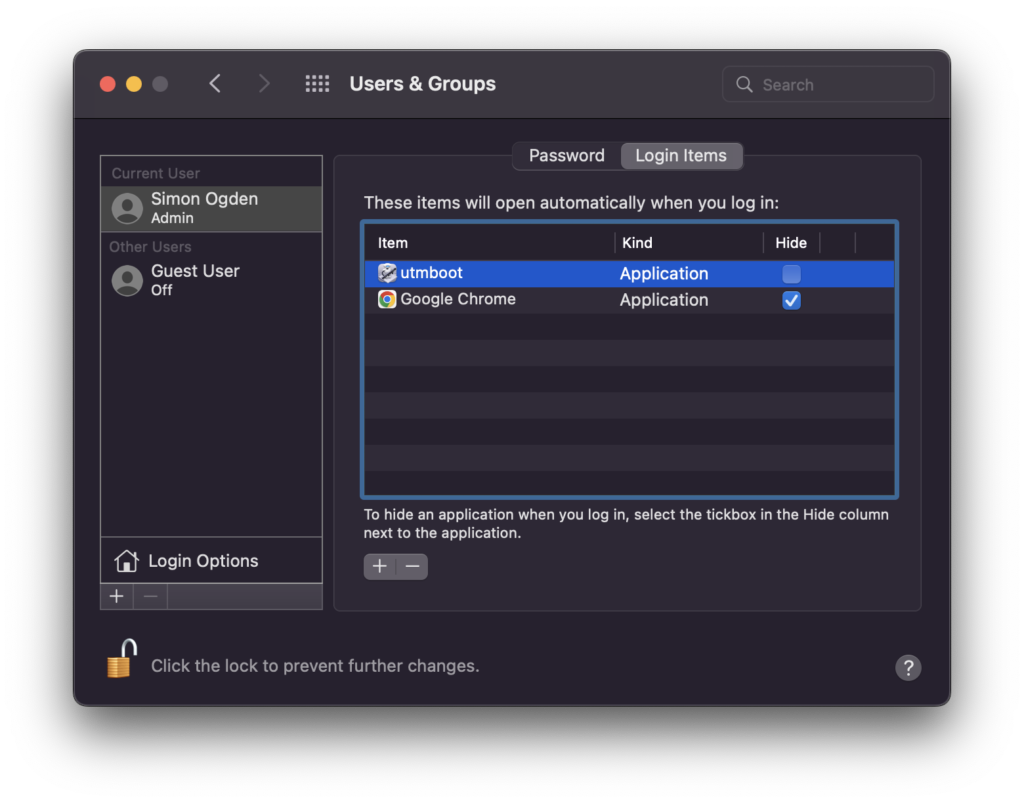
When you boot your Mac past the login screen, UTM will now automatically start your Home Assistant virtual machine!
The one last thing that you may want to do is set your Mac to automatically log in during start up.
Once that is done, the computer will boot from being powered off all the way through to your Home Assistant VM running. Awesome!
Give Your Home Assistant VM a Seperate IP address
You may also want to give your new Home Assistant VM its own IP address so that it appears on your network as a seperate machine.
Then you can treat the VM as if it were a seperate computer with regards to setting up DuckDNS and accessing the server.
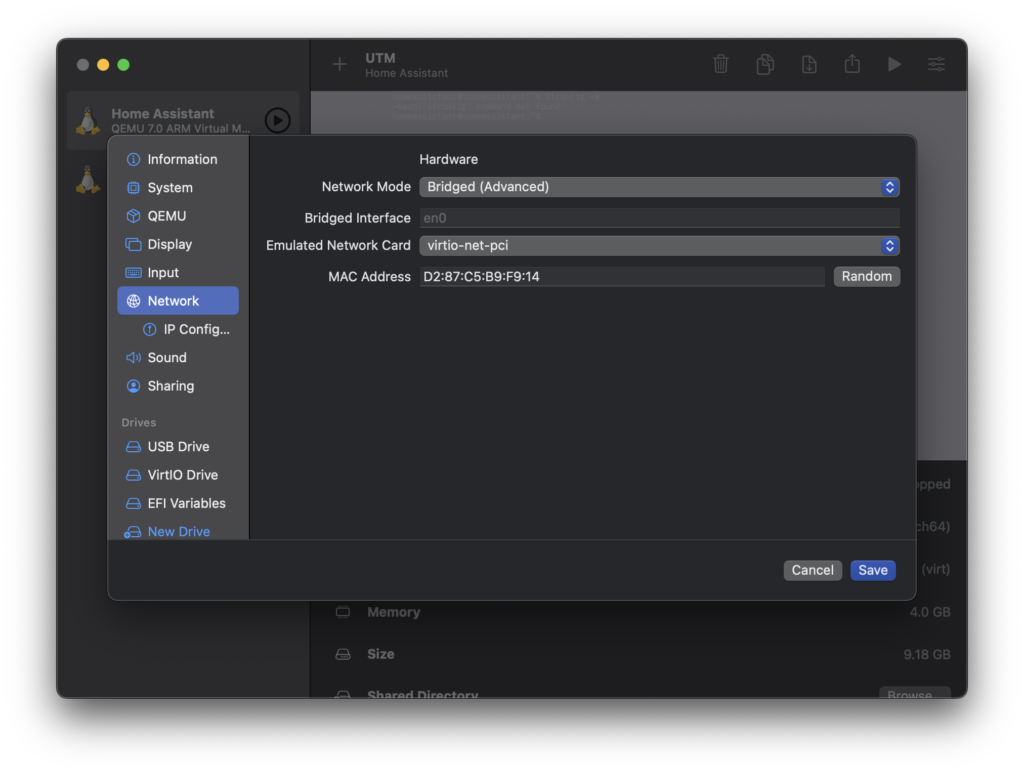
It is very easy to set this up, first you will need to stop your virtual machine if it is currently running.
Next, right-click the virtual machine in the main UTM screen and choose edit. Then choose network and changed the network mode to bridged.
When you reboot the virtual machine, Home Assistant will have its own local IP address on the network and you can treat the virtual machine as if it were a seperate computer.
Conclusion
Installing Home Assistant Supervised in a Linux virtual machine is certainly an in-depth process. However with a little patience, it is possible to get it running very smoothly!
Being able to run Home Assistant in such a way is very beneficial, as it allows us to use Apple Silicon machine or even just run Home Assistant on the same machine that we wish to work on, excellent for development purposes.
Thank you for visiting and don’t forget to check out some of my other awesome Home Assistant tutorials!
Thanks so much for visiting my site! If this article helped you achieve your goal and you want to say thanks, you can now support my work by buying me a coffee. I promise I won't spend it on beer instead... 😏


Hi, Thank you very much for the incredibly detailed installation procedure.
it was a lot of work but I could have never done it without your guide.
I really appreciated the fact that you explained details that are not evident to programming aficionados like me.
Thank you very much!!
Very glad to hear that Rafael! 🙂
I’m on a M1 Mac mini and I can’t seem to get the debian instance online. I get “Your Network is probably not using the DHCP protocol” though my router definitely uses DHCP. ATM my only option is wireless. I tried assigning a static IP using the UTM MAC address but still no luck. Any tips on how to overcome this?
Simple solution. The Bridged Interface needs to match your adapter, in my case it’s my WIFI which is en1. It defaults to en0 so make sure you pick the right one. Run “networksetup -listallhardwareports” to find out which you’re using.
Are you running UTM in briged network mode? Could you paste the contents of your
/etc/network/interfacesfile here?Hi Siytek. Really appreciate you taking the time to write up the guide. Unfortunately, I have hit a snag and currently stuck when I try to install the HA Supervised Deb Package with the command of dpkg -i homeassistant-supervised.deb. Shortly after the Setting up homeassistant-supervised (1.4.1) line, the docker service is restarted and it tries to ping checkonline.home-assistant.io. It successfully sends a packet but fails to receive it.
Any help would be greatly appreciate. Thanks!
Hey Sam, thanks for the comments! Are you trying this on an Intel-based Mac? If yes then I would recommend using VirtualBox instead of UTM. Another reader here emailed me with a very similar sounding problem when trying this on an Intel-based Mac and we found that there was a problem with UTM, whereby the Debian ping command does not work.
If you are having this problem on an M1/M2 ARM-based Mac, please do the following…
Also if you didn’t already, take a look at this: https://siytek.com/home-assistant-supervised-on-mac/#Fixing-Network-Interface-Problems
Hi Sitek. The quick response is greatly appreciated. Yes, I performed the install on an Intel-based mac Mini. Since this is a known issue, I will scour the interweb for the HA install on VirtualBox for Macs.
Thanks!
Worked brilliantly apart from changing to bridged mode when it couldn’t see the DHCP server as the default bridged interface was wrong. This link shows how to find the correct one https://www.coredump.id.au/bridged-networking-in-utm/
after
dpkg -i homeassistant-supervised.deb
it says “errors were encountered while processing
I had the same issue. I figured out there was something wrong with systemd-journal-remote in the dependencies. Try:
apt –fix-broken install
This worked for me.
Same issue here. Did not found a fix so far.
Are you trying this on an Intel Mac? I just ran through the process on M1 processor with latest Debian/HA and without any problems.
If you are using Intel Mac with UTM then the HA supervised installation will break before it completes. This is because for some reason the ‘ping’ command doesn’t work properly on the guest (Debian) when the host (your Mac) is an Intel Mac. This is a known issue/quirk with UTM. As the HA supervised installation script uses the ping command to check the network connection, the installation breaks at this point. It gets stuck in a loop continually checking for your network connection, even if the network connection is good.
When I get time, I am going to fork the supervised installation script and patch the problem, but now I am travelling and am without an Intel Mac for testing.
First, thank you for putting this together and maintaining it.
I got the error also
https://imgur.com/a/QZwZkpS
anyone able to figure this out yet?
I’ve run into this also on my 2020 MacBook Pro M1. Anyone figure it out?
Great Guide! Thanks!
I used this to successfully get my HA instance up and running on my Mac.
I do have a noob question. Can I use the Mac Bluetooth adapter to connect to bluetooth devices using HA bluetooth integration? If so, how?
Yes it should be possible to use USB UTM’s USB pass-through. I recently tried it with a Sonoff Zigbee USB stick and it worked great! Try something like this:
1) Remove your USB BT dongle from the Mac, if it is already plugged in.
2) Enable USB sharing in UTM
3) Plug the USB BT dongle into the Mac.
4) UTM will prompt whether you want to connect it to the host or guest OS.
5) Choose guest OS to connect it to Debian.
At this point you should be able to configure it in Home Assistant as per the standard method. Note that mileage may vary with regards to which devices are supported by UTM USB sharing.
Bonjour je n’arrive pas a copier coller dans le terminal
avez vus une solution svp ?
Bonjour Sandra,
Ah, je pensais avoir déjà inclus cette information. Vous devez utiliser un terminal série.
Here’s how you can copy and paste to your Debian installation.
You can either open a Mac terminal and use SSH to connect to your UTM virtual machine:
ssh [your-utm-debian-ip-address]@[your-username]Once connected your Mac terminal will become your Debian terminal and you can copy and paste to there.
Alternatively you can set up a UTM serial terminal using the following simple steps:
1) Open UTM and right-click your virtual machine, then click Edit.
2) Under ‘Devices’ choose ‘+ new’
3) Choose ‘Serial’ and the mode should be ‘built in terminal’
4) Optionally, you can remove display window. Right-click ‘display’ under ‘devices’ and then click ‘remove.’
I think I’m so close in this and your directions have been great but during the install OS Agent section there is no .deb file for the AMD ? I tried installing the .tar.gz but obviously get the ‘not a Debian form archive error’
Any help would be great.
I’m trying to install on an Intel based MacBook Pro and noticed above to try VirtualBox.
At the stage I’m in on the install what steps do I need to do to try VB. I also read somewhere that WiFi doesn’t work on virtual box. My laptop doesn’t have Ethernet.
Hoping for a quick response to allow me to finalise the install so I can start playing 🙂
So, wait. I am about to embark on the process of installing on Intel Mac. But if the VM can’t access wifi that defeats pretty much the entire object, doesn’t it? Am I missing something?
Hi there,
Tried my best to follow the guide but am getting stuck near the end, installing HA.
Here’s what I see, but am unable to resolve:
https://imgur.com/a/dxHPvUv
Grateful for any advice, thanks!
I am stuck on the same step. Please help. I am using M1 machine.
I had the exact same issue and if you run “apt –fix-broken install” (note… that is two dashes (-) in front of fix). It should prompt you to install systemd-journal-remote.
Mine ran smoothly until it ran out of room in the VM. I do not know how to get into my backups folder to delete some. I had this same problem on my Pi4 system and was able to samba into it. I hadn’t set that up on this one yet
brilliant guide, thanks a mil. I really appreciate it.
No problem! Thanks for taking a moment to leave a comment 🙂
Hi! Thanks for this very detailed guide. Previously, I had an intel mac mini and used virtualbox to run home assistant. I want to restore my last backup of home assistant (.tar file). I got home assistant up and running using this guide! When using the restore function, I choose full restore and after this, when I refresh my browser, I cannot connect to home assistant any more. Do you have an idea why? Should I wait a long time for the full restore? I used duckdns when I used my old (intel) mac mini and also checked if my duckdns domain is online (it is not).
Very glad it helped Yannick! Yes it would make sense that your old DuckDNS config was restored and now it’s causing you problems accessing. Did you have the SSH & Terminal add-on? Can you access with SSH and edit your configuration.yaml file to temporarily remove the DuckDNS config? In this case I am not sure if a full restore will make any difference.
Thanks for the tip! I changed the configuration file using SSH and removed the duckdns part. After restarting home assistant (and finding out my utm machine had a new ip adres after this startup), I was able to acces home assistant again using the local ip adress. I will redo the duckdns configuration soon on this new device. Thanks again! I am curious if utm is faster than virtualbox (for me probably, since the host machine is a lot faster)
Great news! Glad to hear that worked for you. Regarding Virtualbox vs UTM, I just published a huge article about it if you are interested https://siytek.com/utm-vs-virtualbox I haven’t actually benchmarked them though, I should probably do that! One thing to remember is UTM is really just a pretty GUI for QEMU, which is what actually runs the VM (along with the KVM accelerator). So if you are looking to compare performance, you should probably look to compare QEMU+KVM to Virtualbox.
Hi,
First of all, thanks for the nice tutorial!
I’ve been a bit unlucky that on my first try I couldn’t install HA as it doesn’t yet have support for Debian12.
After going trough the whole process again I was able to reach the onboarding screen. However, after changing the network mode to bridged I can’t access it.
I’ve confirmed via reinstalling HA in the terminal that the IP changed from 64.X:8123 to 1.25:8123. However this IP is not reachable via the browser (404).
I tried reinstalling HA, no luck.
Any idea’s on how to fix it? I’m really tired of messing up my venv everytime there’s a Python upgrade. 🙂
Hi
I am stuck at the part of installing docker, I get the error – cannot open html: no such file and syntax error:redirection unexpected
Gareth
Hi Gareth, if you are 100% sure you don’t have a typing error in the command, send a screenshot of the problem to [email protected]
Part of the reason things disappear in /etc/network/interfaces is because we installed Network Manager. That thing takes over. It has a CLI interface called nmcli. I had to reprogram my NIC using that instead of editing the interfaces file.
In my instance, to static the NIC I used the command:
nmcli connection modify Supervisor\ enp0s1 ipv4.method manual ipv4.address 192.168.0.15/24 ipv4.gateway 192.168.0.1 ipv4.dns 8.8.8.8