
What if I told you that you can control not only all of your smart lights but all of your smart devices with your existing dumb light switch without needing to rewire anything? Too good to be true?
Home Assistant is the fantastic platform that makes it possible. New to Home Assistant? Start here.
In this tutorial we will learn how to write a simple YAML configuration in Home Assistant that will allow you to control any of your smart devices using your existing dumb light switch.
In my living room I have several LED strips, a DIY smart LED lamp, smart TV and a smart bulb in the main light fixture. I want all of these devices to switch on when I turn the main light on using the existing dumb switch.
Of course it is possible to replace the switch for a smart switch, however there are many situations where this is not preferible. Many homes do not have the necessary neutral wire in the switch box required by mostly all smart switches.
Table of Contents
Prerequisite
For this tutorial we will assume that you have Home Assistant up and running already. A very basic knowledge of configuration.yaml would also be advantageous, but we will cover as much detail as possible.
You will also need a smart bulb in the light fixture that is connected to the switch you want to use and at least one other smart device you wish to control. The devices should be setup and recognised by Home Assistant as entities.
If you can see the devices you wish to use in the Home Assistant overview or in a lovelace card, you are good to go!
How it works
For this example I will be using the dumb light switch that controls my main living room light. My goal is to switch all of the smart devices on and off in the living room with this switch.
In order to do this we will need to put a smart bulb in the light fixture that is connected to the dumb light switch. Most importantly it needs to have the ability to report it’s status to Home Assistant.
If you are unsure whether your existing bulb is compatible, you can easily check in Home Assistant. First click on developer tools in the sidebar, then click on the states tab at the top.
Scroll down a little and enter “light.” into the entity filter in order to show all of your light entities recognised by Home Assistant. You will need to locate the light in the list which corresponds with the smart bulb that you have connected to the dumb switch you wish to use.
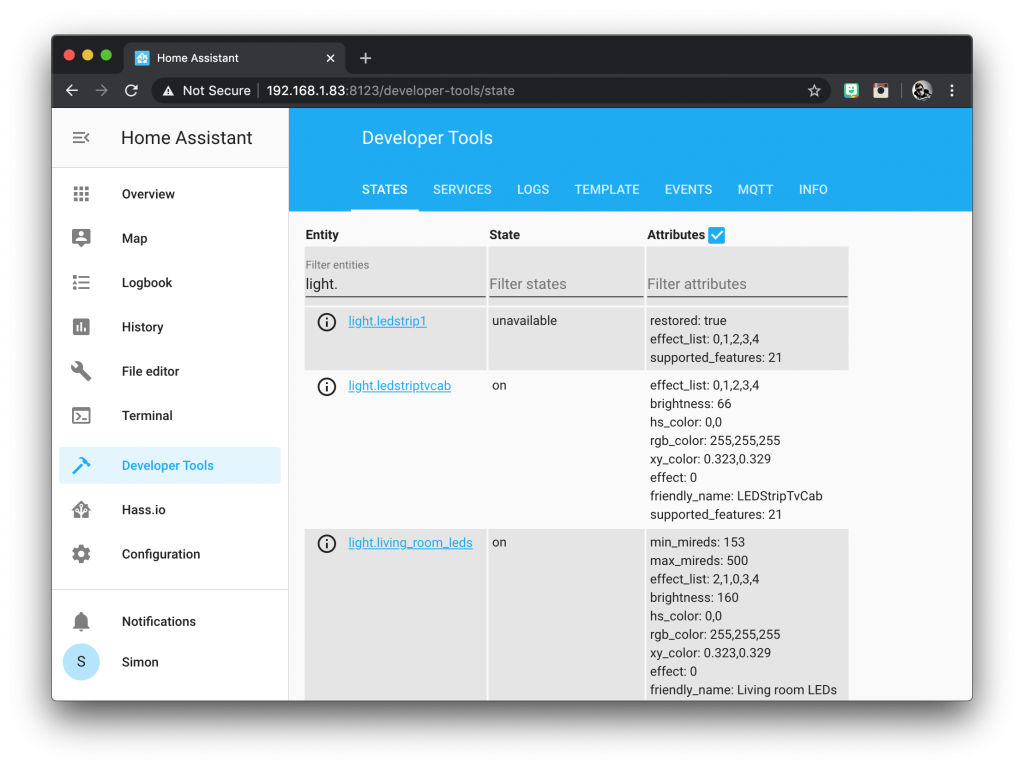
In order to test whether or not your bulb reports back its status, turn your dumb switch on and you should see the state change to on. It may take up to 10 or 15 seconds as the device will be booting up when you turn on the power using the dumb switch, unlike when you switch it on using a WiFi signal.
Afterwards turn your dumb switch off and wait to see if the status changes to unavailable. This means that Home Assistant can no longer detect the smart bulb, as it is powered off.
Again you must be a little patient, it can take a moment for Home Assistant to register the change in state.
It is this change of state that we will leverage in order to control our other smart devices. There will be a delay between switching on the dumb switch and the other devices responding, however the delay does not affect the main light so you won’t be stumbling around in the dark for 10 seconds while you wait a moment for everything else to turn on!
You only need the main bulb connected to the dumb switch to have the ability to report it’s status. You can control any other device so long as it can be recognised by Home Assistant.
Any bulb using MQTT to communicate with Home Assistant will be perfect. If you wish to purchase a bulb for this purpose, I would recommend flashing a Tuya compatible bulb with Tasmota. Check out the Blakadder template repository for some compatible suggestions. Personally I love the Lohas RGBCCT bulb and I use them throughout my house.
Create an automation
In order to link our dumb switch to our smart devices we are going to create an automation that fires when the state of the main bulb in the light fixture changes.
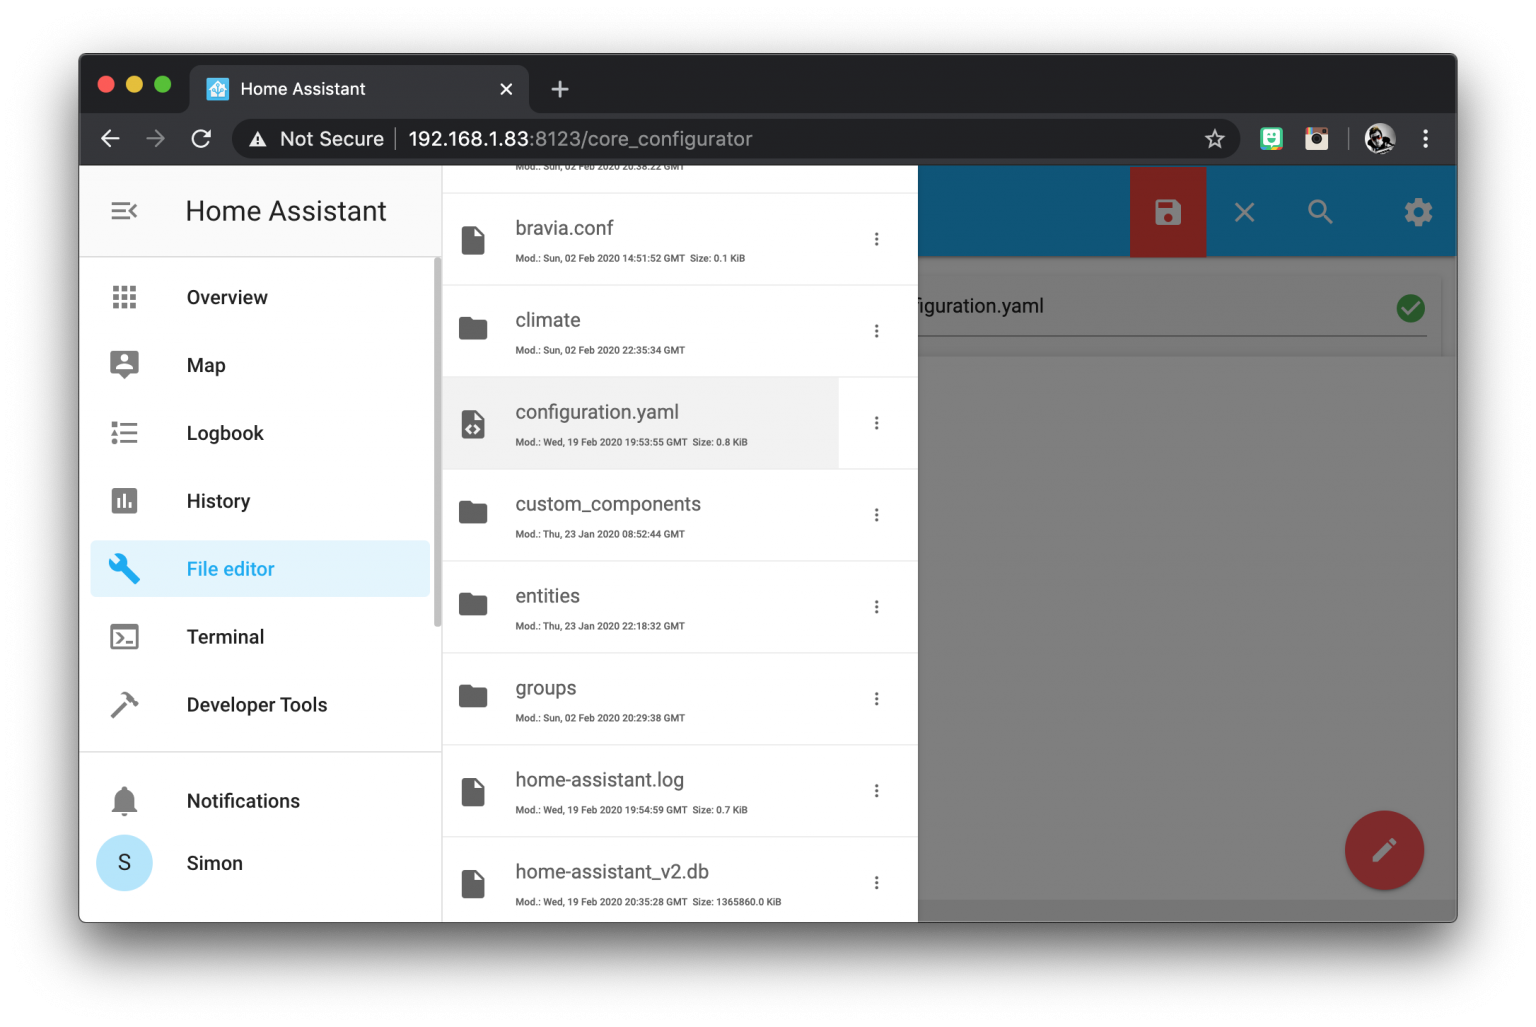
First we will need to open up our configuration.yaml file. You can edit it with a text editor if you prefer, but we will use the Home Assistant file editor. Click on file editor and click your configuration.yaml file.
If you do not see the file editor option in the sidebar, you need to install the file editor add-on. Click the Hass.io option in the sidebar and then go to the add-on store tab. From there you can install the file editor.
Adding automation for ‘on’
Now let’s begin our automation by adding the following code to our configuration.yaml file.
automation:
If you already have automation: in your file, you should add the new code beneath the existing code. You should only have one instance of automation: in your configuration.yaml file.
Also don’t forget that YAML files are very sensitive to the formatting. You must make sure the tabs/spacing are correct or it will produce a syntax error.
If you are having problems getting things to work, the most likely cause is the formatting of the YAML file so double-check that it is all correct.
Next we need to add a trigger and action. The trigger is the event that will cause the action to occur.
Adding a trigger
We will specify the trigger using the platform state. This means the trigger will occur when something changes state, in this case when the bulb in the main light fixture is switched on and off using the dumb switch.
We can add the following code to create an automation instance called “link main light to lamp on” and we will also specify the trigger as a state change.
automation:
   - alias 'link main light to lamp on'
      trigger:
         platform: state
Add the trigger entity name
Next we need to add the entity_id for the main bulb that we wish to use to control the other devices.
For this example the bulb connected to my dumb switch is called light.lohasone but you should choose your own entity here.
automation:
- alias 'link main light to lamp on'
trigger:
platform: state
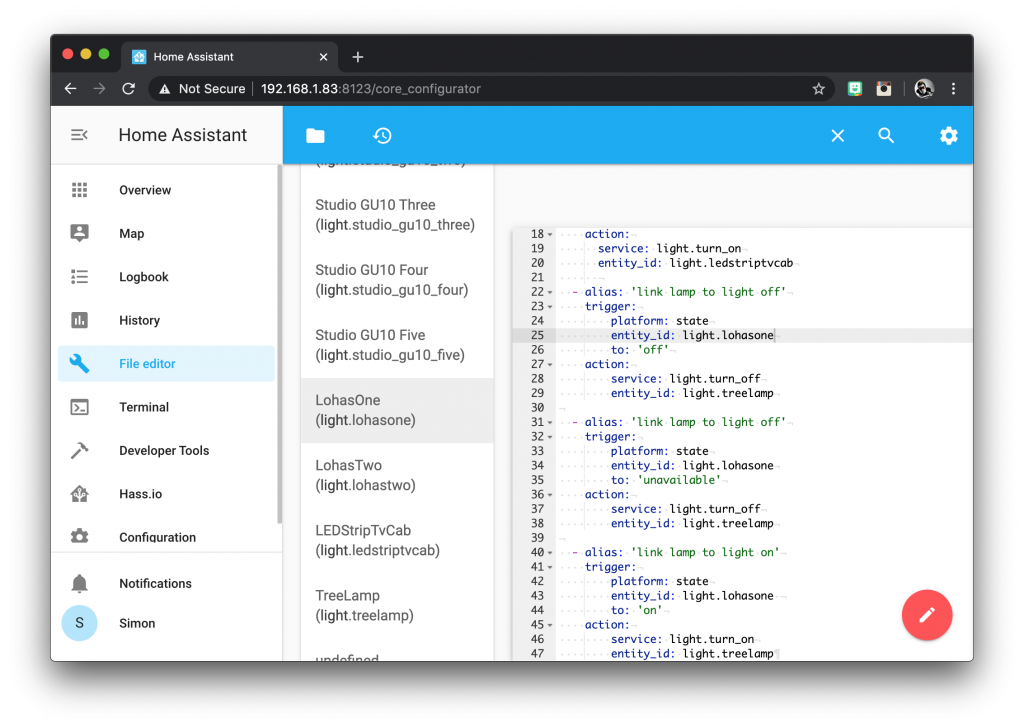
entity_id: light.lohasoneIf you are unsure on the name of your light, simply enter “light” into the search entity box in the file editor. It will present you with a list of your light entities. You can then click the entity in the search result drop down list and it will copy it to your YAML file.
Add the trigger state change
Finally we need to specify the state change that will trigger the automation. We want the action to occur when the state changes to on, therefore we can go ahead and add the following to our code.
automation:
   - alias 'link main light to lamp on'
     trigger:
        platform: state
        entity_id: light.lohasone
        to: 'on'
Adding an action
Now that we have added the trigger, we must add the action that will occur in the event of this trigger firing. For this example I will keep things simple and we will assign the action to one lamp using the service light.turn_on.
However you could also use it to turn on a scene containing all of your entities with the service scene.turn_on. You can learn about creating a scene in this tutorial.
The entity name for the lamp I wish to control is light.treelamp but you should choose your own entity name here. We can go ahead and add the service and entity to the code.
automation:
   - alias 'link main light to lamp on'
     trigger:
        platform: state
        entity_id: light.lohasone
        to: 'on'
      action:
        service: light.turn_on
        entity_id: light.treelamp
Adding automation for ‘off’
Now that we have created our automation instance for ‘on’ we must also create one for ‘off.’
We can just copy the first alias but change the name to ‘link main light to lamp off.’
- alias 'link main light to lamp off'
We need to change the trigger to act when the main bulb becomes unavailable.
This is because the dumb switch will power down the main bulb when turned off. Therefore light.lohasone will be powered down and unavailable.
to: 'unavailable'
We also need to change the service so that the lamp switches off.
service: light.turn_off
So our completed automation should now look something like this.
automation:
   - alias 'link main light to lamp on'
     trigger:
        platform: state
        entity_id: light.lohasone
        to: 'on'
      action:
        service: light.turn_on
        entity_id: light.treelamp
   - alias 'link main light to lamp off'
     trigger:
        platform: state
        entity_id: light.lohasone
        to: 'unavailable'
      action:
        service: light.turn_off
        entity_id: light.treelamp
If you would also like your light entity to turn off when you switch off your main bulb using a signal from elsewhere in Home Assistant, you can add a third instance of alias for the state change ‘off.’
to: 'off'
This addition will cause the lamp to mirror the state of the main bulb entirely. Now our completed code should looks something like this.
automation:
   - alias 'link main light to lamp on'
     trigger:
        platform: state
        entity_id: light.lohasone
        to: 'on'
      action:
        service: light.turn_on
        entity_id: light.treelamp
   - alias 'link main light to lamp off'
     trigger:
        platform: state
        entity_id: light.lohasone
        to: 'unavailable'
      action:
        service: light.turn_off
        entity_id: light.treelamp
   - alias 'link main light to lamp also off'
     trigger:
        platform: state
        entity_id: light.lohasone
        to: 'off'
      action:
        service: light.turn_off
        entity_id: light.treelamp
To link more devices to your main bulb and dumb switch, simply use this template and change the details accordingly. For each automation instance, simply add another alias. Don’t forget to maintain the tab/space formatting!
If you wish to control more than one or two devices, I would definitely recommend putting them in a scene and using the scene.turn_on state. See this tutorial for further details on including light entities in a scene.
Conclusion
As we have seen in this tutorial it is possible to link any device recognised by Home Assistant to a standard dumb light switch without the need for any rewiring!
There is a small delay due to the time it takes for Home Assistant to recognize the state change of a device that is powered up or down, however the solution is very functional and the main bulb is not affected by the delay.
Congratulations! You should now be able to link any device you choose to a dumb light switch! If you feel really adventurous, why not try adding a media_player entity so that your dumb light switch also turns your smart TV on and off!
Thanks for visiting and please let me know what you thought in the comments below. Also don’t forget to check out some my other tutorials for more amazing Home Assistant ideas!
Thanks so much for visiting my site! If this article helped you achieve your goal and you want to say thanks, you can now support my work by buying me a coffee. I promise I won't spend it on beer instead... 😏


