
It is possible to simulate a sunrise in Home Assistant using a simple script and smart bulb.
We can trigger this script at any time so that a beautiful sunrise effect can be enjoyed at any time, even if it is still dark outside.
In this tutorial we will create a simple script to simulate a sunrise using a light entity of our choice.
We will also add a simple card to the lovelace user interface that allows us to enter a wake-up time and enable the script.
This tutorial is a great starting point for learning how to configure Home Assistant.
However if you are looking for a quick solution just to add a sunrise effect to a light in your home, you might prefer to check out this blueprint instead.
Prerequisite
For this tutorial we will assume that you have Home Assistant up and running already.
A very basic knowledge of configuration.yaml would also be advantageous, but we will cover as much detail as possible.
If you are completely new to Home Assistant you may also want to check out my beginners guide to YAML before attempting this tutorial.
Assuming you already have Home Assistant up and running the only other thing you will need is an color smart bulb (RGB).
I would recommend using a bulb that is compatible with Tasmota with either Tasmota or ESPHome firmware, so as not to have to use a cloud network, as there are several disadvantages.
However any bulb (or device such as a LED strip) which Home Assistant recognises as a light entity will work just fine.
Create the sunrise script
Firstly we will need to write a script that will progressively increase the brightness of our lights to simulate the sunrise.
This script will be triggered from card that we create and insert into our user interface.
We will give the card an option to switch the wake-up feature on and off, the ability to choose a time to activate the sunrise and the ability to disable the sunrise over the weekend, or on any days of your choice.
You can make the duration of your sunrise any length you like, but for the purpose of this tutorial we will make it 30 minutes.
Adding script
Firstly you need to make sure you have added script: to your configuration.yaml file.
If you are unsure how to do this, go ahead and check out this tutorial.
script:
Note that this can only be written in the configuration.yaml file once.
If you are new to Home Assistant and YAML, I would recommend starting with an empty configuration.yaml file.
In which case you should now have the following in the file and you can skip to adding the sequence:
default_config:
script:
Beginners who are not entirely new to Home Assistant may already have a few things in their configuration.yaml.
If you already have script written in the configuration.yaml, you will need to add the code beneath the existing code.
You should only have one instance of script in your configuration.yaml file.
Alternatively you may have a reference to an external script.yaml file.
In which case you will need to add the code to this file instead. See this tutorial for more information on splitting the configuration.yaml file.
Also don’t forget that YAML files are very sensitive to the formatting. You must make sure the tabs/spacing are correct or it will produce a syntax error.
If you are having problems getting things to work, the most likely cause is the formatting of the YAML file so double-check that it is all correct.
Add the sequence
Next we need to create a new script entry, we will call it sunrise. We will specify an alias, description and define sequence. Your code should looks something like this.
script:
   sunrise:
       alias: Simulate sunrise
       description: 'fade lights to simulate sunrise'
       sequence:
We want to populate the sequence with a series of light.turn_on services, each with an incremental brightness. We will add a delay between each step.
Therefore we need to decide how many steps to include. The more steps, the smoother the transition will be but the more code we will have to include.
For the purpose of this tutorial we will include 10 steps, each one with a 10 percent increase in brightness.
If you want to improve the smoothness of the transition, you can add more steps if you like.
For example you could include 20 steps and increment the brightness by 5 percent for each step.
We will cover the basic calculation that determines the values required for any given number of steps.
Specify colour temperature
We will also specify a change in the colour temperature so that the light starts out as a warm white and fades to daylight white.
If your bulb does not support colour temperature you can skip over this if you like.
In order to find out if our bulb supports colour temperature and also what the temperature range is, click developer tools in sidebar and then the states tab.
Scroll down a little and enter the name of your light in the filter entities box.
Alternatively you can enter “light.” to display all the light entities so that you can locate it manually.
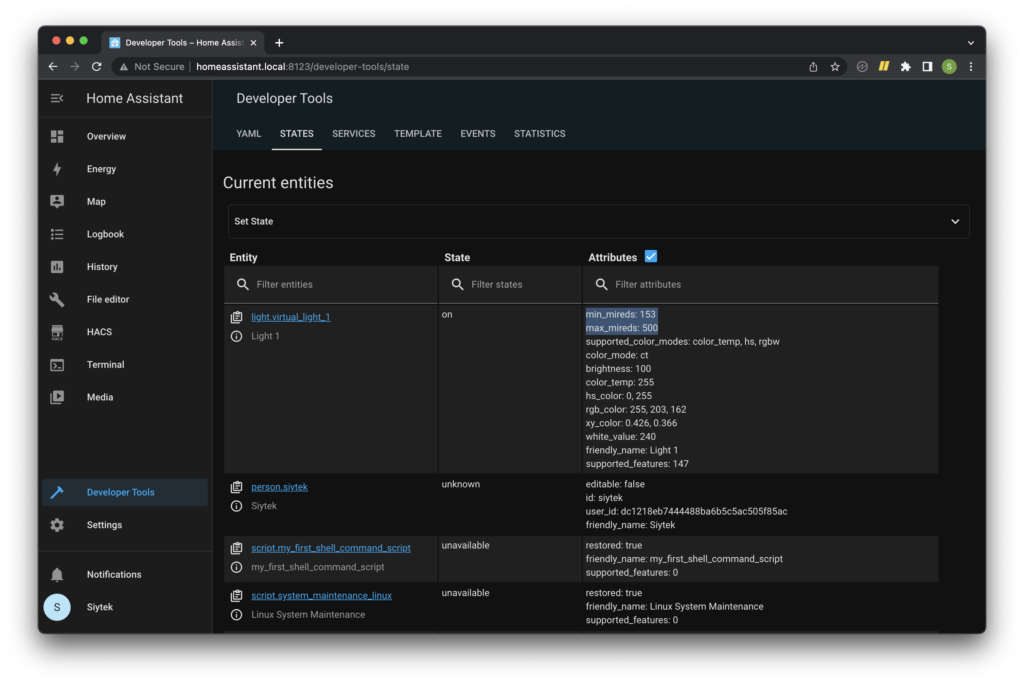
In the right-hand column named attributes, you will see a list of the attributes associated with your bulb. The min_minreds and max_minreds attributes define the colour range of our bulb in mireds, where 153 is cool white and 500 is warm white.
If we subtract the minimum value from the maximum value it will give us the colour temperature range, in my case 347.
Now we need to divide the colour temperature range by the number of steps to get the value that we need to increment the colour temperature by in each step.
As I am including 10 steps, therefore I will need to increment the colour temperature by 34.7, although we will stick to integers and round this up to 35.
Now we know for each step we will increase the brightness by 10 percent and the colour temperature by 35 mireds.
We will begin with the brightness set to 10 and the colour temperature set to 500.
First we should specify a new alias and give it a name. We also need to specify the light.turn_on service, as we wish to switch on our light entity.
script:
   sunrise:
       alias: Simulate sunrise
       description: 'fade lights to simulate sunrise'
       sequence:
          - alias: Sun Bulb On
            service: light.turn_on
Next we need to add data: and specify the entity_id, which is the entity name of the light we wish to use for our sunrise. We will also specify our starting values for brightness_pct and colour_temp.
script:
   sunrise:
       alias: Simulate sunrise
       description: 'fade lights to simulate sunrise'
       sequence:
          - alias: Sun Bulb On
            service: light.turn_on
            data:
              entity_id: light.lohasone
              brightness_pct: 10
              color_temp: 500
Now we need to add a delay before the next step change in brightness.
The delay value will depend on the length of time you choose for your sunrise and the number of steps.
In this example we will use 30 minutes. We need to divide this by our numbers of steps.
This gives us 3 minutes per step, therefore we will set our delay to 3 minutes.
script:
   sunrise:
       alias: Simulate sunrise
       description: 'fade lights to simulate sunrise'
       sequence:
          - alias: Sun Bulb On
            service: light.turn_on
            data:
              entity_id: light.lohasone
              brightness_pct: 10
              color_temp: 500
           - delay:
               minutes: 3
We can use minutes here as the calculation gives us a round number, however if you end up with a decimal point you may want to multiply the number of minutes by 60 to get the delay in seconds, then use seconds: to specify the delay length.
           - delay:
               seconds: 180
Copy the step
Now we need to make another step in the sequence.
We can do this by copying the step that we just created and changing the value for brightness_pct and color_temp.
As we are increasing the brightness by 10 percent each step, our next brightness value will be 20.
A value of 500 mireds will give the warmest yellow that our bulb can produce.
As we are stepping towards cool daylight white, we need to reduce this number by our calculated value of 35. Therefore the next value for color_temp will be 465.
script:
   sunrise:
       alias: Simulate sunrise
       description: 'fade lights to simulate sunrise'
       sequence:
          - alias: Sun Bulb On
            service: light.turn_on
            data:
              entity_id: light.lohasone
              brightness_pct: 10
              color_temp: 500
           - delay:
               minutes: 3
          - alias: Sun Bulb On
            service: light.turn_on
            data:
              entity_id: light.lohasone
              brightness_pct: 20
              color_temp: 465
           - delay:
               minutes: 3
We need to repeat this another 8 times until our brightness value reaches 100 percent.
Our completed code will then have 10 steps, each with the associated incrementation of brightness_pct and color_temp.
Our final color_temp value will be 185, this will be close enough. I have omitted most of the steps for clarity, as the finished code is quite long.
Note that you do not need a delay following the final alias.
script:
   sunrise:
       alias: Simulate sunrise
       description: 'fade lights to simulate sunrise'
       sequence:
          - alias: Sun Bulb On
            service: light.turn_on
            data:
              entity_id: light.lohasone
              brightness_pct: 10
              color_temp: 500
           - delay:
               minutes: 3
          - alias: Sun Bulb On
            service: light.turn_on
            data:
              entity_id: light.lohasone
              brightness_pct: 20
              color_temp: 465
           - delay:
               minutes: 3
             .
             .
             .
             .

          - alias: Sun Bulb On
            service: light.turn_on
            data:
              entity_id: light.lohasone
              brightness_pct: 100
              color_temp: 185
Create the inputs
In order to trigger our sunrise script we need to add several entries to our configuration.yaml file.
We need to add input_datetime, input_boolean and an automation.
Create the booleans
The boolean entity allows us to create a “yes or no” state of our choice that will be remembered by Home Assistant.
In programming a boolean is fundamentally a “true or false” state.
We will create a boolean for whether or not our sunrise should occur, this will be our general on/off switch for the function.
We will also create one for whether or not the sunrise should occur over the weekend.
First we need to add input_boolean to our configuration.yaml file.
input_boolean:
Next we will define an input boolean for enabling our sunrise.
We will name it sunrise_enabled and give it the initial condition “on,” which is the default state of the switch when Home Assistant starts.
Home Assistant uses the Material Design Icons, which makes it very easy to add cool looking icons!
We will assign the icon mdi:weather-sunset but you can use any icon you like.
input_boolean:
   sunrise_enabled:
       name: "Morning Sunrise"
       initial: on
       icon: mdi:weather-sunset
Now we will add a second boolean for whether or not the sunrise should occur over the weekend.
This gives us the option to enable the sunrise if we need to wake early on the weekend, but you can specify other days if you prefer.
We will define the days when we write the automation.
input_boolean:
   sunrise_enabled:
       name: "Morning Sunrise"
       initial: on
       icon: mdi:weather-sunset
   sunrise_weekend:
       name: "Weekend Sunrise"
       initial: off
       icon: mdi:calendar-blank
Create datatime
Now we need to add an entry to configuration.yaml for input_datetime as we wish to trigger our sunrise using time.
input_datetime:
Now we can add the time element sunrise_time. We will only specify time as it is all that is required and we will give it the name “start sunrise at.”
input_datetime:
   sunrise_time:
       name: "Start sunrise at"
       has_time: true
       has_date: false
Create the automation
Now that we have finished our sunrise script and added the necessary input elements, we can tie it all together with an automation. We need to add this to our automations section of configuration.yaml.
automation:
We will be creating an automation with a trigger, condition and action. The trigger will be the time that we set for our sunrise to start.
The conditions will be whether or not we have the sunrise enabled and whether or not it is a weekend day.
The action will be to start our sunrise lighting script.
Adding the trigger
In order to leverage the time within Home Assistant we will use the platform template.
This is a little more advanced so don’t worry if you don’t understand it, you can simply copy and paste it as is.
However if you have used different names in your input_datetime section, be sure to amend sunrise_time within the value_template attribute.
If you want to understand more about templates in Home Assistant, check out the official page.
automation:
   - alias: "Cool artificial sunrise"
     trigger:
       platform: template
       value_template: "{{ states('sensor.time') ==(states.input_datetime.sunrise_time.attributes.timestamp | int | timestamp_custom('%H:%M', False)) }}"
Adding the conditions
Next we will add our first condition. This will be our boolean that defines whether or not our sunrise should be turned on.
automation:
   - alias: "Cool artificial sunrise"
     trigger:
       platform: template
       value_template: "{{ states('sensor.time') ==(states.input_datetime.sunrise_time.attributes.timestamp | int | timestamp_custom('%H:%M', False)) }}"

     condition:
        - condition: state
          entity_id: input_boolean.sunrise_enabled
          state: 'on'
We also need to add a condition for whether or not the sunrise should trigger based upon the day.
As I work Monday to Friday I want to add a switch that will allow me to disable the sunrise on Saturday and Sunday. Over the weekend I usually get to stay in bed until the real sunrise!
We need to add an or condition that will tell our automation to run if the sunrise_weekend boolean is true or if it is a weekday.
You can of course specify day you like, for example if you work weekends and have mon and tues off, you can amend the days accordingly.
First lets add the or condition. Afterwards we can create a subset of conditions that will fall into the or catagory.
automation:
   - alias: "Cool artificial sunrise"
     trigger:
       platform: template
       value_template: "{{ states('sensor.time') ==(states.input_datetime.sunrise_time.attributes.timestamp | int | timestamp_custom('%H:%M', False)) }}"

     condition:
        - condition: state
          entity_id: input_boolean.sunrise_enabled
          state: 'on'
        - condition: or
          conditions:
Next let’s add our condition for sunrise_weekend boolean, this is the switch that will allow us to turn on and off weekend sunrise.
automation:
   - alias: "Cool artificial sunrise"
     trigger:
       platform: template
       value_template: "{{ states('sensor.time') ==(states.input_datetime.sunrise_time.attributes.timestamp | int | timestamp_custom('%H:%M', False)) }}"

     condition:
        - condition: state
          entity_id: input_boolean.sunrise_enabled
          state: 'on'
        - condition: or
          conditions:
             - condition: state
               entity_id: input_boolean.sunrise_weekend
               state: 'on'
Now we can add our second or condition that will trigger the script on our selected days.
automation:
   - alias: "Cool artificial sunrise"
     trigger:
       platform: template
       value_template: "{{ states('sensor.time') ==(states.input_datetime.sunrise_time.attributes.timestamp | int | timestamp_custom('%H:%M', False)) }}"

     condition:
        - condition: state
          entity_id: input_boolean.sunrise_enabled
          state: 'on'
        - condition: or
          conditions:
             - condition: state
               entity_id: input_boolean.sunrise_weekend
               state: 'on'
             - condition: time
               weekday:
                  - mon
                  - tue
                  - wed
                  - thu
                  - fri
Adding the action
Finally we need to specify the action that will take place when our automation is triggered.
We will use the service script.turn_on in order to activate our sunrise light script that we created earlier.
We also need to specify the entity_id which in this case will be the name of our script.
automation:
   - alias: "Cool artificial sunrise"
     trigger:
       platform: template
       value_template: "{{ states('sensor.time') ==(states.input_datetime.sunrise_time.attributes.timestamp | int | timestamp_custom('%H:%M', False)) }}"

     condition:
        - condition: state
          entity_id: input_boolean.sunrise_enabled
          state: 'on'
        - condition: or
          conditions:
             - condition: state
               entity_id: input_boolean.sunrise_weekend
               state: 'on'
             - condition: time
               weekday:
                  - mon
                  - tue
                  - wed
                  - thu
                  - fri

     action:
        - service: script.turn_on
          entity_id: script.sunrise
Create the lovelace card
Now that all of our YAML is complete, we need to add a card to our lovelace interface that will allow us to control the sunrise.
You can design the card however you prefer, this is one of the awesome things about Home Assistant!
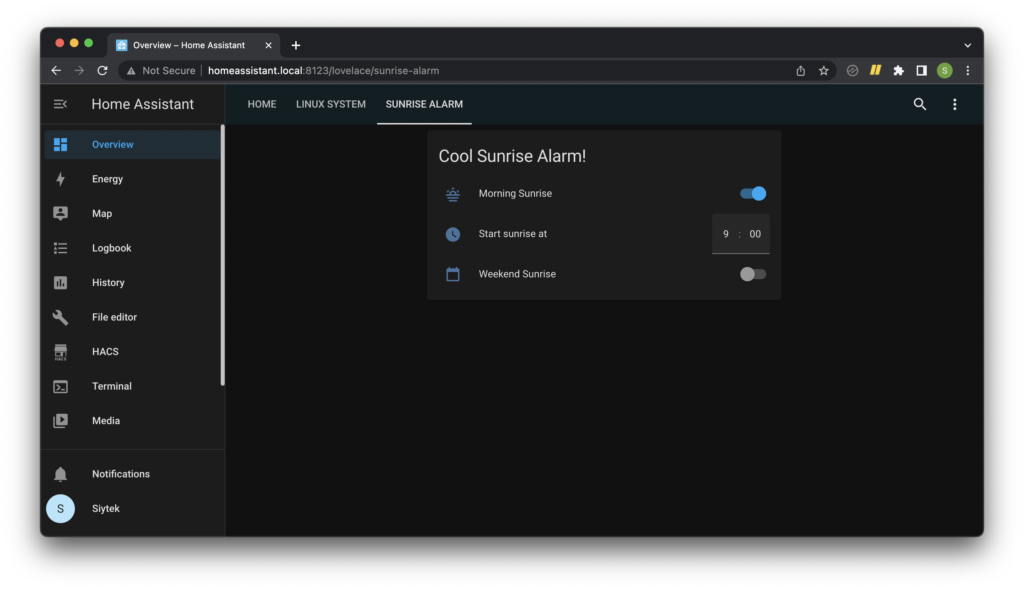
However I will walk you through the process of designing the following simple card.
Create a new card
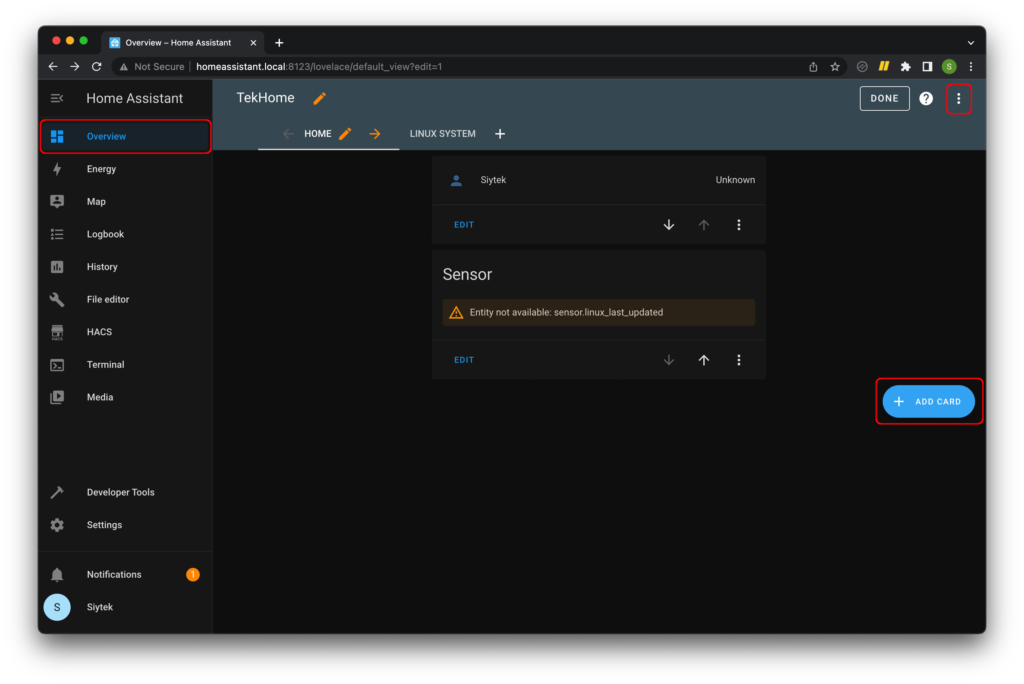
In order to do this you will need to configure your lovelace UI manually. First, click on overview on the left-hand sidebar menu.
Then click the the three dots in the top right-hand corner of the screen and click edit dashboard. Then click the Add card button that should now be visible.
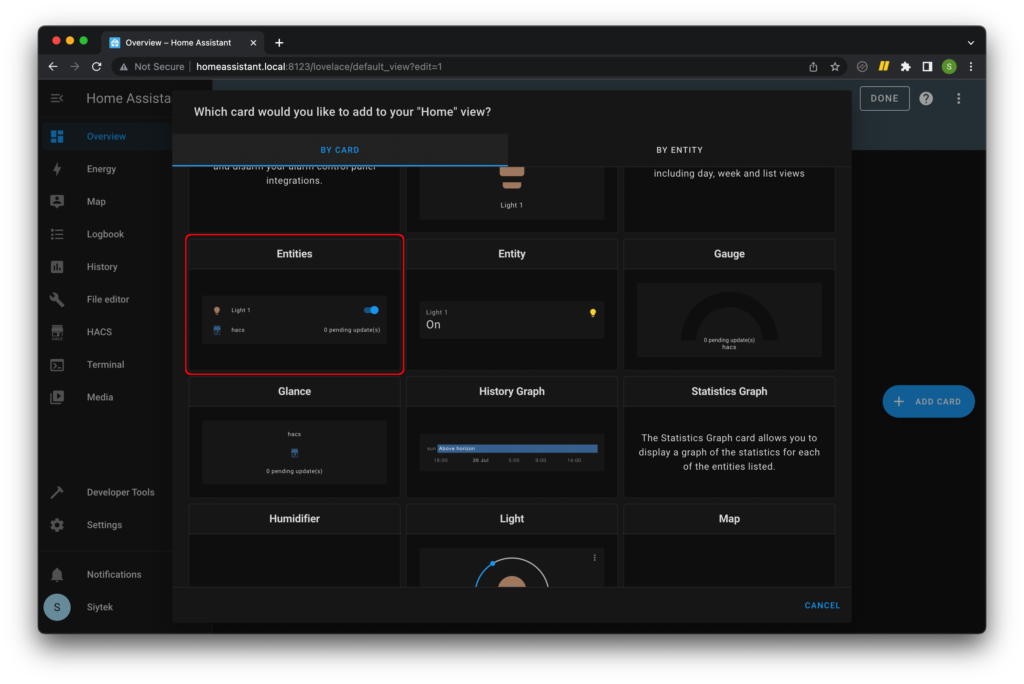
You will be presented with a list of the types of card that can be added to the user interface. Scroll down and click entities in order to add an entities card.
Add the card attributes
In the configuration page go ahead and give your card 4a title, I called mine Cool Sunrise Alarm!
We can also disable show header toggle as we do not need the card’s global toggle switch.
We also need to add our three inputs to the entities list. Assuming you used the same naming as in the tutorial, you can simply type “sunrise” and a dropdown list will appear with all of the entities that we have created.
Click save and we are all done! Now go ahead and give your new artificial sunrise a try!

Conclusion
I have never been a morning person and getting up early for work really sucks!
The addition of a sunrise script combined with automating my kettle to boil has made things a little less painful when the alarm sounds at 6am.
I am pleased with the functionality, although the fade is not perfect the concept of gradually increasing the brightness in the bedroom really does help me wake up!
I hope you have successfully managed to implement your own version and now have a slightly easier morning!
Why not check out some of my other awesome Home Assistant tutorials!
Article Updates
June 2022 : Screenshots updated to latest frontend, version 20220601.0. Fixed table of contents. Adjustments to article information to match newer version of Home Assistant.
Article first published February 21st 2020.
Thanks so much for visiting my site! If this article helped you achieve your goal and you want to say thanks, you can now support my work by buying me a coffee. I promise I won't spend it on beer instead... 😏


I tried this today with a Syska 7W Smart LED tasmotized. Your code works perfectly. Thank you!
Very glad to hear it Nidhin! Thanks for visiting 🙂
One thing I would like to note, we need to include the below code in config file for the sensor.time in the value template in automation to work, I did not foresee this and lost some time figuring it out 🙂
sensor:
– platform: time_date
display_options:
– ‘time’
Thanks for the tip Nidhin, but I couldn’t quite see what you meant. Please could you post all of your code here? Maybe HA changed something since I wrote the tutorial.
Error loading /config/configuration.yaml: while parsing a block collection
in “/config/configuration.yaml”, line 220, column 11
expected , but found ”
in “/config/configuration.yaml”, line 226, column 12
Line 220 is
” – alias: Sun Bulb On”
I have a feeling the spacing didnt copy correct to notepad++
script:
sunrise:
alias: Simulate sunrise
description: ‘fade lights to simulate sunrise’
sequence:
– alias: Sun Bulb On
service: light.turn_on
data:
entity_id: light.master_bedroom_lights
brightness_pct: 10
color_temp: 500
– delay:
minutes: 3
BLAH BLAH YADA YADA….
– alias: Sun Bulb On
service: light.turn_on
data:
entity_id: light.master_bedroom_lights
brightness_pct: 90
color_temp: 180
– delay:
minutes: 3
– alias: Sun Bulb On
service: light.turn_on
data:
entity_id: light.master_bedroom_lights
brightness_pct: 100
color_temp: 140
not sure where im going wrong.
I’m getting the same exact error. I’m also not sure where I’m going wrong:(