
Are you finding that your configuration.yaml file is getting longer and more confusing?
Are you a person who likes to organise things into neat little categories and you feel the urge to bring order to your YAML configuration?
Look no further!
In this tutorial we will learn how to split the configuration.yaml file into multiple files, so that you can better organize your ever-growing YAML configuration.
Home Assistant already splits the configuration out of the box to some degree. Since the addition of the GUI automation editor, automations are stored in the automations.yaml file by default.
However although YAML is slowly becoming less relevant, it is usually still necessary to use it in your Home Assistant configuration. Therefore understanding how YAML files can be split and organized is still a crucial skill to learn.
This article aims to outline the main principles of splitting YAML files in Home Assistant. By the end of this post you will have a good understanding of how you can structure and organize your YAML files.
- Prerequisite
- How do I access the YAML file in Home Assistant?
- The Home Assistant File Structure
- How to Include Other YAML Files in Home Assistant
- Merging Directories Using YAML
- Merging Dictionaries using YAML
- What is the difference between Include_dir_merge_list and Include_dir_merge_named?
- The Home Assistant YAML Secrets file
- Conclusion
Prerequisite
You will need to have the following installed and running before completing this tutorial:
Ideally you should also have a basic understanding of YAML. If you are new to YAML in Home Assistant, check out the YAML for Home Assistant beginners guide first.
How do I access the YAML file in Home Assistant?
The configuration.yaml file is the main file that contains our Home Assistant configuration, located in the root directory.
The easiest way to access the configuration.yaml file is to use the File Editor. Check out this tutorial in order to learn how to install it if you don’t have it installed already.
The file editor will show you all of the files stored within the Home Assistant /config directory. Scroll down the list and locate the configuration.yaml file.
/config/configuration.yaml
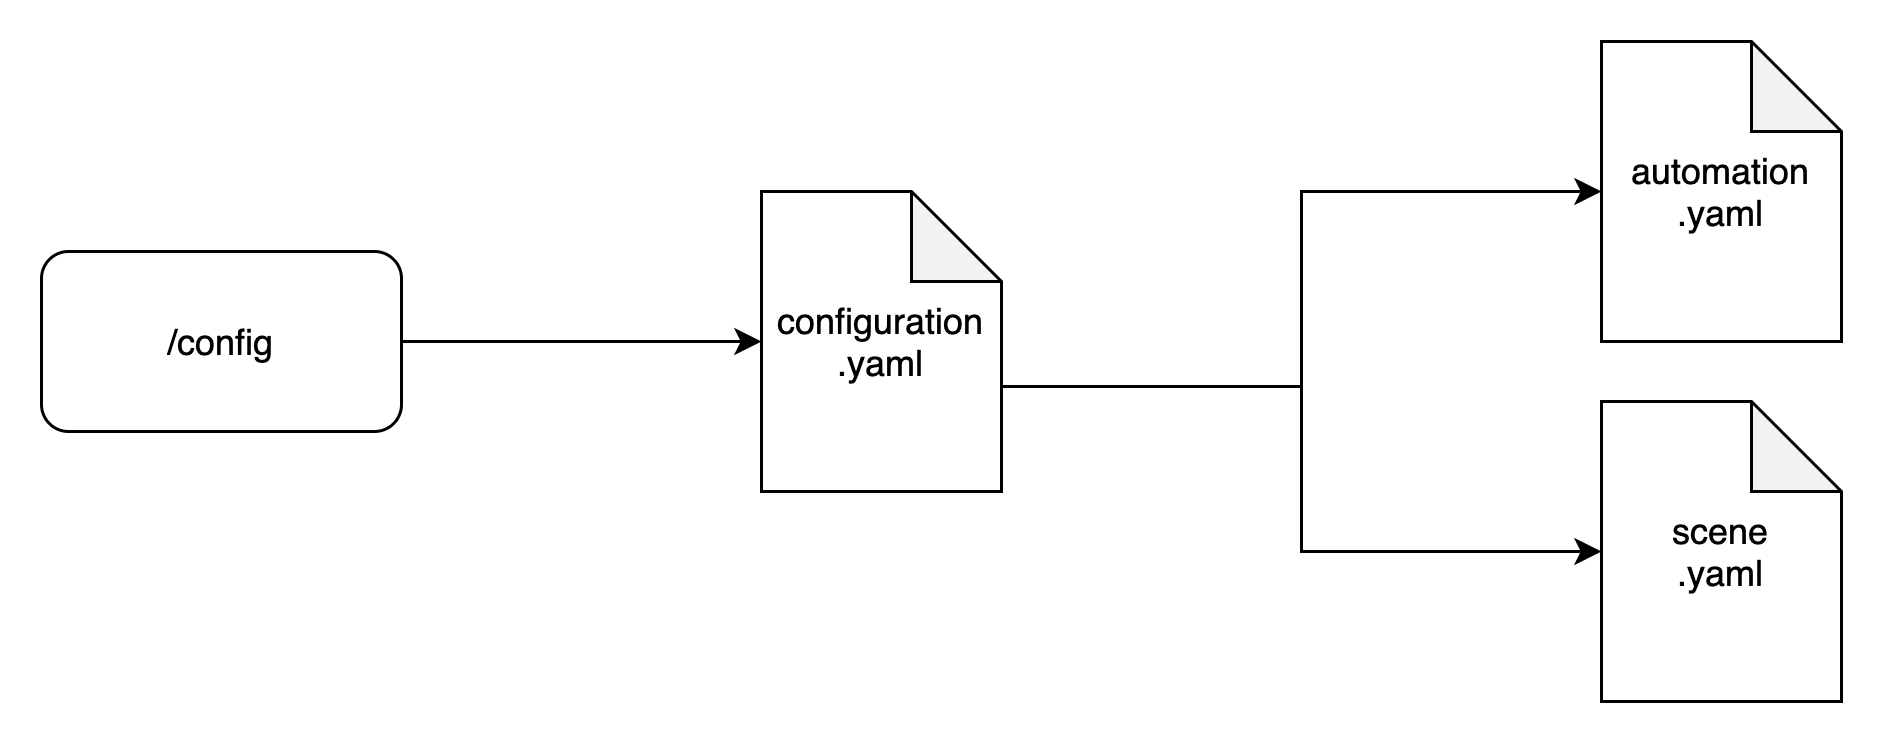
Within this file are all of the integrations that we wish to use in Home Assistant. We can represent the basic configuration with the following diagram.

Let’s look at an example configuration.yaml file.
Within a basic configuration we should find the default_config integration along with some of the other basic integrations.
# Home Assistant required
default_config:

# Automations
automation:
  - alias: 'link LEDs to TV on'
    trigger:
      platform: state
      entity_id: media_player.massive_sony
      to: 'on'
    action:
        - service: light.turn_on
          entity_id: light.ledstriptvcab

# Scenes
scene:
  - name: downstairs movie
    entities:
       light.treelamp:
          state: on
          brightness_pct: 30
  - name: downstairs work
     entities:
        light.treelamp:
           state: on
           brightness_pct: 30
This configuration.yaml file contains a single automation and two scenes and would likely look quite complex to a new user. It is easy to see how this file could get very long, very quickly!
The Home Assistant File Structure
So how can we split this up into more manageable chunks? We can simply move sections of our code into separate files in order to make a tree structure.
If we take our example above, we can split it into three separate files. Firstly we can move the automation and scene integrations to separate files.
# Automations
- alias: 'link LEDs to TV on'
  trigger:
    platform: state
    entity_id: media_player.massive_sony
    to: 'on'
  action:
      - service: light.turn_on
        entity_id: light.ledstriptvcab
# Scenes
- name: downstairs movie
entities:
light.treelamp:
state: on
brightness_pct: 30
- name: downstairs work
entities:
light.treelamp:
state: on
brightness_pct: 30How to Include Other YAML Files in Home Assistant
Now we can link these two new files using an !include statement in our configuration.yaml file.
# Home Assistant required
default_config:

# Includes
automation: !include automation.yaml
scene: !include scene.yaml
Now our new configuration has three files with the automation and scene integration split into separate files. It is organised as shown in the following diagram. Note that all of these files are in the main /config directory.
This is a good method for dividing the configuration file up into separate files but as we can only have one instance of each integration, how can we divide things up further?
Merging Directories Using YAML
Another way we can split the configuration is to include directories instead of files. In order to do this we need to keep the integrations in the configuration.yaml file, but point the integration to a directory in order to populate it.
When we specify a directory for a particular integration, all of the files within the directory will be merged. This allows us to split the integration into several files. Our automation file only has one list entry so it will remain the same as before.
# Automations
- alias: 'link LEDs to TV on'
  trigger:
    platform: state
    entity_id: media_player.massive_sony
    to: 'on'
  action:
      - service: light.turn_on
        entity_id: light.ledstriptvcab
However as we have two scenes, we will split these into two seperate files. We can do this by including each entry in the list in a separate file.
# Automations
- alias: downstairs movie
  trigger:
    platform: state
    entity_id: media_player.massive_sony
    to: 'on'
  action:
      - service: light.turn_on
        entity_id: light.ledstriptvcab
# Scenes 2 - Downstairs Work
- name: downstairs work
entities:
light.treelamp:
state: on
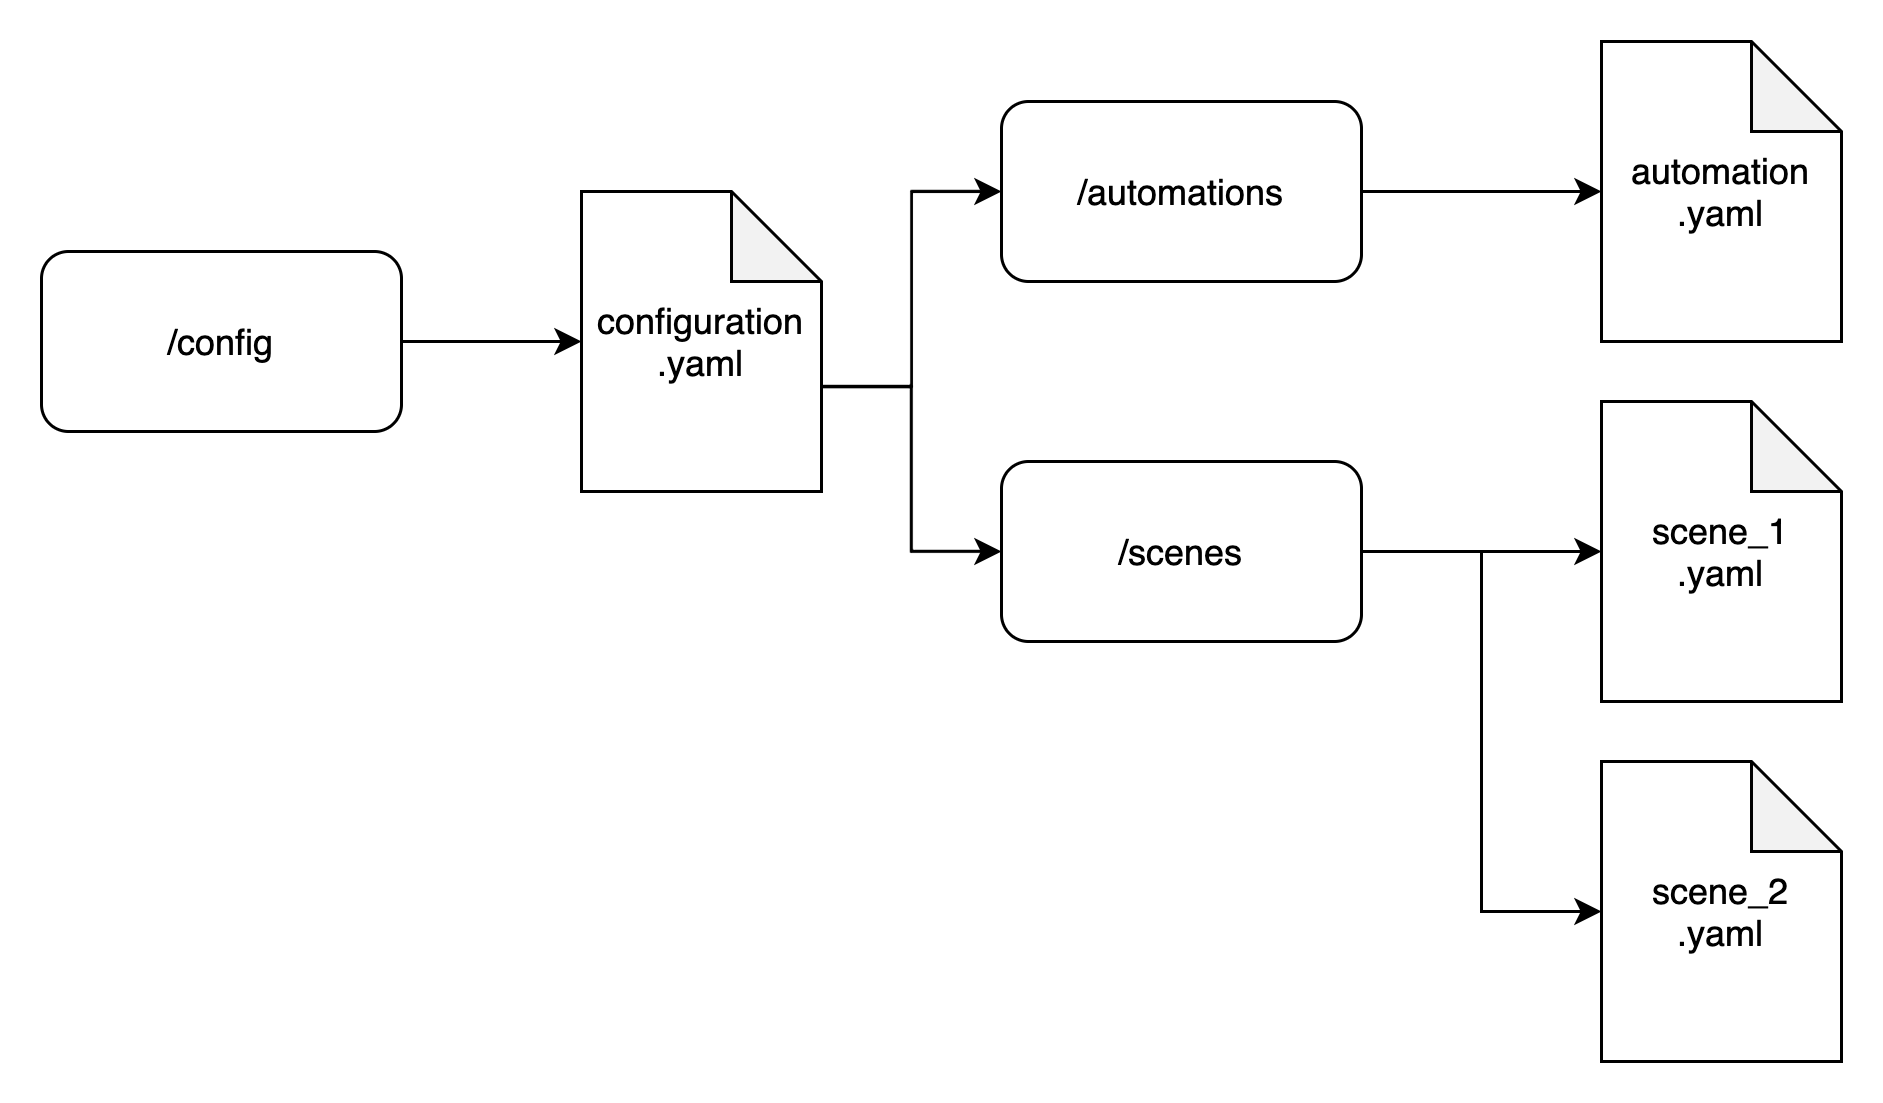
brightness_pct: 30Now we will create a directory for the automations and a directory for the scenes in the /config directory. We will place the automation.yaml file in the directory for automations. Then we will place scene_1.yaml and scene_2.yaml into the scenes directory.
/config/automations
/config/scenes
Now we can include these directories in our configuration.yaml file. We will use the !include_dir_merge_list statement, which will merge all of the YAML files in the specified directory into one list.
# Includes
automation: !include_dir_merge_list automations/
scene: !include_dir_merge_list scenes/
Now our file structure has two new directories along side the configuration.yaml file. In each directory is a set of YAML files for the associated integration.
Each time we wish to add a new integration, we can just add a new YAML file in the relevant directory. Note that the name of the file does not matter, all YAML files in the directory will be merged, regardless of their file name.
Merging Dictionaries using YAML
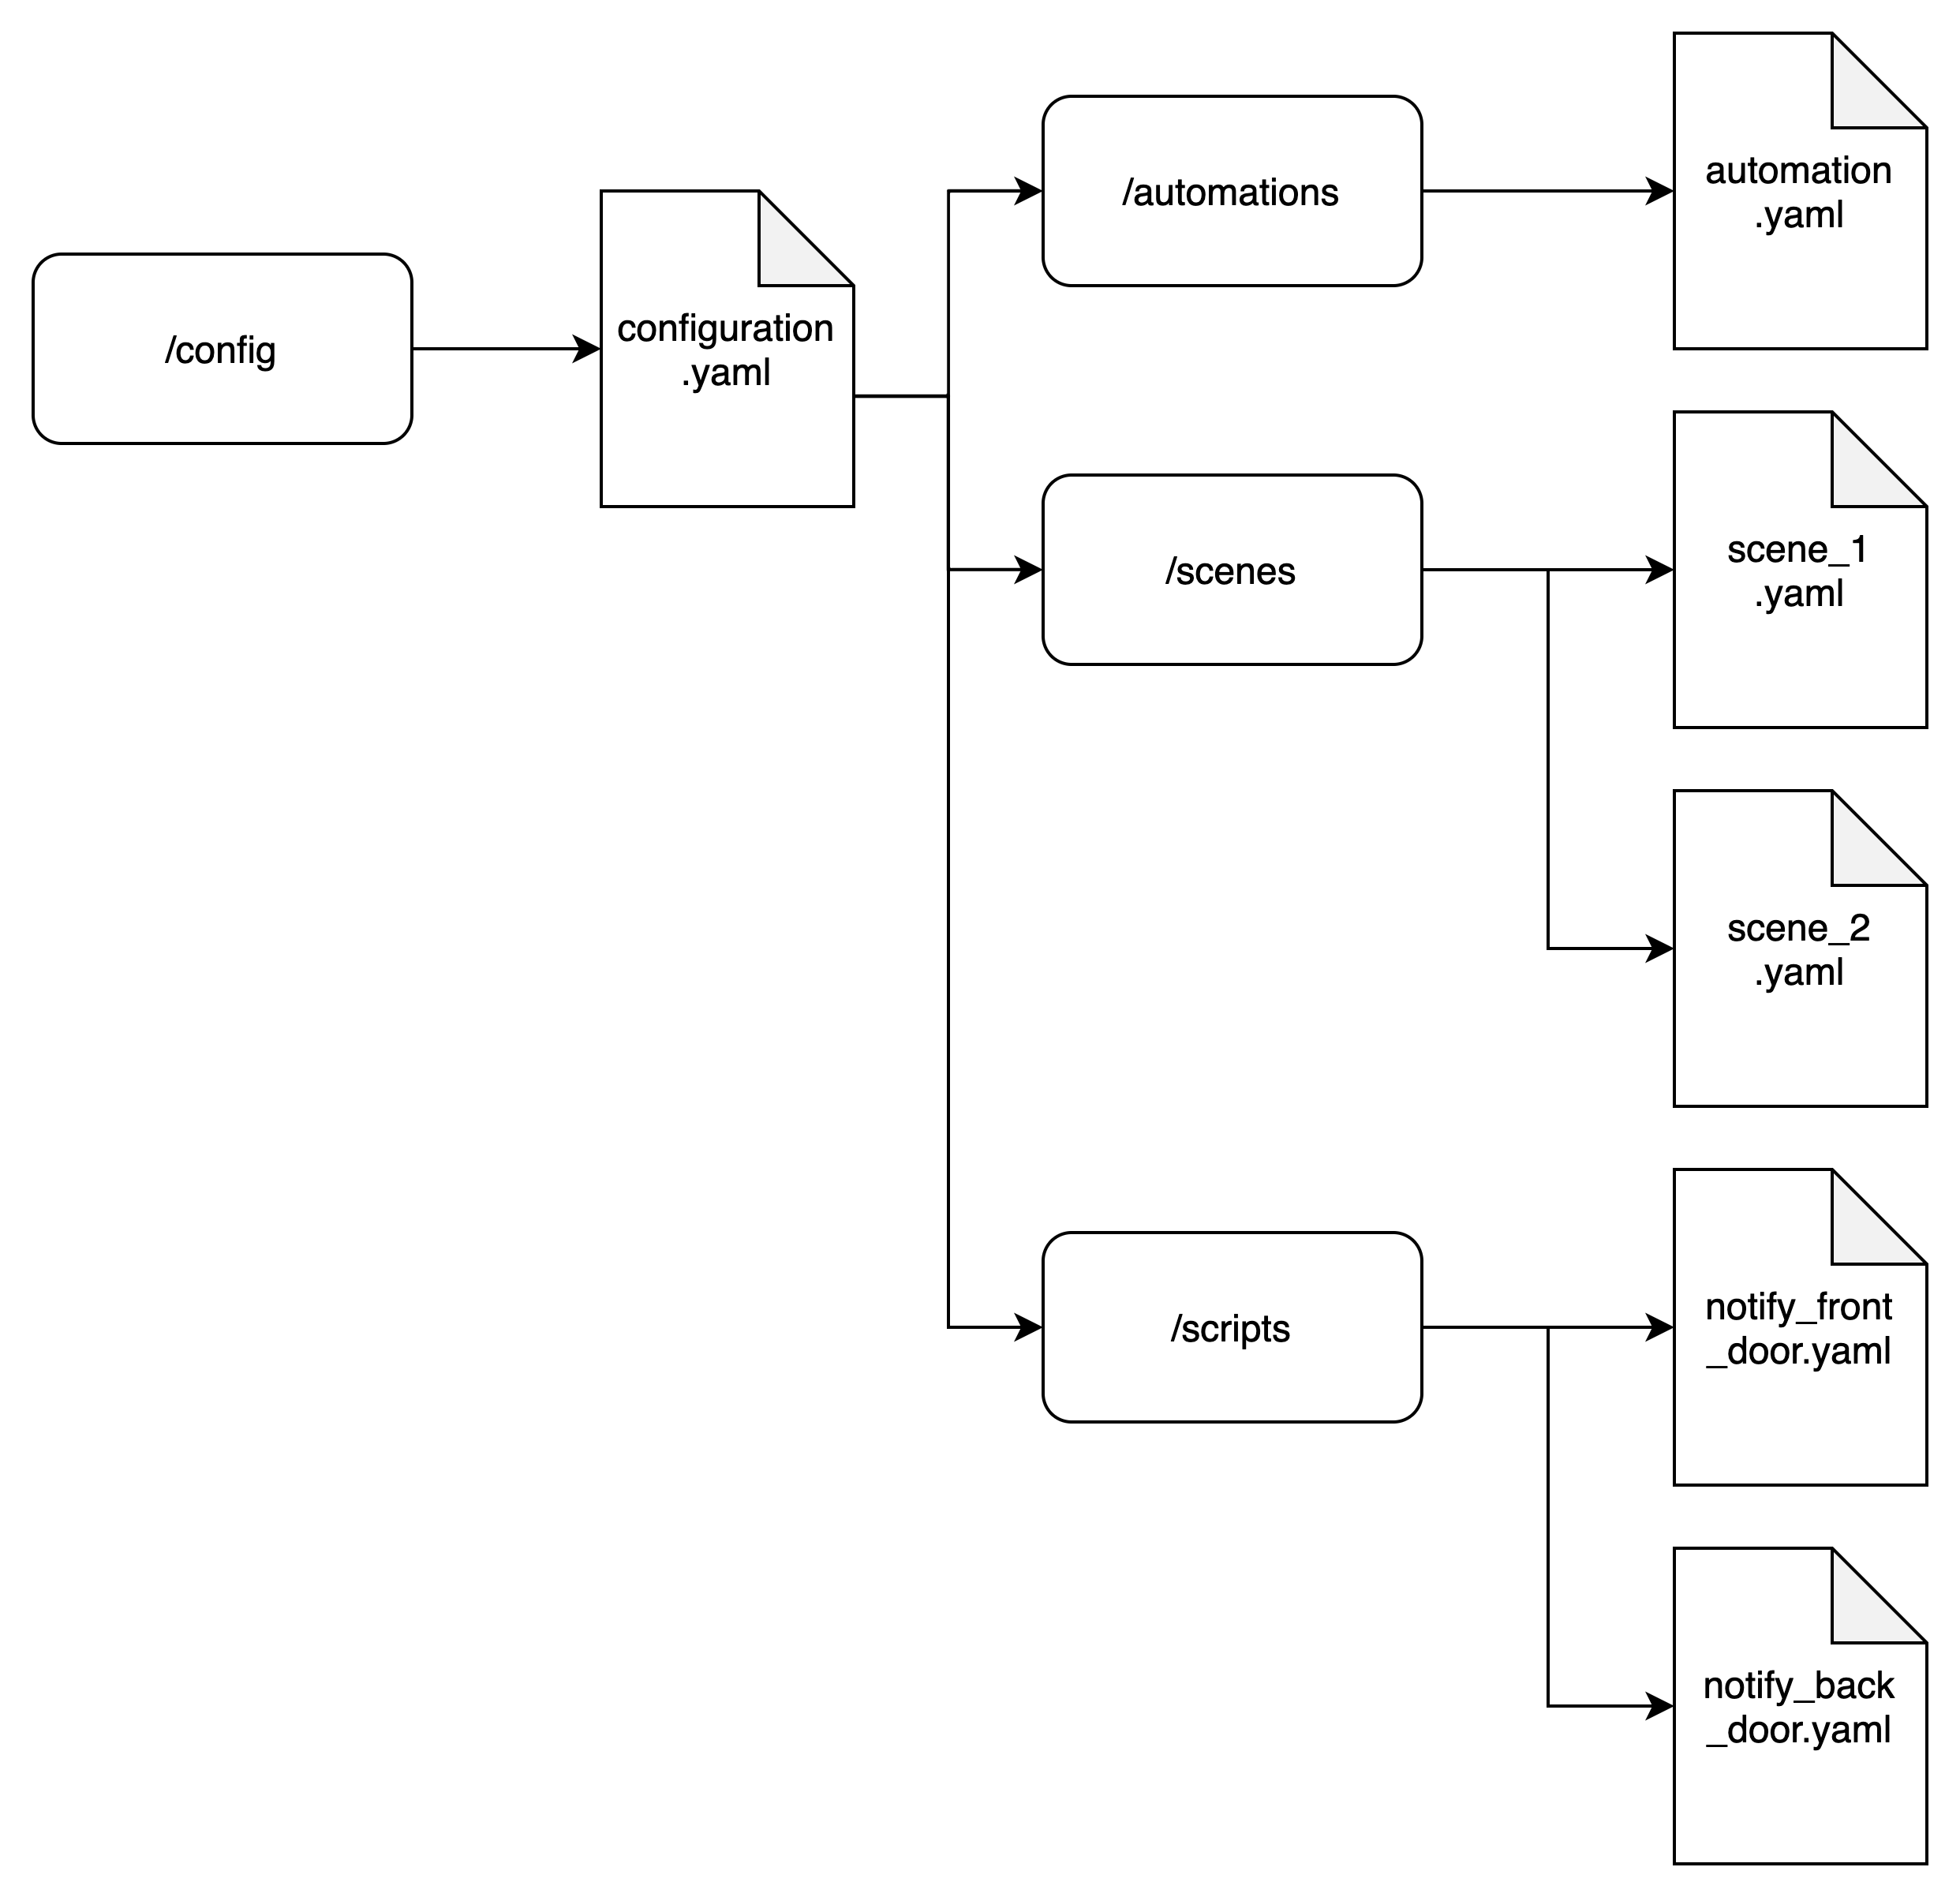
We also need to consider how to merge integrations that are entered as a dictionary rather than a list. An example would be the script integration, so let’s take a look at an example. First we will create a directory for scripts.
/config/scripts
Now we will create two files in this new directory for two different scripts, which send out mobile notifications when the doors are opened.
front_door_open_push:
  alias: Front door open push notification
  description: 'Send a push notification for front door open'
  sequence:
    - alias: Send notification
      service: notify.mobile_app_iphone
      data:
        title: "Door Sensors"
        message: "Front door is open!"
back_door_open_push:
alias: Back door open push notification
description: 'Send a push notification for back door open'
sequence:
- alias: Send notification
service: notify.mobile_app_iphone
data:
title: "Door Sensors"
message: "Back door is open!"Notice how each of the scripts begins with a dictionary definition rather than the list “-” operator?
# List
- alias: 'some cool automation list'

# dictionary
some_cool_script:
This means that we need to use the !include_dir_merge_named statement instead.
script: !include_dir_merge_named scripts/
Apart from using a different statement to tell Home Assistant to merge the directory as a dictionary rather than a list, the end result is the same as with our example for automations and scenes. Now our structure looks like the following diagram.
What is the difference between Include_dir_merge_list and Include_dir_merge_named?
In Home Assistant’s configuration, !include_dir_merge_list and !include_dir_merge_named are YAML tags used to include and merge configurations from multiple files within a specified directory.
They are part of the Home Assistant’s configuration system to help organize and manage your configuration files more effectively.
Here’s the difference between the two:
!include_dir_merge_list:
- This tag is used to include and merge configuration files as a list.
- It’s particularly useful when you have multiple configuration files containing similar settings, and you want to merge them into a single list of items.
- Example use case: You have different YAML files for different rooms, each containing a list of lights. You can use
!include_dir_merge_listto merge all these lists into a single list of lights.
!include_dir_merge_named:
- This tag is used to include and merge configuration files as a dictionary of named items.
- It’s useful when you want to create a dictionary where each key corresponds to a specific name, and the value is the configuration associated with that name.
- Example use case: You have different YAML files for different devices, each containing configuration settings for a specific device. You can use
!include_dir_merge_namedto merge these configurations into a dictionary where each key is the device name, and the value is its configuration.
Both of these tags help you break down your configuration into smaller, manageable files while allowing you to merge them together to form a cohesive configuration for your Home Assistant instance.
The Home Assistant YAML Secrets file
Another way to tidy up your configuration is to move all of the keys, passwords and other sensitive data to one file.
This can be useful if you need to change any credentials and also if you want to make your configuration available to the public on Github.
It also makes it easier to quickly copy and paste into forums if you need help with your configuration and want to include it in a post, without worrying about accidently including your sensitive information!
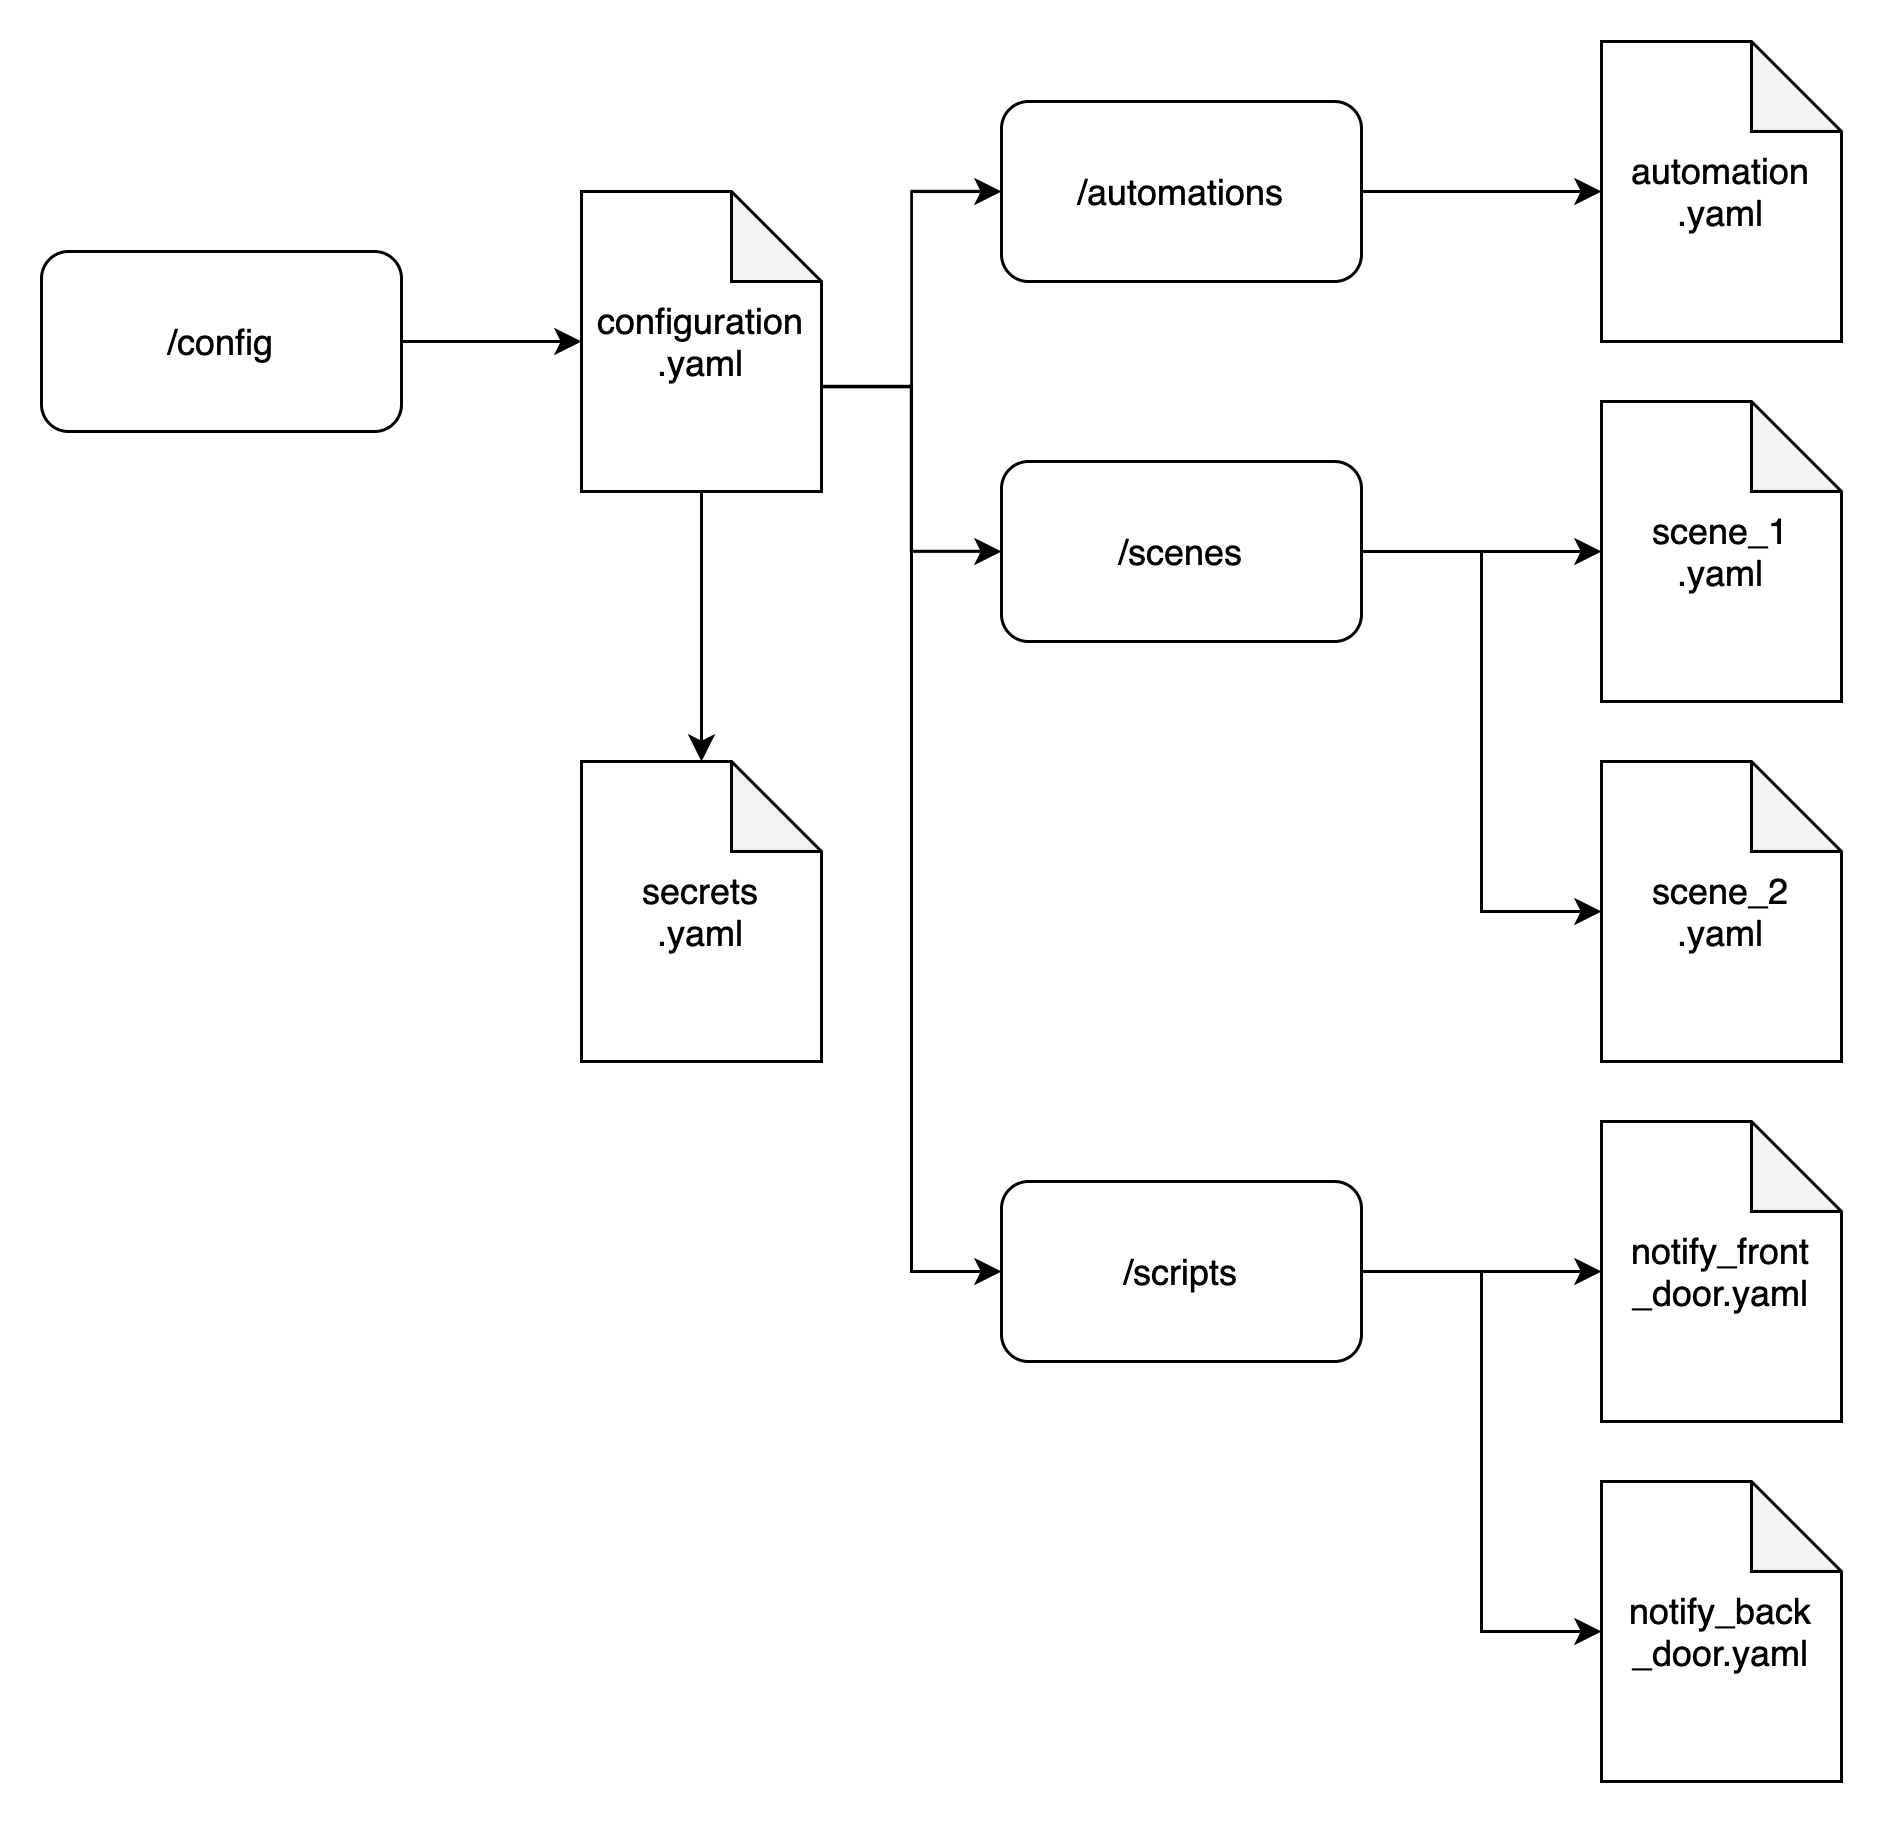
Create a secrets.yaml file
In order to do this we need to create a secrets.yaml file in the config directory.
/config/secrets.yaml
Let’s look at an example using the Google integration for Google calendar. Here is the integration implemented in the configuration.yaml file with the client ID and client secret included in the file.
# Google Integration
google:
  client_id: 584938694594-51oj4gu6gkake18275ra78oki97uevkn.apps.googleusercontent.com
  client_secret: PfRtEsFa-bN3h-PofdESt4sw
How to Add Credentials to the YAML Secrets File
In order to move the credentials to the secrets file, we must first create secrets.yaml and add a reference for each item we wish to include.
google_client_id: 584938694594-51oj4gu6gkake18275ra78oki97uevkn.apps.googleusercontent.com
google_client_secret: PfRtEsFa-bN3h-PofdESt4sw
How to Include Secrets in the Home Assistant Configuration
Now we can replace the credentials in our configuration.yaml file using the !secret statement.
# Google Integration
google:
  client_id: !secret google_client_id
  client_secret: !secret google_client_secret
Now that we have added our secrets file, our final example configuration is represented in the following diagram.
Conclusion
Home Assistant configurations can quickly get complicated as a lot of YAML must be added in order to add more functionality to the system.
Thankfully there is a simple yet sophisticated way to organise the data!
You should now have a basic understanding of how to split the configuration across different files and directories and now it is up to you how you choose to arrange your files.
Go ahead and add yet more YAML to your configuration by following some more of my awesome Home Assistant tutorials!
Article Updates
Aug 21st 2023 : Additional information added. Featured image updated. TOC added.
Article first published March 22nd 2020.
Thanks so much for visiting my site! If this article helped you achieve your goal and you want to say thanks, you can now support my work by buying me a coffee. I promise I won't spend it on beer instead... 😏


Another great tutorial. I hope you are not showing your real Google account info?
Many thanks Bill! No they are not my credentials but thanks for mentioning it. I once left my WiFi password in some ESP Arduino code here and I didn’t spot it for a week, so really appreciate the mention in case I had accidentally left my real credentials in the yaml!
I always load any passwords, IDs, etc in my secrets file. My configuration.yaml is now very small. Most now gets loaded from the package: Splitting yaml for me has been a hard concept to understand as home assistant handles the yaml file differently depending on how it is entered. You do a good job explaining it. What got me to finally understand was petro’s answers to me in the support forum under Lovelace: button card. He did an excellent job with his graphic that finally got through to me.
Wow that is an epic post! I think there is a lot of valuable information there, so I will share the link incase anyone stumbles upon our conversation here. Thank you for the kind feedback, I felt that this was a topic that would benefit from some further explanation.
I also started going through the yaml.org spec as I was told that Home Assistant meets it. So this should help me understand what works, should work, etc. The trouble I have had is I an learning from the middle instead of the beginning and it is taken me awhile to understand basic concepts. I’m almost there, but far from an expert.
Totally understand where you are coming from Bill, I think part the problem is people will generally find plenty of “total beginners guides” which cover the installation and a few very basic functions. Then there is a gap between this and the more advanced stuff, not to mention the problem with outdated information. Just like you, I found myself learning from the middle.
Is there anything you can think of that would make a good “how to” guide for HA? I have some more ideas but I need to order some more hardware first. I think IP cameras/security is a great topic, but I didn’t install a system in my own Home yet and I only write about things I can test or have personal experience with.
Hi!
I’d like to report only a little content mismatching, in scene_1.yaml, where you put the automations description instead of first scene description.
These tutorials are easy and well written, a very good job! Thank you for your contributions! 🙂
Her Roberto, thanks for the kind words! Ah, see what you mean, well spotted! I have corrected this small error now 🙂