
Forget VirtualBox and Parallels, there is a better way to virtualize Ubuntu on your Apple Silicon Mac. In this guide you will learn how to run Ubuntu on your Mac quickly and easily using UTM.
UTM is a freely available open source program that basically functions as a graphical user interface for QEMU, an extremely capable cross platform emulator and virtualization application.
Looking to run Debian instead? Check out my Debian on UTM tutorial here!
Is UTM better than VirtualBox or Parallels?
I used VirtualBox for a long time and it works very well. But personally, I cannot stand the UI, it just looks dated and more homebrew than professional.
As for parallels, it works fantastically well and arguably provides the easiest to use solution. The main disadvantage is that it is a paid solution, and it is not cheap at over $100 at the time of writing.
VirtualBox was also slow to provide a solution suitable for Apple Silicon, which is fundamentally how I found out about UTM.
When I switched to Apple Silicon, VirtualBox was not available for Apple Silicon. In search of an alternative solution, I discovered UTM. Now UTM is my go-to solution for virtualization on Mac.
This is of course my personal opinion. So what about the actual advantages of using UTM? UTM offers several advantages over Parallels and VirtualBox. Here are some key advantages:
- Apple Compatibility: UTM is designed to run on multiple platforms, including macOS, iOS, and iPadOS. This allows you to create and run virtual machines on various Apple devices, providing a consistent experience across different platforms.
- Open-source and free: UTM is an open-source project, which means it is freely available for anyone to use and modify. This can be beneficial for individuals or organizations looking for a cost-effective virtualization solution without licensing fees.
- User-friendly interface: UTM provides a user-friendly interface that simplifies the process of creating and managing virtual machines. It offers a graphical user interface (GUI) with intuitive controls and configuration options, making it accessible to both technical and non-technical users.
- Emulation and virtualization support: UTM supports both emulation and virtualization modes, allowing you to run a wide range of operating systems, including older or unsupported ones. This flexibility is useful for tasks such as running legacy software or testing different operating systems.
- Integration with Apple hardware: UTM leverages Apple’s hardware virtualization capabilities, such as Hypervisor.framework on macOS and Apple Silicon hardware on newer Macs. This enables efficient performance and better integration with the underlying hardware.
- Active development and community support: UTM benefits from an active development community, continuously improving the software, adding new features, and addressing issues. This ensures ongoing support and potential future enhancements based on user feedback and community contributions.
- Security and privacy: As an open-source project, UTM allows users to audit the source code and ensure the absence of malicious or unwanted functionalities. This transparency can provide an added layer of security and privacy assurance for users concerned about their virtualization environment.
It’s important to note that the choice between UTM, Parallels, or VirtualBox ultimately depends on your specific requirements, preferences, and the platforms you intend to use. Each software has its own strengths and may be better suited for different use cases.
Where Can I Get UTM and How Much Does it Cost?
UTM is completely free! It is an open source project and the source code is freely available over on GitHub.
You can download UTM for Mac OS or iOS directly from the official website. There is also a paid version on the app store if you want to support the developers.
How to Install Ubuntu on Mac OS Using UTM
In this section we will walk through the process of installing UTM, creating a new virtual machine and then installing Ubuntu on the new virtual machine.
This will allow us to run Ubuntu alongside our Mac OS host operating system. This tutorial will focus on the Mac OS version of UTM, however you can also run UTM virtual machines on iOS.
Download and Install UTM
UTM is quick and easy to install. First, simply download the latest .dmg package from the official website.
Once you have downloaded the .dmg file, open it and move UTM into your applications directory. You can now launch UTM, which will take you directly to the main application window.
Create a New Virtual Machine in UTM
The first thing that we need to do once we have installed UTM is to create a new virtual machine.
Add a new virtual machine
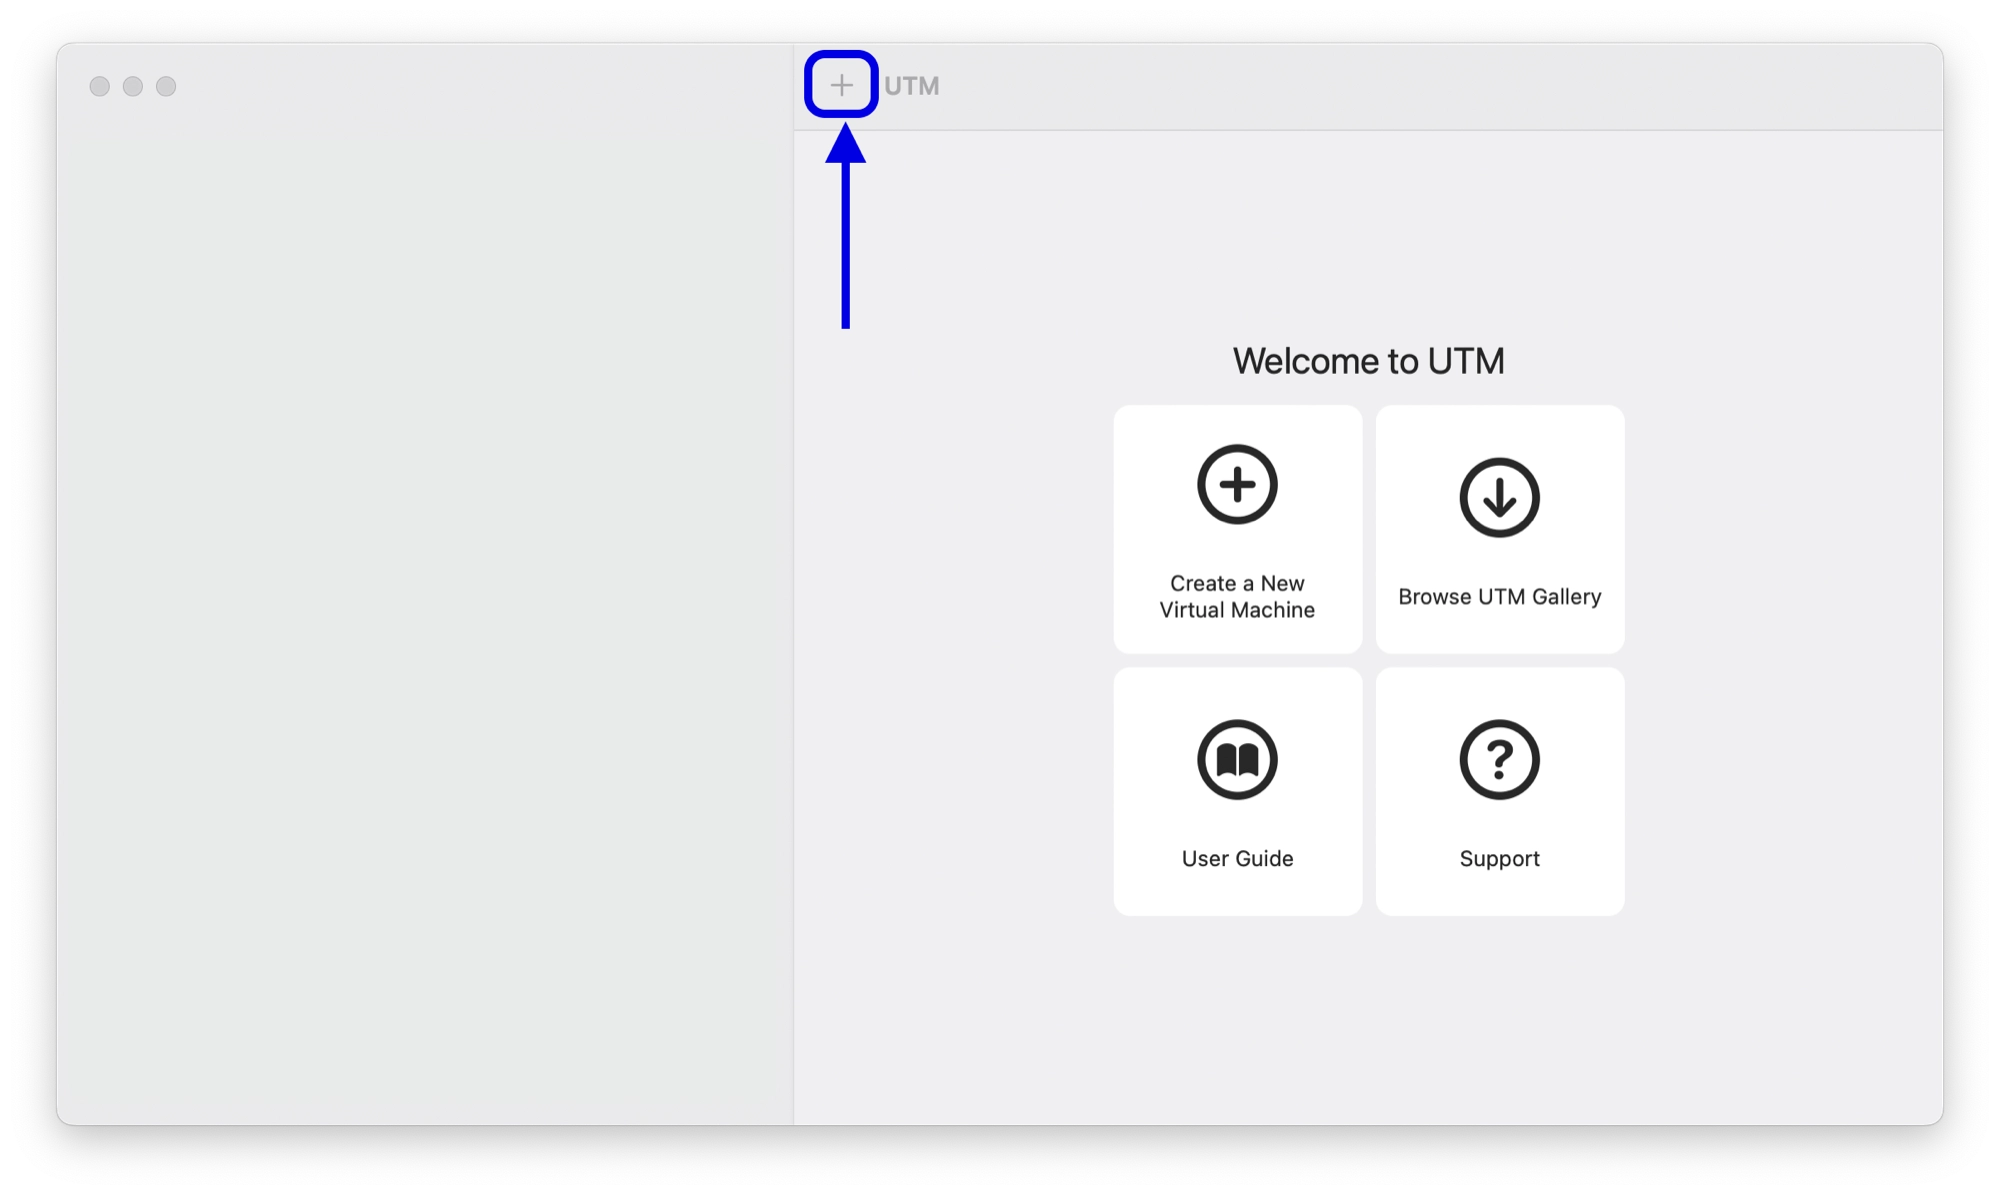
In order to add a new virtual machine in UTM, click the ‘+’ button at the top of the main window:
Should I Virtualize or Emulate a UTM VM?
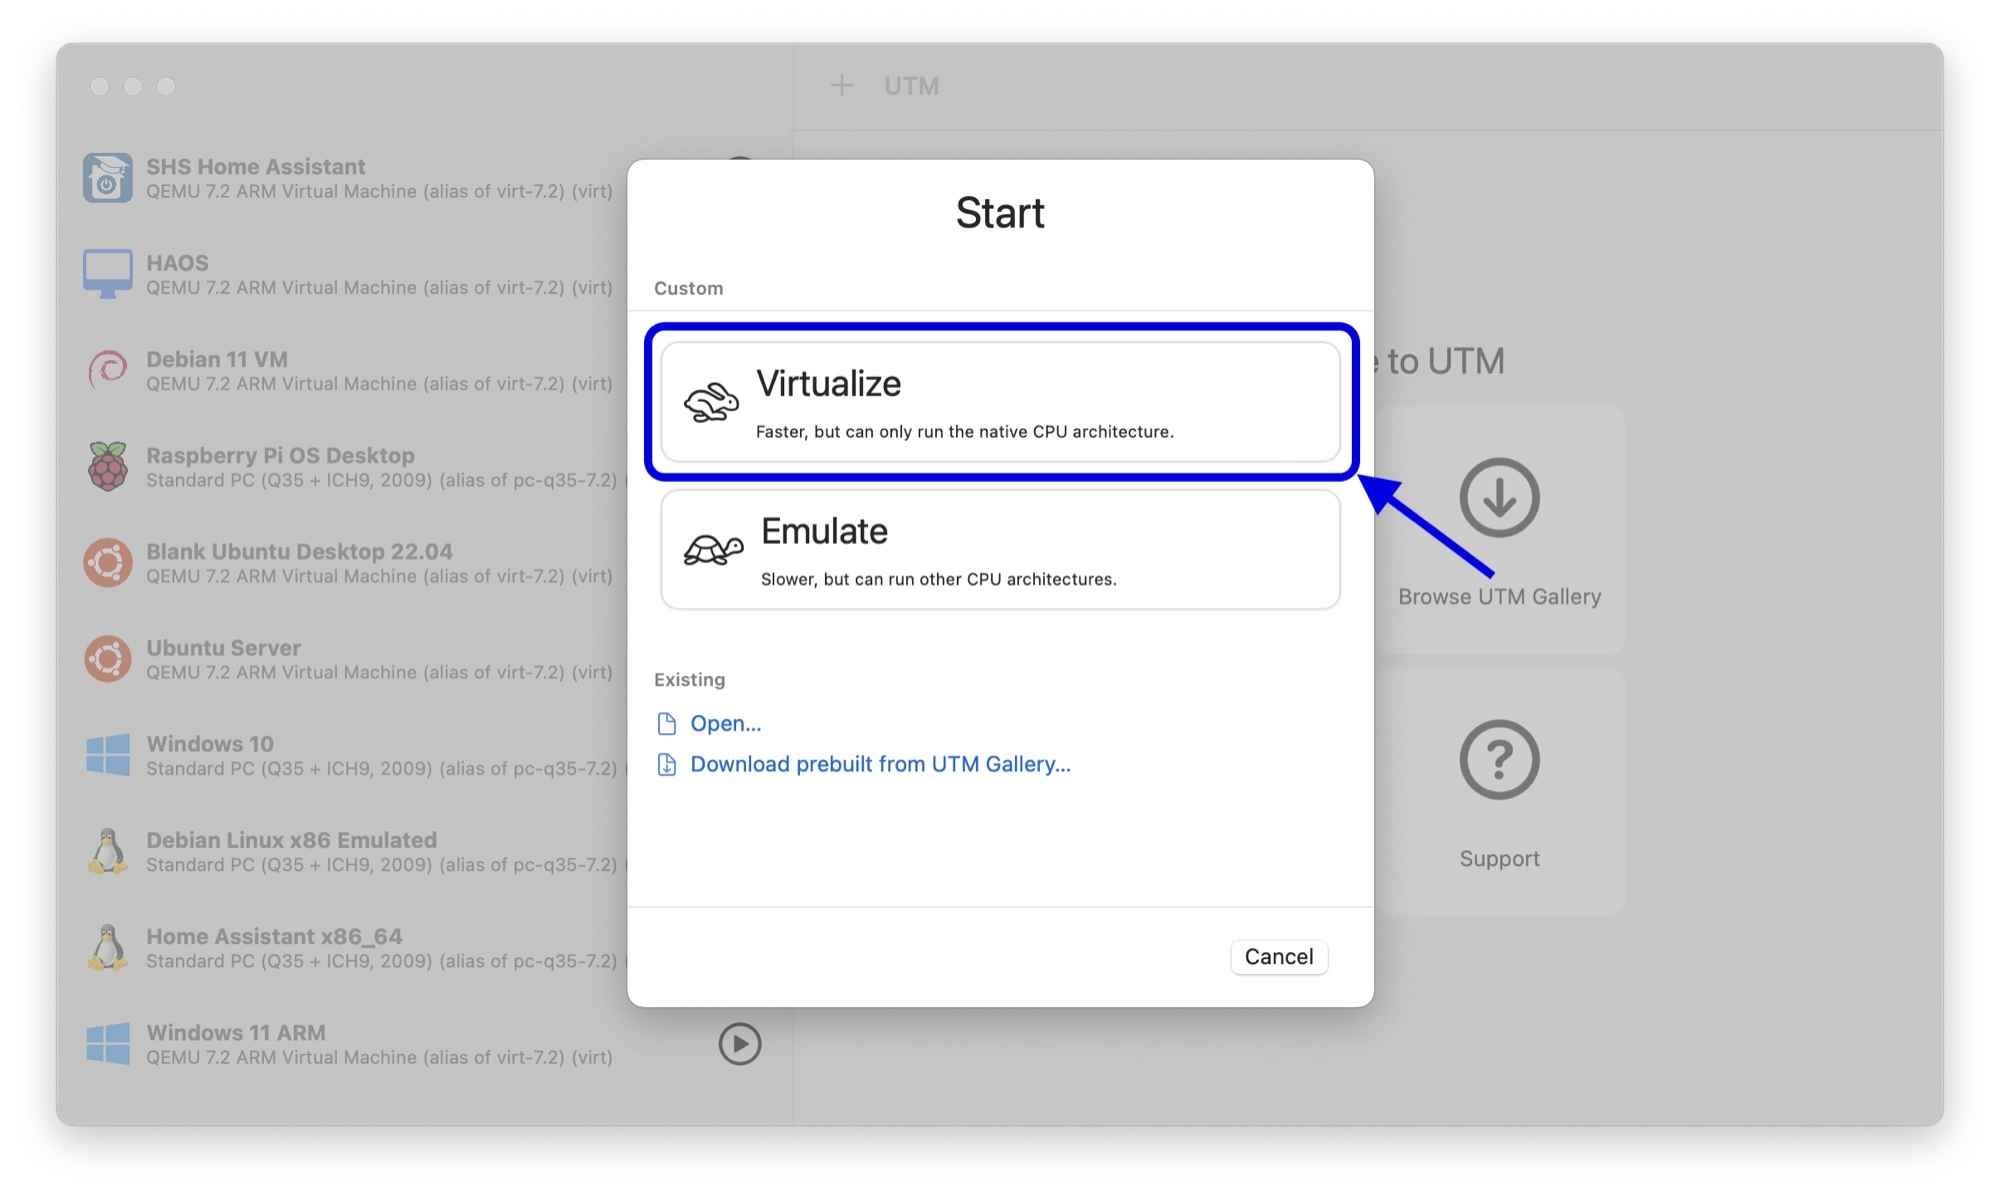
On the first screen you will be given a choice of whether to use virtualization or emulation:
- Virtualization: Virtualization is a technology that allows for the creation of virtual versions or representations of computer resources, such as operating systems, servers, storage devices, or networks. It enables multiple operating systems or applications to run on a single physical machine simultaneously. The virtualization layer, often called the hypervisor, manages the allocation and sharing of the underlying physical resources among the virtual instances.
- Emulation: Emulation, on the other hand, refers to the process of imitating the behavior of one system or device on another system or device. It involves creating a software or hardware environment that mimics the functions and behaviors of a different system, allowing software or applications designed for one platform to run on another platform.
Virtualization is always the best option, as the performance is vastly improved over emulation. It is only necessary to use emulation when the guest OS or guest OS programs that you are trying to emulate are not compatible with your computer’s architecture.
As Ubuntu is available for ARM architecture, it is possible to virtualize it on Apple Silicon. The only exception would be if you need to run software in Ubuntu that is only compatible with x86 (Intel compatible) architecture.
Select the virtualization option by clicking the large button:
Choose an operating system
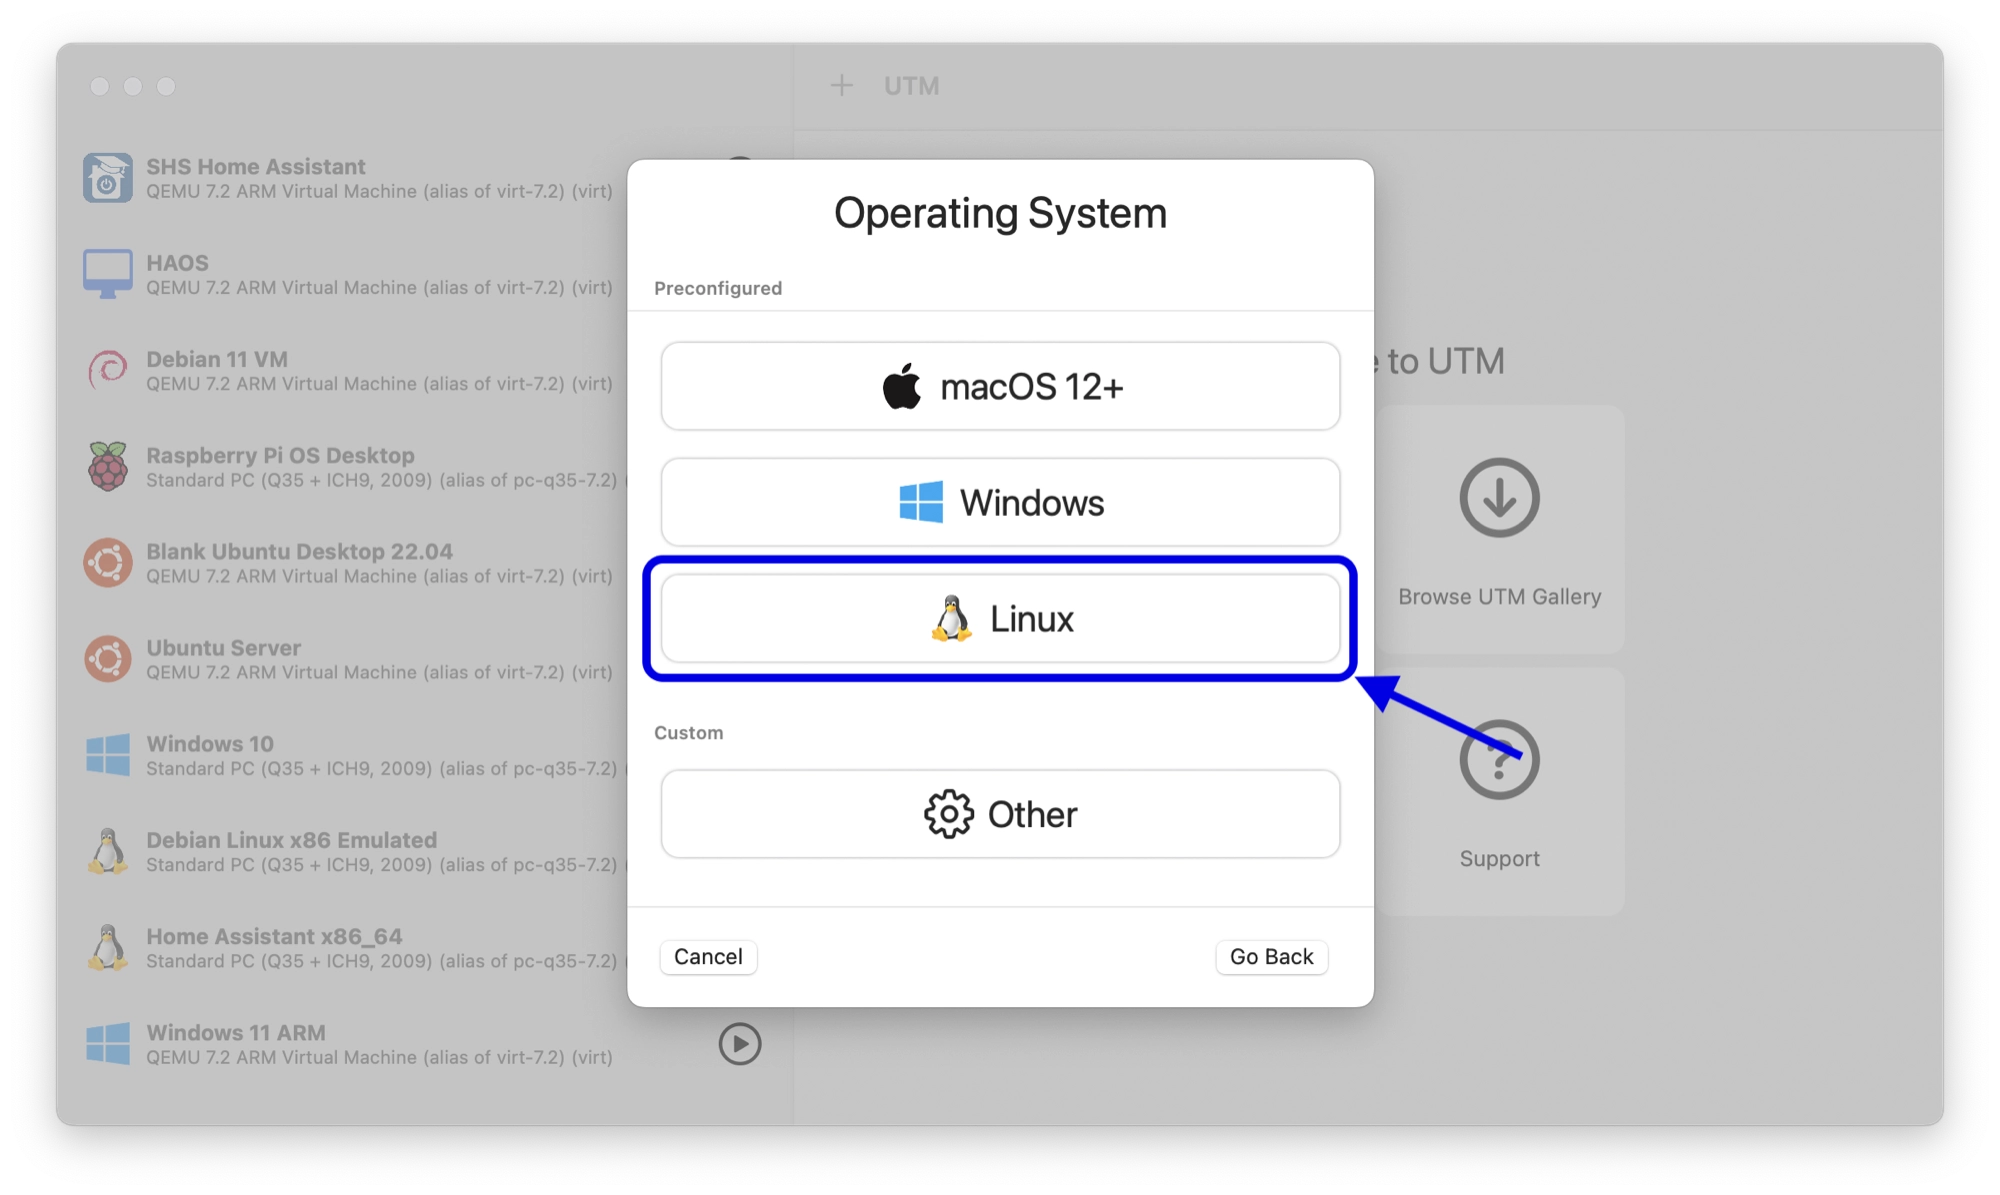
On the next screen we are given the option to choose the type of operating system, which can simplify the configuration.
In this example we will be installing Ubuntu, a popular version of Linux. Therefore go ahead and choose Linux for the operating system.
Choose the boot image
Next we need to supply UTM with a disk image that contains the Ubuntu installer.
If you haven’t download Ubuntu yet, you will need to download either the desktop or server version, the latter being provided without a GUI. In this example we will install the latest long term stable release of Ubuntu Desktop. At the time of writing, this is Ubuntu 22.04 LTS.
I would recommend downloading the LTS version for maximum reliability, however feel free to download a newer version if you prefer.
Assuming you are creating a virtualized VM, you will need to download the ARM architecture (aarch) version of Ubuntu in order to have compatibility with Apple Silicon.
This can be a little confusing, as it is not located on the main download page and instead can be found on the daily downloads page. Use the links below to visit the correct locations for downloading Ubuntu for ARM architecture:
The download will provide you with a .iso disk image containing everything that you need to install Ubuntu. Save it to your prefered location. such as your downloads folder.
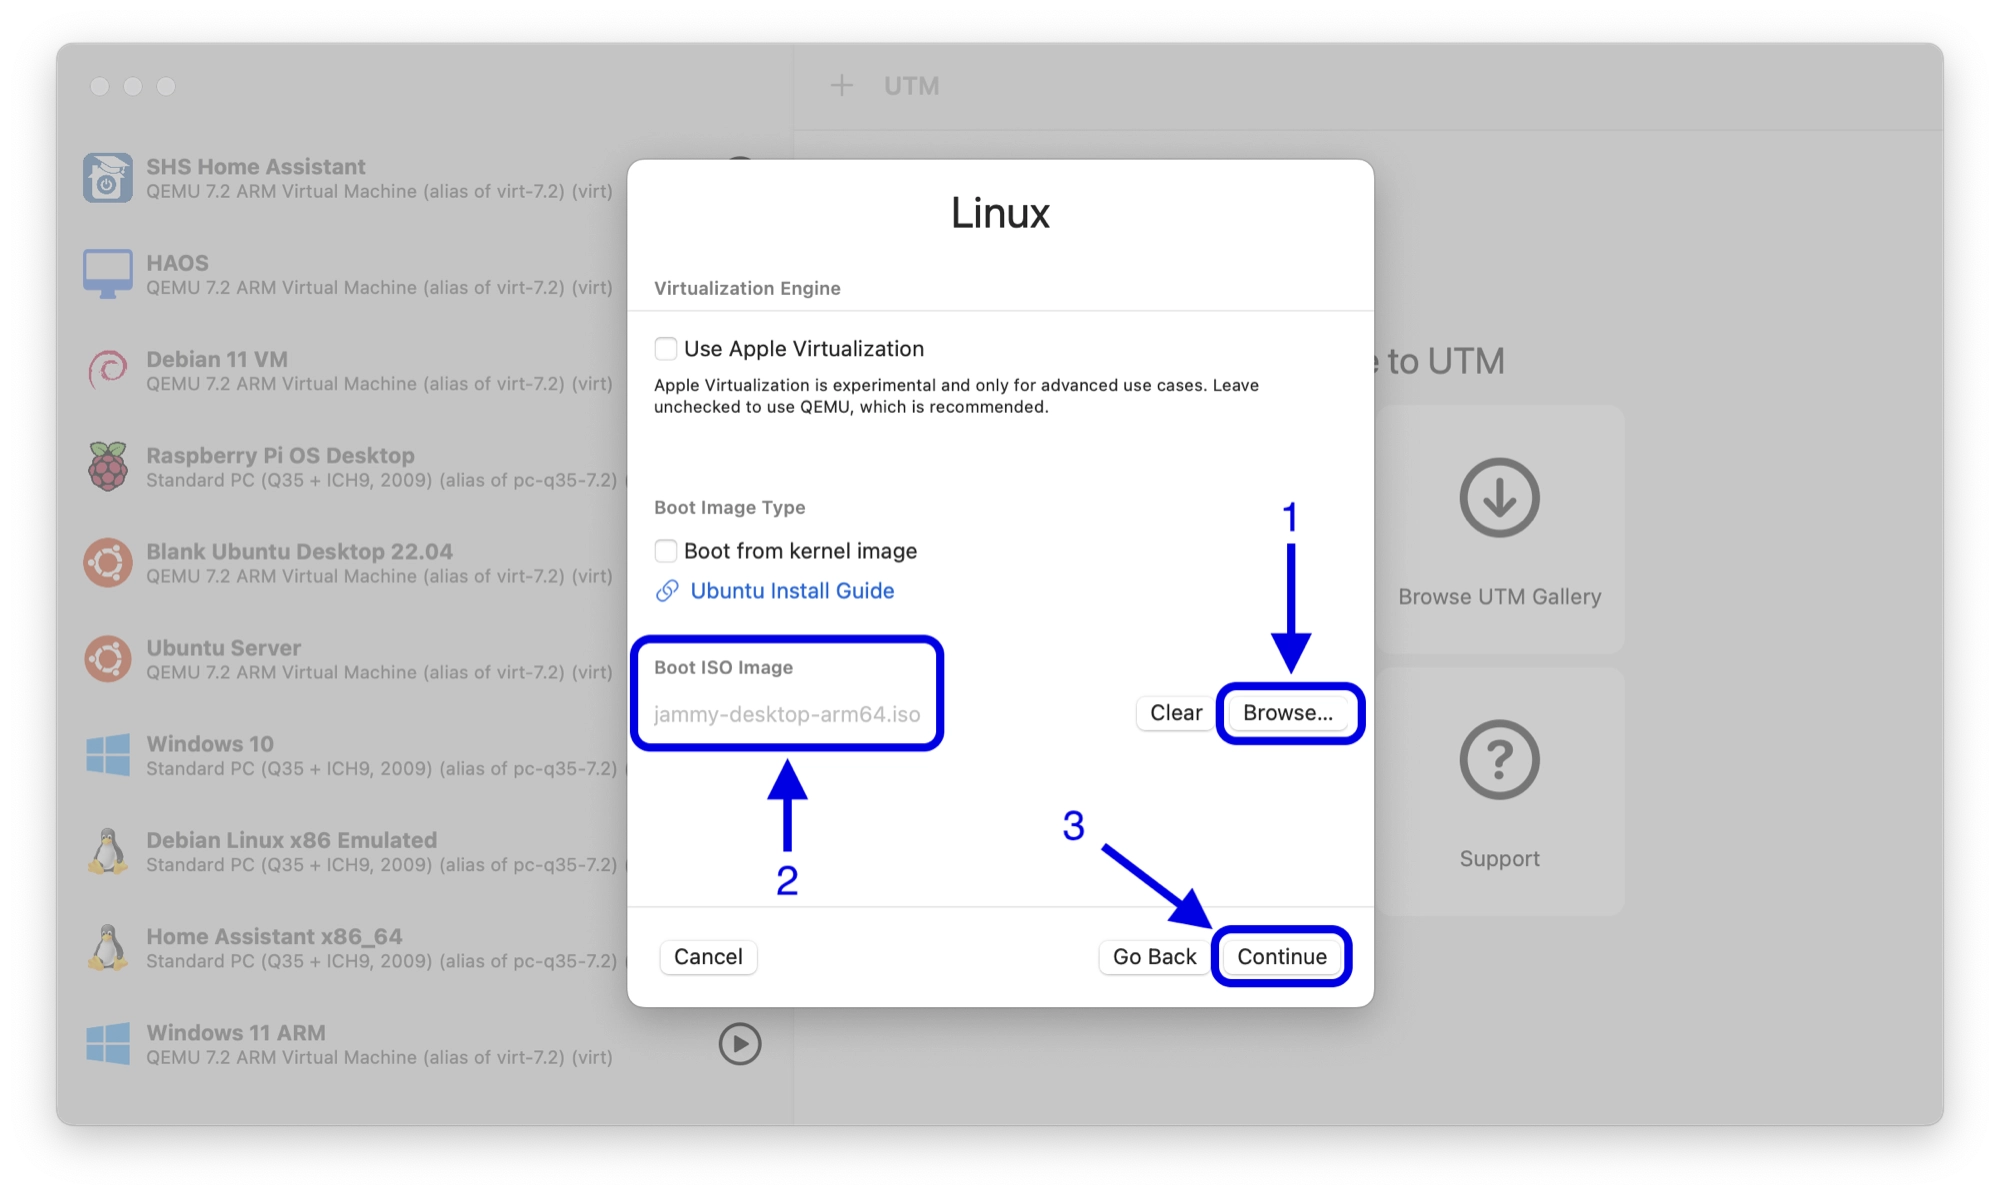
Next, we need to point our VM to this disk image. Under the boot ISO image section, (1) click browse and select the .iso file that you just downloaded.
Once selected, (2) you will see the path to the .iso file. (3) Click continue to move to the next step.
Choosing the hardware settings
Next, we can choose the hardware settings for our VM. For choosing the amount of RAM, a good rule of thumb is to choose somewhere between the guest OS minimum requirement and half of the host OS system’s amount of RAM.
The number of cores can also be specified, but for a virtualized Ubuntu system we can leave this set to default.
If you wish to enable OpenGL graphics hardware acceleration on the guest OS, check the enable hardware OpenGL acceleration box. This is useful if you intend on using graphics intensive programs on the guest OS, but comes with the caveat of the potential for some system instability.
If you are unsure of the best settings to use, you can start with the default settings and change them at a later point if necessary.
Choosing the disk size
On the next screen you can specify the size of the virtual hard disk. This is the size of disk that will be ‘seen’ by Ubuntu.
You can choose a size starting at the guest OS minimum requirement, which for a standard Ubuntu Desktop installation is 25GB.
If you are installing Ubuntu Server, without a graphical user interface, I would recommend a minimum of 10GB, although you can go down to as low as 2.5GB for a very minimal installation.
It is worth noting that although Ubuntu will see a disk of the size you choose here, the space will not be used on your host system’s physical disk until you actually use the space on the guest OS.
It is also possible to change the virtual disk size after installing the guest OS, however the process is quite laborious as you will need to repartition the disk, move any swap partitions and expand the filesystem in the guest OS.
I would therefore recommend that where possible, choose the size of disk according to your needs during the initial configuration of your new VM rather than pick an arbitrary value with a view to change it at a later date.
Choosing a shared location
If you wish to share files between your guest and host operating systems, you can choose a shared folder.
So long as you install the guest additions (more on that later), you will be able to access this folder from both the guest and host operating systems, allowing you to easily transfer files.
Click browse and navigate to a folder that you want to share, then click open to select it. Once selected, you will see the path appear under the shared directory path.
You can also check the share is read only box if you wish to prevent the guest OS from writing to the directory.
Finalizing and starting the VM
On the final screen you have the opportunity to give your new VM a name, such as Ubuntu Desktop LTS 22.04 aarch.
You can review the settings and then click save to add your new virtual machine to UTM.
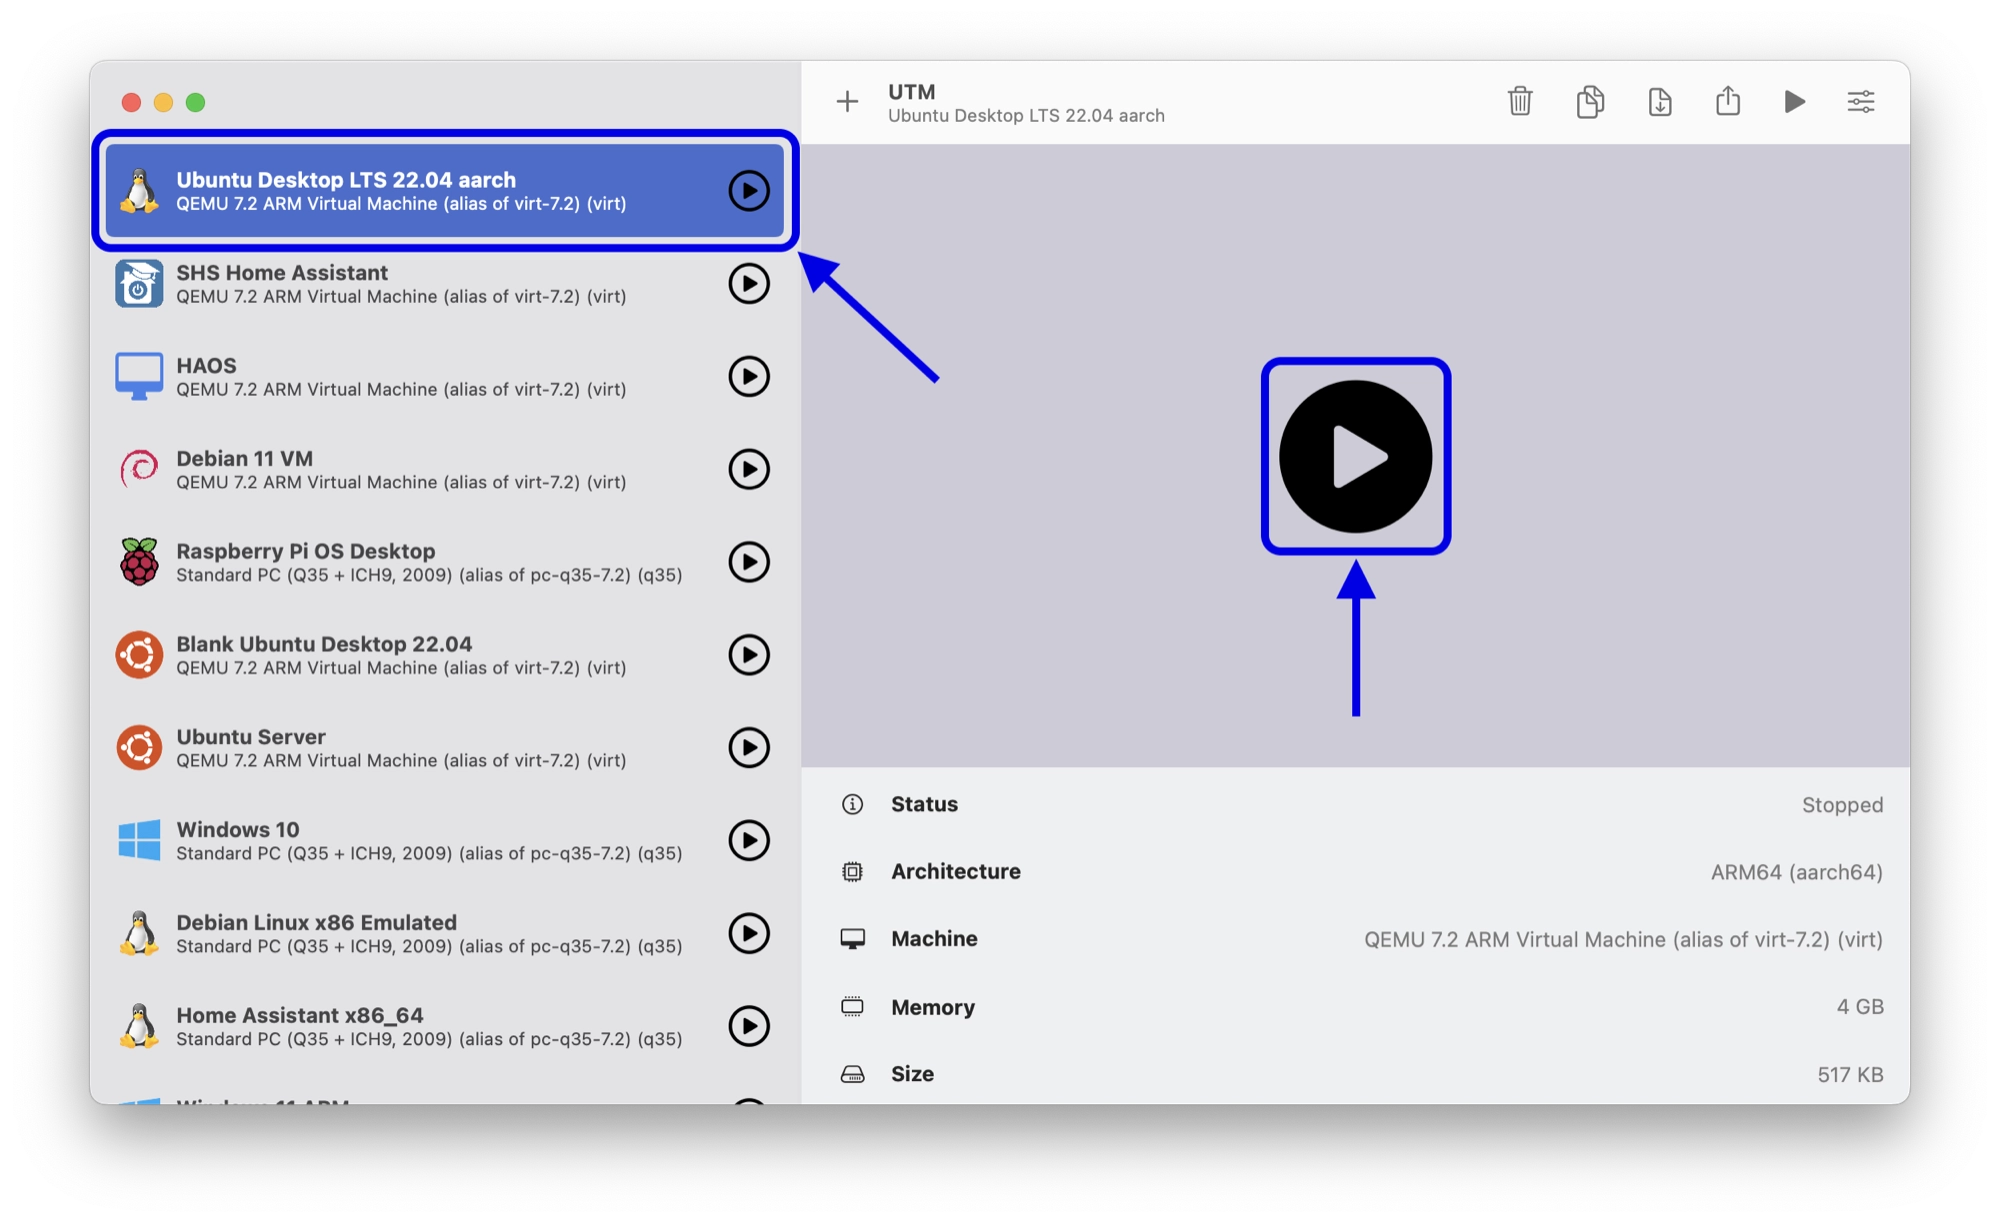
Select your new VM from the left-hand sidebar menu and then click the large play button to boot up the virtual machine.
Note that the default display and network settings should be adequate to get things up and running. You can adjust these at a later point if necessary.
Install Ubuntu on a UTM Virtual Machine
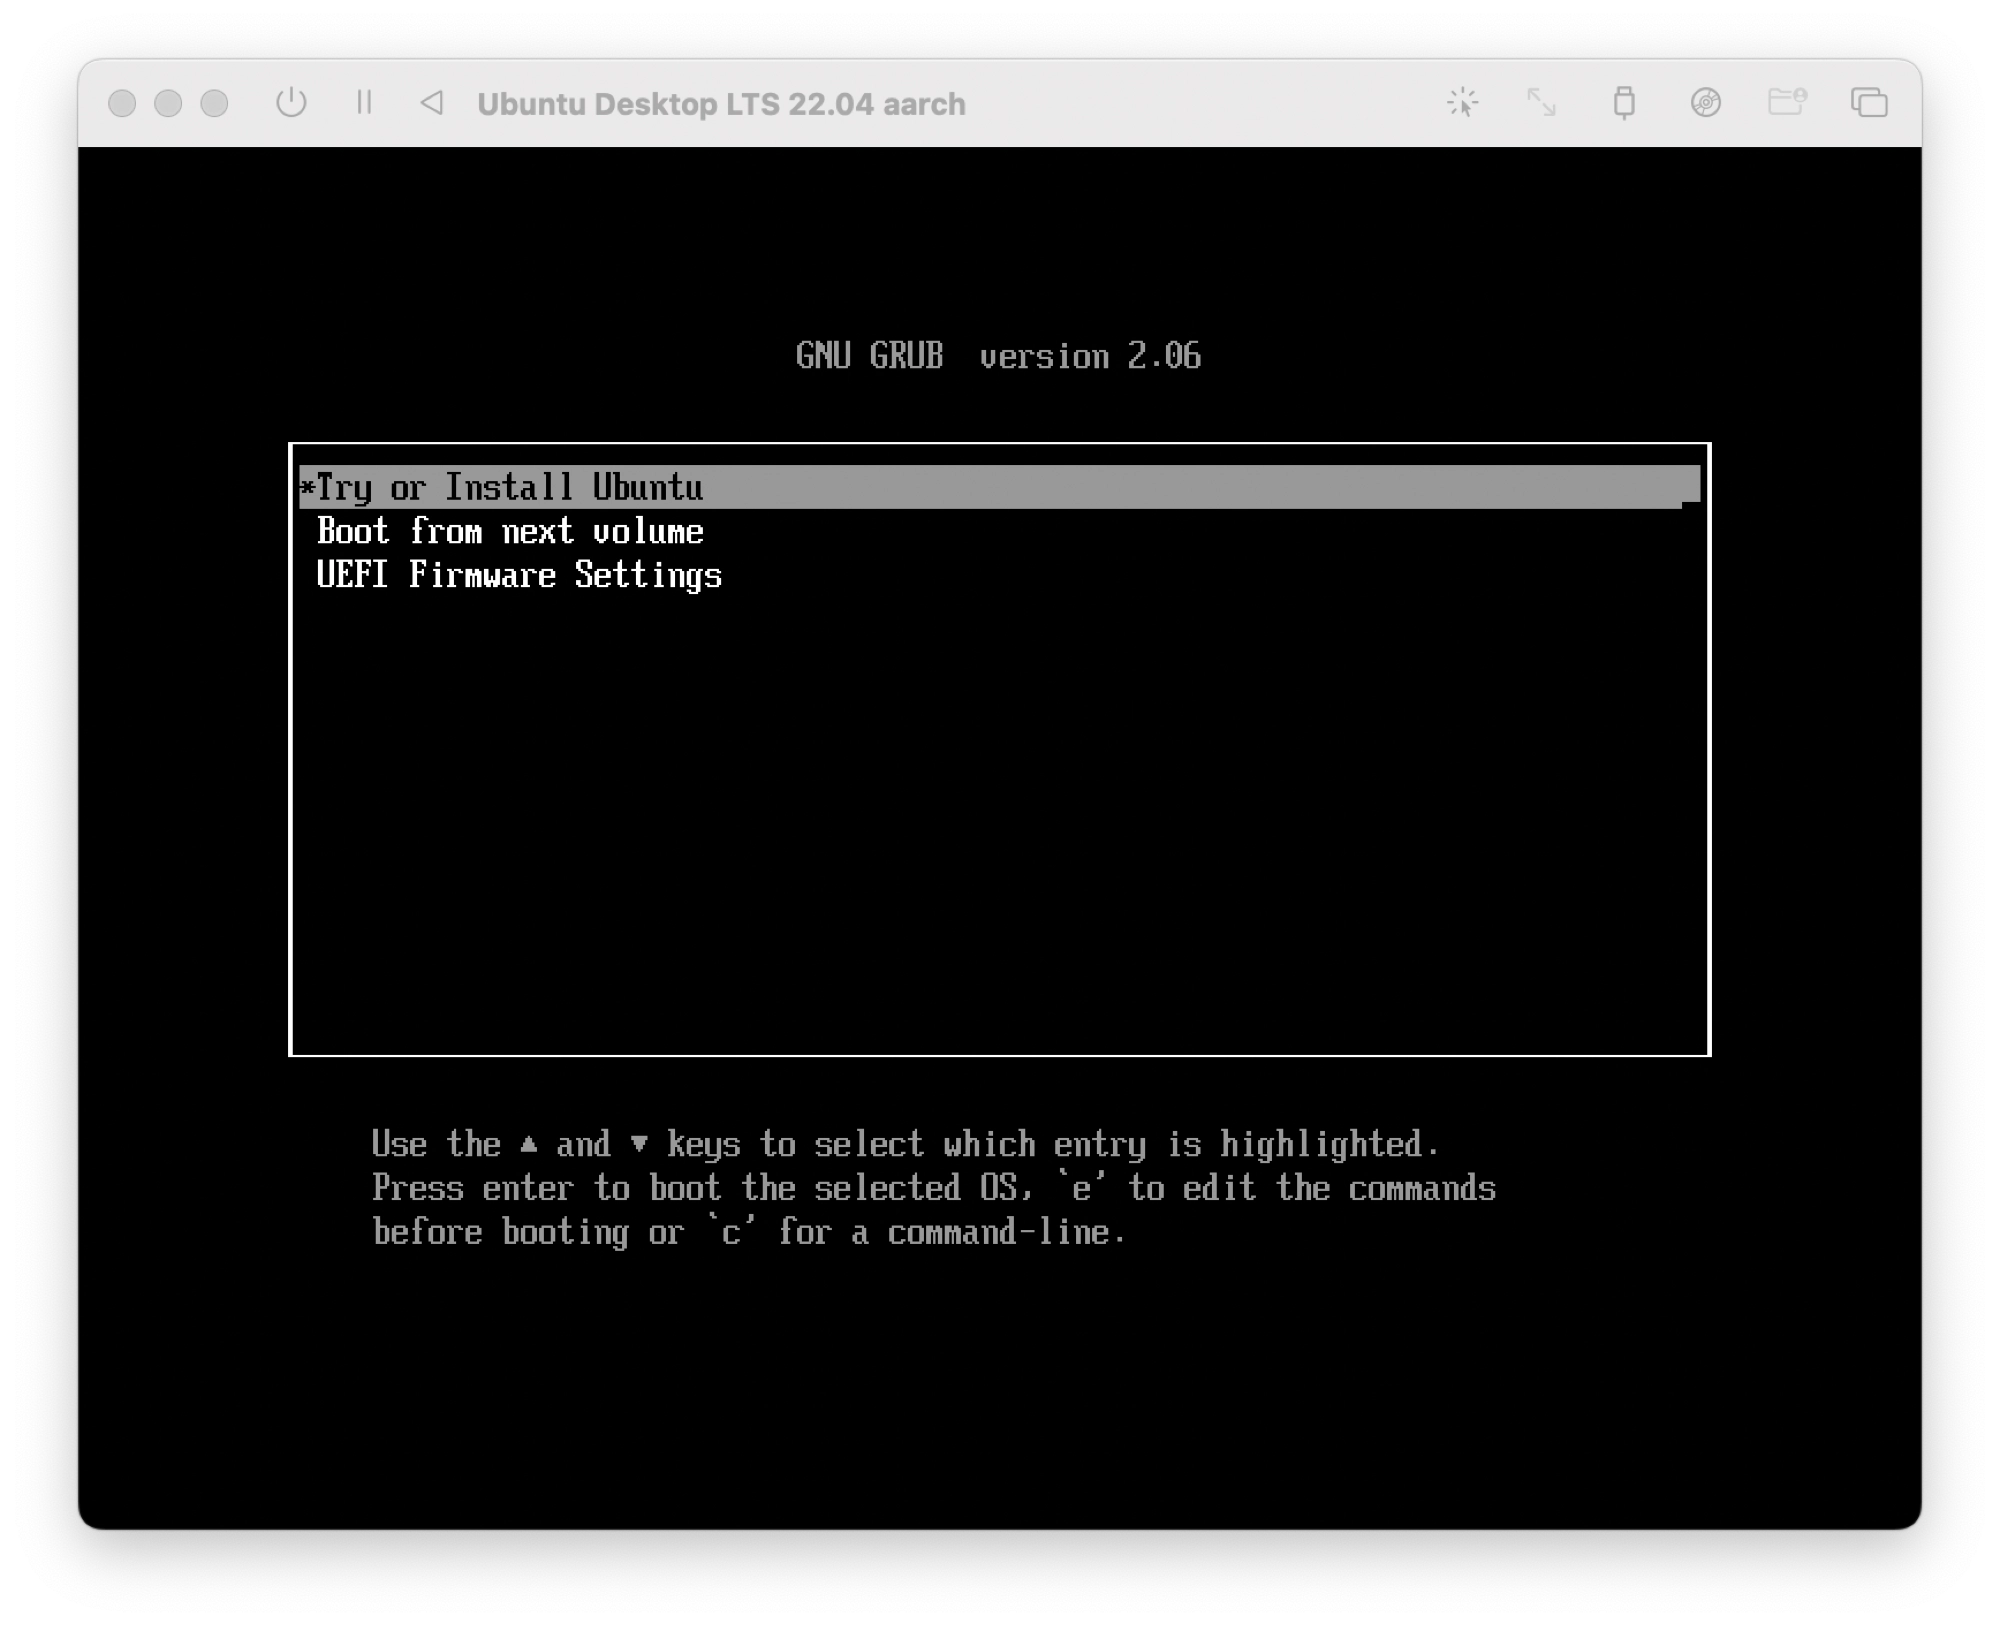
Once you boot your new VM, you will be taken to GRUB, where you can choose to begin the installation. Select Try or Install Ubuntu and then press enter.
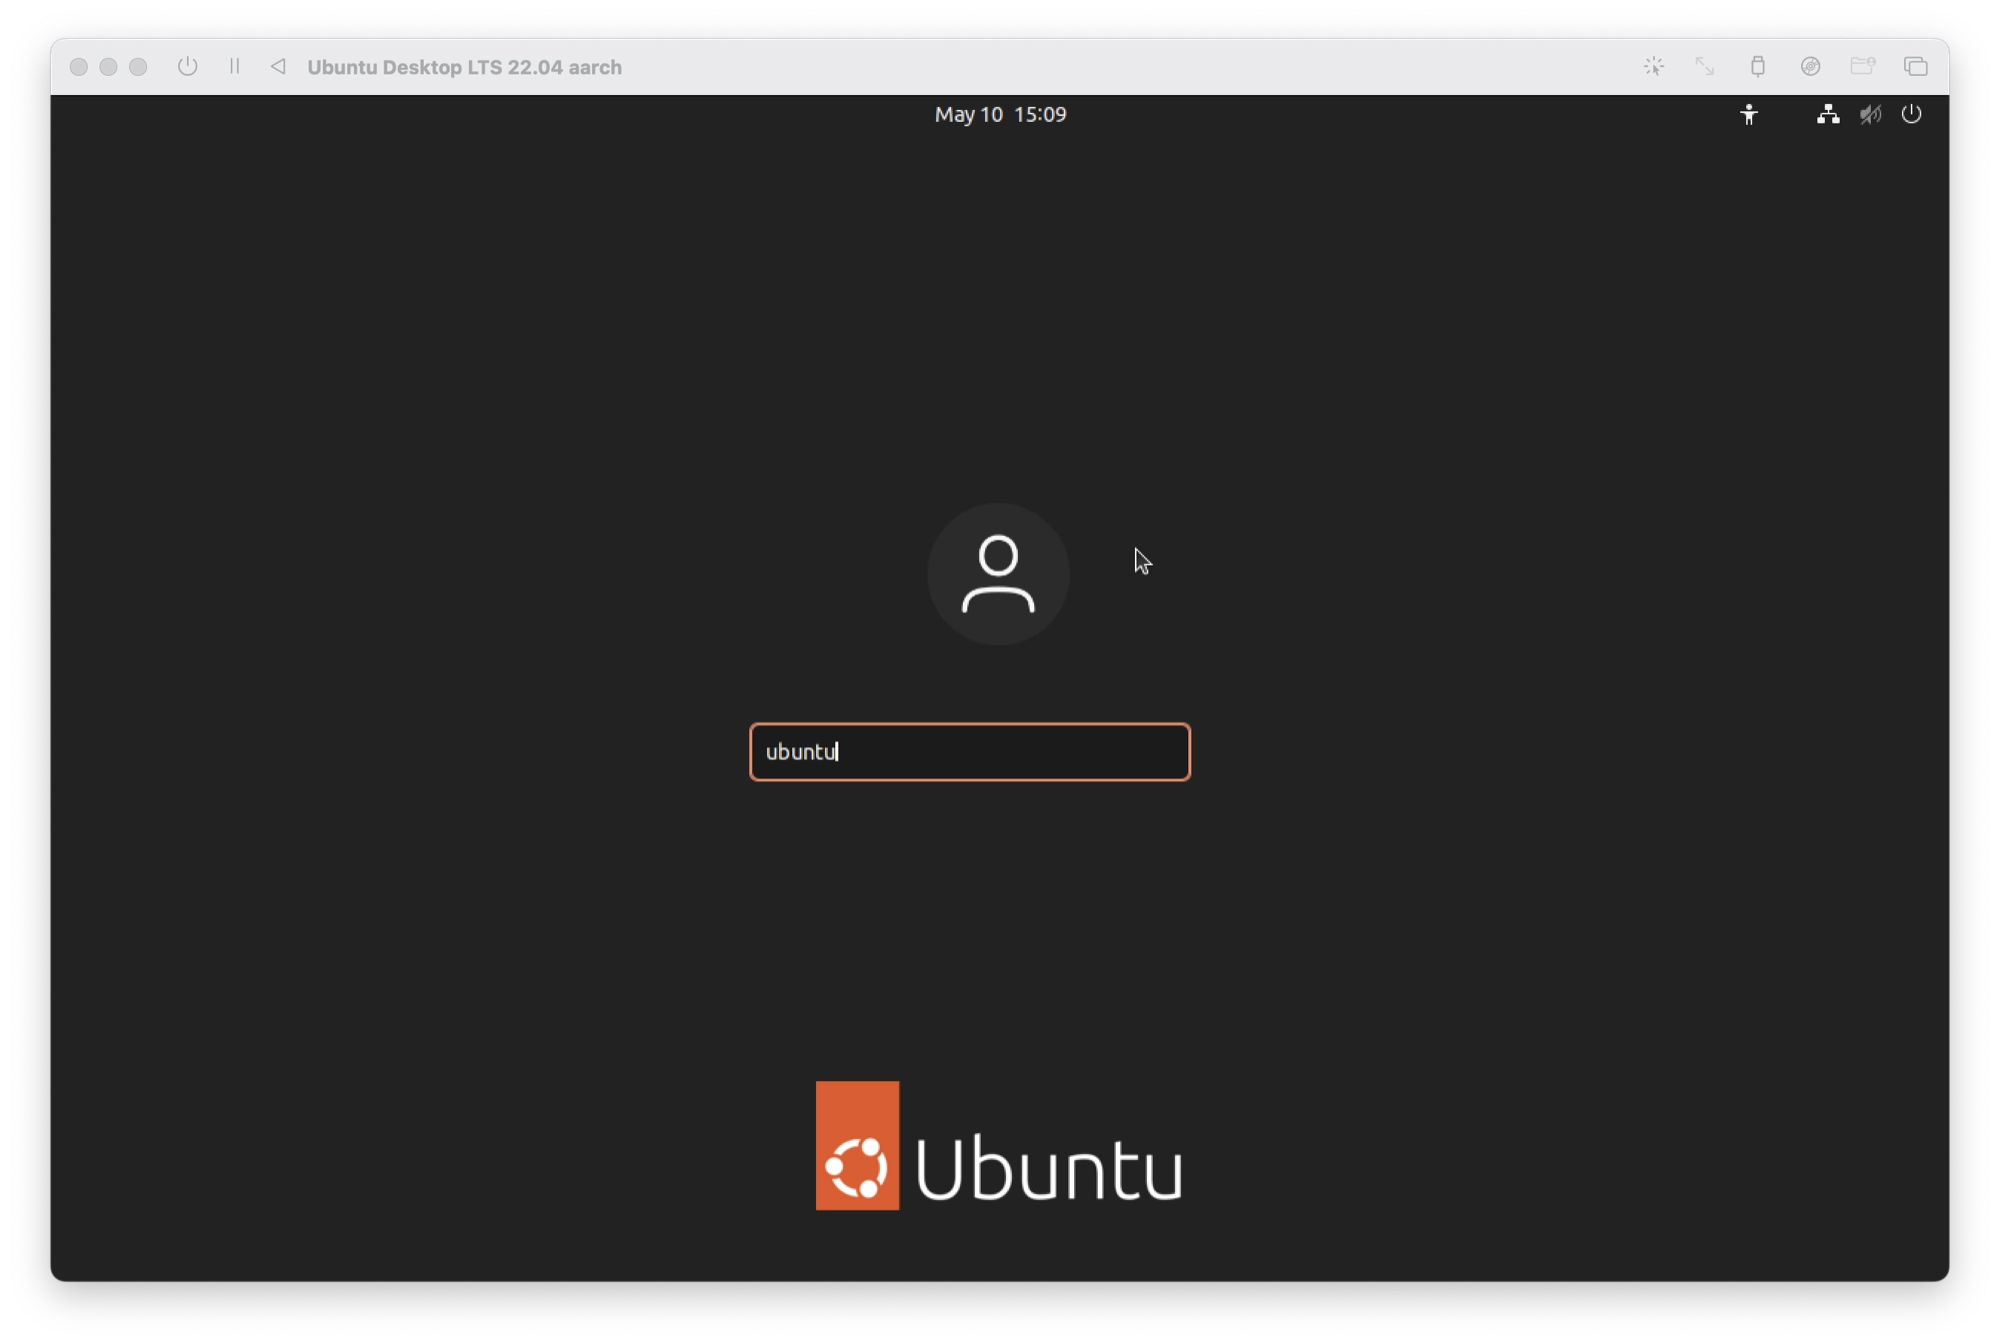
Next, you will be taken directly to the Ubuntu login screen. Enter the default username ubuntu and leave the password blank in order to log in to the desktop.
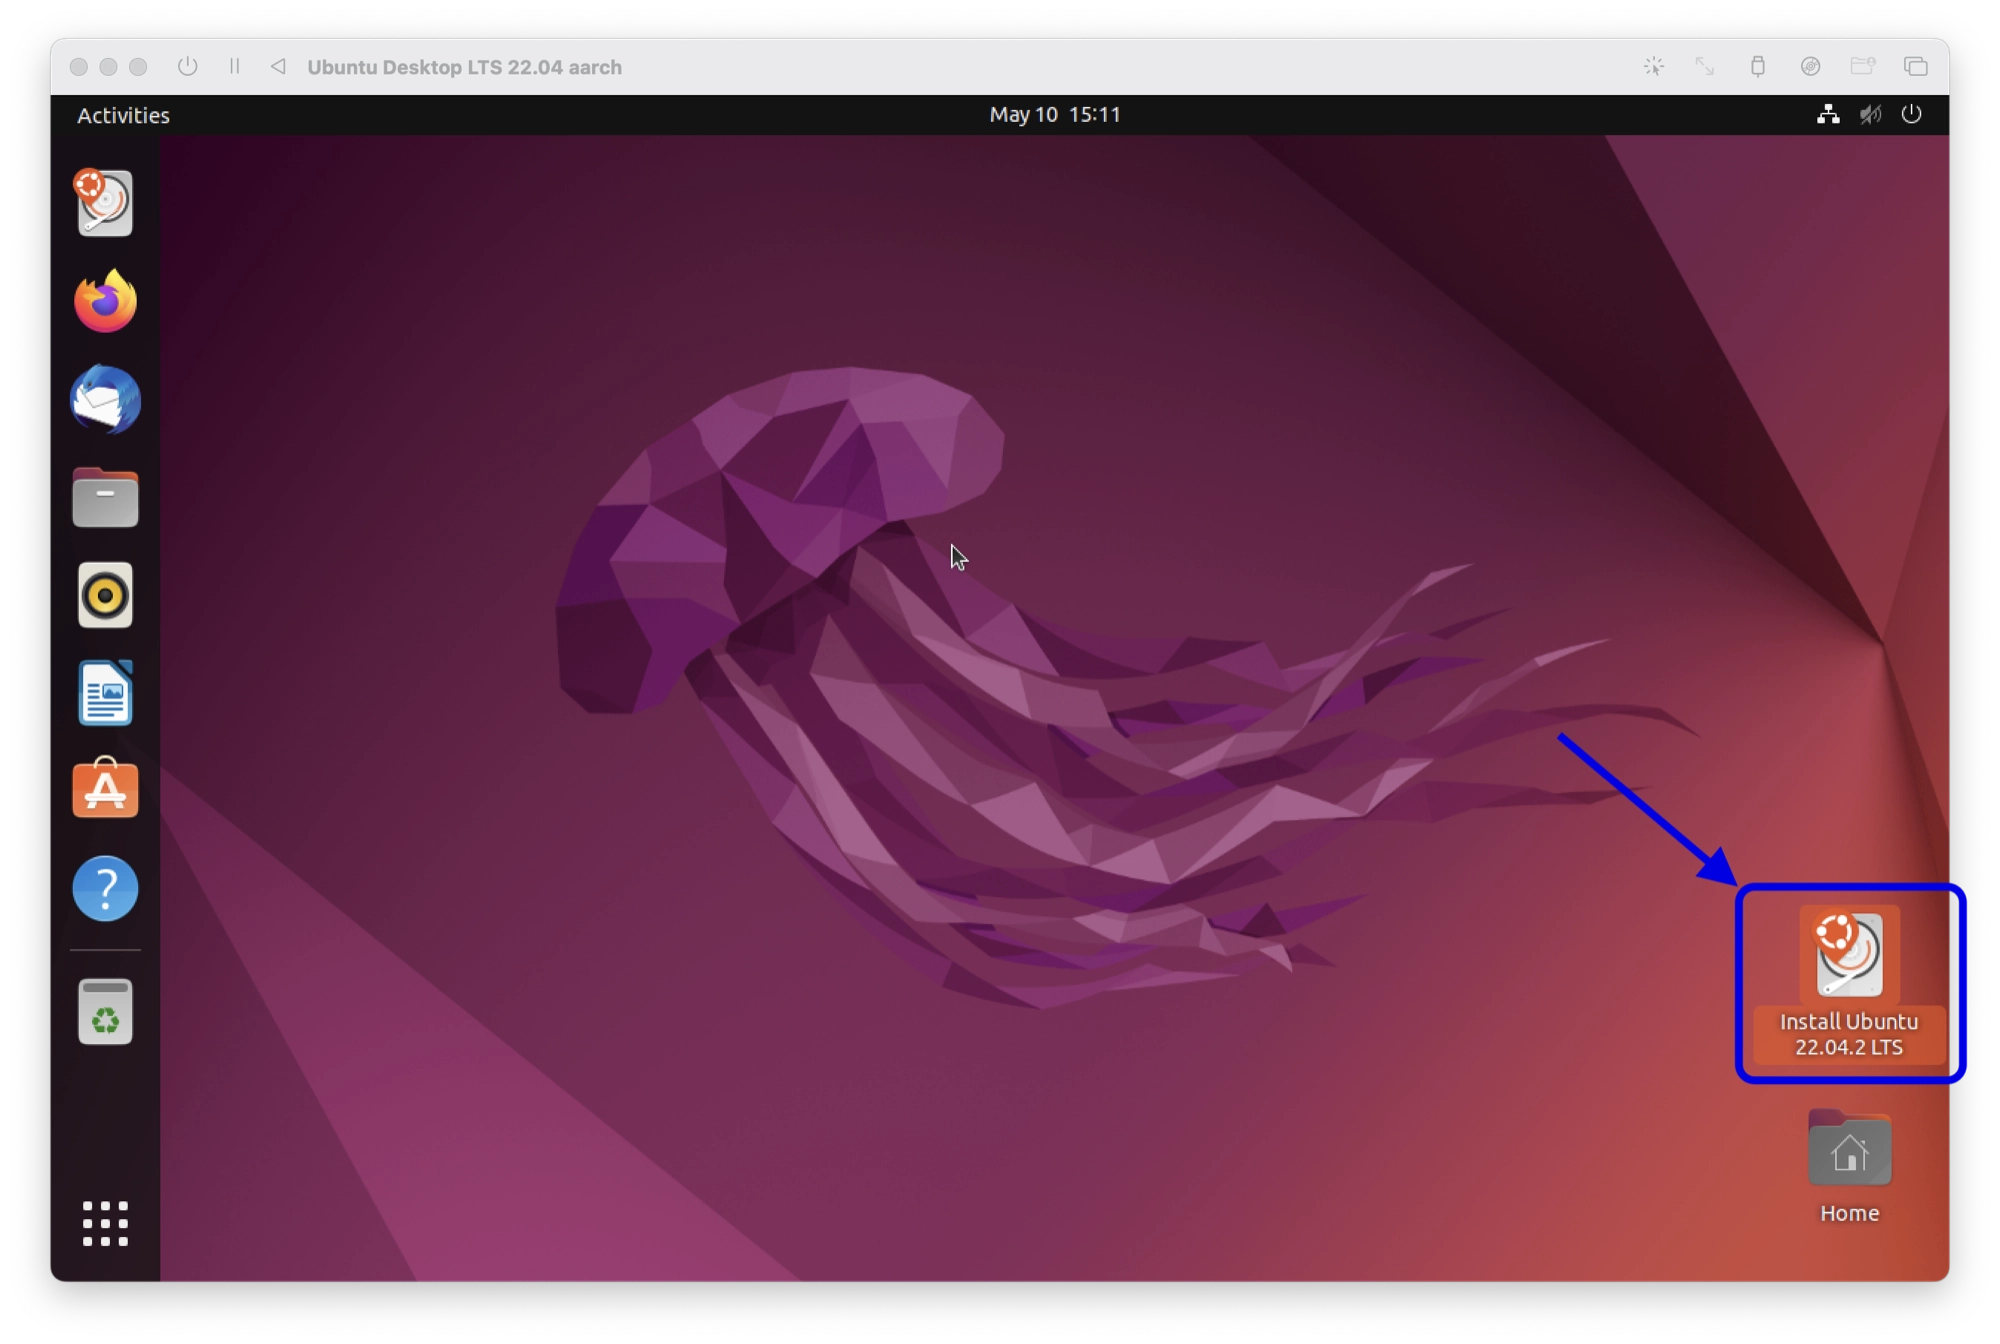
In order to install Ubuntu permanently, click the Install Ubuntu icon in the bottom right-hand corner of the screen to begin the installation process.
Now follow the Ubuntu installation steps as follows:
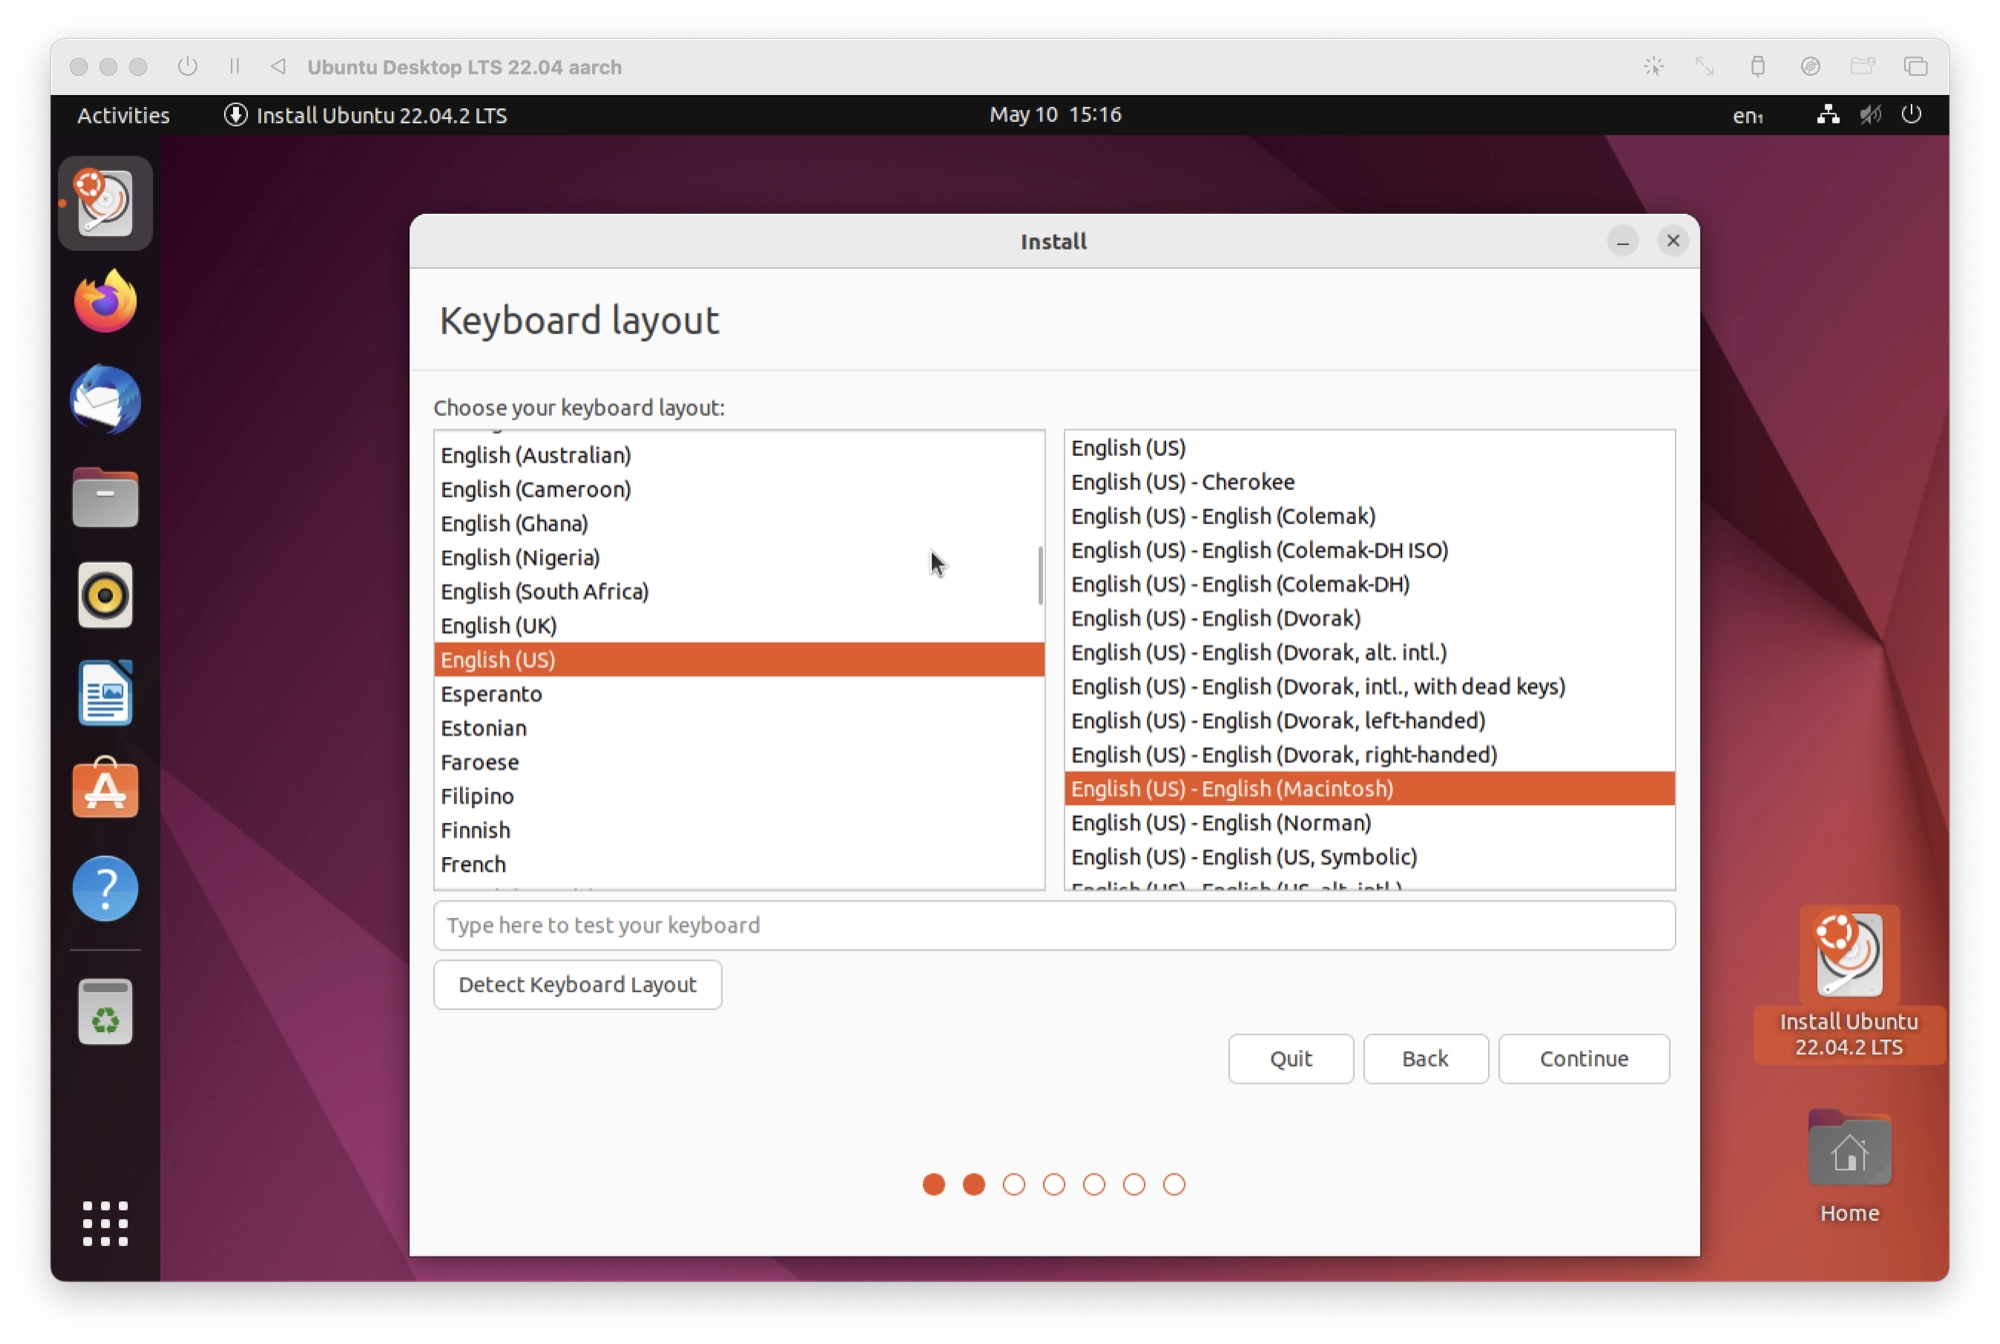
- Choose your desired language and then click continue.
- Choose a Mac keyboard layout for the language of your Mac. For example English (US) > English (Macintosh).
- Choose either a normal or minimal installation:
- Normal installation: includes standard tools such as a web browser, offices tools, games etc…
- Minimal installation: skips the aforementioned tools.
- Choose to download updates while installing Ubuntu.
- Choose erase disk and install Ubuntu, and then click install now to begin the installation process.
- When prompted to create the partitions and write changes to disk, click continue.
- Select your location in order to configure the timezones correctly.
- Enter your desired credentials and choose whether or not you wish the system to log in automatically or require a password.
- Click continue to copy and install the necessary files.
- At the end of the installation process, do not click restart yet.
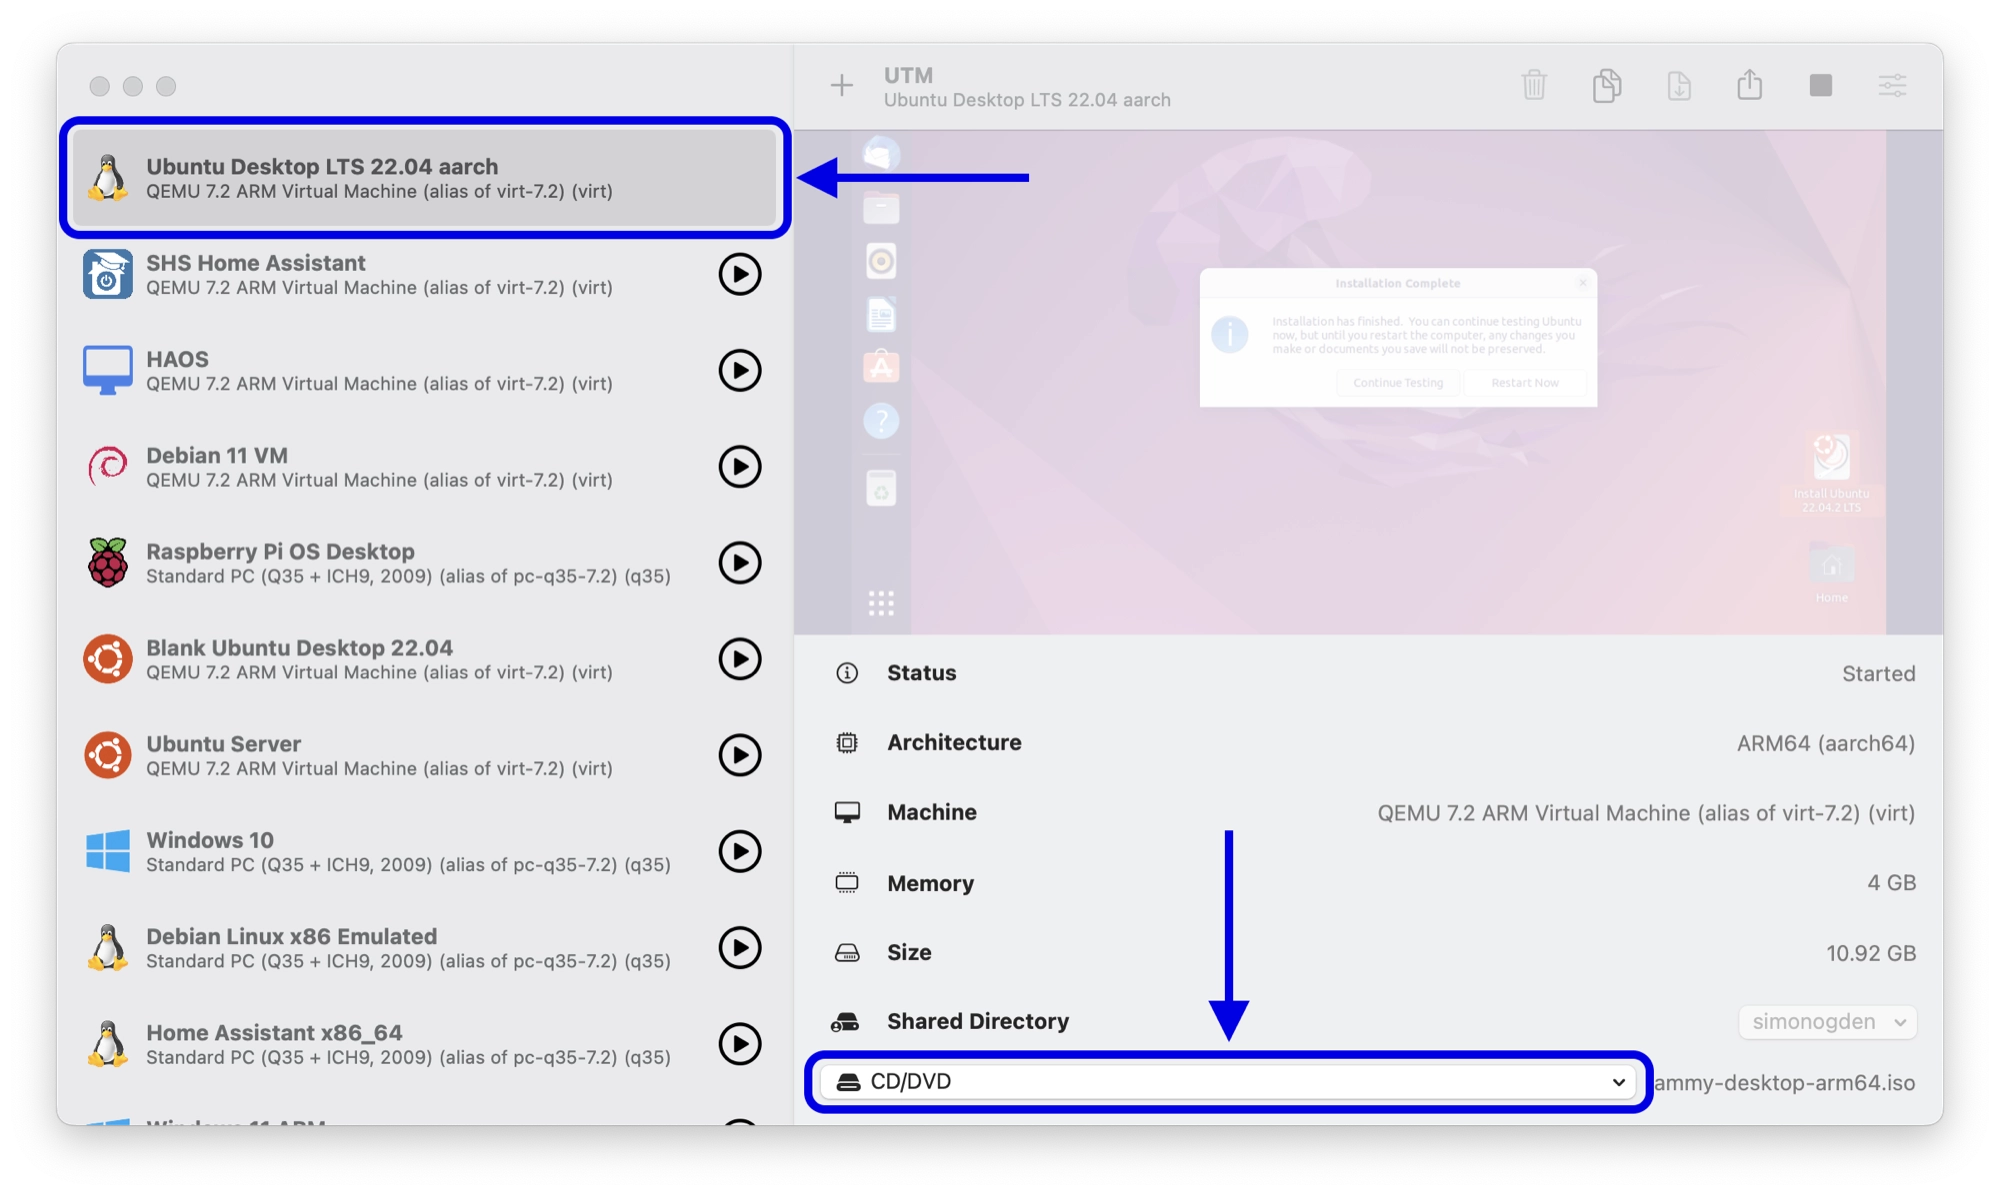
Before restarting following the installation, we need to remove the installation media. This can be done from the UTM main window.
With the VM selected in the left-hand sidebar, click the CD/DVD dropdown menu and then click clear. This will remove the Ubuntu installation .iso so that the VM boots with the new installation, rather than booting the installer again.
Once you have removed the installation media, click restart now to restart the Ubuntu VM.
Installing UTM Guest Addition for Ubuntu
Now that we have completed the Ubuntu installation, we will need to make sure the system has the guest additions for Ubuntu. This is a package of files that allows Ubuntu to fully support all of the UTM features:
- Directory sharing
- Clipboard sharing
- Dynamic screen resolution
- Mouse cursor Mac OS without “capturing” or iOS in “tablet mode”
In most cases the guest additions are already installed and you do not need to complete this step. However, in some cases you may need to install or update them and can therefore follow the next steps.
In order to install the guest additions, we will use the Ubuntu Terminal. Click show applications in the bottom left-hand corner and then click the Terminal application.

Next, enter the following command into the terminal and press enter:
sudo apt install spice-vdagent
This command will install or update the guest additions if necessary. You may also receive notification that no files were added or updated, which means you already had the latest version installed.
Conclusion
Congratulations! You have successfully managed to install Ubuntu Linux on to a new UTM virtual machine on your Apple Silicon Mac.
The process is relatively straightforward, however if you did encounter any difficulties, please leave a message in the comments.
Thanks so much for visiting my site! If this article helped you achieve your goal and you want to say thanks, you can now support my work by buying me a coffee. I promise I won't spend it on beer instead... 😏


Great tutorial. I now have UTM and Ubuntu running. Only thing is that I don’t see the shared directory in the folder structure in Ubuntu. Going to look for that now.
Found it here: https://docs.getutm.app/guest-support/linux/#virtfs