In this tutorial you will learn how to create a simple MacOS GUI window using nothing but the terminal and a couple of free tools!
And do you want to know the best thing?
The window is going to look absolutely native to MacOS, including a cool menu on the main top menu bar. Awesome!
wxWidgets gives applications a truly native look and feel because it uses the platform’s native API rather than emulating the GUI
– https://www.wxwidgets.org/
So… how on earth do we do this?
We will be using an open source C++ library called wxWidgets, which is completely free to download.
Further to this the wxWidgets library is also cross-platform, so the same code can be used to create Windows and Linux versions of the application.
Note that this tutorial is ideal for those wanting to use C++, however if you are just looking to develop an app for macOS then you would be better considering using Xcode and Swift, check out this tutorial to find out just how easy it is!
Table of Contents
- Prerequisite
- Where To Download wxWidgets for MacOS
- How To Build wxWidgets from Source on MacOS
- Building the wxWidgets Hello World Example on MacOS
- Conclusion
Prerequisite
If you have visited the wxWidgets website, you may have noticed that there is already a good selection of documentation available already.
However you need to have some intermediate level of understanding in order to make use of it.
Therefore this article is aimed at beginners.
wxWidgets is a C++ library that lets developers create applications for Windows, macOS, Linux and other platforms with a single code base
– https://www.wxwidgets.org/
We will cover everything from the download and installation process, right the way up to getting the hello world GUI program up and running.
If you are just getting started with coding and you want to get a simple GUI application going on MacOS, this is absolutely the tutorial for you!
If you have never compiled C++ on MacOS before then I would recommend first running through my tutorial which explains how to compile C++ on MacOS.
If you are new to programming in general, I would also recommend following my beginners guide to C++ on MacOS before working through this tutorial.
Where To Download wxWidgets for MacOS
In order to use wxWidgets we must first download the source code and then compile it into usable libraries.
It is possible to download the wxWidgets source directly from the official website, however for the purpose of this tutorial we will use git.
You should already have git installed on MacOS but you may need to activate it with the following command.
git version
However if you do need to install git, there are several quick and easy methods of installation given on the official website.
First, let’s create a directory for wxWdigets. This can be any location of your choice, but for this purpose of this tutorial we will create it within the home directory.
mkdir ~/wxw
cd wxw
Next, from within the newly created directory we can download wxWidgets using git.
git clone --recurse-submodules https://github.com/wxWidgets/wxWidgets.git
This will copy all of the necessary files into our newly created directory. It may take a couple of minutes to complete.
How To Build wxWidgets from Source on MacOS
Now that we have downloaded the wxWidgets source we will need to build it.
There are several tools/methods that we can use to build the source. In this example we will use a freely available tool called CMake.
So, what exactly is CMake?
CMake is an open-source, cross-platform selection of tools designed to build, test and package software.
Simply put, we will be using CMake to help us to build the wxWidgets libraries that we need for our program.
Once we have compiled libraries, we can include them in our own C++ program in order to generate GUI elements.
Download and Install CMake
If you don’t already have CMake on your system, you will first need to install it.
You can download the latest stable release directly from the official website.
However I would recommend installing CMake using Homebrew. If you don’t have Homebrew, take a quick look here and follow the quick and easy installation instructions.
Then run the brew command to install CMake.
brew install cmake
Build wxWidgets Using CMake
Once git has finished cloning wxWidgets into the directory that you made earlier, go ahead and list the directory contents.
ls
You should notice that the wxWidgets directory has now been created. Go ahead and change into this directory.
cd wxWidgets
Next, we need to create an empty directory within our wxWidgets directory in order to store the compiled libraries.
mkdir build-mac
cd build-mac
Once you have entered the new directory, go ahead and run the cmake command in order to create the build files.
cmake ..
You may find that this produces and error due to missing dependencies.
If you are missing anything, you will need to install each of the missing dependencies before running cmake again.
If you do need to try again, I would recommend deleting the build-mac directory and starting again from this point in the tutorial.
Once CMake has finished we are ready to build the wxWidgets libraries. Go ahead and run the make command.
make -j 16
Note that the -j flag specifies the number of threads.
If you encounter any errors then you can try the make command alone, just be aware that it will take a lot longer.
Building the wxWidgets Hello World Example on MacOS
Now that we have downloaded the wxWidgets source and built from it the libraries that we need, we can try a sample C++ program!
There is a hello world program example on the official site with a detailed write up.
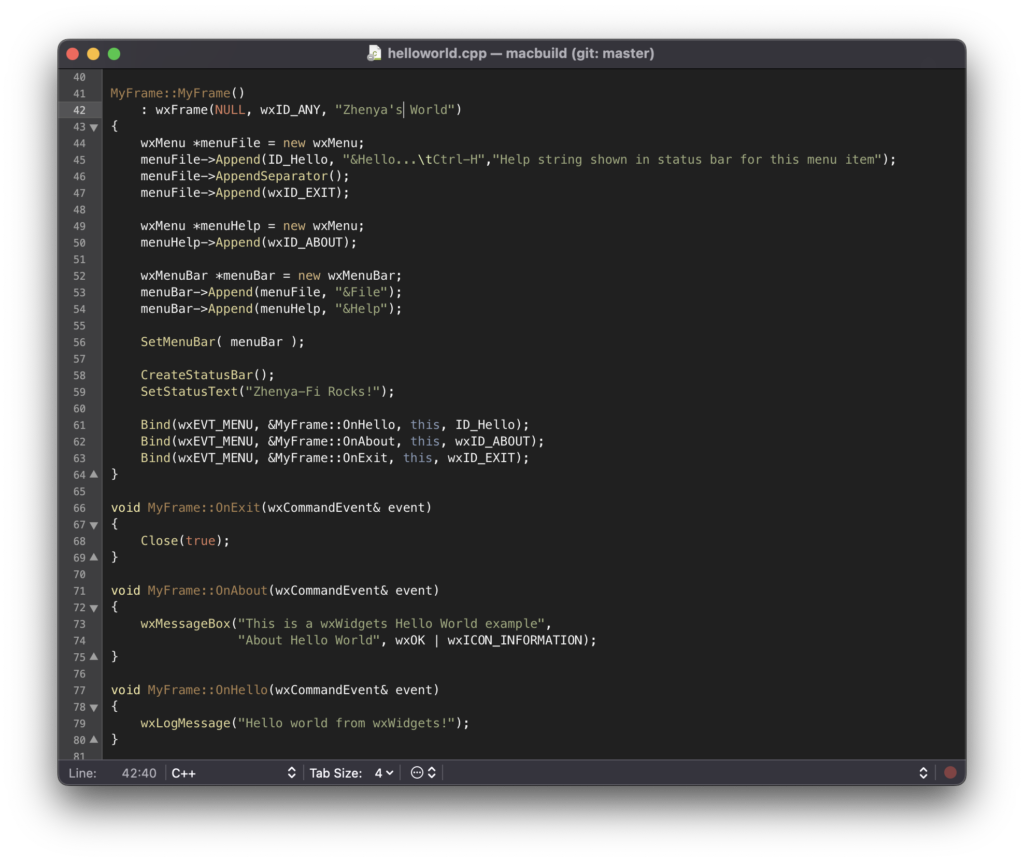
It would be wise to read all of the details on the official page as it will help you to understand what is going on. However for the purpose of this tutorial, we will just use the code as is so go ahead and copy the following:
// wxWidgets "Hello World" Program

// For compilers that support precompilation, includes "wx/wx.h".
#include <wx/wxprec.h>

#ifndef WX_PRECOMP
    #include <wx/wx.h>
#endif

class MyApp : public wxApp
{
public:
    virtual bool OnInit();
};

class MyFrame : public wxFrame
{
public:
    MyFrame();

private:
    void OnHello(wxCommandEvent& event);
    void OnExit(wxCommandEvent& event);
    void OnAbout(wxCommandEvent& event);
};

enum
{
    ID_Hello = 1
};

wxIMPLEMENT_APP(MyApp);

bool MyApp::OnInit()
{
    MyFrame *frame = new MyFrame();
    frame->Show(true);
    return true;
}

MyFrame::MyFrame()
    : wxFrame(NULL, wxID_ANY, "Hello World")
{
    wxMenu *menuFile = new wxMenu;
    menuFile->Append(ID_Hello, "&Hello...\tCtrl-H",
                     "Help string shown in status bar for this menu item");
    menuFile->AppendSeparator();
    menuFile->Append(wxID_EXIT);

    wxMenu *menuHelp = new wxMenu;
    menuHelp->Append(wxID_ABOUT);

    wxMenuBar *menuBar = new wxMenuBar;
    menuBar->Append(menuFile, "&File");
    menuBar->Append(menuHelp, "&Help");

    SetMenuBar( menuBar );

    CreateStatusBar();
    SetStatusText("Welcome to wxWidgets!");

    Bind(wxEVT_MENU, &MyFrame::OnHello, this, ID_Hello);
    Bind(wxEVT_MENU, &MyFrame::OnAbout, this, wxID_ABOUT);
    Bind(wxEVT_MENU, &MyFrame::OnExit, this, wxID_EXIT);
}

void MyFrame::OnExit(wxCommandEvent& event)
{
    Close(true);
}

void MyFrame::OnAbout(wxCommandEvent& event)
{
    wxMessageBox("This is a wxWidgets Hello World example",
                 "About Hello World", wxOK | wxICON_INFORMATION);
}

void MyFrame::OnHello(wxCommandEvent& event)
{
    wxLogMessage("Hello world from wxWidgets!");
}
Create a helloworld.cpp file
You will need to paste this code into a new .cpp file in the build-mac directory.
The easiest way to do this is by using Nano, the terminal text editor. From the build-mac directory, enter the following command.
nano helloworld.cpp
This command will open a blank file in the nano text editor, called helloworld.cpp.
Paste the hello world sample code from above into the Nano text editor. Then press control + X followed by Y and then enter to save and close the file.
This will create a new file helloworld.cpp that contains the hello world sample code.
Using Nano is probably the quickest and easiest way to create this file, however you could use your prefered text editor instead.
Compile the helloworld.cpp file
The last thing that we must do is compile the hello world sample code into an executable file.
We will do this using G++ from the GNU Compiler Collection.
If you do not have G++ or have not yet compiled any C++ on MacOS, you can check out this guide for further assistance if needed.
The following command will compile helloworld.cpp into the executable file helloworld.
g++ -std=c++20 helloworld.cpp -o helloworld `./wx-config --cxxflags --libs`
Note that wx-config is a small configuration utility that can return the paths of previously build libraries as well as the required flags. It basically simplifies the compilation command.
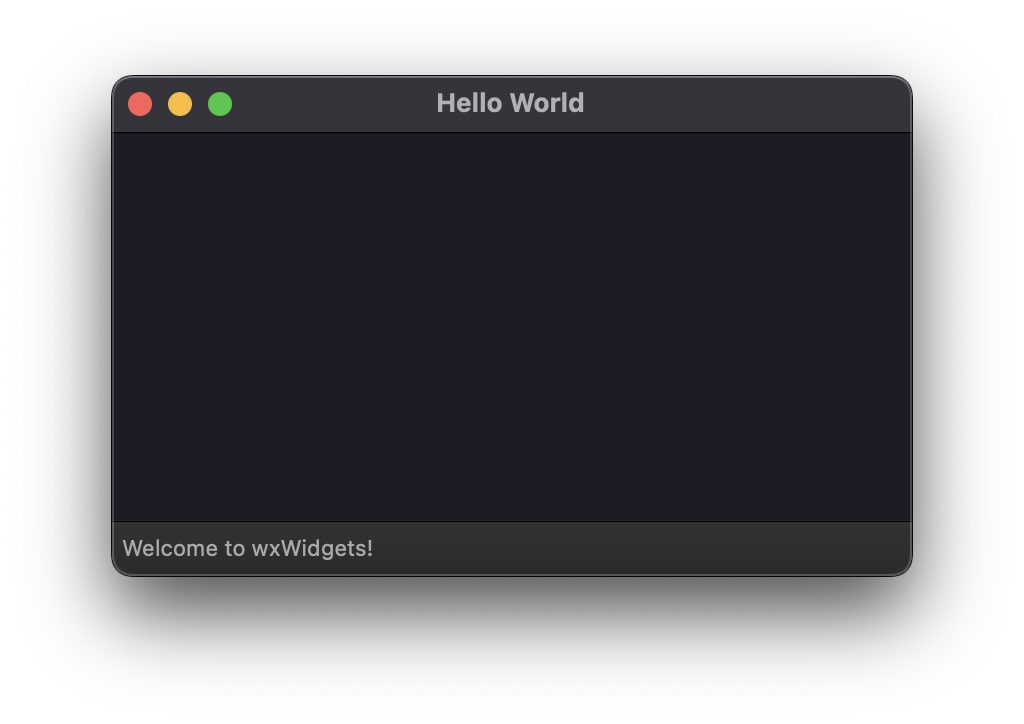
Running the wxWidgets hello world example
The previous command will execute without errors if everything is configured correctly. In this case the helloworld executable file should be available.
You can run the helloworld executable file directly from the terminal.
./helloworld
When the program runs, a small MacOS GUI window should open. Congratulations! You have build your first C++ MacOS GUI application!
Conclusion
It is entirely possible to build a beautiful native GUI for MacOS using C++ with the help of wxWidgets.
Although the build process for the libraries is a little in-depth, it is still fairly straightforward to get the hello world example up and running.
Thanks for reading this far! If you enjoyed this tutorial, be sure to check out some of my other C++ tutorials whilst you are here!
Thanks so much for visiting my site! If this article helped you achieve your goal and you want to say thanks, you can now support my work by buying me a coffee. I promise I won't spend it on beer instead... 😏