If you want to design and make your own application for macOS but you are not quite sure where to begin then you are in the right place!
This article is the first in a series of articles that will provide beginners with a complete step by step guide for building a simple macOS application from start to finish.
This article will walk you through the process of creating your very own macOS application using Xcode, which is a free tool that Apple provide for building your own applications compatible with Apple devices.
By the end of this tutorial you will have a solid understanding of what Xcode is, why you need it and where you can get it.
If you already know what Xcode is and would prefer to just skip the primer and get started with the fun bit, you can click here to skip ahead to getting started with building an application.
Complete Beginners Guide: Swift & Xcode
- Part 1 – How to Make a macOS Desktop App: Beginners Start Here
- Part 2 – Beginners Guide to Adding Images, Sounds and Icons to Xcode
- Part 3 – An Easy Beginners Guide to Making a macOS GUI using Swift
- Part 4 – How to Add Audio to your macOS App Using Swift
- Part 5 – Beginners Guide to Xcode & Swift: Completing the App
What is Xcode for macOS and Why Do I Need It?
Xcode is a completely free tool provided by Apple that you can use to produce your very own app. It provides a complete suite of tools for building your application from start to finish.
You can use Xcode to design applications for the whole Apple ecosphere, including macOS, iPhone, iPad and Apple Watch.
In this tutorial we will focus on designing an application for macOS, however the skills that you will learn are transferable and this article also provides a great primer for iOS development.
Is Xcode Difficult to Use?
Xcode can look a little scary when you first get started, but don’t fear! It is no more complicated than any computer application with a lot of functionality.
If you have mastered Photoshop, Final Cut or even Microsoft Excel then you can also master Xcode!
Do I Need to Use Xcode, or Can I Use Something Else?
You don’t actually need to use Xcode to develop applications on macOS. You can write programs for Mac by pairing just a text editor and compiler, leveraging any of the commonly available languages, such as Python or C++.
You can even produce applications with a graphical user interface using nothing more than the macOS Terminal and a bit of C++.
Xcode is just one of the tools that you can use to make your application, however one of the benefits of using it is that it has everything that you need in one place.
We call this type of tool an Integrated Development Environment, or IDE. Xcode is one of many IDEs available for macOS, however it is likely the best choice if you want to develop applications targeting the Apple ecosphere.
As Xcode is produced by Apple themselves, it provides the easiest way to produce beautiful and feature-rich applications targeting the Apple ecosphere.
Although Xcode is not mandatory, I would strongly recommend choosing it to develop your projects, unless you need cross-compatibility (applications that work on macOS, Windows and Linux). In this case you may want to consider Qt instead.
What is Swift and Why Do I Need It?
Swift is a special computer programming language that allows developers to create apps for Apple devices like iPhones, iPads, and Mac computers.
It was made by Apple in order to be really good at making apps that are both safe and fast. Here are some important things to know about Swift:
- Safety: Swift was designed to help developers make fewer mistakes. It has special features that make it easier to catch and fix errors, so the apps you use are less likely to crash or have problems.
- Speed: Swift is built to make apps run quickly. It’s been carefully made to be fast and efficient, so the apps you use respond quickly and feel smooth.
- Easy to Understand: Swift is designed to be easy to read and write. It uses simple words and phrases that make sense, so developers can understand the code easily. This helps them create apps more quickly and with fewer mistakes.
- Works with Older Code: If developers have already made apps using an older language called Objective-C, they can still use that code in Swift. This makes it easier to update and improve existing apps without having to start from scratch.
- Interactive Learning: Swift has a special feature called “Playgrounds” that helps people learn how to code. It’s like a sandbox where developers can experiment and see the results of their code right away. It’s a fun way to learn and try out new ideas.
- Shared with the Community: Apple made Swift available to everyone by sharing it with the wider community of developers. This means that many people are contributing to making Swift better by creating new tools and resources.
Swift has become very popular among developers who make apps for Apple devices. It’s considered a great language because it makes app development safer, faster, and more enjoyable.
In this tutorial we won’t dive too deeply into programming concepts as our goal is to become familiar with Xcode. However we will utilize some simple Swift code in order to produce our sample application.
The reason I like to adopt this approach is because I believe it is much easier to learn programming when applying it.
This will also make this tutorial suitable for both complete beginners who have no prior programming experience and those who understand programming concepts but have not yet used Xcode or Swift.
How do I Install Xcode and Swift on my Mac for Free?
Both Xcode and Swift are both completely free and are available to download and install either from the App store or directly in a browser:
You can download Xcode using your browser from the official site, or you can use the App Store:
- Open the Mac App Store on your Mac computer.
- Search for “Xcode” using the search bar at the top right corner of the App Store.
- Locate the Xcode app in the search results.
- Click on the “Get” or “Download” button to start the download and installation process.
- Go make coffee! Xcode is a rather huge download, so it will take a while.
Are Swift and Xcode really free?
Both Xcode and Swift are entirely free to download and use. While Xcode and Swift may not directly generate revenue, they play a crucial role in facilitating app development for Apple platforms.
By providing developers with powerful development tools like Xcode, Apple aims to foster an ecosystem that encourages the creation of innovative apps and services, ultimately driving hardware sales, app revenue, and other monetization avenues within its ecosystem.
So Apple provide everything that we need to develop our own applications for free. Awesome!
This makes sense, as the more developers they have producing apps for the App store, the more revenue they can generate in commission through App store sales.
I think this business model is great because it allows literally anyone to start a business in software development.
You don’t need any large amounts of investment to get started. All you need is your Mac.
Can I Sell my macOS Application Made With Xcode?
Yes, you are completely free to sell your macOS application that has been made with Xcode.
Once you have developed your macOS application using Xcode, you have the option to distribute and sell it through various channels. Here are a few common methods to sell your macOS application:
- Mac App Store: You can choose to distribute your application through the Mac App Store, Apple’s official marketplace for macOS apps. By submitting your app to the Mac App Store, you can reach a wide audience of macOS users and leverage the built-in distribution and payment infrastructure provided by Apple. Keep in mind that selling your app on the Mac App Store requires adherence to Apple’s guidelines and compliance with their review process.
- Third-Party Platforms: Apart from the Mac App Store, there are third-party platforms and marketplaces where you can sell your macOS applications. Examples include platforms like Setapp, Paddle, FastSpring, and more. These platforms provide alternative distribution channels and payment processing solutions for independent developers.
- Direct Sales: You have the option to sell your macOS application directly from your own website or other online platforms. This approach gives you more control over the distribution and pricing of your application. You can use payment gateways, such as PayPal or Stripe, to handle transactions and deliver licenses or download links to customers upon purchase.
When selling your macOS application, it’s important to consider factors like pricingand software licensing, however that is beyond the scope of this article so we will save that for another day!
Creating a New Xcode Project
Once you have downloaded and installed Xcode it is time to launch it for the first time! When you first open Xcode, you will be greeted by the welcome screen:
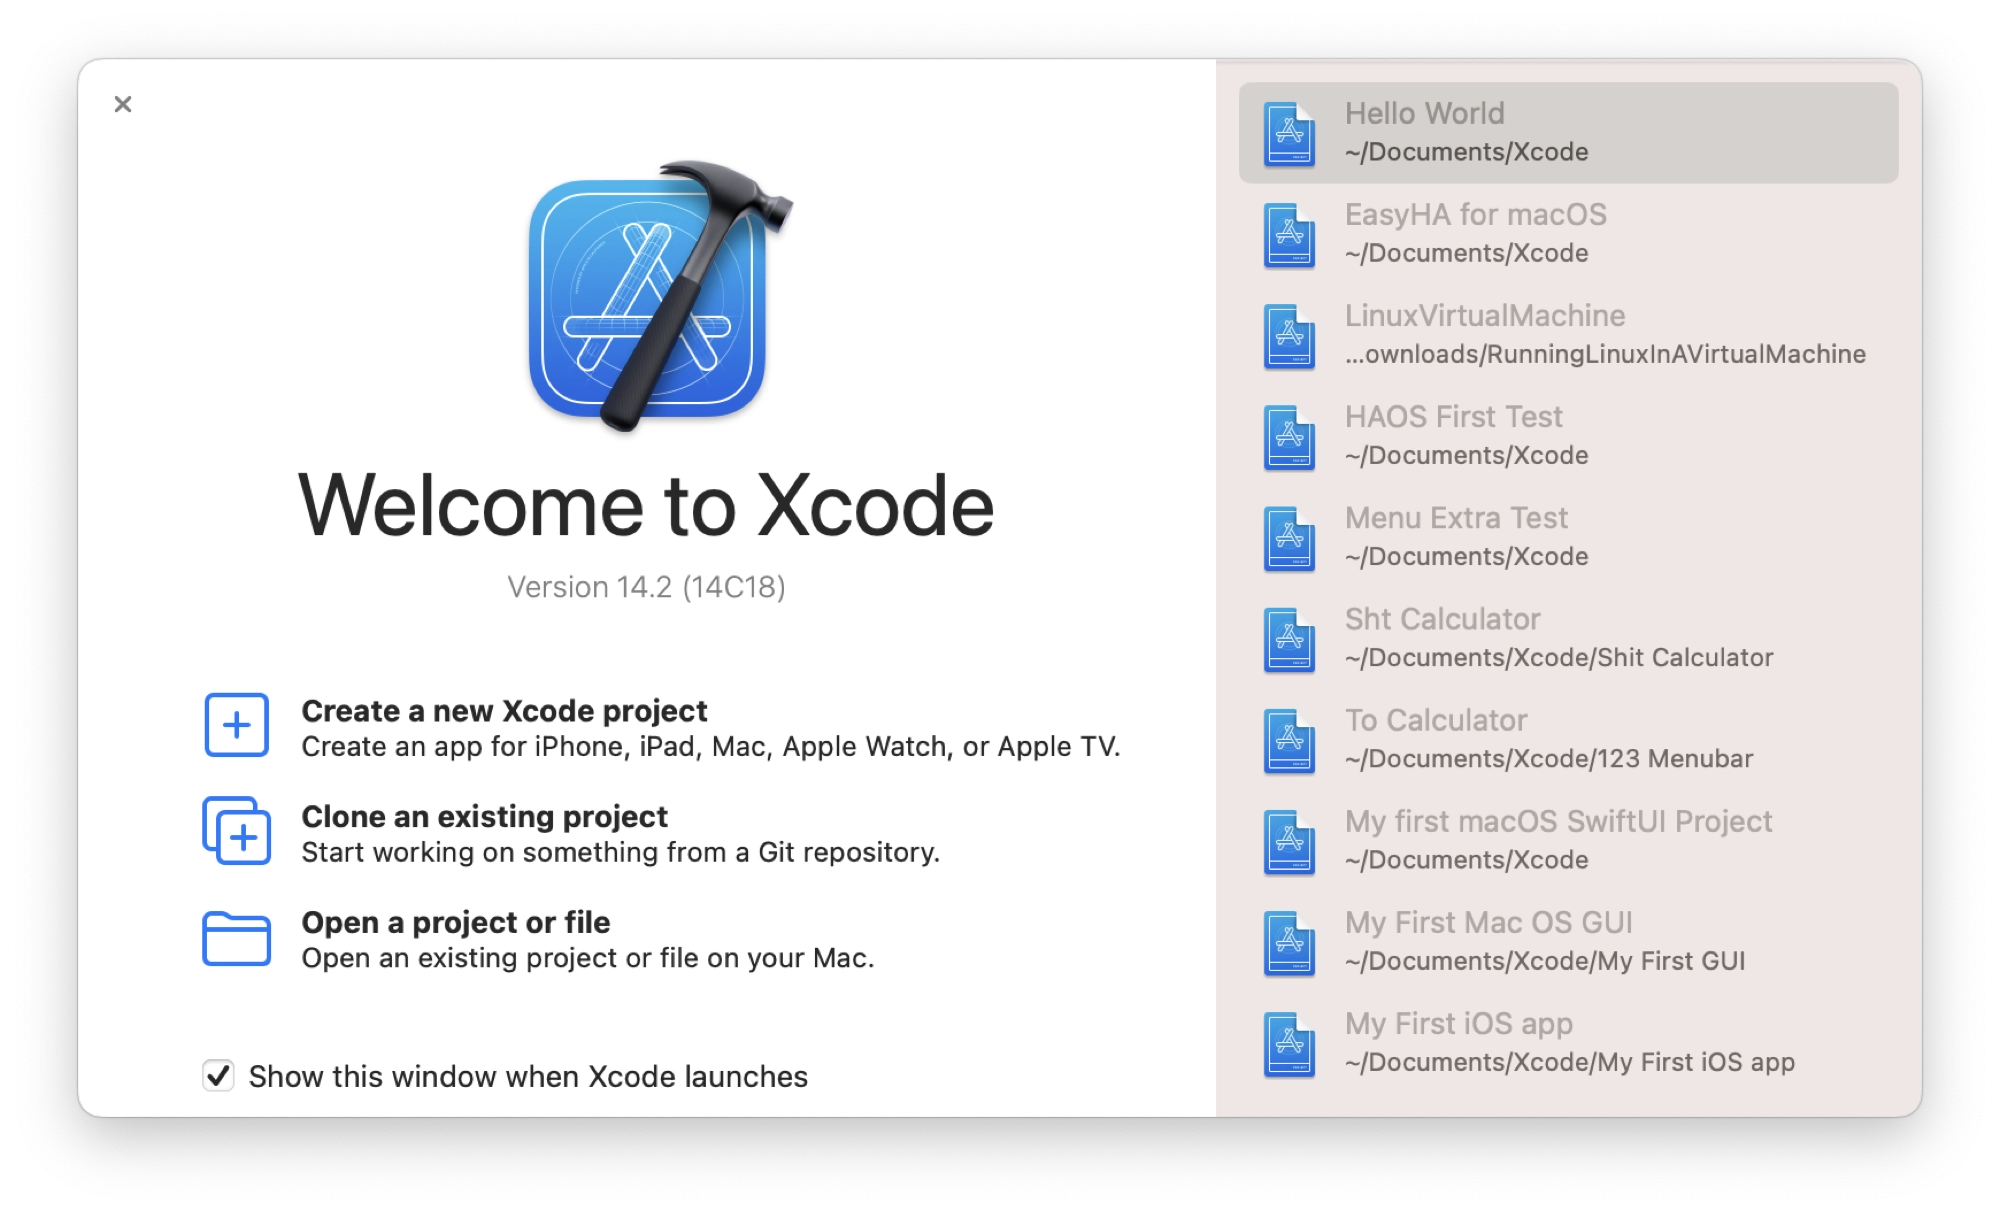
On the right-hand side you have a convenient option for choosing recent projects, which will become populated as you create more projects.
On the right-hand we have options to create a new project, clone an existing project or open a specific existing project.
Go ahead and click Create a New Project.
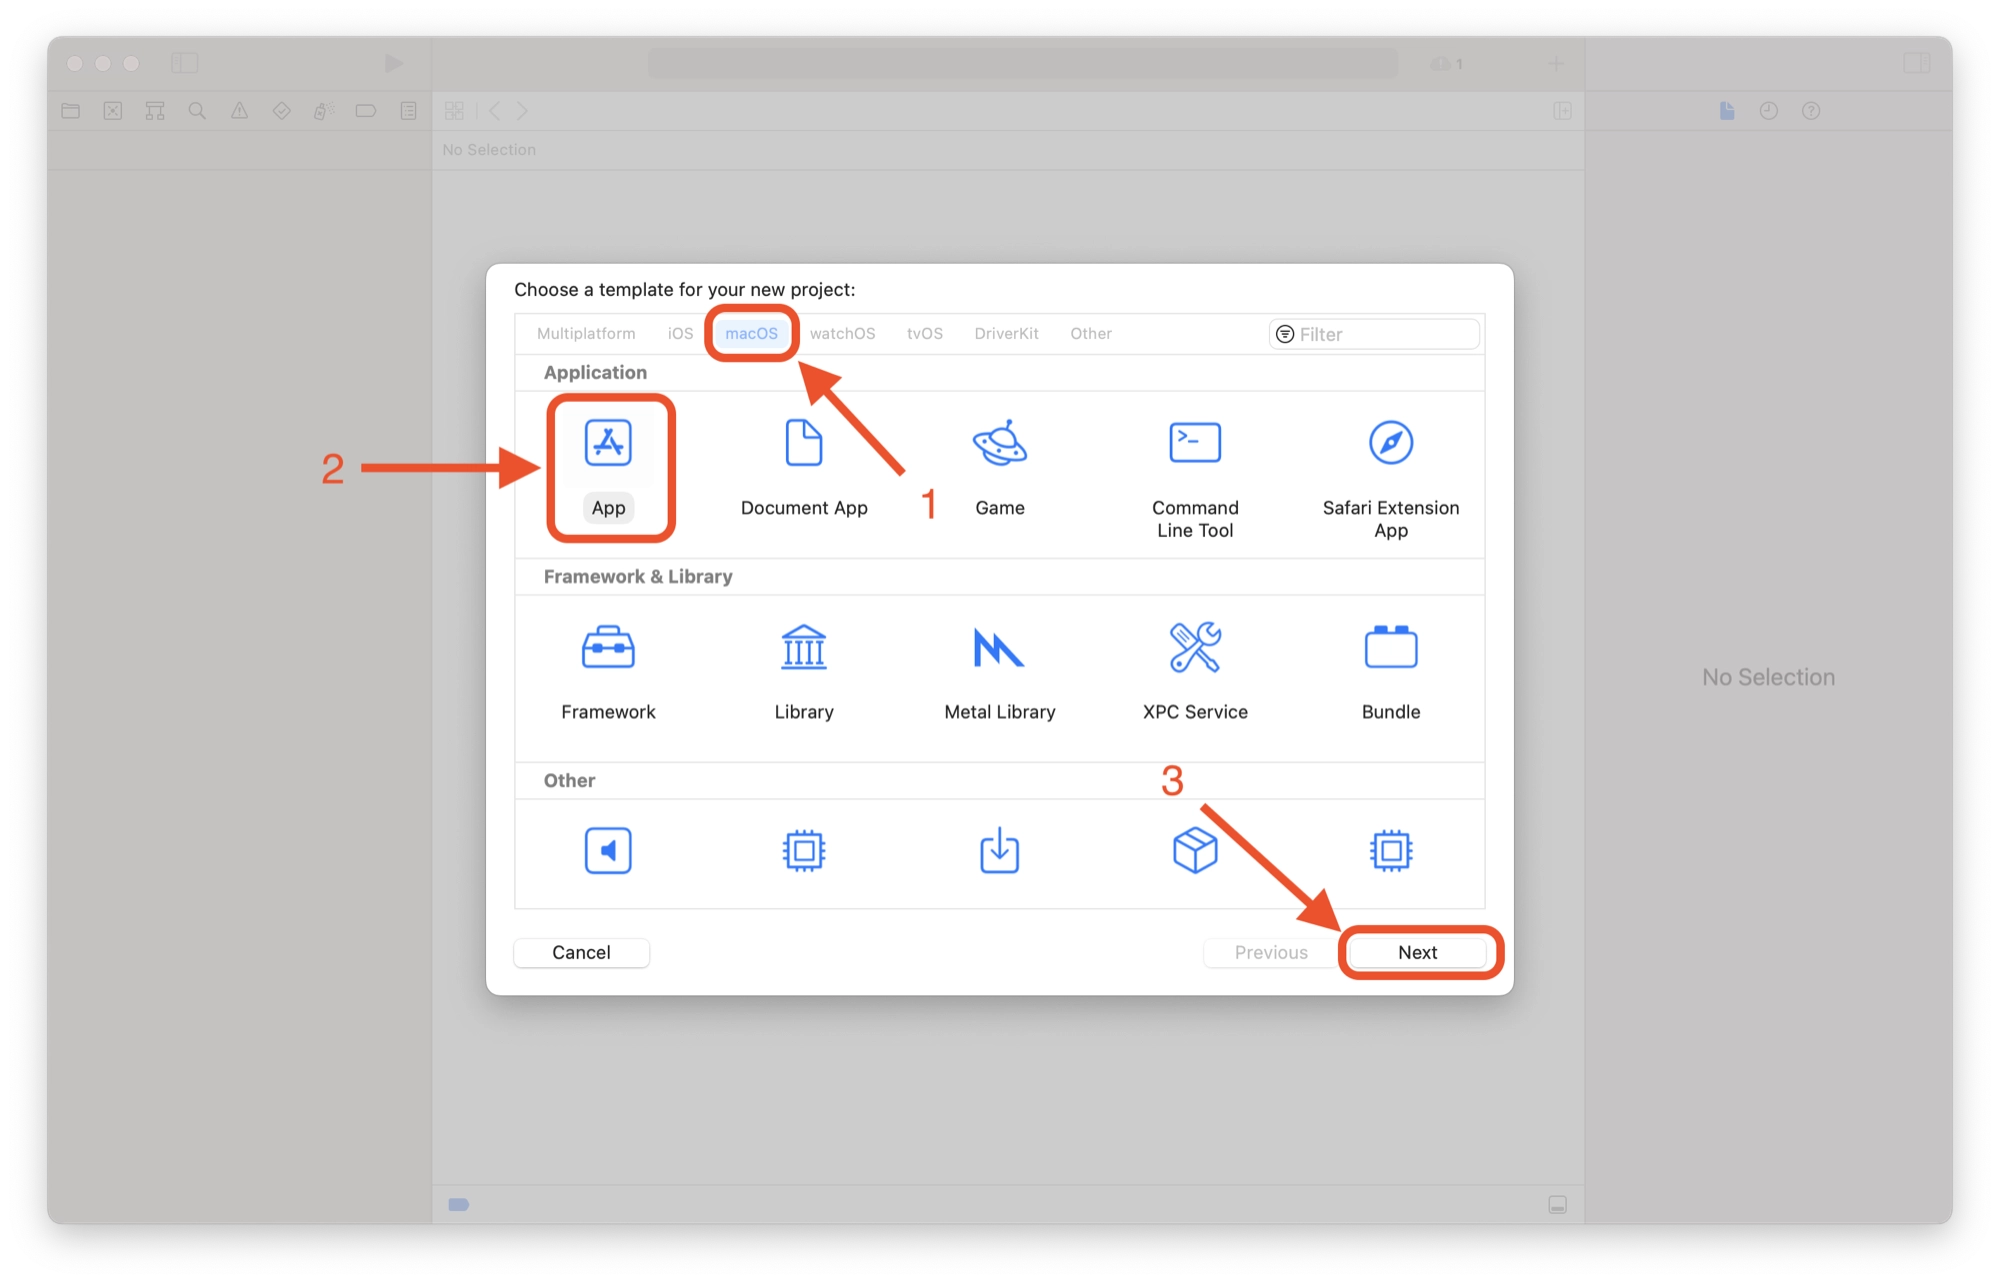
On the next screen you can choose the type of project that you wish to create. Choose the macOS platform, choose App and then click Next. This will create a project suitable for building a macOS application.
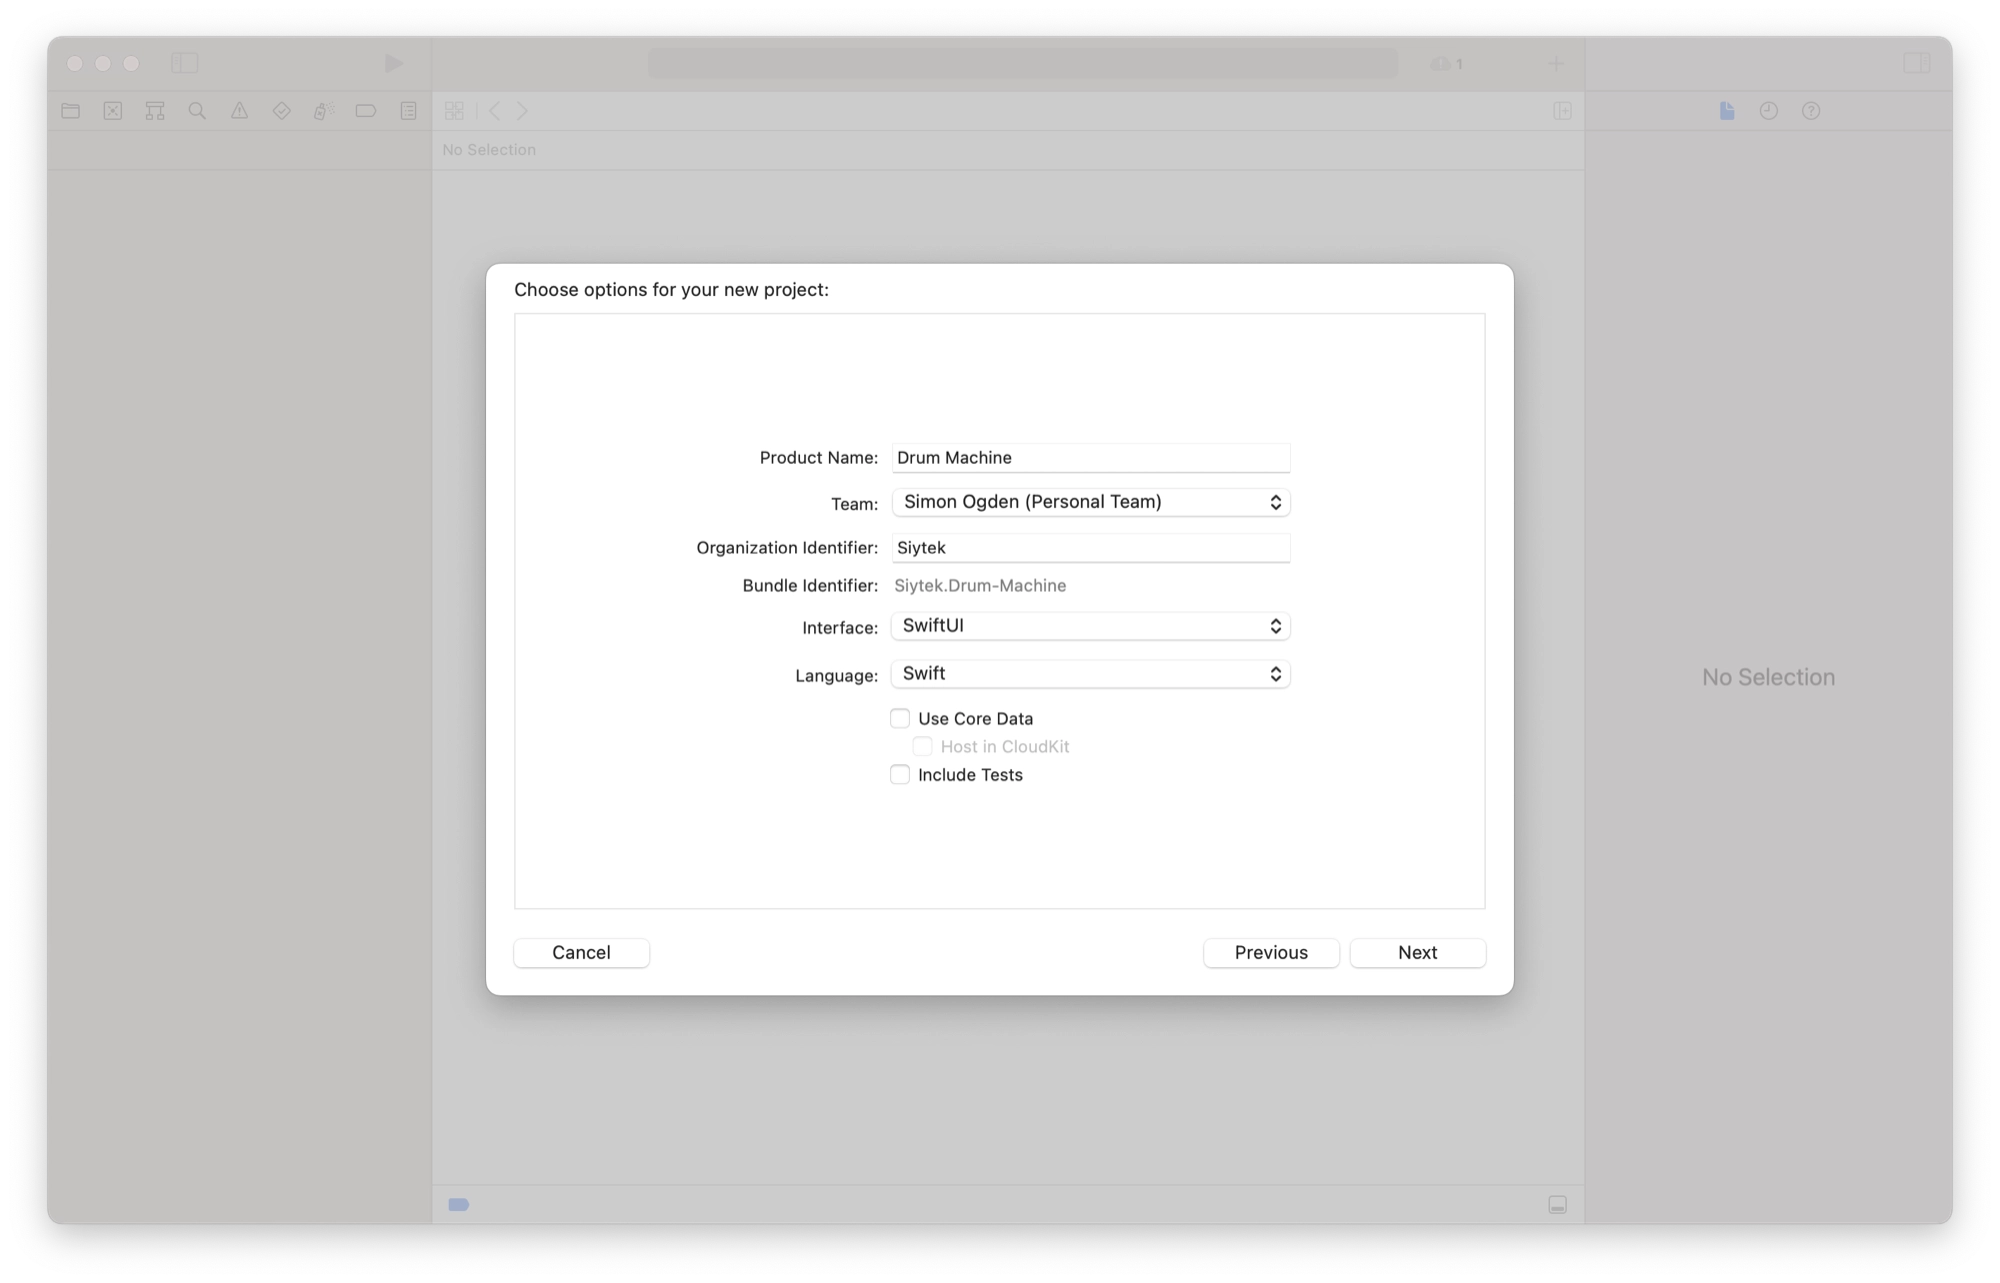
On the next screen you will be given the opportunity to choose the main project settings. We will call our sample application Finger Drums.
Note that it is not straightforward to rename a project once you have chosen the name, so choose wisely!
For the Team option you should just be able to set the personal team option.
Enter an organization identifier, which is the name of your company. You don’t actually need a company, you can just get creative and make something up!
Make sure that the Interface is set to SwiftUI and the language is set to Swift.
Once done, click Next to create your project. A file save dialog will open so that you can choose where to save your project.
A new folder will be created named the same as the project, which will contain all of your project files. I save all of my projects in a folder called “Xcode” located in my Documents folder.
Take a Tour Of Xcode
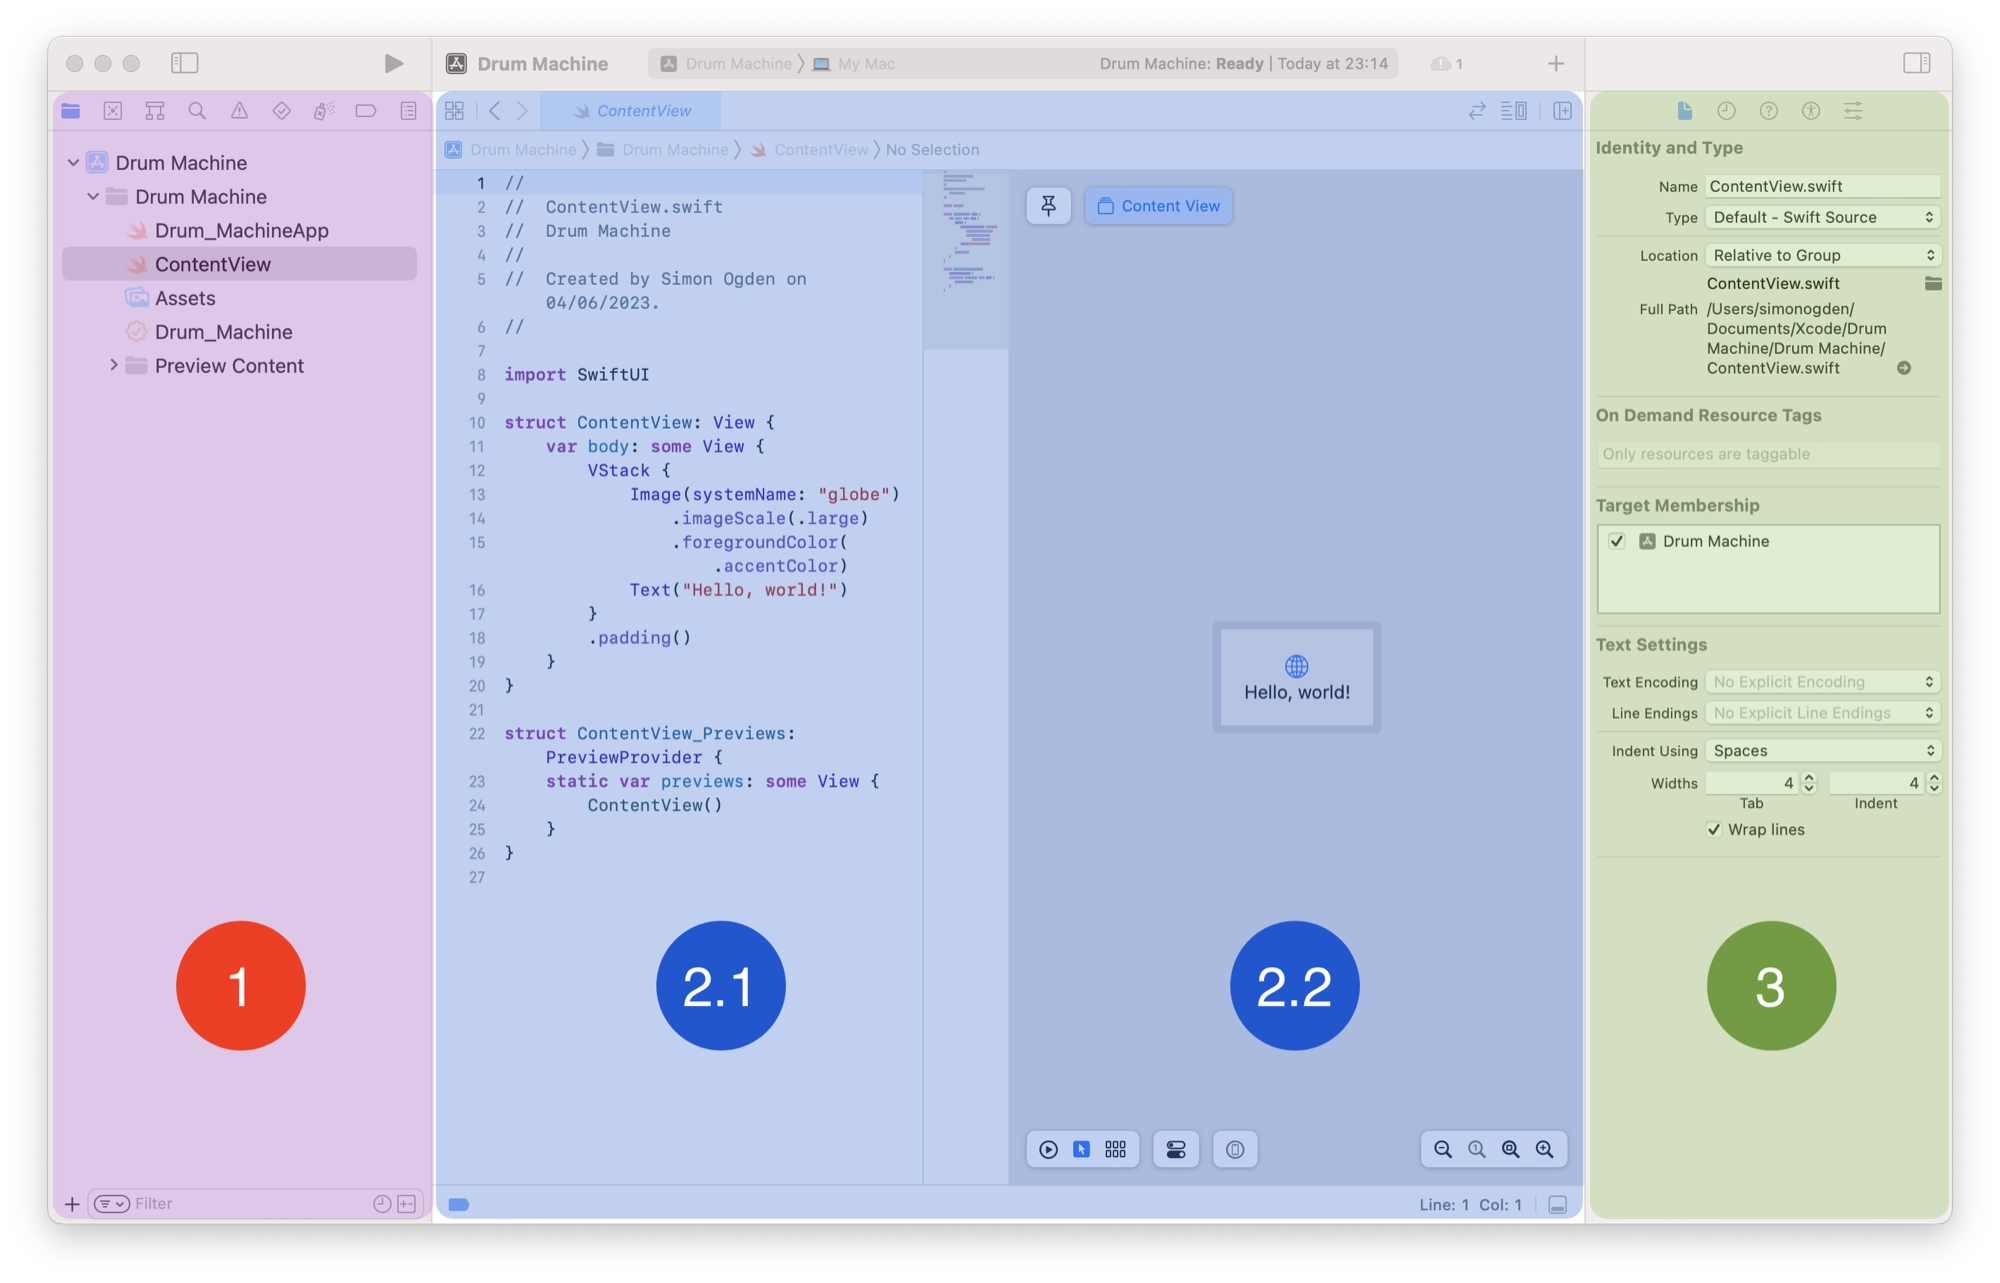
Once you have created a new project, you will be taken to the main Xcode screen.
As I mentioned before, this can look a little daunting at first, but it is actually very easy once you get to grips with some of the basics.
The Main Xcode Application
Let’s take a look at the main sections of the screen, starting from left to right:
- The left-hand sidebar is called the Navigator.
- The main window, which is divided into two parts:
- The left-hand side of the main display shows the element selected in the Navigator.
- The right-hand side of the main display shows a preview generated by the code.
- The right-hand sidebar is called the Inspector.
The Xcode Navigator
The Xcode Navigator is a feature in Xcode that helps you navigate and organize the different files and components in your project. It’s like a file explorer or a roadmap for your project.
The Navigator consists of different tabs that represent different aspects of your project. Here are some of the most useful tabs you’ll find in the Navigator:
- Project navigator: This tab shows you all the files and folders in your project. It helps you organize and access your source code files, resources like images or sounds, and any other files you’ve added to your project.
- Symbol navigator: This tab helps you navigate through your codebase by listing different symbols, such as classes, methods, functions, or variables, in your project. It allows you to quickly jump to specific parts of your code.
- Issue navigator: This tab shows you any warnings or errors in your project. It helps you identify and fix issues or bugs in your code.
- Test navigator: If you’re writing tests for your code, this tab helps you navigate through your test cases and see their results.
- Source control navigator: If you’re using a version control system like Git, this tab helps you manage and track changes to your code, view commit history, and collaborate with other developers.
The Xcode Navigator is a valuable tool because it helps you find and organize your project’s files and code, quickly navigate through different parts of your codebase, and keep track of any issues or errors. It’s especially useful as your project grows larger and more complex.
The Xcode Navigator can make it easier for you to locate files, understand your code structure, and fix any problems that arise.
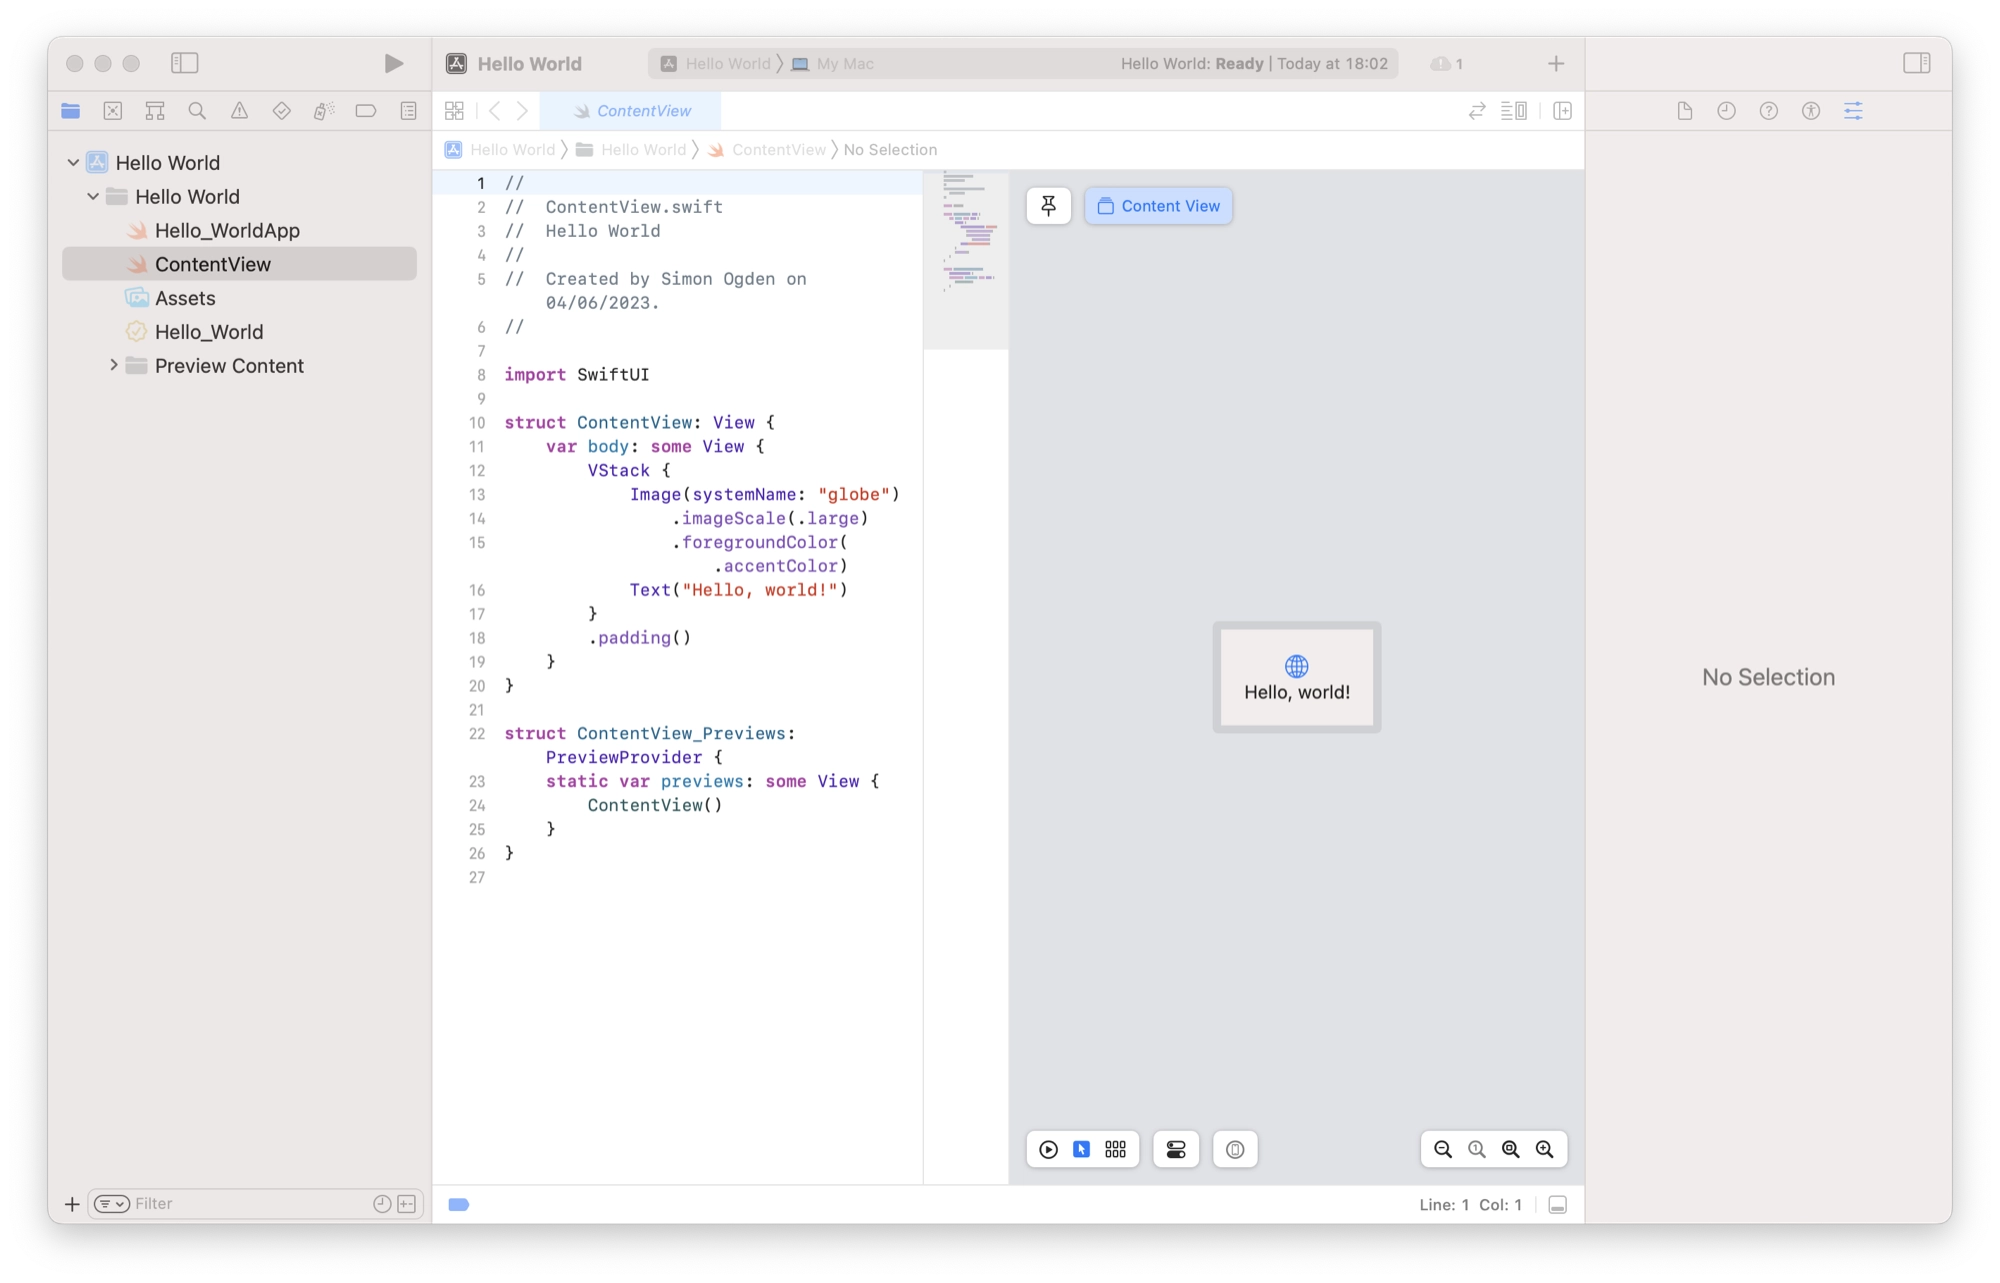
The Xcode Main Display
The central window in Xcode is the primary workspace where you develop your app. It consists of several important components that help you build and debug your project.
- Source Code Editor: The central window provides a dedicated area where you write and modify the code for your app. You can implement the functionality of your app by writing code in this editor. It supports languages like Swift and Objective-C, allowing you to create the logic and behavior of your app.
- Preview Window: The central window can sometimes be split into two parts, whereby the right-hand side becomes the preview window. Here you can see a visual preview of the code that is present in the source code editor, found on the left-hand side.
- Debug Console: During development, you may encounter issues or need to inspect the behavior of your app at runtime. The central window provides a debug console where you can see output messages, errors, and log statements from your code. The console helps you track the flow of your program, identify bugs, and test your app’s functionality.
The central window in Xcode is where you primarily work on your app’s code, design the user interface, and debug your project.
The Source Code Editor allows you to write and modify the code that defines your app’s functionality, while the Preview window provides visual feedback to aid you in designing the look at feel of your app.
Additionally, the debug console helps you monitor and troubleshoot your app’s behavior during development. Together, these components form the central workspace in Xcode for building, testing, and refining your app.
The Xcode Inspector
The Xcode Inspector is a useful tool in Xcode that helps you customize and fine-tune various elements of your app’s user interface.
Whether you want to change the appearance, behavior, or properties of user interface (UI) elements like buttons, labels, or text fields, the Xcode Inspector provides a convenient way to make those modifications.
Let’s explore some key features of the Xcode Inspector:
- The Xcode Inspector is a feature in Xcode for modifying app interface elements.
- It serves as a control panel for customizing appearance and behavior.
- You can access the Inspector by selecting elements in your Swift files.
- It allows you to modify properties like text, color, font, and behavior.
- The Inspector adapts to the selected element, providing relevant customization options.
- You can also connect elements to code functions, known as actions.
- The Inspector simplifies visual customization for beginners without extensive coding knowledge.
- It acts as a centralized tool for configuring UI elements and other project components.
The Xcode Inspector empowers beginners to easily customize their app’s user interface, providing a straightforward way to tweak the appearance and behavior of various elements without requiring advanced coding skills.
Create your First Xcode Application
So far we have covered some of the key Xcode basics and you should now have a good understanding of what Xcode is and how to set it up ready to begin a new project.
In part 2 of this tutorial we will get started with creating the actual application!
Thanks so much for visiting my site! If this article helped you achieve your goal and you want to say thanks, you can now support my work by buying me a coffee. I promise I won't spend it on beer instead... 😏