Yes it’s absolutely possible to set up a LAMP server with MariaDB and PHP on Raspberry Pi! Perhaps you already have a project in mind, but here is a great idea; create a mirror of your existing site so you can tinker with the code locally, then push the update once you are happy with the changes. Awesome!
In this tutorial we will focus on setting up a LAMP server on Raspberry Pi in order to host WordPress. We will be covering the installation of a new site for those that are looking to host a new site on a fresh piece of Pi.
- Prerequisite
- What is a LAMP server?
- Installing Apache
- Installing PHP
- Installing MariaDB
- Configure WordPress
- Conclusion
Prerequisite
All that is required for this tutorial is a Raspberry Pi running the latest version of Raspbian. You can enter everything in manually using a screen and keyboard if you like, but I would recommend using SSH so that you can copy and paste the commands from your host machine.
If you need to install Raspbian on your Pi then I have a beginners tutorial that you can check out. It also covers how to connect via SSH so you can skip to that part if you want to learn how to connect to your Pi with the terminal on your main computer.
What is a LAMP server?
“LAMP” is quite simply an acronym for all of the common components required to run a modern website, such as a WordPress-based site. The four components are as follows;
- Linux – in our case, Raspbian
- Apache – the web server software
- MySQL – we will be using MariaDB
- PHP – the hypertext preprocessor
In order to host a website on a Linux OS such as Raspbian, we need to have all of these elements installed and running. Don’t worry if this all seems a little complex! It is very easy to install and configure everything with just a few terminal commands.
Linux
Not much explanation required here! Linux is the host operating system that runs the other three elements. Our Raspberry Pi is fundamentally a tiny Linux computer when running its native operating system, Raspbian.
Apache
The Apache portion of the collective group of elements is the software that serves the website to the world. It deals with the incoming requests and delivers the content.
There were various explanations in circulation claiming to know why the name was chosen, but it was eventually confirmed by the developers that the software is named after the collective of native American nations, known as Apache.
MySQL
MySQL is a very commonly used open-source relational database backend that can server database driven applications, such as our WordPress website. The “My” portion is the name of the co-founders daughter and SQL is an acronym for structured query language.
The company behind MySQL was bought by Sun Microsystems, who were then bought by Oracle in 2010. When Oracle acquired MySQL there were some concerns about whether it would remain open-source, so a fork was created and named MariaDB.
MariaDB is therefore intended to be highly compatible with MySQL whilst still remaining open-source, regardless of the future direction of MySQL.
PHP
PHP is a scripting language that is ideal for web pages and it is used by WordPress. It consists of a PHP interpreter that runs on the web server in the background.
When the site is visited, the PHP script is executed by the interpreter. The interpreter then produces a response such as HTML or image data, which can be used to by the browser to display the page.
Installing Apache
It is usually a good idea to make sure that our operating system is fully to date before we proceed, so we can go ahead and enter the following.
sudo apt update && sudo apt upgrade -y
Next let’s install the Apache web server. This is super-easy, we just need to enter the following command.
sudo apt install apache2 -y
If you don’t already know the IP address of your Pi, go ahead and enter the following command to display your network details. You will most likely be using wlan or eth depending on whether you are connected wirelessly or with a cable respectively.
ifconfig
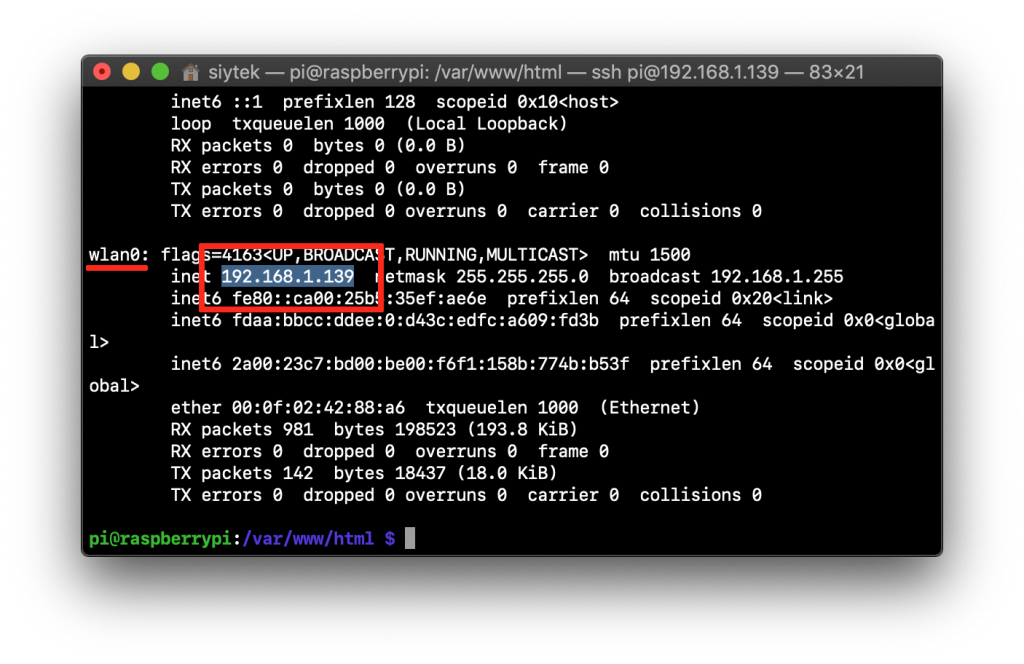
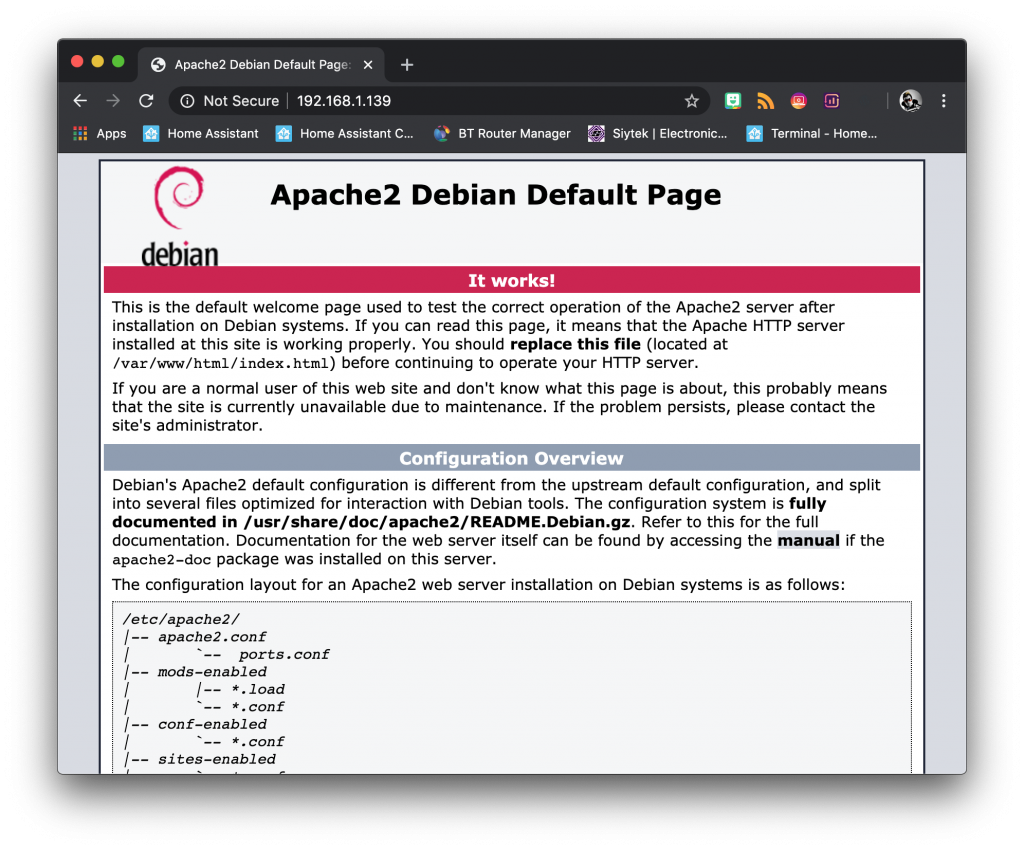
Now we can test to see if our Apache web server is running by entering the IP address into our browser. If everything has worked then you should be greeted by the Apache2 default page.
Installing PHP
Now that we have Apache up and running we can go ahead and install PHP by entering the following command.
sudo apt install php -y
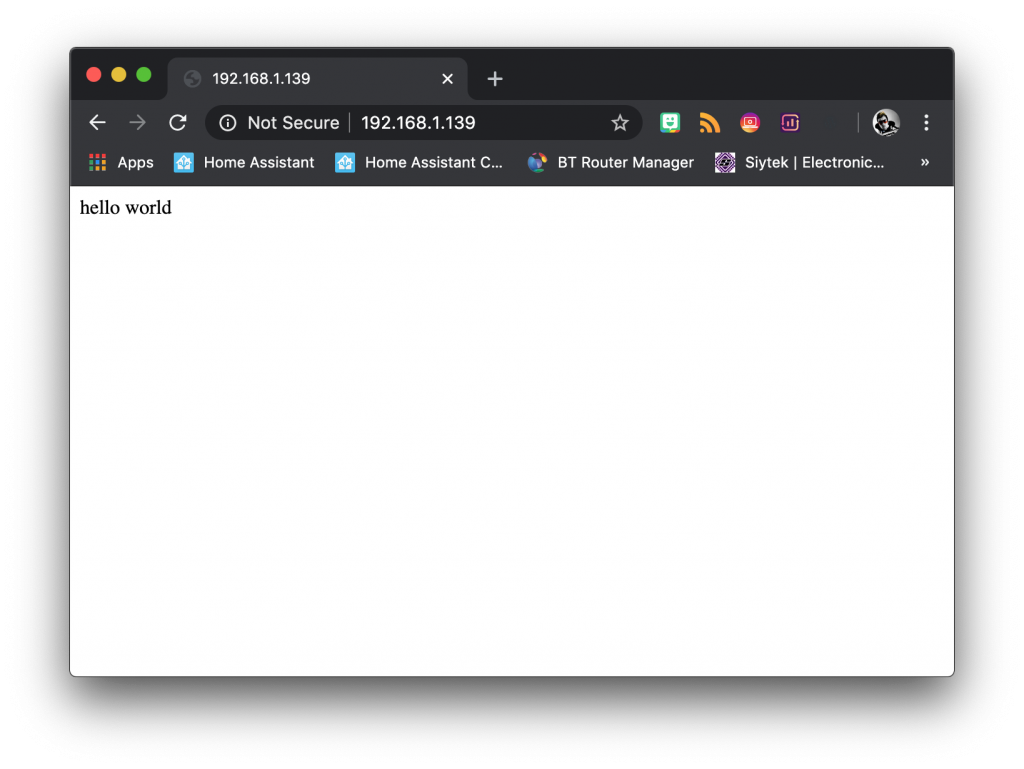
Once PHP has finished installing, we can create a “hello world” example file to test it. When Apache is installed a directory is created where all of the website files reside. We need to change to this directory so that we can create a new PHP file.
cd /var/www/html
Next we can use the nano text editor to create a test file, go ahead and enter the following command to open nano. You can use a different text editor if you have a prefered option.
sudo nano index.php
Once you have a new file in your chosen text editor, go ahead and enter the following PHP code.
<?php echo "hello world"; ?>
Go ahead and press ctrl + X to exit and save the file and then enter the following command to restart Apache.
sudo service apache2 restart
If everything is configured correctly then your browser should display the text “hello” world” when you click refresh.
Installing MariaDB
The final thing we need to configure on our server is MariaDB, so go ahead and enter the following command to install it.
sudo apt install mariadb-server-10.0 php-mysql -y
Once the installation has finished we can run the installation wizard with the following command.
sudo mysql_secure_installation
The first thing the script will do is ask you to set up a password so go ahead and set one up. You will then be asked a series of questions, to which you should just press “y” for all of them.
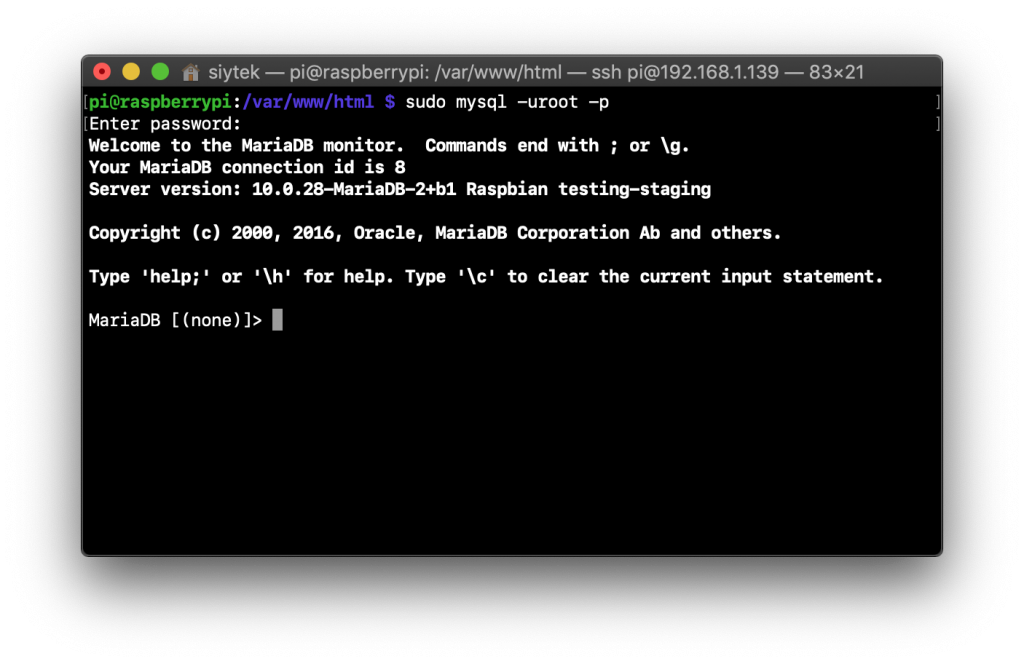
Once the wizard has finished we can log into MariaDB with the following command using the password that we setup in the wizard.
sudo mysql -uroot -p
This will take us to the MariaDB command prompt.
At the MariaDB command prompt we can enter the following command to create a new database called wordpress.
create database wordpress;
Next we need to grant privileges to the root user for localhost connections. You should replace <password> with your own password.
GRANT ALL PRIVILEGES ON wordpress.* TO 'root'@'localhost' IDENTIFIED BY '';
It is then necessary to flush the previous database privileges using the following command.
FLUSH PRIVILEGES;
Finally we can exit the MariaDB command prompt.
exit
Now that we have completed the configuration for MariaDB, we can go ahead and restart Apache.
sudo service apache2 restart
Configure WordPress
Now its finally time to install WordPress! First we will change to the public HTML directory and delete all of the contents, as we wish the fill the directory with a WordPress installation.
cd /var/www/html && sudo rm -r *
Next we will download and extract the latest version of WordPress.
sudo wget http://wordpress.org/latest.tar.gz
sudo tar xzf latest.tar.gz && rm -rf latest.tar.gz
This will extract all of the files into a directory called wordpress. We need to move these files into the current public HTML directory.
sudo mv wordpress/* ./ && rm -rf wordpress
Finally we will set the permissions for the Apache user.
sudo chown -R www-data: .
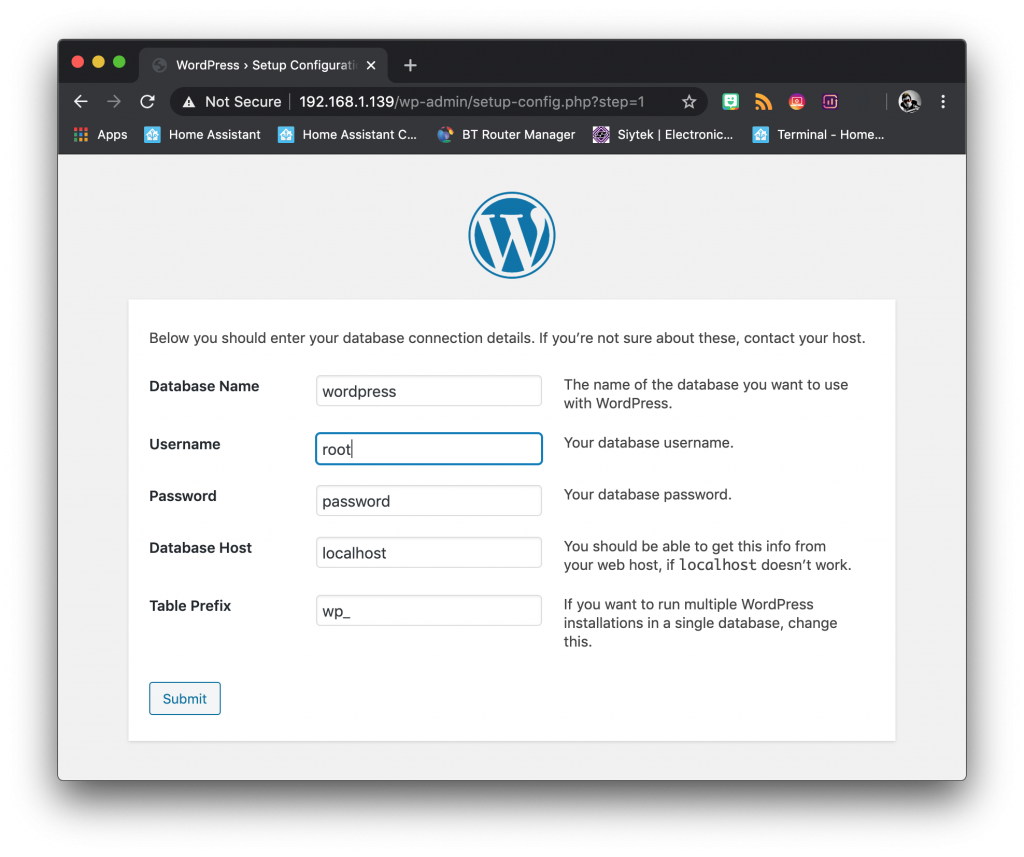
Now we should be able to navigate to the IP address in our browser (or just hit refresh if you’re already on the page) and see the WordPress setup page. Awesome!
Simply follow the onscreen instructions to complete the installation. You will need to enter the database name that you chose when configuring MariaDB. The username will be root and the password will be your chosen password from MariaDB. Database host and table prefix should be left set to default.
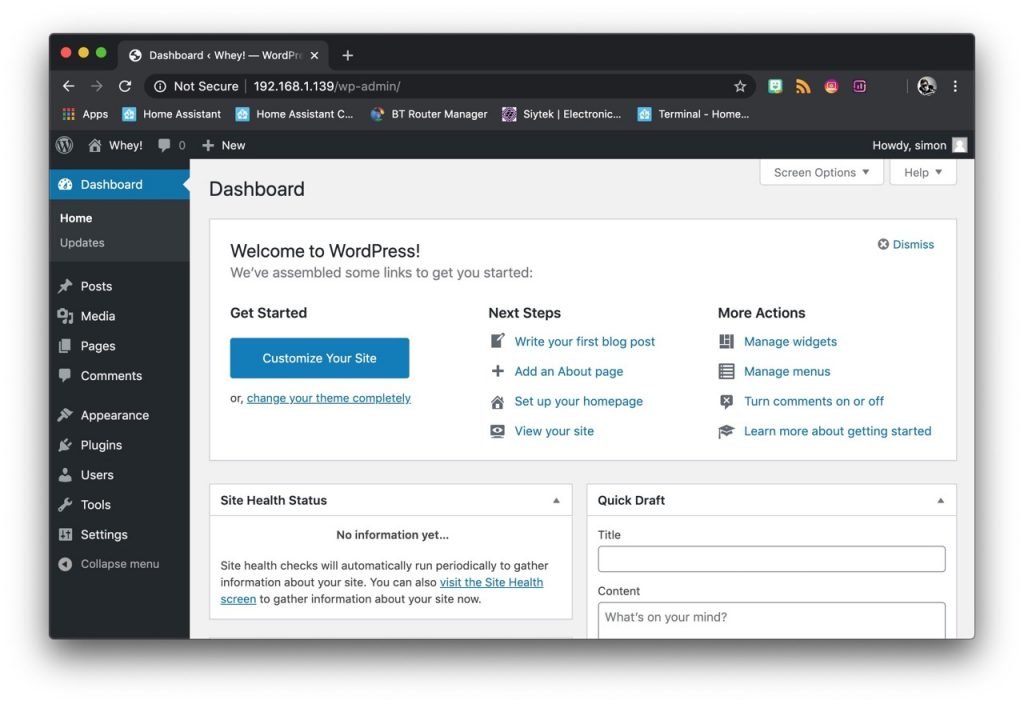
If you have everything configured correctly when you submit these details, you should be taken to a page where you can configure a new user for WordPress. Once complete, you will be able to sign into your new WordPress dashboard. Awesome!
Conclusion
Building a LAMP server on Raspberry Pi is a great little project for anyone wishing to get a little more familiar with the Linux terminal. It could also prove to be incredibly useful for someone who wants to run a local mirror of their existing WordPress site.
The installation is moderately challenging as there are several steps to take in order to install everything required. However it is definitely worth taking the time to work through the process methodically and it feels rather rewarding to first land on your very own WordPress hosted website!
Why not go check out some of my other awesome Raspberry Pi or Linux tutorials!
Thanks so much for visiting my site! If this article helped you achieve your goal and you want to say thanks, you can now support my work by buying me a coffee. I promise I won't spend it on beer instead... 😏