
If you are looking to create your own WooCommerce login and registration pages quickly and easily, you are in the right place! This guide will teach you how to create your own simple WooCommerce login and registration page without using any expensive resource-intensive plugins.
Instead of a plugin, we will use some simple code. But don’t panic! This guide will provide you will easy to follow step by step instructions, so even if you have no coding experience, you should be able to follow along. Any problems? Let us know in the comments below!
By the end of this tutorial you will have created a your own login and registration forms that can be easily inserted anywhere on your website using a simple shortcode. You will learn how to do this at the end of the tutorial.
Prerequisites
This tutorial will teach you how to create a login and registration page using WooCommerce. There are a couple of simple prerequisites that you should take note of prior to beginning.
Adding the WooCommerce Plugin
You will need to have the WooCommerce plugin installed. If you have not yet installed WooCommerce, go ahead and checkout the official installation guide first in order to install the plugin.
Note that the basic WooCommerce plugin is absolutely free to download and use.
Adding a Child Theme
I would also advise installing a child theme. This step is optional, but it will ensure that the code we add does not get overwritten next time you update your theme.
If you do not wish to add a child theme now, you can continue with this tutorial. However you should ensure that you install a child theme and move the code over to the child theme before you next update your theme, otherwise the code will be overwritten.
If you do not have a child theme, there are two ways that you can add one. The easiest way is by using a theme that already provides a child theme, such as Astra, which is a great lightweight theme that fully supports WooCommerce.
Using Astra to Generate a Child Theme
Astra provides both the main theme and child theme as downloads. You simply download and install the main Astra theme, and then use their simple online tool to create, download and install a child theme.
You can get Astra here, then simply check out their quick and easy guide which explains how to install their child theme.
Manually Adding a Child Theme
If you are not using a premium theme which provides an easy to use child theme, you can create one manually.
In order to do this you will need to have access to your WordPress files. This is generally done using SFTP and a free SFTP client software like FileZilla.
Most hosting companies provide instructions on how to access files either with SFTP or by using their own file management tools. Here are some examples:
- Cloudways – Guide to Connecting to Your Application Using SSH/SFTP
- Siteground – How to manage my files via File Manager?
- Hostinger – How to Use File Manager in Hostinger’s hPanel
- Bluehost – Accessing the File Manager
- A2 Hosting – Getting started with cPanel’s File Manager
Once you have access to your WordPress files, you can follow this tutorial on WPBeginner which will walk you through the process of manually creating a child theme.
Activate Your Child Theme
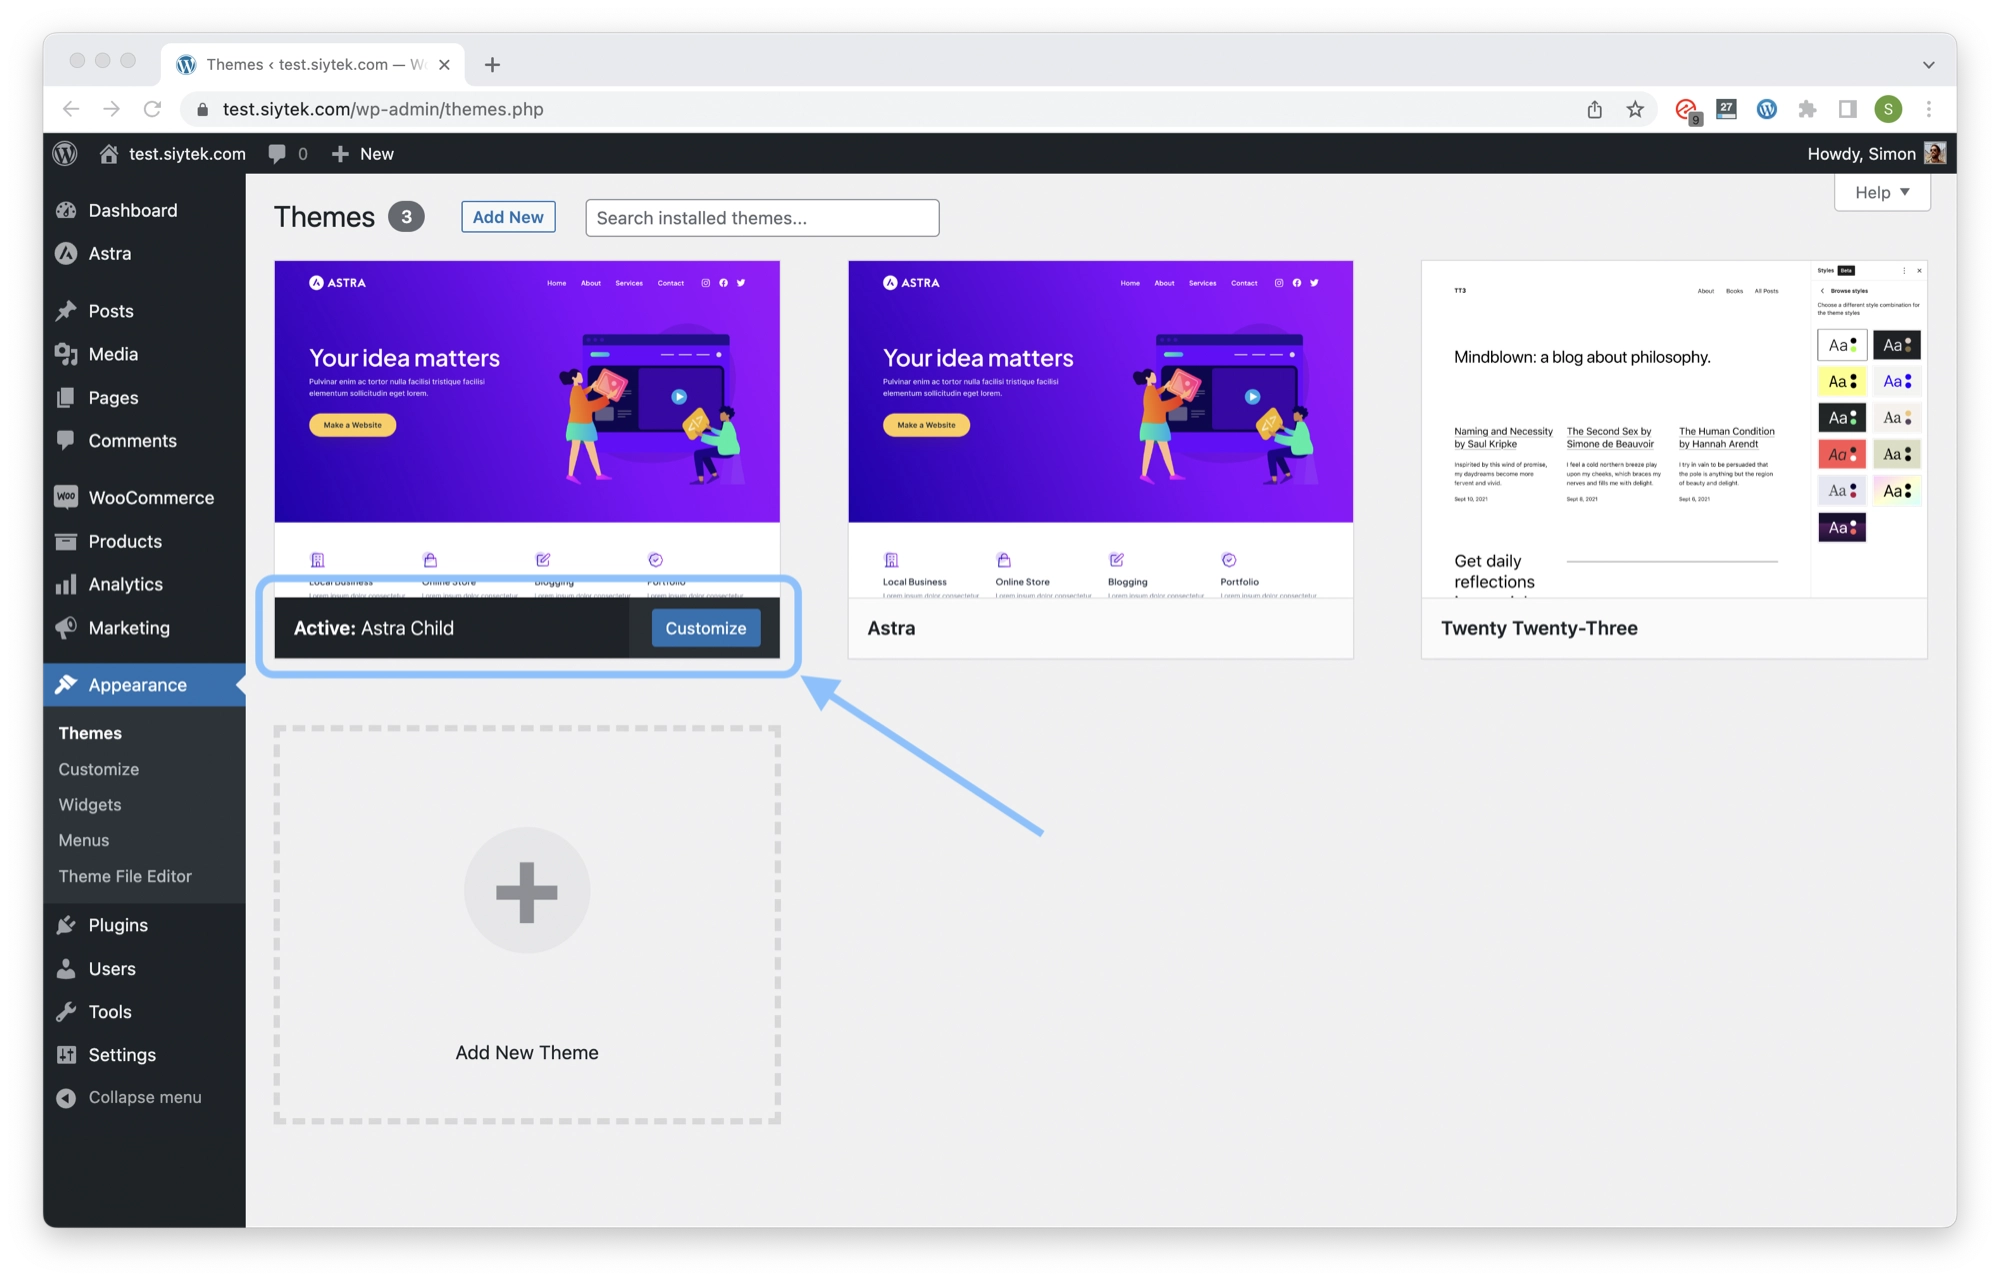
Once you have set up your child theme, ensure that it is activated. To do this, click Appearance in the WordPress sidebar and then click Themes. Click the Activate button on your child theme.
Set Up WooCommerce
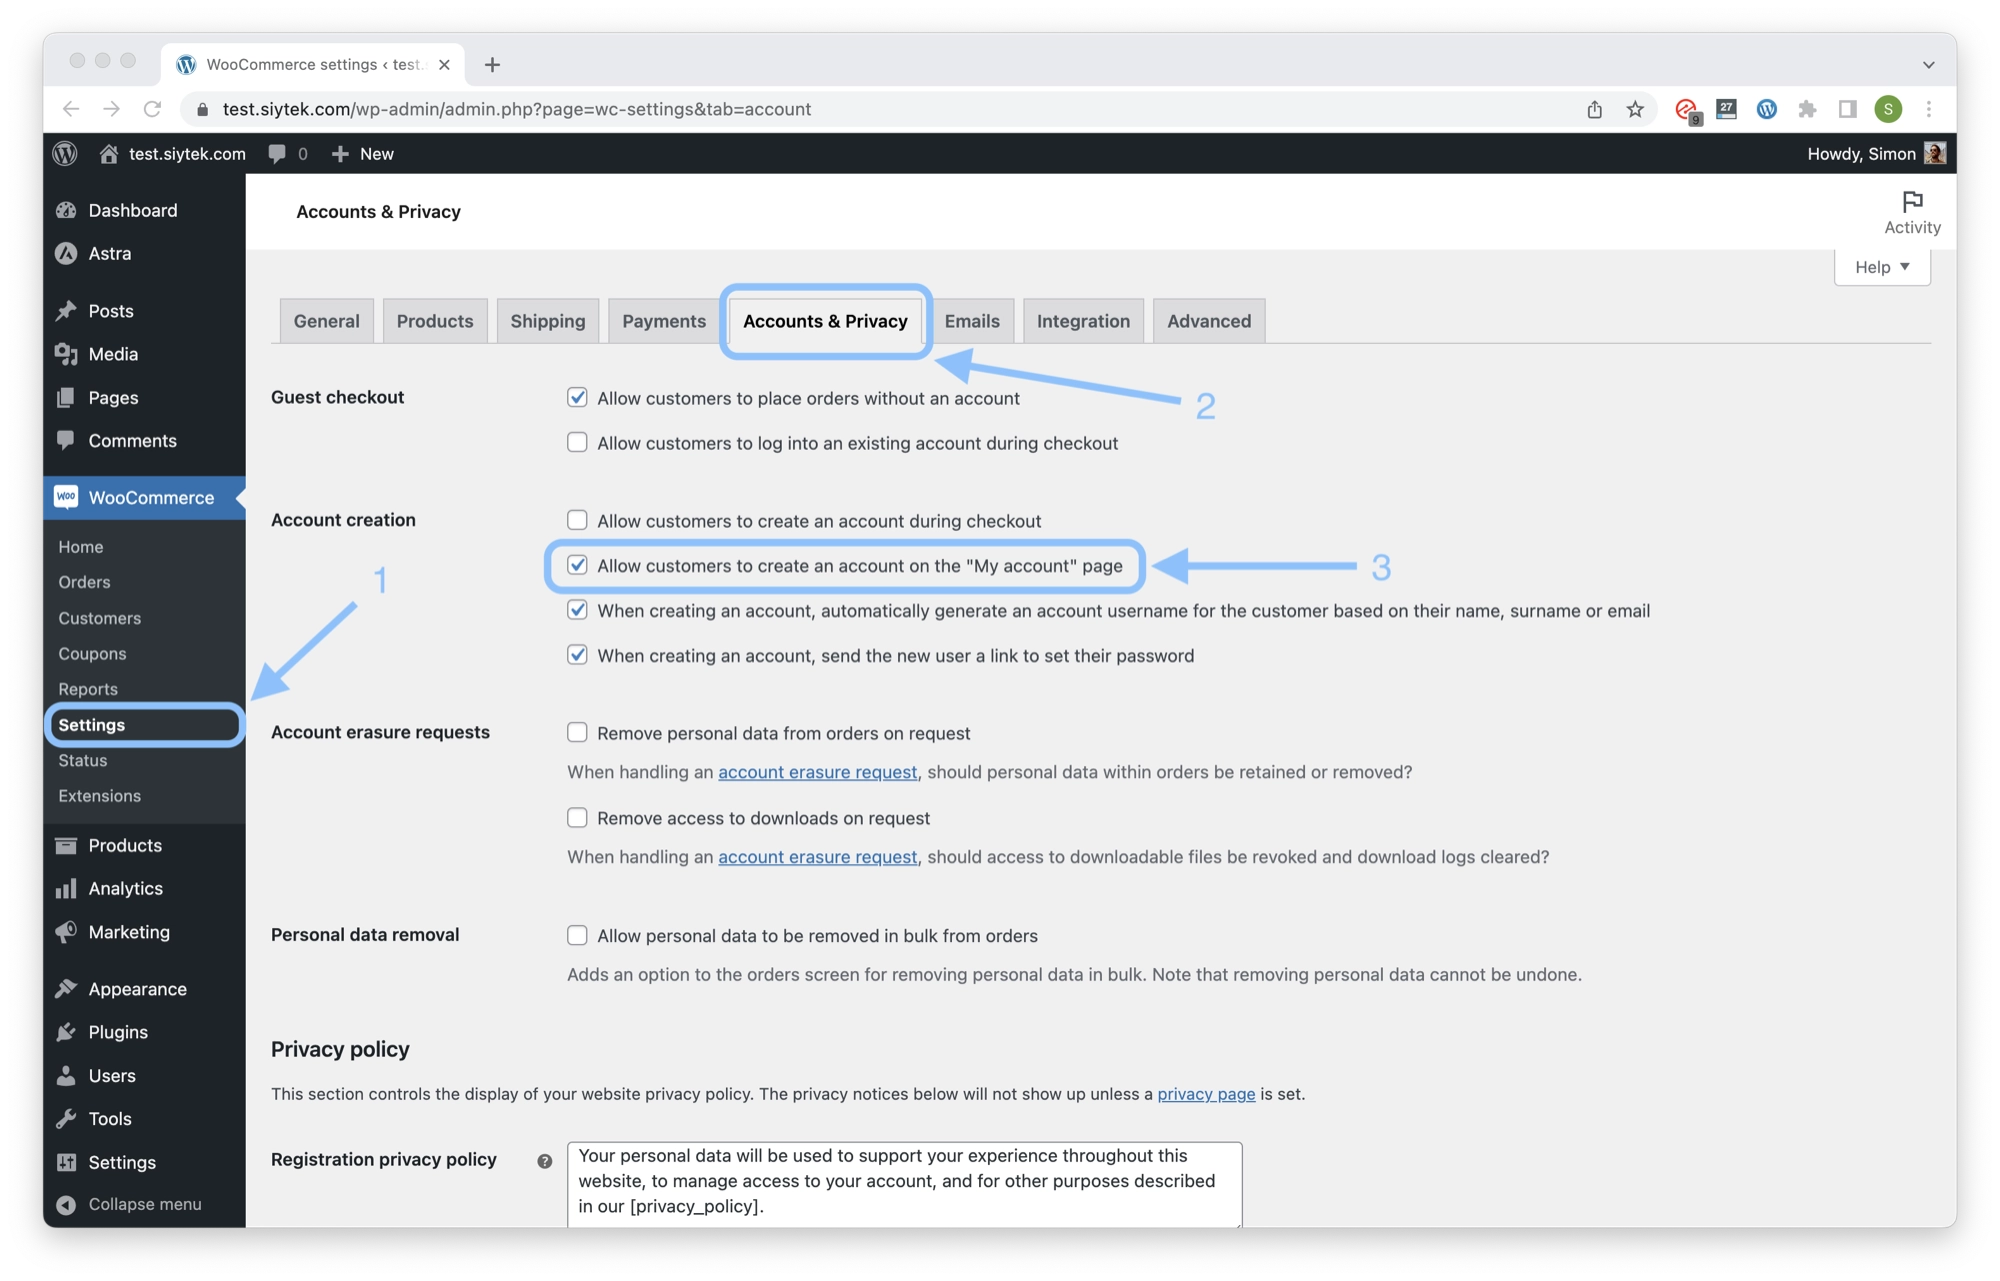
The first thing we need to do is enable account registration on the “My Account” page, in order to enable both login and registration.
- Click settings in the left-hand WordPress menu under WooCommerce.
- Click the Accounts & Privacy tab.
- Check the box for allow customers to create an account on the “My Account” page.
- Scroll to the bottom of the page and click save.
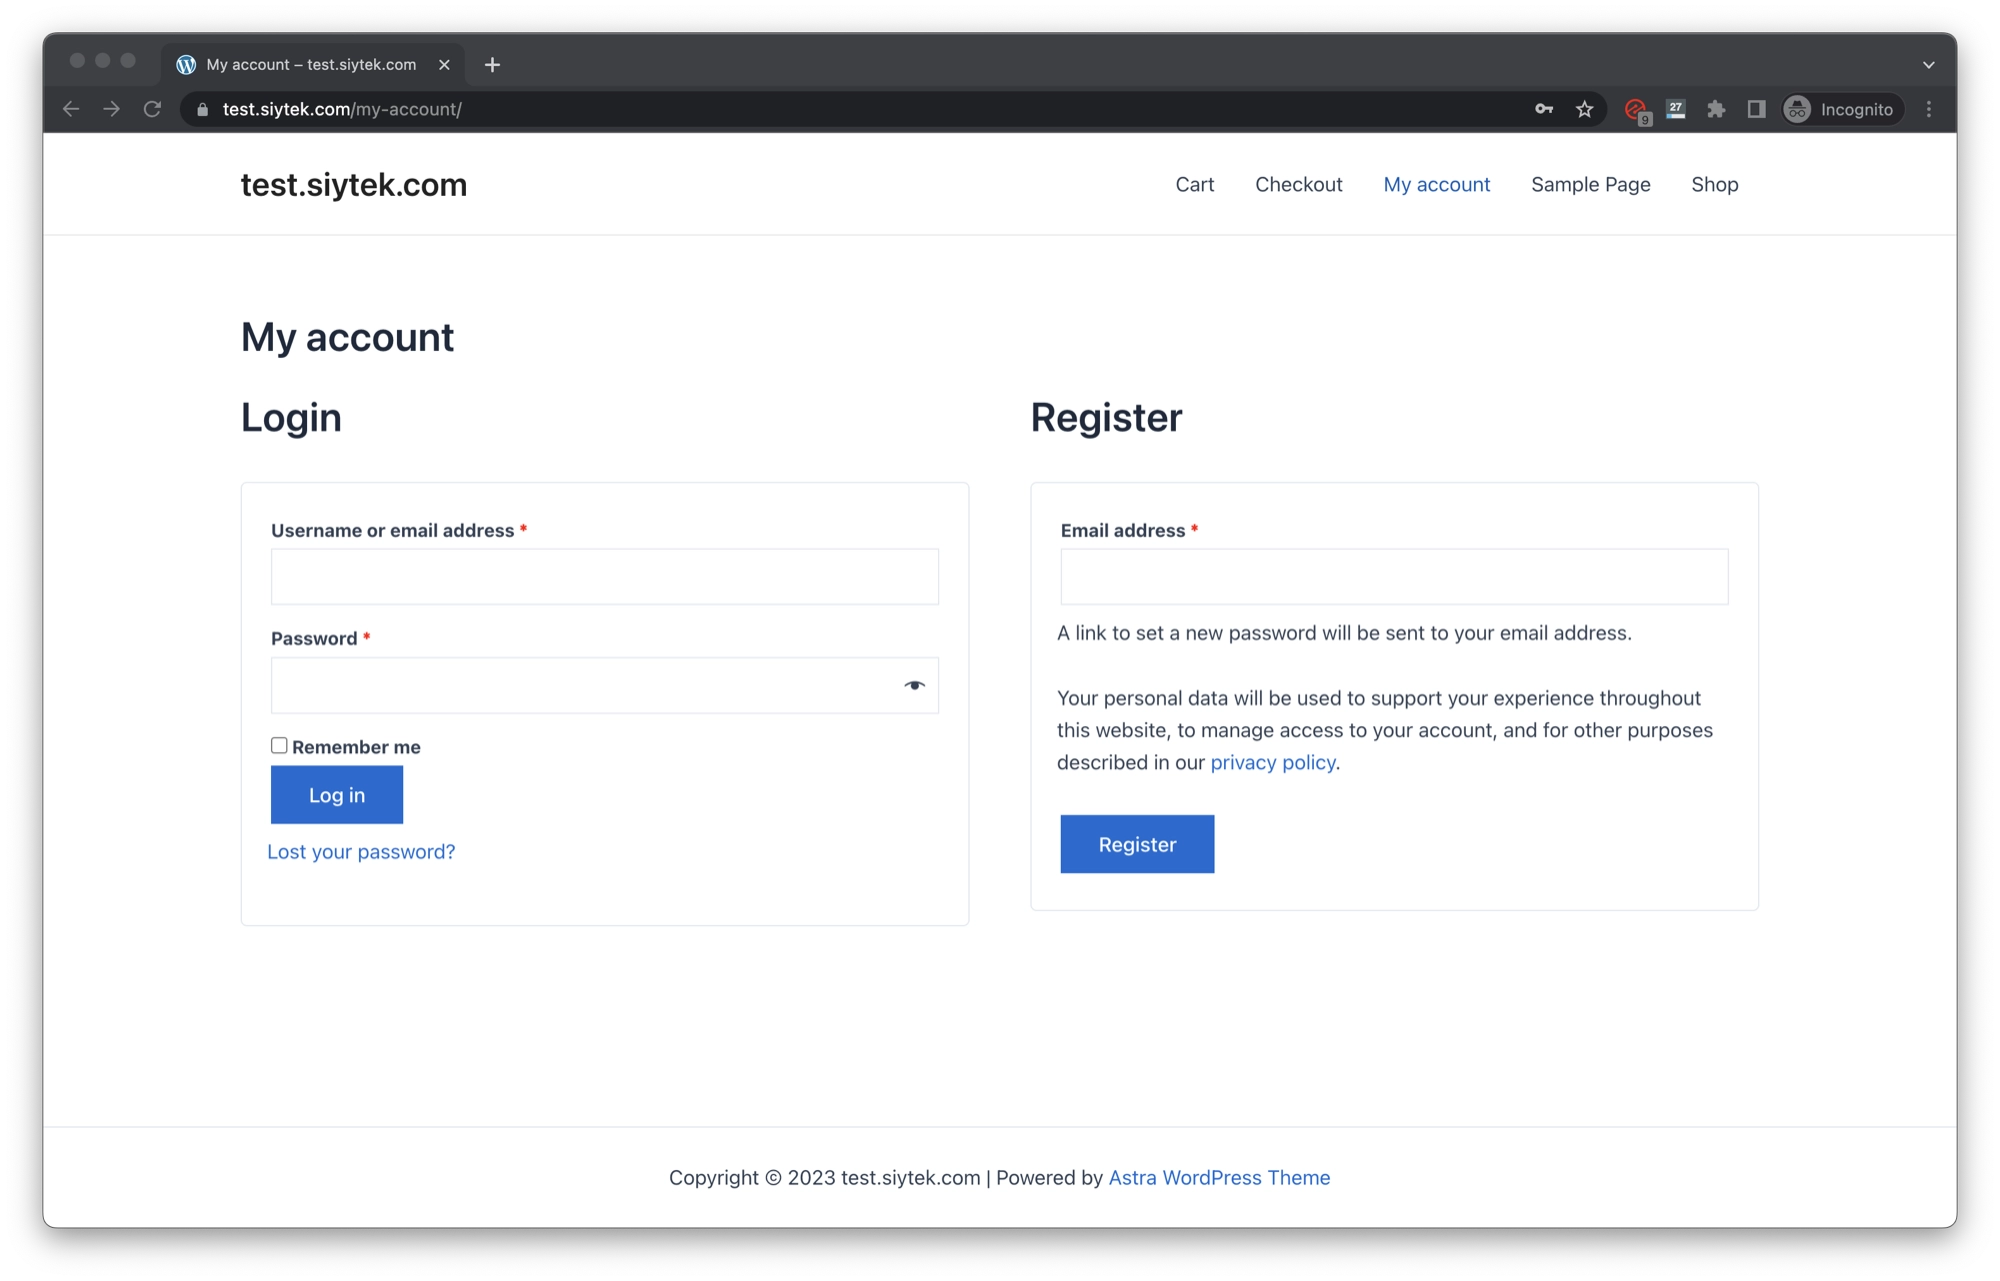
When you navigate to yourdomain.com/my-account, you should now see both the login and registration forms. Note that you must be logged out.
The easiest way to do this without logging out of WordPress is simply to open your My Account page in an incognito/private browsing window. If you are logged in there too, simply log out and you will not be logged out of your main browser session.
Create a Login Shortcode
The first thing that we will do is create our own shortcode that generates our custom login form. Once you have completed the tutorial, you will be able to place this shortcode anywhere that you want the login form to appear.
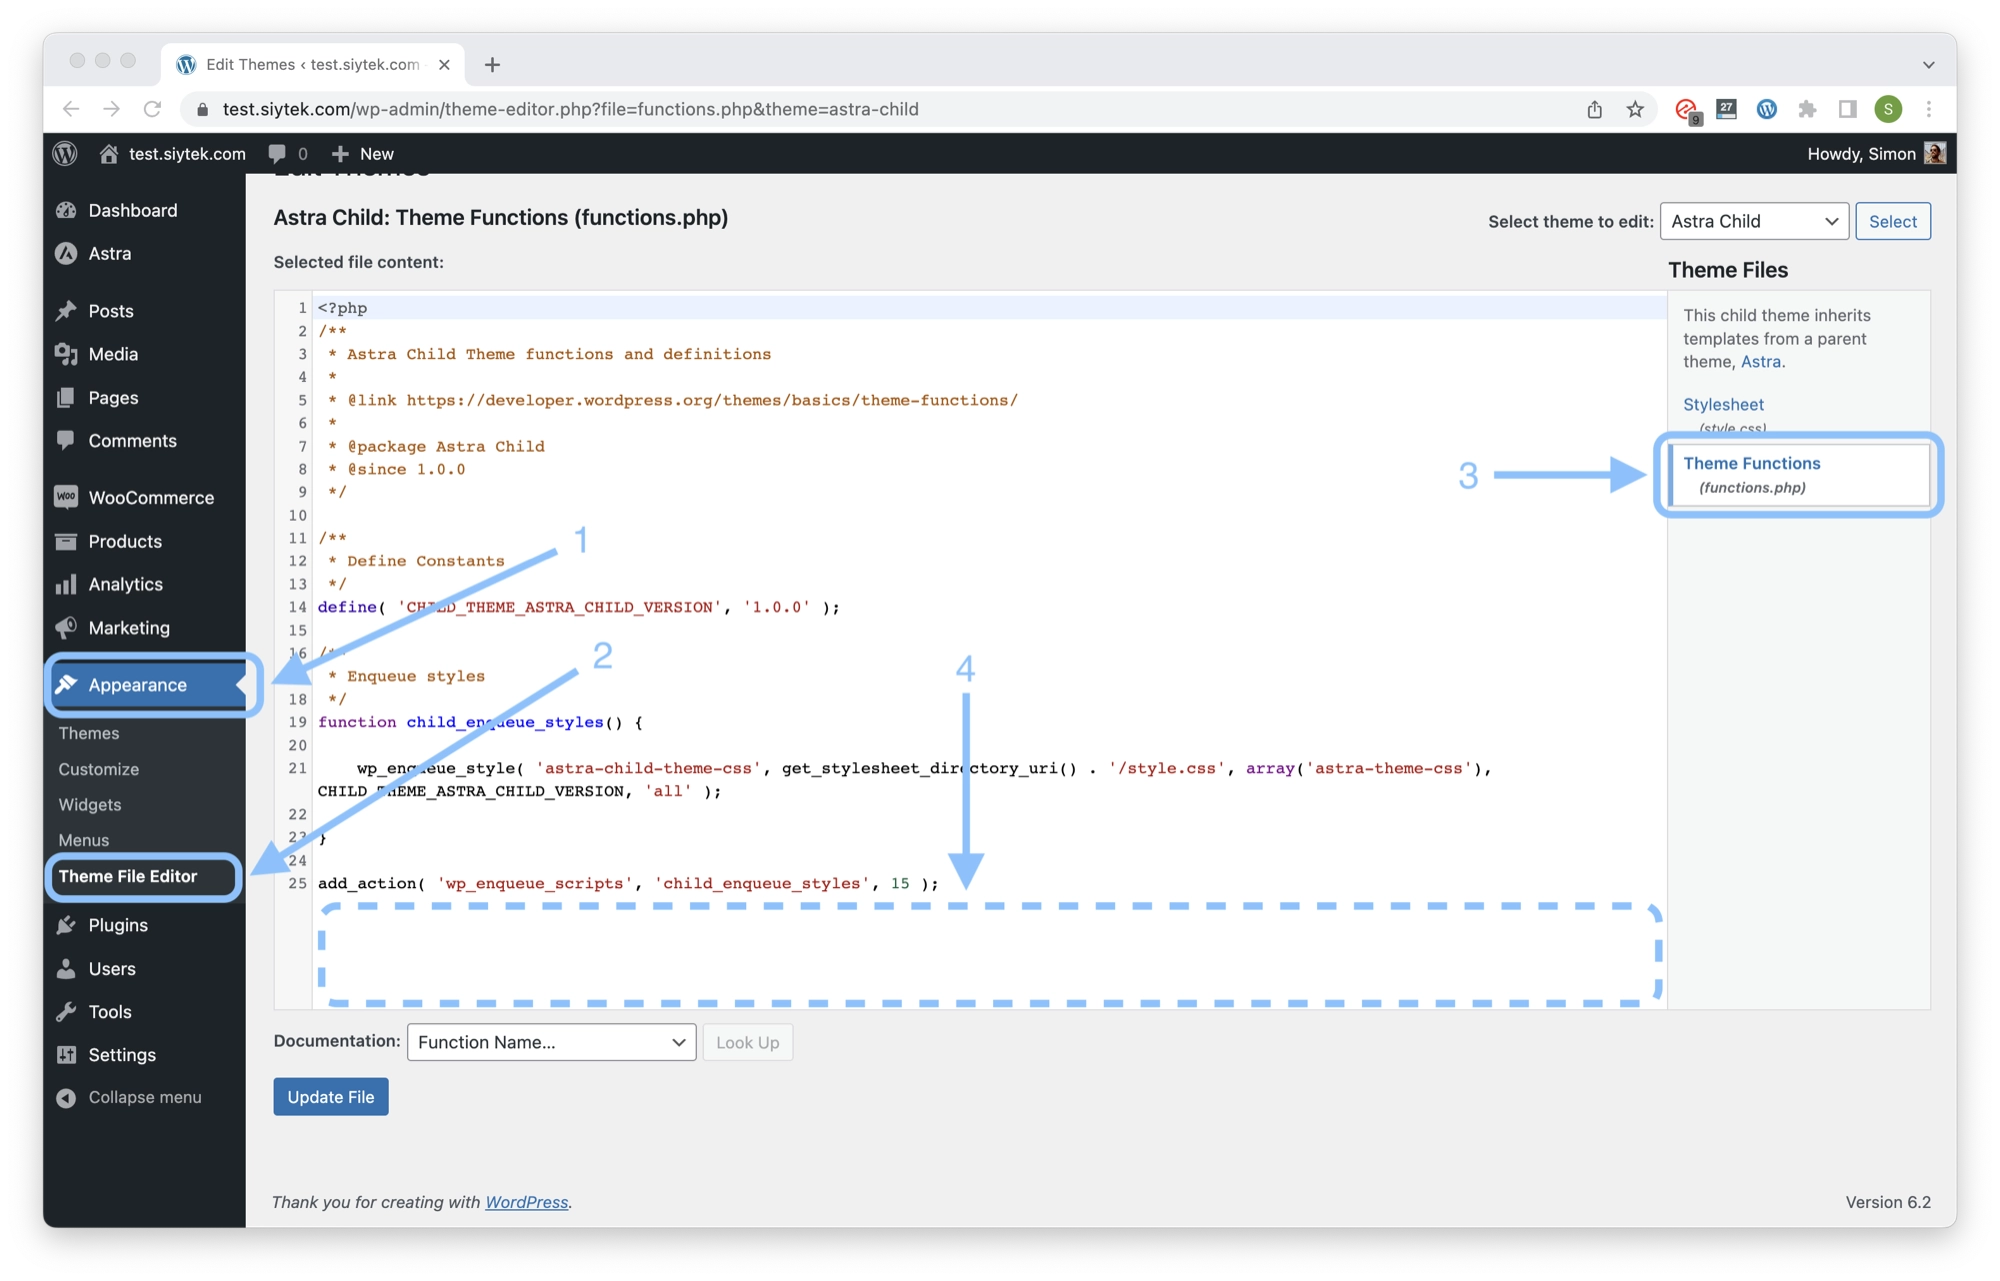
In order to do this, we will need to edit the functions.php file:
- Click Appearance in the WordPress left-hand sidebar.
- Click Theme File Editor in order to open the WordPress file editor.
- Click Theme Functions (functions.php) in the right-hand sidebar within the file editor.
- We will be adding some new code to the end of the file.
Note that if you see more files in the right-hand sidebar of the file editor, you have probably not enabled your child theme. You can edit the main theme functions.php file, although it is not recommended as the changes will be lost next time you update your theme.
Next add the following code to the end of the functions.php file and then click the Update File button at the bottom of the page.
/**
 * Generate Login form
 */
function generate_login_form(){

	ob_start();

		echo "Awesome login form coming soon!";

	return ob_get_clean();

}
add_shortcode('generate_login_form' , 'generate_login_form');
This code creates a new function called generate_login_form and attaches it to a shortcode of the same name. The function will be called wherever we enter the shortcode Don’t worry if that doesn’t make sense yet, it will become more clear in the following test.
- Create a new page and call it something like Login Form.
- Add a new block and search for shortcode.
- Enter the name of the new shortcode inside of square brackets:
[generate_login_form]. - Publish the page so that it can be accessed.
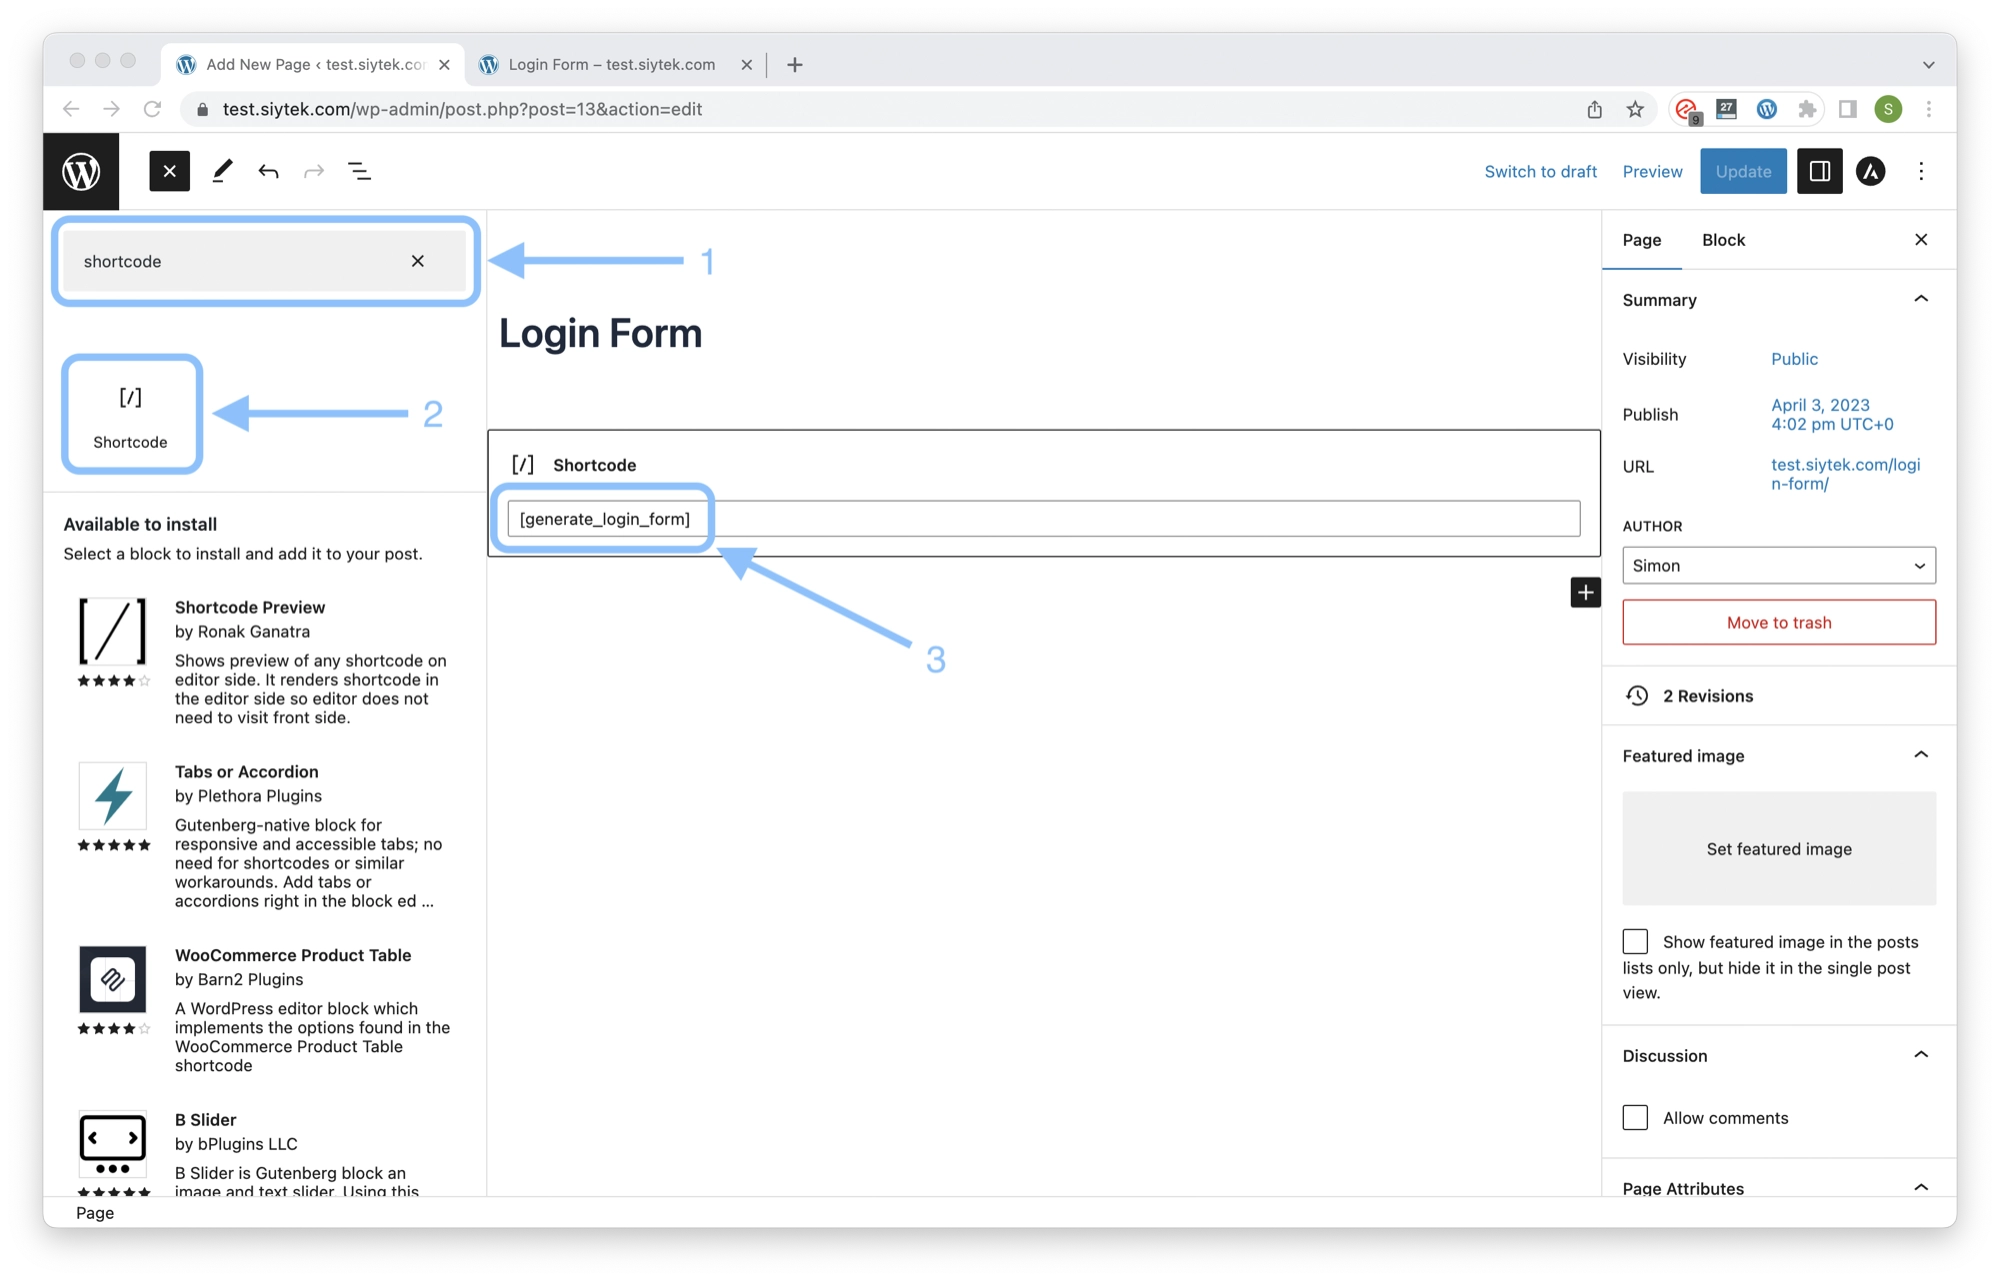
Next, go ahead and navigate to the page that you just created (yourdomain.com/login-form). You will see that the code from our function within the functions.php has been executed in the place where we put the shortcode block.
The echo command that is currently in the function simply writes the text that is specified after the command. We will replace this with the HTML necessary to generate the login form.
Don’t worry, this is really easy! We will simply steal the code from the existing WooCommerce login form. This is completely acceptable and legitimate as WooCommerce is open source.
The login and registration forms are located within a WooCommerce file called form-login.php, which is freely available here on GitHub or over on the WooCommerce Developers pages.
First we need to prepare our function by removing the echo command and replacing it with some opening and closing tags, so that we can insert HTML into our PHP file.
/**
* Generate Login form
*/
function generate_login_form(){
ob_start();
?> // stop PHP and the start HTML
// The HTML login form code from form-login.php will go here
<?php // stop HTML and start PHP
return ob_get_clean();
}
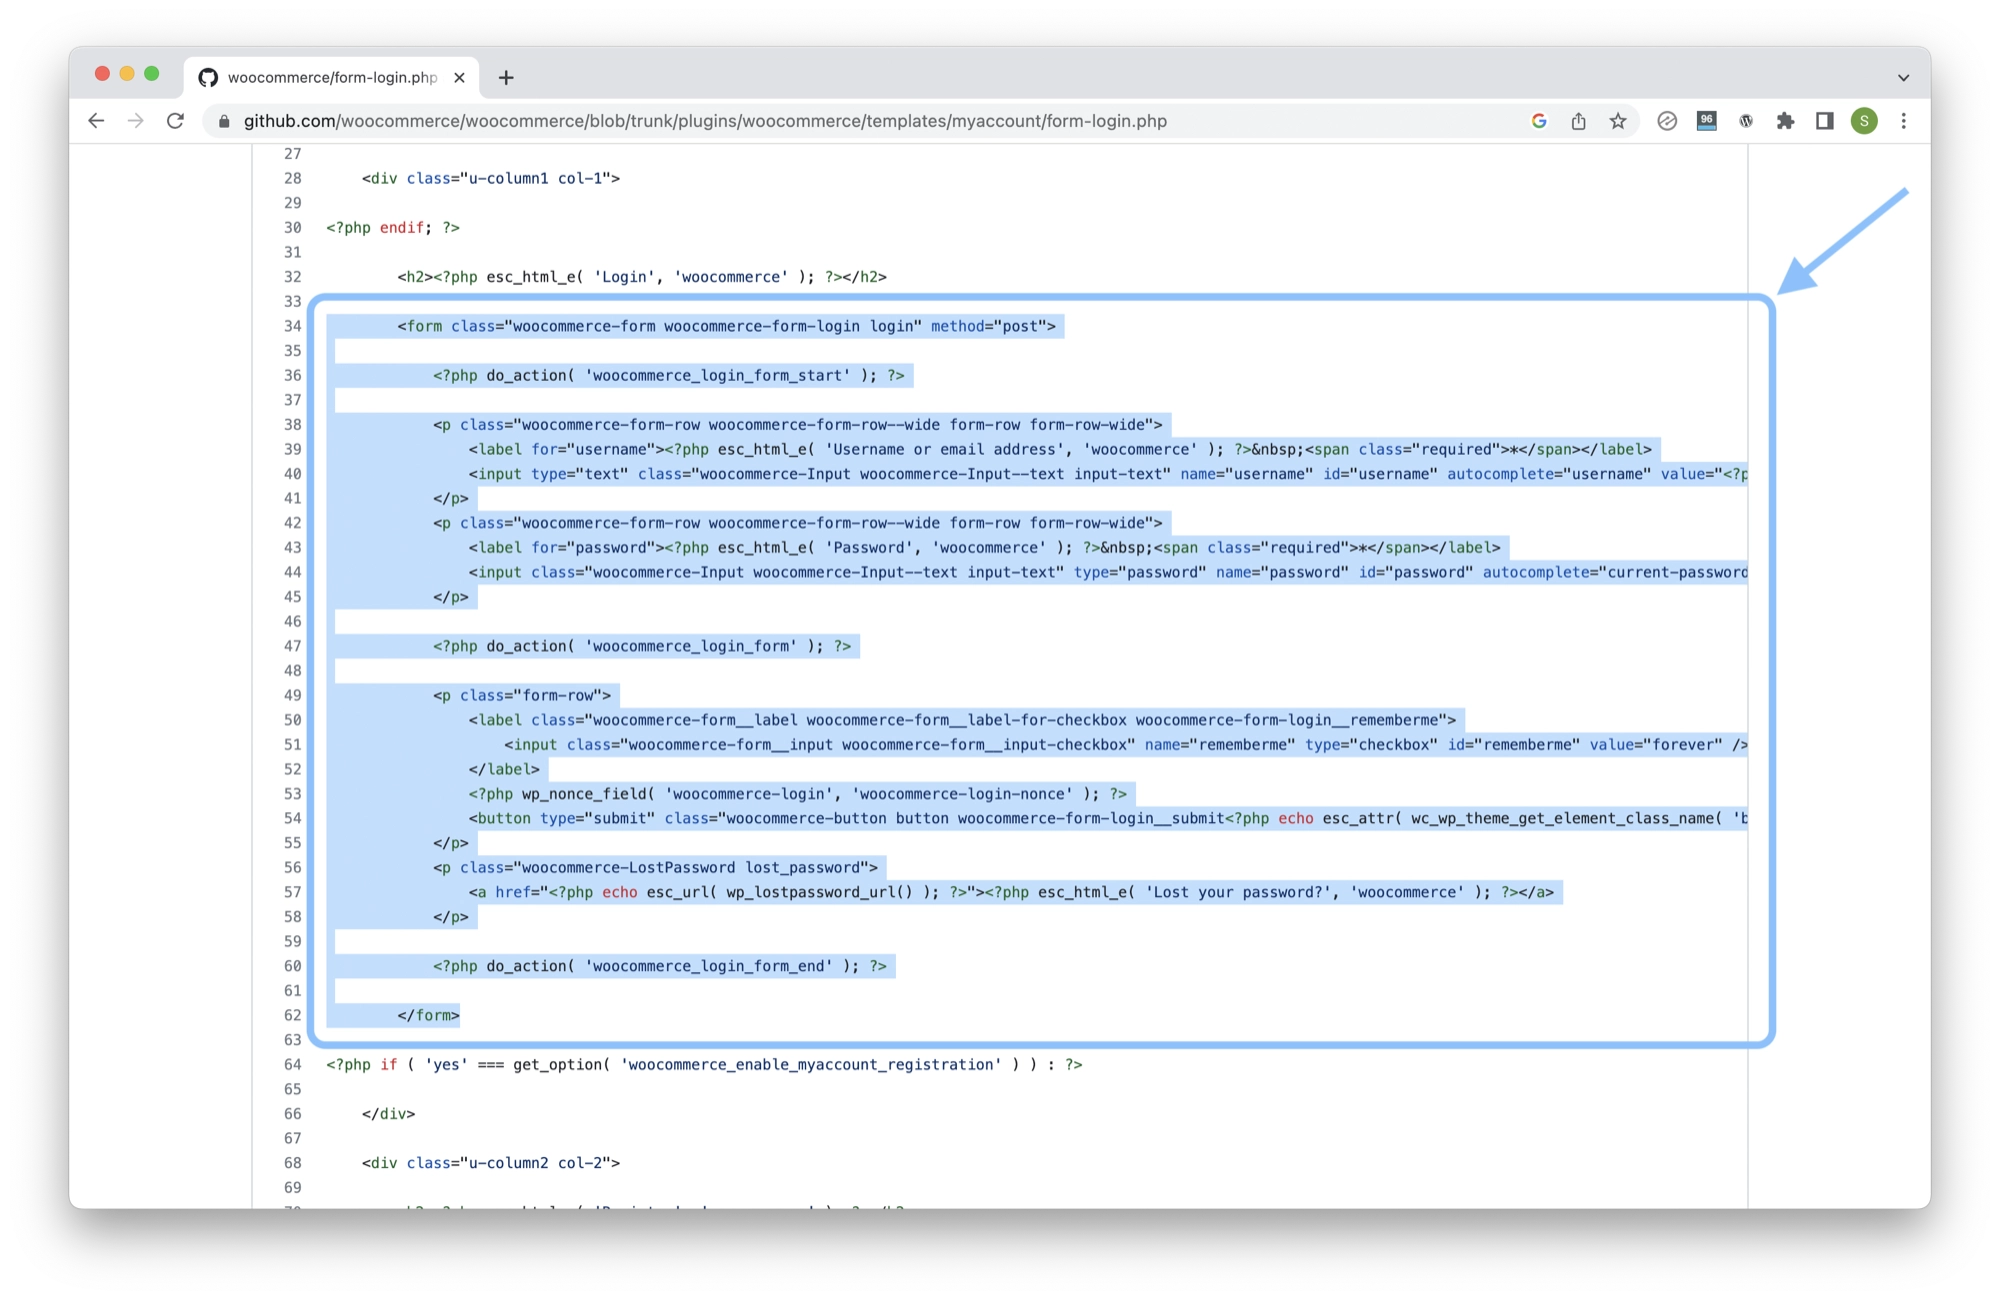
add_shortcode('generate_login_form' , 'generate_login_form');In the form-login.php file you will find two forms, identified by <form></form> tags. The login form is the first form in the file, so we will copy the code between the <form></form> tags and insert it into our function.
You can just copy and paste the code below directly into your own functions.php file:
/**
* Generate Login form
*/
function generate_login_form(){
ob_start();
?>
<form class="woocommerce-form woocommerce-form-login login" method="post">
<?php do_action( 'woocommerce_login_form_start' ); ?>
<p class="woocommerce-form-row woocommerce-form-row--wide form-row form-row-wide">
<label for="username">
<?php esc_html_e( 'Username or email address', 'woocommerce' ); ?>
<span class="required">*</span>
</label>
<input
type="text"
class="woocommerce-Input woocommerce-Input--text input-text"
name="username"
id="username"
autocomplete="username"
value="<?php echo ( ! empty( $_POST['username'] ) ) ? esc_attr( wp_unslash( $_POST['username'] ) ) : ''; ?>" />
<?php // @codingStandardsIgnoreLine ?>
</p>
<p class="woocommerce-form-row woocommerce-form-row--wide form-row form-row-wide">
<label for="password"><?php esc_html_e( 'Password', 'woocommerce' ); ?>
<span class="required">*</span>
</label>
<input
class="woocommerce-Input woocommerce-Input--text input-text"
type="password"
name="password"
id="password"
autocomplete="current-password" />
</p>
<?php do_action( 'woocommerce_login_form' ); ?>
<p class="form-row">
<label
class="woocommerce-form__label woocommerce-form__label-for-checkbox woocommerce-form-login__rememberme">
<input
class="woocommerce-form__input woocommerce-form__input-checkbox"
name="rememberme"
type="checkbox"
id="rememberme"
value="forever" />
<span><?php esc_html_e( 'Remember me', 'woocommerce' ); ?></span>
</label>
<?php wp_nonce_field( 'woocommerce-login', 'woocommerce-login-nonce' ); ?>
<button
type="submit"
class="woocommerce-button button woocommerce-form-login__submit
<?php echo esc_attr( wc_wp_theme_get_element_class_name( 'button' )
? ' ' . wc_wp_theme_get_element_class_name( 'button' ) : '' ); ?>"
name="login"
value="<?php esc_attr_e( 'Log in', 'woocommerce' ); ?>">
<?php esc_html_e( 'Log in', 'woocommerce' ); ?></button>
</p>
<p class="woocommerce-LostPassword lost_password">
<a href="<?php echo esc_url( wp_lostpassword_url() ); ?>"><?php esc_html_e( 'Lost your password?', 'woocommerce' ); ?>
</a>
</p>
<?php do_action( 'woocommerce_login_form_end' ); ?>
</form>
<?php
return ob_get_clean();
}
add_shortcode('generate_login_form' , 'generate_login_form');Just to help clarify, here is the code that we copied from the original form-login.php file:
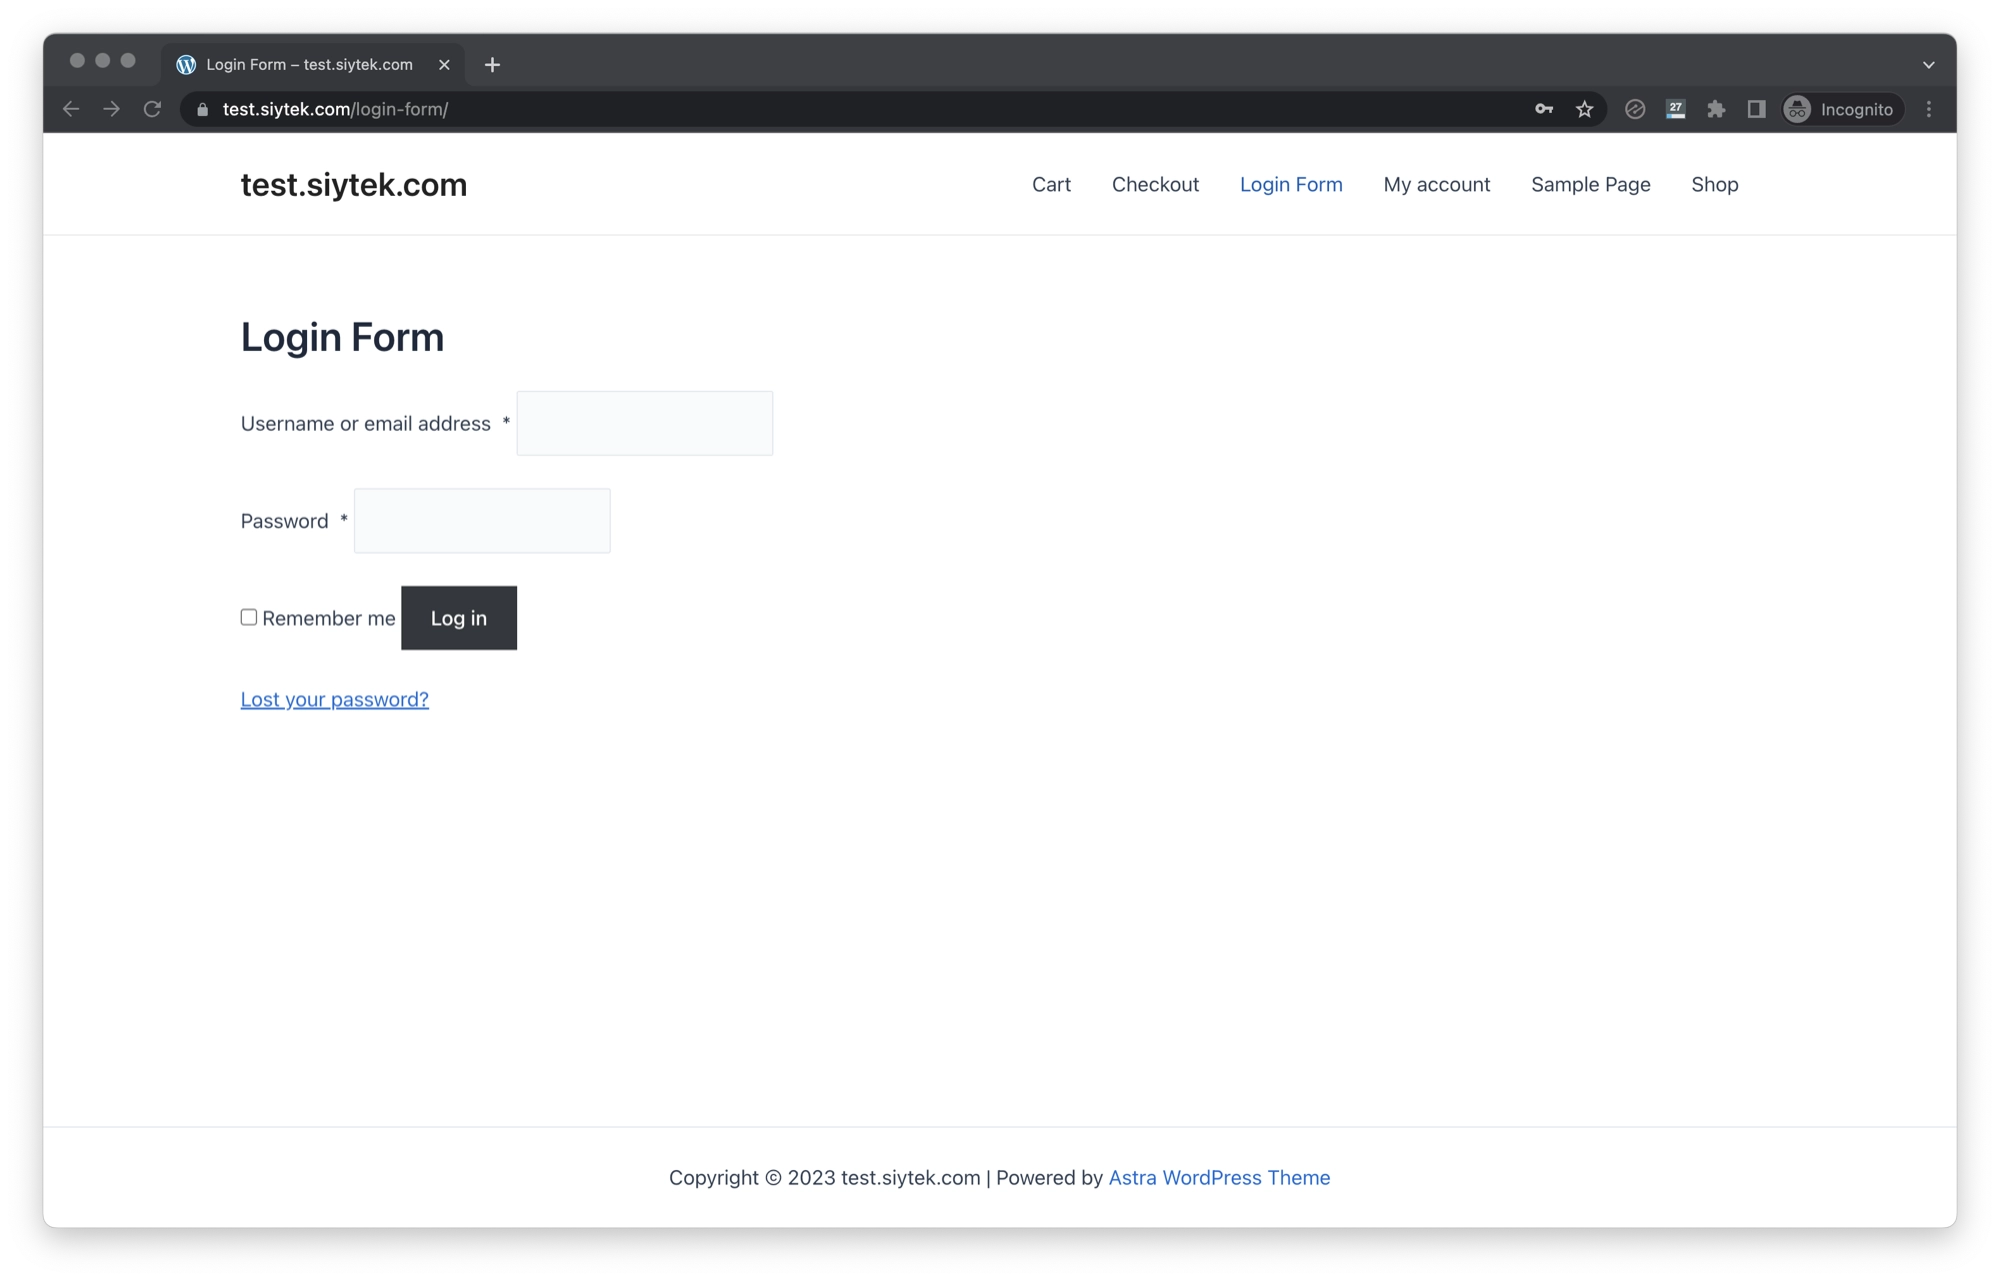
Now go ahead and visit/refresh your login page yourdomain.com/login-form and you should now see your very own login form appear! Feel free to experiment with the HTML above to further customize your login form.
Note that the login form will not function at this stage. We first need to complete the subsequent steps.
Create a Registration Shortcode
The process of creating the registration page is identical to the process of creating the login form, however we will use the second form in the form-login.php file.
- Copy and paste the code below into your functions.php file, underneath the
generate_login_formfunction (at the end of the file). - Create a new page called something like registration-form.
- Create a new shortcode block and enter the name of the new shortcode inside of square brackets:
[generate_registration_form]. - Publish the page so that it can be accessed.
- Navigate to
yourdomain.com/registration-formin order to check that the registration page works correctly.
/**
* Generate Registration form
*/
function generate_registration_form(){
ob_start();
?>
<form method="post" class="woocommerce-form woocommerce-form-register register"
<?php do_action( 'woocommerce_register_form_tag' ); ?> >
<?php do_action( 'woocommerce_register_form_start' ); ?>
<?php if ( 'no' === get_option( 'woocommerce_registration_generate_username' ) ) : ?>
<p class="woocommerce-form-row woocommerce-form-row--wide form-row form-row-wide">
<label for="reg_username"><?php esc_html_e( 'Username', 'woocommerce' ); ?>
<span class="required">*</span></label>
<input
type="text"
class="woocommerce-Input woocommerce-Input--text input-text"
name="username"
id="reg_username"
autocomplete="username"
value="<?php echo ( ! empty( $_POST['username'] ) )
? esc_attr( wp_unslash( $_POST['username'] ) ) : ''; ?>" />
<?php // @codingStandardsIgnoreLine ?>
</p>
<?php endif; ?>
<p class="woocommerce-form-row woocommerce-form-row--wide form-row form-row-wide">
<label for="reg_email"><?php esc_html_e( 'Email address', 'woocommerce' ); ?>
<span class="required">*</span></label>
<input
type="email"
class="woocommerce-Input woocommerce-Input--text input-text"
name="email"
id="reg_email"
autocomplete="email"
value="<?php echo ( ! empty( $_POST['email'] ) ) ? esc_attr( wp_unslash( $_POST['email'] ) ) : ''; ?>" />
<?php // @codingStandardsIgnoreLine ?>
</p>
<?php if ( 'no' === get_option( 'woocommerce_registration_generate_password' ) ) : ?>
<p class="woocommerce-form-row woocommerce-form-row--wide form-row form-row-wide">
<label for="reg_password"><?php esc_html_e( 'Password', 'woocommerce' ); ?>
<span class="required">*</span></label>
<input
type="password"
class="woocommerce-Input woocommerce-Input--text input-text"
name="password"
id="reg_password"
autocomplete="new-password" />
</p>
<?php else : ?>
<p><?php esc_html_e( 'A link to set a new password will be sent to your email address.', 'woocommerce' ); ?></p>
<?php endif; ?>
<?php do_action( 'woocommerce_register_form' ); ?>
<p class="woocommerce-form-row form-row">
<?php wp_nonce_field( 'woocommerce-register', 'woocommerce-register-nonce' ); ?>
<button
type="submit"
class="woocommerce-Button woocommerce-button button
<?php echo esc_attr( wc_wp_theme_get_element_class_name( 'button' )
? ' ' . wc_wp_theme_get_element_class_name( 'button' ) : '' ); ?>
woocommerce-form-register__submit"
name="register"
value="<?php esc_attr_e( 'Register', 'woocommerce' ); ?>"><?php esc_html_e( 'Register', 'woocommerce' ); ?> </button>
</p>
<?php do_action( 'woocommerce_register_form_end' ); ?>
</form>
<?php
return ob_get_clean();
}
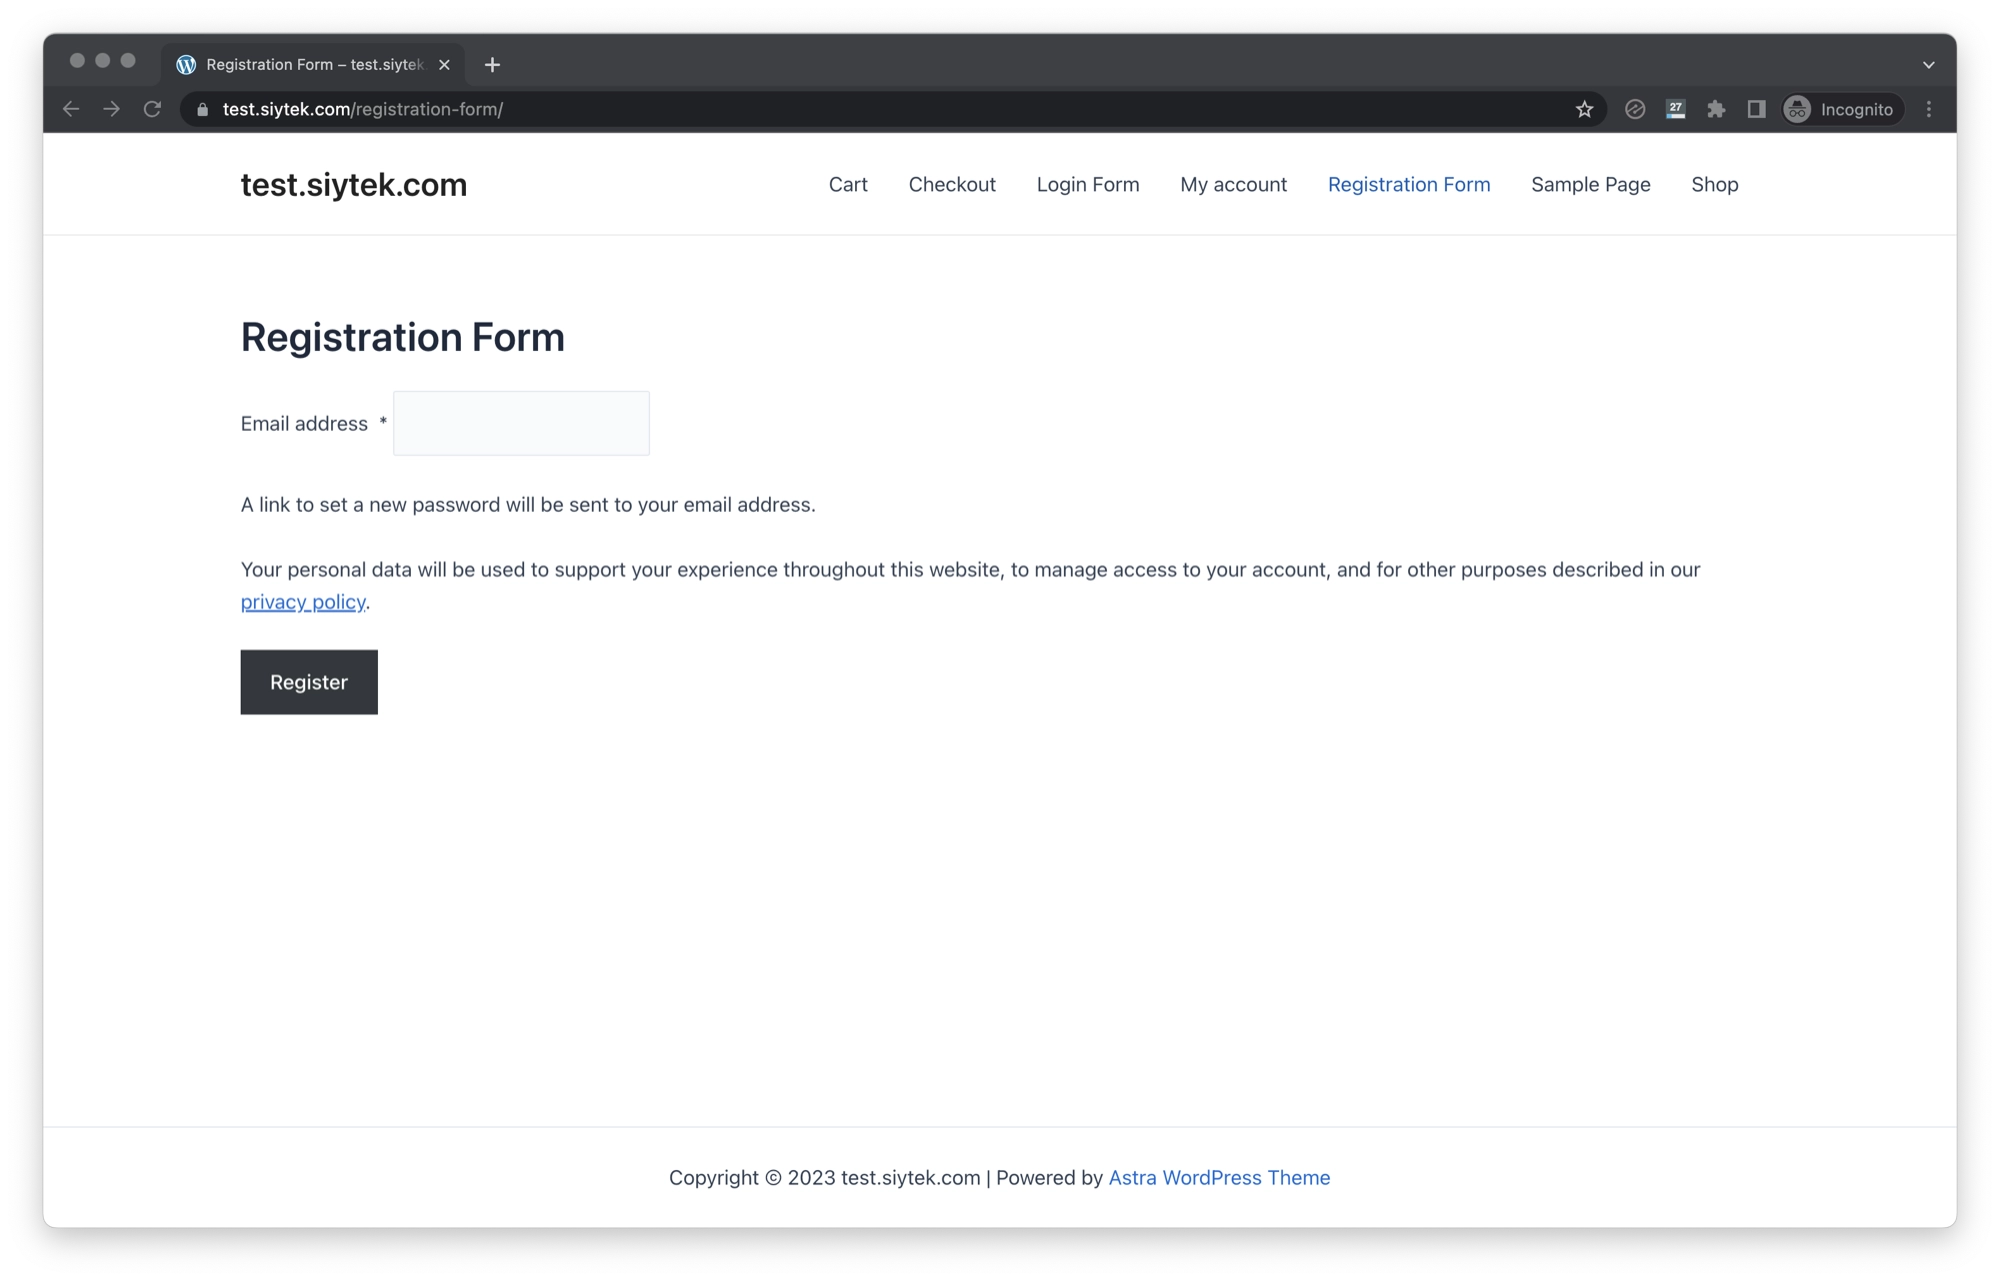
add_shortcode('generate_registration_form' , 'generate_registration_form');Once completed, your registration form should look something like the following. Note that the registration form will not function at this stage. We first need to complete the subsequent steps.
Linking My Account
The custom login and registration pages are now complete, however they are not yet fully functional.
This is because WooCommerce login and registration requires the My Account code to be loaded on the page in order for the login or registration process to function.
We will add a third and final function to the functions.php file, which performs the following steps:
- First check if the user is on either of the new login-form or registration-form pages that we have created.
- If the user is on either of those pages, check if the user is already logged in.
- If the user is already logged in, redirect them to the My Account page.
- If the user is not already logged in, add the My Account code to the page ready for displaying the form.
Go ahead and add the following function to the end of your functions.php file, after the two previous functions for the login and registration pages:
/**
 * Link My Account
 */
function link_my_account( $content ){

	// If you are on the login or registration page
	if( is_page('login-form') || is_page('registration-form') ){
		// and you are already logged in
		if( is_user_logged_in() ){
			// redirect to the My Account page
			wp_safe_redirect('/my-account');
			exit();
		// else if you are not logged in
		} else {
		// add the WooCommerce My Account code to the page and display the form.
		ob_start();
		?><div style="display: none;">[woocommerce_my_account]</div><?php
		$content .= ob_get_clean();

		}
	}

	return $content;
}
add_action ('template_redirect' , 'link_my_account');
Notes About the Account Linking Function
You can customize this function as needed. If you place the shortcode for the login or registration page on a page other than login-form or registration-form, you can simply change the page names. You can also add additional pages, for example:
if( is_page('my-login-form-name-here') || is_page('my-registration-form-name-here') || is_page('another-login-registration-page-here') || is_page('and-another-login-reg-page' )){You can also customize the redirect if already logged in. Simply change the permalink to the page you wish to redirect to:
wp_safe_redirect('/redirect-me-here');Lastly, just a note about the HTML code that is inserted in order to trigger the My Account code. You will notice that it is simply a shortcode placed within <div> tags. The contents are hidden using the style attribute to specify the CSS display property:
<div style="display: none;">[woocommerce_my_account]</div>
Conclusion
Congratulations! You have reached the end of the tutorial. Customizing the functionality of WooCommerce can be a little daunting, but with a little patience you can save yourself a lot of money by adding your own functionality.
You should now have your own separate login and registration pages, including shortcode that you can move on to any page that you like.
Thanks so much for visiting my site! If this article helped you achieve your goal and you want to say thanks, you can now support my work by buying me a coffee. I promise I won't spend it on beer instead... 😏