Looking for the easiest way to send and receive data from an ESP8266? A great starting point is understanding how to configure your ESP8266 to send and receive a UDP packet.
You can use UDP to communicate with other ESP8266 devices, your computer or many other WiFi devices.
In this tutorial we will write a simple application in the Arduino IDE that will receive a text string over UDP, print it to the serial console and then respond back with a confirmation message.
Table of Contents
- Prerequisite
- Connect to WiFi recap
- Adding UDP parameters
- Begin UDP
- Handle received packet
- Send a response
- Testing with PacketSender
- Conclusion
Prerequisite
You will need to have the Arduino IDE installed and configured to flash ESP devices. You will also need an ESP-based board such as the Wemos D1 Mini, as this will not work with a standard Arduino board.
I would recommend that you first follow my tutorial on how to configure the Arduino IDE for ESP devices and connect your device to WiFi. The tutorial is written for the Wemos D1 Mini but it applies to any ESP-based board compatible with the Arduino ESP core.
I would also recommend that you use PacketSender to test communications after you flash the device, you can download it for free. Alternatively you can use a different method to send and receive the UDP packets if you prefer.
Connect to WiFi recap
If you have read the previous tutorial how to configure the Arduino IDE for ESP devices, then you will have seen the code for connecting an ESP device to WiFi with Arduino.
Ideally you should at least read through the WiFi section of this tutorial to get an idea of how this works.
However if you already understand it and wish to skip over this step, you can just create a new project in the Arduino IDE and copy and paste the following code.
#include <ESP8266WiFi.h>

// Set WiFi credentials
#define WIFI_SSID "YOUR WIFI NETWORK SSID"
#define WIFI_PASS "YOUR WIFI PASSWORD"

void setup() {
  // Setup serial port
  Serial.begin(115200);
  Serial.println();

  // Begin WiFi
  WiFi.begin(WIFI_SSID, WIFI_PASS);

  // Connecting to WiFi...
  Serial.print("Connecting to ");
  Serial.print(WIFI_SSID);
  // Loop continuously while WiFi is not connected
  while (WiFi.status() != WL_CONNECTED)
  {
    delay(100);
    Serial.print(".");
  }

  // Connected to WiFi
  Serial.println();
  Serial.print("Connected! IP address: ");
  Serial.println(WiFi.localIP());

}

void loop() {
  // put your main code here, to run repeatedly:

}
Adding UDP parameters
Now that we have the basic code placed in a new Arduino IDE project, we can start to add the additional code for sending and receiving UDP. We will keep things nice and simple so that you gain and understanding of how it works, then you can copy and paste the code and expand on it for your own project!
Adding UDP support
First we need to add an include for the WiFi UDP library.
#include <ESP8266WiFi.h>
#include <WiFiUdp.h>
We also need to add a definition for the port that we wish to use for communication. For the example I have chosen 4210 but you can choose any port you like, just make sure it is not already in use.
#include <ESP8266WiFi.h>
#include <WiFiUdp.h>

// Set WiFi credentials
#define WIFI_SSID "YOUR WIFI NETWORK SSID"
#define WIFI_PASS "YOUR WIFI PASSWORD"
#define UDP_PORT 4210
Create an instance
Next we need to create an instance of the UDP class. You can call it whatever you like, but for this example we will simply call it UDP.
#include <ESP8266WiFi.h>
#include <WiFiUdp.h>

// Set WiFi credentials
#define WIFI_SSID "YOUR WIFI NETWORK SSID"
#define WIFI_PASS "YOUR WIFI PASSWORD"
#define UDP_PORT 4210

// UDP
WiFiUDP UDP;
Create message variables
We need to add two additional char variables to buffer the send and receive packets. We can specify our default response message here, feel free to change it to whatever you like.
#include <ESP8266WiFi.h>
#include <WiFiUdp.h>

// Set WiFi credentials
#define WIFI_SSID "YOUR WIFI NETWORK SSID"
#define WIFI_PASS "YOUR WIFI PASSWORD"
#define UDP_PORT 4210

// UDP
WiFiUDP UDP;
char packet[255];
char reply[] = "Packet received!";
Begin UDP
Now we come to our setup() function. Following the WiFi configuration we can begin our instance of UDP listening on the port we defined earlier with UDP_PORT.
#include <ESP8266WiFi.h>
#include <WiFiUdp.h>

// Set WiFi credentials
#define WIFI_SSID "Gysotc"
#define WIFI_PASS "ENPhaUr3gxEn"
#define UDP_PORT 4210

// UDP
WiFiUDP UDP;
char packet[255];
char reply[] = "Packet received!";

void setup() {
  // Setup serial port
  Serial.begin(115200);
  Serial.println();

  // Begin WiFi
  WiFi.begin(WIFI_SSID, WIFI_PASS);

  // Connecting to WiFi...
  Serial.print("Connecting to ");
  Serial.print(WIFI_SSID);
  // Loop continuously while WiFi is not connected
  while (WiFi.status() != WL_CONNECTED)
  {
    delay(100);
    Serial.print(".");
  }

  // Connected to WiFi
  Serial.println();
  Serial.print("Connected! IP address: ");
  Serial.println(WiFi.localIP());

  // Begin listening to UDP port
  UDP.begin(UDP_PORT);
  Serial.print("Listening on UDP port ");
  Serial.println(UDP_PORT);

}
Handle received packet
In our loop() function we will continuously check to see if a UDP packet has been received. If a packet has been received, we can handle it appropriately and then send a response message.
Parse packet
First we need utilize the UDP.parsePacket() method, which will process an incoming UDP packet and then return the size of the packet. We can load this value into an integer value called packetSize.
#include <ESP8266WiFi.h>
#include <WiFiUdp.h>

// Set WiFi credentials
#define WIFI_SSID "Gysotc"
#define WIFI_PASS "ENPhaUr3gxEn"
#define UDP_PORT 4210

// UDP
WiFiUDP UDP;
char packet[255];
char reply[] = "Packet received!";

void setup() {
  // Setup serial port
  Serial.begin(115200);
  Serial.println();

  // Begin WiFi
  WiFi.begin(WIFI_SSID, WIFI_PASS);

  // Connecting to WiFi...
  Serial.print("Connecting to ");
  Serial.print(WIFI_SSID);
  // Loop continuously while WiFi is not connected
  while (WiFi.status() != WL_CONNECTED)
  {
    delay(100);
    Serial.print(".");
  }

  // Connected to WiFi
  Serial.println();
  Serial.print("Connected! IP address: ");
  Serial.println(WiFi.localIP());

  // Begin listening to UDP port
  UDP.begin(UDP_PORT);
  Serial.print("Listening on UDP port ");
  Serial.println(UDP_PORT);

}

void loop() {

  // If packet received...
  int packetSize = UDP.parsePacket();
Once we have received a packet, the packetSize integer will no longer be zero. We can enclose our packet handler inside an if statement which tests packetSize for a non-zero value.
This prevents our program from continuously firing packet received events when there is in fact no packet.
#include <ESP8266WiFi.h>
#include <WiFiUdp.h>

// Set WiFi credentials
#define WIFI_SSID "Gysotc"
#define WIFI_PASS "ENPhaUr3gxEn"
#define UDP_PORT 4210

// UDP
WiFiUDP UDP;
char packet[255];
char reply[] = "Packet received!";

void setup() {
  // Setup serial port
  Serial.begin(115200);
  Serial.println();

  // Begin WiFi
  WiFi.begin(WIFI_SSID, WIFI_PASS);

  // Connecting to WiFi...
  Serial.print("Connecting to ");
  Serial.print(WIFI_SSID);
  // Loop continuously while WiFi is not connected
  while (WiFi.status() != WL_CONNECTED)
  {
    delay(100);
    Serial.print(".");
  }

  // Connected to WiFi
  Serial.println();
  Serial.print("Connected! IP address: ");
  Serial.println(WiFi.localIP());

  // Begin listening to UDP port
  UDP.begin(UDP_PORT);
  Serial.print("Listening on UDP port ");
  Serial.println(UDP_PORT);

}

void loop() {

  // If packet received...
  int packetSize = UDP.parsePacket();
  if (packetSize) {

  }

}
Read packet
Inside of our packet handler we can print a message which states that we have received a packet, as well as the size of the packet in bytes.
The UDP.read() method will load the packet into the packet buffer specified in the first argument. We can specify the maximum buffer size with the second argument.
The UDP.read() method will also return the length of the packet, so we will load this into an integer called len.
Finally if the length of the packet is greater than zero, we will terminate it with an ASCII zero character so that it conforms to the Arduino recommendation for strings. This prevents errors when we print the string to the serial port.
#include <ESP8266WiFi.h>
#include <WiFiUdp.h>

// Set WiFi credentials
#define WIFI_SSID "Gysotc"
#define WIFI_PASS "ENPhaUr3gxEn"
#define UDP_PORT 4210

// UDP
WiFiUDP UDP;
char packet[255];
char reply[] = "Packet received!";

void setup() {
  // Setup serial port
  Serial.begin(115200);
  Serial.println();

  // Begin WiFi
  WiFi.begin(WIFI_SSID, WIFI_PASS);

  // Connecting to WiFi...
  Serial.print("Connecting to ");
  Serial.print(WIFI_SSID);
  // Loop continuously while WiFi is not connected
  while (WiFi.status() != WL_CONNECTED)
  {
    delay(100);
    Serial.print(".");
  }

  // Connected to WiFi
  Serial.println();
  Serial.print("Connected! IP address: ");
  Serial.println(WiFi.localIP());

  // Begin listening to UDP port
  UDP.begin(UDP_PORT);
  Serial.print("Listening on UDP port ");
  Serial.println(UDP_PORT);

}

void loop() {

  // If packet received...
  int packetSize = UDP.parsePacket();
  if (packetSize) {
    Serial.print("Received packet! Size: ");
    Serial.println(packetSize);
    int len = UDP.read(packet, 255);
    if (len > 0)
    {
      packet[len] = '\0';
    }
  }

}
Send packet to the serial port
Once we have finished handling our packet, we can print it to the serial port so that it is displayed in the serial console.
#include <ESP8266WiFi.h>
#include <WiFiUdp.h>

// Set WiFi credentials
#define WIFI_SSID "Gysotc"
#define WIFI_PASS "ENPhaUr3gxEn"
#define UDP_PORT 4210

// UDP
WiFiUDP UDP;
char packet[255];
char reply[] = "Packet received!";

void setup() {
  // Setup serial port
  Serial.begin(115200);
  Serial.println();

  // Begin WiFi
  WiFi.begin(WIFI_SSID, WIFI_PASS);

  // Connecting to WiFi...
  Serial.print("Connecting to ");
  Serial.print(WIFI_SSID);
  // Loop continuously while WiFi is not connected
  while (WiFi.status() != WL_CONNECTED)
  {
    delay(100);
    Serial.print(".");
  }

  // Connected to WiFi
  Serial.println();
  Serial.print("Connected! IP address: ");
  Serial.println(WiFi.localIP());

  // Begin listening to UDP port
  UDP.begin(UDP_PORT);
  Serial.print("Listening on UDP port ");
  Serial.println(UDP_PORT);

}

void loop() {

  // If packet received...
  int packetSize = UDP.parsePacket();
  if (packetSize) {
    Serial.print("Received packet! Size: ");
    Serial.println(packetSize);
    int len = UDP.read(packet, 255);
    if (len > 0)
    {
      packet[len] = '\0';
    }
    Serial.print("Packet received: ");
    Serial.println(packet);
  }

}
Send a response
The last part of the code will send the response back to the sender. We must open the response with a UDP.beginPacket() method.
The first argument is the IP address we wish to send the packet to and the second argument is the port. We can use UDP.remoteIP() and UDP.remotePort() to use the values from the message sender.
We will then use UDP.write() to send the packet before ending with the UDP.endPacket() method.
#include <ESP8266WiFi.h>
#include <WiFiUdp.h>

// Set WiFi credentials
#define WIFI_SSID "Gysotc"
#define WIFI_PASS "ENPhaUr3gxEn"
#define UDP_PORT 4210

// UDP
WiFiUDP UDP;
char packet[255];
char reply[] = "Packet received!";

void setup() {
  // Setup serial port
  Serial.begin(115200);
  Serial.println();

  // Begin WiFi
  WiFi.begin(WIFI_SSID, WIFI_PASS);

  // Connecting to WiFi...
  Serial.print("Connecting to ");
  Serial.print(WIFI_SSID);
  // Loop continuously while WiFi is not connected
  while (WiFi.status() != WL_CONNECTED)
  {
    delay(100);
    Serial.print(".");
  }

  // Connected to WiFi
  Serial.println();
  Serial.print("Connected! IP address: ");
  Serial.println(WiFi.localIP());

  // Begin listening to UDP port
  UDP.begin(UDP_PORT);
  Serial.print("Listening on UDP port ");
  Serial.println(UDP_PORT);

}

void loop() {

  // If packet received...
  int packetSize = UDP.parsePacket();
  if (packetSize) {
    Serial.print("Received packet! Size: ");
    Serial.println(packetSize);
    int len = UDP.read(packet, 255);
    if (len > 0)
    {
      packet[len] = '\0';
    }
    Serial.print("Packet received: ");
    Serial.println(packet);

    // Send return packet
    UDP.beginPacket(UDP.remoteIP(), UDP.remotePort());
    UDP.write(reply);
    UDP.endPacket();

  }

}
Testing with PacketSender
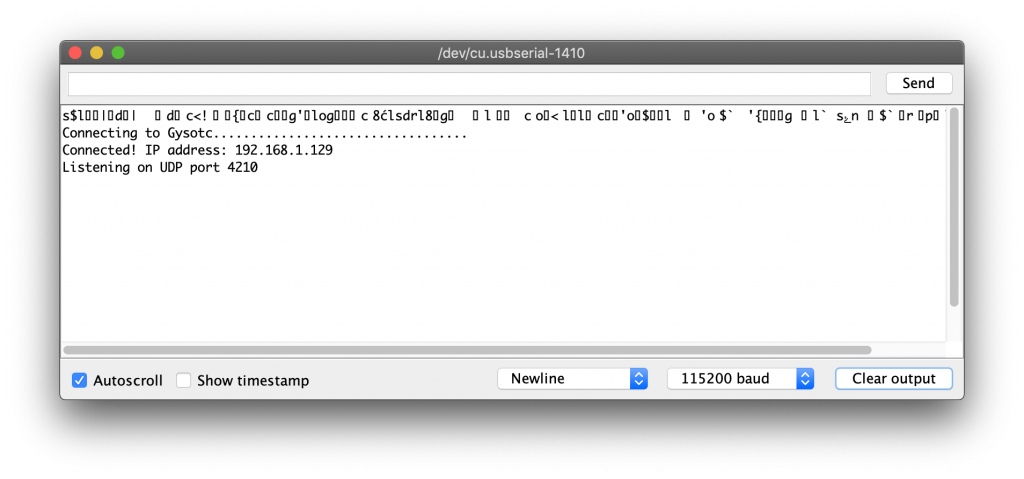
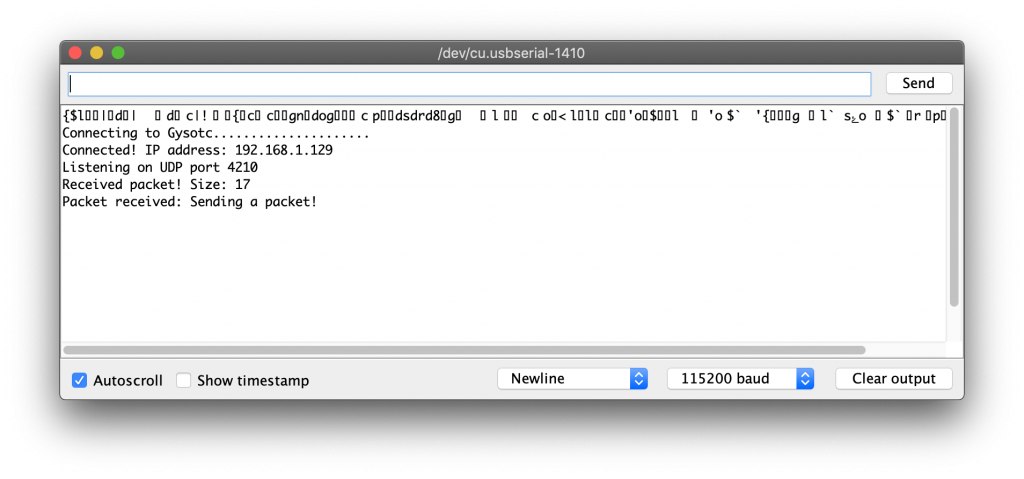
Now we have completed the code you can go ahead and upload the sketch! Once the upload has completed, open the serial console and set the baud rate to 115200.
Press the reset button on your ESP board and if everything is correct, your ESP device will connect to your router and report back the IP address.
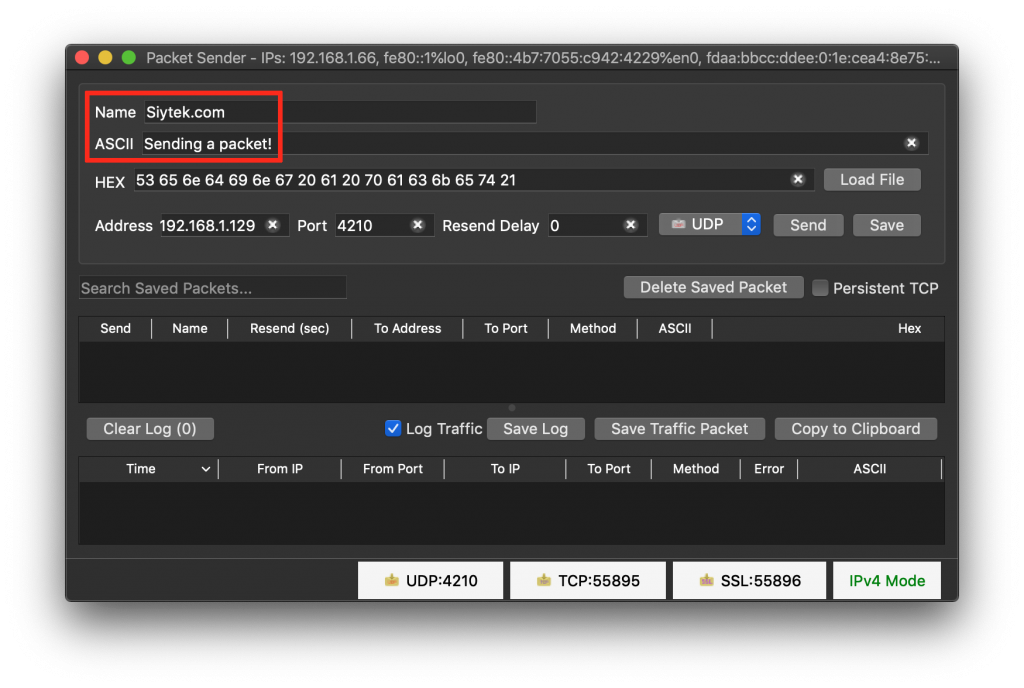
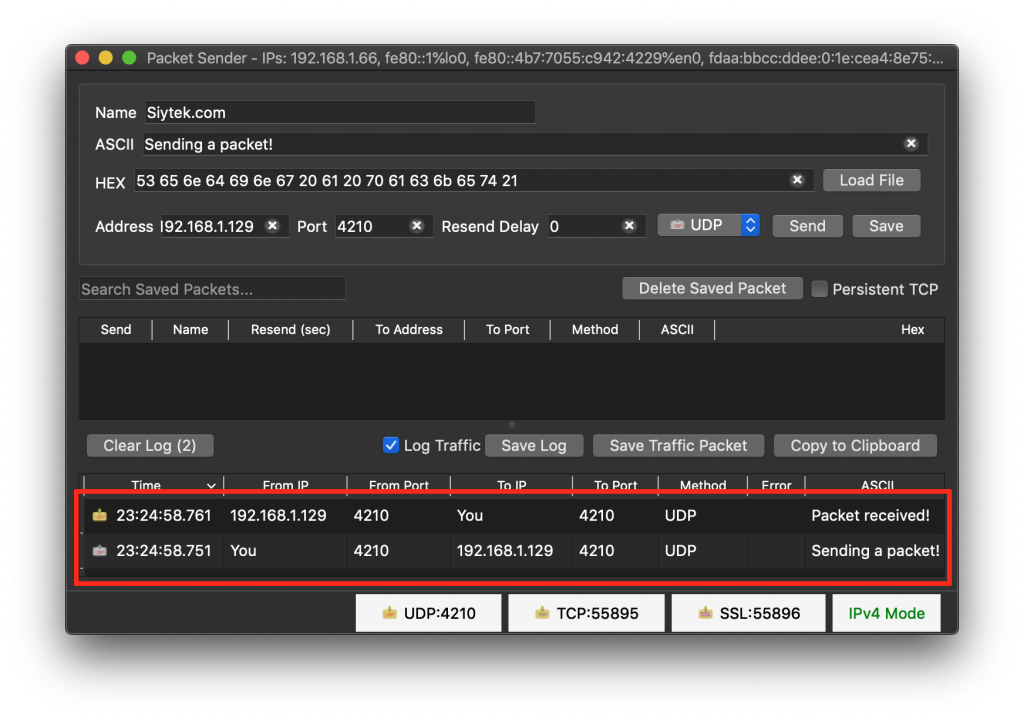
Now we can test the code with PacketSender, a tool that will allow us to send and receive UDP packets. Open up PacketSender and enter a message in the ASCII box. You can give the configuration a name too if you like.
Enter the IP address of your ESP board, you can fetch this from the Arduino serial console window. Then go ahead and click send!
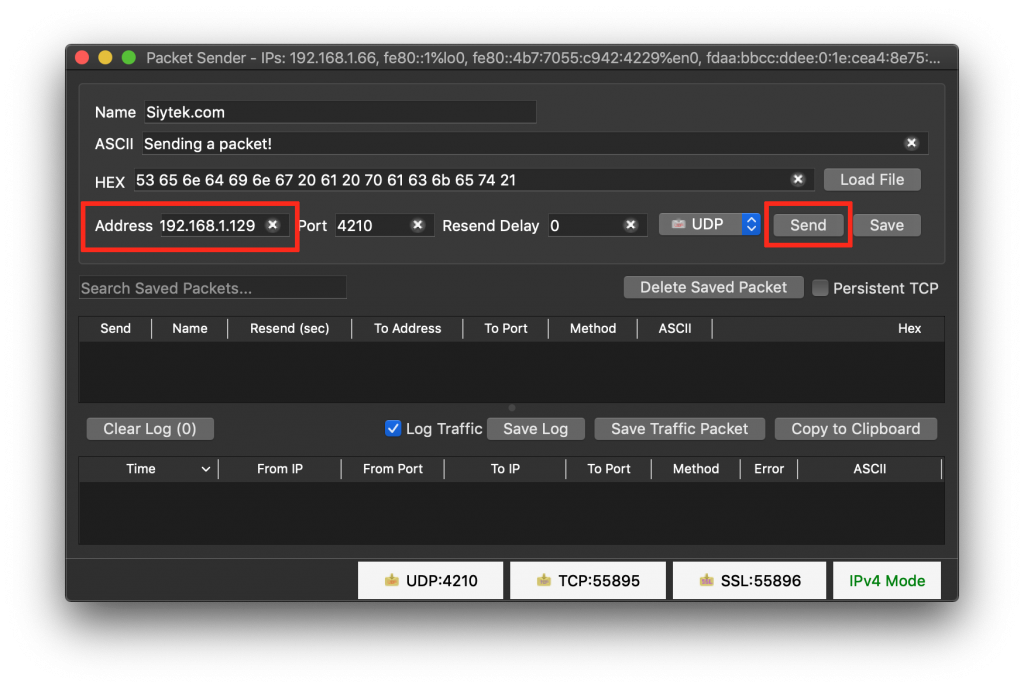
If everything is configured correctly you should see the packets sent and received to the ESP device. Here you can see the response message that we specified in the ESP code.
You should also be able to see the message received in the Arduino serial console.
Conclusion
The Arduino ESP core is a superb tool for the IoT enthusiast and in this tutorial we have learnt just how simple it can be to establish communication between devices.
This tutorial provides a very basic understanding of how to send and receive UDP packets, however it should be enough information for you to integrate communication into your own project.
Why not go ahead and check out some more of my ESP device tutorials to get some more inspiration for your ESP projects!
Thanks so much for visiting my site! If this article helped you achieve your goal and you want to say thanks, you can now support my work by buying me a coffee. I promise I won't spend it on beer instead... 😏


Dear Sir or Madam,
My name is Ger from thye Netherlands.
Thanks for explaining the UDP programming, tis make a lot clear.
Also with the scripts, witch i use for understanding better.
I have one question:
I have a part of script receiving array, can you tell me how to send these array?
int len = UDP.read(packet, 4);
if(len>0){packet[len] = ‘\0’;}
input_ROLL = int(packet[0]);
input_PITCH = int(packet[1]);
input_THROTTLE = int(packet[2])*24;
Mode = int(packet[3]);
I hope you can explaine to me and thanks for that in advance.
Greetings Ger
Hi Ger,
Thanks for the comments! Glad the tutorial was helpful! Try removing int and also declaring those variables if you didn’t declare them earlier in your program:
char input_ROLL = packet[0];
char input_PITCH = packet[1];
char input_THROTTLE = packet[2]*24;
char Mode = packet[3];
Hello Siytek,
Thanks for the quick answer and explanation.
I see that you develop and do a lot in the field of Technology Tutorials.
I’m a Raspberry Pi freek and recently took a look at Arduino. Working with the ESP8266 and ESP32 is a lot of fun and a very different way with C++ but slowly learning more and more.
In addition, I come to another question, I am making a drone and control it by the ESP8266, hence my question about UDP. I will succeed and am now diligently looking for a clear way to create and send the UDP packets.
Do you know if it is possible to connect an analog joystick to an ESP8266 and send the values of the joystick and buttons from there via the UDP?
If you have a diagram and or a script, or an example (No smartphone), then I am very grateful, you say …. no that is not possible …. then I will look further for some kind of solution.
Thanks in advance for an answer and greetings from the cold Netherlands,
Ger
Hello Siytek,
Forget the above, I’ve become a bit wiser and connect a joystick to the ESP8266, analog.
Can I now just send the value of the joystick with udp to my receiver with the explanation you gave with ?.
I am now working with the Packet Send program, but what should the script be like if I want to send one or more packets with Arduino to another Arduino.
I hope you can find some time to help me, thanks for that,
Regards Ger