
Looking for an easy way to integrate Alexa into Home Assistant without any cost?
This guide will have you up and running in minutes with a super-simple setup!
There are several ways to integrate Alexa with Home Assistant. This guide will focus on using the Philips Hue emulated bridge method, as this is the easiest way without an associated cost.
Table of Contents
- Prerequisite
- Connecting Alexa
- Adding the emulated Hue integration
- Adding Home Assistant on the Alexa app
- Conclusion
Prerequisite
You will need a Home Assistant installation up and running and some configured entities, a light or two should do just fine.
You will also need an Alexa configured with the Alexa app as we will be using it to add Home Assistant as a device.
The configuration is super-simple, but if you are completely new to Home Assistant then you may want to check out my beginners guide to configuring Home Assistant first.
Connecting Alexa
There are several methods that we could use to connect Alexa to Home Assistant.
First let’s take a look at the different methods so that you understand the best option for your setup.
Manually creating a skill
The most versatile method for connecting Alexa to Home Assistant is to actually create a custom skill.
This gives complete flexibility in setting up the configuration.
There are however two main caveats; firstly you need an Amazon developer account, which requires credit card details and may charge you although it is unlikely with personal usage.
Secondly it is a complicated process to set this up. Here at Siytek.com this is exactly the kind of tutorial I like to write and it would absolutely be my first choice method for integrating Alexa, had it not been for the requirement to give billing details.
However on this occasion I just do not want to give Amazon my billing details.
Personally I would rather pay a very small monthly fee to the developers by using the Home Assistant cloud, in order to support the project.
I may change my mind and write a future tutorial on this method as it really interests me.
However for now if you are interested in the full functionality, you can check out the official documentation:
- Create an Alexa Home skill to control lights, etc
- Create a custom skill to build custom components
- Create a new flash briefing source
Using Home Assistant cloud
The development work that has gone into Home Assistant is immense and we as the users are very lucky to get all of this for nothing due to the awesome open source revolution!
If you are happy to contribute a small amount for the Home Assistant cloud service then you should definitely check it out, as it gives the best functionality.
JuanMTech already has a great post explaining how to set up Alexa with the HA cloud service.
You can also check out the official setup documentation here.
Emulated Philips Hue bridge
This tutorial will cover the emulated Philips Hue bridge method, which gives users the option to connect Alexa with a very simple configuration and for no cost.
One caveat to this method is devices can only appear to Alexa as a Philips Hue bulb.
This will give us complete functionality of our light entities, however other entities will only be able to be turned on and off.
One exception to this is the volume control of media players can be controlled using brightness.
So what has this got to do with Philips Hue? In short, Home Assistant will pretend to be a Philips Hue bridge in order to trick Alexa into thinking that she is connecting to a Philips Hue setup.
The emulated Philips Hue bridge will then relay commands between Alexa and the Home Assistant core.
This allows all light entities within Home Assistant to appear to Alexa as Philips Hue bulbs. Genius!
Adding the emulated Hue integration
In order to add the emulated bridge to Home Assistant we need to add a few lines of YAML to the configuration.yaml file.
If you are unsure on where to find this file or how to edit it, go take a quick look at my beginners guide to YAML.
Adding the integration and port
Go ahead and add the following to your configuration.yaml file. Note that due to some recent updates, the port must be left set to 80.
emulated_hue:
  listen_port: 80
Adding the IP address
It may also be necessary to manually add the IP address of your Home Assistant server.
However this is optional as the emulated bridge should find it automatically.
emulated_hue:
  listen_port: 80
  host_ip: 192.168.1.83
Exposing entities
Next we need to expose some entities that we wish Alexa to be able to discover.
The easiest way to do this is just expose all entities within a specified domain. For example, all light entities can be exposed with the domain light.
emulated_hue:
  listen_port: 80
  host_ip: 192.168.1.83
  exposed_domains:
    - light
If is also possible to expose entities individually if you only want to add specific entities to Alexa.
emulated_hue:
  listen_port: 80
  host_ip: 192.168.1.83
  exposed_domains:
    - light
  entities:
    light.treelamp:
      name: "Cool LED lamp"
Flipping mapping
It is also possible to map the “alexa turn off” voice command to a “turn on” function in Home Assistant.
This can be useful for scripts as you may want to call a script that disables something.
For example, you might want to say “alexa turn off studio lights,” which calls a scene that switches off all of the studio lights.
In order to activate the scene, a scene.turn_on service is required, therefore you could use the off_maps_to_on_domains attribute.
emulated_hue:
  listen_port: 80
  host_ip: 192.168.1.83
  exposed_domains:
    - light
  entities:
    light.treelamp:
      name: "Cool LED lamp"
  off_maps_to_on_domains:
    - script
    - scene
We are all done! Go ahead and save the file and restart Home Assistant.
Providing there are no errors in the log, we should now be able to add the devices with the Alexa app.
Adding Home Assistant on the Alexa app
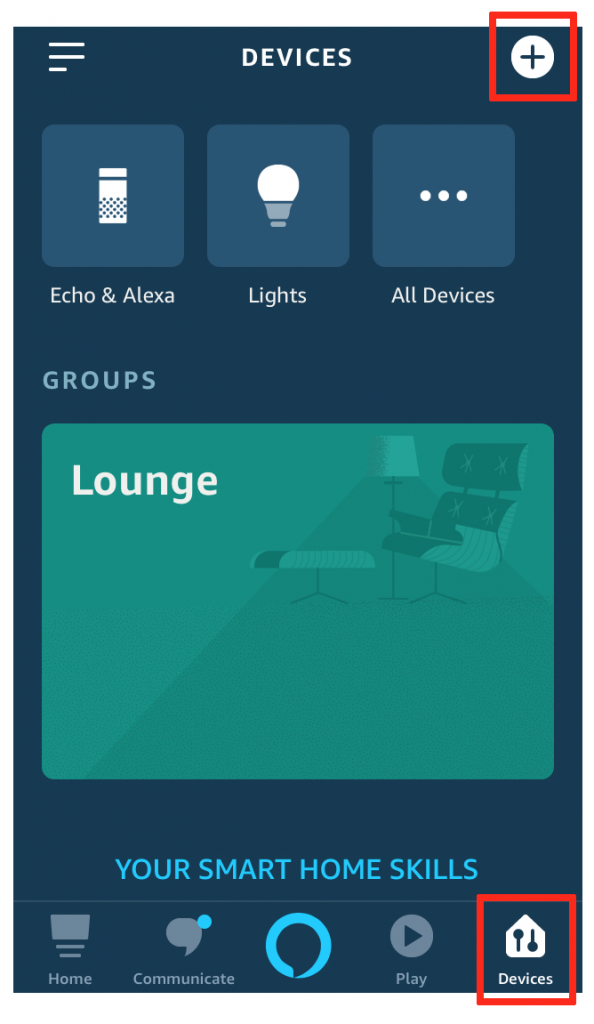
Adding the devices to Alexa is super-simple, we just need to follow the normal step-by-step process.
Go ahead and tap devices and then tap the plus icon and tap add device.
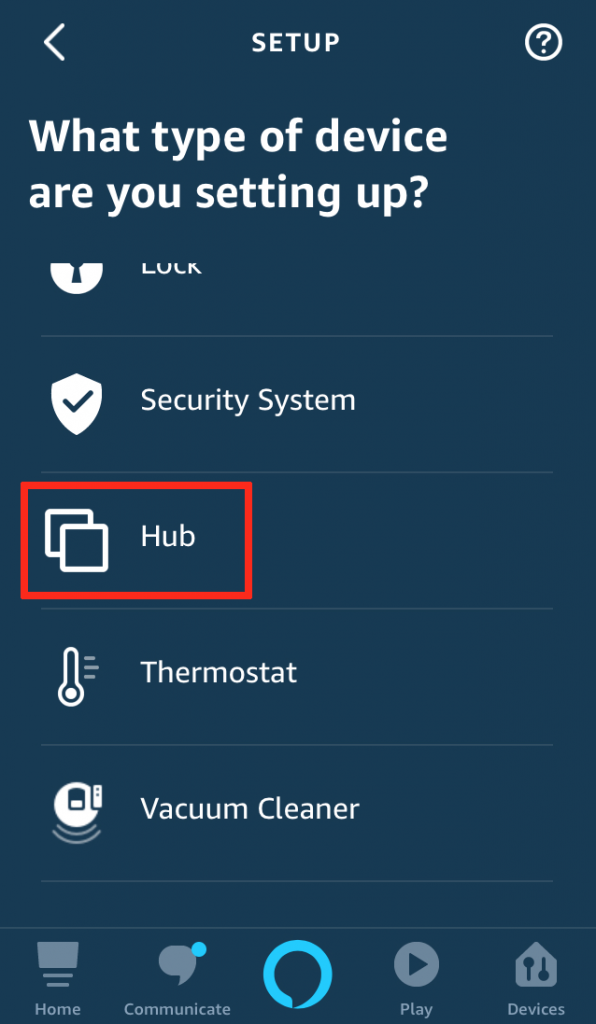
You can either choose Philips Hue from the popular brands or scroll down and select hub, followed by Philips Hue.
Next you need to choose the Philips Hue V1 bridge (Circular shape).
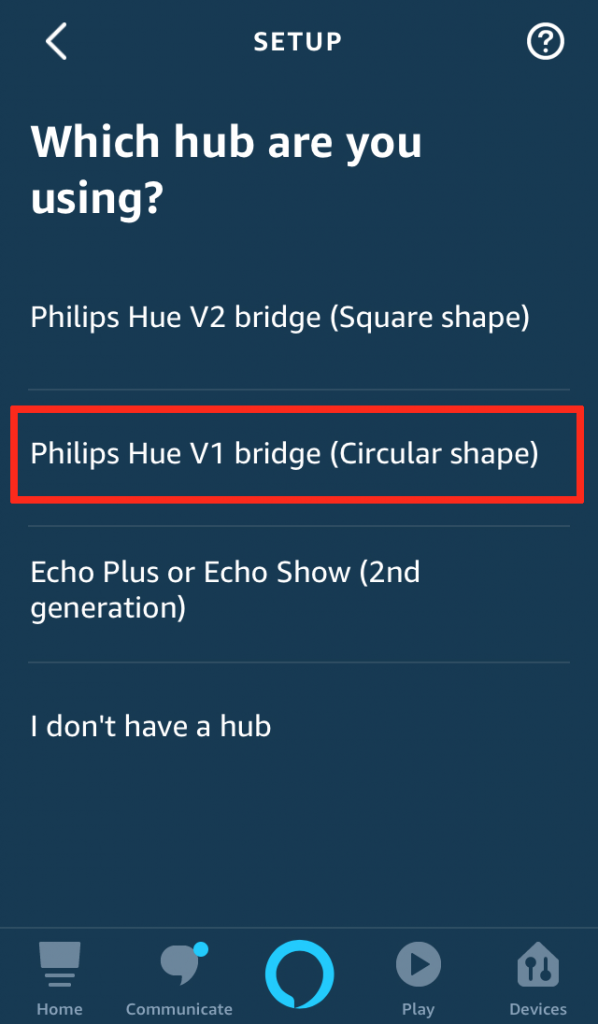
Once you have selected it, Alexa will take a moment to detect the device and if everything has been setup correctly, the emulated Philips Hue bridge on your Home Assistant installation will be detected!
You can go ahead and add the desired entities.
Conclusion
I am not a fan of closed-source consumer products but the Amazon Alexa as really cool!
Philips Hue emulation does not provide an ideal method for integration, but it does provide a working method that is simple to set up.
Personally I will be sticking to more refined HomeKit emulation for voice activation, although I think my Echo Dot will find a place in the corner of the kitchen and will be assigned the task of informing me of the latest news during morning coffee.
Now that you have your Alexa up and running with Home Assistant, why not go check out some of my other awesome Home Assistant tutorials and find out what you can do with her!
Thanks so much for visiting my site! If this article helped you achieve your goal and you want to say thanks, you can now support my work by buying me a coffee. I promise I won't spend it on beer instead... 😏


Came looking here for a way to use Amazon Alexa but not using NabuCasa.
I no longer call the contribution small (it was 2 years ago when I singed up for it) and I canceled it today.
Seems to be not working anymore, as Alexa is asking to link itseld with my Philips Hue-Account.