In my previous tutorial we learnt how to setup a basic push notification in Home Assistant with the companion mobile app.
In this tutorial we will learn how to send a push notification to iOS and include an action button that can trigger an automation in Home Assistant. Awesome!
Table of Contents
- What is an actionable notification?
- Prerequisite
- Configure Home Assistant
- Actionable notification structure
- Add the iOS integration
- Notification script
- Notification automation
- Import push configuration
- Adding the entity button
- Conclusion
What is an actionable notification?
An actionable notification is the same as a normal notification, only it has the added functionality of a button that can be pressed to fire an automation in Home Assistant.
There are many circumstances where this might be useful. You could generate a notification for when the doorbell is pressed and the action button could fire an automation that unlocks the door.
You could also generate a notification triggered by a motion sensor and the action button gives you the option to activate the burglar alarm.
Perhaps your partner likes to stay in bed during the weekend. Your bed occupancy sensor could give you a notification for when they finally get out of bed. Then simply press your action button to boil the kettle for them, how nice!
Prerequisite
I would recommend that you read my previous tutorial on basic notifications first.
You should have Home Assistant installed and running. A basic understanding of YAML would also be highly beneficial.
If you are not yet familiar with automation or YAML then I would recommend reading the tutorials about automation and scripts first.
You will also need the Home Assistant app installed on at least one device. The Home Assistant Companion App can be downloaded from the iOS App Store or Play Store.
You will also either need the file editor add-on or be familiar with editing the files using your favorite text editor. If you are not familiar with either you may want to check out my tutorial on automationor scripts first.
Configure Home Assistant
You need to be running Home Assistant version 0.95 or newer, I would recommend just updating to the latest version.
First we need to make sure that the default_config integration is added to our configuration.yaml file. If not then you can go ahead and add it.
default_config:
If there is some reason that you have removed it, you can instead enter the following.
mobile_app:
discovery:
So long as you have either of these options within your configuration.yaml file, the companion app will automatically configure itself.
It is important that you enable notifications during the installation. If you have already installed the companion app and did not enable notifications during the installation, you may need to follow the steps in the troubleshooting section.
Actionable notification structure
In order to create a notification with an action button, we will add YAML code to three different integrations.
iOS integration
In order to use actionable push notifications, they must be configured using the iOS integration. Here we define a set of categories and actions associated with the notifications.
An action is the event that will occur when the actionable notification button is pressed. You can add up to four actions per category and each action will be represented by a button.
A category is simply a group of relevant actions that can be assigned to a notification. For example we could create a category called “lights” with three actions, “main” “LEDs” and “lamps.”
If we assign the category “lights” to a particular notification, the action buttons for “main,” “LEDs” and “lamps” will be available under that notification.
Script
You can send an actionable push notification from anywhere that supports the notify service.
For the example in this tutorial we will add a simple entity button that fires a script, which will send the notification to our mobile device.
Automation
When the actionable notification button is pressed on the mobile device, it will fire an instance of automation within Home Assistant.
In this example we will create a simple automation that turns on a lamp when the button is pressed.
Add the iOS integration
First we need to add the iOS integration to our configuration.yaml file.
ios:
  push:
    categories:
Then we need to add the category and specify the identifier, which should be kept in lower case with no spaces.
ios:
  push:
    categories:
      - name: ioslights
        identifier: 'ios_lights'
Categories are entered in a YAML list under push. To add more categories, use the “-” operator and maintain the correct tabs/spacing.
Next we will add the actions. The texted entered for the title attribute will be the text that appears on the button.
You can choose whether or not to open the Home Assistant app by setting the activationMode to foreground or background.
You can set the action to require the phone to be unlocked first by setting authenticationRequired to true. Leaving it set to false will allow the action to be triggered without unlocking.
The button text will appear red if destructive is set to true. Useful if the action is critical, such as unlocking the front door or triggering the alarm.
ios:
  push:
    categories:
      - name: ioslights
        identifier: 'ios_lights'
        actions:
          - identifier: 'TREE_LAMP'
            title: 'Turn on Tree Lamp'
            activationMode: 'background'
            authenticationRequired: false
            destructive: false
Notification script
Now that we have configured our ios integration we can create an instance under the script integration to send the push notification.
We will create a new script called push_with_action_button and give it an alias and description.
script:
   push_with_action_button:
        alias: Test push with button
        description: 'Send a test push notification with action'
        sequence:
In the sequence we need to specify the service as notify.mobile_app_<your device ID>, where <your device ID> is the name of your mobile device in Home Assistant.
script:
   push_with_action_button:
        alias: Test push with button
        description: 'Send a test push notification with action'
        sequence:
           service: notify.mobile_app_iphone
           data:
Next we should add the standard messages required for the notification. This is the same as with a standard push notification.
script:
   push_with_action_button:
        alias: Test push with button
        description: 'Send a test push notification with action'
        sequence:
           service: notify.mobile_app_iphone
           data:
              title: "siytek.com"
              message: "Someone pushed my button!"
Finally we need to specify a category for the notification. We will use the identifier specified under the ios integration for the category that we wish to assign.
script:
   push_with_action_button:
        alias: Test push with button
        description: 'Send a test push notification with action'
        sequence:
           service: notify.mobile_app_iphone
           data:
              title: "siytek.com"
              message: "Someone pushed my button!"
              data:
                 push:
                     category: "ios_lights"
Notification automation
Finally we can write an automation for each action button. In this example we only have a single action TREE_LAMP as specified earlier by the action identifier under the ios integration.
We will specify the automation under the automation integration. If you already have automation code in place, simply add it beneath the existing code.
automation:
  - alias: Notification turn on treelamp
Next we will specify the trigger and choose event for the platform. We will use ios.notification_action_fired for the event_type to tell Home Assistant to fire this automation when an action button is pressed on our mobile device.
automation:
  - alias: Notification turn on treelamp
    trigger:
      platform: event
      event_type: ios.notification_action_fired
We also need to specify the actionName as “TREE_LAMP” from our earlier action identifier. This will tell Home Assistant to fire this automation when that specific button is pressed.
automation:
  - alias: Notification turn on treelamp
    trigger:
      platform: event
      event_type: ios.notification_action_fired
      event_data:
        actionName: TREE_LAMP
Finally we can specify the action. For this example we will use a simple light.turn_on service to turn on the entity light.treelamp.
automation:
  - alias: Notification turn on treelamp
    trigger:
      platform: event
      event_type: ios.notification_action_fired
      event_data:
        actionName: TREE_LAMP
    action:
        - service: light.turn_on
          entity_id: light.treelamp
Import push configuration
Once you have finished writing the YAML you will need to restart Home Assistant.
We also need to import the push configuration in the Home Assistant app. This needs to be done any time changes are made.
Scroll down to the bottom of the sidebar within the app and tap app configuration.
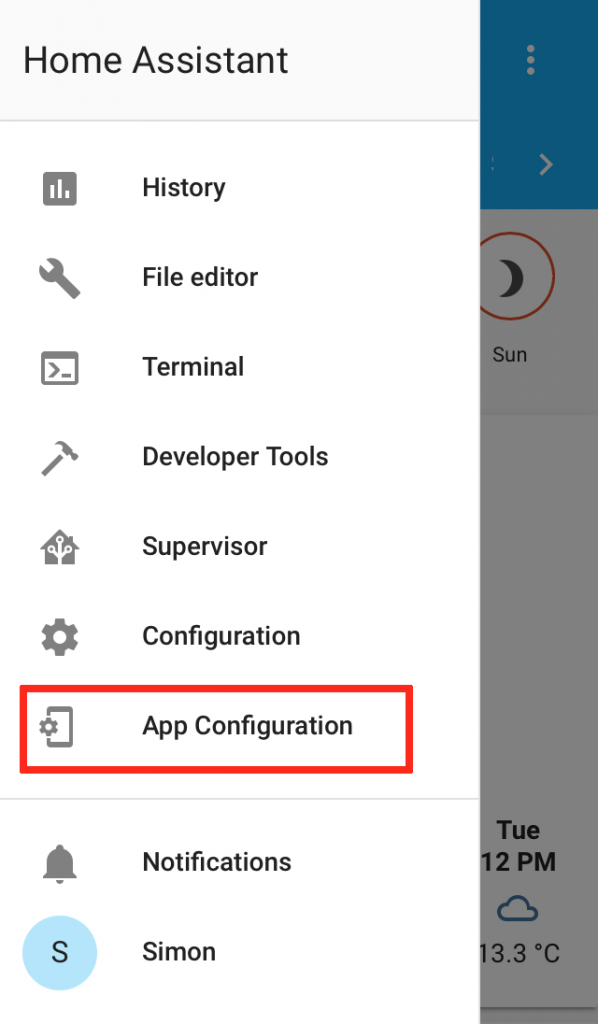
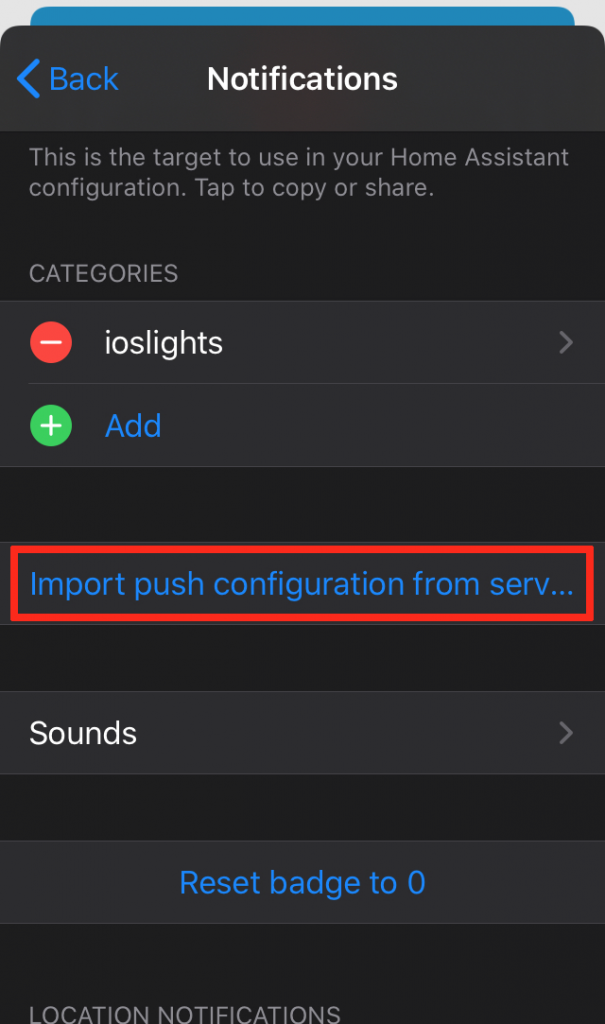
Then tap notifications to enter the notifications menu. From there just tap import push configuration from server.
Adding the entity button
In order to test our new notification we will add an entity button to the user interface.
We will create the button using the UI editor. From the overview page, click on the three dots and then configure UI in the top right-hand corner of the page.
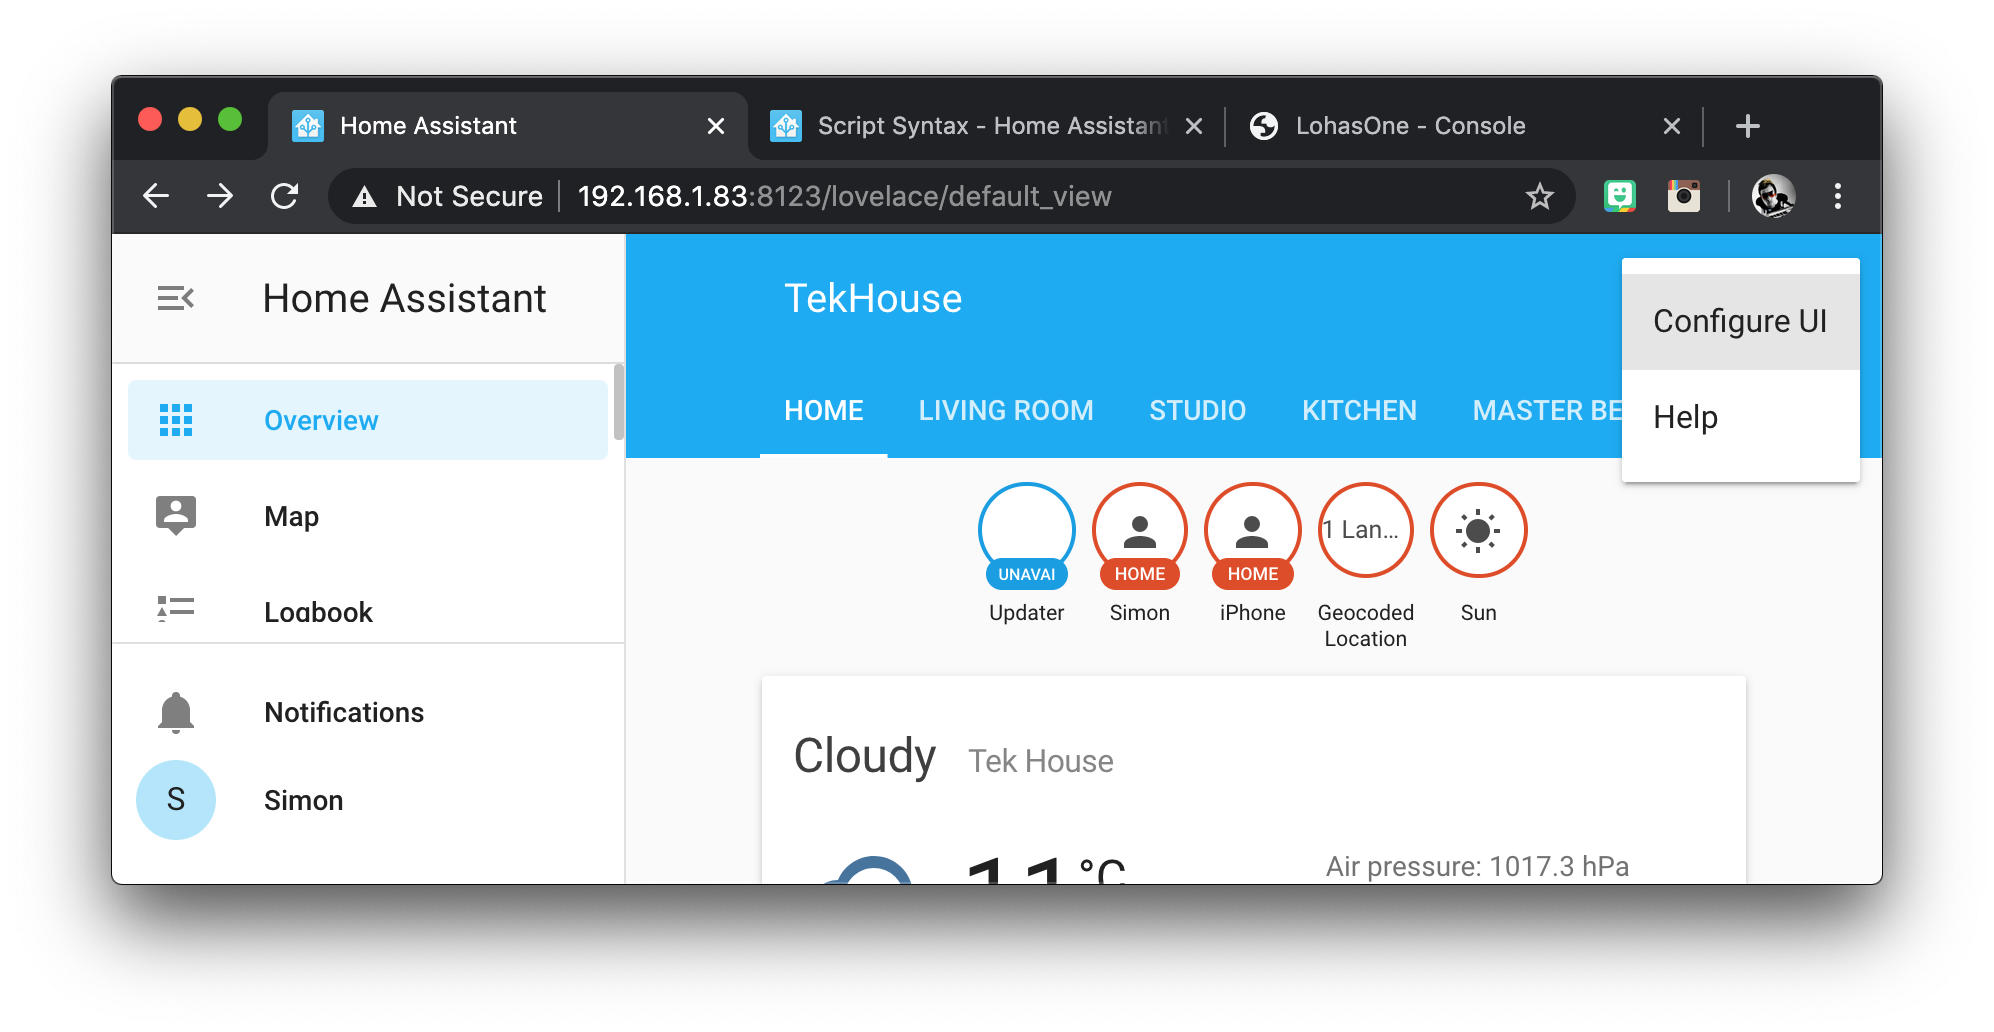
This will switch on the UI editor mode.
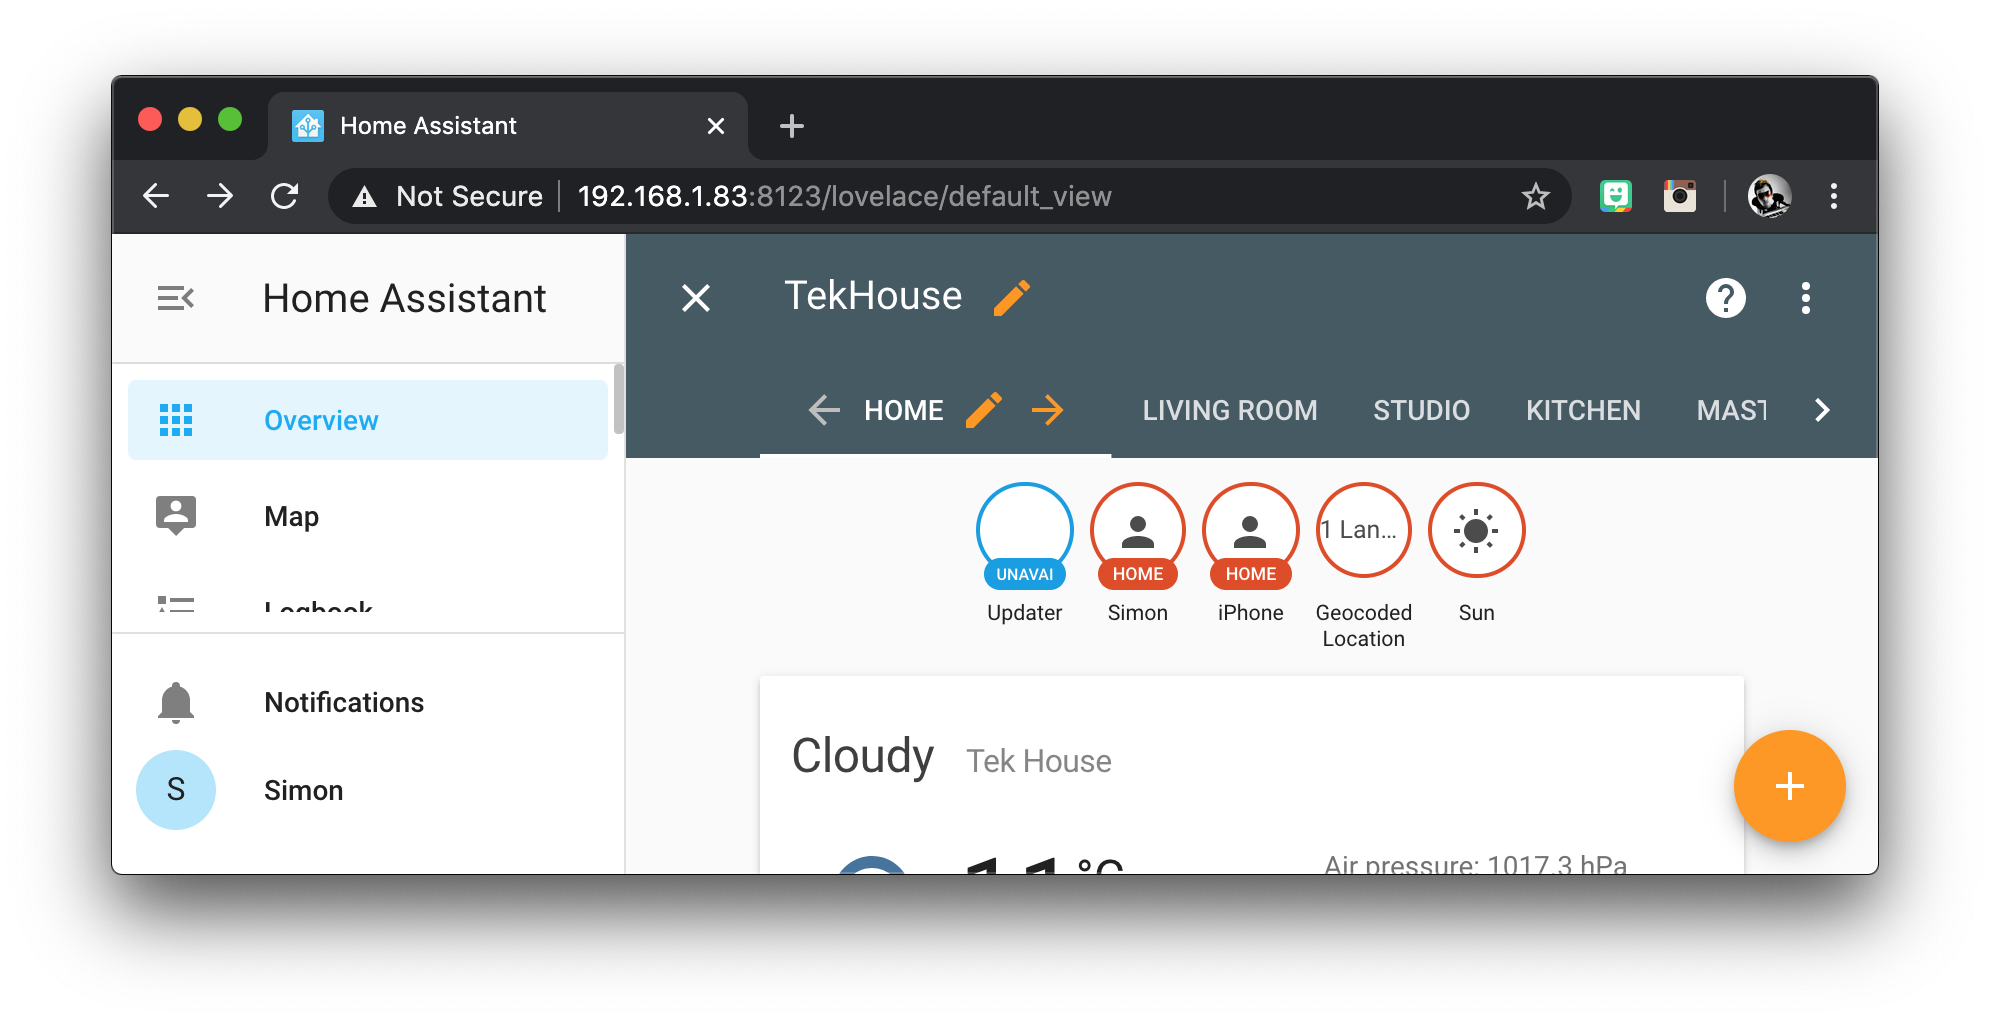
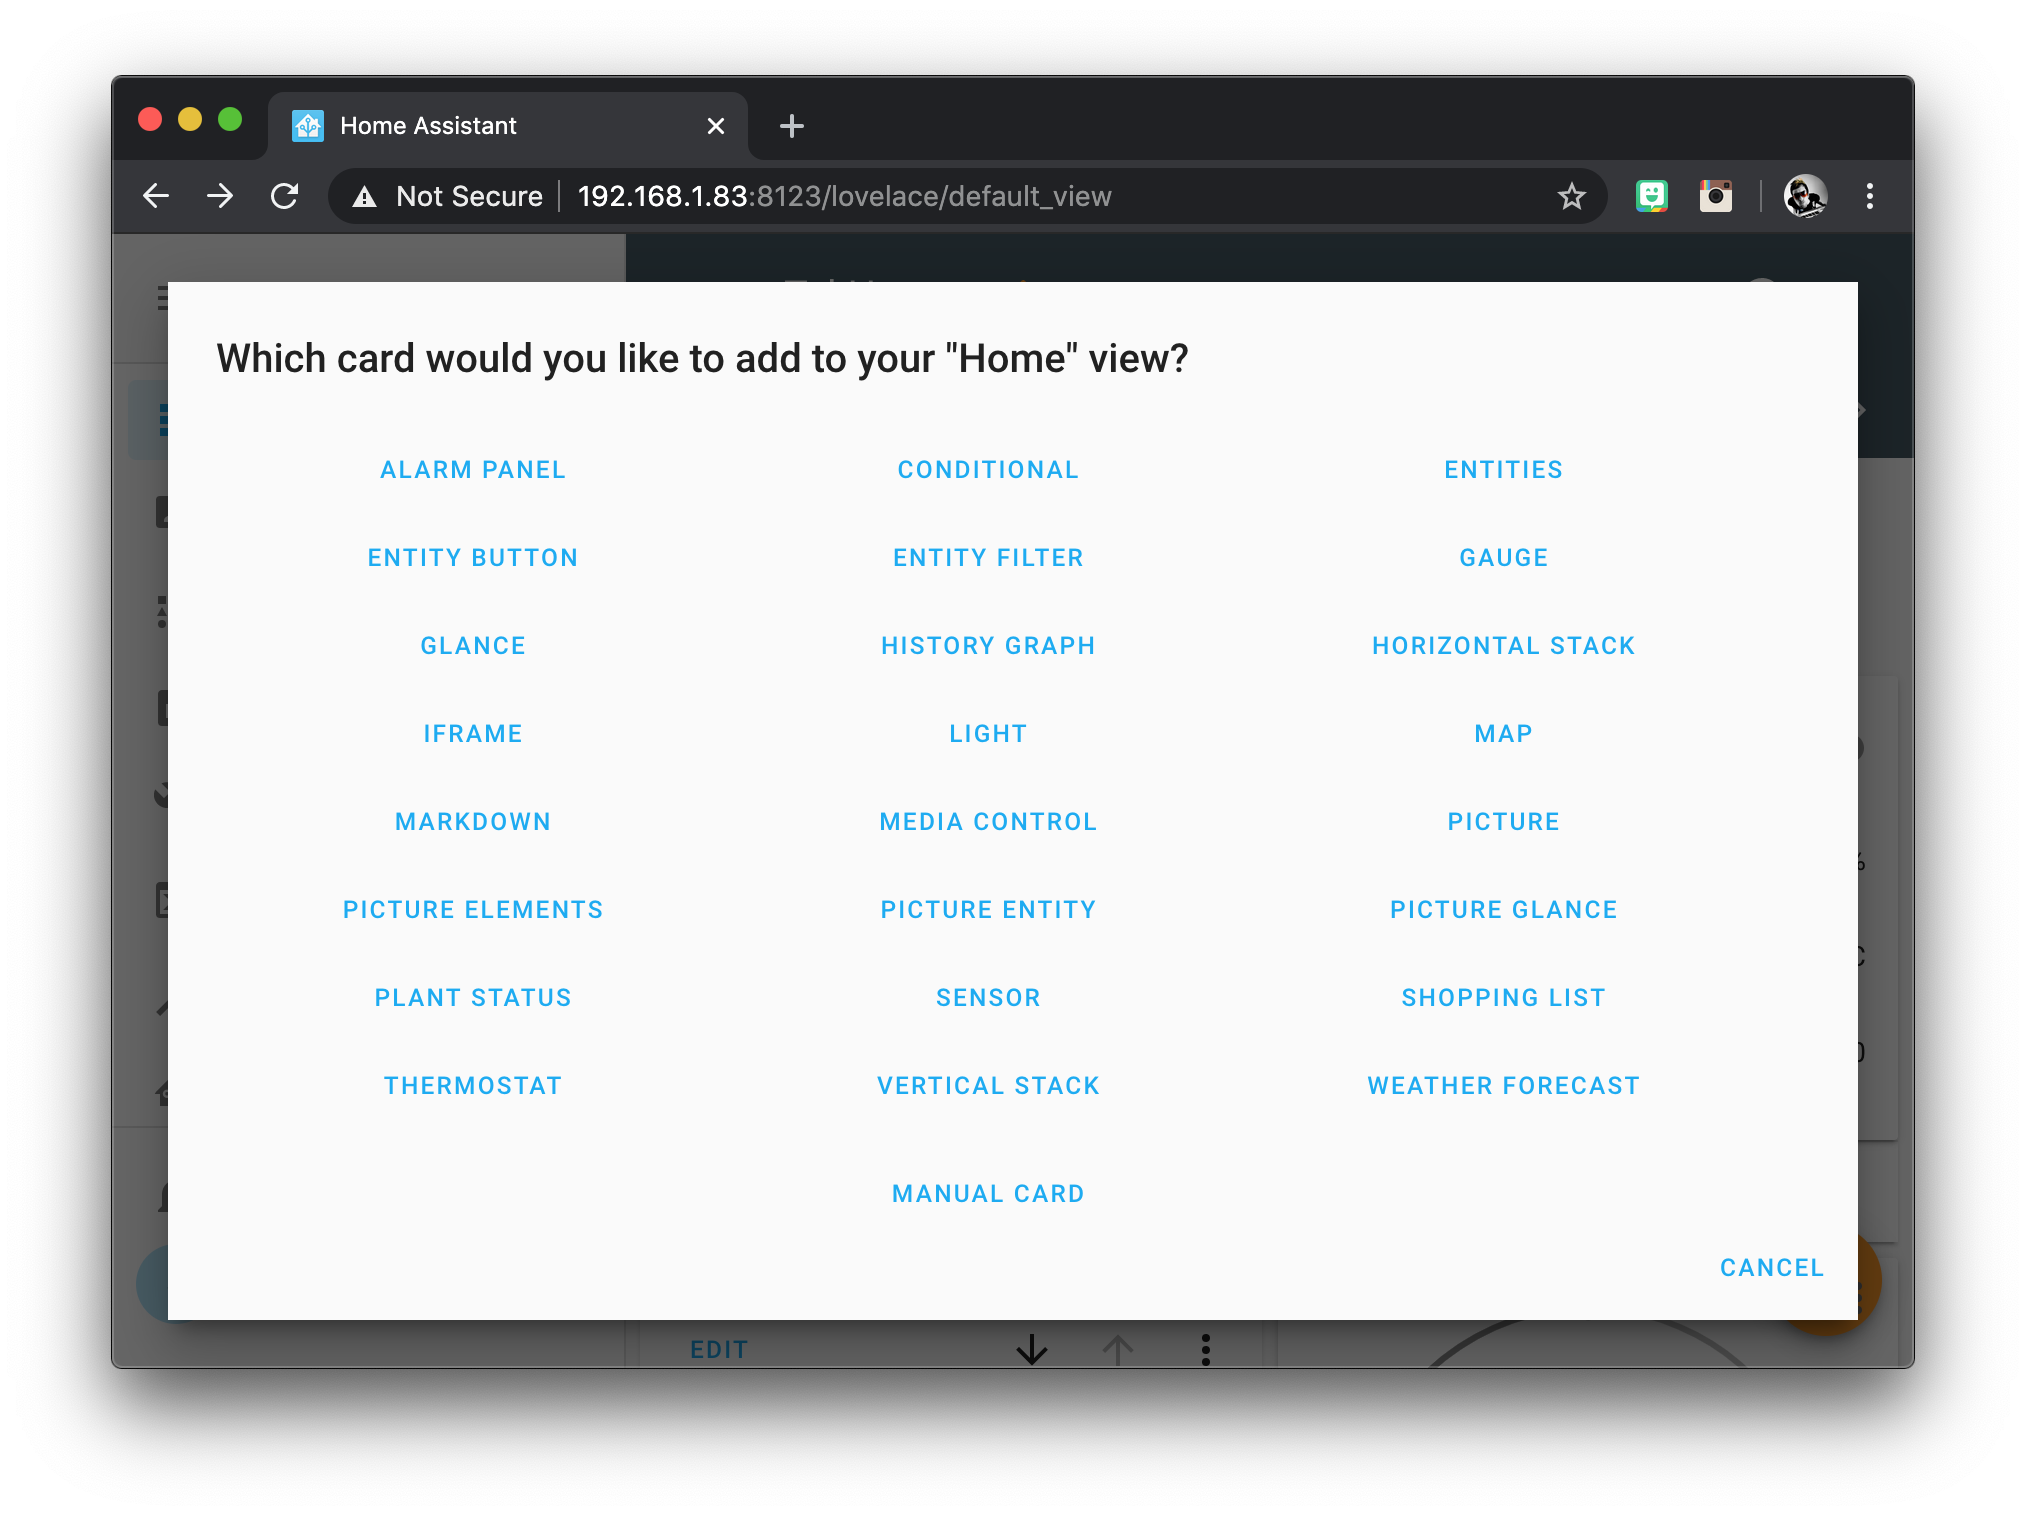
Once on the desired tab, click the orange circle with the plus towards the bottom left of the screen and then choose the entity button card.
In the entity box at the top, enter the entity_id for the script. If you type “script” into the box, a dropdown will appear and you can just find it in the list.
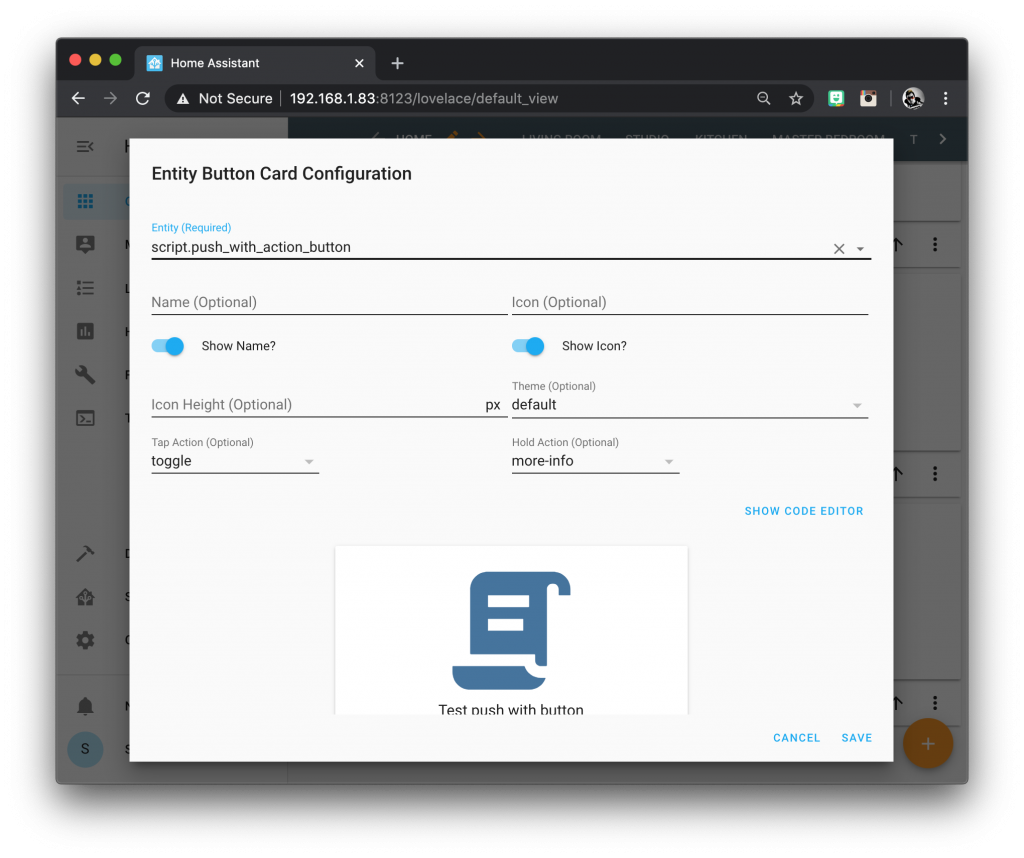
Then simply click save and the button will be added to your user interface. Go ahead and click the button and check out your new actionable notification!
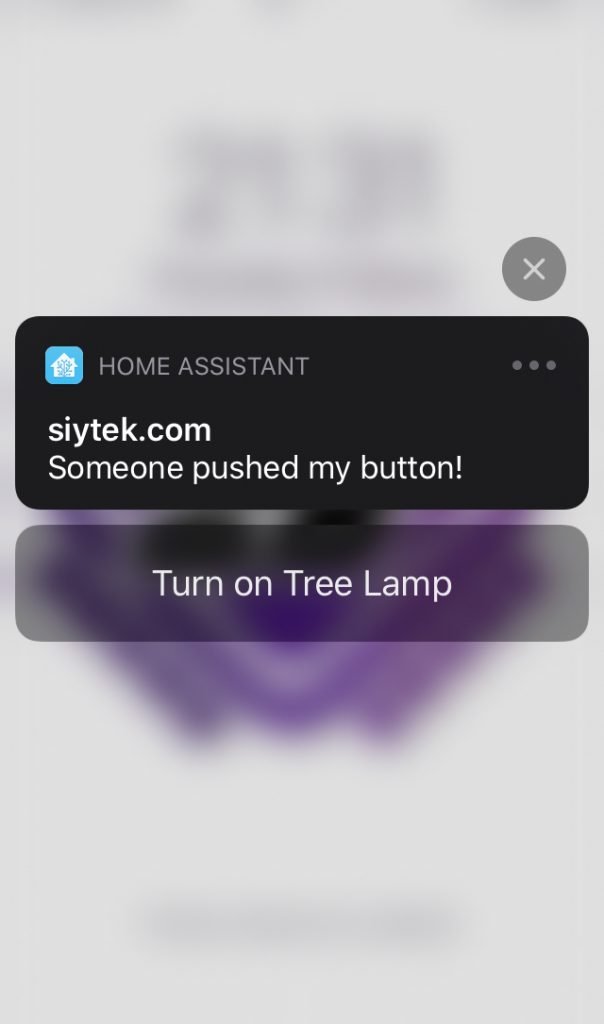
Don’t forget to swipe left and click view in order to see the button if you are on the lock screen.
For notifications appearing at the top of the screen, swipe the notification downwards to access the action buttons.
Conclusion
In this tutorial we have learnt that it is possible to harness the power of actionable notifications in iOS.
This is another great integration within Home Assistant and you should now have the knowledge to go ahead and create your own customised actionable notifications!
Why not give my easy DIY thermostat a try next, as you could also include some fancy notifications!
Thanks for taking the time to read the tutorial and for visiting my site! Be sure to check out some of my other awesome Home Assistant tutorials!
Thanks so much for visiting my site! If this article helped you achieve your goal and you want to say thanks, you can now support my work by buying me a coffee. I promise I won't spend it on beer instead... 😏


Hello Siytek,
here I am again. The tutorial for “HOME ASSISTANT PUSH NOTIFICATIONS” works really well for me. But for this one, I get this message ( I’ve checked spaces and indentation already):
“Test push with button: Error executing script. Service not found for call_service at pos 1: Unable to find service notify/mobile_app_iphone”
Here is what I made:
“configuration file”
ios:
push:
categories:
– name: iostv
identifier: ‘ios_tv’
actions:
– identifier: ‘TV_LIGADA’
title: ‘Turn on TV’
activationMode: ‘background’
authenticationRequired: false
destructive: false #
“script file”
push_with_action_button:
alias: Test push with button
description: Send a test push notification with action
sequence:
service: notify.mobile_app_iphone
data:
title: TESTE
message: Someone pushed my button!
data:
push:
category: TV_LIGADA
“automation file”
– id: ‘1585533380836’
alias: IOS Notification – Push button
description: Notification turn on TV
trigger:
– event_data:
actionName: TV_LIGADA
event_type: ios.notification_action_fired
platform: event
condition: []
action:
– data: {}
entity_id: media_player.tv
service: media_player.turn_on
Thanks in advance. Sorry to bother you.
Nacho.
Hi Siytek, I am getting the message.
I had to correct “notify.mobile_app_iphone_xxxx”. But I do not receive the button below. In my case it should be “Turn on TV”.
Cheers.
Nacho.
Hey Nacho, no worries and here to help! First you need to check if the notify.mobile_app_[YOUR-iPHONE-NAME] service is available. Click developer tools from the side bar and then click the services tab. In the service text box, type in “notify.mobile” and you should get a box appear with notify_app_[YOUR-iPHONE-NAME] if everything is configured correctly. Make sure your script matches this exactly and let me know if helps you solve the problem.
Thanks!
Hi Siytek, this is working fine!
Excellent! Glad to hear it works Nacho 🙂
Hey Nacho, I think there is a typo in my example code, sorry it’s fixed now! Try changing category: TV_LIGADA in your script file to match the identifier from the ios integration and also include the quotes, so in your case it would be category: “ios_tv” and let me know if it works?
Hi Siytek, this makes more sense but it is still not working.
I only get the message (no push button).
I double checked it all attenting to comma ” or ‘, spaces and everything.
I do not know if any configuration is missing here.
Thanks anyway.
Hey Nacho, did you import push configuration from server on the iOS app? Also you cannot see the button directly on the notification, you must swipe the notification left (on the lock screen) and tap view to see the button. When I get a moment i’ll give your code a try in my HA configuration.
Hi Siytek, now I see the button as you said. Thanks for that. I got to find out why the tv is not turning on.
Hi Siytek, it got some delay and it is working.
Thanks again! Cheers!
Hi Siytek, one more thing that I noticed.
When I turn off the wifi connetion, I received the message but when I press the button, nothing happens. Why that happened?
Hey Nacho, I am not sure why it would work with the WiFi off, are you using DuckDNS and the connection is working over mobile data when the WiFi is off? Maybe there is an issue with your network?
I assume the automation formatting is correct as looks to be created with the editor. If you head over to the developer tools menu on the sidebar and then goto the services tab, enter media_player.turn_on in the service box.Then enter entity_id: media_player.tv into the service data box and click call service. Can you confirm that the service works correctly?
Finally you could try replacing the code generated by the automation editor with the exact code from the tutorial, using your own values. Although the code generated does seem ok to me.
Hi Siytek, everything was all correct. The thing is that my external url was not informed in the HA app. Once I filled that, everything worked as you taught.
Thank you so much for your support and patient.
Superb! Well done for getting it working and glad to be of service 🙂