
Recently I wrote an epic post on how to design your own DIY HVAC control system, covering many different types of system in detail. This post is ideal for the enthusiast who is looking for the complete guide.
However I realised that some folks might prefer a nice quick and easy tutorial for building a simple and functional thermostat.
This project is designed to replace a single thermostat in a home with a single zone heating. If you have multiple zones or a full HVAC system with air conditioning, I would recommend checking out the complete post.
In this tutorial we will build a thermostat using a single Wemos D1 Mini, DHT22 temperature/humidity sensor and relay module.
Table of Contents
- Prerequisite
- Parts
- Disclaimer
- Building the thermostat
- Flash Tasmota
- Configure Tasmota
- Configure Home Assistant
- Create the lovelace cards
- Conclusion
Prerequisite
You should have Home Assistant installed and running. A basic understanding of YAML would also be highly beneficial.
If you are not yet familiar with automation or YAML then I would recommend reading the tutorials about automation and scripts first.
Parts
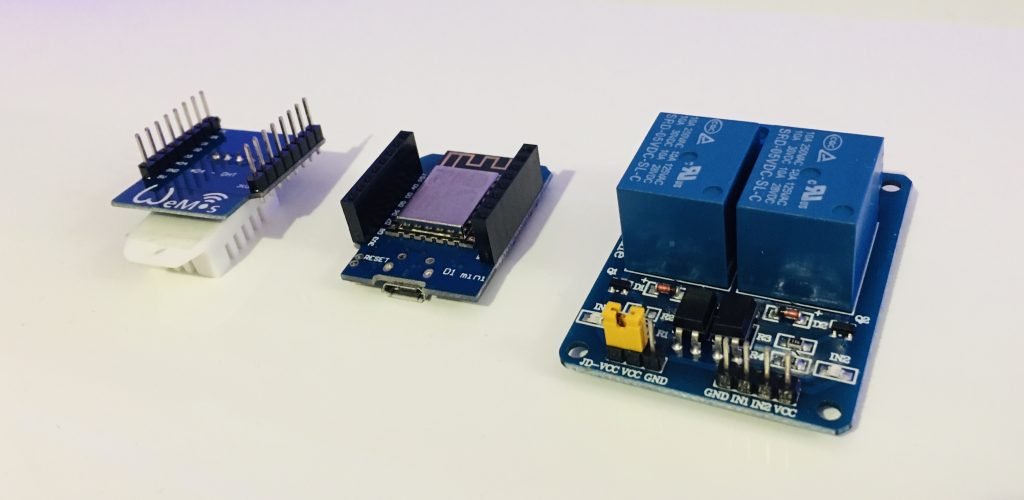
In order to complete this project you will need the following parts.
- A Wemos D1 Mini board
- A DHT22 temperature/humidity sensor (or shield)
- A single or dual relay module
- Some project wire
- A micro USB lead
- Soldering iron & some solder
- 0.1uF capacitor (already included on DHT22 shield)
- 10k resistor (already included on DHT22 shield)
Disclaimer
Please do not attempt to make any modifications to your HVAC system unless you are absolutely certain you understand what you are doing. I am not a HVAC engineer and offer this information with absolutely no guarantee that it will work with your HVAC system.
There are many different configuration of HVAC system so you need to gain a full understanding of your own system and how it is configured. This information is purely for educational purpose only.
If in doubt, stop and seek expert assistance from a qualified HVAC engineer.
Building the thermostat
Ok lets jump straight in! The Wemos D1 Mini boards generally come without the headers soldered.
The only soldering we need to do is to attach the headers. If your headers are already attached you can skip this step and put the soldering iron away.
Step 1: Add the headers
It does not matter which headers you choose, however you should choose ones suitable for your application. This will be dependant on the wires you are using and whether or not you are using a DHT22 shield.
I already have female header on my D1 Mini and male header on my DHT22 shield. As the relay module also has male header, I can use male to female jumper wires to connect everything.
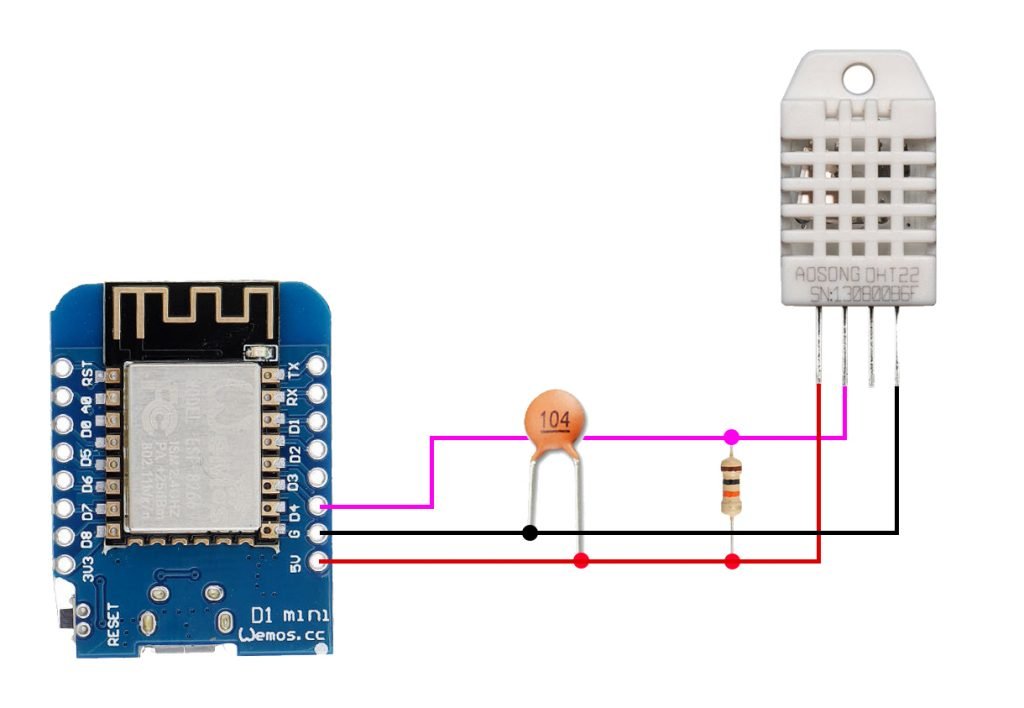
Step 2: Add the capacitor and resistor
If you are not using a DHT22 shield, you will need to add a resistor and capacitor to the DHT22 sensor. The sensor should be wired to the Wemos D1 Mini as follows.
The DHT22 can accept 3.3V or 5V so you can use either supply voltage. If you are using a shield then you can just plug it into your D1 Mini module.
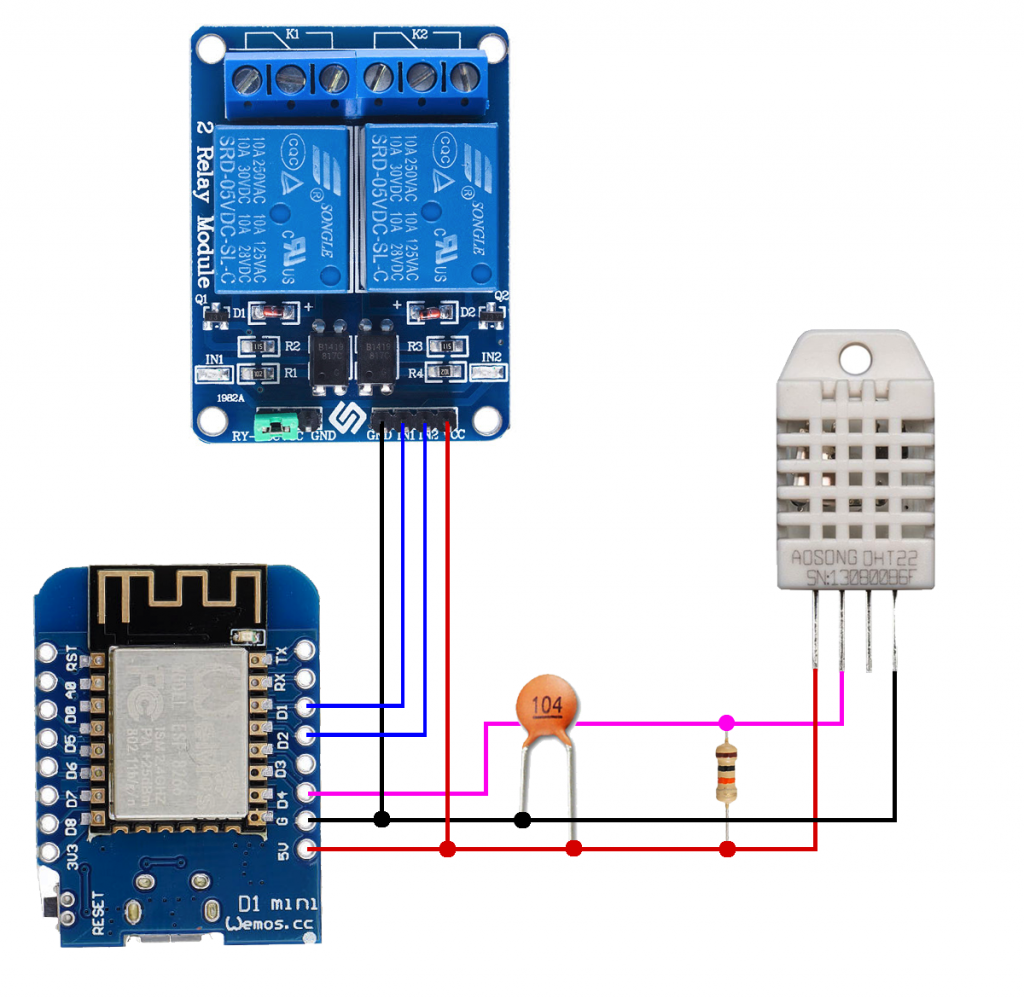
Step 3: Wire the relay module
Next we need to connect the relay module. If you are using a boiler and only need to switch the heat signal you can use a single relay. If you are using a furnace with a fan you should use a second relay to switch the fan.
You can use any of the spare digital pins, however take note of the pins that you choose for the configuration stage.
Flash Tasmota
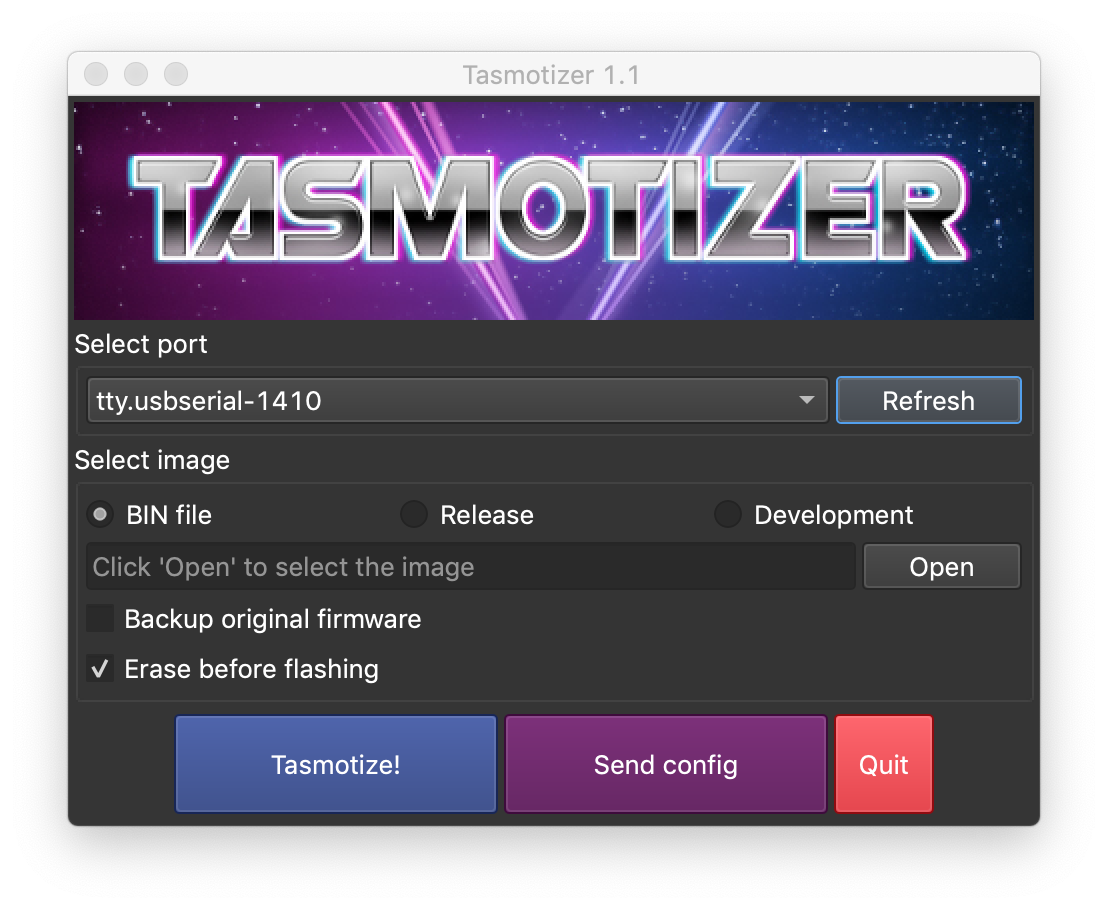
In order to control the relays attached to our D1 Mini and take readings from our DHT11 sensor, we need to install the Tasmota firmware.
The D1 Mini has a built-in USB to serial interface so it is very easy to load the Tasmota firmware. Go ahead and connect your D1 Mini to your computer with a USB cable.
The easiest way to flash the device is by using the Tasmotizer software. It is compatible with Windows, Mac and Linux. If you need to flash Tasmota I would recommend following my complete guide on how to use Tasmotizer.
Configure Tasmota
Once you have flashed Tasmota to your D1 Mini you will need to connect Tasmota to your WiFi router and then find the IP address so that you can access the main menu. All of the steps for basic configuration are available in the latter part of this guide.
Once you have connected Tasmota to your router and can access the main menu, we can configure the device specifically to function as a temperature and humidity sensor.
From the main menu go ahead and click configuration followed by configure module. You will be presented with the module configuration menu.
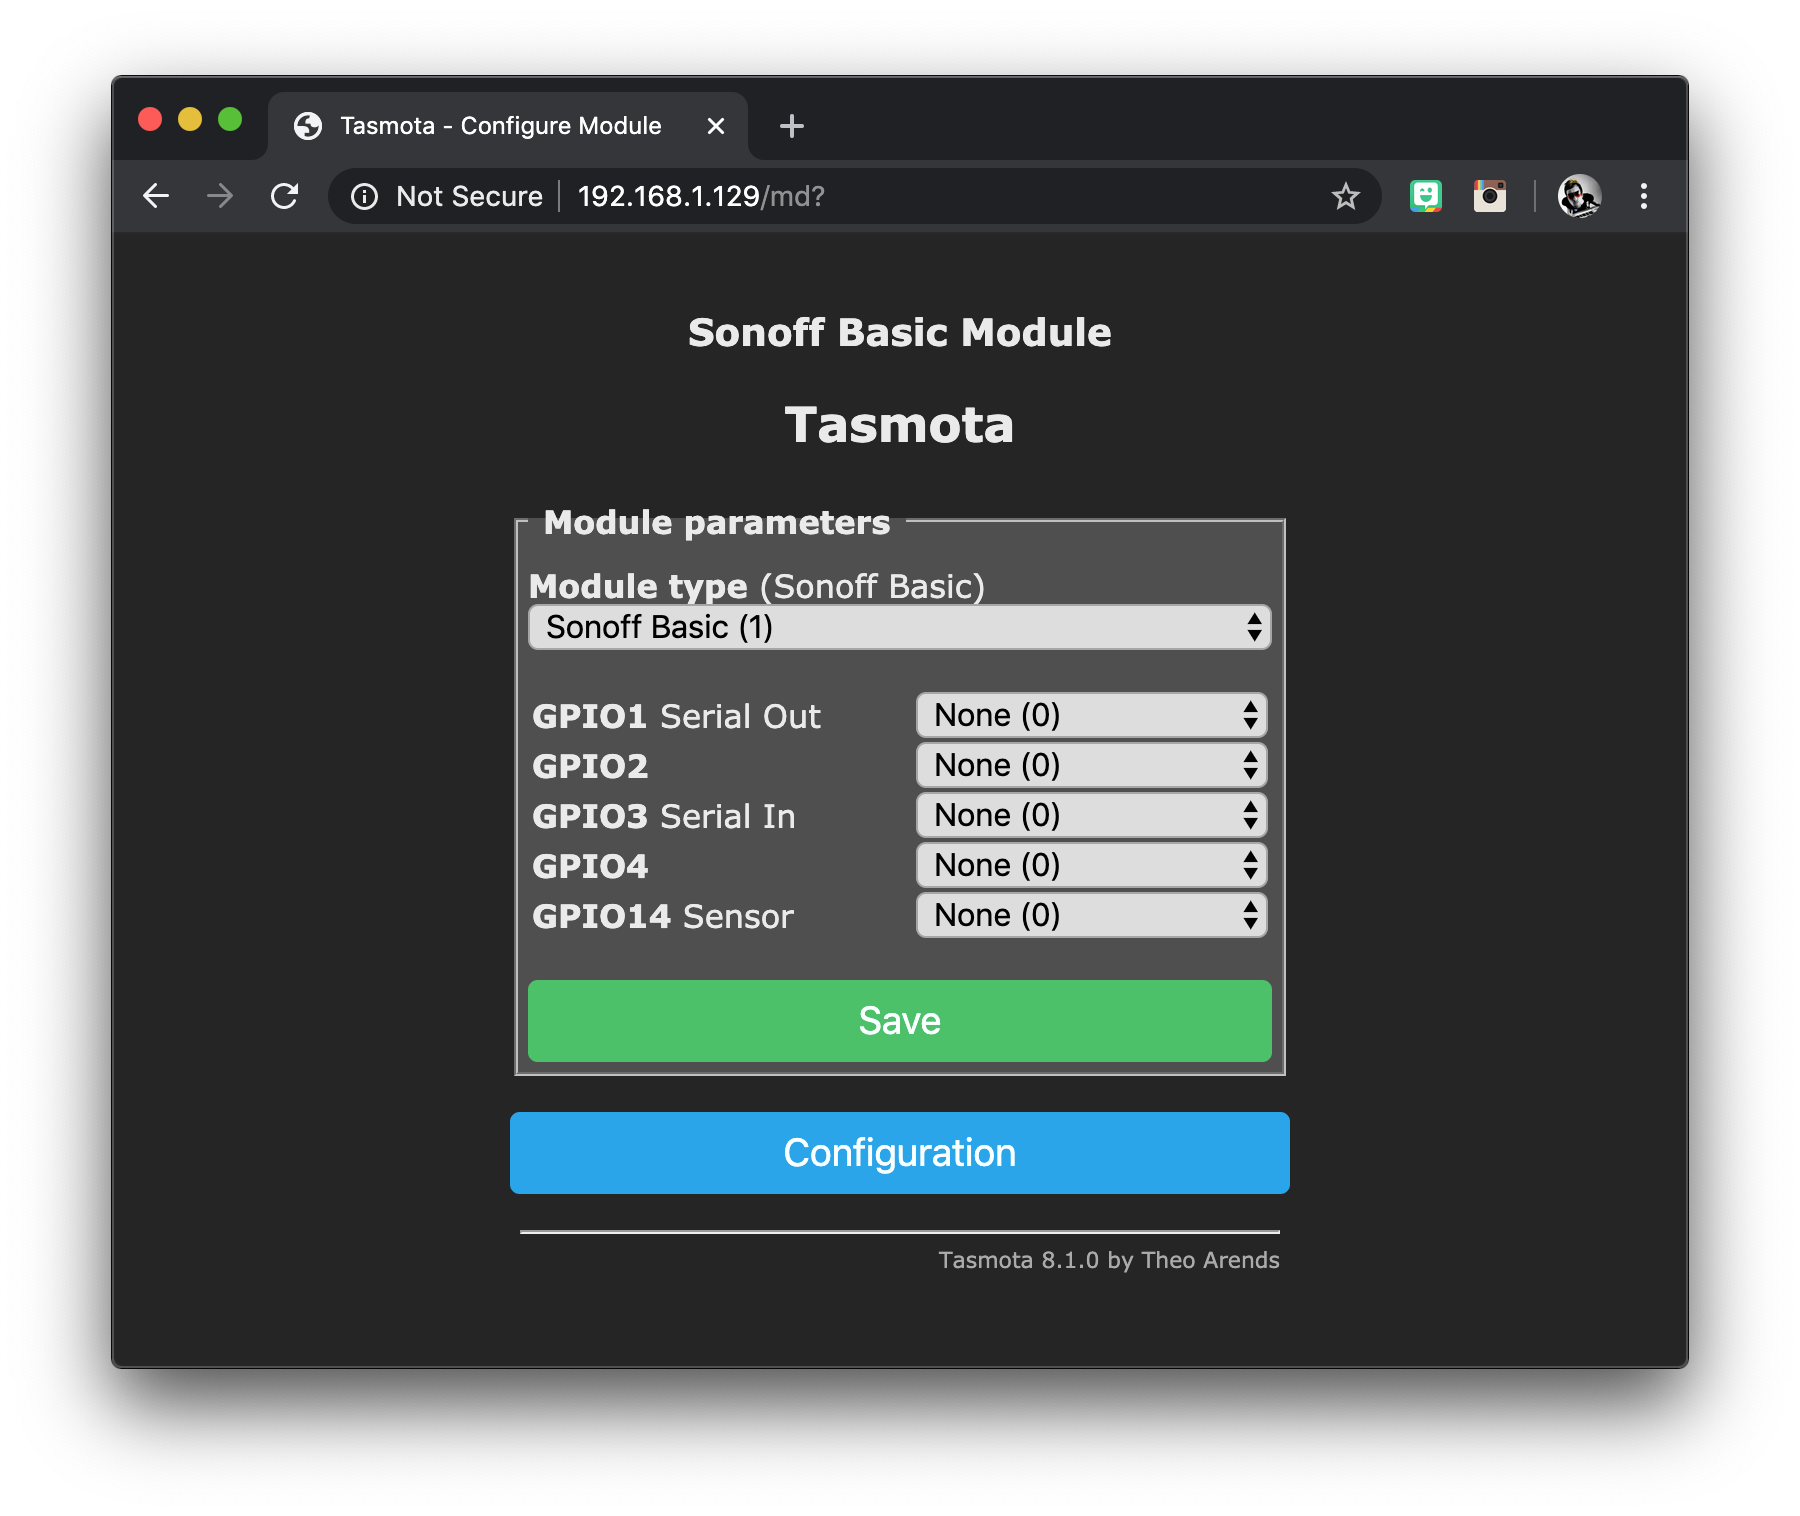
In the drop down menu under module type, you need to select the device generic (18). This allows us to configure our D1 Mini manufally. Click save and wait for Tasmota to reboot back to the main menu.
Once Tasmota has rebooted, go back to the configure module menu. You should see that all of the GPIOs are now available. We can select the function of each pin of the D1 Mini in the drop down menus.
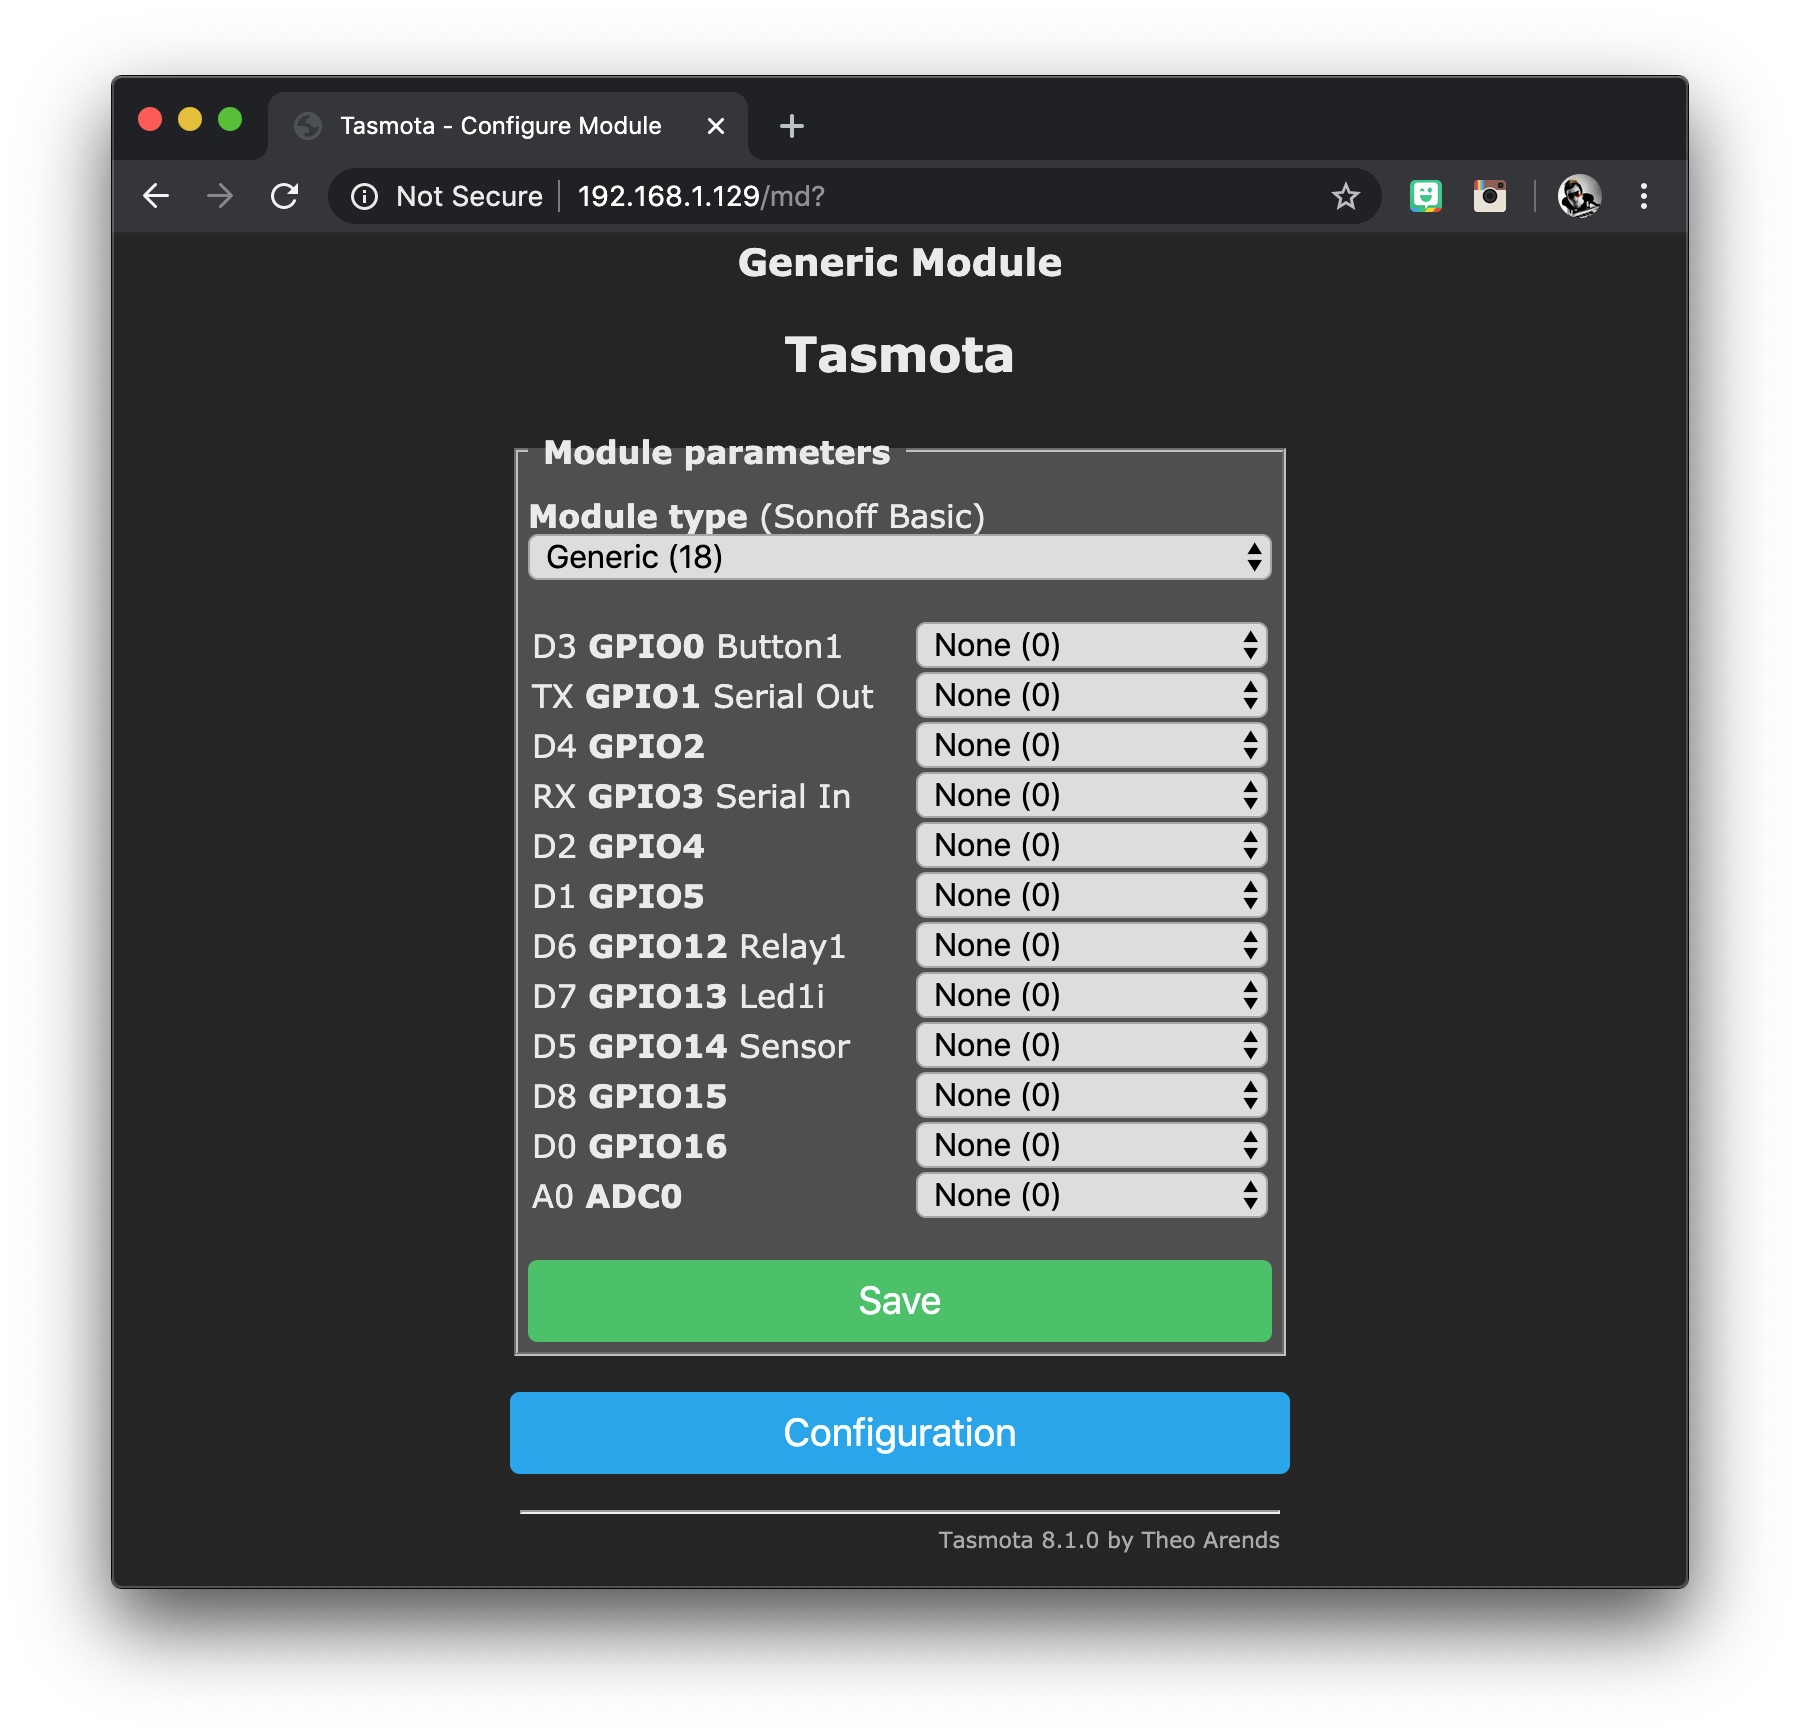
Next we need to select the DHT22 sensor in the drop down menu for D4. If you have wired the sensor to a different pin, you should choose the drop down menu for the pin that you have selected.
At the time of writing there is an option in the drop down menu for DHT11, however there is not an option for the DHT22. This had me stumped for a while!
As there is no option for the DHT22 you will need to select SI7021 (3) from the menu as it uses the same 1-wire protocol.
We also need to set our D1 and D2 pins to relays. Don’t forget to use the correct drop down boxes that relate to the pins that you chose for your relay module if different from the diagram.
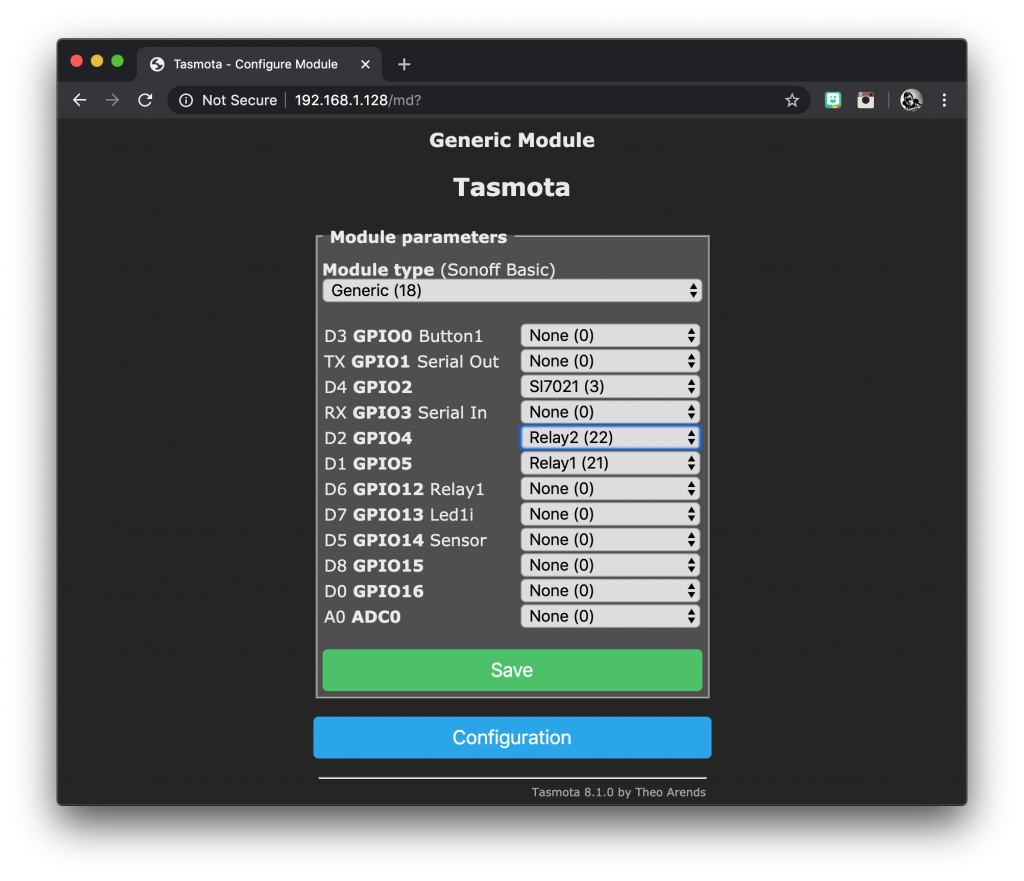
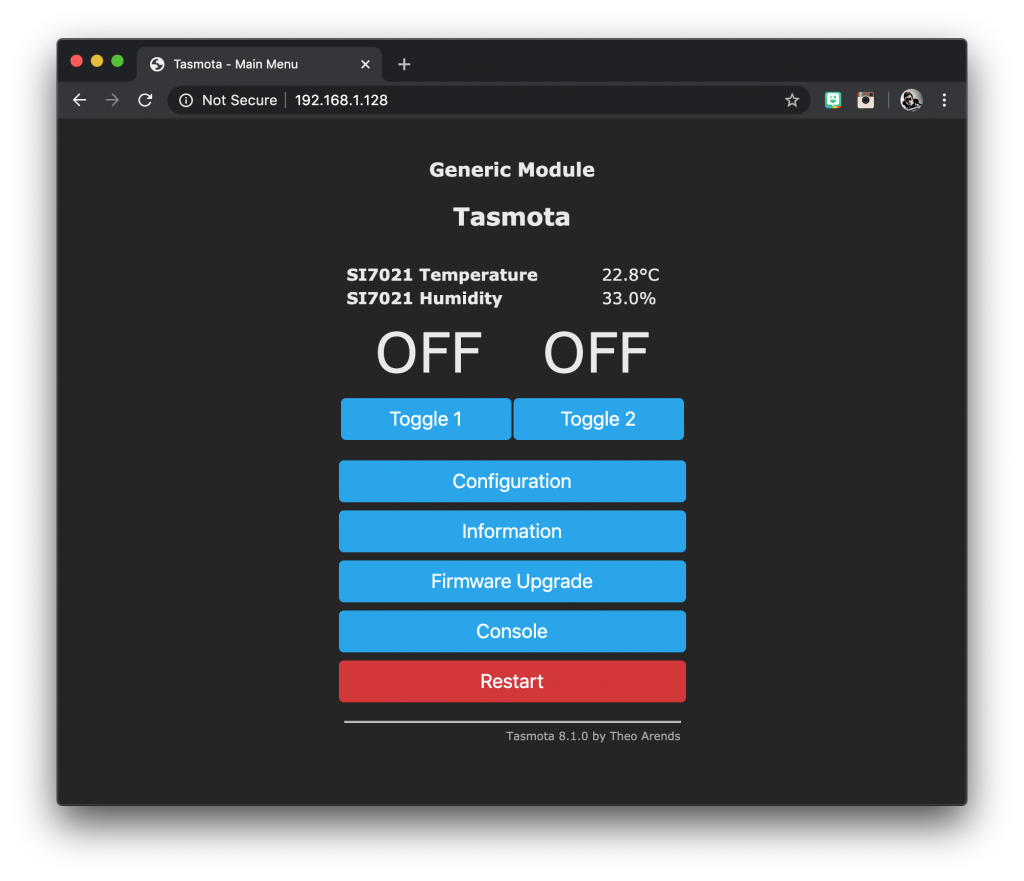
Click save and wait for Tasmota to reboot. After the reboot you should now be able to see the relay toggle switches as well as the temperature and humidity readings on the main menu!
Awesome! You will also need to configure MQTT in Tasmota so that it can be detected in Home Assistant. If you don’t know how to do this, check out my tutorial on how to setup Tasmota to auto discover in Home Assistant.
Configure Home Assistant
Now we are ready to configure Home Assistant, assuming you have already setup MQTT auto discovery in Tasmota.
Configure entities
First we need to give our new entities suitable names. Click the configuration option in the sidebar and choose integrations.
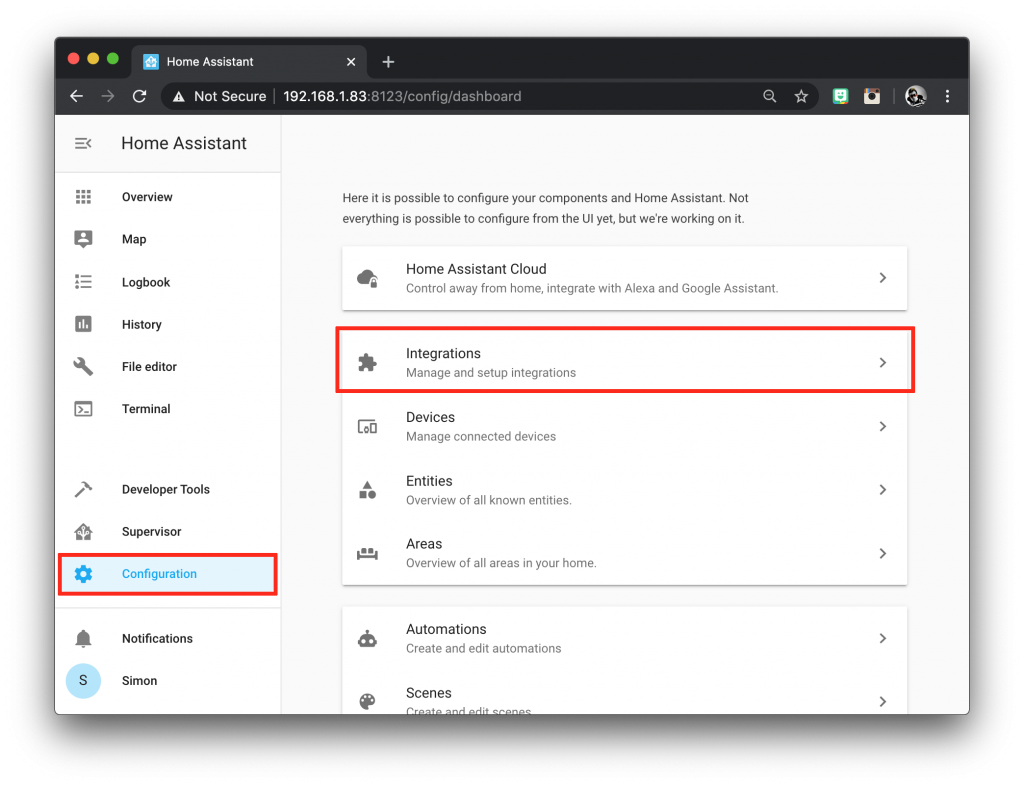
Then click on MQTT from the list of configured integrations.
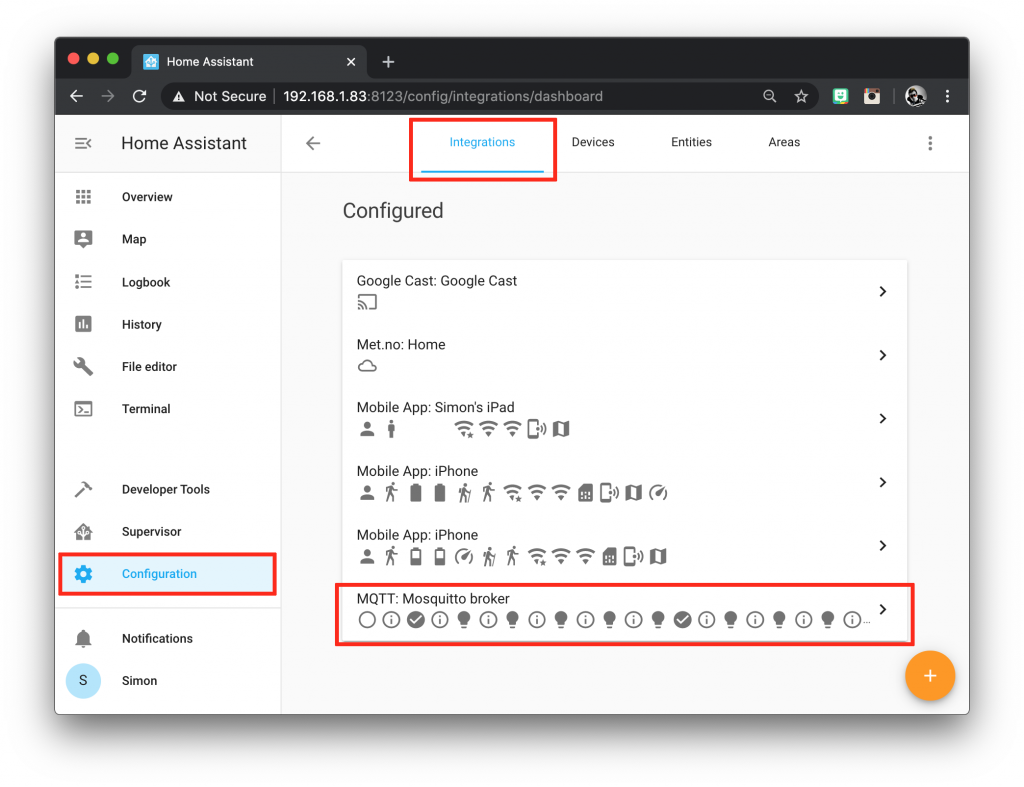
Next find your new Tasmota device in the list and click it. You will be taken to the device page and should see entities create for temperature, humidity and the relays.
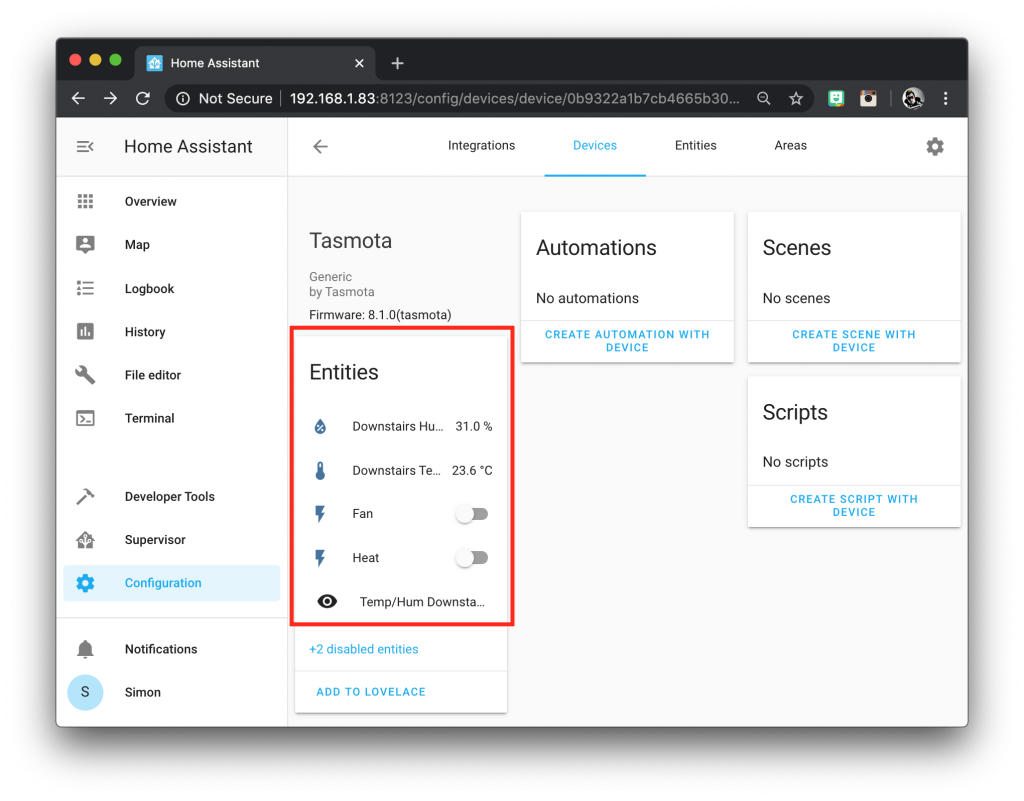
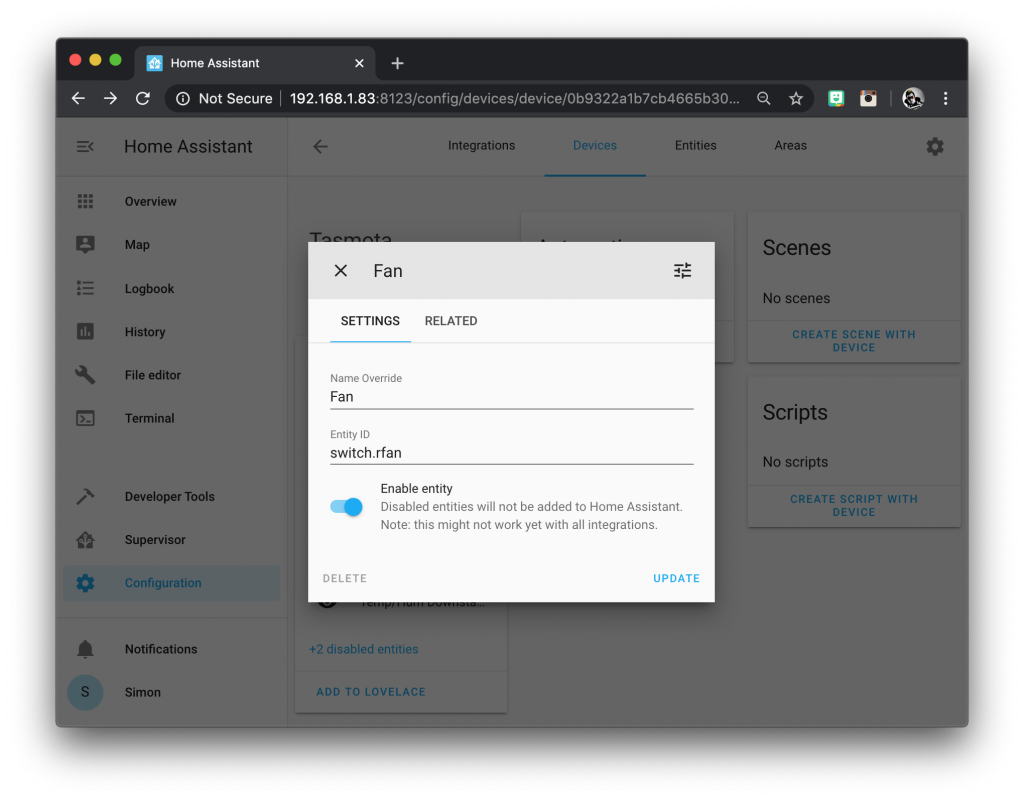
Clicking on the entity will bring up a box where you can enter a name and entity_id. Name them as desired but be sure to leave the portion of the entity_id before the period intact.
I have given my entities the following names to make them easily identifiable in the code.
- sensor.humiditydownstairs
- sensor.temperaturedownstairs
- switch.rfan
- switch.rheat
Setup climate component
Home Assistant has a really good built-in thermostat integration called generic thermostat that we will use for our system. In order to use the generic thermostat we must create a new instance under climate in the configuration.yaml file.
Go ahead and open configuration.yaml in the file editor and add the following code for the climate integration. I have named this instance downstairs as it is part of my larger two zone system, but you can name it whatever you like.
climate:
  - platform: generic_thermostat
    name: Downstairs
    heater: switch.rheat
    target_sensor: sensor.temperaturedownstairs
    min_temp: 15
    max_temp: 25
    ac_mode: false
    target_temp: 20
    cold_tolerance: 0.3
    hot_tolerance: 0
    initial_hvac_mode: "off"
    away_temp: 16
    precision: 0.1
We need to specify heater as the switch entity we wish to use to switch on our heat. The target_sensor attribute needs to be set to the temperature sensor we wish to use for the thermostat.
You can leave the other values set to default, but it you would like a detailed explanation on the climate component then all the details are given in my ultimate thermostat post.
Setup automation
If you are using a fan in your system then you will want to connect the fan to the second fan relay. In which case we must write some automations to ensure that the fan operates when the heat is turned on.
This step is important and should not be skipped or you may cause damage to your HVAC system.
The automation rules should be entered into your configuration.yaml file under automation. If you already have automations then you should enter this code beneath the existing code.
- alias: "Turn on fan if heat is on"
  trigger:
      platform: state
      entity_id: switch.rheat
      to: 'on'
  action:
      service: switch.turn_on
      entity_id: switch.rfan

- alias: "Turn off fan if heat is off"
  trigger:
      platform: state
      entity_id: switch.rheat
      to: 'off'
  action:
      service: switch.turn_off
      entity_id: switch.rfan
With this automation in place the fan will turn on when the heat is turned on. The fan will also turn off when the heat is turned off. However you can turn on the fan when the heat is off and the heat will remain off, should you only want to turn on the fan.
Create the lovelace cards
We will create the cards using the UI editor and the built-in thermostat card. From the overview page, click on the three dots and then configure UI in the top right-hand corner of the page.
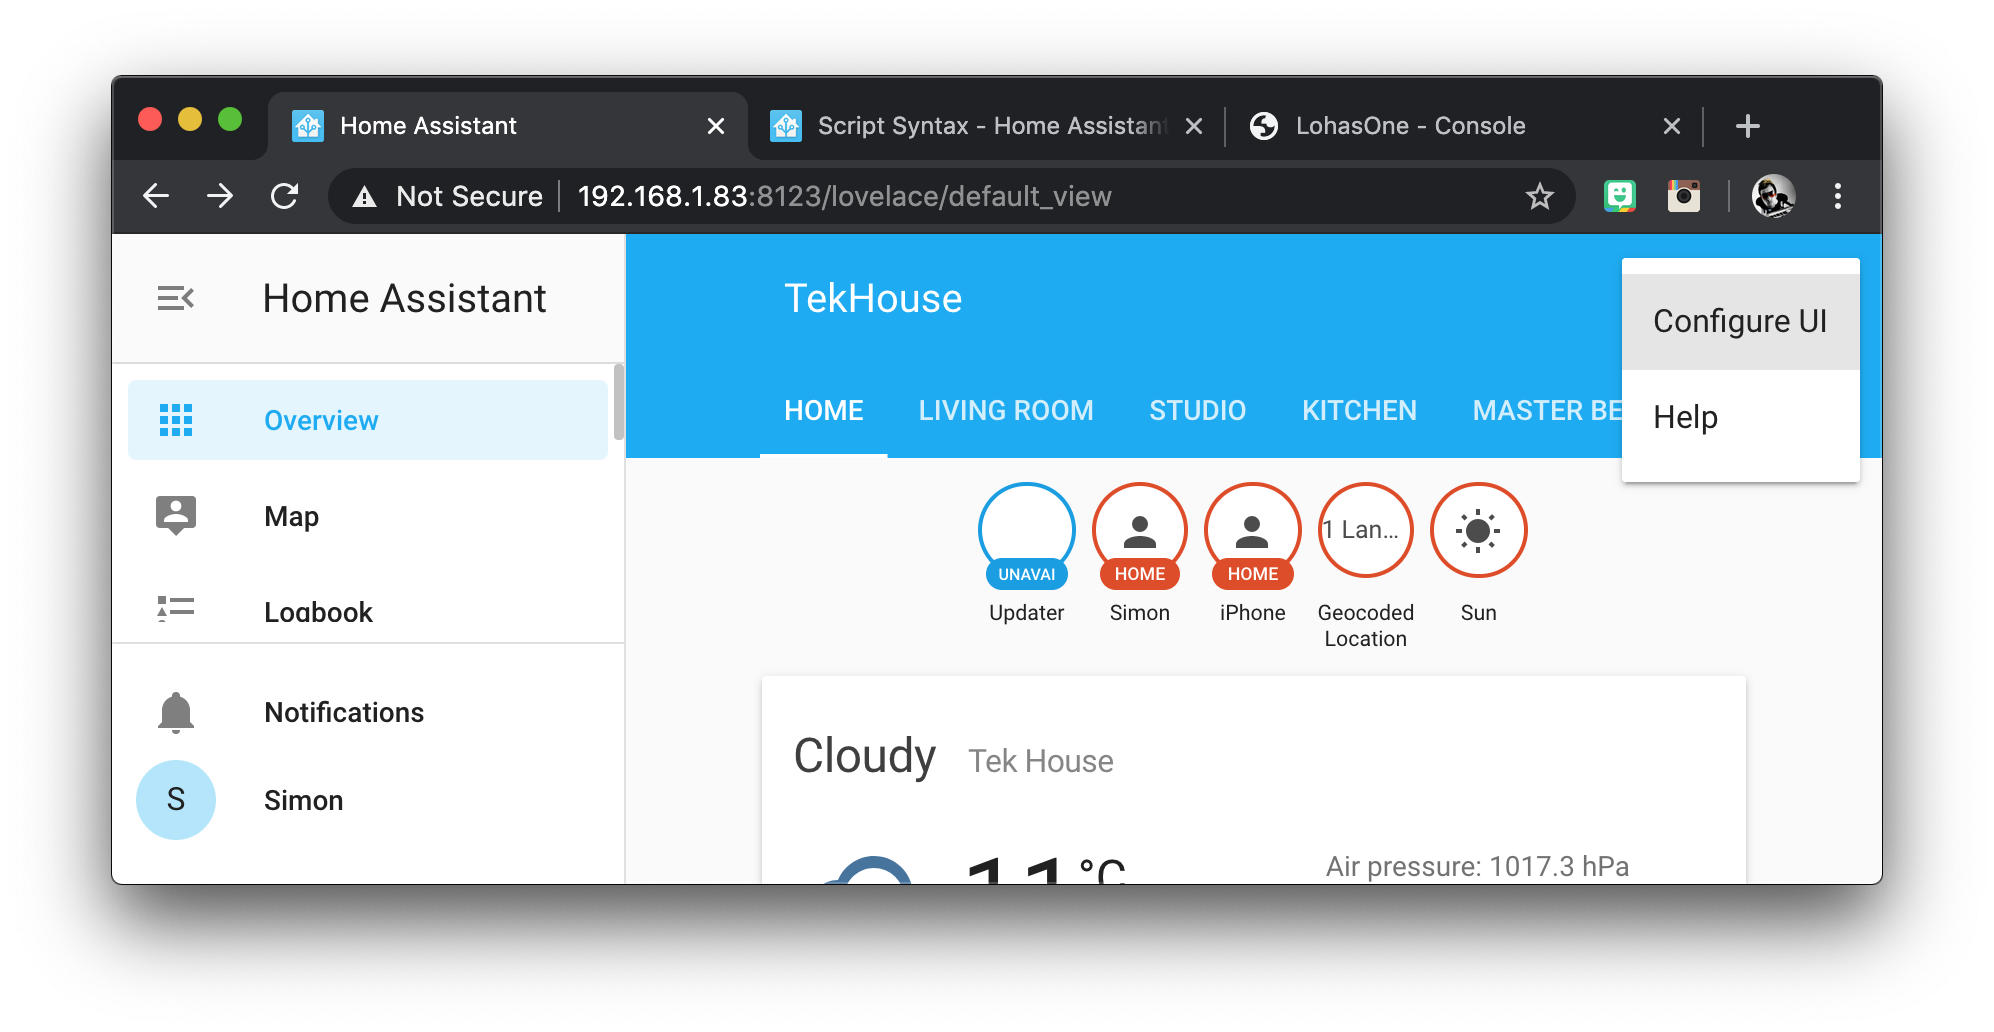
This will switch on the UI editor mode. I will create a new tab called thermostat for the cards but you can put them anywhere you like.
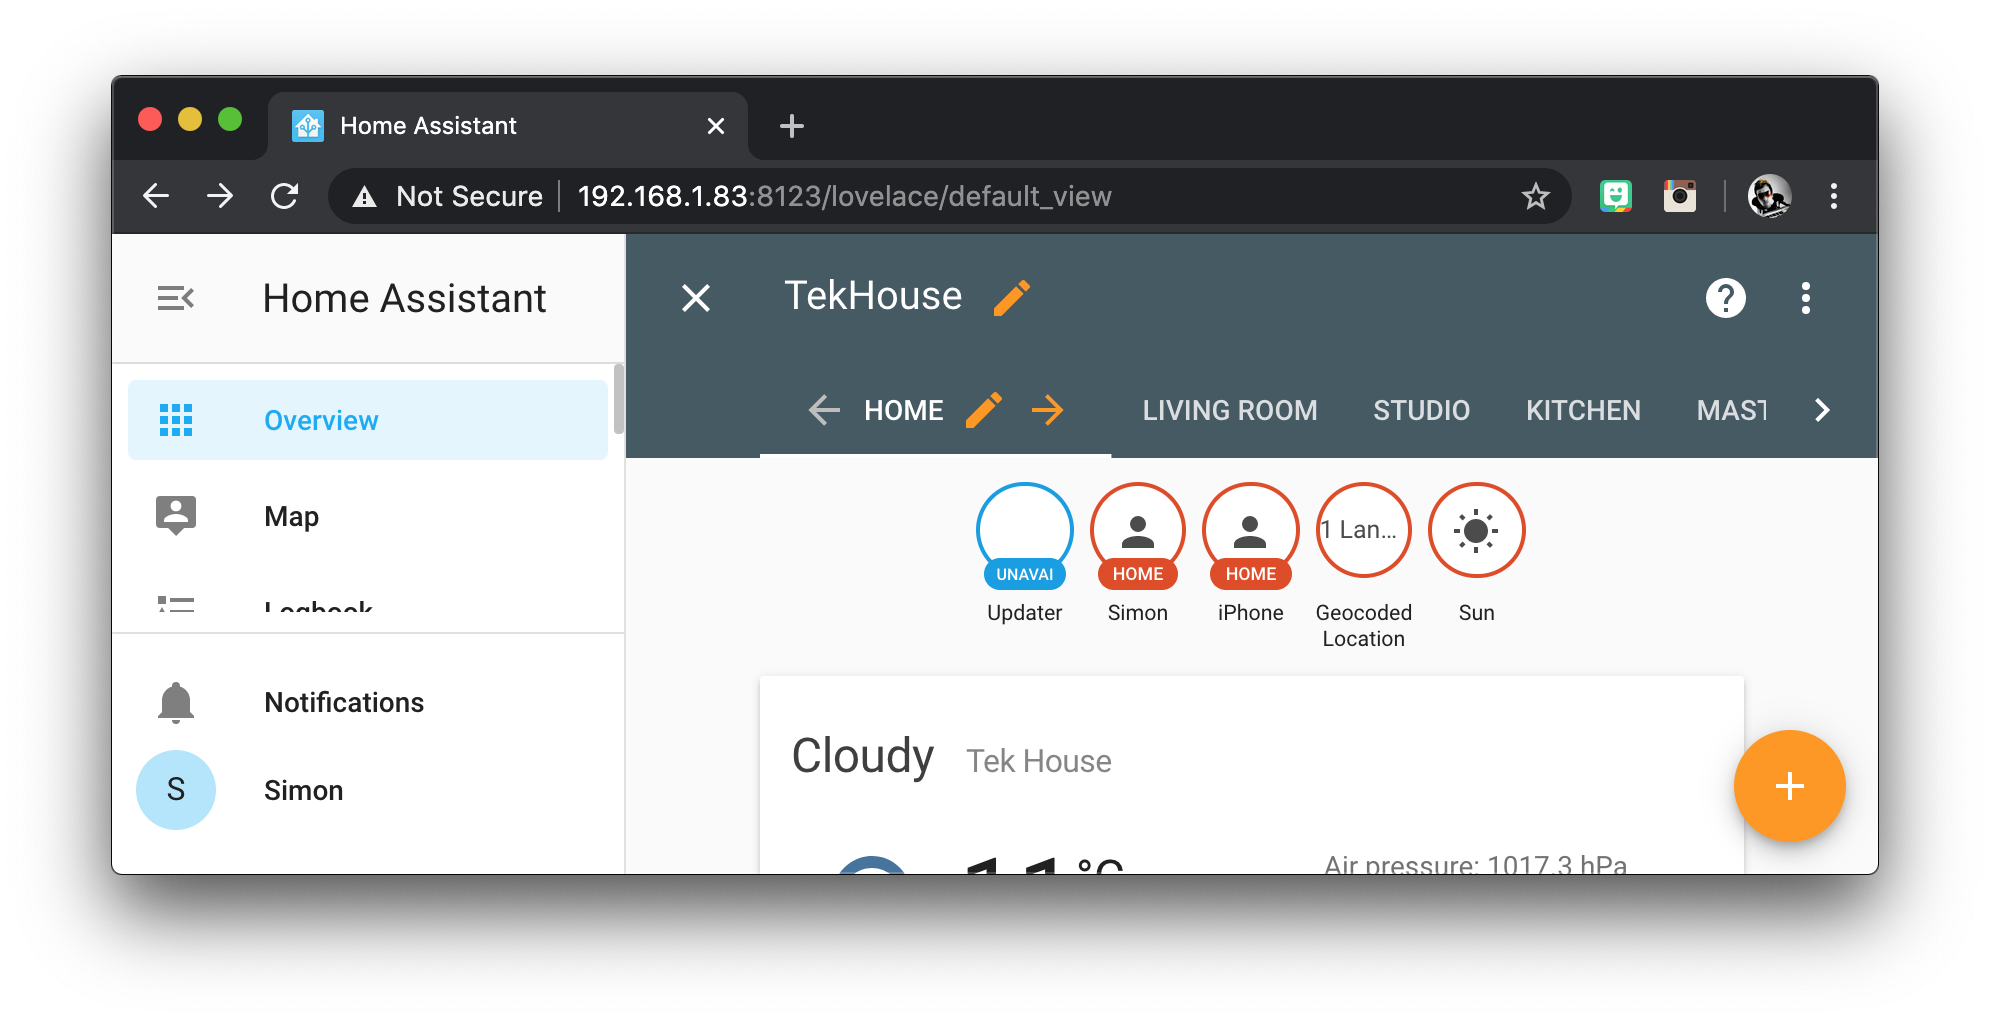
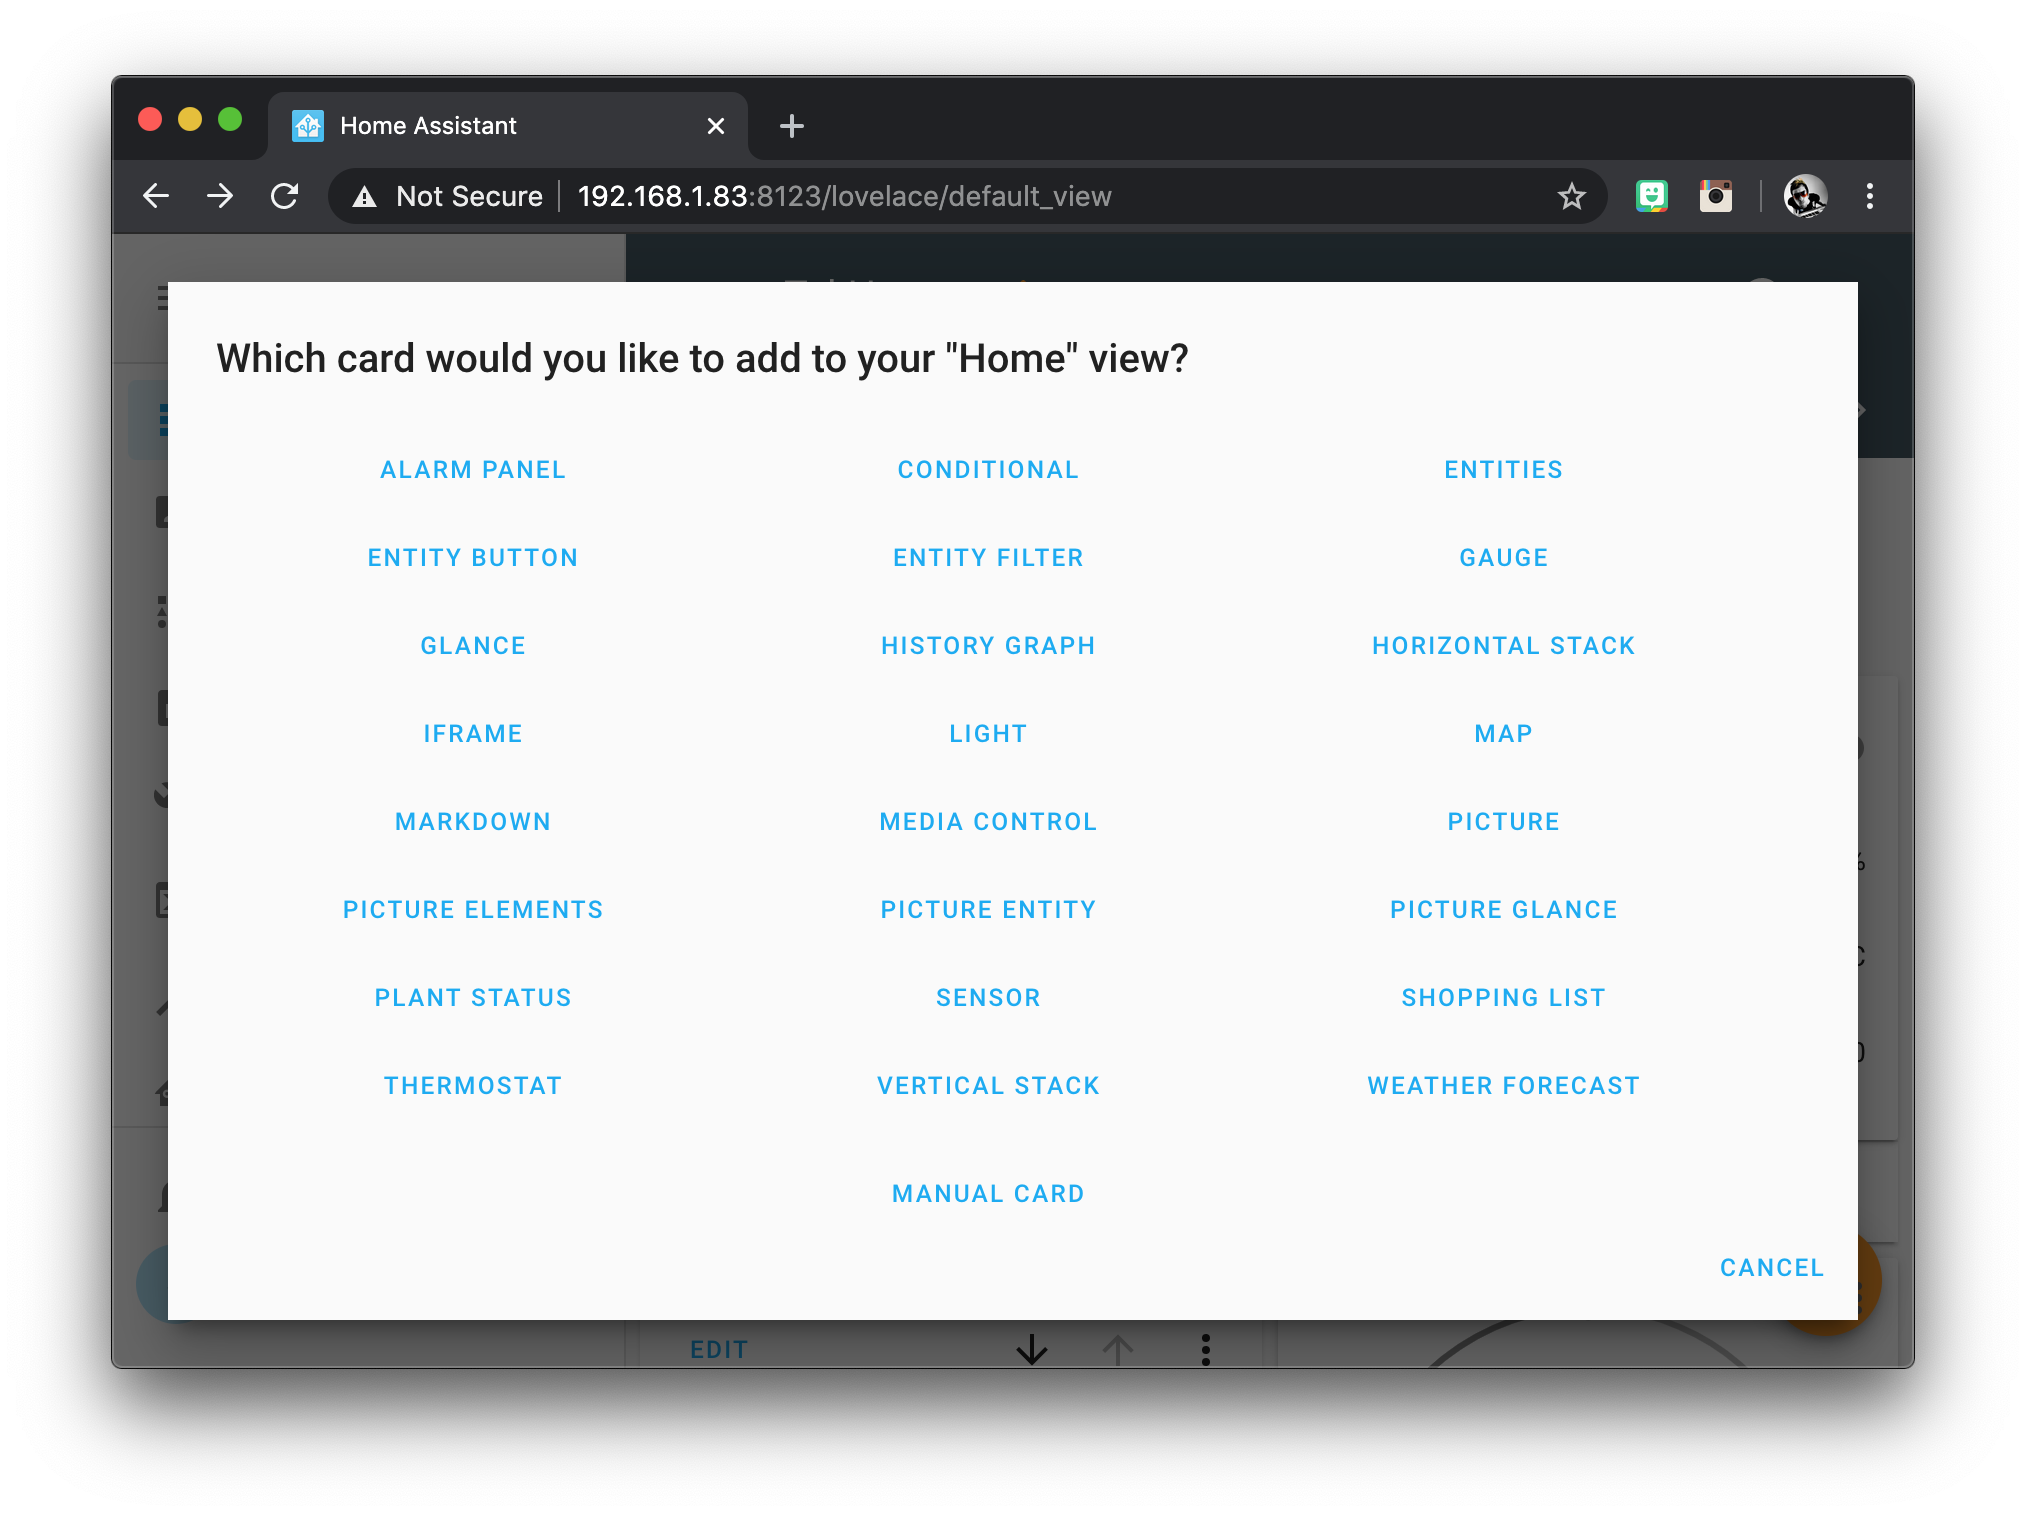
Once on the desired tab, click the orange circle with the plus towards the bottom right of the screen and then choose the thermostat card.
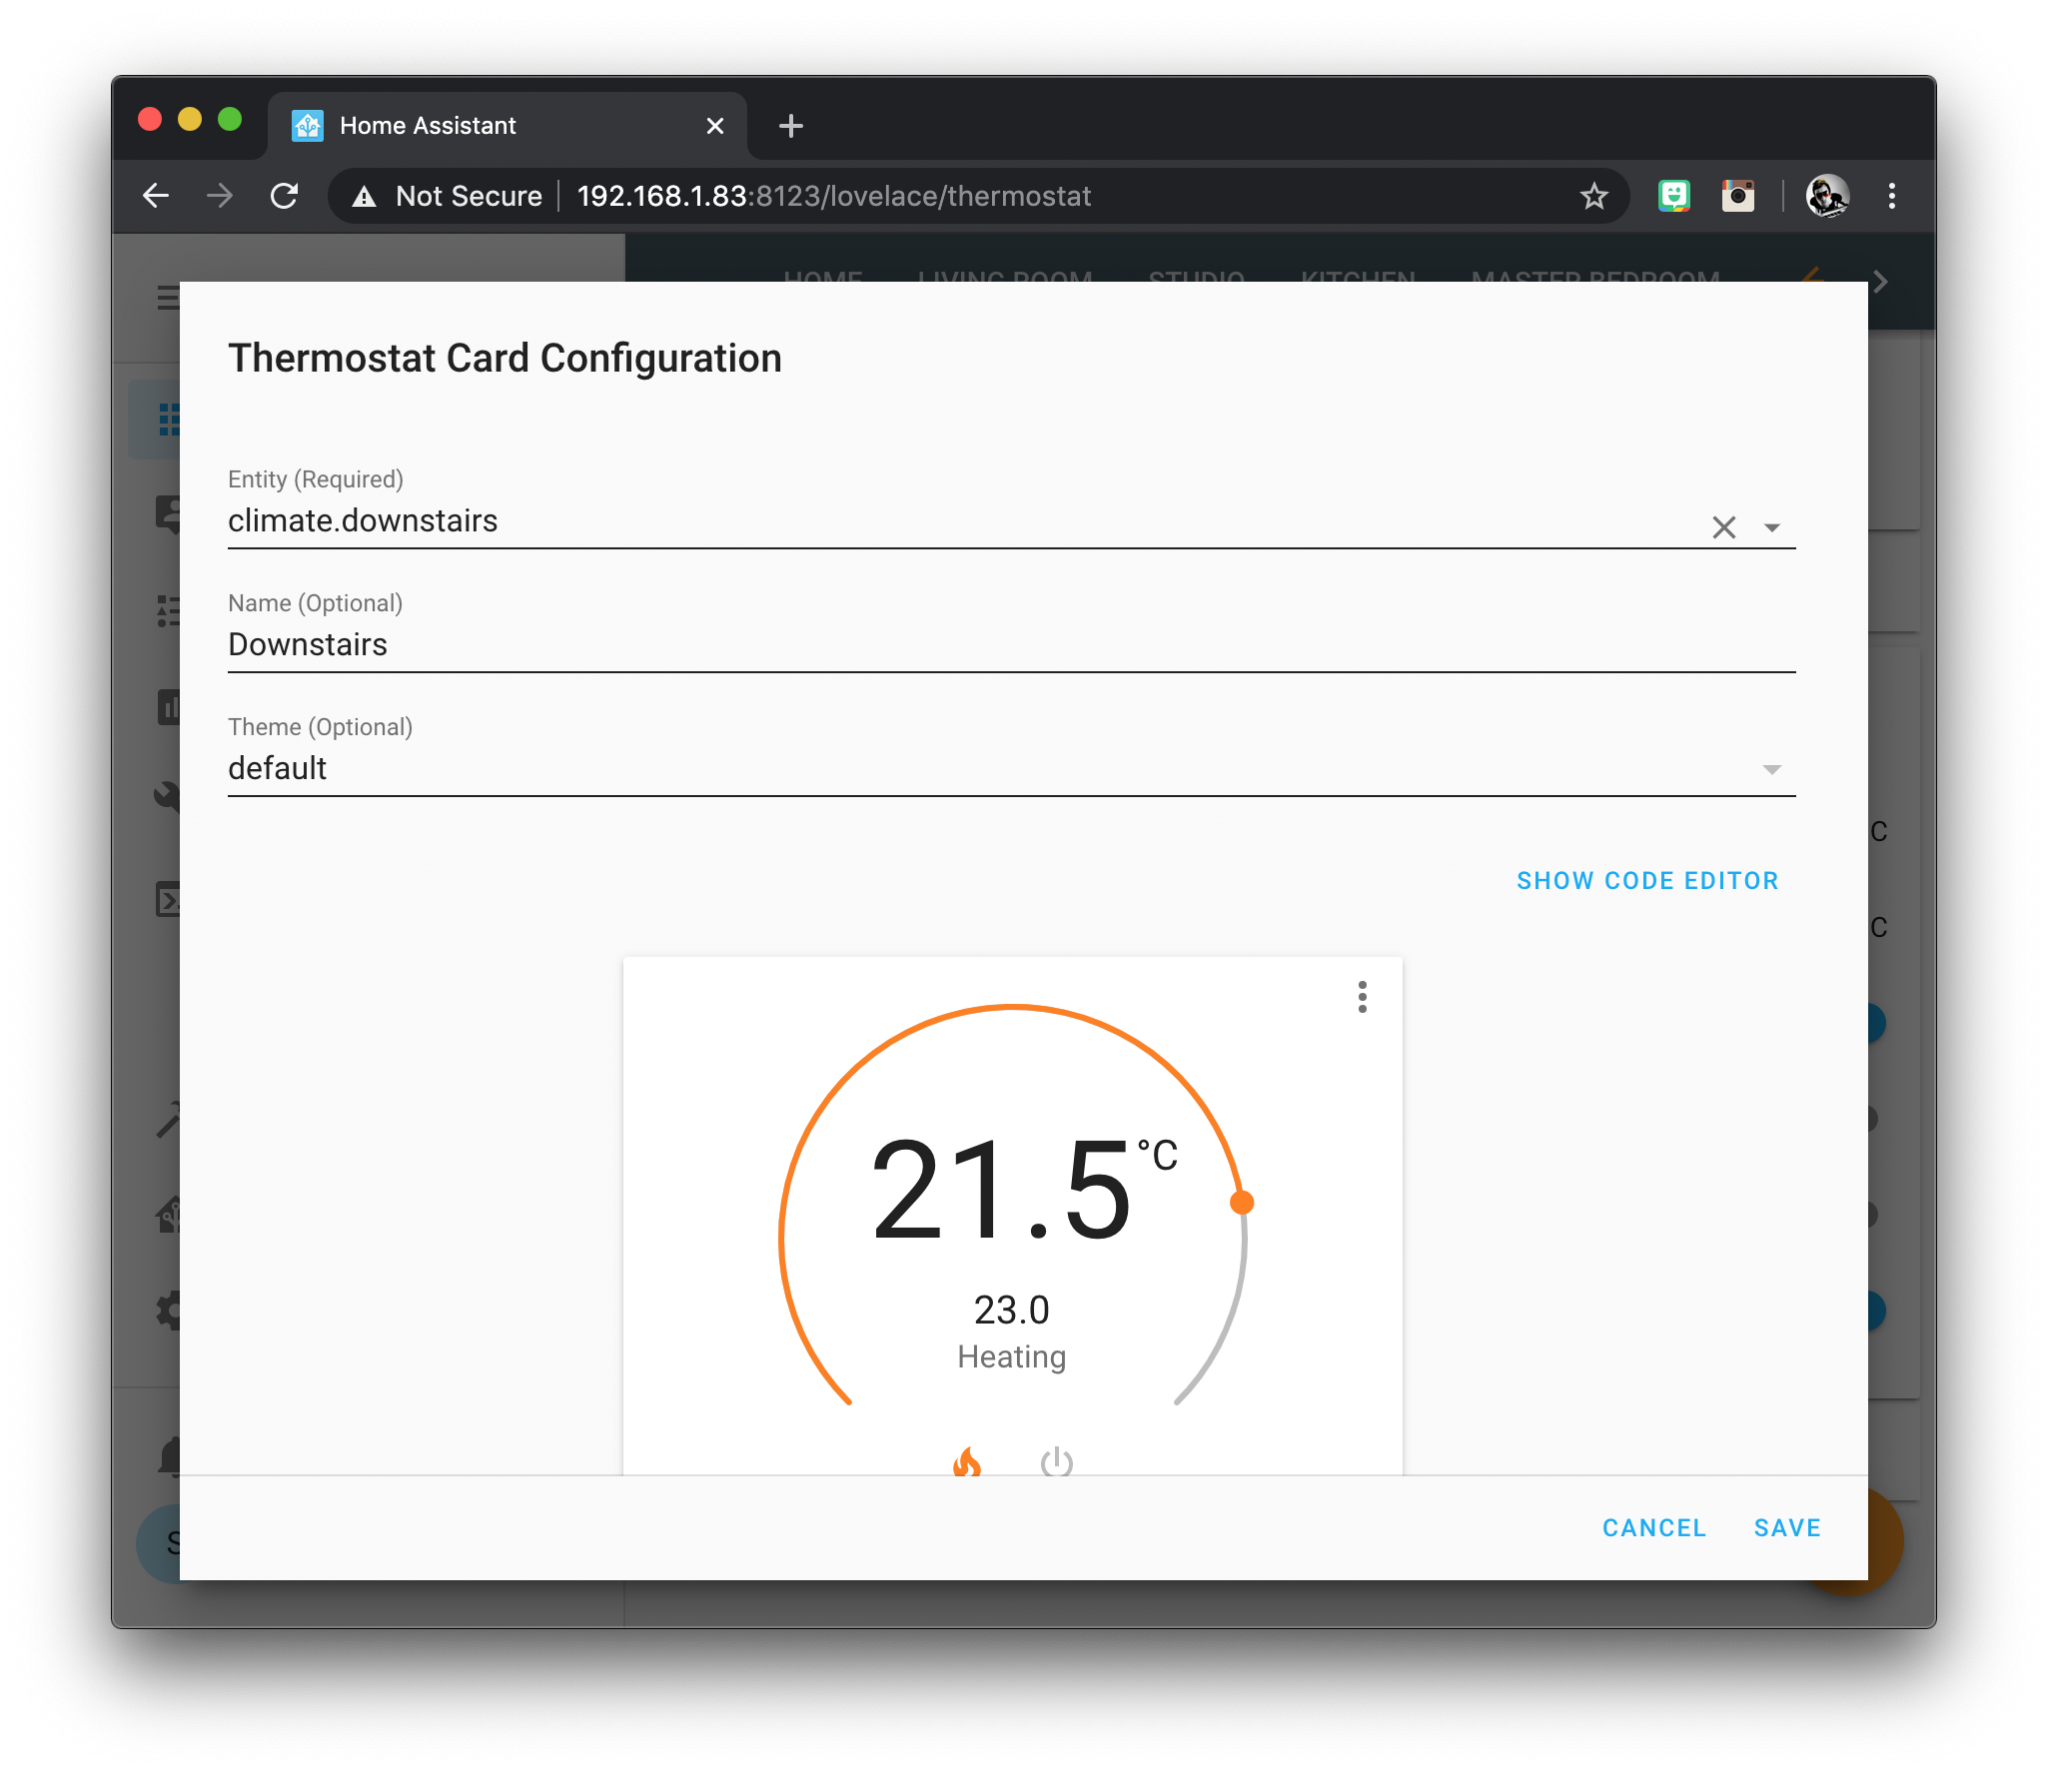
Select the climate entity in the entity box. Enter the name you wish to be displayed on the card under the name box. Once you are done click save.
That’s it! Your new thermostat will be added to your user interface and you can go ahead and try it out.
Conclusion
In this tutorial we have taken a look at a simple heat only thermostat solution for Home Assistant. The generic thermostat within Home Assistant works very well and is much cheaper than installing a commercially available system.
For further reading I would definitely recommend checking out my ultimate DIY thermostat post, which covers multi zone systems and several solutions for integrating the AC.
Thanks so much for visiting my site! If this article helped you achieve your goal and you want to say thanks, you can now support my work by buying me a coffee. I promise I won't spend it on beer instead... 😏


Thank you for excellent tutorial! I suffered a big frustration in order to find the correct micro USB cable. I even thought that I destroyed the circuit during soldering. The best way was to go to the electrical appliances/computer store with Wemos, and try it on the spot. The current setting for DHT22 (Shield) on Wemos is “AM2301” (SI7021 does not give correct values). Also the +5V power supply to DHT22 (Shield) did not work for some reason, I had to connect the +3,3V line. Many thanks for your site!
Very glad to hear it MK! Thanks for visiting and for taking the time to give feedback 🙂