
Did you know that Home Assistant can be far more than just a home assistant? It is probably not too far fetched to say that it can manage, schedule and automate all technological aspects of your life.
Like one third of the other webmasters in the world, I run this site on WordPress. I was looking for a solution to manage backups and of course I turned to Home Assistant.
If you have a website, WordPress or otherwise, you can manage and automate many of the backend processes with the awesome Home Assistant and this article will show you how!
Table of Contents
- Prerequisite
- Accessing your site with terminal
- Getting a Dropbox token
- Writing a Bash script
- Configure Home Assistant
- Conclusion
Prerequisite
This tutorial is more advanced and requires some understanding of Home Assistant plus a good understanding of Linux and the basic terminal commands. You will also need the SSH & Web Terminal add-on installed.
If you are not yet confident writing configurations in YAML then I would recommend that you take a look at my other tutorials on automation and scripts first.
In order to link your website backend to Home Assistant, you will need be able to access your site via SSH using the shell integration. I would recommend checking out my tutorial on Home Assistant shell integration if you have not yet used shell commands in your configuration.
At the time of writing this site is hosted on Siteground, which offers SSH access on all of their plans. If you are not using Siteground then you will need to check if SSH access is available with your plan and chosen web host.
As there are different configurations for Home Assistant and some complications accessing external storage media with some setups, I opted to use Dropbox as a universal solution compatible with all setups. You will therefore need a Dropbox account, although the bash script could be modified to save your backups elsewhere.
Accessing your site with terminal
The method for setting up SSH access to your website will differ depending on your hosting company. You will need to follow the guide for setting up SSH specific to your hosting provider.
To demonstrate how it is done, I will document the process for my chosen hosting company, Siteground. Your process should be similar if using a different hosting company.
If you have problems with the following steps, I would highly recommend checking out my tutorial on SSH with the shell integration to gain a better understanding.
Getting an SSH key
The first thing we need to is look at the instructions for accessing SSH provided by the web hosting company. Siteground require us to create a new private key and copy it to our local machine. A new key can be created with the key manager tool found in the members area.
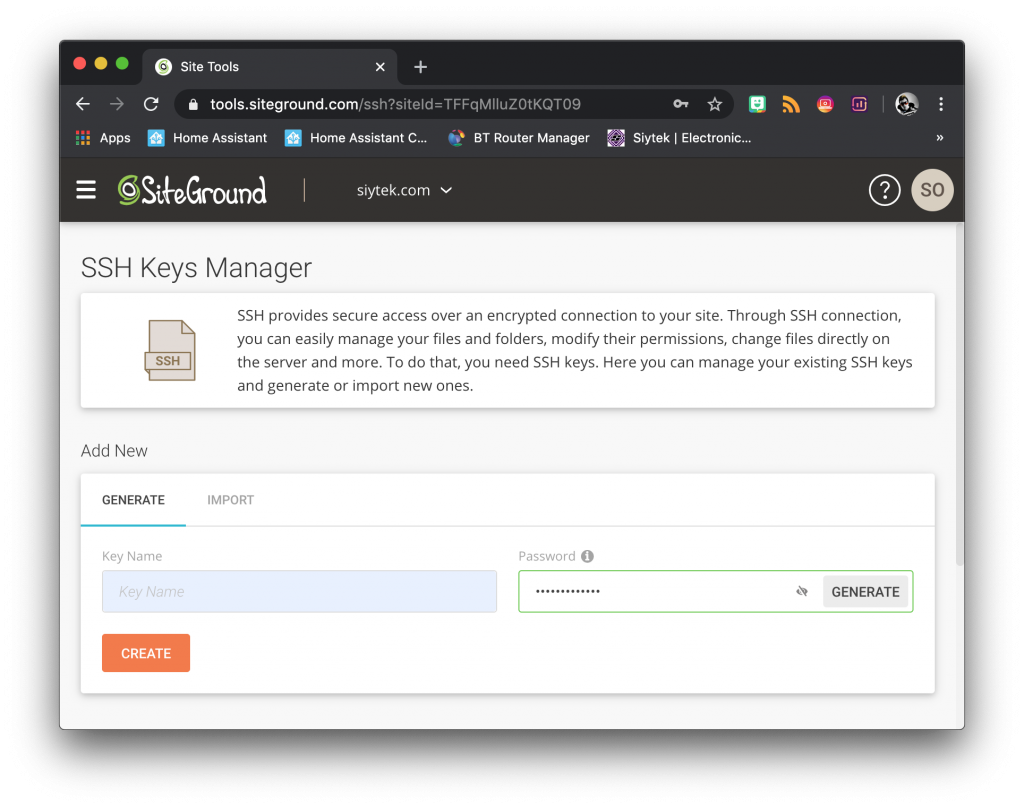
We can create a new key specifically for Home Assistant to gain access to the website backend. We will name this key “Home Assistant” to differentiate it from SSH access from the main system terminal. Once the key is created we can go ahead and copy it to the clipboard.
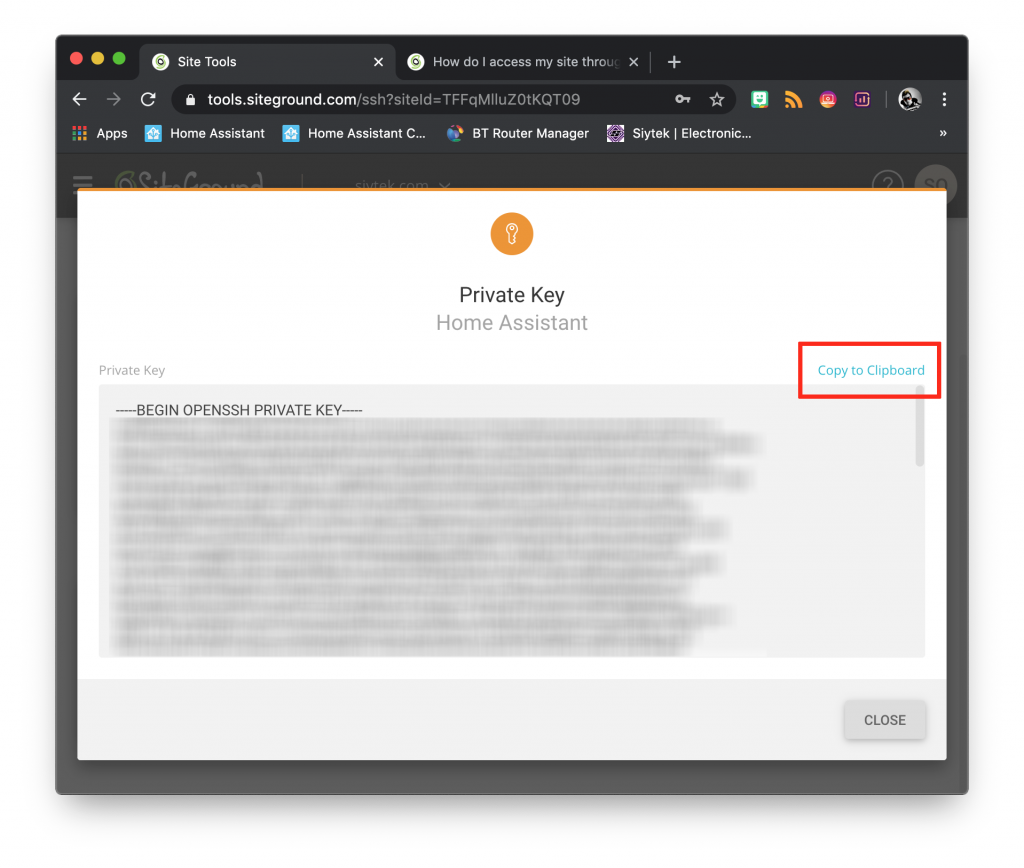
Next we need to create a new file in the Home Assistant /config directory called website_key.txt with a text editor. It is important that this file is saved in plain text format. Copy and paste the key into the text file and then save it.
/config/website_key.txt
Adding the key to Home Assistant
Now that we have the key saved in a file inside of the Home Assistant config directory, we can add it to Home Assistant. Go ahead and open the Home Assistant terminal. You can either use the web terminal or you can SSH to it with a terminal program.
First we need to give the key file the correct permissions.
chmod 600 /config/website_key.txt
In order to add the key we must first ensure that the SSH agent is running by entering the following command.
eval "$(ssh-agent -s)"
The command should echo the PID of the SSH agent. Now we can go ahead and add the key to Home Assistant.
ssh-add /config/website_key.txt
Once the key has been added, we need to copy it back to the /config/ssh directory so that Home Assistant can access is separately from the terminal. If you do not have the ssh directory, you can just create it.
cp ~/.ssh/id_rsa ~/config/ssh
Now you should have access to your website backend via SSH from both the Home Assistant terminal and from within the YAML configuration. Your SSH credentials will be provided by your hosting company, you can use them to log in to your website backend bash shell.
<username>@<yoursite.com> -p <port>
Getting a Dropbox token
We will be writing a bash script that will run on our web server backend, which copies the SQL database and pushes it, along with all of the other website files, to a Dropbox account. Home Assistant will call the bash script and pass arguments based upon settings made in the UI.
In order to be able to send files from the bash script, we will need to use the Dropbox API. This will require us to obtain an OAuth token from the developer site. Just complete the following steps to grab your OAuth token.
- Head over to the Dropbox developers website and log in.
- Choose the option from Dropbox API on the first step.
- Choose full dropbox access on the next step.
- Give you app a unique name.
- Click create app.
- Scroll down to the OAuth 2 section and click generate.
- Copy the token to a plain text file for using later.
Writing a Bash script
Now that we have access to our website backend through SSH and the dropbox key, we can create a script to manage the backups. All of the files can be found in the Github repository for this project.
Arguments
In order to give Home Assistant control of the bash script, we will pass arguments to the script from the shell_command integration and load them into variables. For clarity the arguments are as follows.
| Argument | Variable | Description |
|---|---|---|
| $1 | overwrite | Boolean for overwrite option |
| $2 | username | MySQL database username |
| $3 | database | MySQL database name |
| $4 | password | MySQL database password |
| $5 | dropbox_key | Dropbox OAuth token |
| $6 | website_path | Root of website files |
| $7 | dropbox_path | Path to store backup on Dropbox |
| $8 | log_path | Path to public location of last backup timestamp file |
The overwriting option allows you to choose between creating date stamped iterations of the database each time the backup is performed, or just to overwrite a single file. The latter being beneficial for those using a free Dropbox account with limited storage space.
Your MySQL credentials and database name will be available through your hosting management area. I would advise that you create a new user with read-only privileges to use with this script for additional security.
The website path should be specified as the root of your website. All files and folders from this point will be backed up.
~/www/yoursite.com
The Dropbox path is the location in Dropbox that you wish to store your backup. All files specified from the root of the website will be copied to this path.
/website_backup
The log path is a publicly accessible website address which hosts a simple text file containing the datetime stamp from the last backup. Home Assistant can use the curl command to fetch this data in order be displayed in the user interface. You can see the last backup of this site at https://siytek.com/dropbox_backup.log and the log path is as follows.
~/www/siytek.com/public_html/dropbox_backup.log
The first part of the script takes the arguments passed and places them inside variables with more meaningful names.
#!/bin/bash

# Script config
thedate="-"$(date +"%d_%m_%Y")
datetime=$(date '+%d/%m/%Y %H:%M:%S');
website_path=$6 # Path to website root folder
overwrite=$1
log_path=$8

# SQL credentials
username="$2"
database="$3"
password="$4"

# Dropbox config
dropbox_key="$5"
dropbox_path=$7 # Backup storage location
MySQL defaults file
The next part of the script creates a temporary file in which to place the MySQL password. This is necessary in order to avoid having to manually type the password, which of course is not possible when calling the script remotely.
# Create defaults file
echo "[mysqld]" > sql_pw
echo "[mysqldump]" >> sql_pw
echo "password=""'"${password}"'" >> sql_pw
Copy the database with MySQLdump
The script will then make a local backup copy the database using MySQLdump. The IF statement determines whether or not a date stamped version of the file should be created.
# If database overwrite set to FALSE then add dated backup
if [ $overwrite = "off" ]; then
        echo " adding new backup database-backup${thedate}.sql"
        mysqldump --defaults-file=./sql_pw --single-transaction -u ${username} ${database} > ./database-backup${thedate}.sql
# Else just overwrite the same database backup each time

else
    	echo " overwriting database-backup.sql"
        mysqldump --defaults-file=./sql_pw --single-transaction -u ${username} ${database} > ./database-backup.sql
        thedate=""
fi
Remote the MySQL defaults file
Once the database has been copied to a local backup, the MySQL defaults files is removed. As mentioned before it is advisable to create a MySQL user with read-only privileges for this purpose for additional security.
# Removing defaults file
rm sql_pw
Transfer the backup to Dropbox
Now we can go ahead and transfer the database backup to Dropbox using the API.
echo "Transfering database to Dropbox..."
curl -X POST "https://content.dropboxapi.com/2/files/upload" \
    --header "Authorization: Bearer ${dropbox_key}" \
    --header "Dropbox-API-Arg: {\"path\": \"${dropbox_path}/database-backup${thedate}.sql\",\"mode\": \"overwrite\",\"autorename\": true,\"mute\": false}" \
    --header "Content-Type: application/octet-stream" \
    --data-binary @database-backup${thedate}.sql \
    > ./dropbox_database_backup.log
Once the database has been uploaded we can transfer all of the additional websites files using an iterative loop for each file in all of the subfolders for the specified website root folder.
rm dropbox_website_backup.log
for file in $(find ${website_path} -name '*' -type f); do

       curl -X POST "https://content.dropboxapi.com/2/files/upload" \
       --header "Authorization: Bearer ${dropbox_key}" \
       --header "Dropbox-API-Arg: {\"path\": \"${dropbox_path}${file#${website_path}}\",\"mode\": \"overwrite\",\"autorename\": true,\"mute\": false}" \
       --header "Content-Type: application/octet-stream" \
       --data-binary @$file \
       >> ./dropbox_website_backup.log
done
In both cases a log file is written but errors are not yet handled. A more sophisticated version of this script should handle errors and report back to Home Assistant to ensure backup reliability. For now the log files must be periodically checked manually.
Writing the datetime stamp
Finally we can write a new datetime stamp in the publically accessible log so that Home Assistant can report the last time that the backup was run in the UI.
# Writing to the log file
echo "Writing date and time to ${website_path}/dropbox_backup.log"
echo ${datetime} > $log_path

echo "Done!"
The completed script
The completed script should be uploaded to your web server backend so that it can be called remotely by Home Assistant.
I would recommend putting it in the home directory for simplicity. You can download the script from the Github repository.
An easy way to put the script on your web server is just to copy the raw script and paste it into a new file created in the terminal.
nano ha_backup.sh
# Home Assistant Website Backup Manager script V0.1
# Pushes a backup copy of the website and SQL database to Dropbox
# Triggered and controled by Home Assistant Frontend
# For more information visit https://siytek.com
# The awesome Home Assistant: https://home-assistant.io

#!/bin/bash

# Script config
thedate="-"$(date +"%d_%m_%Y")
datetime=$(date '+%d/%m/%Y %H:%M:%S');
website_path=$6 # Path to website root folder
overwrite=$1
log_path=$8

# SQL credentials
username="$2"
database="$3"
password="$4"

# Dropbox config
dropbox_key="$5"
dropbox_path=$7 # Backup storage location

# Back up the database locally
echo -n "Backing up database..."

# Create defaults file
echo "[mysqld]" > sql_pw
echo "[mysqldump]" >> sql_pw
echo "password=""'"${password}"'" >> sql_pw

# If database overwrite set to FALSE then add dated backup
if [ $overwrite = "off" ]; then
        echo " adding new backup database-backup${thedate}.sql"
        mysqldump --defaults-file=./sql_pw --single-transaction -u ${username} ${database} > ./database-backup${thedate}.sql
# Else just overwrite the same database backup each time

else
    	echo " overwriting database-backup.sql"
        mysqldump --defaults-file=./sql_pw --single-transaction -u ${username} ${database} > ./database-backup.sql
        thedate=""
fi

# Removing defaults file
rm sql_pw

# Backup database to Dropbox
echo "Transfering database to Dropbox..."
curl -X POST "https://content.dropboxapi.com/2/files/upload" \
    --header "Authorization: Bearer ${dropbox_key}" \
    --header "Dropbox-API-Arg: {\"path\": \"${dropbox_path}/database-backup${thedate}.sql\",\"mode\": \"overwrite\",\"autorename\": true,\"mute\": false}" \
    --header "Content-Type: application/octet-stream" \
    --data-binary @database-backup${thedate}.sql \
    > ./dropbox_database_backup.log


echo "Backing up archive to Dropbox..."

rm dropbox_website_backup.log
for file in $(find ${website_path} -name '*' -type f); do

       curl -X POST "https://content.dropboxapi.com/2/files/upload" \
       --header "Authorization: Bearer ${dropbox_key}" \
       --header "Dropbox-API-Arg: {\"path\": \"${dropbox_path}${file#${website_path}}\",\"mode\": \"overwrite\",\"autorename\": true,\"mute\": false}" \
       --header "Content-Type: application/octet-stream" \
       --data-binary @$file \
       >> ./dropbox_website_backup.log
done

# Writing to the log file
echo "Writing date and time to ${website_path}/dropbox_backup.log"
echo ${datetime} > $log_path

echo "Done!"
Configure Home Assistant
Now that the web server backend has been configured we can build the Home Assistant user interface. Each integration is listed in a separate file for simplicity, however you can combine them all into configuration.yaml if you prefer.
You can view all of the YAML files on the Github repository.
Input boolean integration
First we will add a switch to control whether or not we wish to create date stamped backups or whether we wish to conserve space and overwrite one backup file.
We will also add a switch that allows us to turn on automated backups that occur at a specified time each day.
wordpress_overwrite:
  name: "Write Over Backup"
  icon: mdi:harddisk-remove
# Option to backup automatically at specified time
wordpress_backup_enabled:
  name: "Auto Backup On/Off"
    icon: mdi:harddisk
Shell command integration
Next we will create a shell command that launches the remote script bash on the web server and passes all of the variables. You will need to change the arguments and server details accordingly.
The first argument is set using a template that extracts the state of the overwrite switch and passes it to the bash script.
wordpress_backup: ssh -i /config/ssh/id_rsa -o 'StrictHostKeyChecking=no' <user>@<domain> -p <port> '<path to script> {{states("input_boolean.wordpress_overwrite")}} <MySQL Username> <MySQL Database> <MySQL Password> <Dropbox Key> <Public HTML path> <Dropbox path> <Timedate path>'Script integration
In order for us to have a button in the user interface that can manually activate the backup, we will create a script that files the shell command. Adding this script to the user interface will give us a button to launch the command.
backup_wordpress:
  alias: "Backup WordPress"
  sequence:
    service: shell_command.wordpress_backup
Sensor integration
Next we will create a sensor that uses a curl command to fetch the timedate stamp from the last time the script was run. You will need to enter the public HTML path that matches the associated argument when calling the script.
We will also create a sensor.time instance so that we can compare the time with a user specified value in order to trigger the backup automatically at a desired time.
- platform: command_line
  name: "Wordpress Last Backup"
  command: curl https://<your-domain>/<your-log-file>.log
# Initilizes the date and time sensors
- platform: time_date
  display_options:
    - 'time'
    - 'date'
Input datetime integration
We also need to create an input that allows the user to input a time in which the backup should run automatically. Here we can specify the time by a text box input.
wordpress_backup_time:
  name: "Auto Backup Time"
  has_time: true
  has_date: false
Automation integration
Finally we need to create an automation that triggers the shell command if the user specified time matches the actual time and if automatic backups are enabled.
calias: "Fire wordpress backup"
trigger:
  platform: template
  value_template: "{{ states('sensor.time') == (states.input_datetime.wordpress_backup_time.attributes.timestamp | int | timestamp_custom('%H:%M', False)) }}"
condition:
  condition: state
  entity_id: input_boolean.wordpress_backup_enabled
  state: 'on'
action:
  service: script.turn_on
  entity_id: script.backup_wordpress
Adding the UI
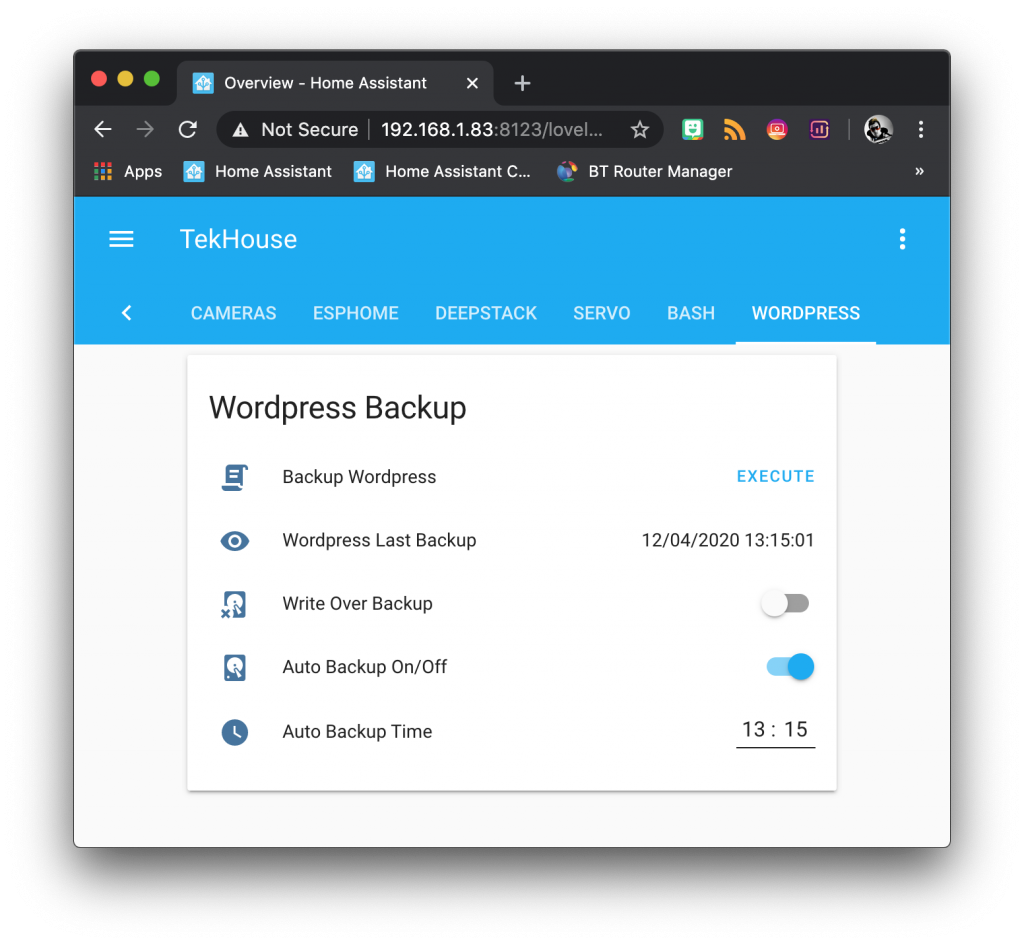
With all of the entities created we can now finally add them to the user interface to create a control panel for our managed website backup.
In order to do this we need to add a new entities card with a desired title. We can turn off the header toggle as it is not required.
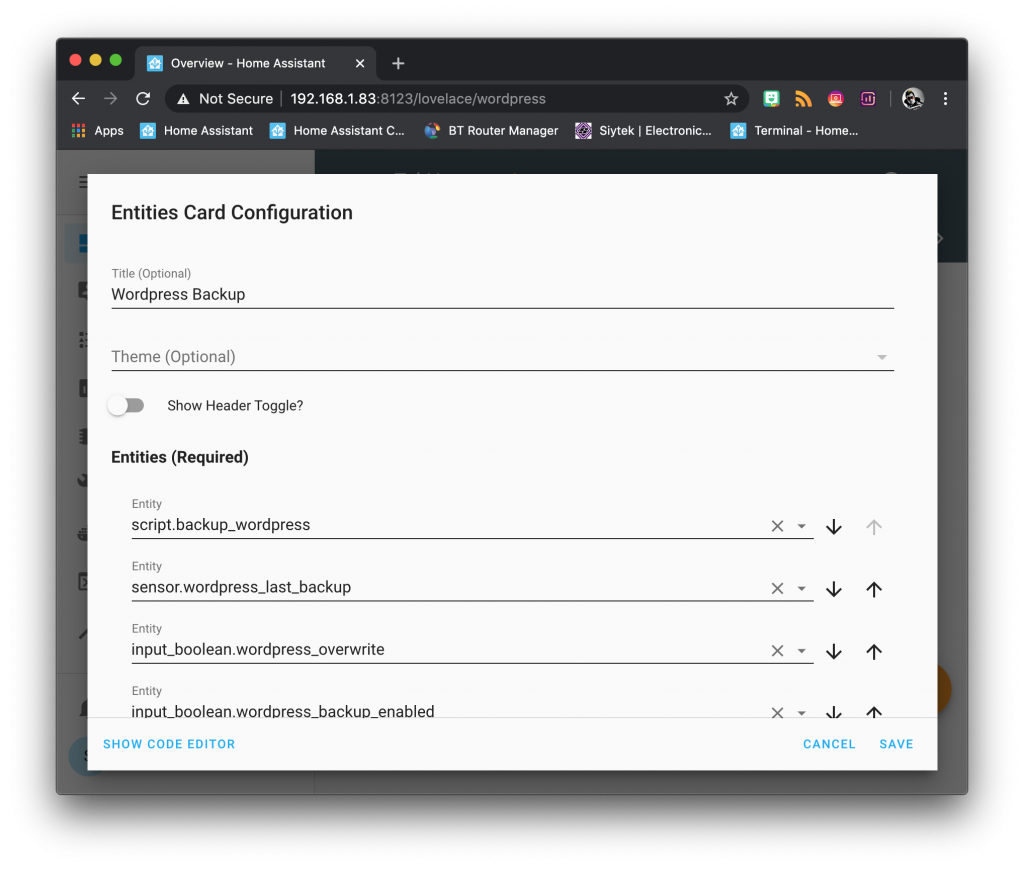
This will produce a simple yet effective card allowing us to manage remote website backups. Awesome!
Conclusion
Home Assistant is far more than just simple home automation software and this article gives an insight into just how powerful it can be. The shell command offers huge potential of linking not just external devices but external services.
I believe that Home Assistant has the potential to outgrow its own name and in the future it could automate all aspects of our lives, including our businesses and external services.
Congratulations if you managed to implement this idea! Hopefully it at least taught you some of the true potential of Home Assistant. Why not grab a nice beverage and get stuck in to some more of my awesome Home Assistant tutorials!
Thanks so much for visiting my site! If this article helped you achieve your goal and you want to say thanks, you can now support my work by buying me a coffee. I promise I won't spend it on beer instead... 😏


