
Sometimes men need to be men and do cool shit, like you know… the kind of shit your girlfriend or mother just does not understand…
Sometimes it is essential for us men to be men. Sometimes men need to build a giant barrel smoker oven or organise a drunken Nerf war. In some ways we remain children all of our lives, just the toys got bigger and more expensive!
We love and adore our girlfriends, sisters and mothers but they can never truly understand our child-like mentality when it comes to the methods in which we like to play.
So without further ado, here are 5 Arduino projects that you are going to love, but no chance your girlfriend is going to get it…
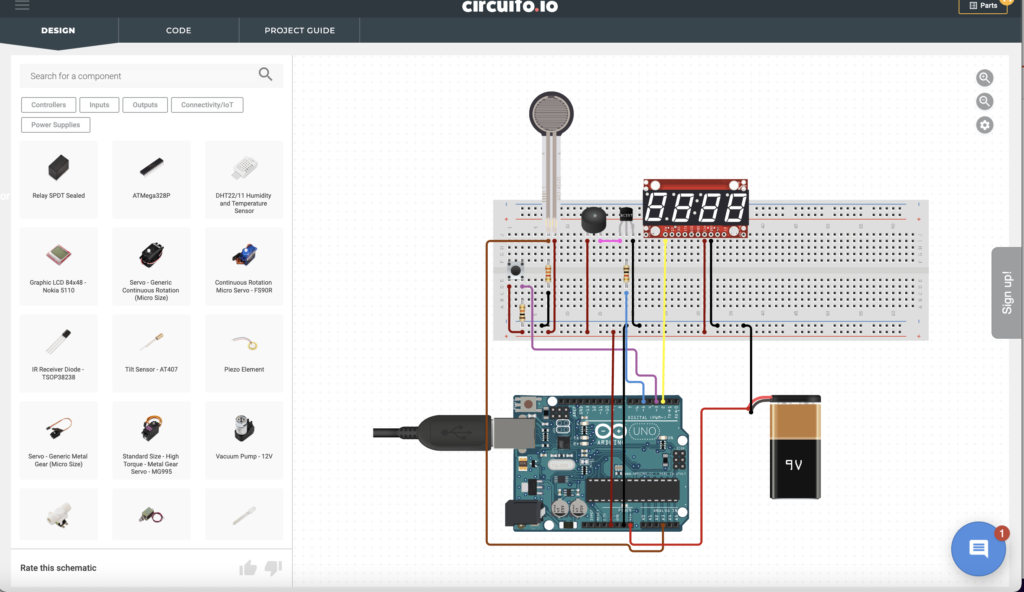
#5: The Beer Chugging Meter by Circuito.io
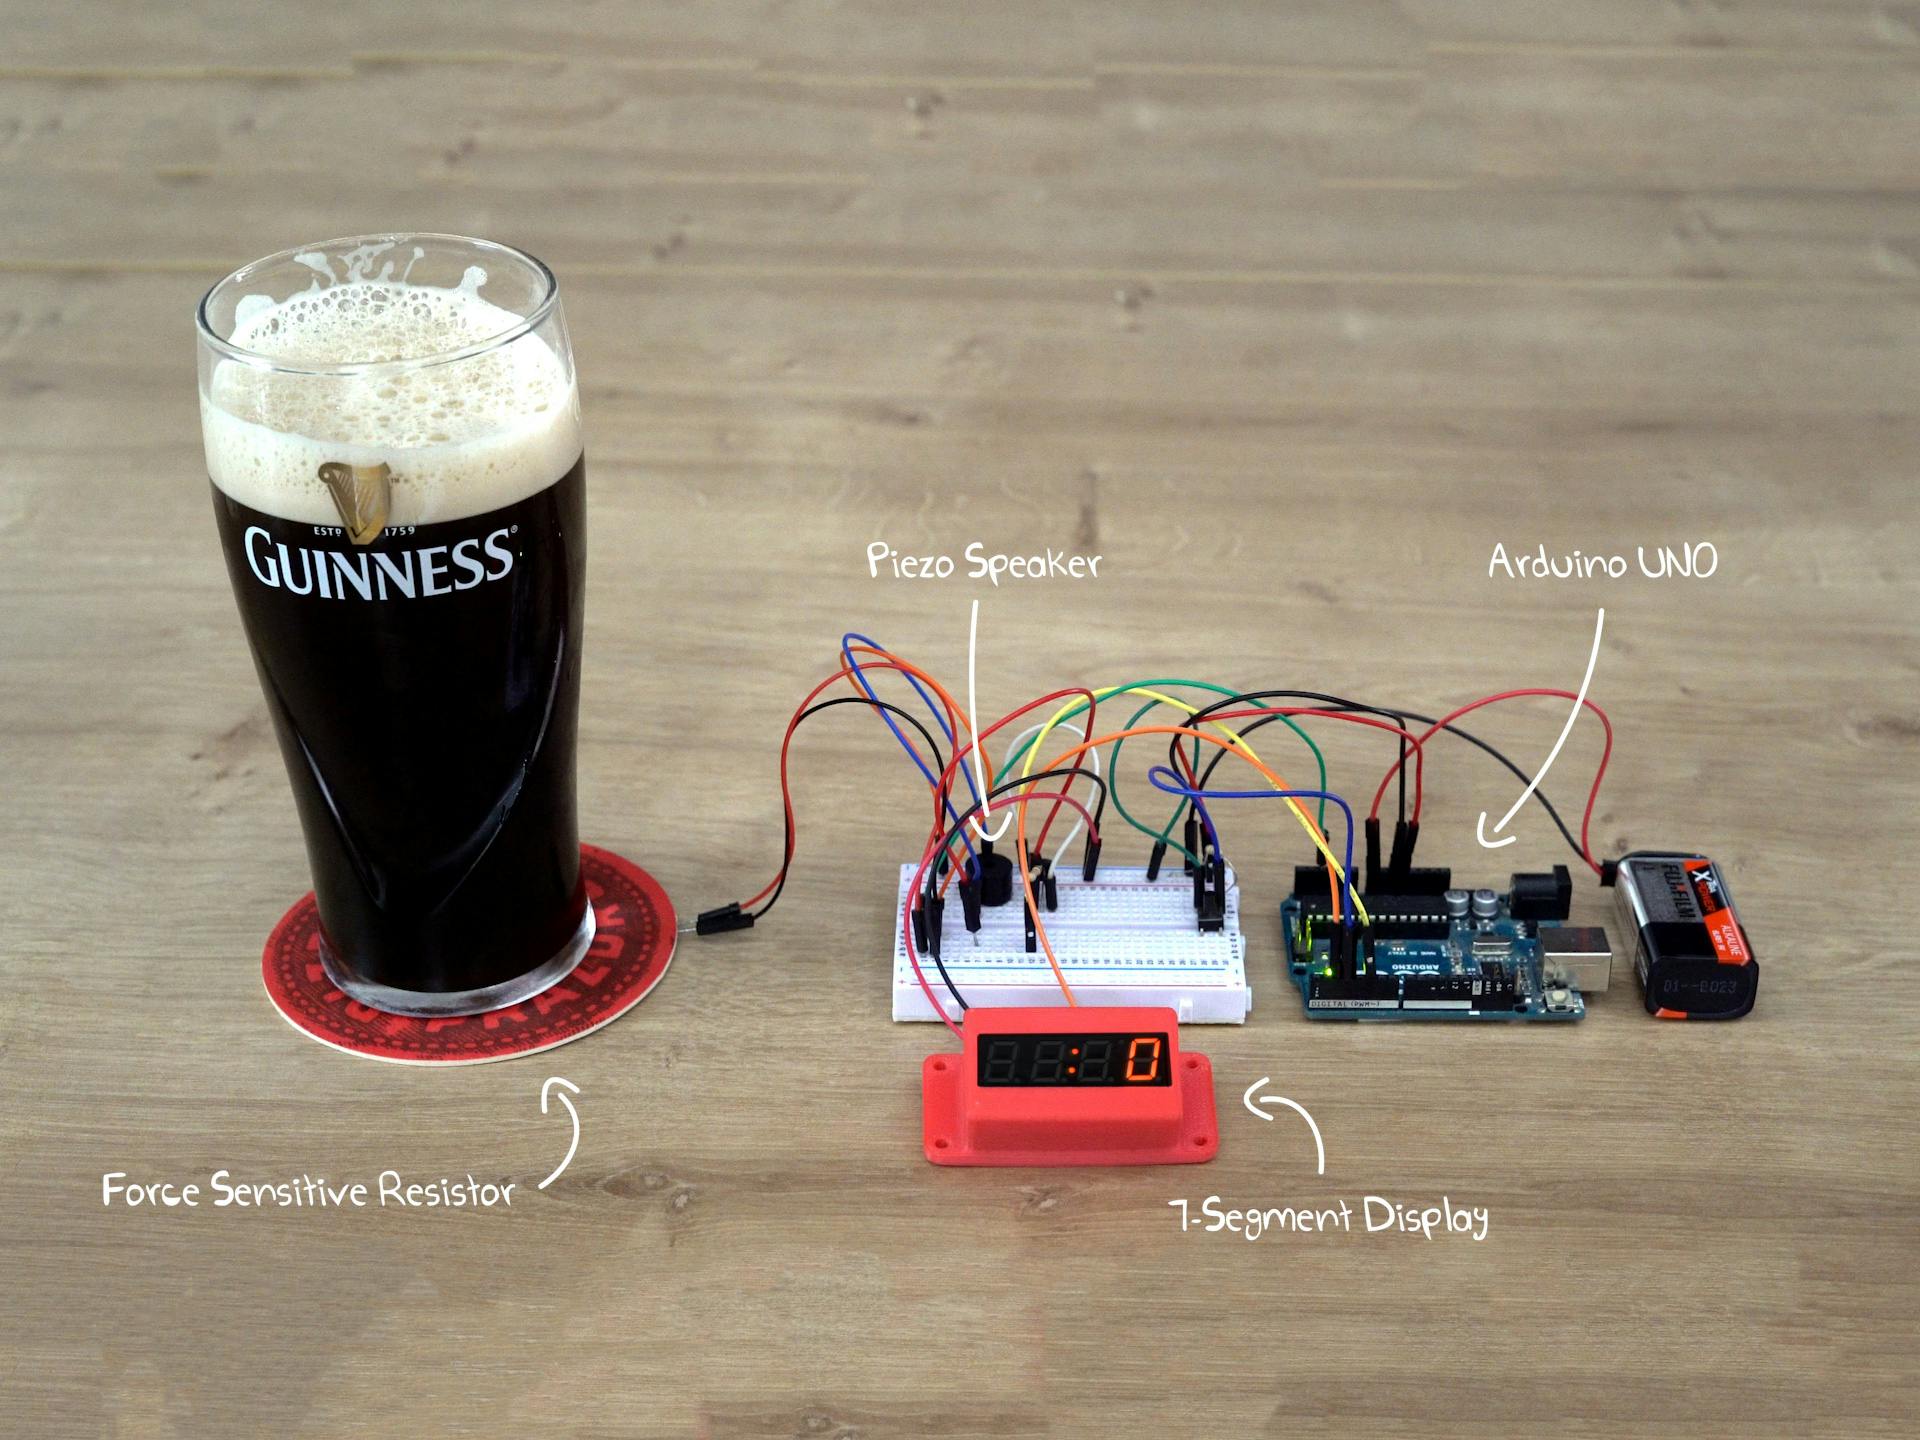
Ah yes, the classic beer chugging meter!
This wonderful contraption consists of a beer mat connected to an Arduino via a force sensing resistor, which is capable of timing how long it takes someone to down a pint… loverly!
This device allows you to put an end to that age old debate… who can down a pint faster?!
You can build the chugging meter on a simple breadboard with as little as the following components:
 | Force Sensitive Resistor 0.5″ | Amazon Price… |
 | SparkFun Serial 7-Segment Display | Amazon Price… |
 | Mini Push Button Switch (breadboard friendly) | Amazon Price… |
 | Mini Buzzer/Speaker (breadboard friendly) | Amazon Price… |
 | Arduino UNO | Amazon Price… |
The breadboard build and code can be found using their patent pending ‘magic link‘ and they also offer the ability to make modifications to the design.
The project can also be found over at the Arduino Project Hub.
#4: Arduino Coil Gun (without massive capacitors) by Gyro

Holy shit… shit just got dangerous!
A man known only as Gyro has built a real-life coil gun… I say man’s been playing too much Quake. But seriously, this thing is impressive and that’s just the 3D printing.
The project began life as a breadboard mess but the later revision with 3D printing looks superb!

As the projectile passes through the barrel an infrared sensor detects its position progressing and energises each coil sequentially to further accelerate the projectile.
Gyro has make an almost feature-length video about his creation, I would recommend watching it prior to embarking on a mission to build this absolute beast.
If you want to build this absolute monster, the parts list is quite extensive!
Tools:
- drill
- dremel
- handsaw
- soldering iron
- 3D printer (optional)
Materials:
- 0.8mm or 21SWG enameled Copper wire
- arduino nano
- infrared LED and infrared phototransistor
- resistors:
- 2x 330R
- 2x 680K (may vary)
- 10x 10K
- 2x 1n4007 Diodes
- 2x IRF3205
- LM358
- step up converter – XL6009 in my case
- XT60 connectors
- Li-po battery – at least 6 cells recommended. Must handle at least 40A.
- 10mm outer diameter and 8mm inner dia. plastic tube
- 8mm or 7mm steel rod. Must contain a lot of iron so it is ferromagnetic.
Complete instructions for both the revision 1 and revision 2 projects can be found over on Instructables.
Coilgun Without Massive Capacitors
Coilgun Without Massive Capacitors. Finished
#3: Musical Floppy Drives by Dave Madison
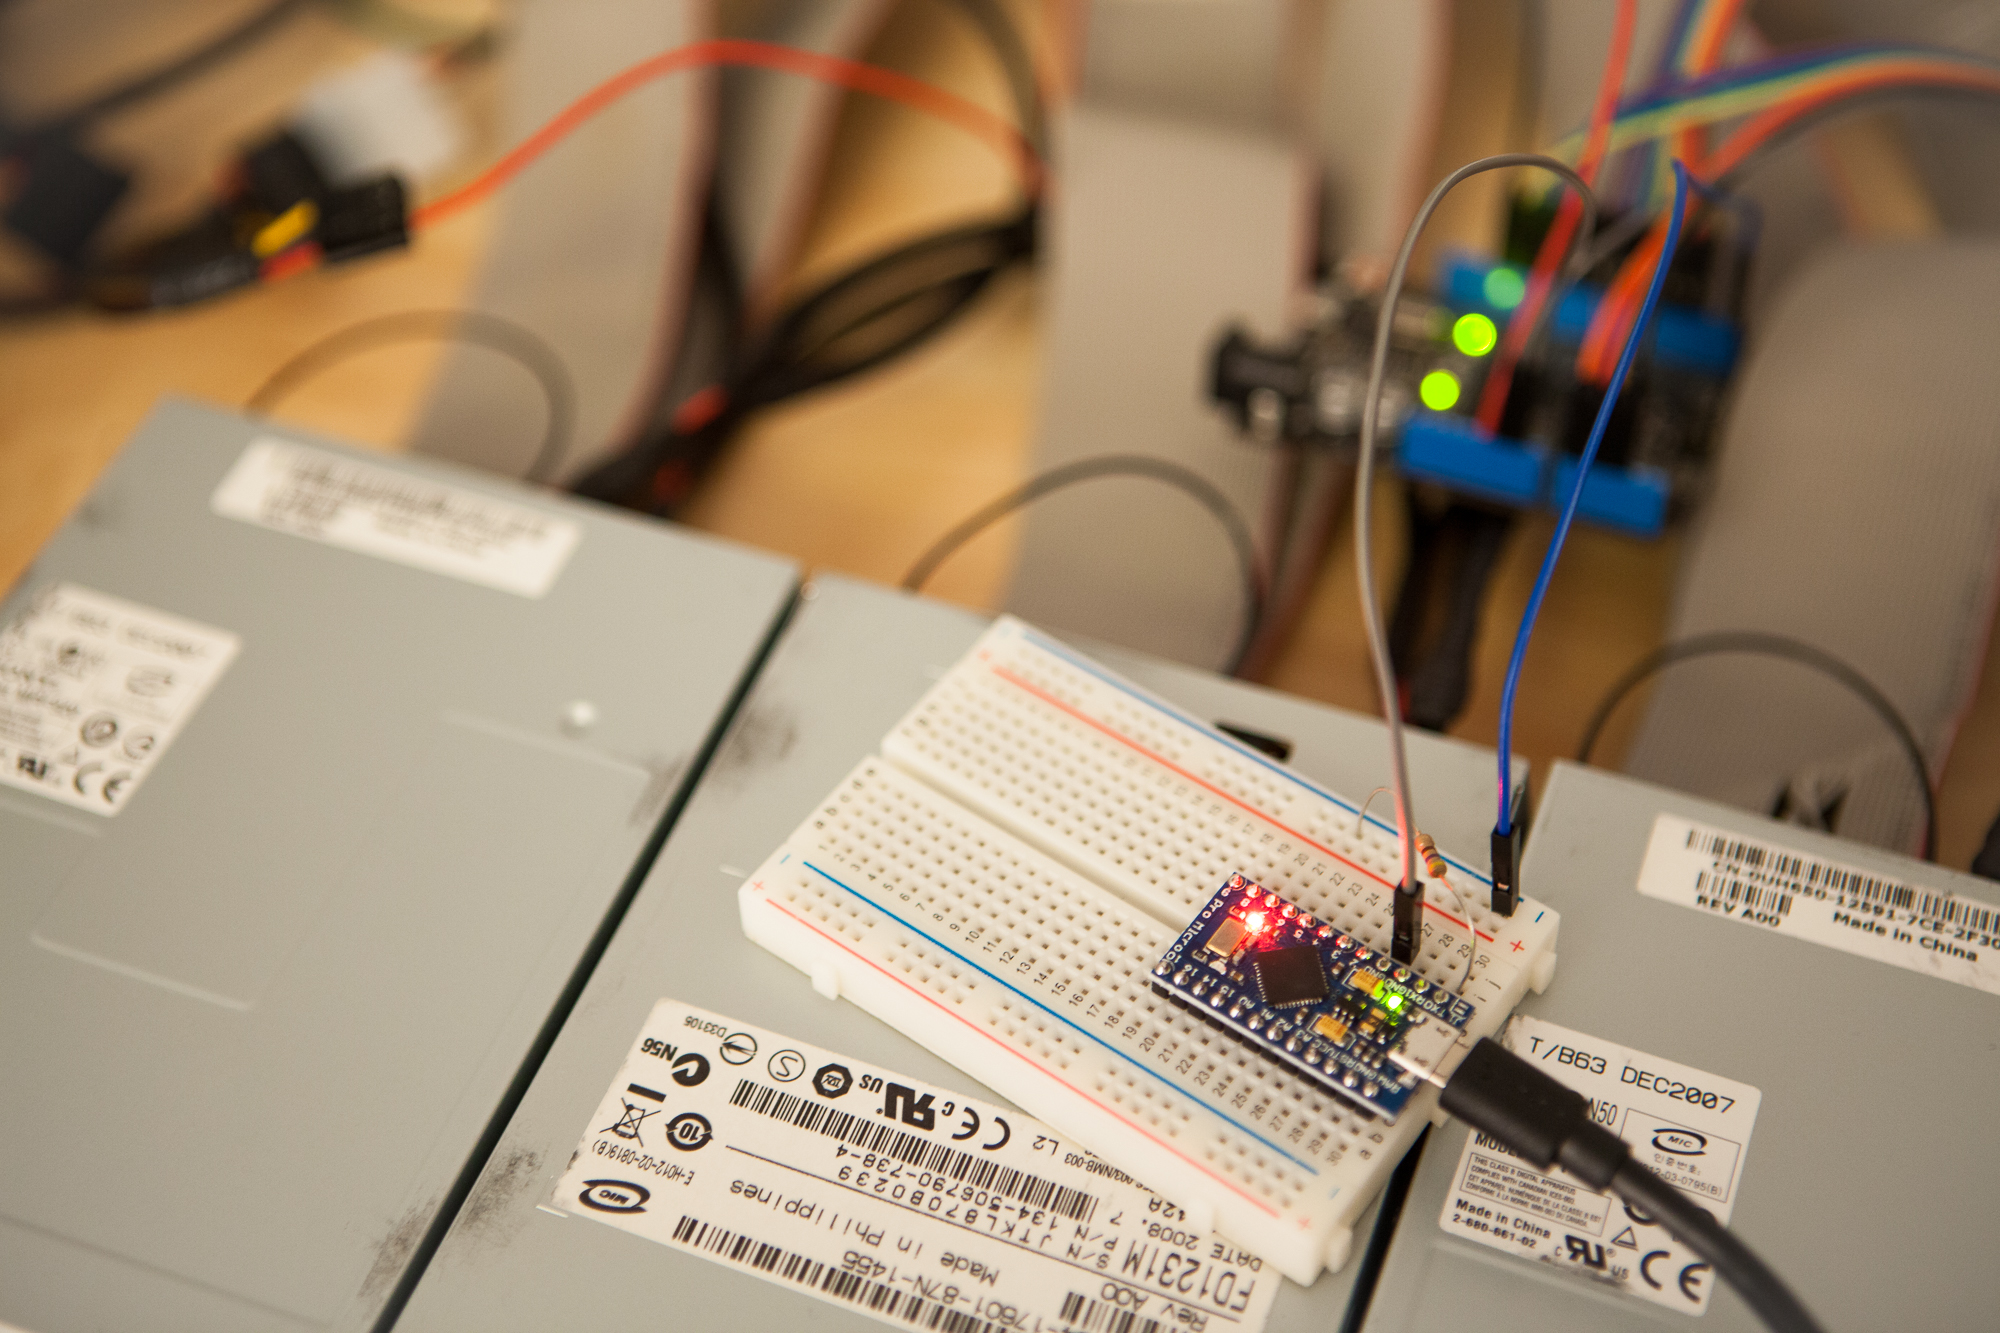
I have no idea who first came up with the idea that a battered old floppy disk drive could be used as a musical instrument, but they should be given a medal!
Dave Madison has been particularly innovative with his creation. He took an Arduino UNO running Moppy, software designed to turn the drive into an instrument, and paired it with an Arduino Micro to convert MIDI to Moppy.
This means it is possible to send MIDI directly to the floppy instrument, without using a computer!
This also means that it is possible to connect this setup to Ableton and control it via sequencing using a MIDI bridge, such as the Hairless Serial to MIDI Bridge.
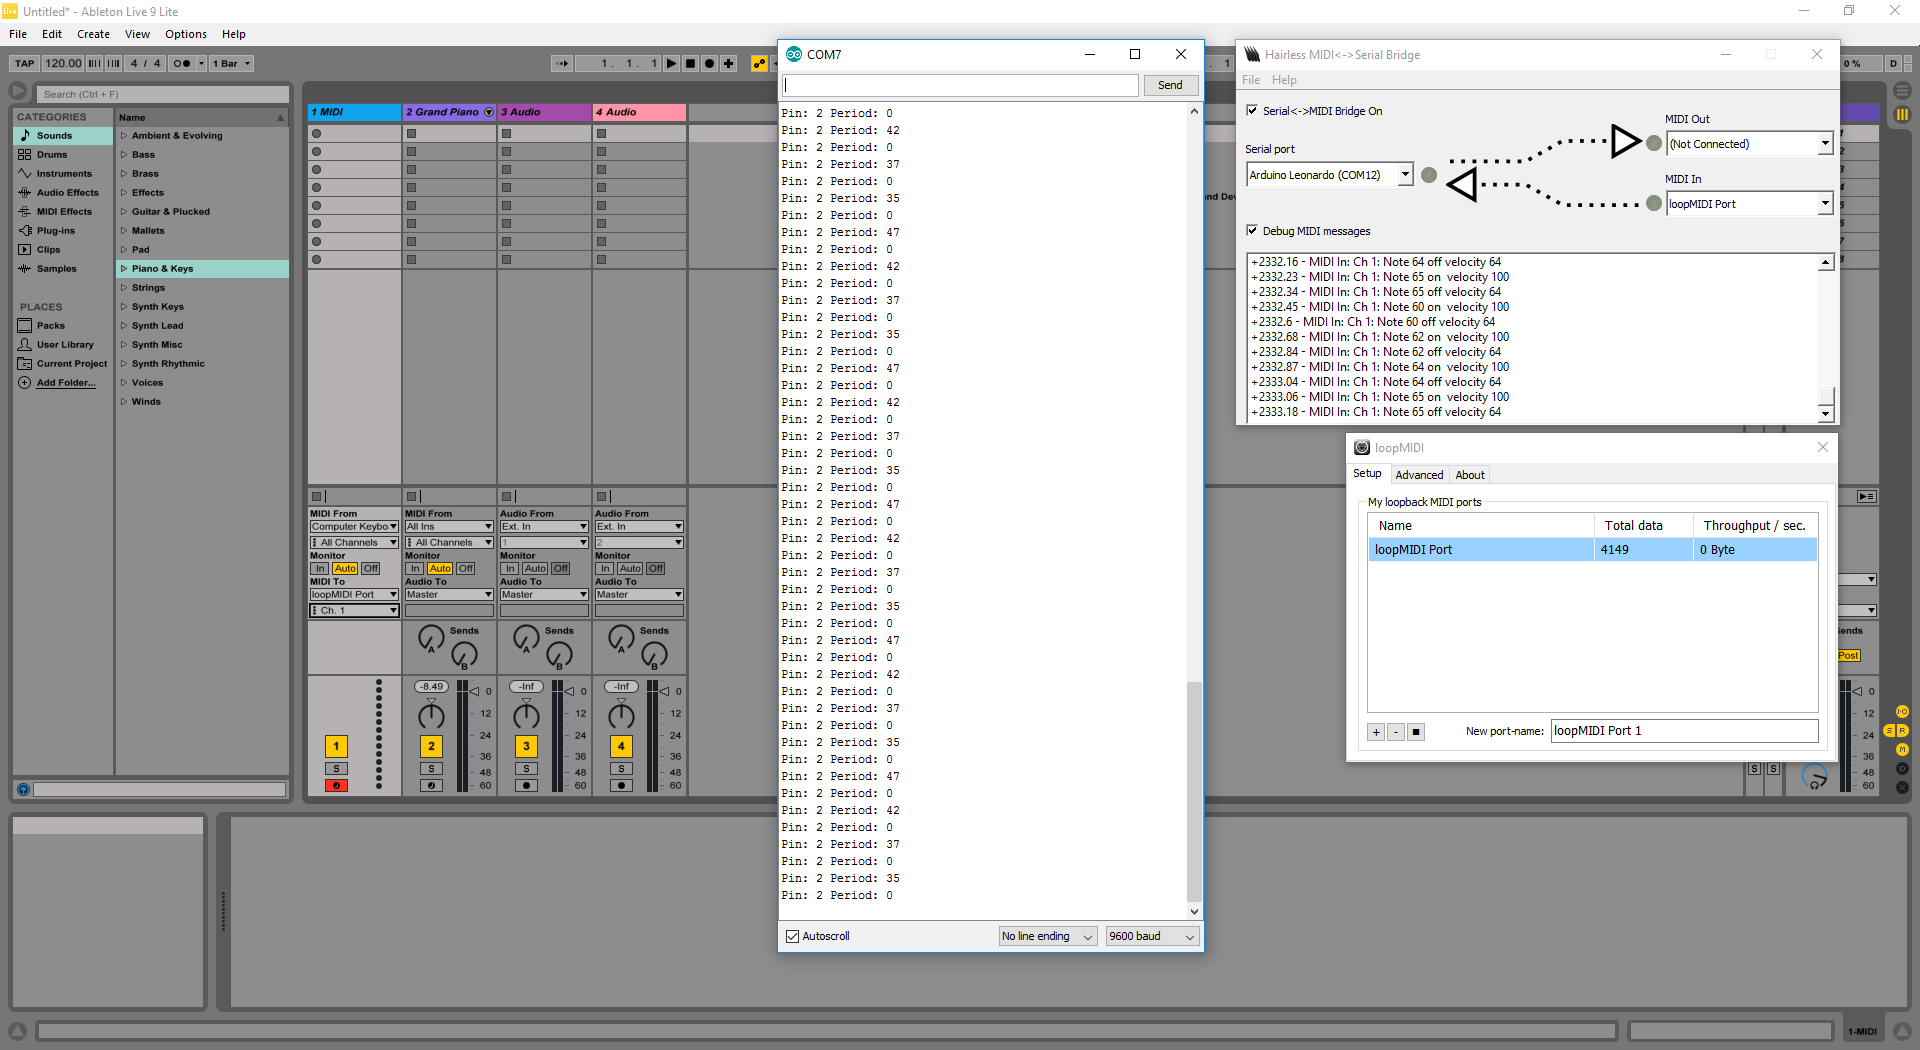
If you are interested in building your own epic MIDI controlled floppy disk instrument, Dave has written up his project in great detail so be sure to check it out!
#2: Poor Man’s Oscilloscope by @sagar_saini_7294
Let’s be honest, do any of us really know what an oscilloscope is? …I mean REALLY know?
Sure us EE folks can use them to a certain degree, but I would bet a month salary there is something on there you can’t explain, right?
Ok so the oscilloscope is one of the most important tools in the electronic engineering toolbox, but it’s absolutely certain that unless you live in the world of EE, you are for sure not going to understand it, girlfriends, brothers, uncles and their pets included.
With that said there is one thing that you can understand just by looking at an oscilloscope. The immediate reaction from almost anyone is… shit, that looks expensive! And they would be right!

So as mere mortals we are generally unable to justify the expense of an oscilloscope for home projects, however they are a vital tool of the EE.
So what to do? Introducing the poor man’s oscilloscope! …we build one of course!

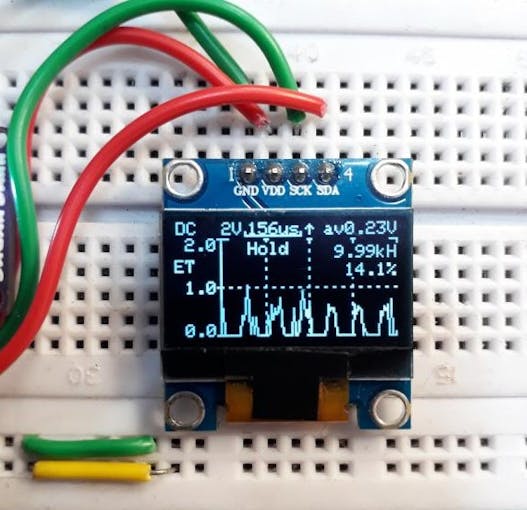
Over on the Arduino Create Hub we can find the wonderful and clever Arduino Oscilloscope, also known as the poor man’s oscilloscope, which boasts the following features:
- Single-channel -20Khz bandwidth
- Onscreen- Volt/Div and Time/Div
- Duty cycle monitoring
- Small 0.96-inch I2C
- AC/DC measurements option
- Mode changing, Hold state features
- Low battery consumption
- Portable and pocket-sized
The project write up is very detailed and even includes downloadable schematics and PCB designs, should you prefer to pay for a board rather than use ugly breadboard.
Here is a list of components required for this project:
 | Arduino Nano | Amazon Price… |
 | 128 x 64 OLED Display | Amazon Price… |
 | 100K, 10K, 820K, 510K, 12K Resistors | Amazon Price… |
 | 100nF, 7pF Capacitors | Amazon Price… |
| 4 x Tactile Switch | Amazon Price… |
 | Breadboard & Jumper Wires | Amazon Price… |
For further details, instructions on how to build this and the Arduino code, check out the project over on Arduino Create Hub.
#1: 3D Printed Robot Lawn Mower by Rep_AL

Aaaaaand the winner is…. RoboMower!!
I decided to crown this project the champion not only because of the level of professionalism in the build, but also because of my own personal hatred towards mowing the lawn.
I love a good lawn like the next person, it looks beautiful. You can’t beat a bit of outdoor cooking with a backdrop of sunshine and freshly cut grass.
The only problem is… its a TOTAL chore to cut the grass. Wouldn’t we all rather be lounging in a chair drinking a beer when the weather is nice, right?
Introducing 330 Monster, the 3D printed lawn mower project from Rep_AL!
This is a truly impressive project and with all resources available from the Rep_AL website.
Rep_AL offer kits and STL files for their various models of fully autonomous lawn mowers at very reasonable prices! (Note that I am not affiliated in any way with them).
The project includes a boundary wire system, which is pinned to the ground to mark the boundaries that the mower should operate in.
When the mower senses the perimeter wire it backs off and heads in a new direction. It also has 3 sonar sensors in order to detect obstacles and avoid them.
There is also an optional charging station so when the mower gets low on batteries, it uses the boundary wire to find its way back to the charging station. Simple but clever!
For further information you can check out the write-up over on The Arduino Create Hub or head on over to the Rep_AL website.
Thanks so much for visiting my site! If this article helped you achieve your goal and you want to say thanks, you can now support my work by buying me a coffee. I promise I won't spend it on beer instead... 😏