Want the latest version of Fritzing for free? This tutorial will teach you how to build the latest version of Fritzing from source code, which is still freely available from Github.
So what is building Fritzing from source anyway?
Fritzing used to be a free to download community driven project but at some stage they introduced an enforced donation for downloading the application.
However the source code still remains available to download at no cost, so we can use some freely available tools to turn the source code into a working application.
Fritzing can still be free!
*** ATTENTION WINDOWS USERS *** Please follow this NEW and UPDATED tutorial for building Fritzing on Windows 10/11.
Table of Contents
Prerequisite
Setting up the tools for building Fritzing can be a little bit challenging but we will walk through it step-by-step. Once you have completed the first build, you will be able to quickly build new versions in the future so it is worth spending the time.
In order to build Fritzing you are going to need the latest version of Qt Creator. You can download it for free using the online installer.
- Windows users choose MinGW or msvcXX OpenGL and the latest version of Visual Studio. The latter is recommended in the official build guide.
- Mac users choose clang 64-bit
Windows users will also need Visual Studio for building Fritzing.
Download source code and dependencies
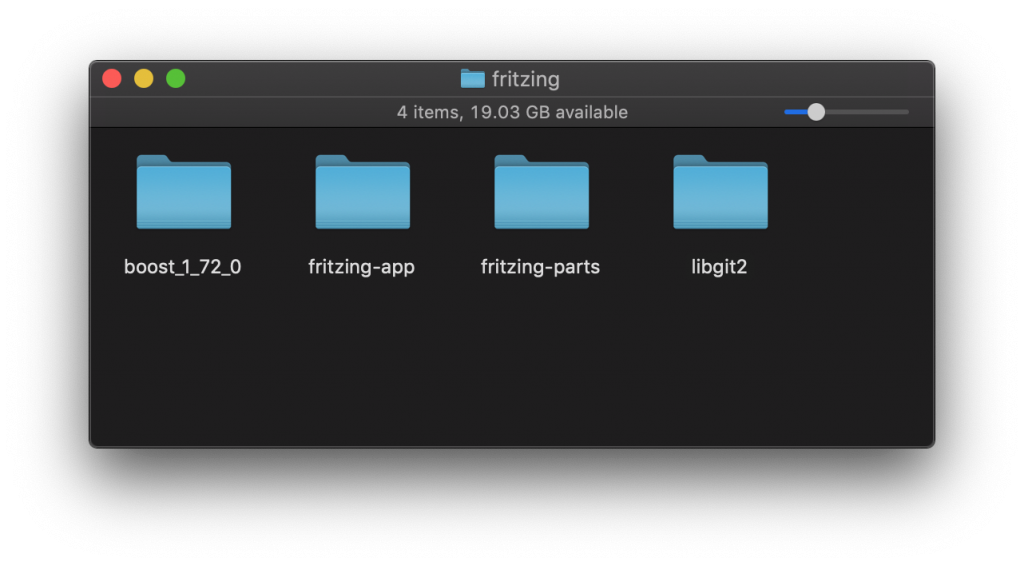
Whilst you download Qt Creator we can prepare the other required files. Go ahead and create a fresh directory called fritzing in a memorable location on your hard drive. I will be using Mac terminal, Windows users should use their native file structure (e.g. c:/fritzing)
mkdir ~/fritzing
cd ~/fritzing
Download Fritzing source
Now we need to download the Fritzing source code from Github. You can either download the .zip file from the Fritzing Github or use the command line with the git command if you have it installed.
Download the Fritzing app and extract it to your newly created Fritzing folder. Alternatively use the git command from within the fritzing folder.
git clone https://github.com/fritzing/fritzing-app
Download the Fritzing parts library and extract it to your newly created fritzing folder. Alternatively use the git command from within the fritzing folder.
git clone https://github.com/fritzing/fritzing-parts
If you go the route of downloading and extracting the .zip files, go ahead and rename the folders to fritzing-app and fritzing-parts.
Download dependencies
Now that we have the source code we need to download some additional dependencies.
Install Boost
Go ahead and download the latest version of Boost and extract it into your fritzing directory.
Mac users will probably want to download the .tar.gz version and Windows users will probably want to download the .zip version. However either will be ok so long as you have the tools to extract them.
Install cmake
Mac
If you don’t already have Homebrew installed, go ahead and open terminal and enter the following command.
/bin/bash -c "$(curl -fsSL https://raw.githubusercontent.com/Homebrew/install/master/install.sh)"
We can then use Homebrew install cmake with the following command.
brew install cmake
Windows
Windows users should download the precompiled binaries from the official website.
Install libgit2
Go ahead and download version 0.28.x of libgit2 from the Github releases page. Extract it into your fritzing directory and change the folder name to libgit2.
We will need to build libgit2 using cmake so go ahead and enter the following commands, substituting your chosen path for the fritzing folder.
cd ~/fritzing/libgit2
mkdir build
cd build
cmake -DBUILD_SHARED_LIBS=OFF ..
cmake --build .
Running Fritzing
Now that we have downloaded all of the dependencies, you should have a folder containing the following.
- fritzing-app directory
- fritzing-parts directory
- libgit2 directory
- boost_x_x_x directory
Setup Qt Creator
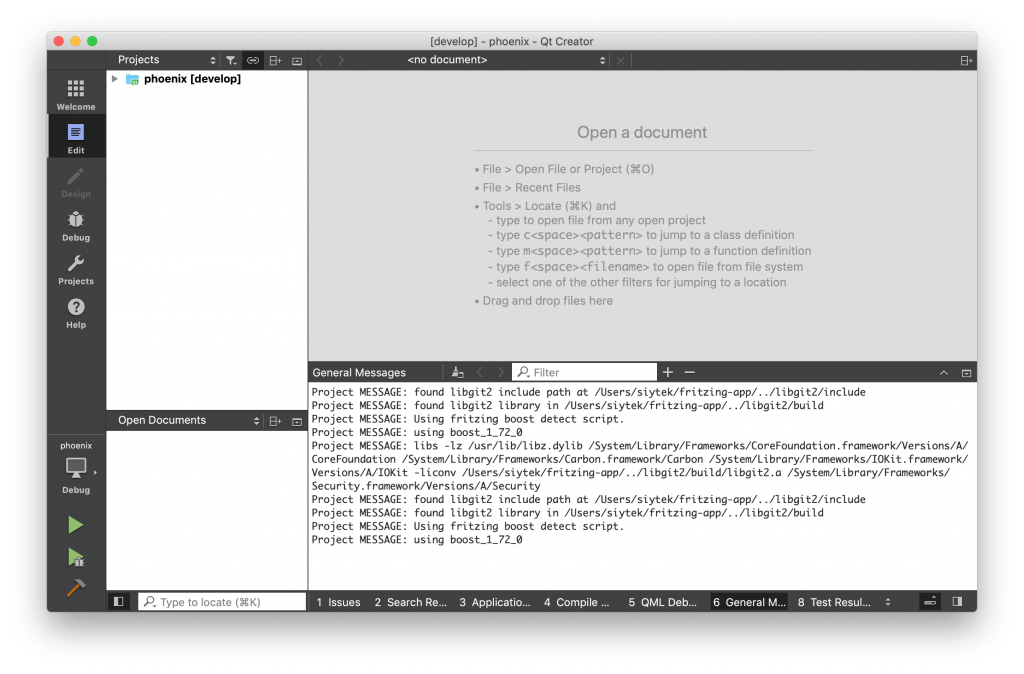
Once you have installed Qt Creator, go ahead and open fritzing-app/phoenix.pro located in the fritzing-app directory.
Open Fritzing in Qt Creator
This file will open in Qt Creator studio. If everything is configured correctly you should see some messages that state that libgit2 and boost have been found. Go ahead and click projects from the left-hand menu.
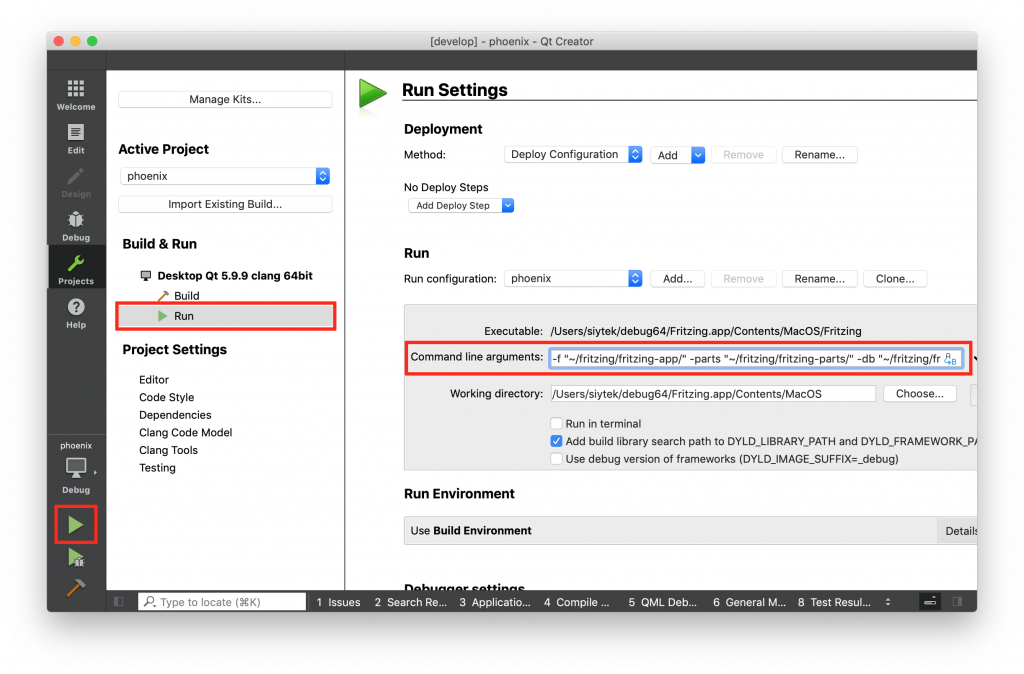
Add the first run command line argument
Next click run from the left-hand menu. We need to enter the following command line arguments, replacing the path for the path that you have chosen to locate the folders.
-f "/path/to/fritzing-app/" -parts "/path/to/fritzing-parts/" -db "/path/to/fritzing-parts/parts.db"
Once you have entered the command line argument go ahead and click the run button at the bottom of the left-hand menu. It will take a moment to build and then the Fritzing app should load for the first time. Awesome!
Add the subsequent command line argument
Once you are on the main Fritzing screen, go ahead and close the app. Then change the command line argument to the following.
-f "/path/to/fritzing-app/" -parts "/path/to/fritzing-parts/"
Qt Creator is now configured so you can go ahead and save the project. You can continue to use Fritzing via Qt Creator, however it is also possible to build an app.
Building Fritzing
Now we are ready to build a binary for Fritzing. This will give us a nice executable application that will run without the need for Qt Creator.
Build for Windows
*** ATTENTION WINDOWS USERS *** Please follow this NEW and UPDATED tutorial for building Fritzing on Windows 10/11.
Windows users will need to install Visual Studio in order to build Fritzing.
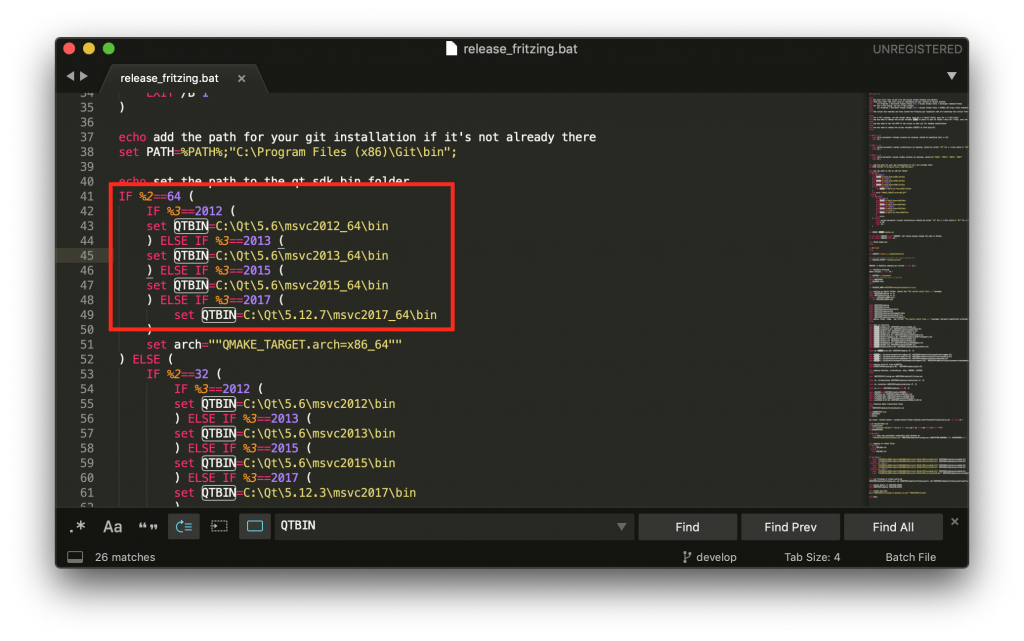
First we need to locate the file release_fritzing.bat stored in the fritzing-app/tools folder. Go ahead and open it your favorite text editor, Notepad will suffice if you don’t have a code editor.
You may or may not need to change the QTBIN directory for 64-bit builds. This directory should contain the qmake.exe file. If you edit the file path go ahead and save the file.
Next we need to open up a Visual Studio command prompt. This can be found on the Start menu under All Programs > Microsoft Visual Studio > Visual Studio Tools > Developer Command Prompt.
Simply drag and drop the release_fritzing.bat on to the command prompt and allow the compilation to occur, it may take a while. On completion you will have your very own completely free and fully functioning Fritzing program named fritzing.<version>.pc.zip and located in the releases folder. Awesome!
Build for Mac
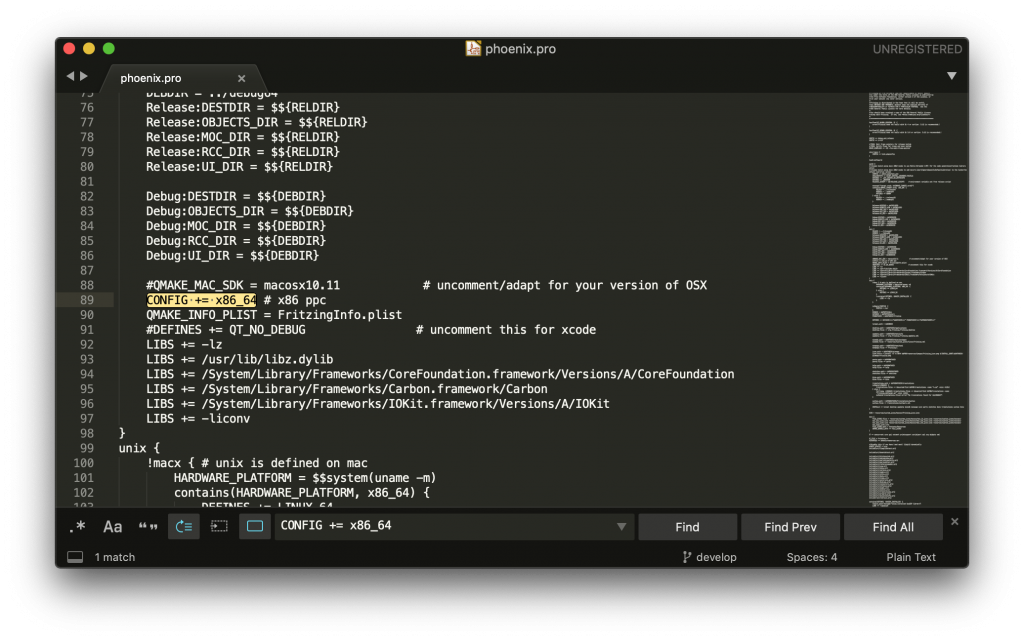
Go ahead and open fritzing-app/phoenix.pro with your favorite text editor. Locate the line CONFIG += x86_64 and make sure the x86 ppc is commented out (it should have a # symbol before it like in the screenshot). If you need to amend it go ahead and save it afterwards.
Next we need to check the path in the deploy_fritzing_mac.sh file located in fritzing-app/tools. Go ahead and open it in your favorite text editor and check that the QTBIN path contains the qmake file. Change the path if necessary and save the file.
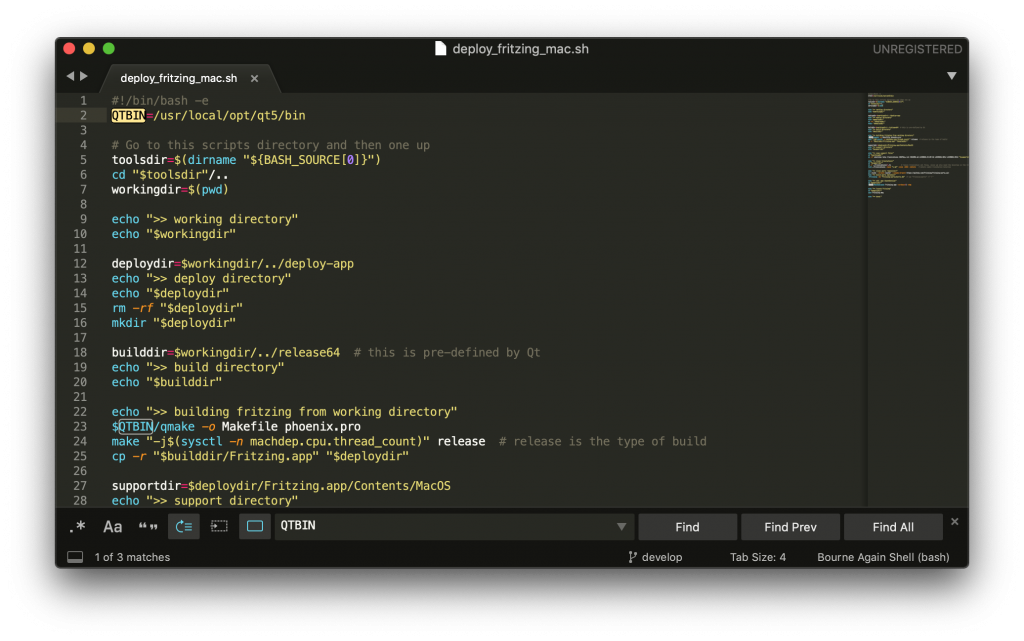
Now simply run the script to build Fritzing. You can do this from the terminal with the following command, using the path that you chose.
~/fritzing/fritzing-app/tools/deploy_fritzing_mac.sh
Once the script has finished building Fritzing, you should find the Fritzing app located in /fritzing/deploy-app. Awesome!
Conclusion
It takes a little work to setup the necessary tools for building Fritzing, however once you have successfully been able to build the app you will have your very own Fritzing binary, free to use forever!
If you ran into problems then it might be worth donating to the project as it is only a small amount that they ask for, and download the pre-compiled version.
Now that you have Fritzing installed, why not go check out some of my other awesome Arduino, ESP device or Raspberry Pi tutorials!
Thanks so much for visiting my site! If this article helped you achieve your goal and you want to say thanks, you can now support my work by buying me a coffee. I promise I won't spend it on beer instead... 😏


I have already endured the build procedure and want others to benefit from my effort, so I decided to provide my Windows build as a MSI installer. It is x64 binary of the Fritzing 0.9.4 (CD-498) source code linked against Qt 5.14.2, boost 1.73.0 and libgit2 v1.0.0 (the latest versions at the time of building). The installer can be retrieved from [link removed]. If you get an error when starting the program, don’t panic, you just need to install a VC-Redistributable: [link removed].
I don’t know whether this is illegal, but if somebody has reasonable complaints, this person can write me an email and I will remove the link.
I carefully tested the program, but I am not liable for any damage it might cause.
Hi Ben, many thanks for visiting and sharing your links. I understand this would be very helpful for people but didn’t want to take this chance myself, therefore I wrote the article about how to compile Fritzing rather than just providing an article with the download links.
I don’t want to link directly to file sharing sites containing the binaries due to the uncertainty and therefore I have removed your links. However please feel free to share a link to a forum or blog post containing your links if you have either available. Hope you understand and thanks again for visiting! 🙂
Yes please, Ben. If you could share any more details of your experience of building (fritzing) for Windows actually on Windows, it would be greatly appreciated, especially for anyone like myself who is stuck at the “If everything is configured correctly” stage of Sitek’s instructions.
it’s not illegal. Fritzing was begun as an open source project, and it’s using open source libraries. Whoever runs the fritzing download page does not own copyright to all those open source libraries. (see all those dependencies … none of those are owned by Fritzing but they are all inside of the Fritzing binary when downloaded)
all they are doing is obfuscating access to a binary build and since people are actually wondering if this is legal, they are also, whether they intend to or not, obfuscating their ownership of the code.
its kind of a unique thing they are doing, a lot of projects like Ubuntu will suggest a donation and pre-fill an amount of like 5 bucks in their download , where you can just type 0. I do not recall seeing an open source project that requires a donation for binary download. Ubuntu does not own the vast majority of code in an ubuntu distribution. Its open source.
anyone can build it and anyone can host a binary. thats the entire point of an open source license.
Hello sir. I am badly in need of your build version of fritzing for my capstone project. Please send me a copy or the link if available. Thank you so much.
Great write up. Thank you!
Thanks for visiting! 🙂
Thanks a lot for this very clear and well written guideline!
A small hint/(addition for all Mac users who may run into linker errors (undefined symbols) when building Fritzing with Qt Creator, since this took quite some time to figure out:
If you use Macports and/or Homebrew as package manager(s), you may have libiconv installed via the package manager. However, macOS ships with libiconv in /usr/lib/ by default. When building libgit2, make sure that you link against the default version in /usr/lib/ and not the one installed by your package manager, because Qt Creator will be linking against the system default libiconv and not the custom installed one. Otherwise you will run into undefined symbol linker errors.
Happy building!
Alexander R.
Thanks so much Alexander, glad you figured it out! Do you mind if I quote this in the article?
I tried this for over 12 hours. I would spend 2+ hours trying to fix one problem, only to have another occur immediately afterwards. Each and every problem I ran into took hours to fix.
Issue 1: Qt was looking for a build64 folder in libgit2. So I mmkdir build64 instead of build.
Issue 2: Qt was looking for a Release folder but the current version of libgit2 forces Debug version. Every time I looked for answers on this, I just kept getting told to use -DCMAKE_BUILD_TYPE=Release but cmake was stubbornly refusing to even acknowledge the option had even been entered. It took me 4 hours to find someone to finally stated that you have to add –config Release to the build command. So, with I thought I was finally going to build as pheonix.pro loaded without errors.
Issue 3: Once I added the command line arguments, I thought it would be done but nope. 463 errors all complaining about unresolved external symbols and from what little information I could find about this error, it was going to take a few more hours to fix.
At this point, I am done and have decided I should have just went ahead and purchased the pre-built one. I decided to do this because I have a lot experience with make on linux so had figured it would be no trouble at all. Heck, the only reason I am even trying to do this at all is because I have 0.9.3 of fritzing but it doesn’t seem to have auto-routing at all…no button and the ‘do not autoroute’ is checked and grayed out, so I was hoping the newest version will have all of the features.
Hi Lapis, thanks for visiting and for taking the time to post a detailed comment. I am sorry to hear of your struggles with this. May I ask what system you tried to build on? I built this several times with a fresh installation of Qt on Mac OS X with no issues using the method described. Admittedly I don’t really use Windows and I didn’t try building on Windows 10 before. If you had problems with Windows then perhaps I need to do a seperate tutorial for it. Thanks 🙂
I run into the exact same issues on Win10.
I guess I’m spoiled by how easy it is to compile/build on Linux, what a mess on Windows!
Currently stuck with 460 errors in Qt.
I’m sure they made it intentionally hard for people to compile this, so that they can earn money on opensource software 🙂
It is always hard to compile source code, not to mention software that relies on several other libraries and binaries.
I believe they need to earn money to maintain the project somehow, since Fritzing became a widely used application because it’s an advanced tool that gives a lot of features for one of the most used development boards in the world 🙂 , many open source projects have died or suffer delays between releases because they don’t receive enough support :/.
The request in their page looks to me like a statement saying “We are working on low budget and need your help now!”
F
Pingback: PComp Project 1: color wave – Esther Zhang
“If everything is configured correctly you should see some messages that state that libgit2 and boost have been found.”
Famous last words just thrown out there. Of course this is where I had to stop because as usual it was NOT configured correctly and you gave no more information as to what to do then.
So it is back to KiCad.
Hi Eric, thanks for your comment and sorry you ran into some trouble. Unfortunately I cannot help you unless you provide some useful information, such as the details of the errors that you encountered…
theres no db file in the fritzing parts am i doing anything wrong?
Do I really need Qt Creator? Can’t I just use CMake directly? I don’t want to install extra software for this when I should have all the tooling I need already.
The process is based upon the official process documented by Fritzing. You can follow their process instead, but it comes without many of the details in my article. If you do manage to build it with CMake directly, I would be very interested to know!