So you want to know how to flash Tasmota quickly and easily? Introducing the only post you will ever need!
In this article you will find 6 great ways to flash Tasmota, plus one additional and exclusive tool for Mac users! (Don’t worry Windows users, this tool is available for you too!)
Whether you are Mac, Linux or Windows based, there is a step-by-step process here to cover every circumstance, which will make flashing your device easy.
The best method to choose will also depend on what hardware you are trying to flash:
- Flashing Tasmota Online using Chrome Browser
- Flashing Tasmota using Raspberry Pi
- Flashing Tasmota using Mac/Linux Terminal
- Flash Tasmota using an Arduino board
- Flash Tasmota over the air using Raspberry Pi
- Flash Tasmota over the air using Linux
- An Easy Way to Flash Tasmota: Tasmotizer
- BONUS: Tasmotizer on Mac WITHOUT using the Terminal
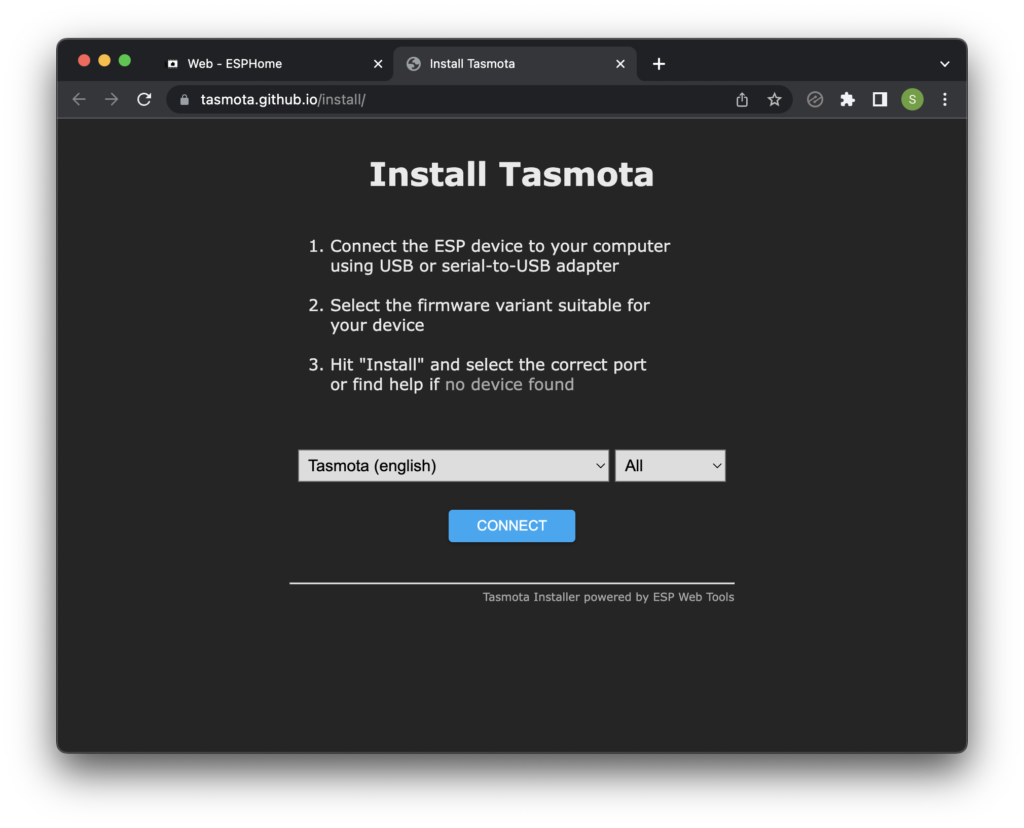
Flashing Tasmota Online using Chrome Browser
A bunch of super-smart folks have developed a serial API for Chrome browser, but what does that mean?
It means that many people are switching to online firmware updates using chrome browser. It is now possible to flash Tasmota directly from your browser!
If you are using Chrome browser then this is by far the easiest way to flash Tasmota. Just follow the link to the online flasher: https://tasmota.github.io/install/
The only caveat is that it only works with Chrome browser, so if you are not using it then go ahead and download it here.
Flashing Tasmota using Raspberry Pi
If you are using Raspberry Pi and you want to flash devices over a wired connection then definitely check out How To Flash ESP Devices With Tasmota Using Raspberry Pi! This tutorial will also be interest to anyone who is trying to flash the MagicHome hardware as this is what is used in the example.
The reason the Raspberry Pi is an awesome choice for flashing Tasmota using a wired connection is that it has a built in serial port that can be accessed with the GPIO header.
You don’t need any additional hardware such as a USB-to-serial board when using a Pi. In this tutorial you will learn exactly how to make a cable to connect your Pi to the ESP device, as well as all of the steps necessary to flash the device.
Flashing Tasmota using Mac/Linux Terminal
If you are a Mac/Linux terminal ninja or if you just have a desire to feel like a hacker then the How To Flash Tasmota With Mac/Linux Terminal guide is for you!
In this tutorial you will learn how to use the command line interface tool for flashing ESP devices, ESPTool. This will definitely be of interest to anyone running a headless machine or for someone who wants to control the flashing operation with an external program. Think batch flashing tools…
The ESP device used in the example is the Wemos D1 Mini, so this tutorial may also be of interest to anyone using this particular device. It also covers further information about setting up Tasmota and configuring MQTT.
Flash Tasmota using an Arduino board
So you don’t have a serial programmer to hand nor a Raspberry Pi? I was inspired to write the guide How To Flash Sonoff Tasmota With An Arduino Uno And ESPTool when I lost my USB-to-serial programmer and was already running Hass.io on my Raspberry Pi.
This guide will explain how to wire an Arduino board to an ESP board in order to flash it. You can use the USB-to-serial programmer that is built into the Arduino to flash the ESP device instead!
Burnt out your FTDI adapter? Dog ate your FTDI adapter? To cheapskate to buy an FTDI adapter? Cannot wait for Amazon to deliver a new FTDI adapter? This article has the answer!
Flash Tasmota over the air using Raspberry Pi
It is very hard to ignore those super-cheap Chinese products on Amazon. You can get a smart bulb for a fraction of the price of a branded product that is easily as good, if not better! The main problem is how do we get Tasmota onto the bulb if we cannot access the PCB to solder on the wires?
There is an amazing tool that solves this problem called Tuya Convert and in the article How To Use Tuya Convert On Raspberry Pi you can learn how to flash Tasmota to your Tuya devices over WiFi using the Linux operating system.
Seriously, is there anything that you can’t do with a Raspberry Pi?!
Flash Tasmota over the air using Linux
It is very hard to ignore those super-cheap Chinese products on Amazon. You can get a smart bulb for a fraction of the price of a branded product that is easily as good, if not better! The main problem is how do we get Tasmota onto the bulb if we cannot access the PCB to solder on the wires?
There is an amazing tool that solves this problem called Tuya Convert and in the article How To Easily Flash Tuya Devices Over The Air Using Linux you can learn how to flash Tasmota to your Tuya devices over WiFi using the Linux operating system. Awesome!

An Easy Way to Flash Tasmota: Tasmotizer
Flashing your ESP device with the command line is a great way to flash your device, but even the sight of a terminal window is enough to strike terror into the heart of even the most seasoned tech savvy individual.
Even if you a terminal ninja you may just prefer the convenience of a neat and tidy graphical tool to get the job done. Ladies and gentlemen I present to you, the Tasmotizer! By far the easiest way to flash Tasmota and available on all platforms.
If you want the complete walk-through or just want to grab the download link then go ahead check out How To Flash Tasmota The Easy Way: A Guide To The Tasmotizer!

BONUS: Tasmotizer on Mac WITHOUT using the Terminal
If you check out my Tasmotizer guide you will quickly learn that there is an executable version available for Windows. However if you are using Mac then you still need to install and run it using terminal.
This almost defeats the purpose! Tasmotizer is the easy solution meant to bypass the terminal method, otherwise why not just use ESPTool?
I thought that I must fix this, so I compiled and built a .dmg file for Mac users, so now I can present to you the guide How To Run Tasmotizer On Mac Without Terminal including a download link to my Tasmotizer binary for Mac!

Thanks so much for visiting my site! If this article helped you achieve your goal and you want to say thanks, you can now support my work by buying me a coffee. I promise I won't spend it on beer instead... 😏