If you a new to Home Assistant it can be quite difficult to overcome the initial learning curve, however once you get to grips with the basics it is really quite simple, whilst being a very powerful tool.
The Home Assistant developers have been making it progressively easier and more user friendly, however at the time of writing it is not yet possible to configure everything in the GUI. You will need to use at least a little YAML.
It is now possible to create automations, scenes and scripts using the graphical user interface. However in order to use these tools you will still need an understanding of the various states, entities and services within Home Assistant.
In this tutorial we will take a look at the graphical user interface for creating our automations. Then we will then take a look at the YAML version of the automation.
Prerequisite
You will first need to have Home Assistant installed on your prefered hardware. If you have not yet installed Home Assistant, I would recommend checking out this article first.
If you wish to have a go at making automations with YAML, you will also need to have the file editor installed. Check out this article if you need to install the File Editor, it is really easy to install and only takes a few minutes.
You will also need some examples of the following devices set up in Home Assistant:
- 1 x Light entity
- 1 x Switch Entity
- 1 x Temperature Sensor Entity
If you don’t have all of these available, you could also consider using virtual components instead.
What Are Home Assistant Entities?
In order to create automations in Home Assistant, it is good to have a grasp of some of the basics. First, let’s take a brief look at what a Home Assistant entity is.
An entity is the terminology used to describe an object within Home Assistant. Entities are grouped by their type, for example all lights are grouped into the light entity category and switches are grouped into the switch entity category.
Each entity has a name that Home Assistant uses for reference, called the entity_id.
Home Assistant also allows us to assign a friendly name to objects, which is a more human readable reference for the particular entity. The friendly name serves as a reference for us humans, but is not used by the Home Assistant programming.
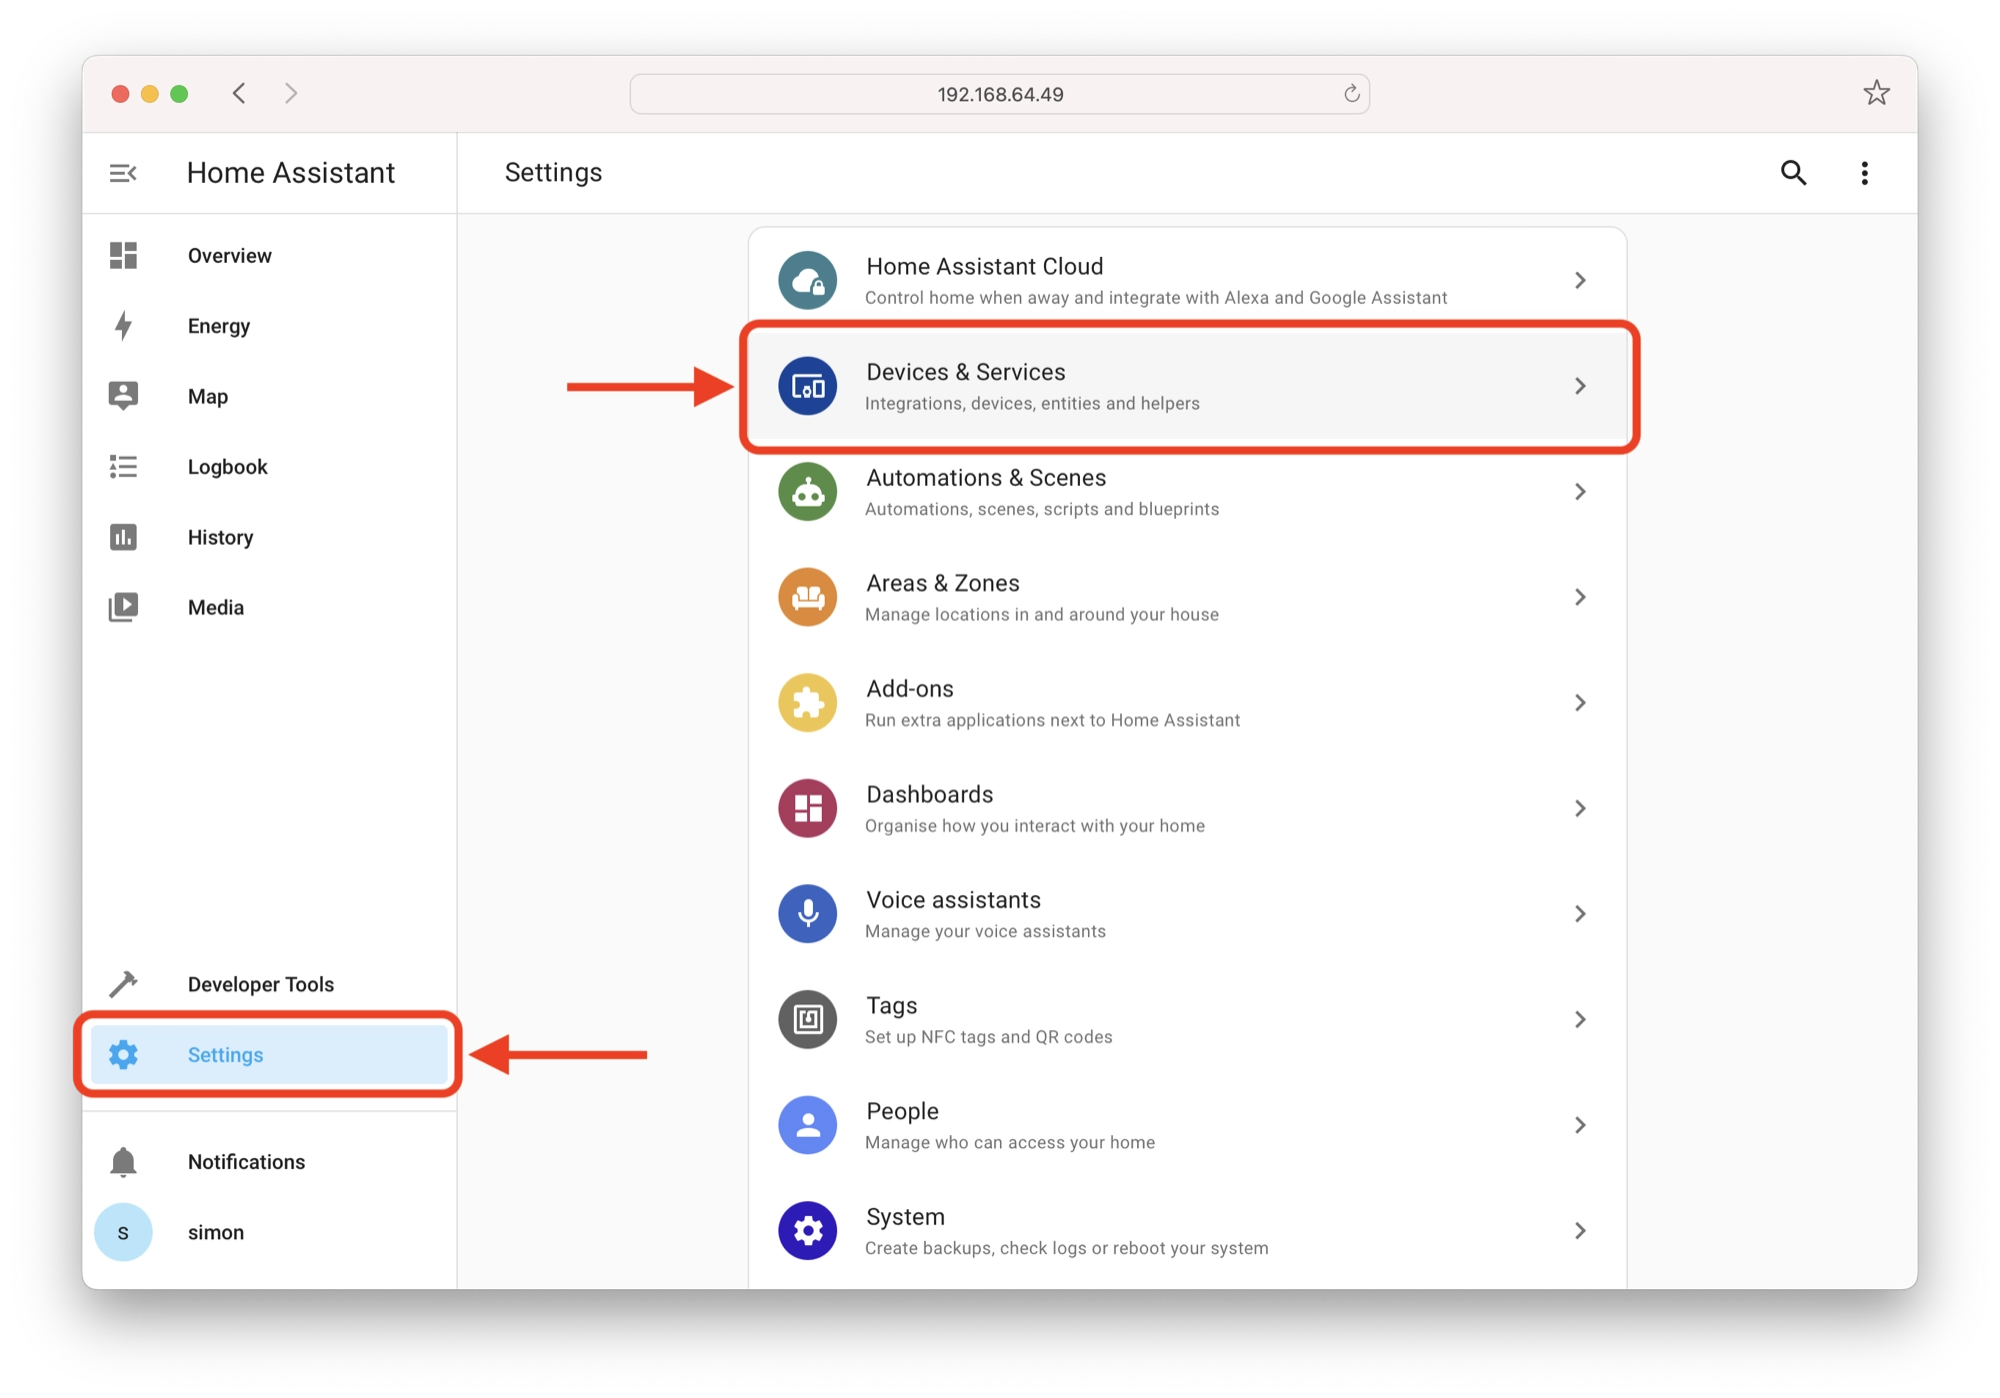
If you are working in the user interface (UI), you can change various aspects of entities, such as the friendly name. To access these attributes from the UI, first click Settings > Devices & Services.
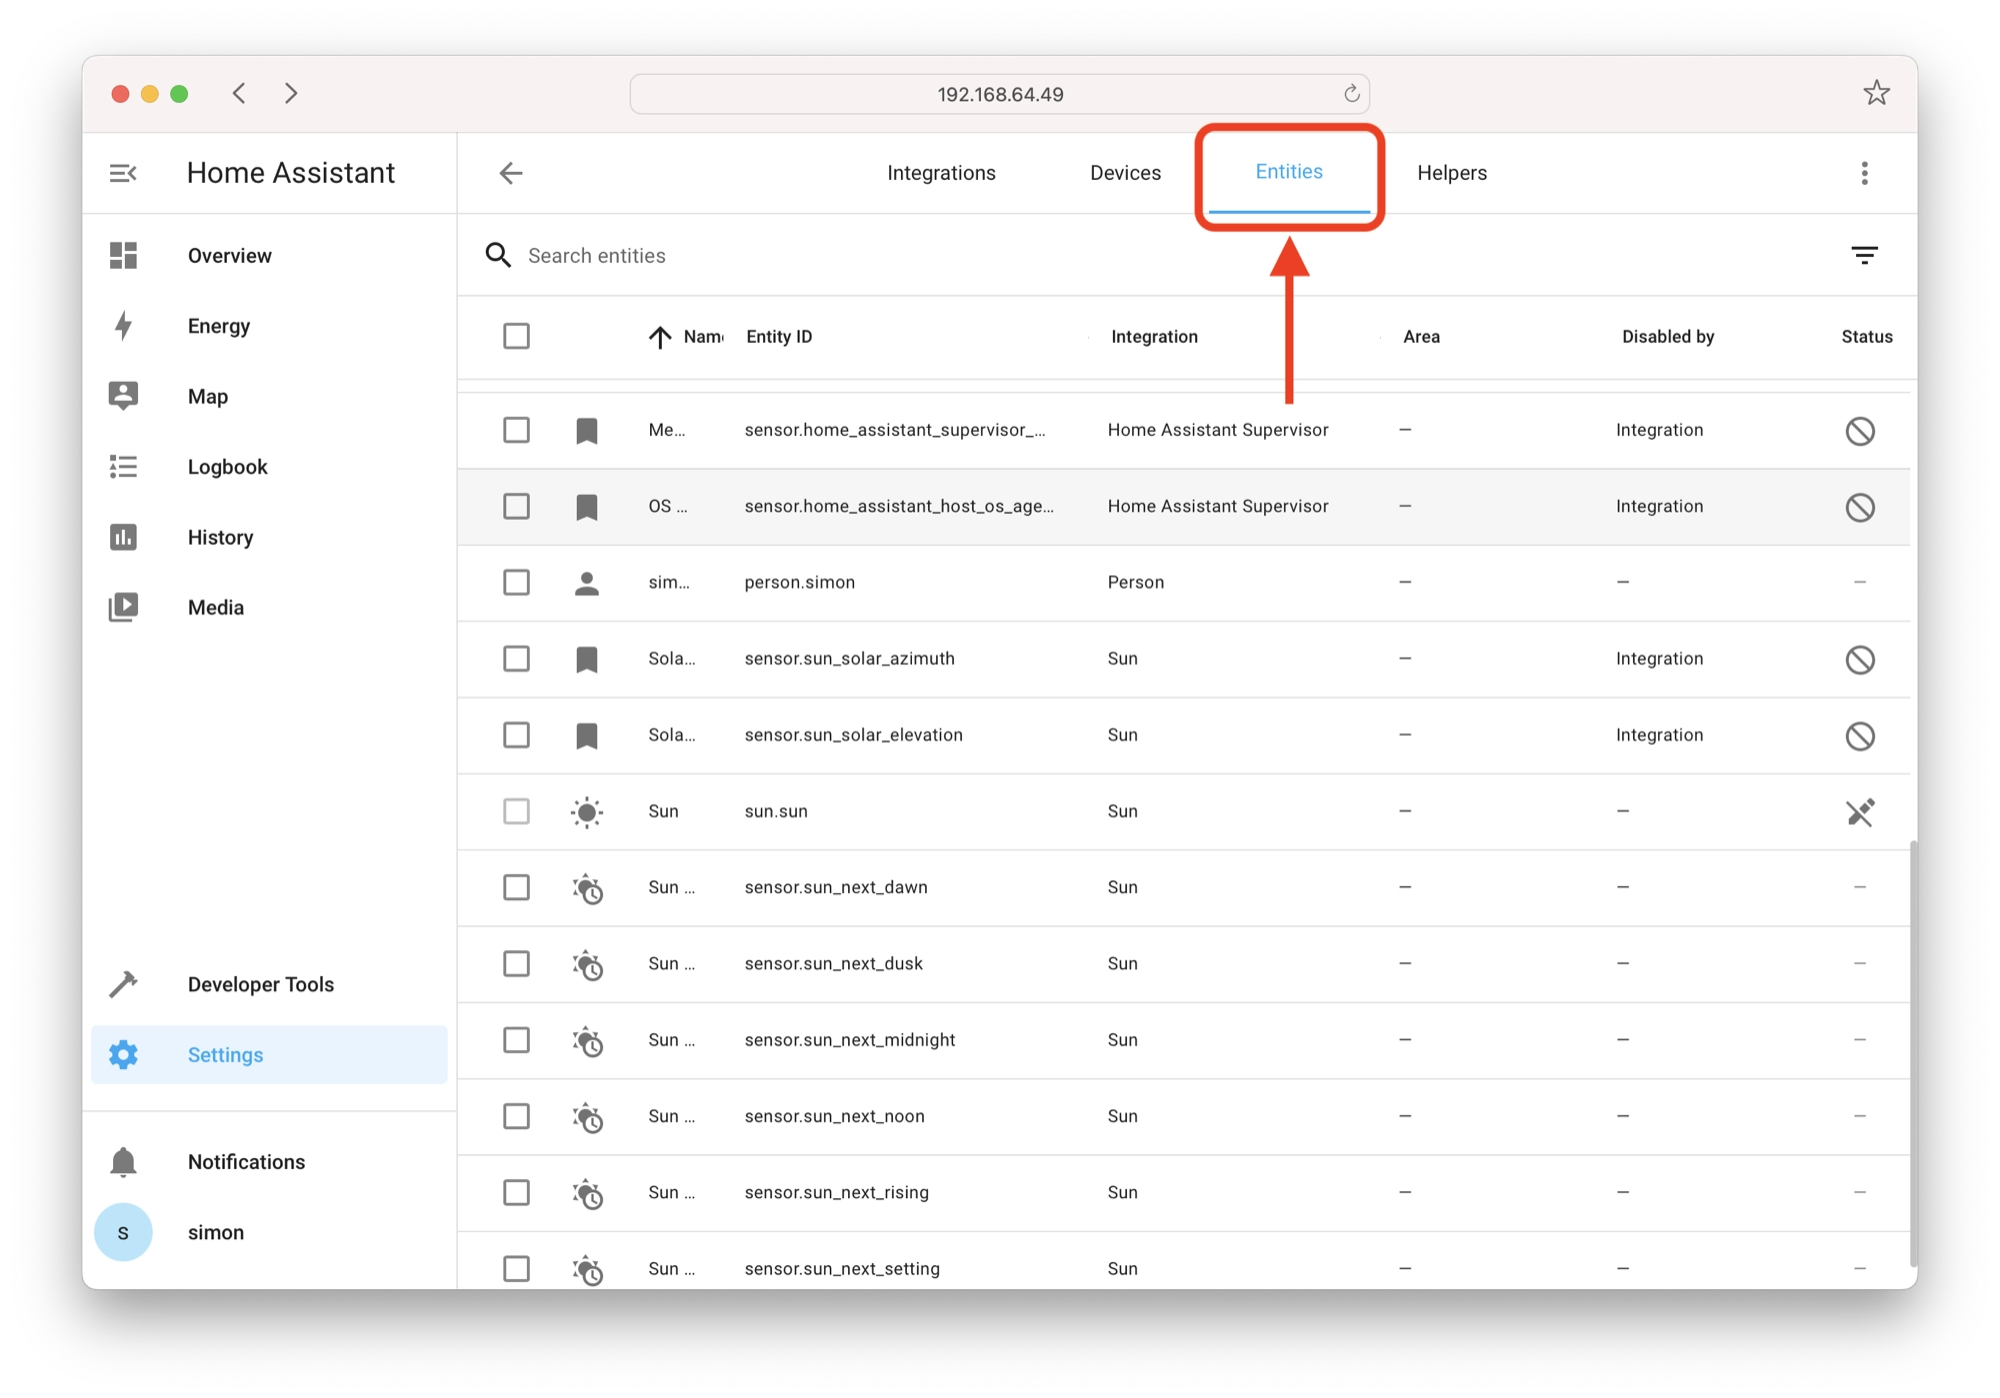
Next, click the entities tab to display the entities on your system. You can use the search and filter function to locate specific entities within the list.
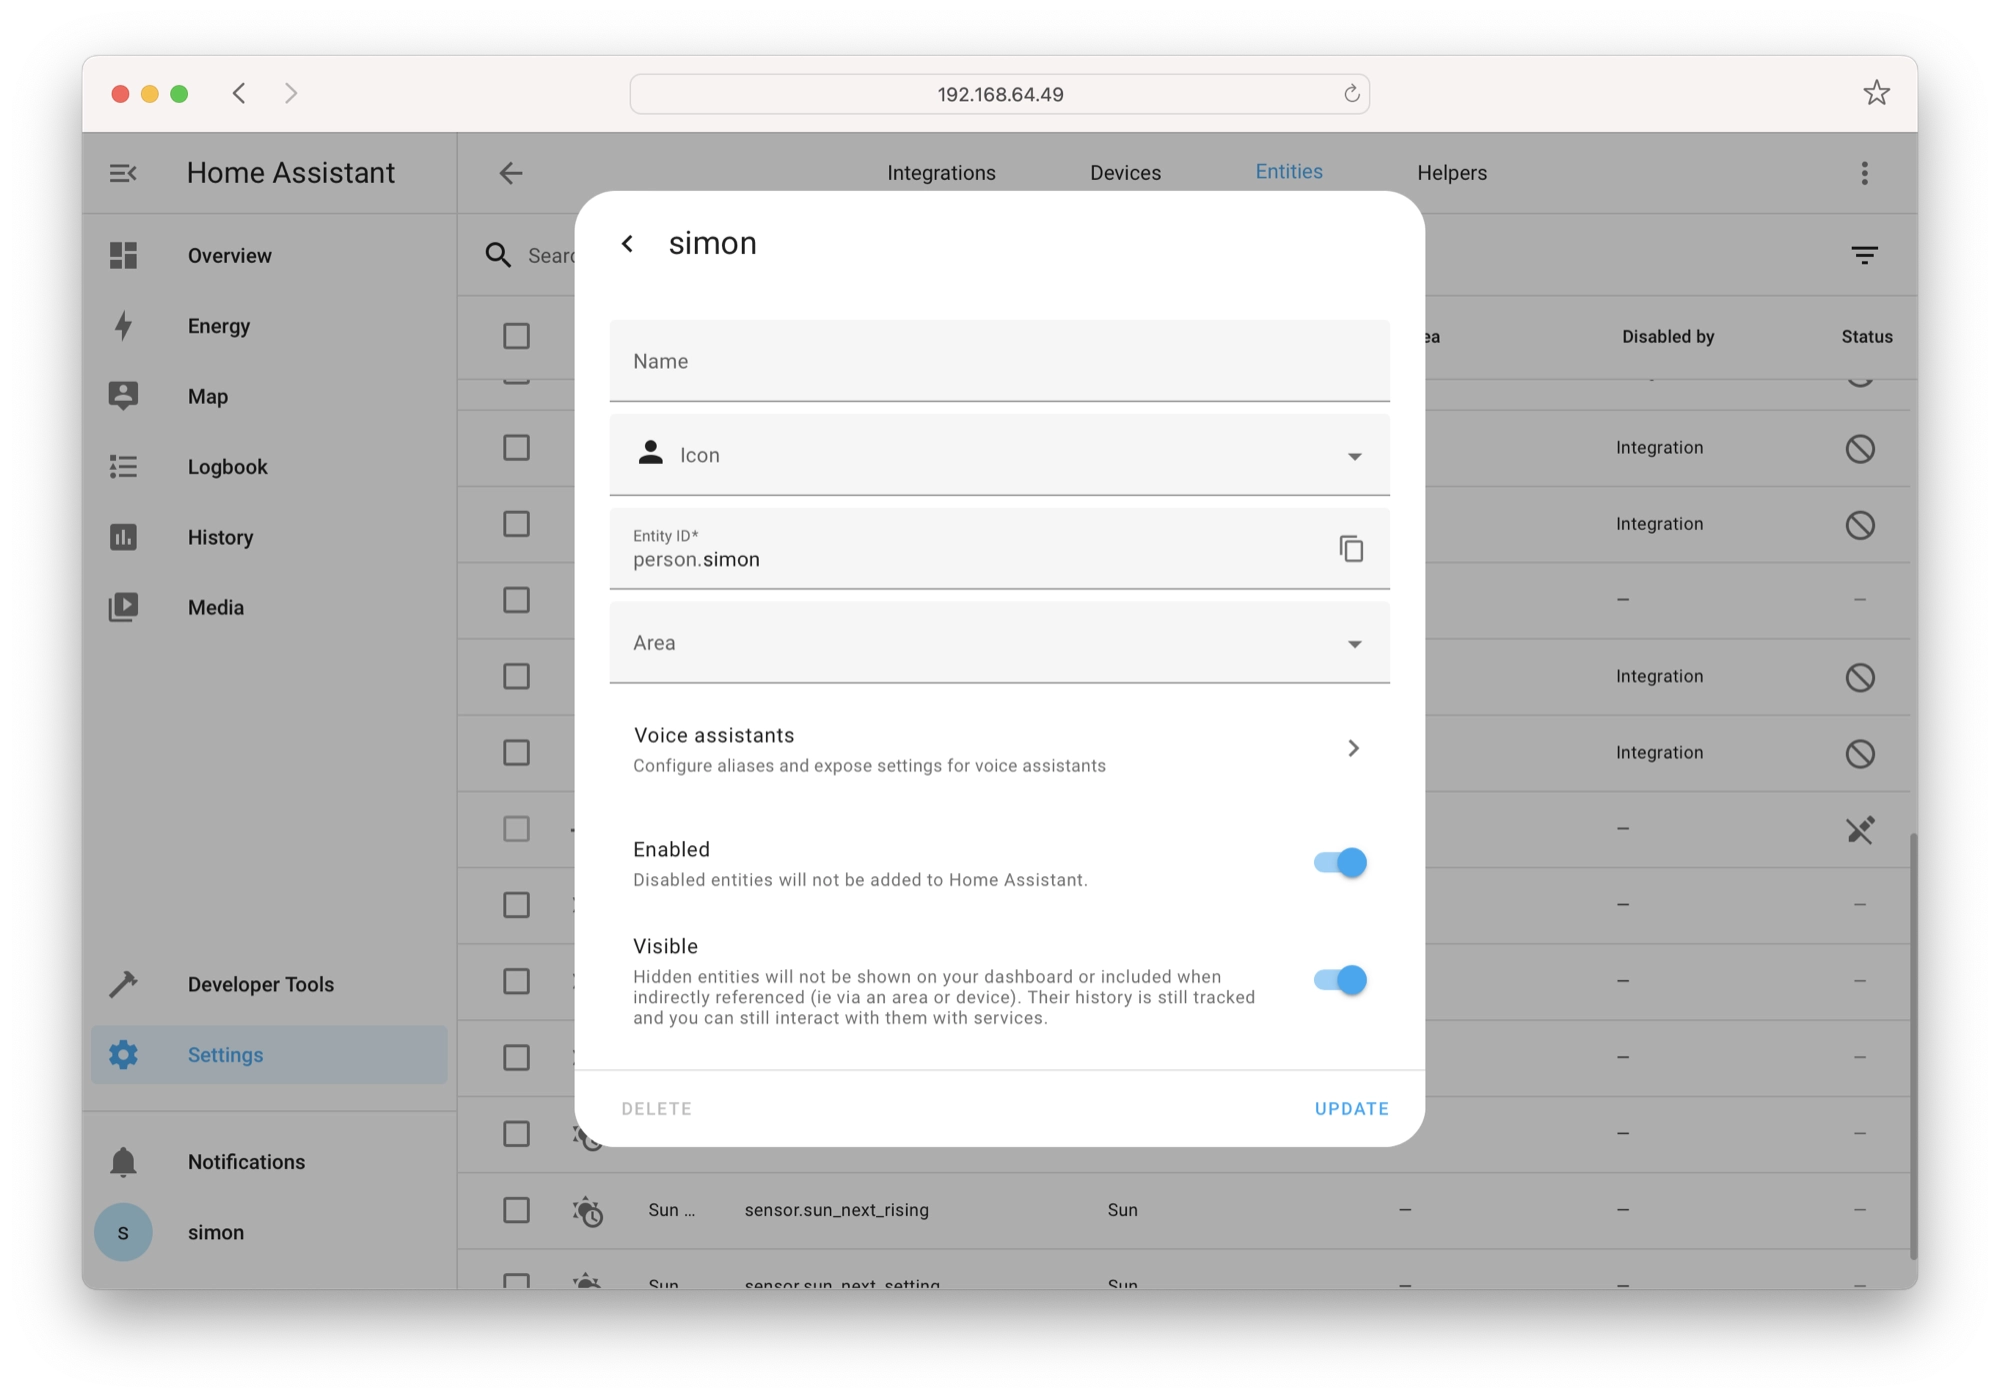
Click the entity that you wish to edit and then click the gear icon at the top of the popup. This will display the attributes that can be edited for the selected entity. You can save any changes by pressing the Update button.
When we want to reference an entity in Home Assistant we use the following syntax:
entity.entity_id
For example, I have a lamp in the corner of my room that I refer to as treelamp and it is part of the light entities in my Home Assistant configuration. Therefore in YAML I refer to this entity as follows:
light.treelamp
I can also give this entity the friendly name “Tree Lamp” so that my configuration is neater and easier to read.

The same method would be used to reference a switch. Here is another entity from my Home Assistant setup, a smart plug that I use to control the kettle.
switch.kettle
Now that we understand how to reference entities in Home Assistant we can take a look at creating our first automation!
What is a Home Assistant Automation?
Automation is a powerful feature of Home Assistant, which allows us to tie entities together and create events that occur automatically.
An example would be that we can get our lamp to automatically turn on and off when we switch the main light in the room on and off. Another example could be that we get the kettle to switch on when we get out of bed.
An instance of automation consists of three primary elements, the trigger, the conditions and the action.
What is an Automation Trigger?
The trigger is the event in Home Assistant that causes the automation to fire. You can see a full list of the different triggers available on the Home Assistant website.
There are many examples of something that could be a trigger, examples include an entity turning on, a person returning home or the sun rising.
What is an Automation Condition?
The conditions are a series of rules that define whether or not an automation should occur when fired. A condition could prevent an automation from running over the weekend or only turn on a light after sunset.
For further information you can read about all of the different conditions on the Home Assistant website.
What is an Automation Action?
The action is quite simply the action that will occur when the automation fires. The action could be something like a light turning on, a door locking or script firing.
How to Create Home Assistant Automations Using the GUI Editor
The quickest and easiest way to create automations in Home Assistant is to use the graphical user interface (GUI) automation editor.
The GUI automation editor allows us to build and manage all aspects of automation in Home Assistant and has become sophisticated enough that in most cases, it is no longer necessary to use YAML.
Automations created with the editor are saved in a file called automations.yaml and in order for these automations to be loaded, the configuration.yaml file must be pointing to this file.
Home Assistant points to automations.yaml by default, so in most cases you shouldn’t need to change anything and you can begin creating automations right away.
However if your automations are failing to appear in Home Assistant, you should first check that the automations.yaml file is referenced correctly, see this section for further information.
Creating a Simple Automation
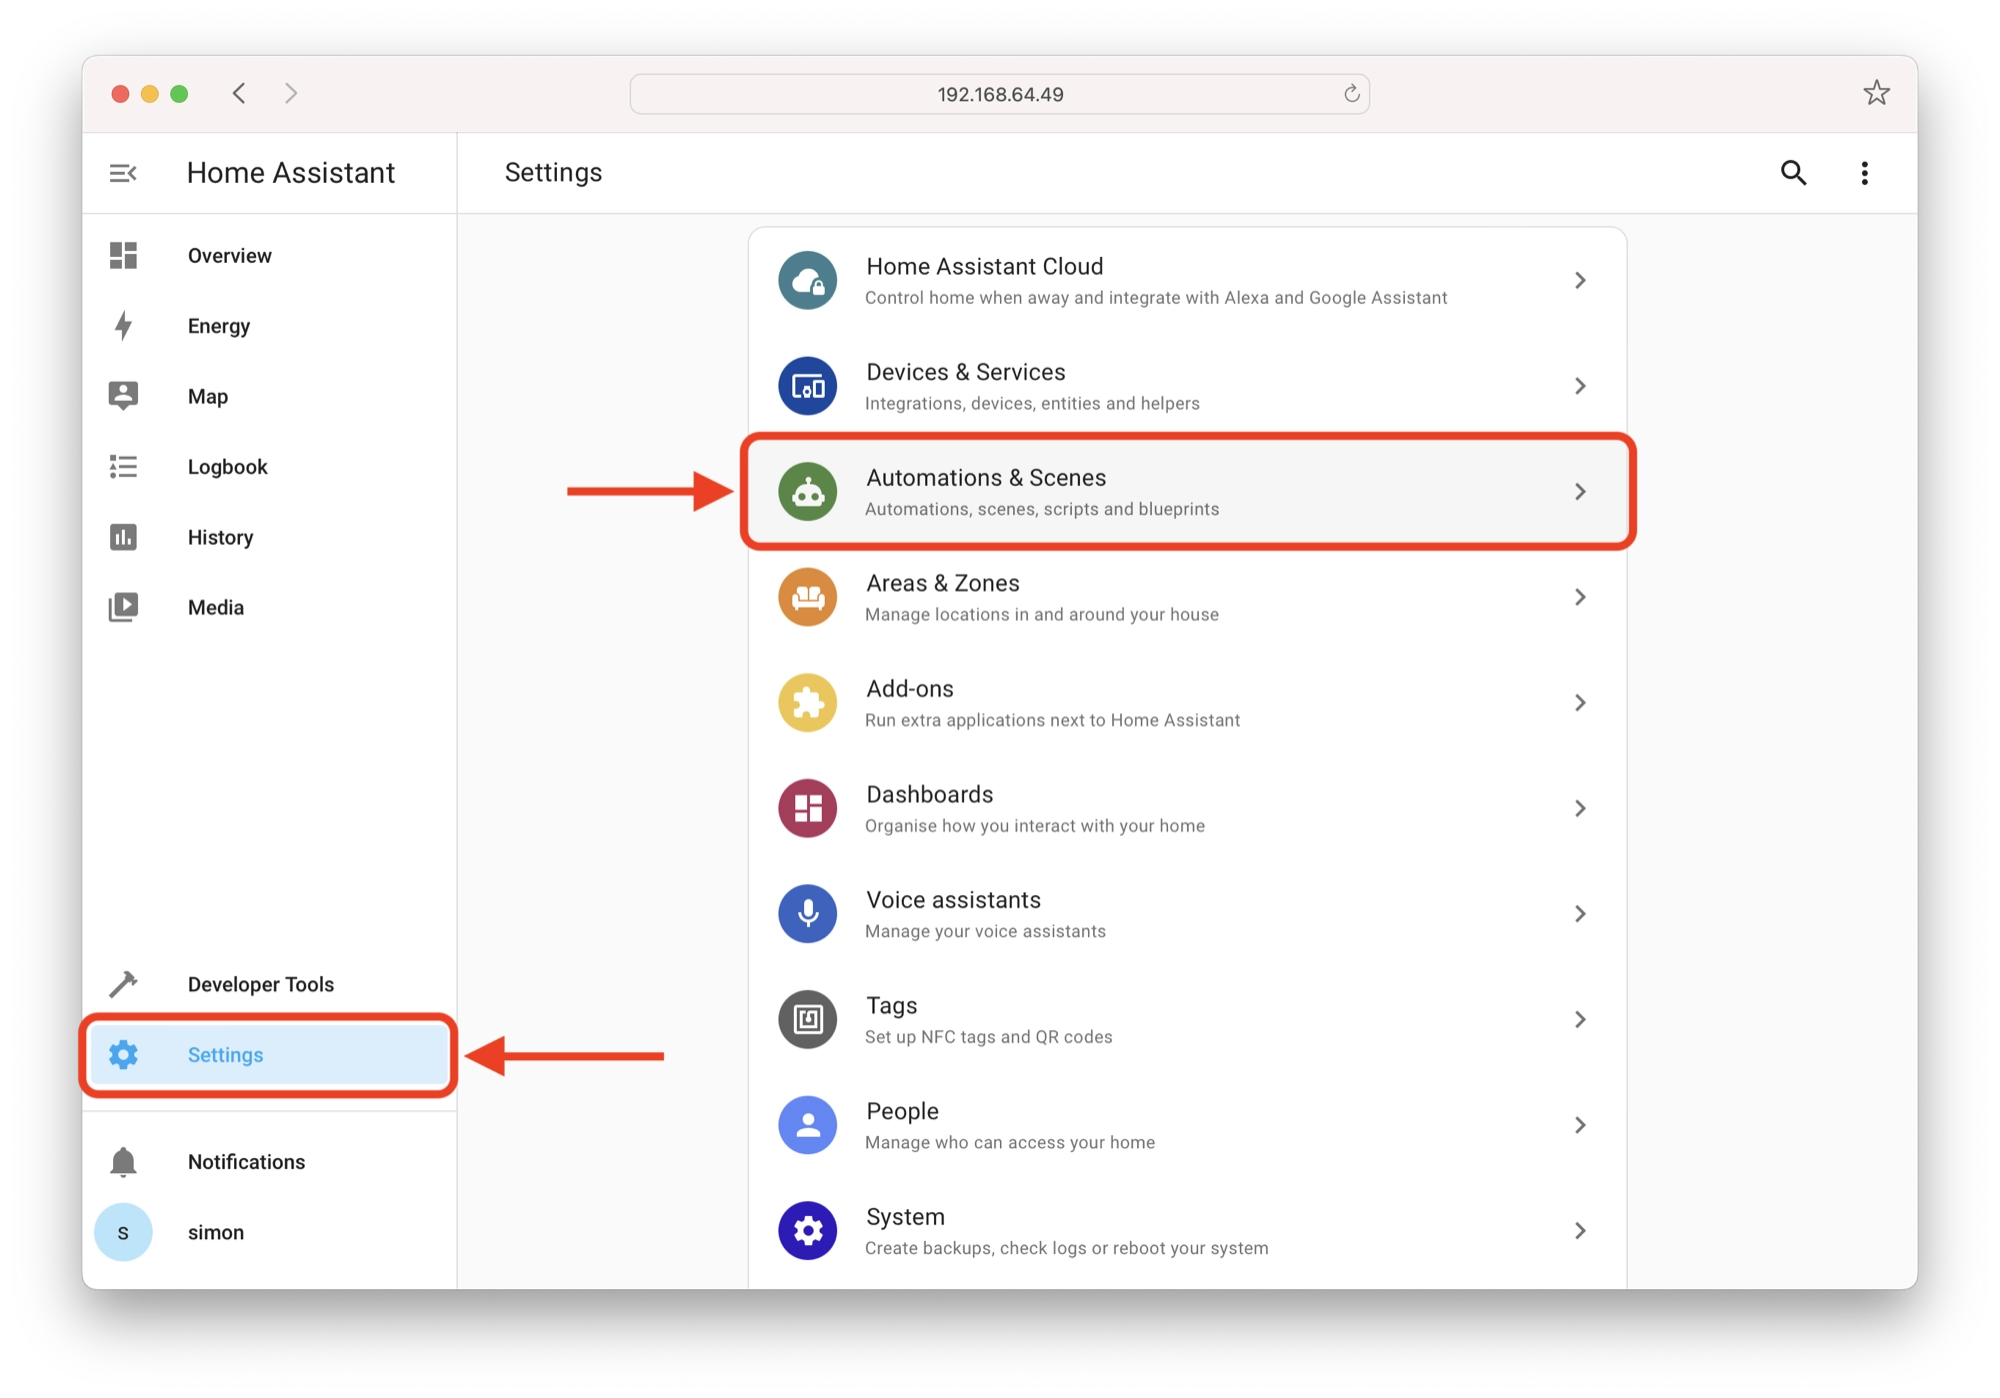
Let’s take a look at how to create a simple automation using the Home Assistant GUI automation editor. In order to create a new automation, first click Settings > Automations & Scenes.
Next, ensure that you have the Automations tab selected. Here you can find all of the automations on your Home Assistant system.
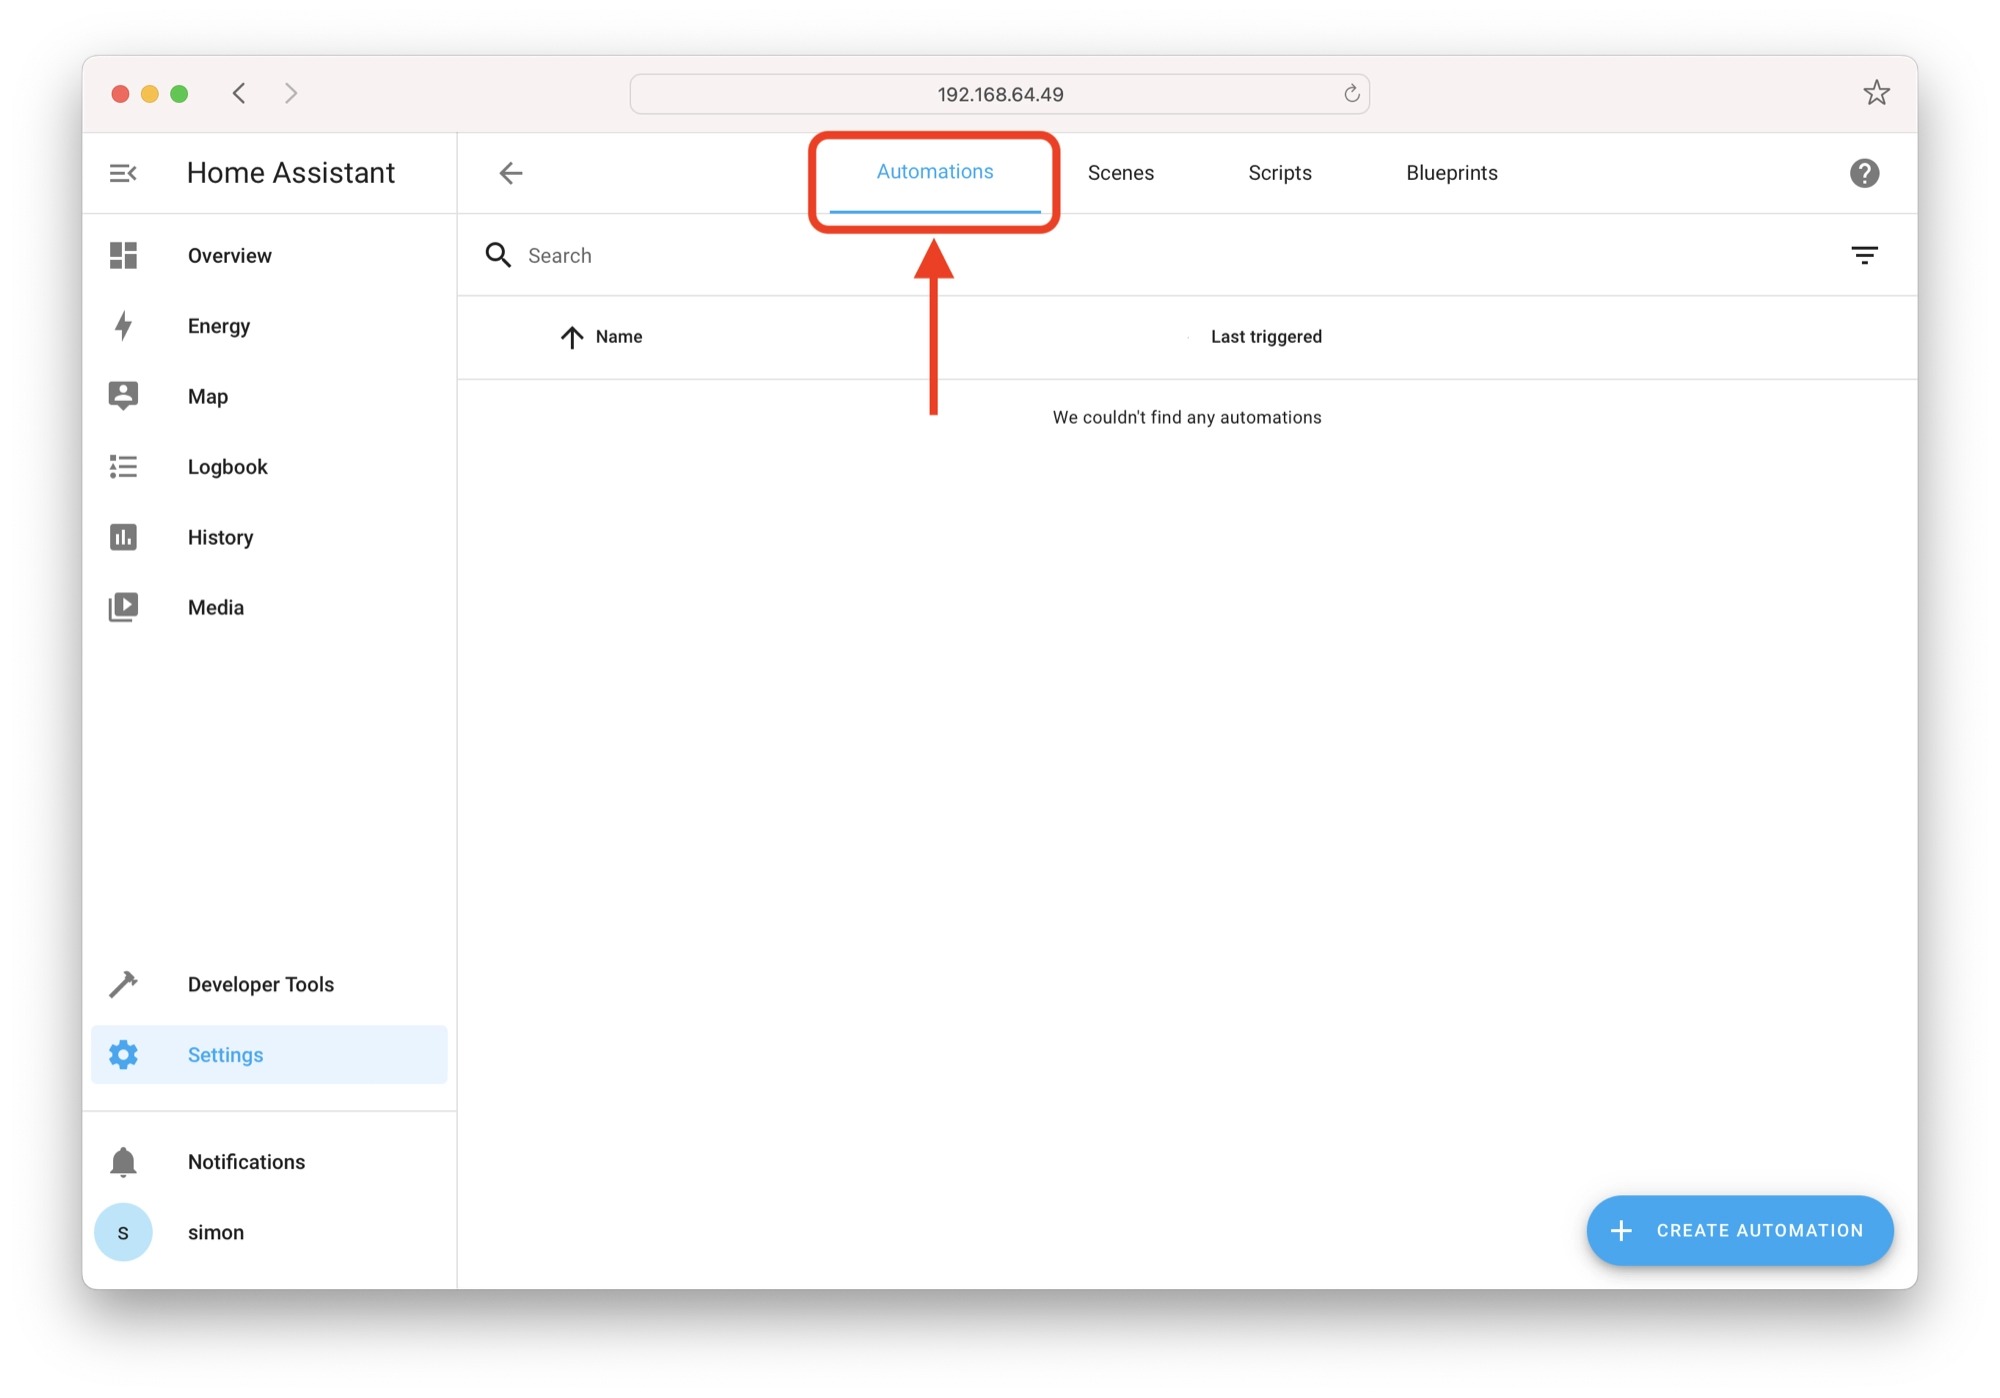
You may find that this list can build up fairly quickly! At this stage it becomes useful to use the search and filter tools at the top of the page, in order to find the correct automation.
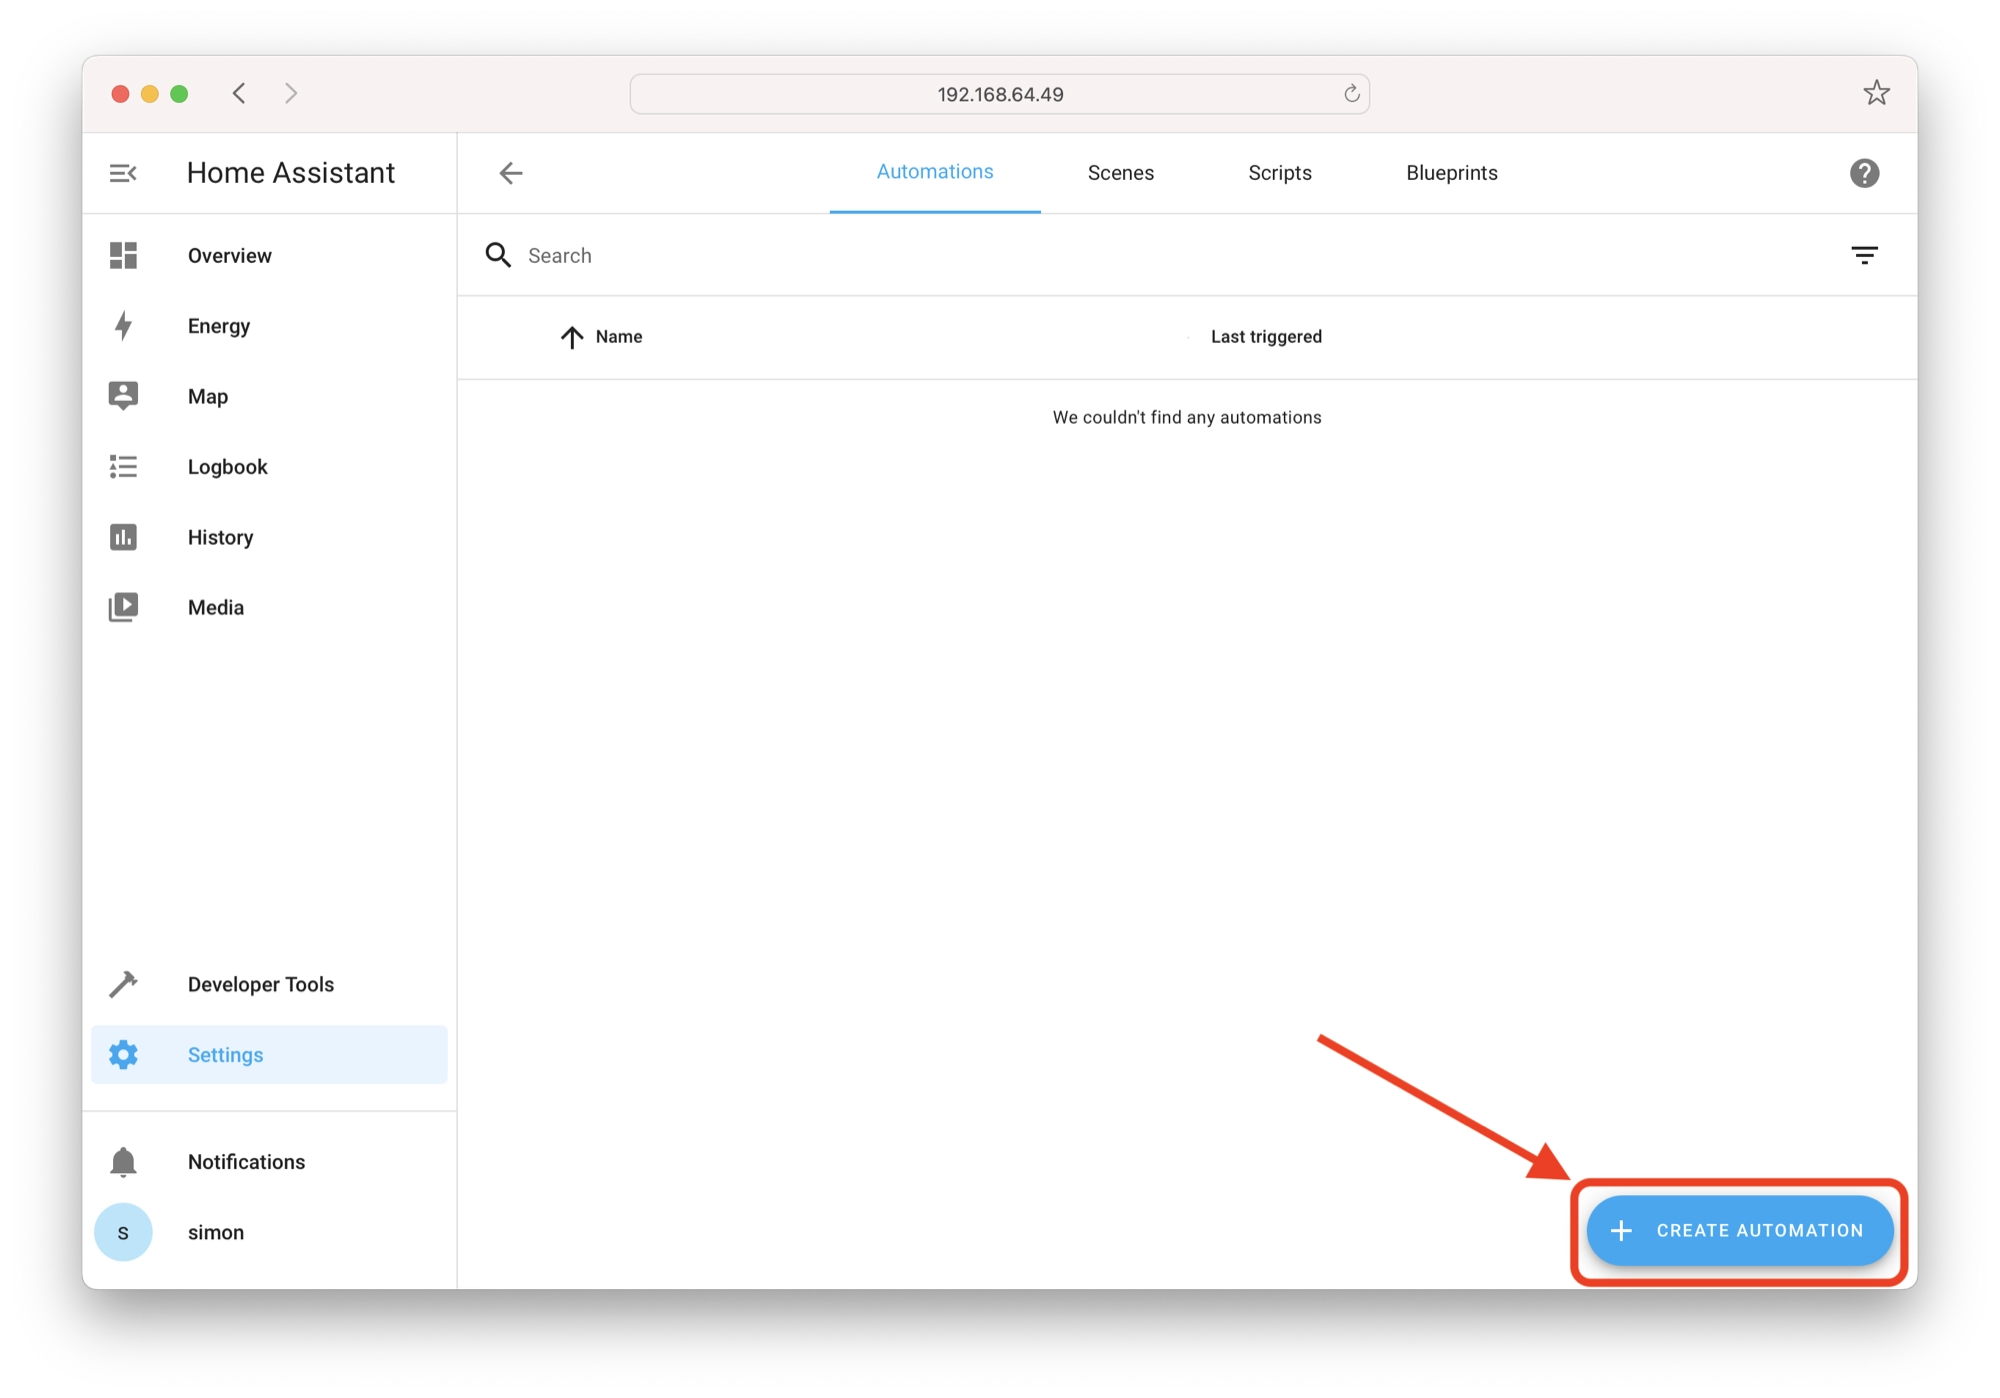
In order to add a new automation, click the Create Automation button at the bottom of the page.
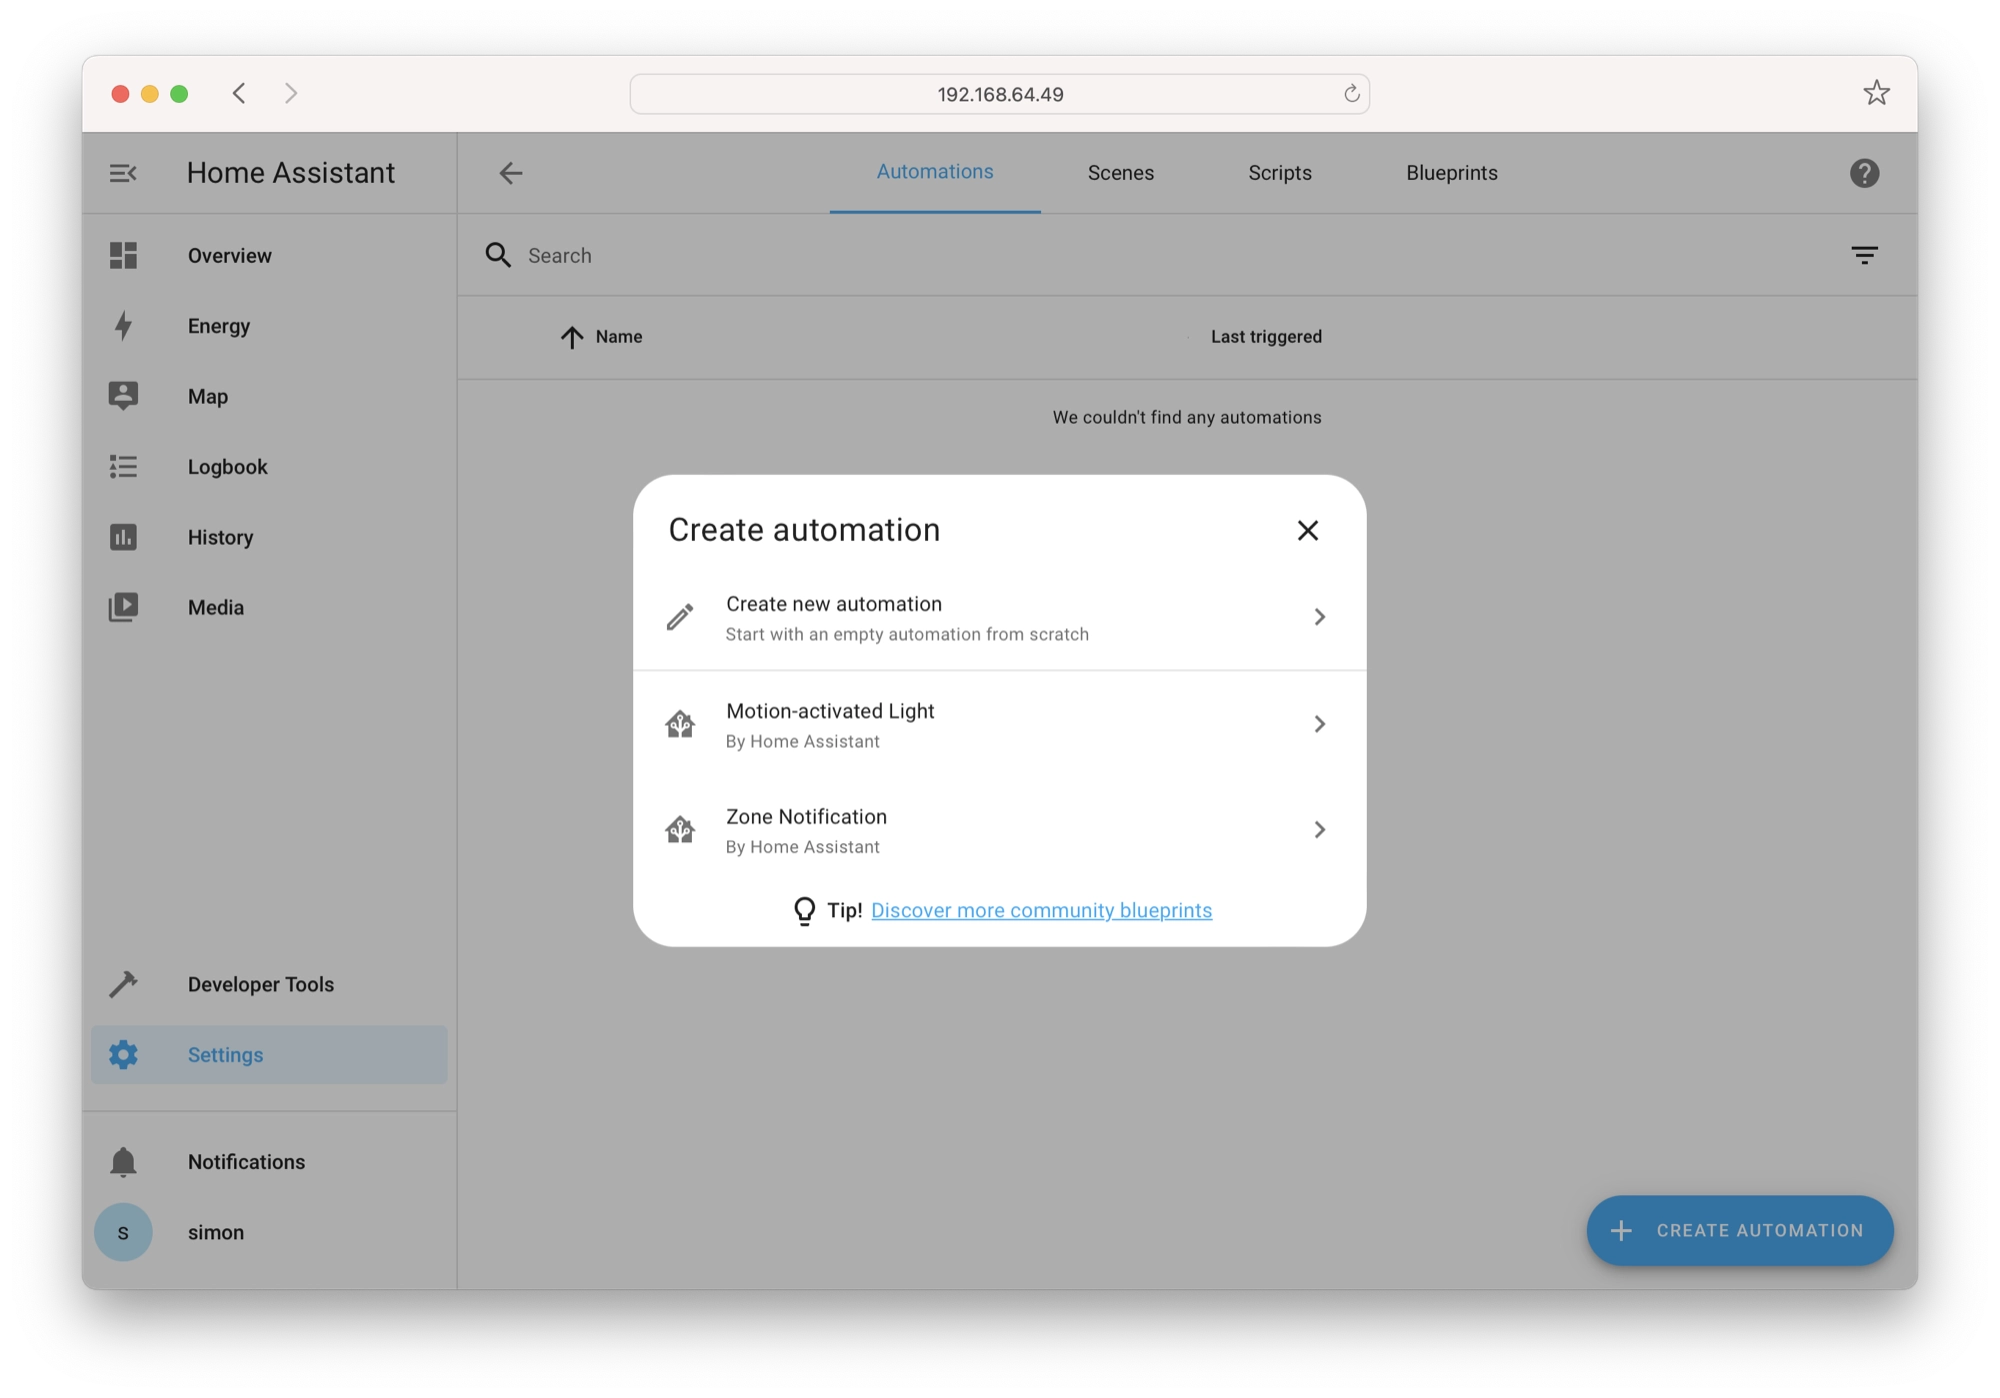
Next, as we will be creating a simple automation, click Create new automation.
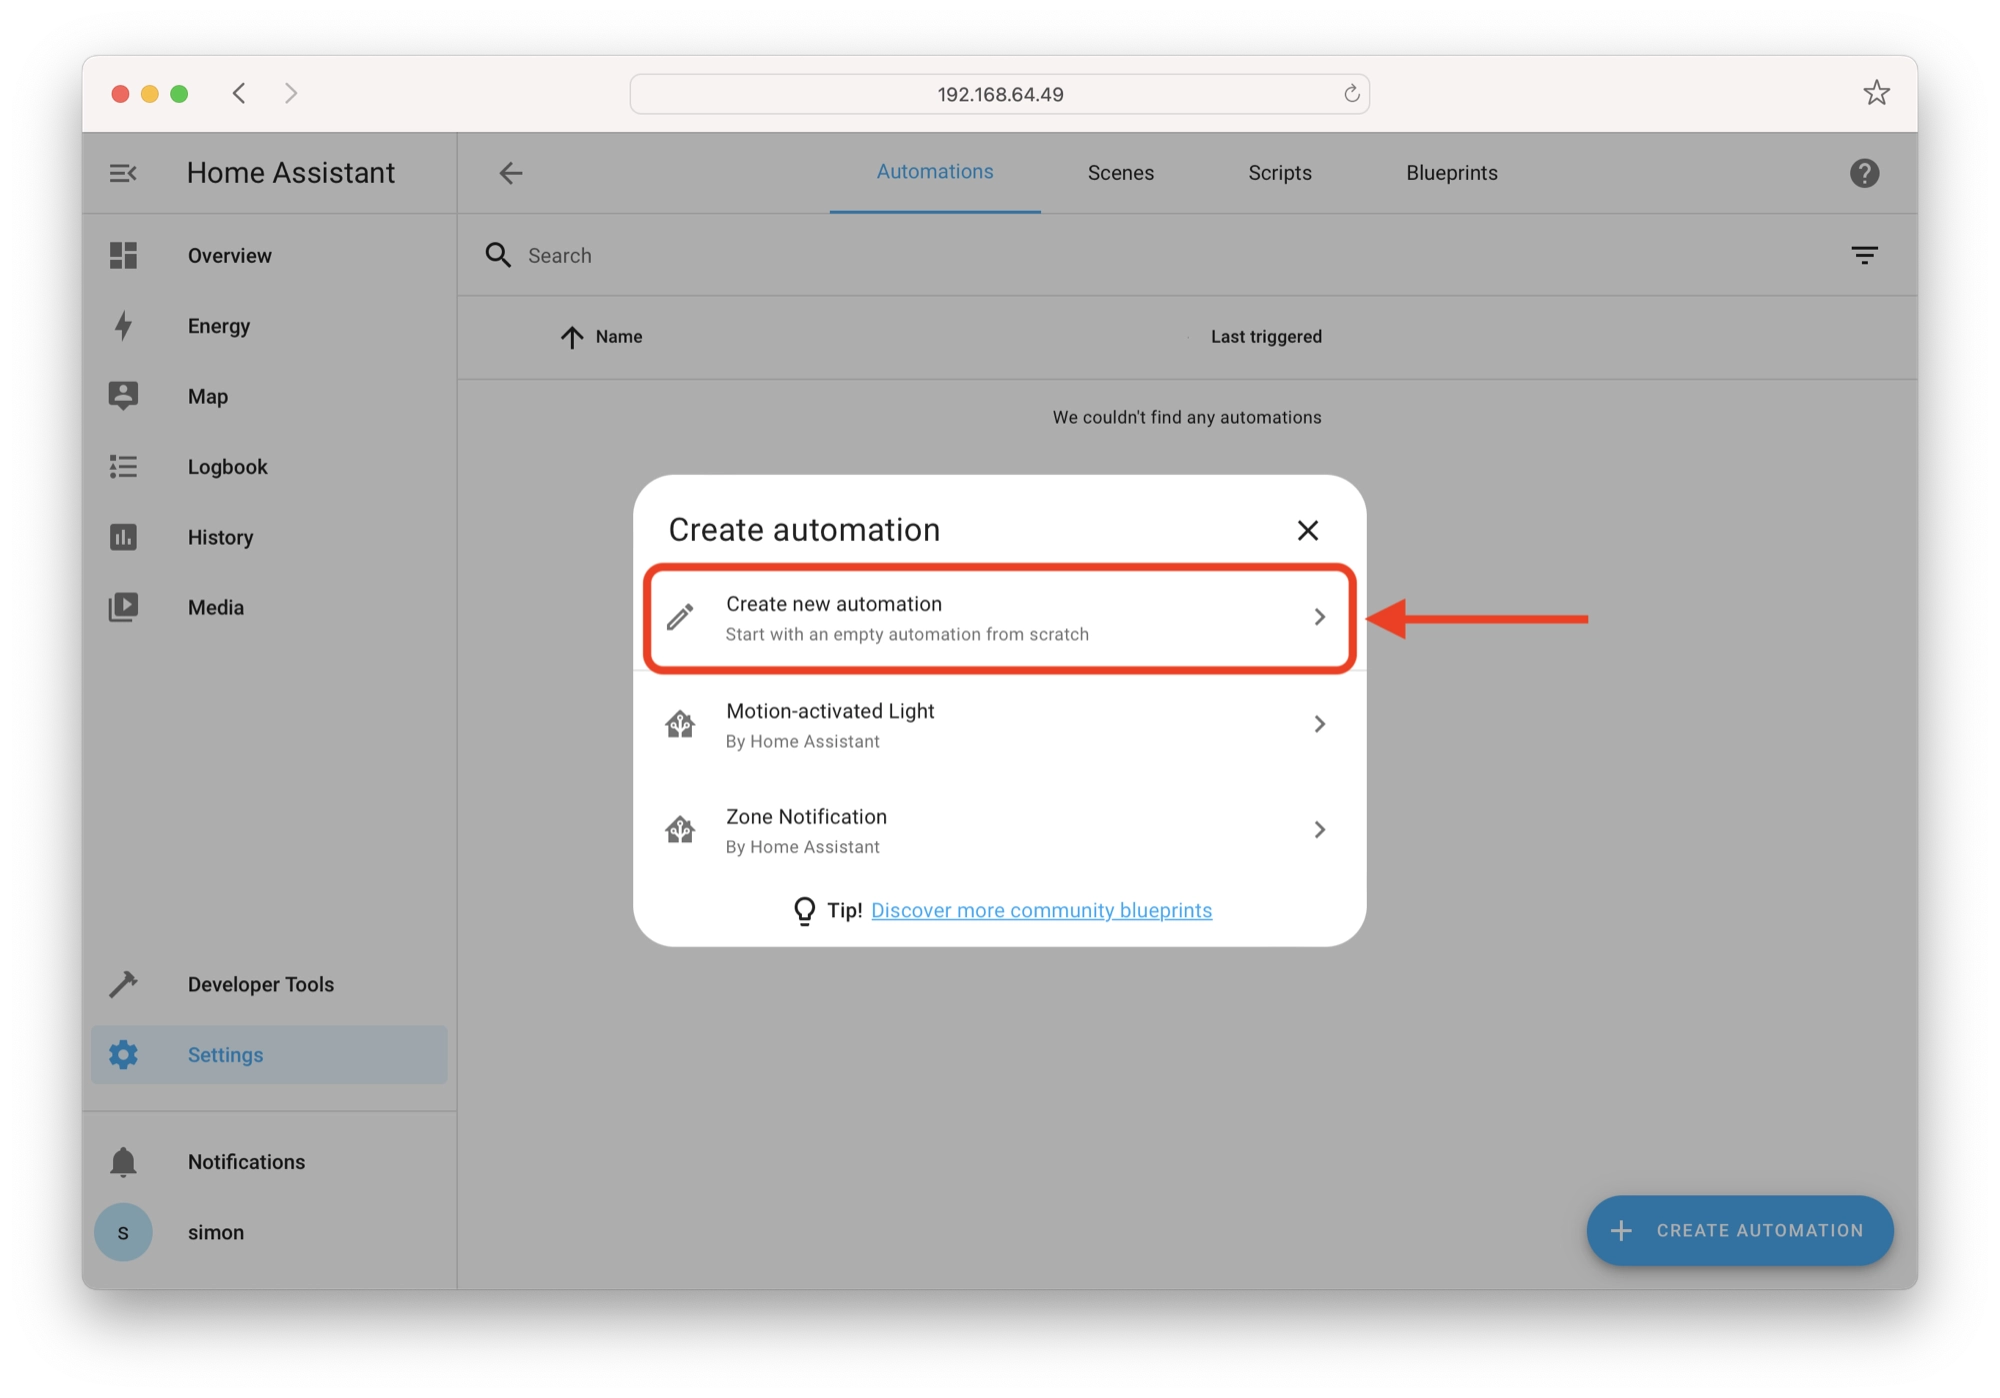
On the next screen you will be presented with the option to add automation triggers, conditions and actions. An automation needs both a trigger and action to function, but conditions are optional.
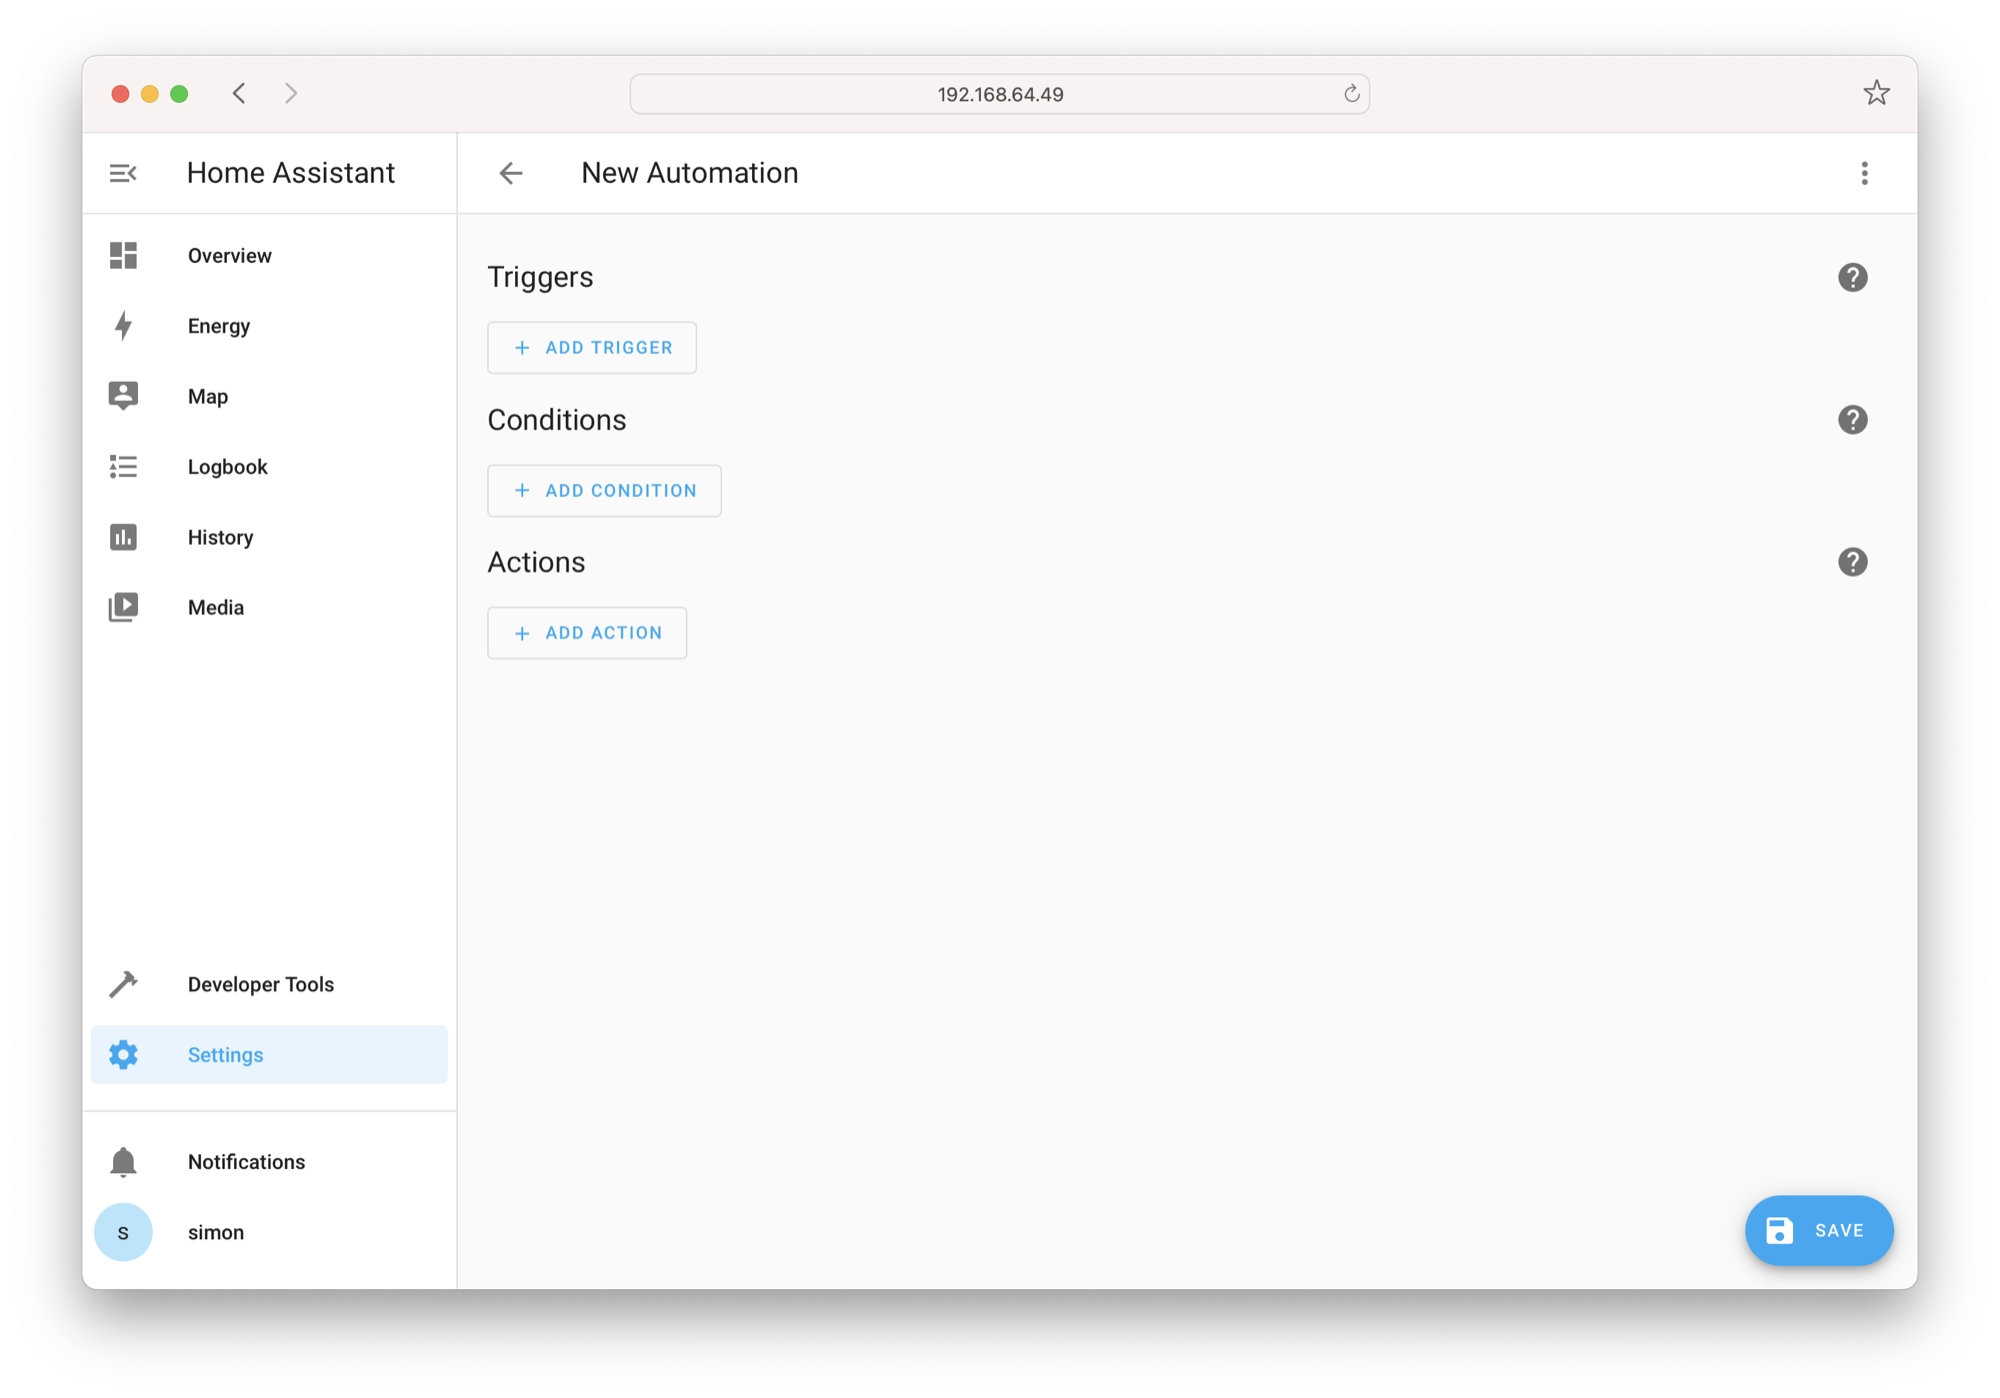
In this first simple example, we will create an automation with only the required trigger and action steps. If you are unsure what this means, take a quick recap of this section.
The goal of our first automation will be to boil the kettle at sunrise, ready for morning coffee.
In order to achieve this, we can create an automation that is triggered at sunrise using the sun entity. Once triggered, the automation will turn on the power to the kettle in order to boil it.
Adding an automation trigger
In order to use the sun entity to trigger the new automation, click Add Trigger and then choose Sun from the list of available triggers.
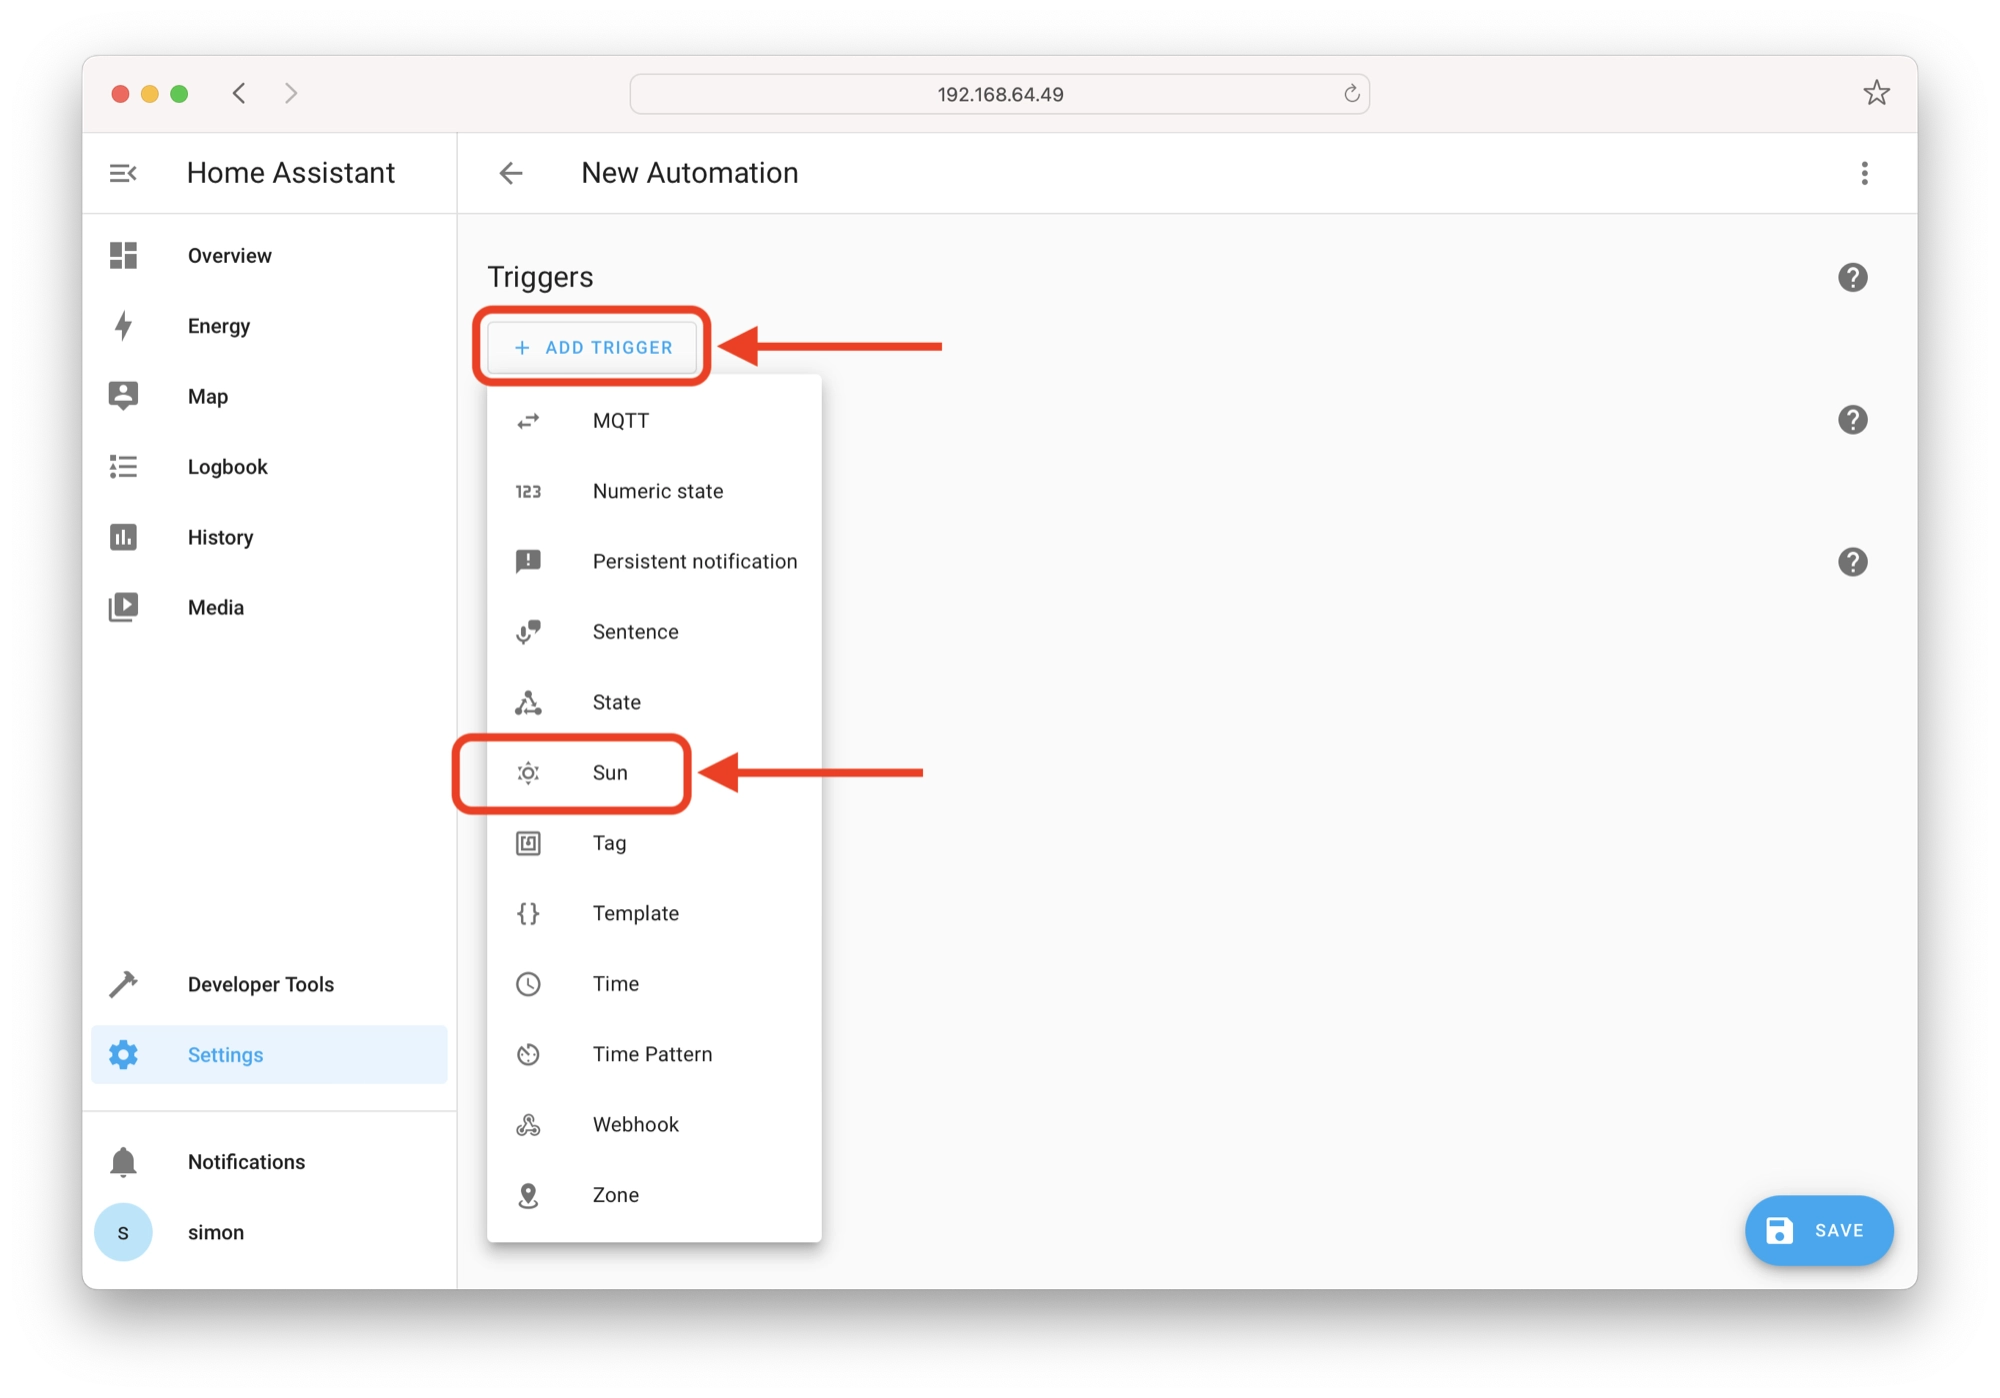
The sun trigger will be added to the automation. It is very easy to configure, simply choose whether you wish to trigger at sunrise or sunset.
In this example we are aiming to boil the kettle in the morning, so we will choose Sunrise.

Adding an automation action
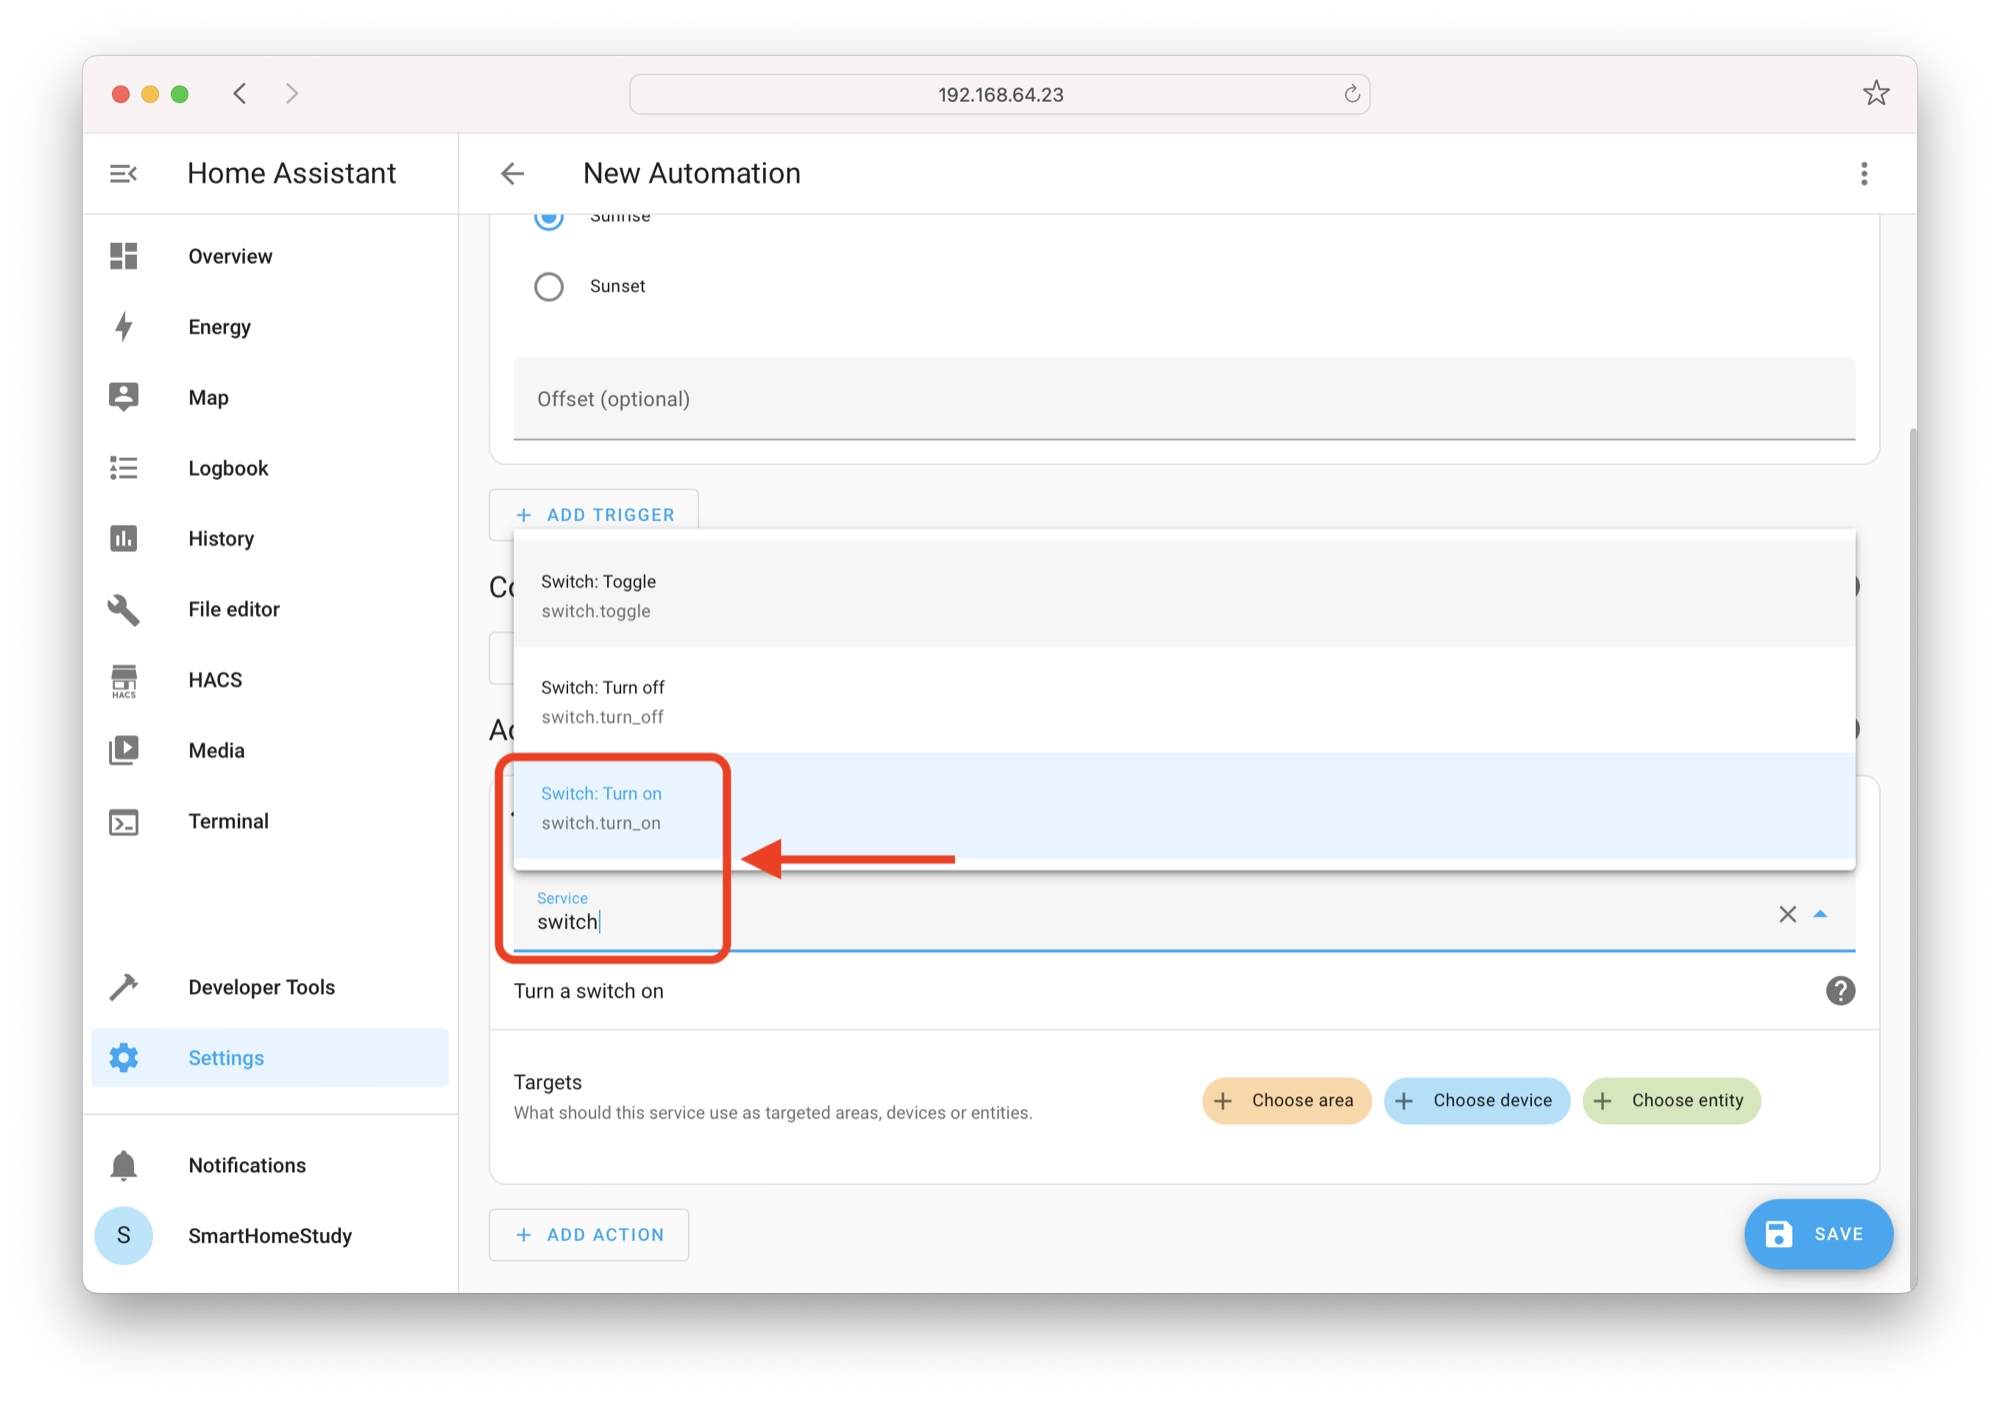
Next we need to set the action that we wish to occur at sunrise, which in this example will be turning on the kettle. Click the Add Action button and then choose Call service from the list of available actions.
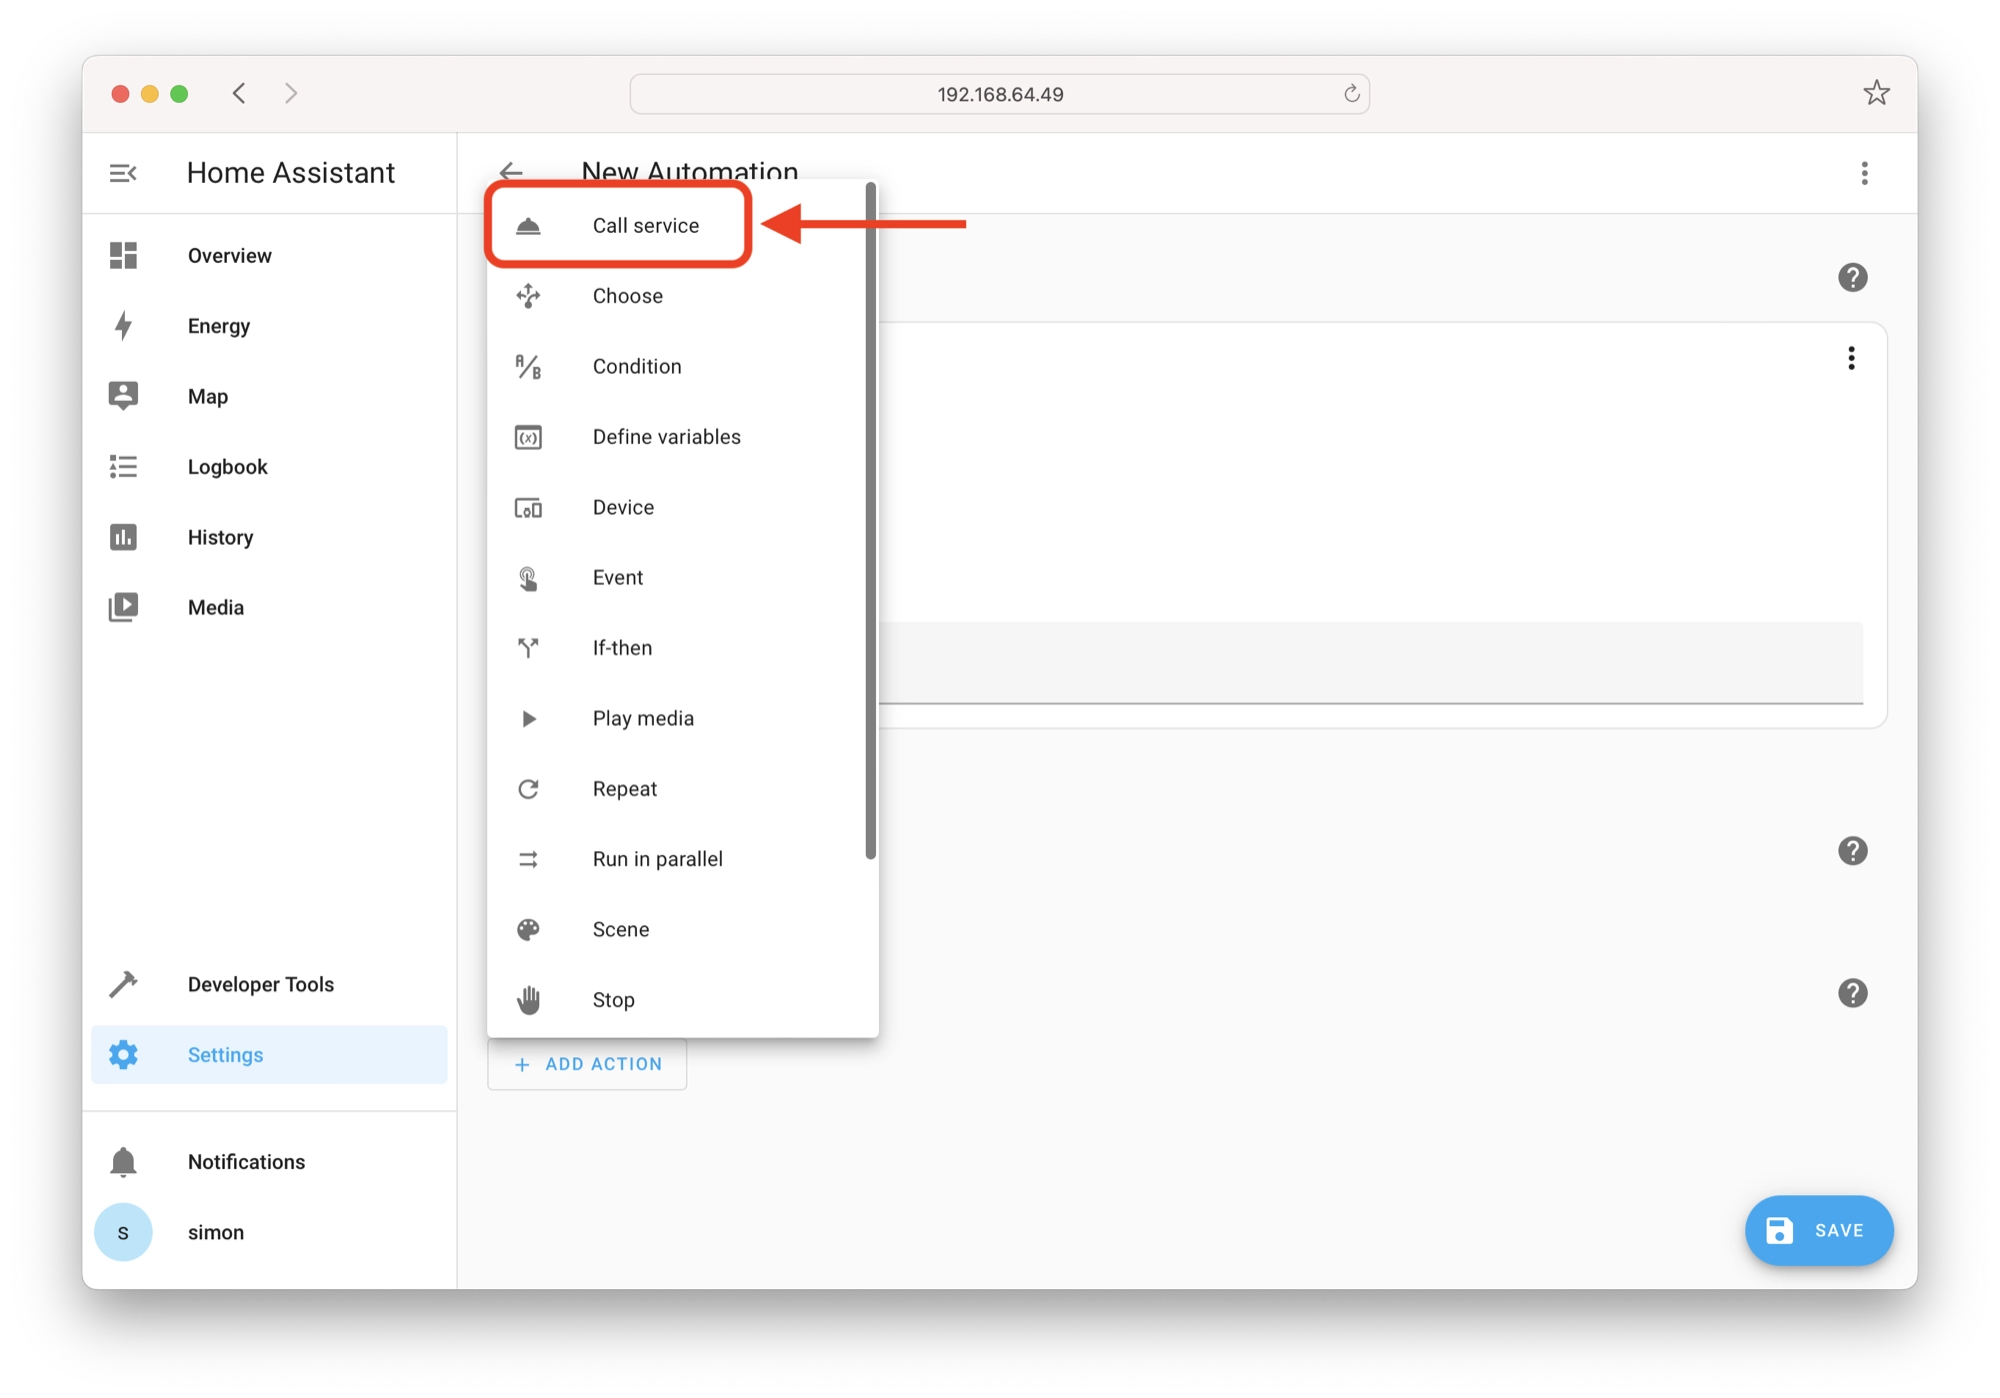
In the call service text box, start typing switch and you will then be able to select the service switch.turn_on. This service will allow us to change the state of our switch from off to on.
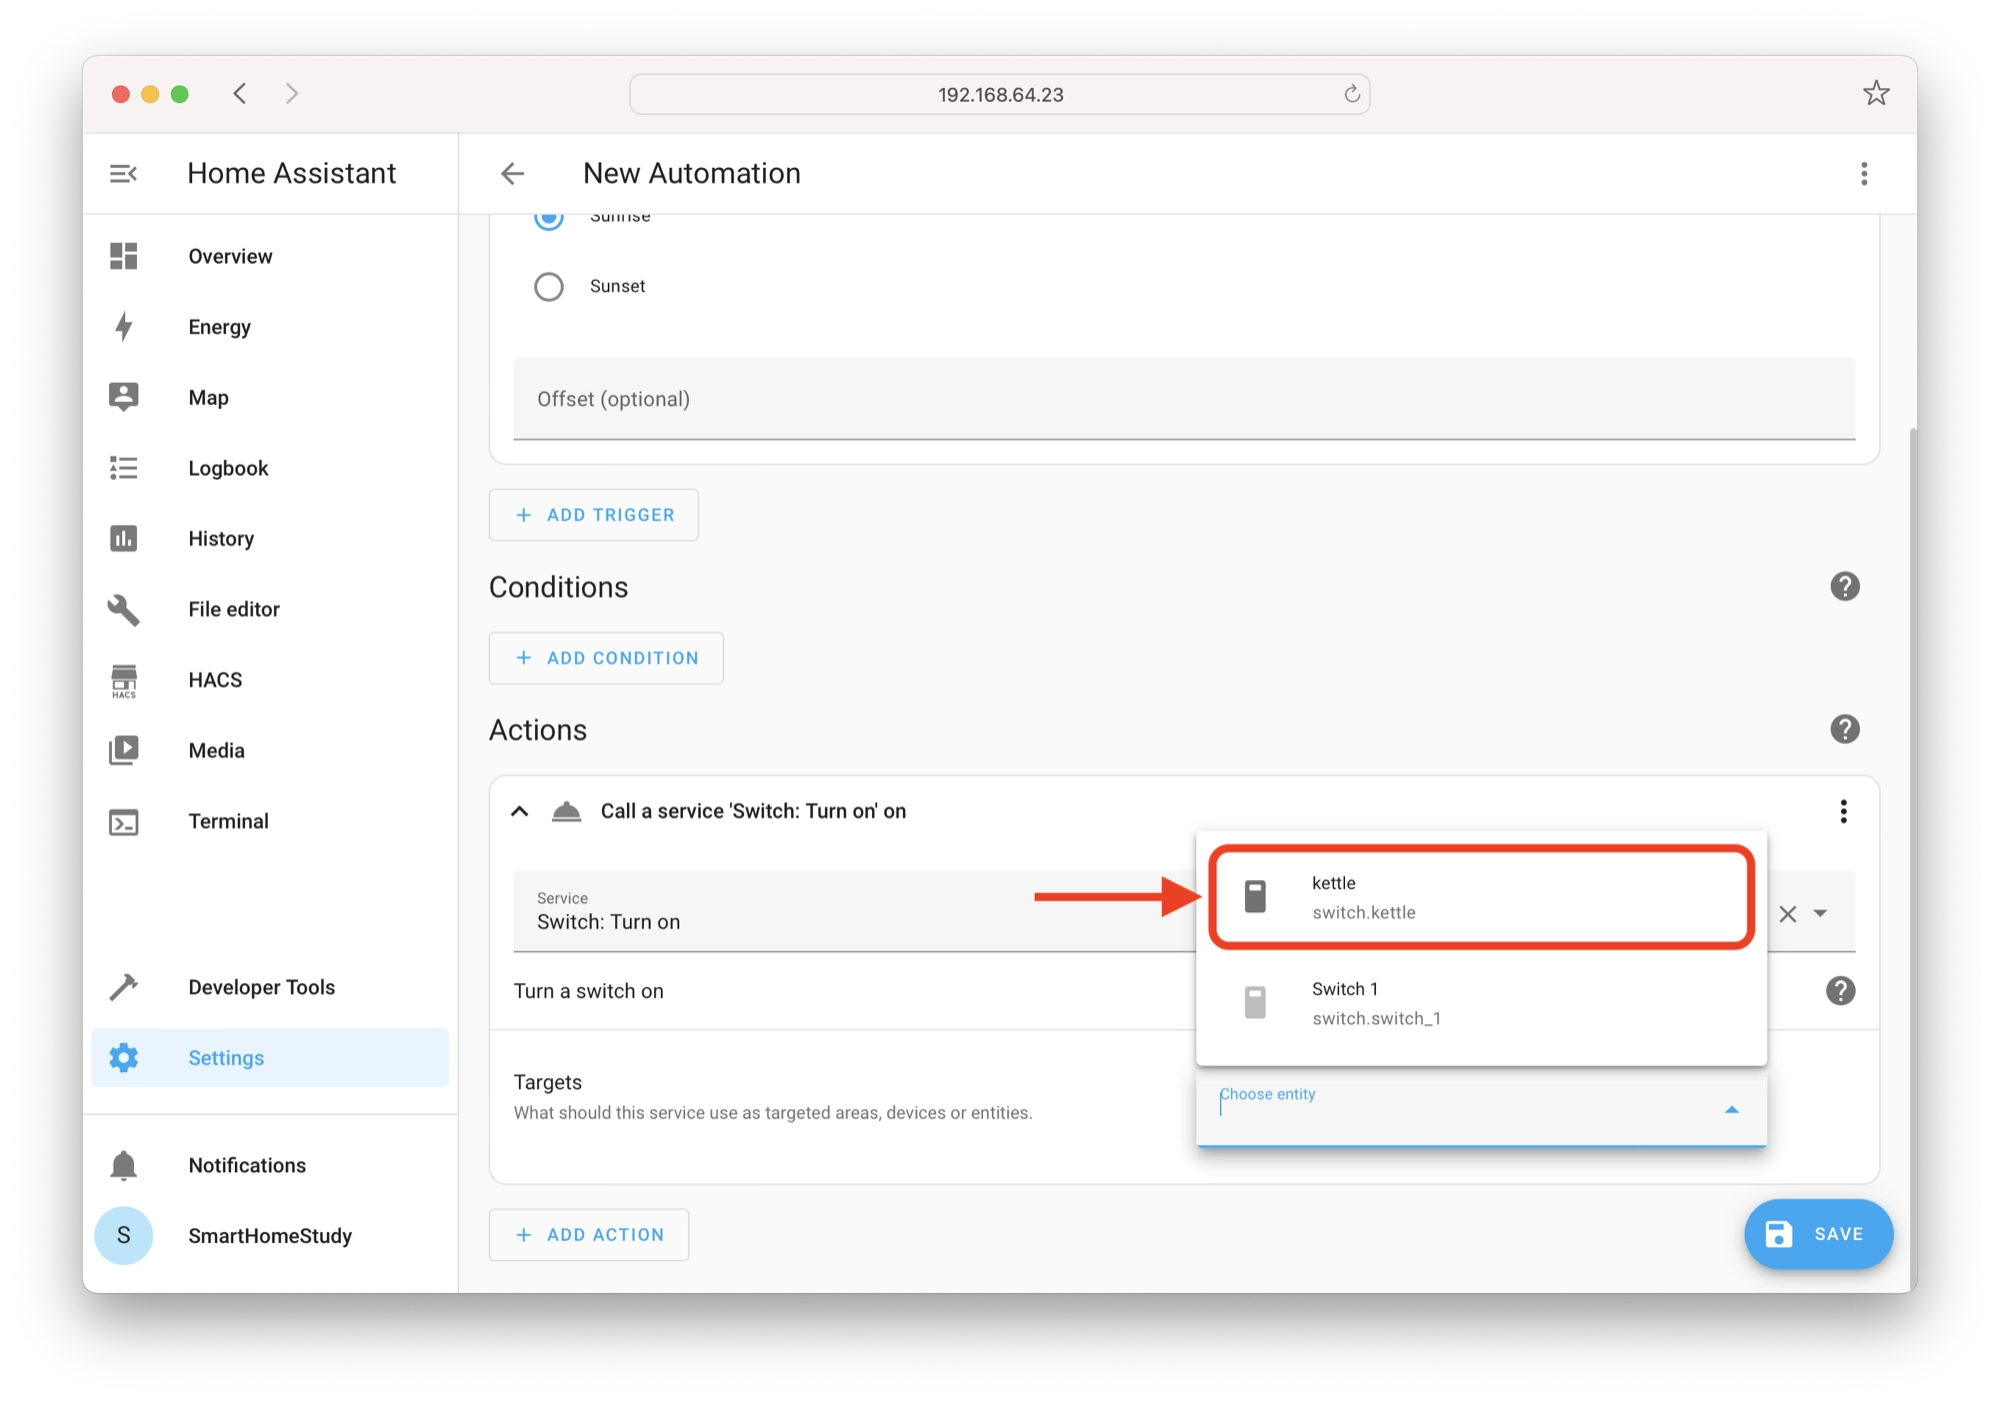
Next we need to choose the switch entity that we wish to turn on when the automation is called. In our example this will be the smart plug that our kettle is plugged in to.
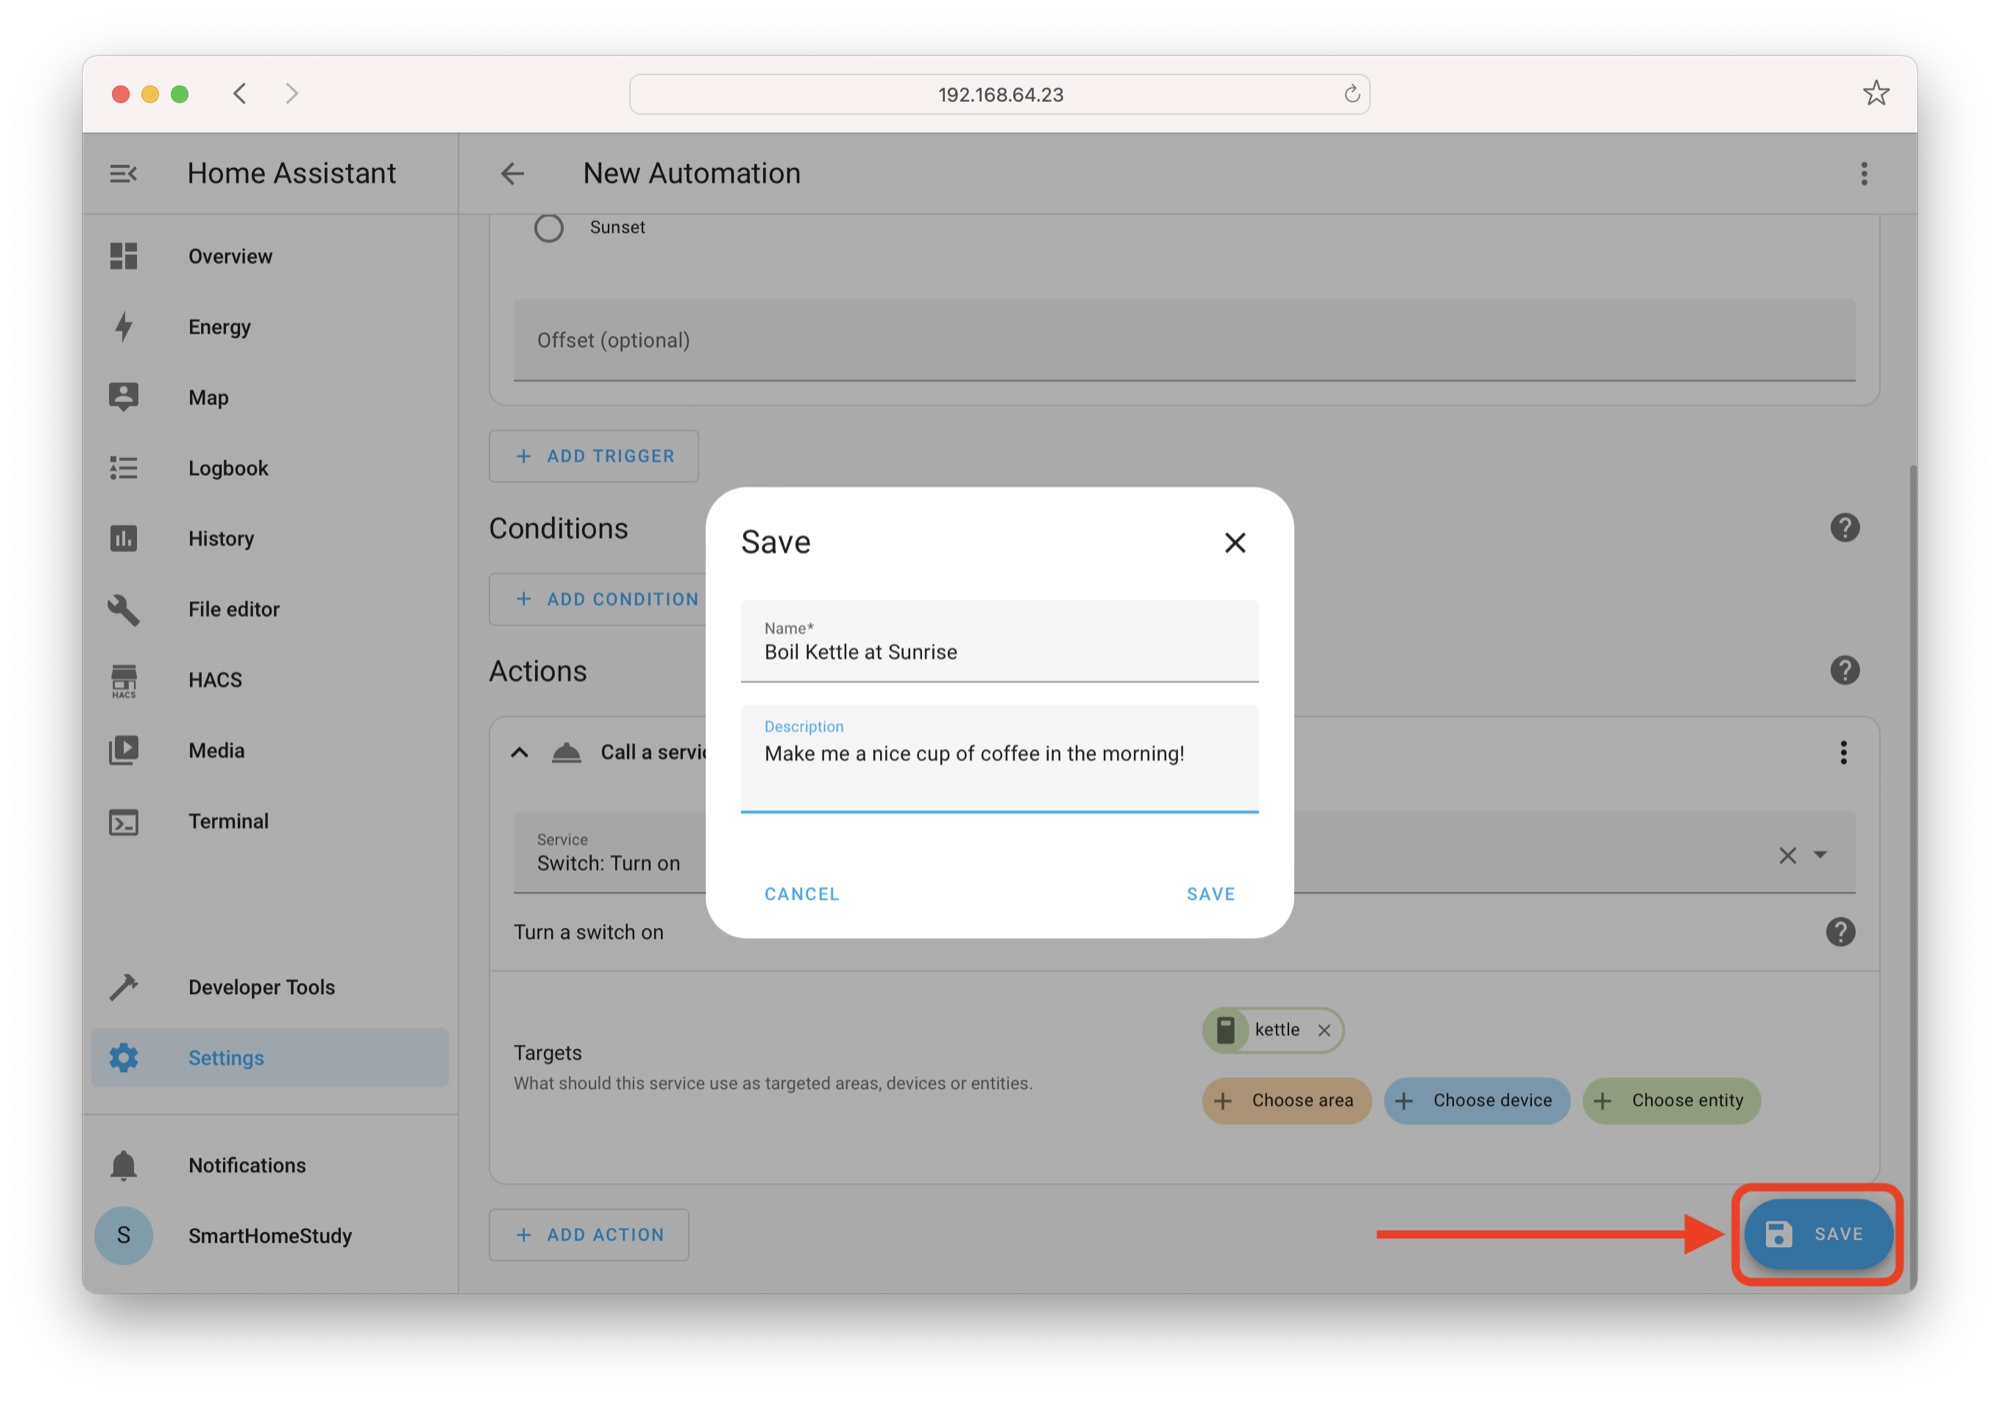
The last thing to do in order to complete the automation is to save it. Click the Save button in the bottom left-hand corner and enter a name for your automation.
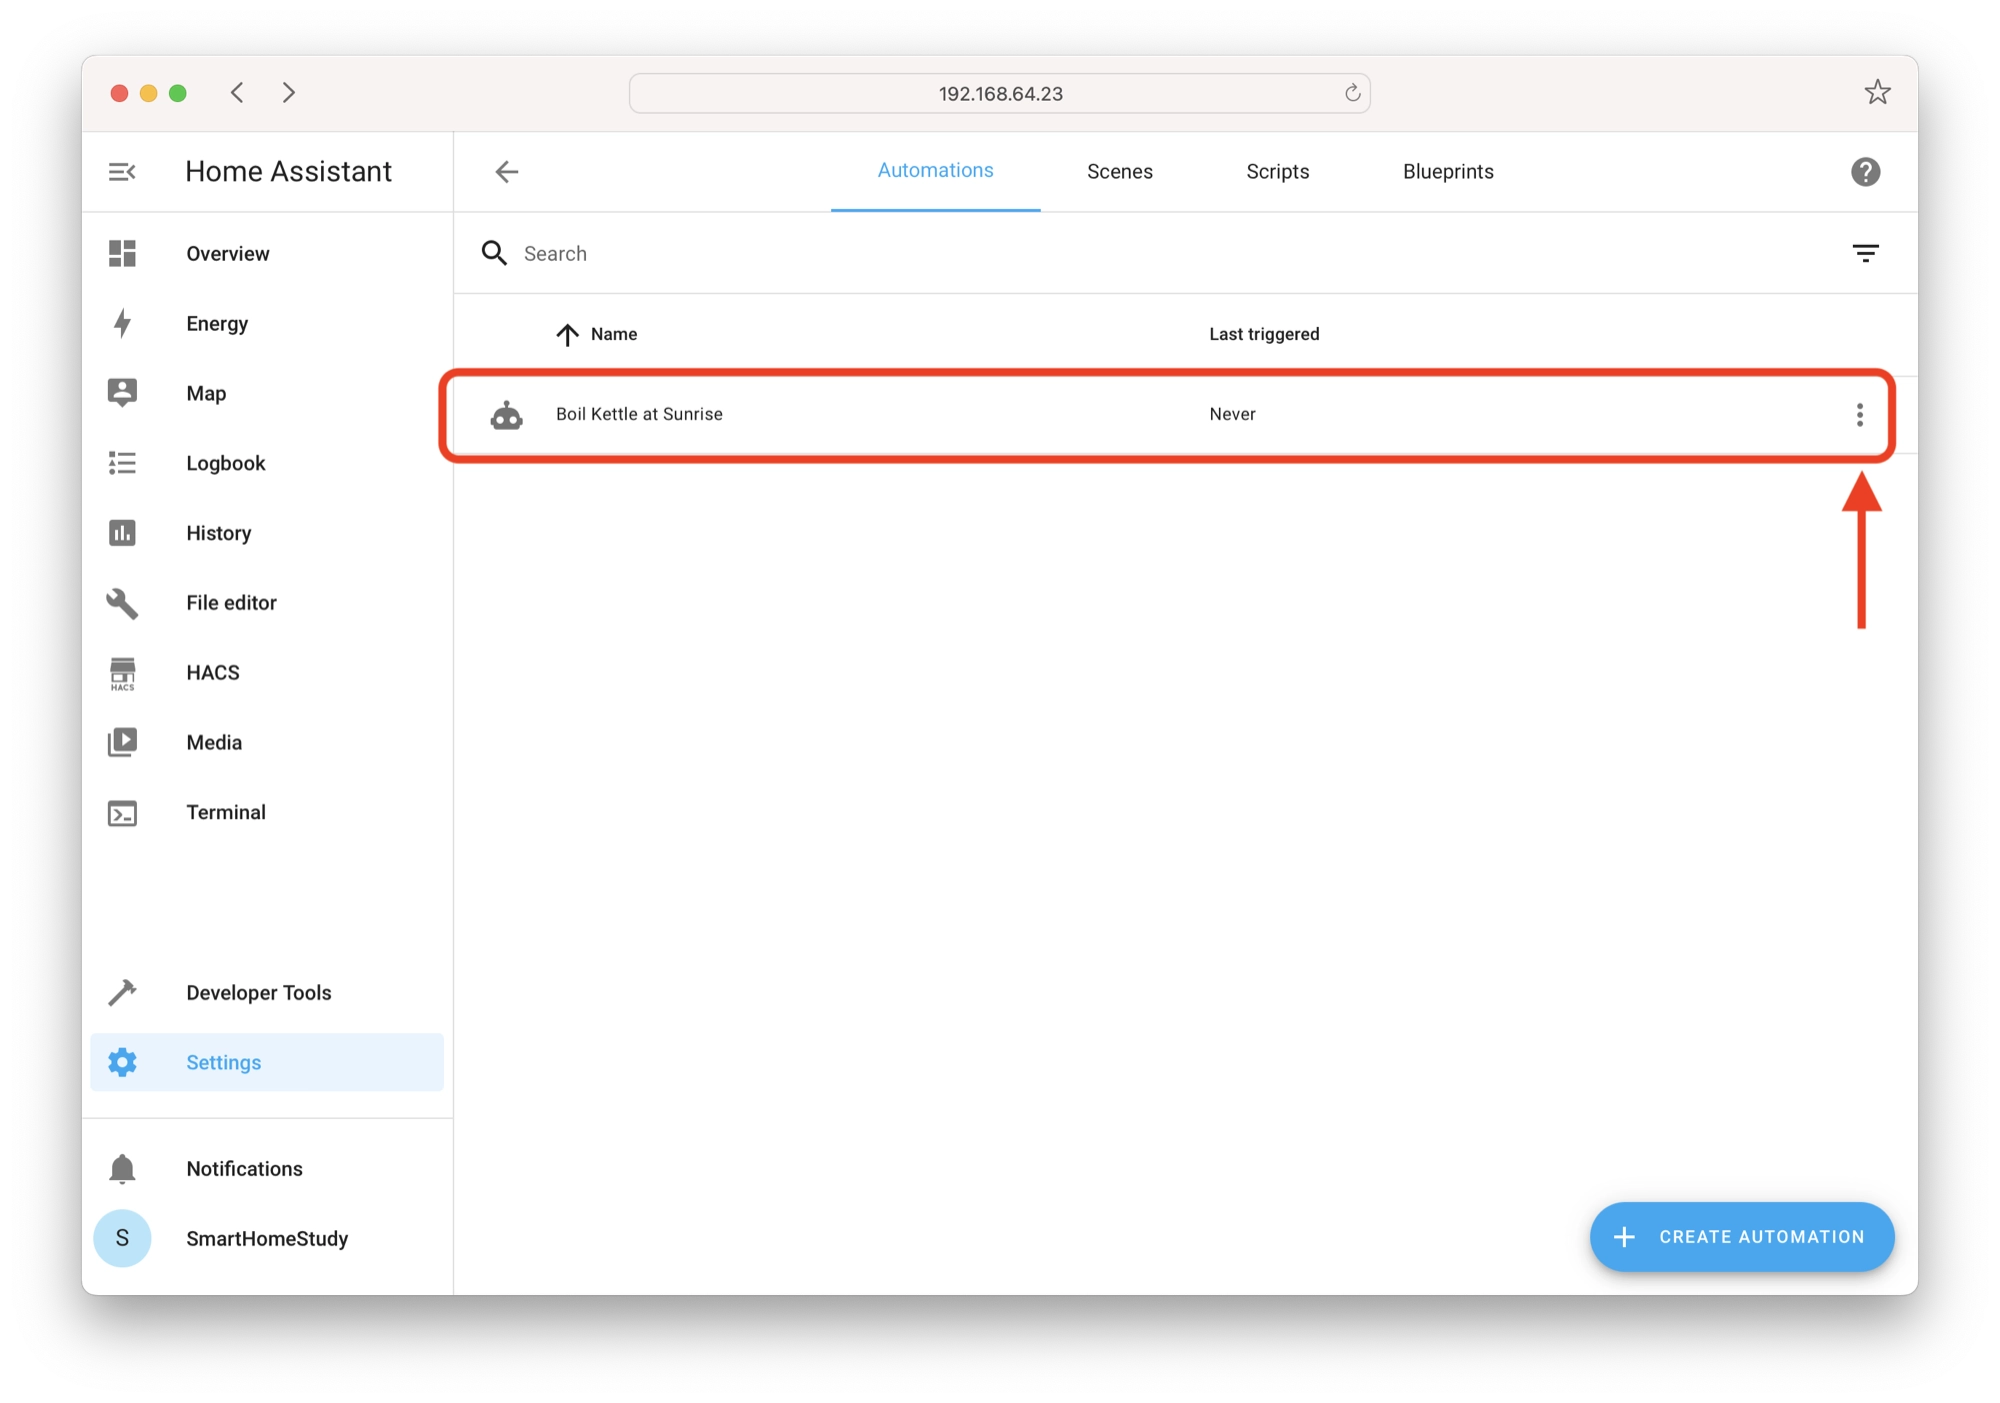
Once you have saved the automation, you should see it listed under the Automations tab of the Automations & Scenes menu.
Clicking the kebab menu (three dots) on the right-hand side will reveal a list of options, such a testing, deleting or duplicating the automation.
Create an automation with a condition
Now that we have an understanding of a basic automation, let’s create an automation that has a condition.
This automation will fire when the bedroom light is switched on, but only if the temperature is above 23°C. So we are introducing a temperature value as our condition.
The action will be tied to a smart plug that controls an AC unit in the living room. When I wake up in the morning and turn the bedroom light on, the AC turns on and starts to cool the living room if the temperature is above 23C.
Adding an automation trigger
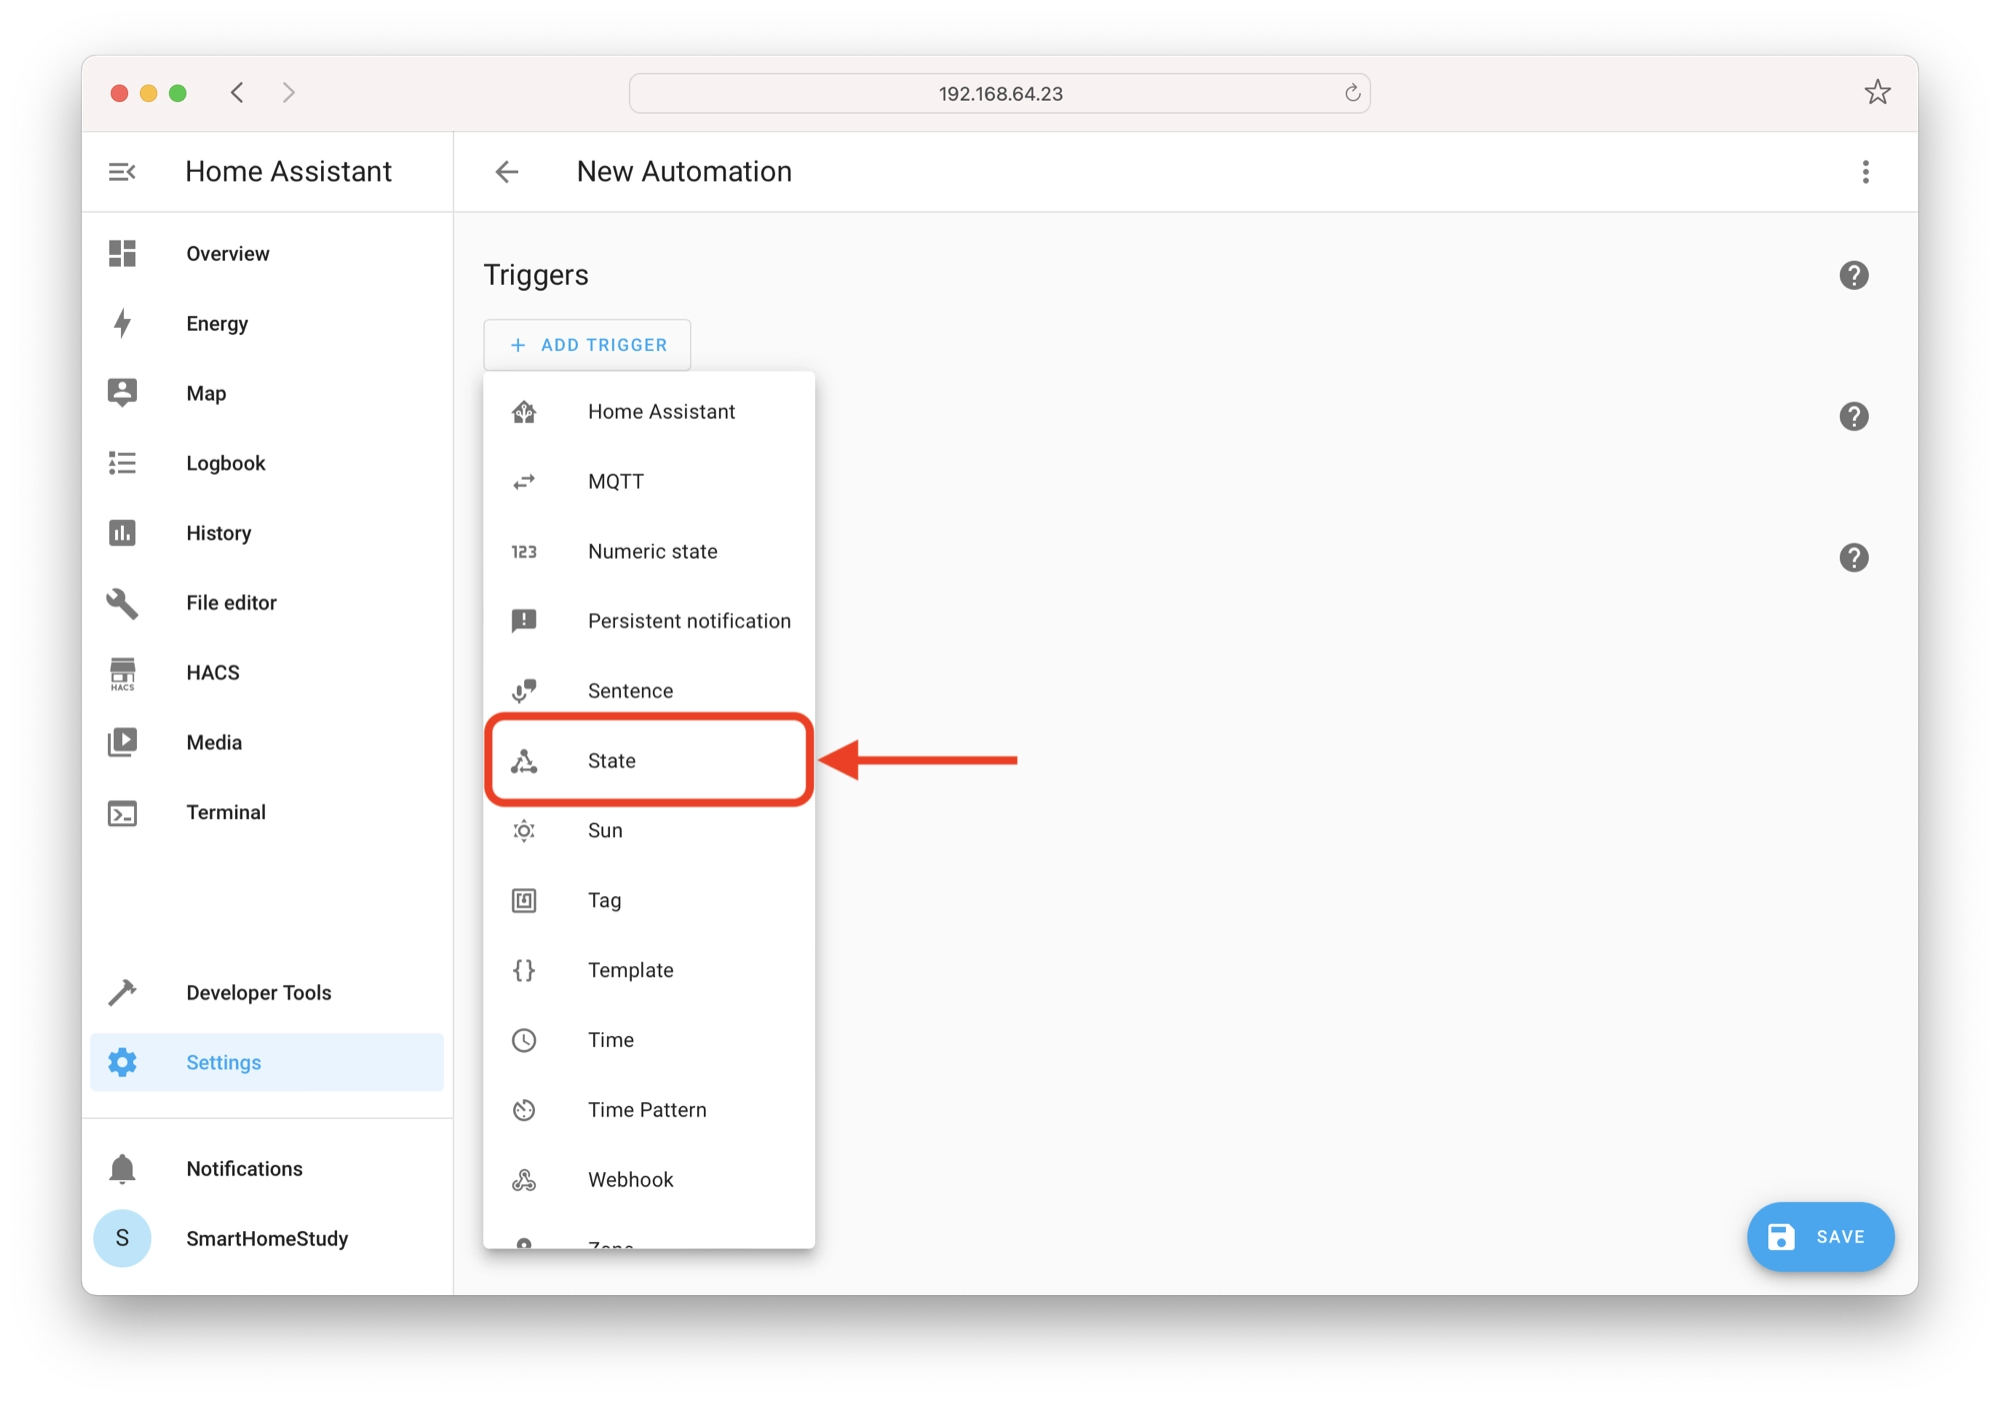
First, let’s create a new automation and add the trigger. In order to trigger this automation when the bedroom light is switched on, we will look for the bedroom light changing from the off state to the on state.
In order to do this, we will choose state for our automation trigger.
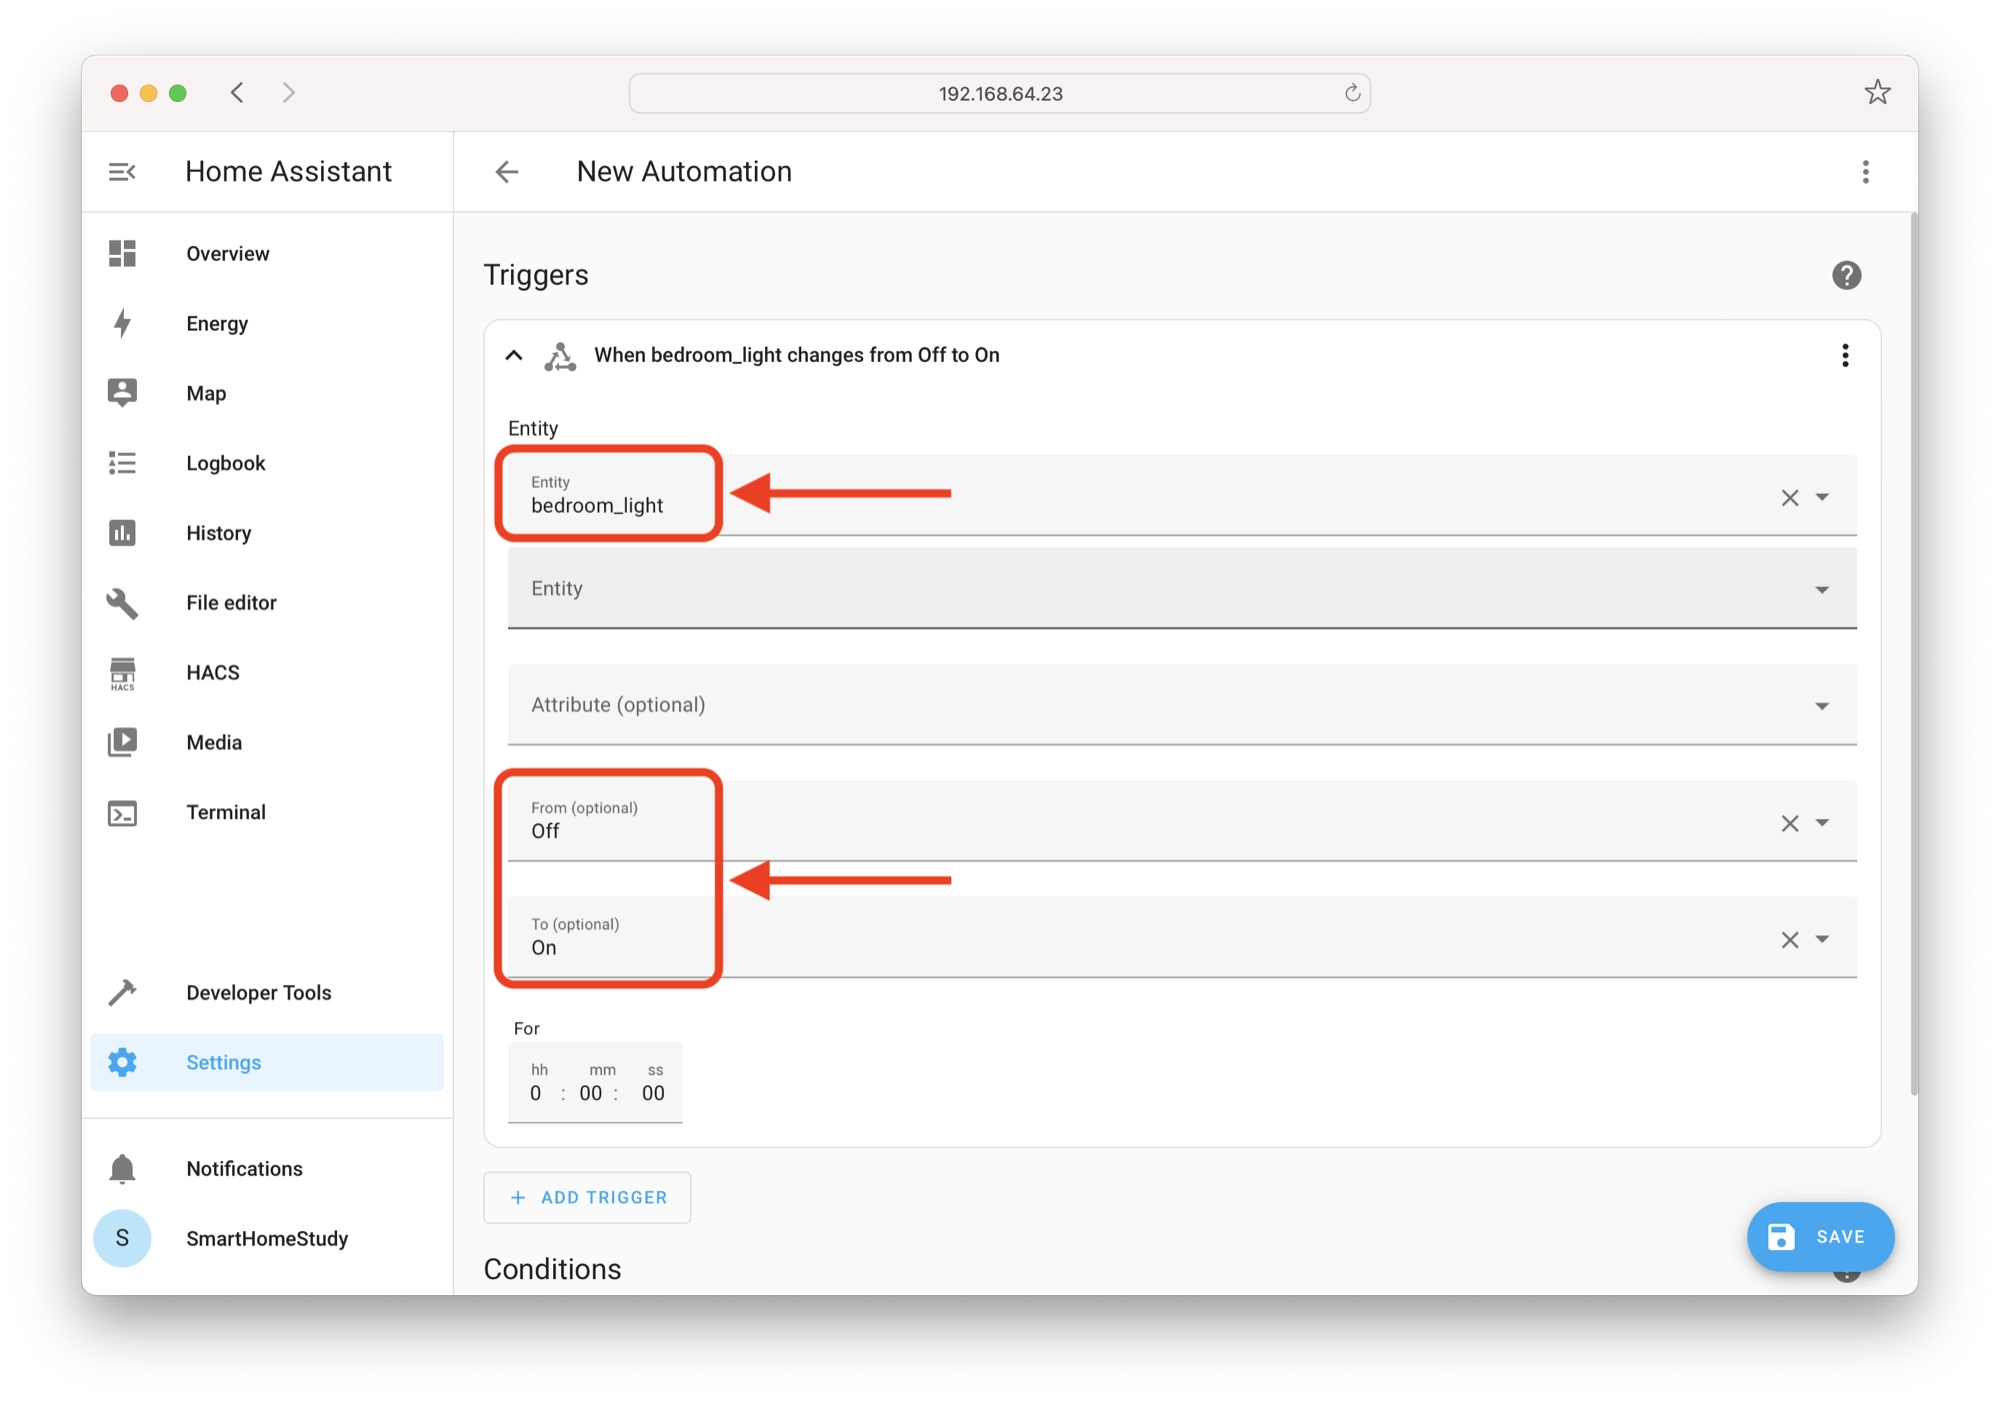
In the Entity options we will select the light entity that we wish to monitor, for example light.bedroom_light. We will set the from state to off and the to state to on.
This will cause our automation to trigger when the light.bedroom_light state changes from off to on.
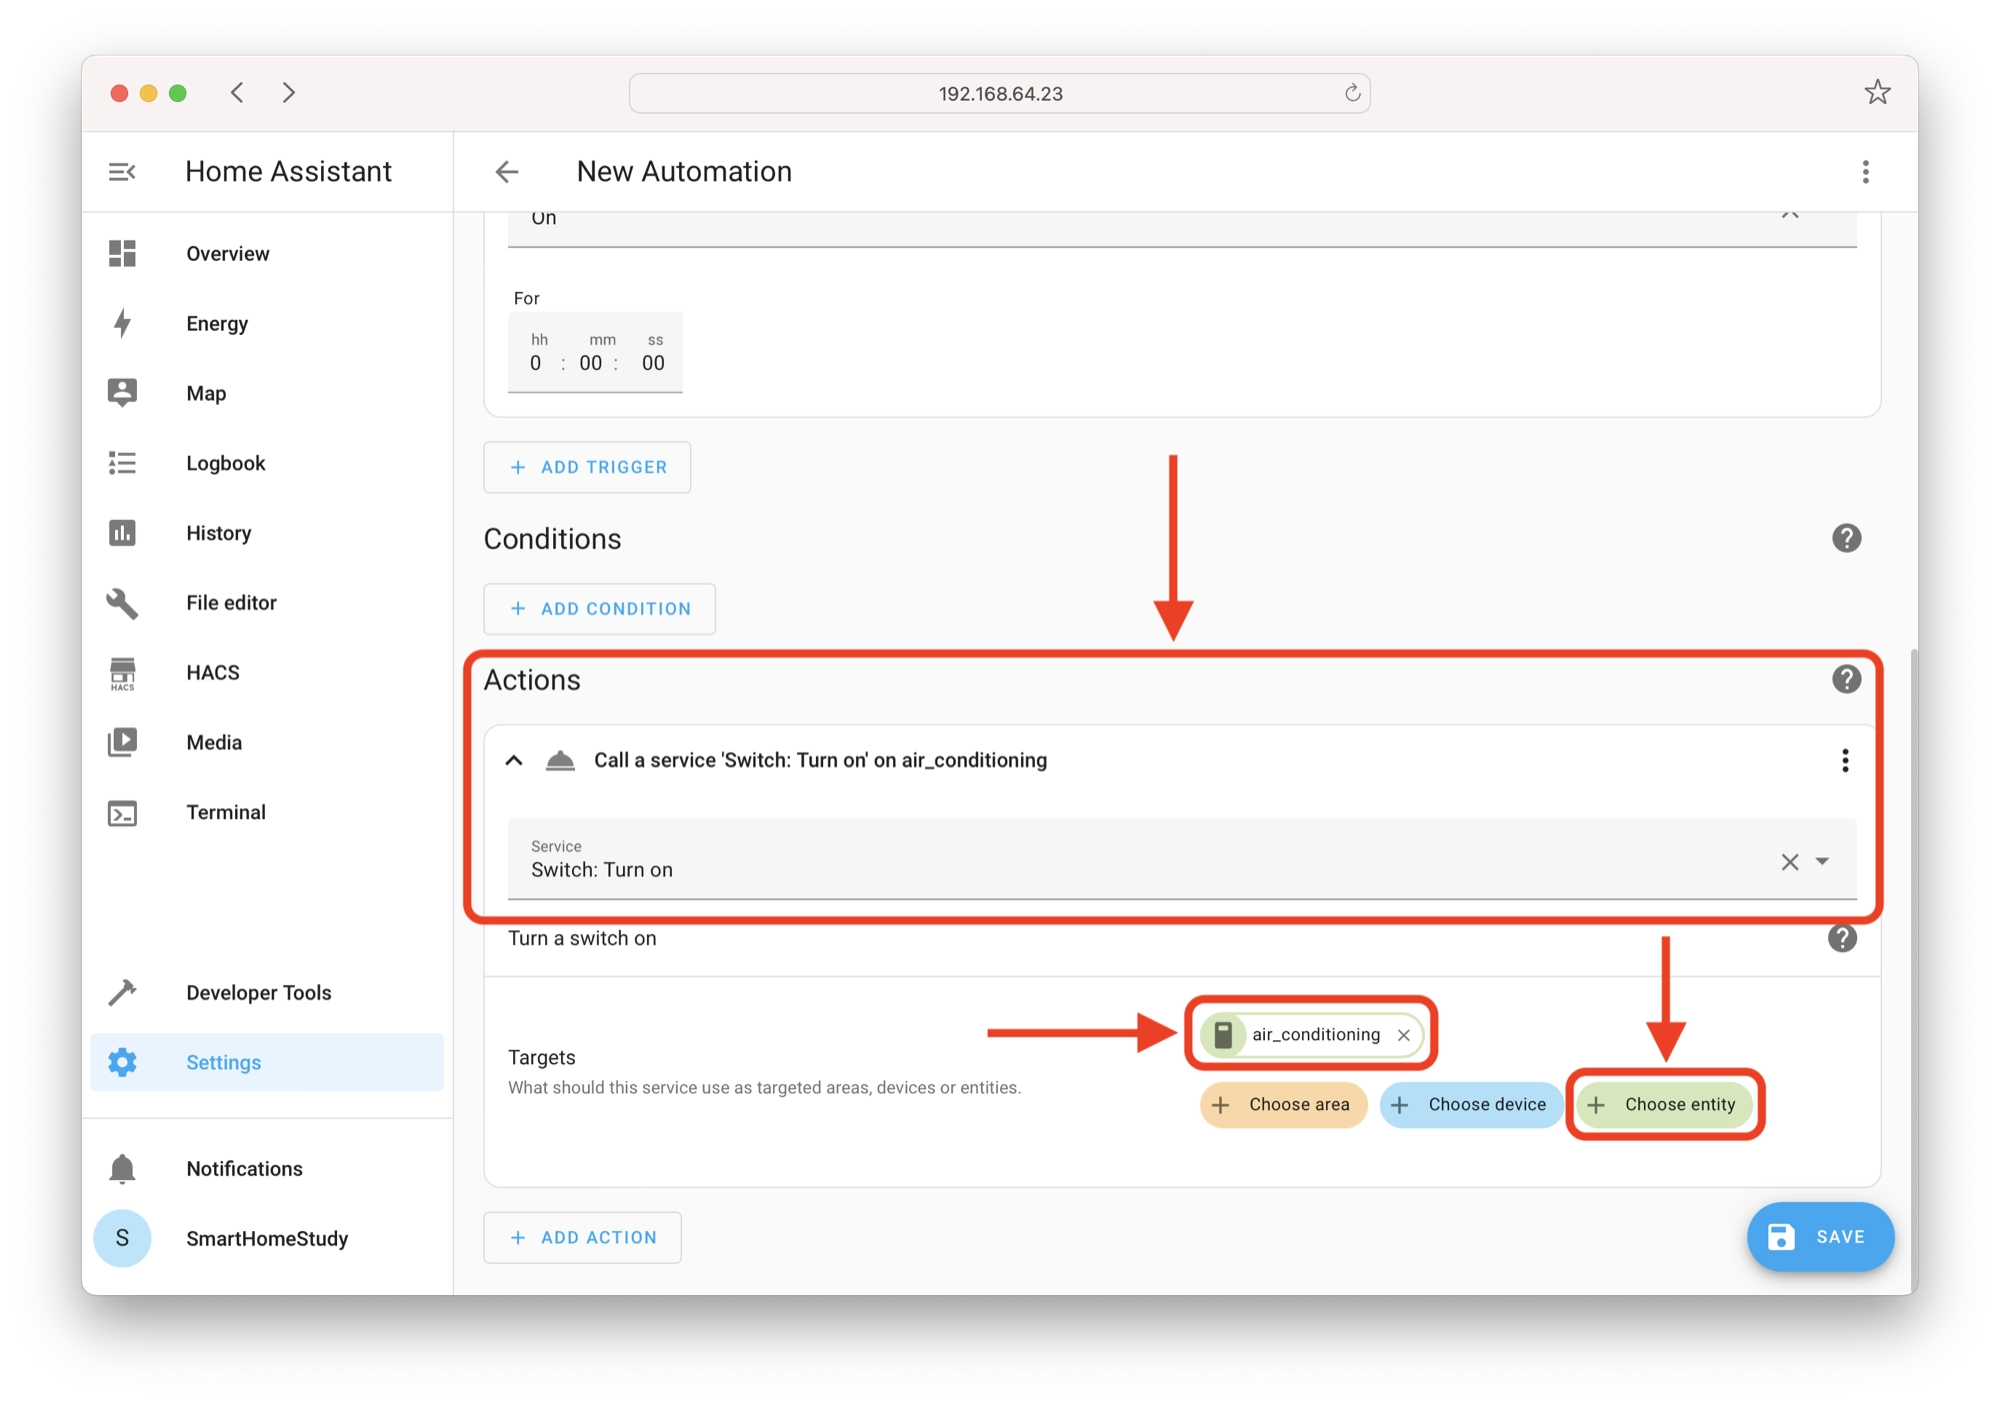
Adding an automation action
Next, we will add the action that will occur when the automation is triggered. Much like the previous example, in this example we will use call service to turn on the plug that is connected to the AC.
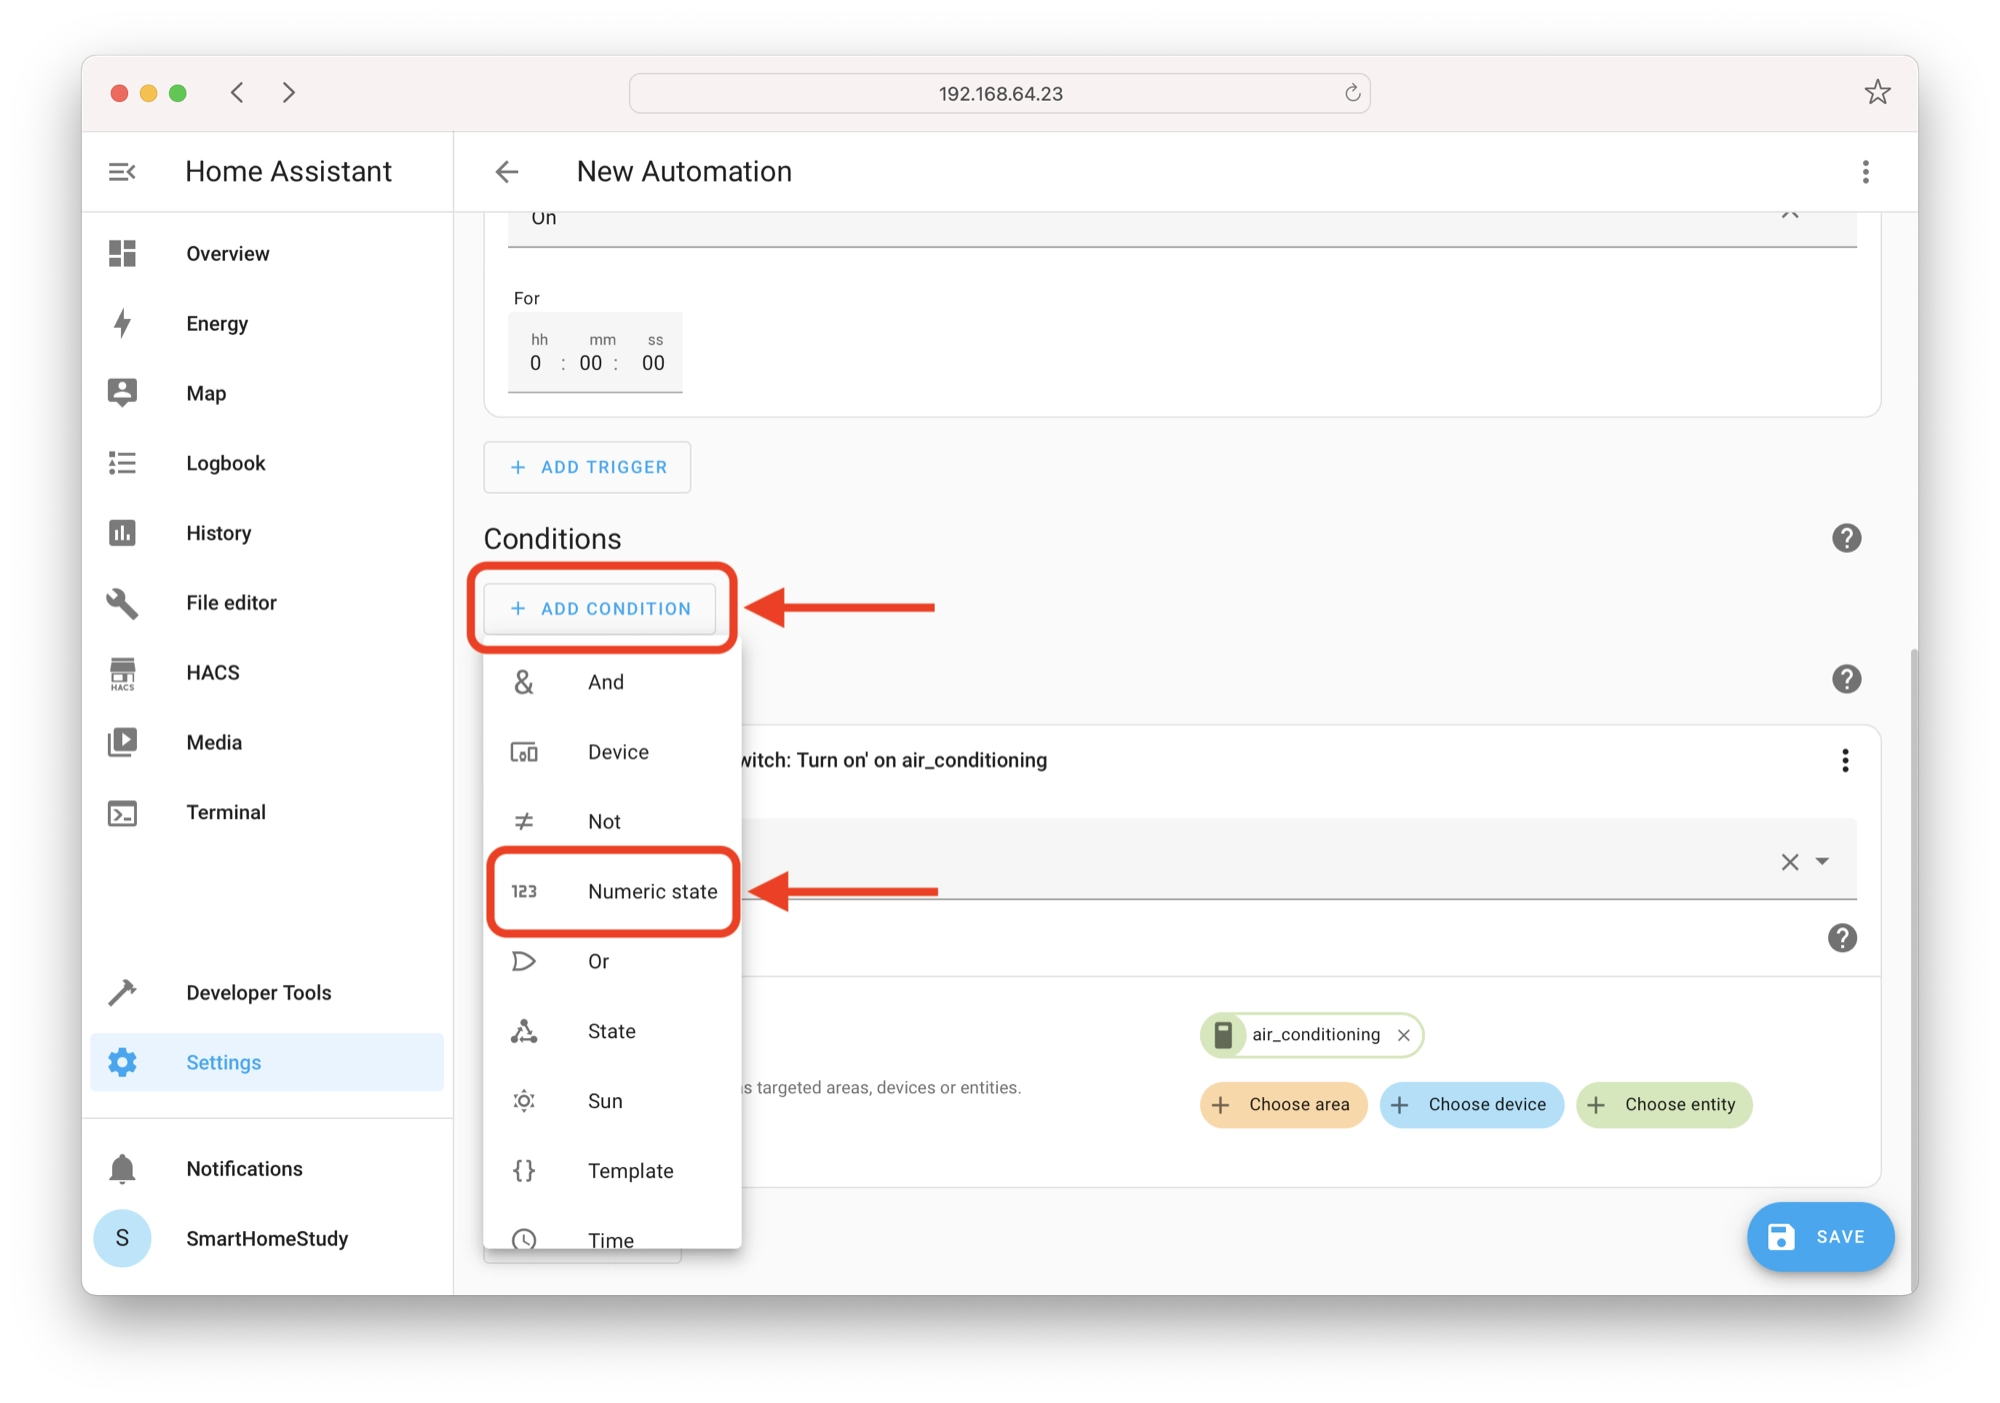
Adding an automation condition
Lastly, we will add a condition to this automation that prevents it from firing when the temperature is below a certain threshold. This will prevent our AC unit being turned on when the temperature is too cold and AC is not required.
In order to do this we will set a condition by choosing numeric state as the condition type. This allows us to detect a change in a numeric value, in this case the temperature.
We will set the entity to the sensor entity that is measuring temperature, which in this example will be sensor.temperature_downstairs.
The number above parameter will tell Home Assistant to fire the action only if the sensor value is above the number specified.
The number below parameter works the same but when the sensor value is below the number specified.
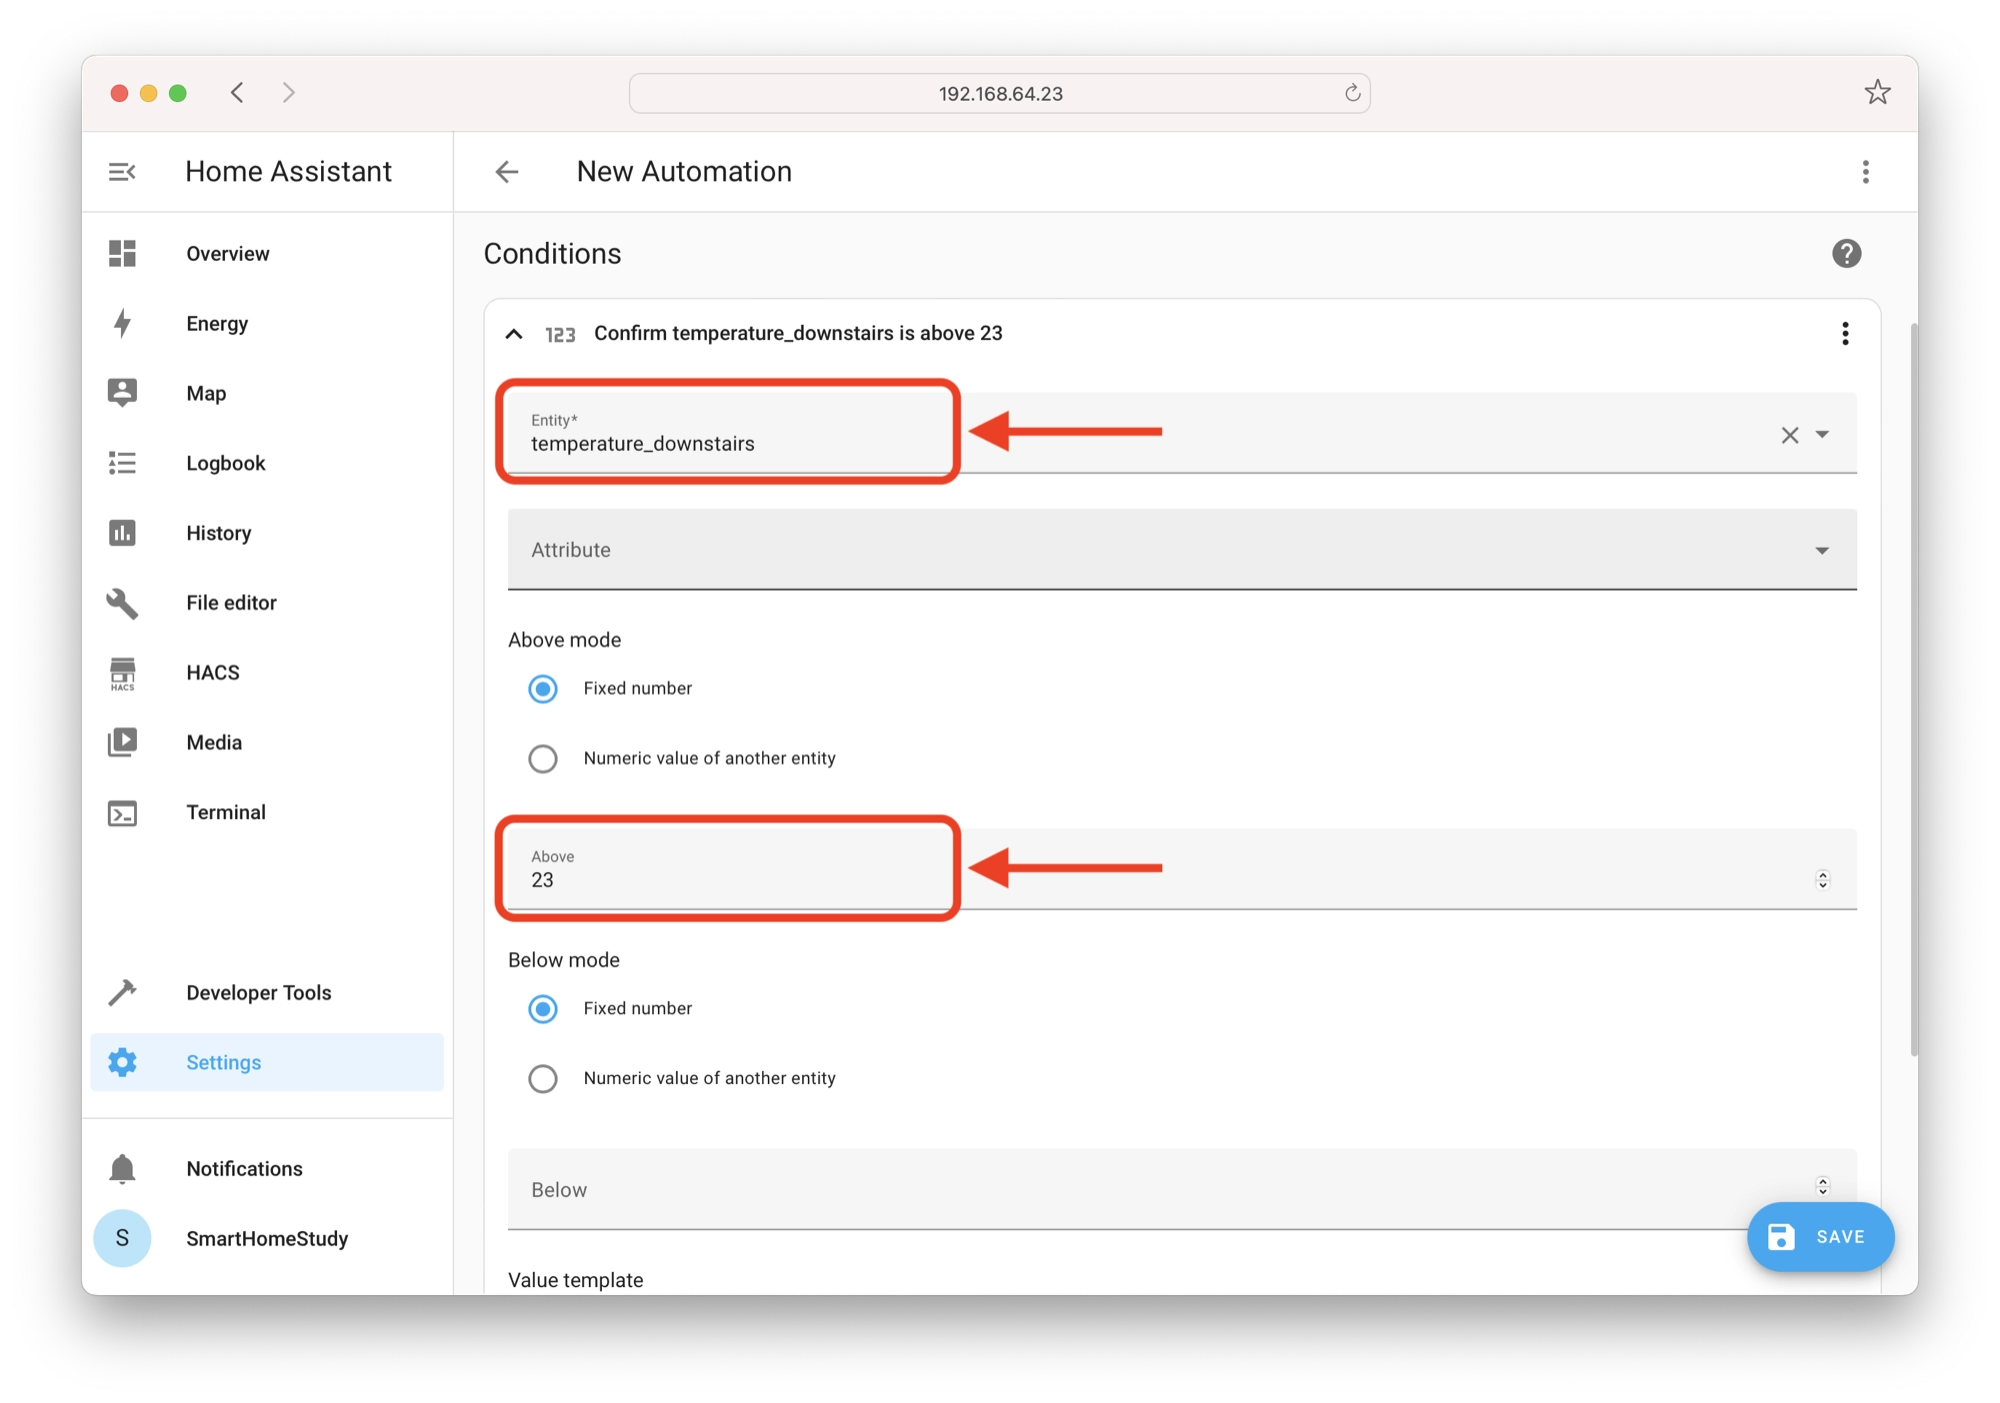
That’s it! Now we can save the new automation using the save button in the bottom right-hand corner of the screen. This automation should only fire when the temperature reading is above 23.
The Automations YAML File
All of the automations generated by the GUI editor will be stored in a file called automations.yaml. You can find this file in the config directory, along with the configuration.yaml file.
If you are new to YAML in Home Assistant and you are unsure what the configuration.yaml file is, I would recommend first checking out this beginners guide to YAML.
Opening and editing automations.yaml
In this section we will take a look at the automations.yaml file and discuss creating automations using YAML directly.
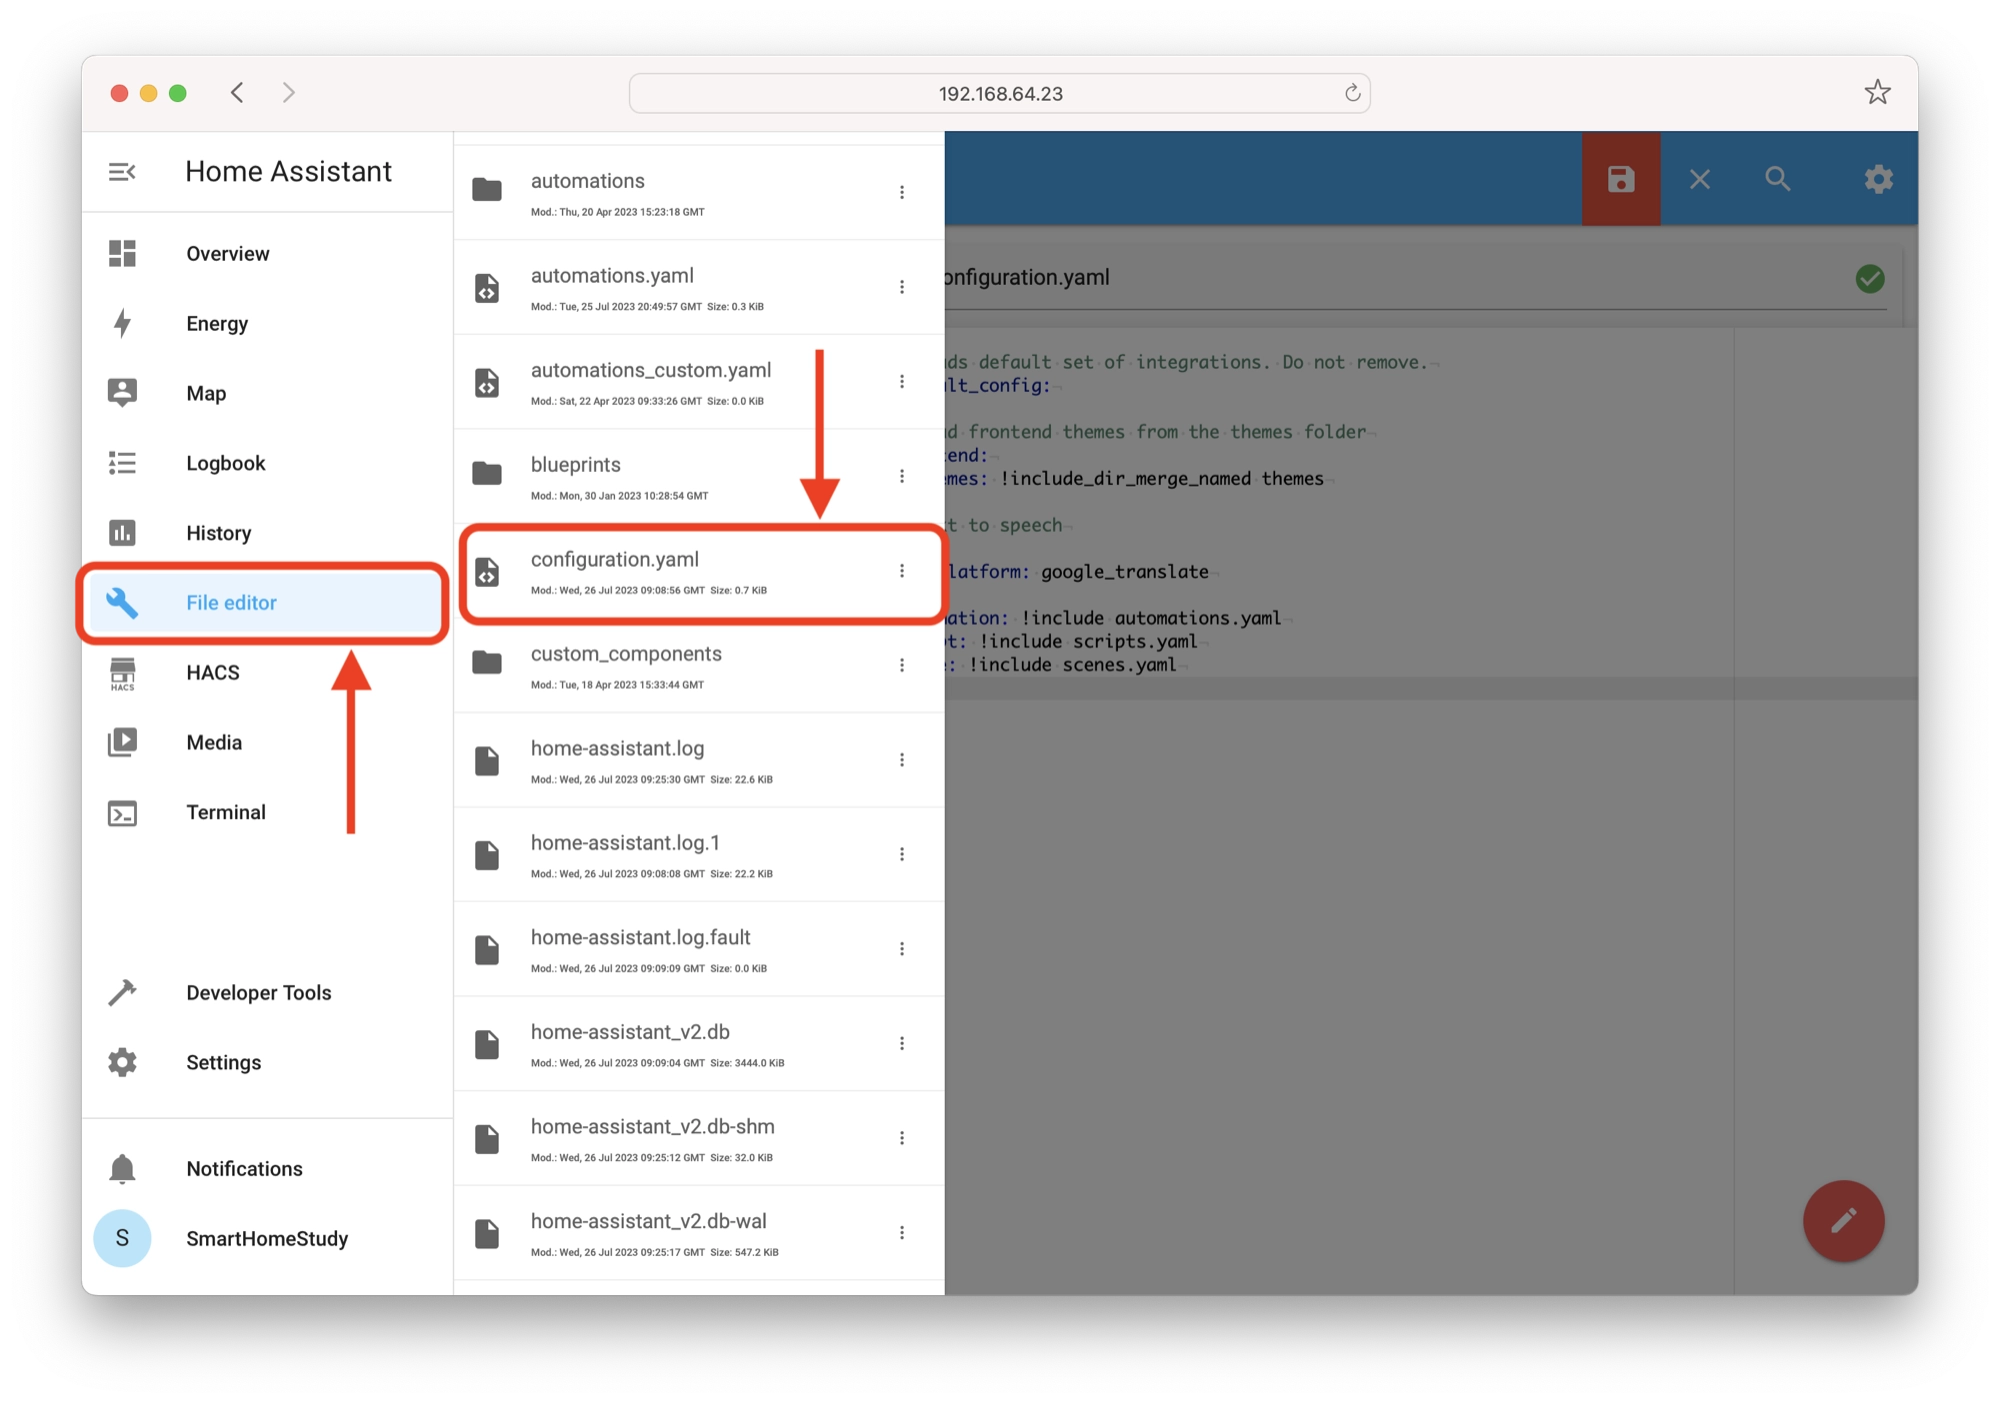
In order to access the automations.yaml file, we will use the File Editor add-on. Click File Editor in the sidebar in order to open the File Editor.
Next, locate the configuration.yaml file and click it to open it in the File Editor.
The automation integration
The automation integration is the section of the YAML configuration where you input all of the automations in your Home Assistant system.
It is denoted in the configuration.yaml file as automation: and you can either place the automation YAML directly beneath it, or you can use it to reference another file.
In most cases it makes sense to reference another file, in order to keep the configuration tidy. In the default “out of the box” configuration, Home Assistant should be pointing the automation integration to the automations.yaml file.
automation: !include automations.yaml
The automations.yaml file is where all of the automations created by the GUI editor are stored.
If you wish to create your own automations directly in YAML, you can add them to the automations.yaml file. This allows you to use automations created by the GUI as well as to create and edit your own automations in YAML.
Creating Automations with YAML
In this first section of this article, we created an automation using the graphical user interface automation editor. In this section we will take a look at how to create and edit automations directly in YAML.
Note that Home Assistant has reached a point whereby it is not really necessary to use YAML for automations in most cases. I would recommend using the GUI editor, however I have left this section of the article intact for educational purposes.
Open the file editor
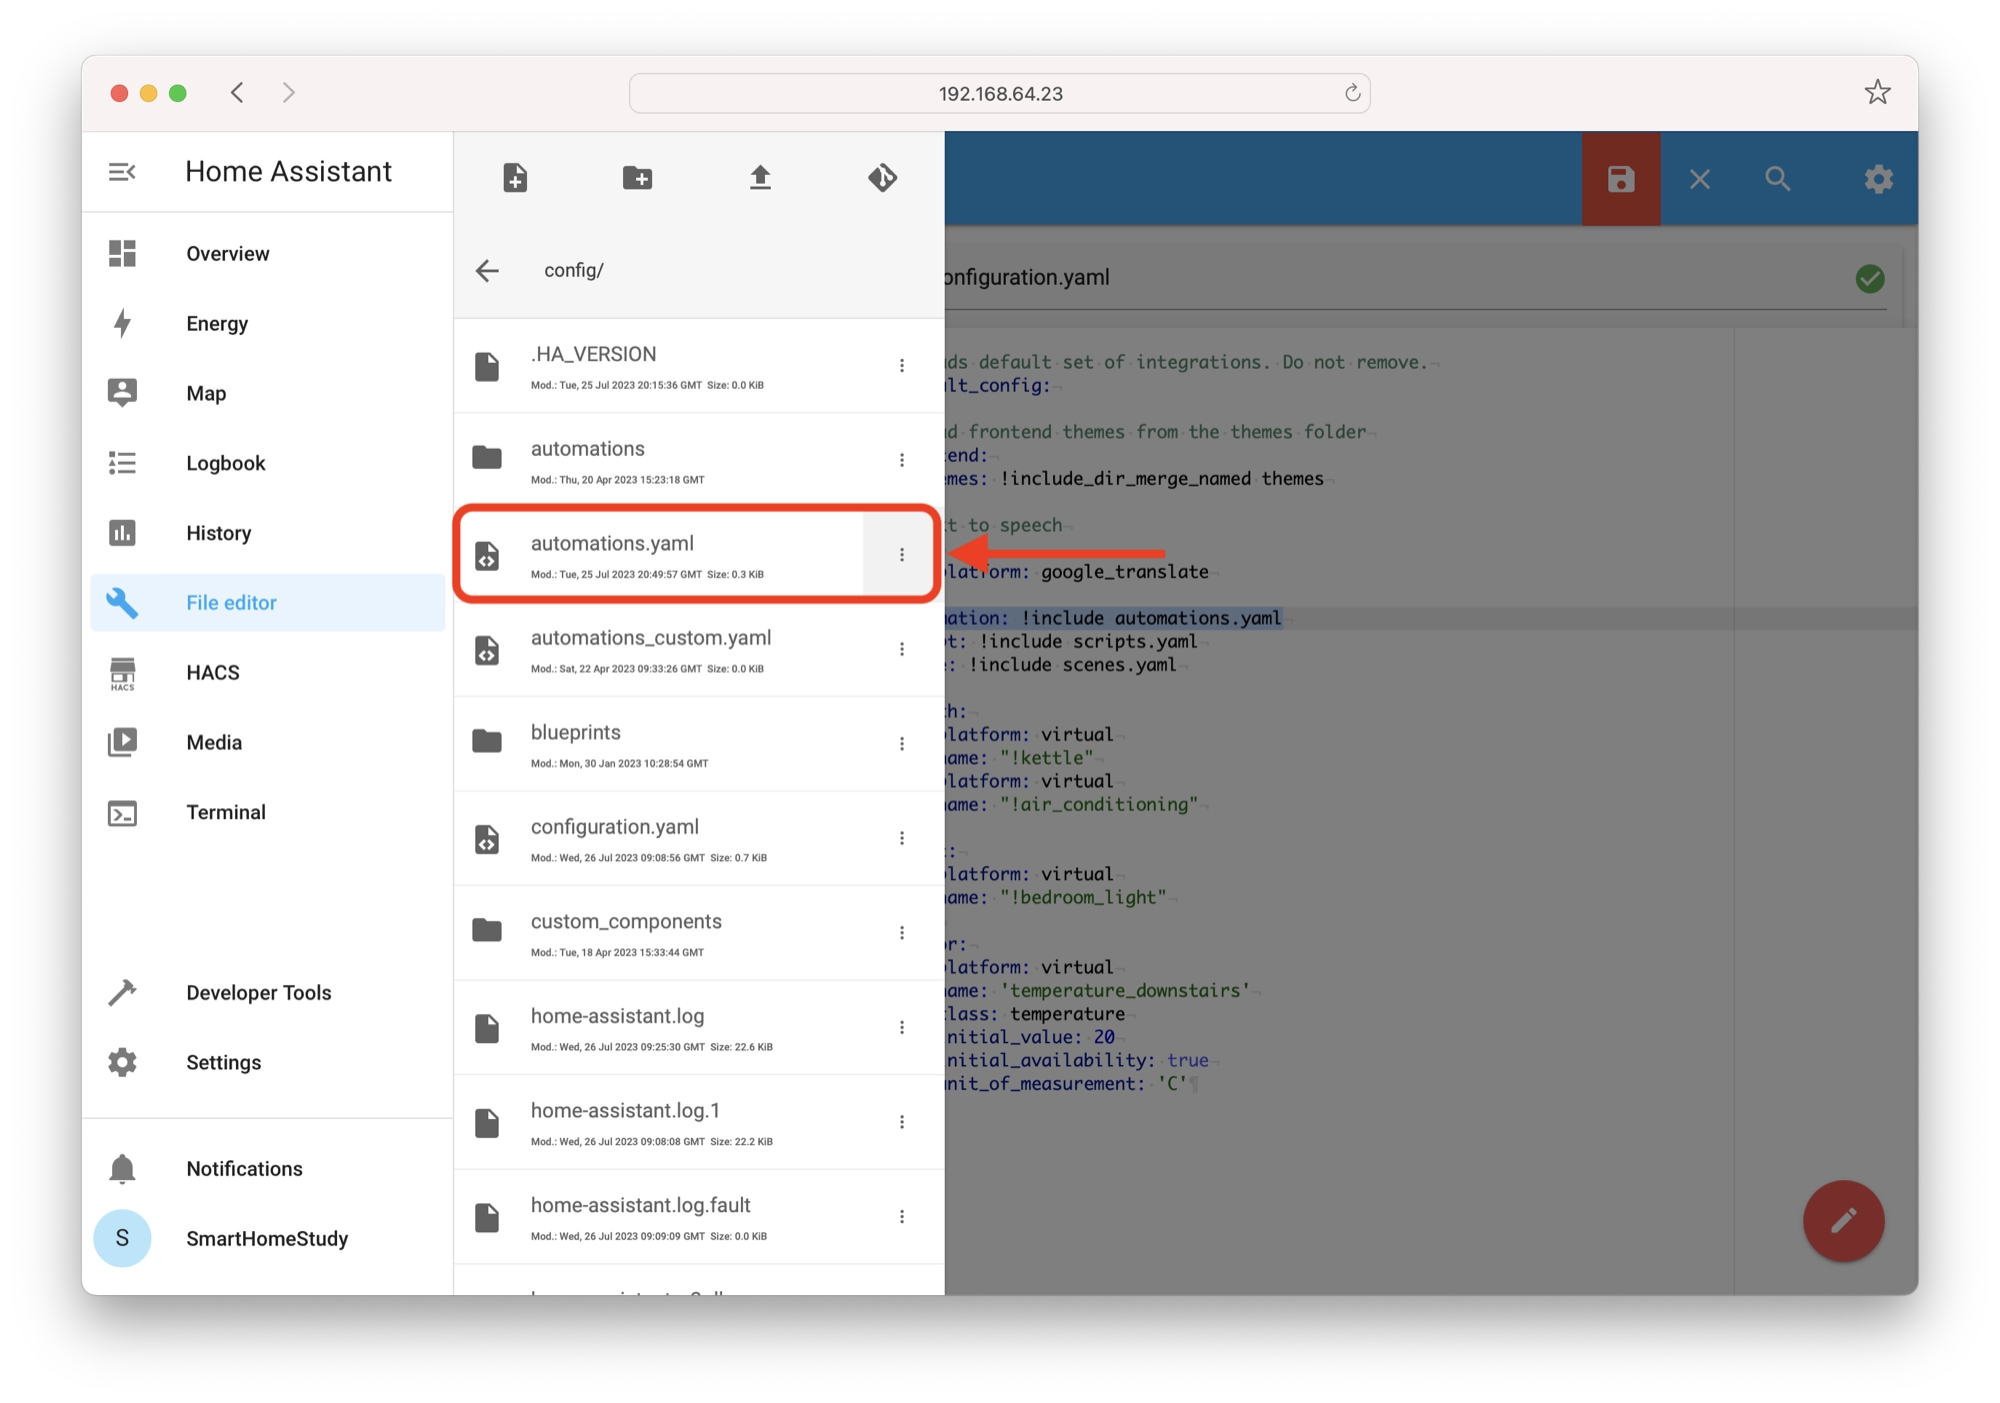
First click on file editor on the sidebar and navigate to your automations.yaml file.
Writing the automation manually
If you saved the automation in the graphical editor you will see the code that has been generated. If you wish to manually add an automation, simply write the code beneath the existing code.
One very important point to make is that YAML is very sensitive to tabs and spacing. You must ensure that your tabs and spacing are correct in the file or you will get syntax errors. This is the number one cause of problems when people are editing YAML.
We must also move the “-” operator down to the alias: parameter as we still need it there in order to specify a new item in our list of automations. The “-” operator is always used to denote items in a list, just think of it like a bullet point.
ID number
In order for the automation to work with the graphical editor we will need to specify an ID number.
The graphical editor generates one automatically but if you are writing an automation manually, just specify your own number. It does not matter what number you specify, as long as it is unique.
- id: '1582583923026'
Name and description
Firstly we will give our automation the name MorningAC and description.
- id: '1582583923026'
  alias: MorningAC
  description: Turn on air conditioning at sunrise if temperature is above 23 degrees
If you wish to write all of the your automations in YAML and are not going to use the graphical editor, you can omit the ID attribute.
Add the trigger
Next we specify the trigger and assign the entity_id.
- id: '1582583923026'
  alias: MorningAC
  description: Turn on air conditioning at sunrise if temperature is above 23 degrees
  trigger:
  - entity_id: light.bedroom_light
Then we specify the platform as state because we want to trigger the automation when the state of something changes, in this case our light. The state change we are looking for is from off to on.
- id: '1582583923026'
  alias: MorningAC
  description: Turn on air conditioning at sunrise if temperature is above 23 degrees
  trigger:
  - entity_id: light.bedroom_light
    platform: state
    from: 'off'
    to: 'on'
Add the condition
Next we will specify the condition as a numeric_state. We would only like our automation to fire when sensor.temperature_downstairs is above 23.
- id: '1582583923026'
  alias: MorningAC
  description: Turn on air conditioning at sunrise if temperature is above 23 degrees
  trigger:
  - entity_id: light.bedroom_light
    platform: state
    from: 'off'
    to: 'on'
  condition:
  - above: '23'
    condition: numeric_state
    entity_id: sensor.temperature_downstairs
Add the action
Lastly we will specify the action as the switch.turn_on service. The entity we wish to switch on is switch.air_conditioning.
- id: '1582583923026'
  alias: MorningAC
  description: Turn on air conditioning at sunrise if temperature is above 23 degrees
  trigger:
  - entity_id: light.bedroom_light
    platform: state
    from: 'off'
    to: 'on'
  condition:
  - above: '23'
    condition: numeric_state
    entity_id: sensor.temperature_downstairs
  action:
  - entity_id: switch.air_conditioning
    service: switch.turn_on
YAML tips
As previously mentioned, make sure that your tabs and spacing are correct! This is the number one cause of problems for beginners.
The order of items in a list does not matter. For example you can write the trigger as it is generated by the graphical editor.
  trigger:
  - entity_id: light.bedroom_light
    platform: state
    from: 'off'
    to: 'on'
Or you can write it like this, with the items in the list in a different order. Note that items in the list have the same tab spacing.
  trigger:
  - platform: state
    entity_id: light.bedroom_light
    to: 'on'
    from: 'off'
When you want to create a list of something, use the “-” operator and be sure to put a space afterwards. You can create lists of triggers, conditions and actions.
  trigger:
  - platform: state
    entity_id: light.bedroom_light
    to: 'on'
    from: 'off'
  - platform: sun
    event: sunrise
For more YAML tips, be sure to check out my beginners guide to YAML for Home Assistant enthusiasts!
Conclusion
Congratulations, you have successfully made it to the end of this tutorial! I hope that it has given you a better understanding of automations in Home Assistant.
Thanks for visiting and please be sure to leave a comment below! Now click on one of the links below and go put your new found knowledge to some good use!
Article Updates
Jul 26th 2023 : Article overhaul and updated using HA Core 2023.7.3. Featured image updated. TOC added.
Article first published February 24th 2020.
Thanks so much for visiting my site! If this article helped you achieve your goal and you want to say thanks, you can now support my work by buying me a coffee. I promise I won't spend it on beer instead... 😏


Is there any way to control automation from different node?
For example, I have ESP8266 (node A) with binary GPIO sensor connected to physical switch. I want to control relay attached to another ESP8266 (node B) everytime GPIO sensor in node A is switched on. Do you have any reference where i can find the solution? Thanks
Hi Maulana, thanks for visiting! Are you wanting to link these two directly or are you using Home Assistant? If you are running Home Assistant then yes it’s definitely possible. Flash both ESP8266 nodes with Tasmota, set one up as a switch and the other as a relay using Generic(18). Then connect both nodes to Home Assistant using MQTT. Finally, set up an automation that switches the relay when the button is pressed.
Hi Siytek,
Thank you for creating this tutorial. I think you have simplified the creation of automation .
I have installed Home assistant 10days ago. I have been struggling to understand automation /scripts etc.
I found it very useful.
regards,
Vikram
Very glad to hear it Vikram! Thanks for visiting 🙂