
If you are new to Home Assistant one of the first questions you may be asking is how can I make a series of sequential events occur in the event of some kind of other action.
For example you may want a smart light switch to turn on the main light, a lamp and the TV in the living room.
Or perhaps you would like the bedroom light and heating to switch on in the morning when the temperature is colder than 10 degrees celsius and the sun has not risen?
You may also want to add a delay between these events, for example all the lights turn off a couple of minutes after you turn the TV off, giving you time to leave the living room and not be plunged into darkness!
Prerequisite
In order to complete this tutorial, you will need to have Home Assistant installed and running. If you don’t have Home Assistant installed yet, click here to visit the installation tutorial first.
Installing the Home Assistant File Editor add-on
We will also be using the Home Assistant File Editor add-on, which is not installed by default. If you have not yet installed the File Editor, click here to learn how to install it.
What is a Script in Home Assistant?
In Home Assistant, a script is a feature that allows you to define a sequence of actions that can be executed with a single service call.
It’s a way to bundle multiple automation steps together for easy execution and organization. Instead of triggering individual services or actions one by one, you can trigger a script that encapsulates all the necessary steps.
Here’s how a script is typically defined in Home Assistant’s configuration (using YAML syntax):
# Example script
script:
  my_example_script:
    alias: My Example Script
    sequence:
      - service: light.turn_on
        entity_id: light.living_room
        data:
          brightness: 100
          color_temp: 400
      - service: media_player.play
        entity_id: media_player.tv
In this example, we define a script named my_example_script. The script contains a sequence of actions to be executed when the script is triggered.
When you execute this script, it will turn on the living room light with specific brightness and color temperature settings and then start playing the media on the TV.
Scripts can be triggered manually from the Home Assistant UI or through various automation mechanisms like events, triggers, or conditions.
They are handy for creating complex automation routines without the need to repeat the same actions multiple times throughout the configuration.
Using scripts in Home Assistant can make your home automation setup more organized, efficient, and easier to manage.
How to Call a Script in Home Assistant
To call a script in Home Assistant, you have several options, depending on how you want to trigger the script. Here are some common methods to call a script:
- Manually calling a script using Developer Tools:
- Open the Developer Tools section from the left-hand sidebar.
- Click on the Services tab.
- In the “Service” field, type
script.turn_on. - In the “Service Data” field, enter the name of your script, e.g.,
{"entity_id": "script.my_example_script"}. - Click the “Call Service” button to execute the script.
- Automations:
You can also trigger a script within an automation. For example, if you have a motion sensor in your hallway, you can create an automation that calls a script to turn on the lights when motion is detected.
   automation:
     - alias: "Motion Detected in Hallway"
       trigger:
         platform: state
         entity_id: binary_sensor.motion_sensor_hallway
         to: "on"
       action:
         service: script.turn_on
entity_id: script.my_example_script- Button Presses or Switches:
If you have physical buttons or switches integrated into Home Assistant, you can use them to trigger scripts.
   automation:
     - alias: "Button Pressed"
       trigger:
         platform: event
         event_type: zwave.scene_activated
         event_data:
           entity_id: zwave.your_button_entity_id
           scene_id: 1
       action:
         service: script.turn_on
entity_id: script.my_example_script- Voice Assistants:
If you have set up Home Assistant to work with a voice assistant like Amazon Alexa or Google Assistant, you can use voice commands to trigger scripts. Make sure your script is exposed to the voice assistant through the integration.
These are just a few examples of how you can call a script in Home Assistant. The method you choose will depend on your specific use case and the devices and integrations you have set up in your Home Assistant configuration.
Home Assistant Script Variables
One other powerful feature of a script is that it has the ability to be passed variables. This means that when we call the script, we can also specify chosen attributes within the script differently.
For example we could write a script that turns off everything in the living room, but delays turning the main light off. We could call the script and pass the variable for delay in seconds.
This means that different actions which call the script could specify a different length of time that the main light should be left on for.
Basic Script Variables
In Home Assistant, variables can be defined within scripts using the variables action. These variables can store data and be accessed by subsequent actions, providing more dynamic and flexible automation possibilities.
In the following example, we define two variables, entities and brightness, which can be defined by the action that calls the script.
- alias: "Set variables"
  variables:
    entities:
      - light.kitchen
      - light.living_room
    brightness: 100
- alias: "Control lights"
  service: light.turn_on
  target:
    entity_id: "{{ entities }}"
  data:
    brightness: "{{ brightness }}"
By using variables in this way, we can call the script from different sources, such as different automations, and pass the values that we wish to use in the script execution.
This allows us to write a script that performs a particular (repetitive) task, but allows us to apply that script to many different things. For example, the purpose of the script above is to change the attributes of a light entity.
Different automations could leverage the script to set different brightness values for different entities, without the need for multiple copies of the same script.
Dynamic Templating
Variables in Home Assistant scripts support templating, allowing users to inject dynamic content into actions. This enhances automation flexibility even further, making it easier to create context-aware routines.
In the following example, the blind_state_message variable captures the current state of a cover entity, making it possible to send real-time notifications with the updated entity status.
- alias: "Set a templated variable"
  variables:
    blind_state_message: "The blind is {{ states('cover.blind') }}."
- alias: "Notify about the state of the blind"
  service: notify.mobile_app_iphone
  data:
    message: "{{ blind_state_message }}"
Understanding Variable Scope
It’s important to note that variables have local scope in Home Assistant scripts. Changes made to variables in nested sequence blocks won’t affect their value in outer sequence blocks.
In the following example, the people variable is set to zero and incremented within the nested if sequence, but its value remains unchanged in the outer sequence.
sequence:
  # Set the people variable to a default value
  - variables:
      people: 0
  # Try to increment people if Simon is home
  - if:
      - condition: state
        entity_id: device_tracker.simon
        state: "home"
    then:
      # At this scope and this point of the sequence, people == 0
      - variables:
          people: "{{ people + 1 }}"
      # At this scope, people will now be 1 ...
      - service: notify.notify
        data:
          message: "There are {{ people }} people home" # "There are 1 people home"
  # ... but at this scope it will still be 0
  - service: notify.notify
    data:
      message: "There are {{ people }} people home" # "There are 0 people home"
Creating a Home Assistant Script With the Graphical editor
There are two ways that you can make scripts in Home Assistant. You can either use the graphical editor, or you can write the script directly in YAML.
The easiest way to create a script is to use the graphical editor, so we will take a look at that method first.
Create a New Script
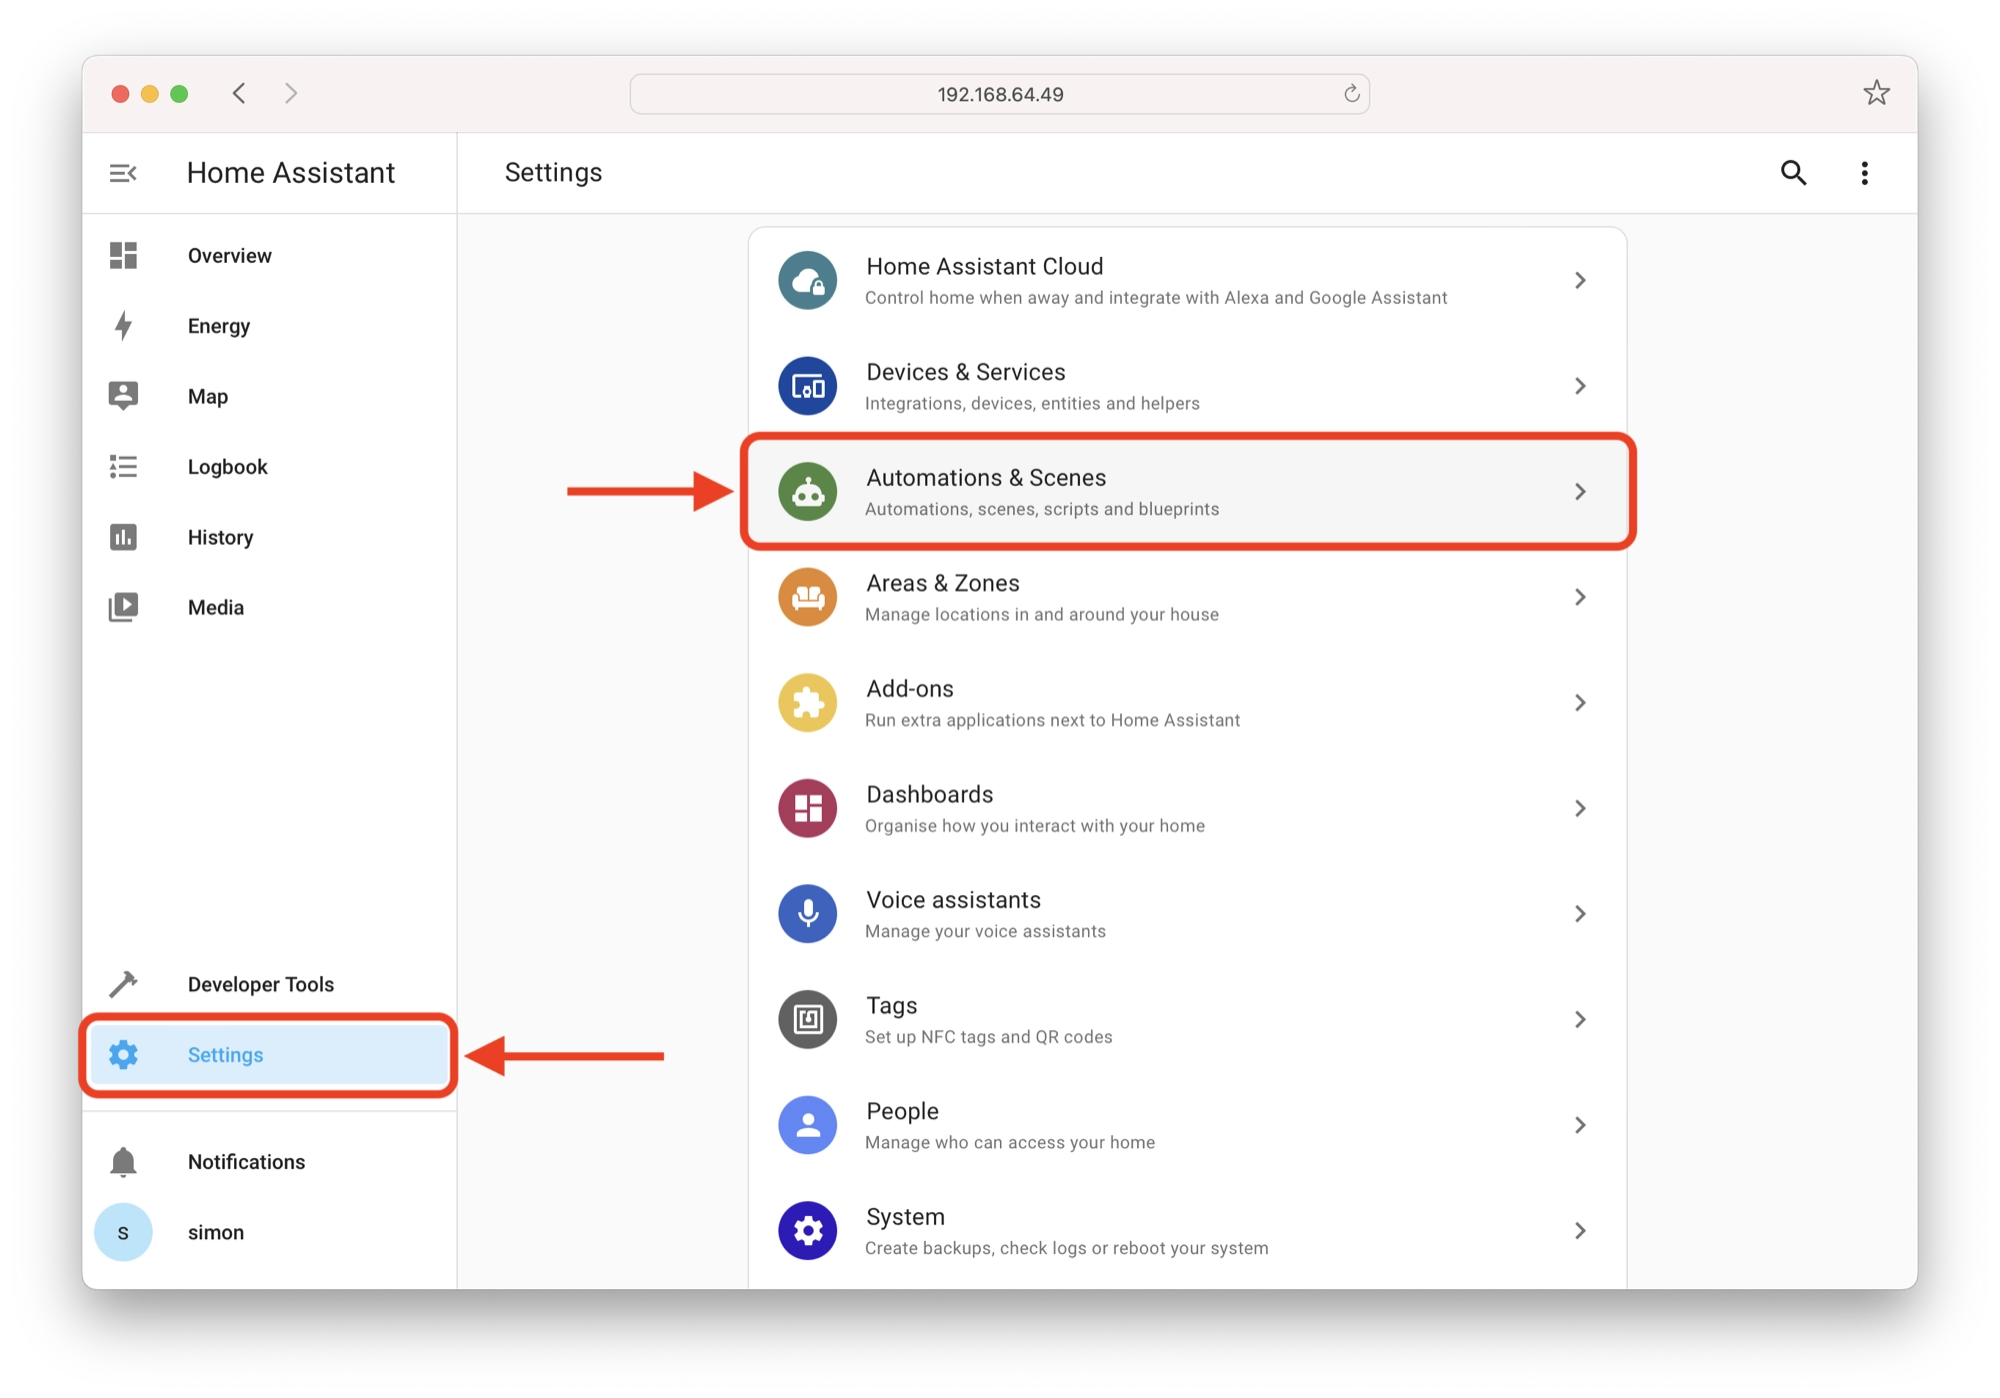
In order to create a new script with the graphical editor, first click Settings > Automations & Scenes.
Next, click the Scenes tab at the top of the page.
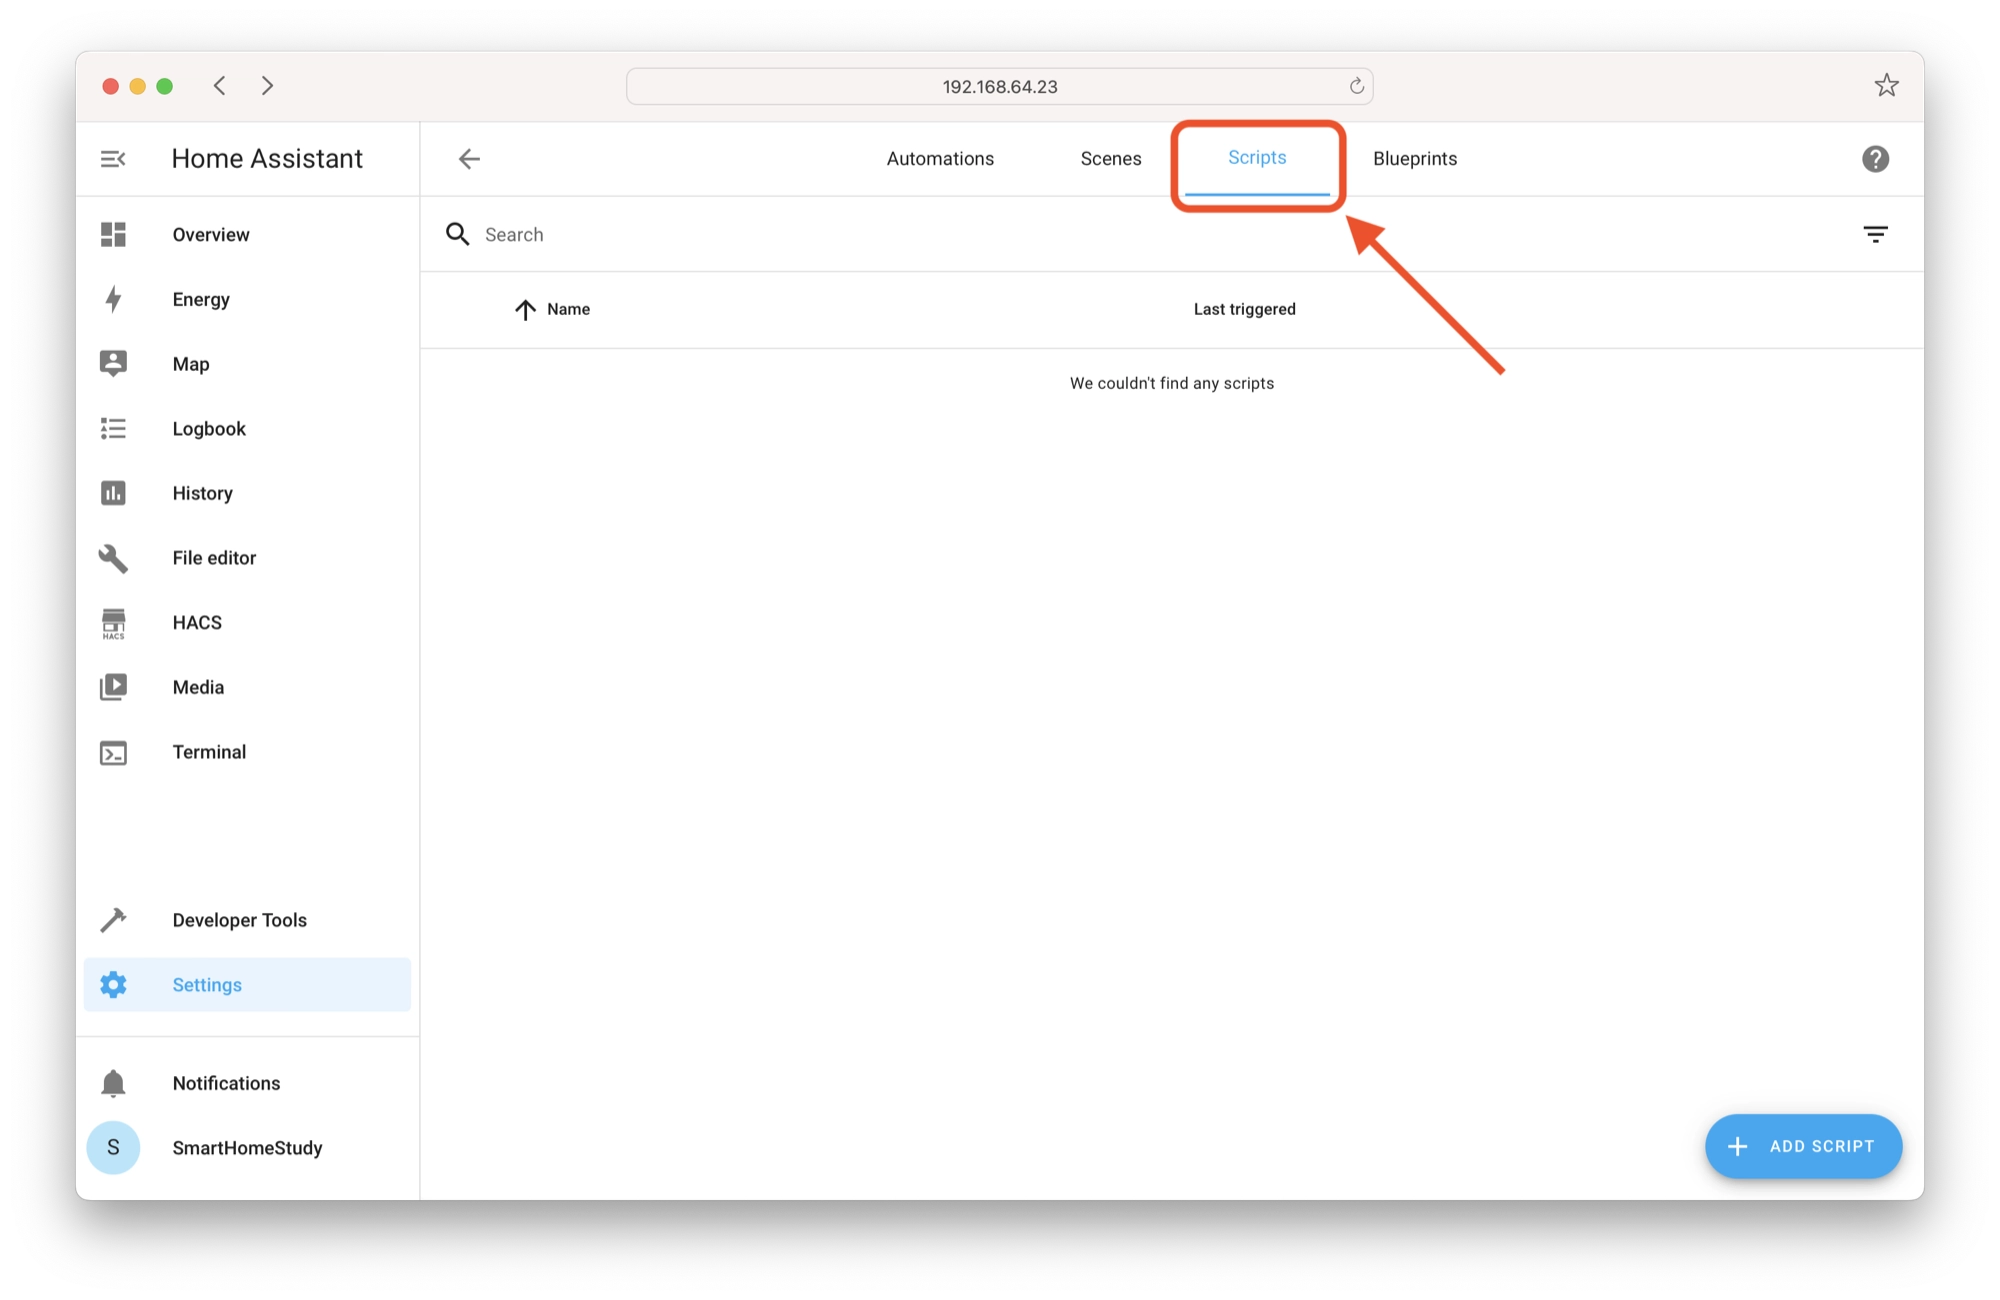
The main Scripts window displays a list of all scripts currently on your system. If you have not created any scripts yet, the list will be empty.
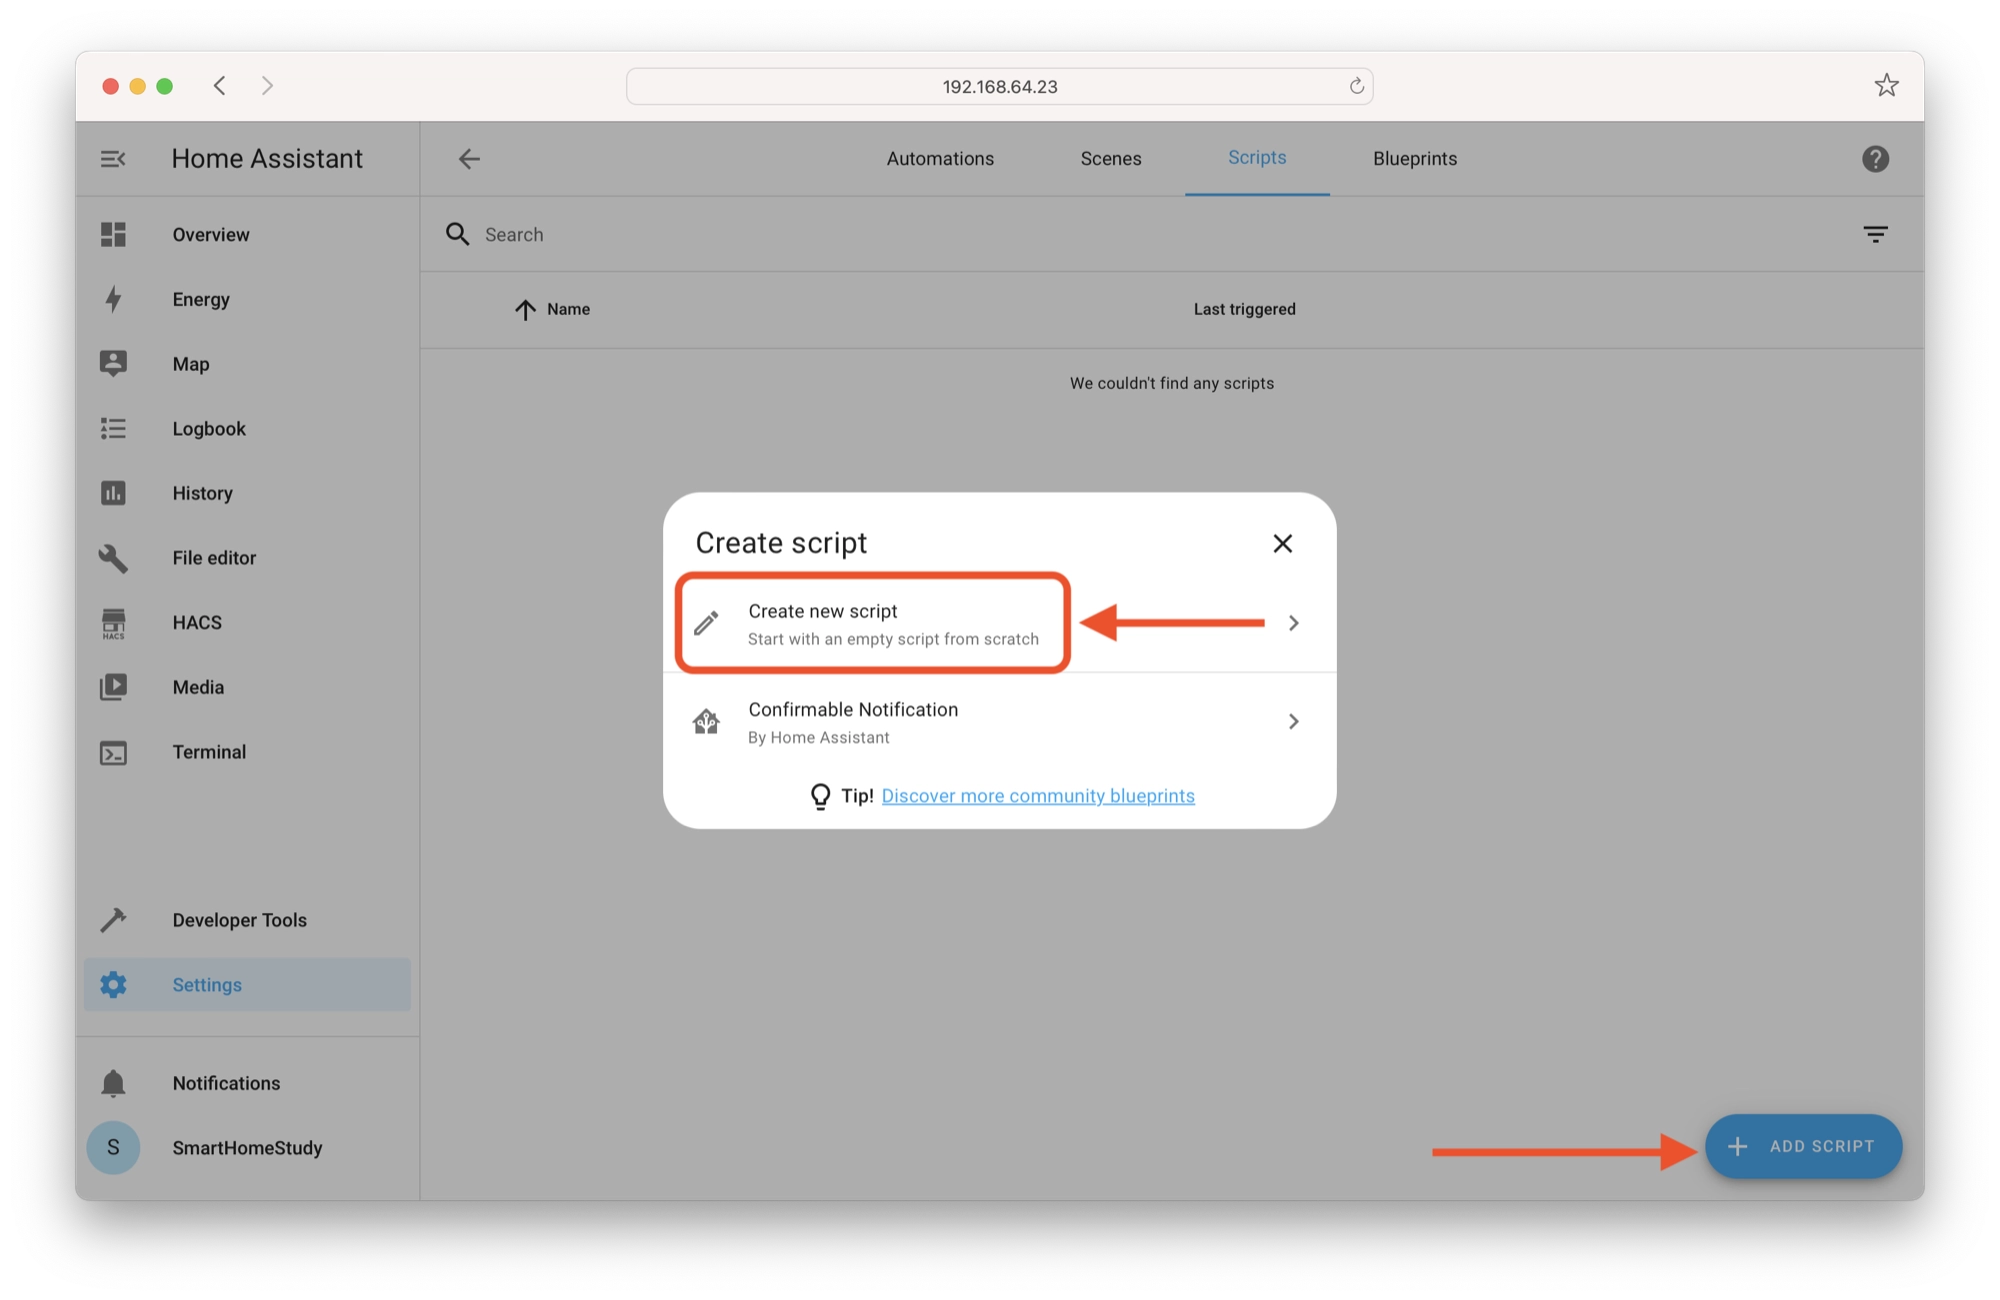
In order to add a new script, click the Add script button in the bottom left-hand corner and then click Create a new script.
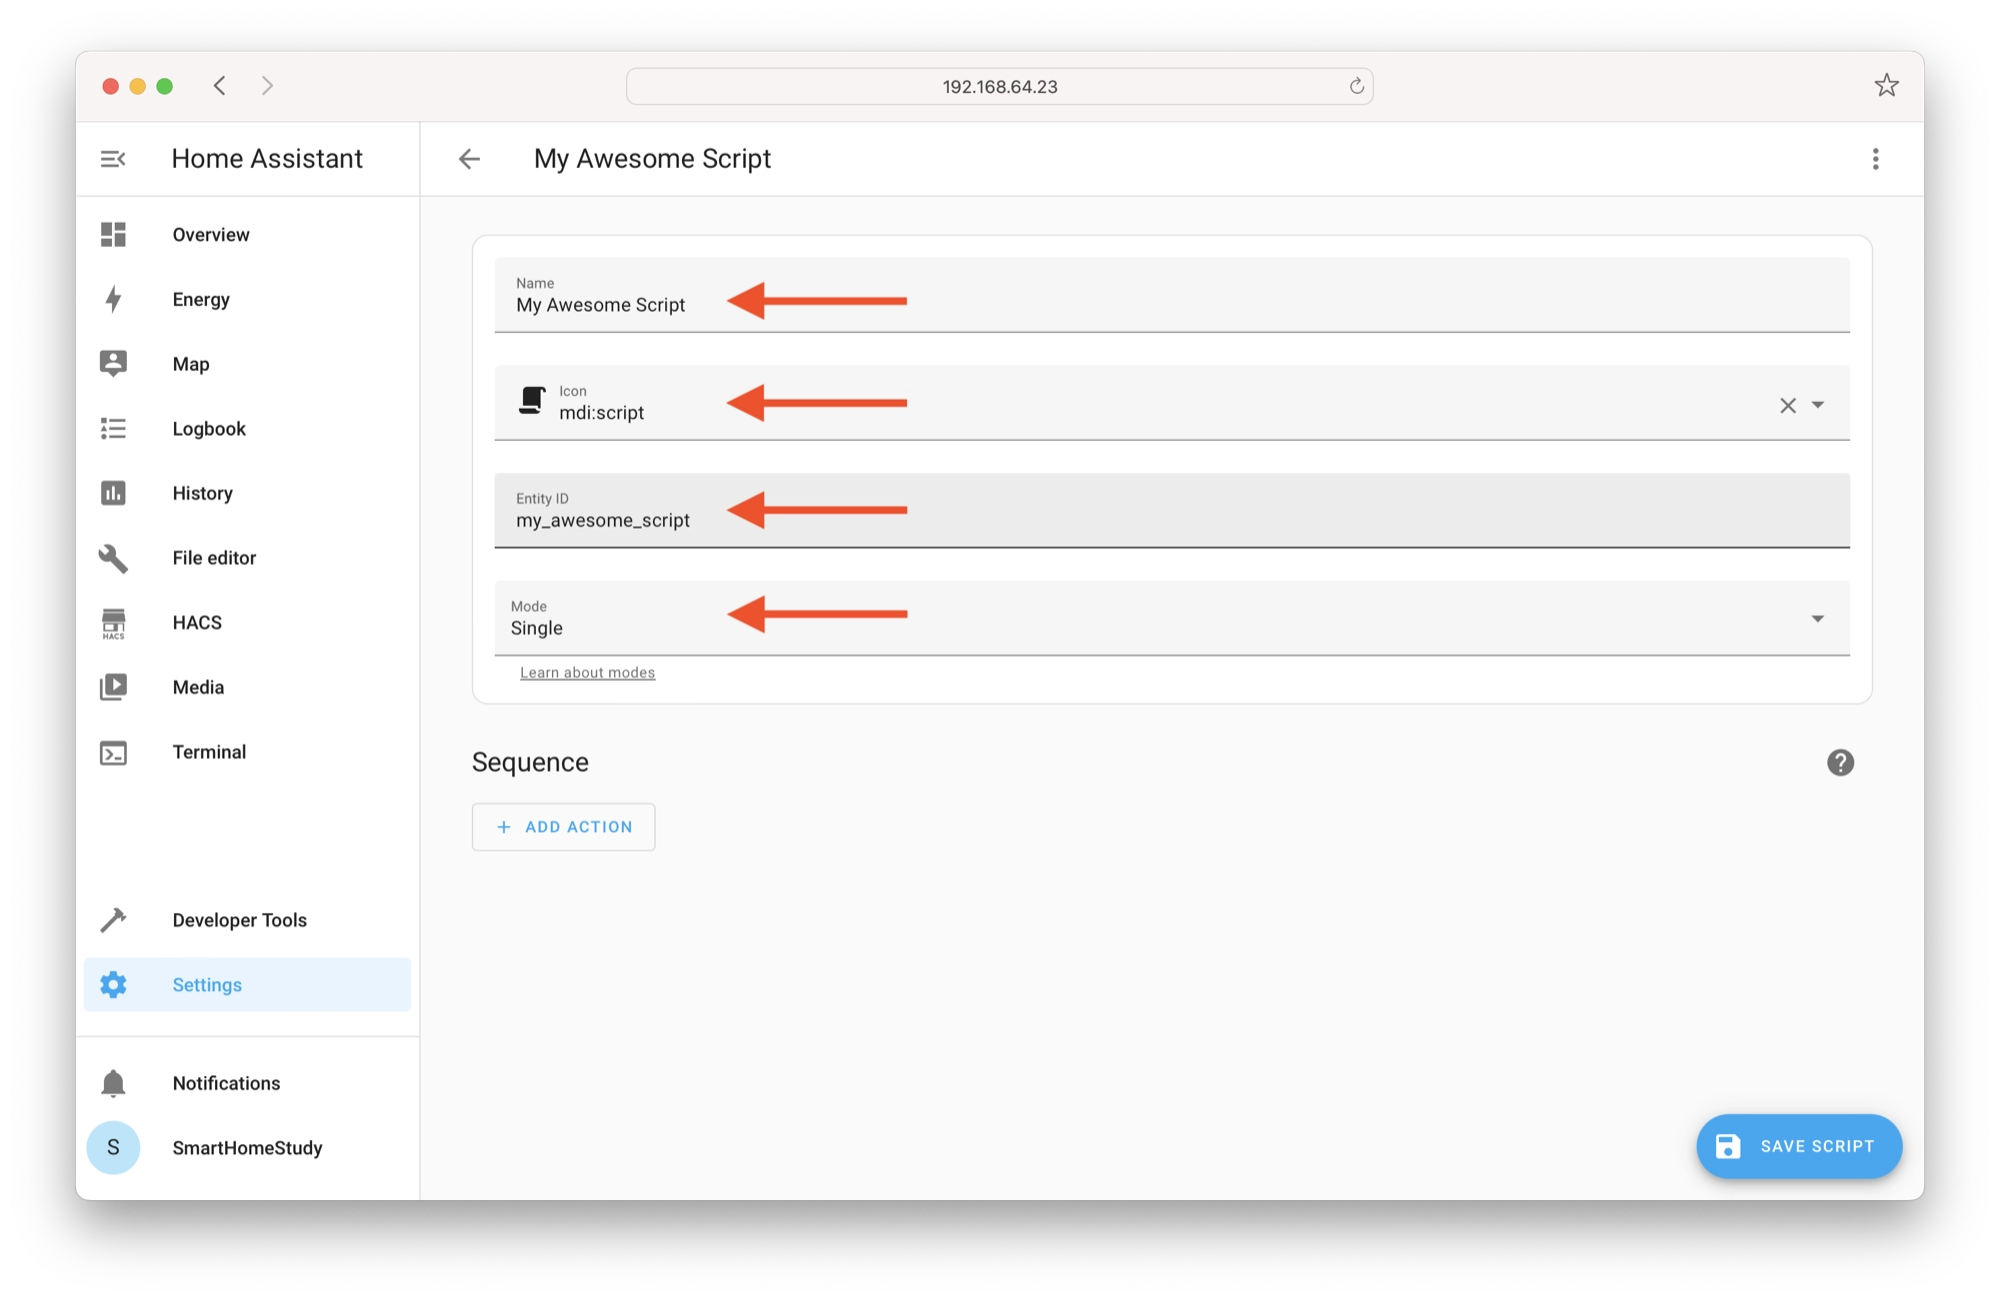
Configuringing the Script Attributes
Next, you will be taken to the editor where you can configure the script as necessary. Enter a name for your script and choose an icon. The Entity ID will be generated automatically, but you can change it if you prefer.
Choose the desired mode that you would like to use for your script:
- Single – The script will run through the list of actions sequentially and stop when they are all completed. Only a single instance of the script can run. If an attempt is made to start the script whilst it is running, a warning is given.
- Restart – The same as single, but the script will restart it an attempt is made to run it whilst it is already running.
- Queued – If the script is running, a second instance of the script will begin once the current instance has finished.
- Parallel – Multiple instances of the script are allowed. A new instance will begin each time the script is called.
For this simple example we will leave the mode set to single.
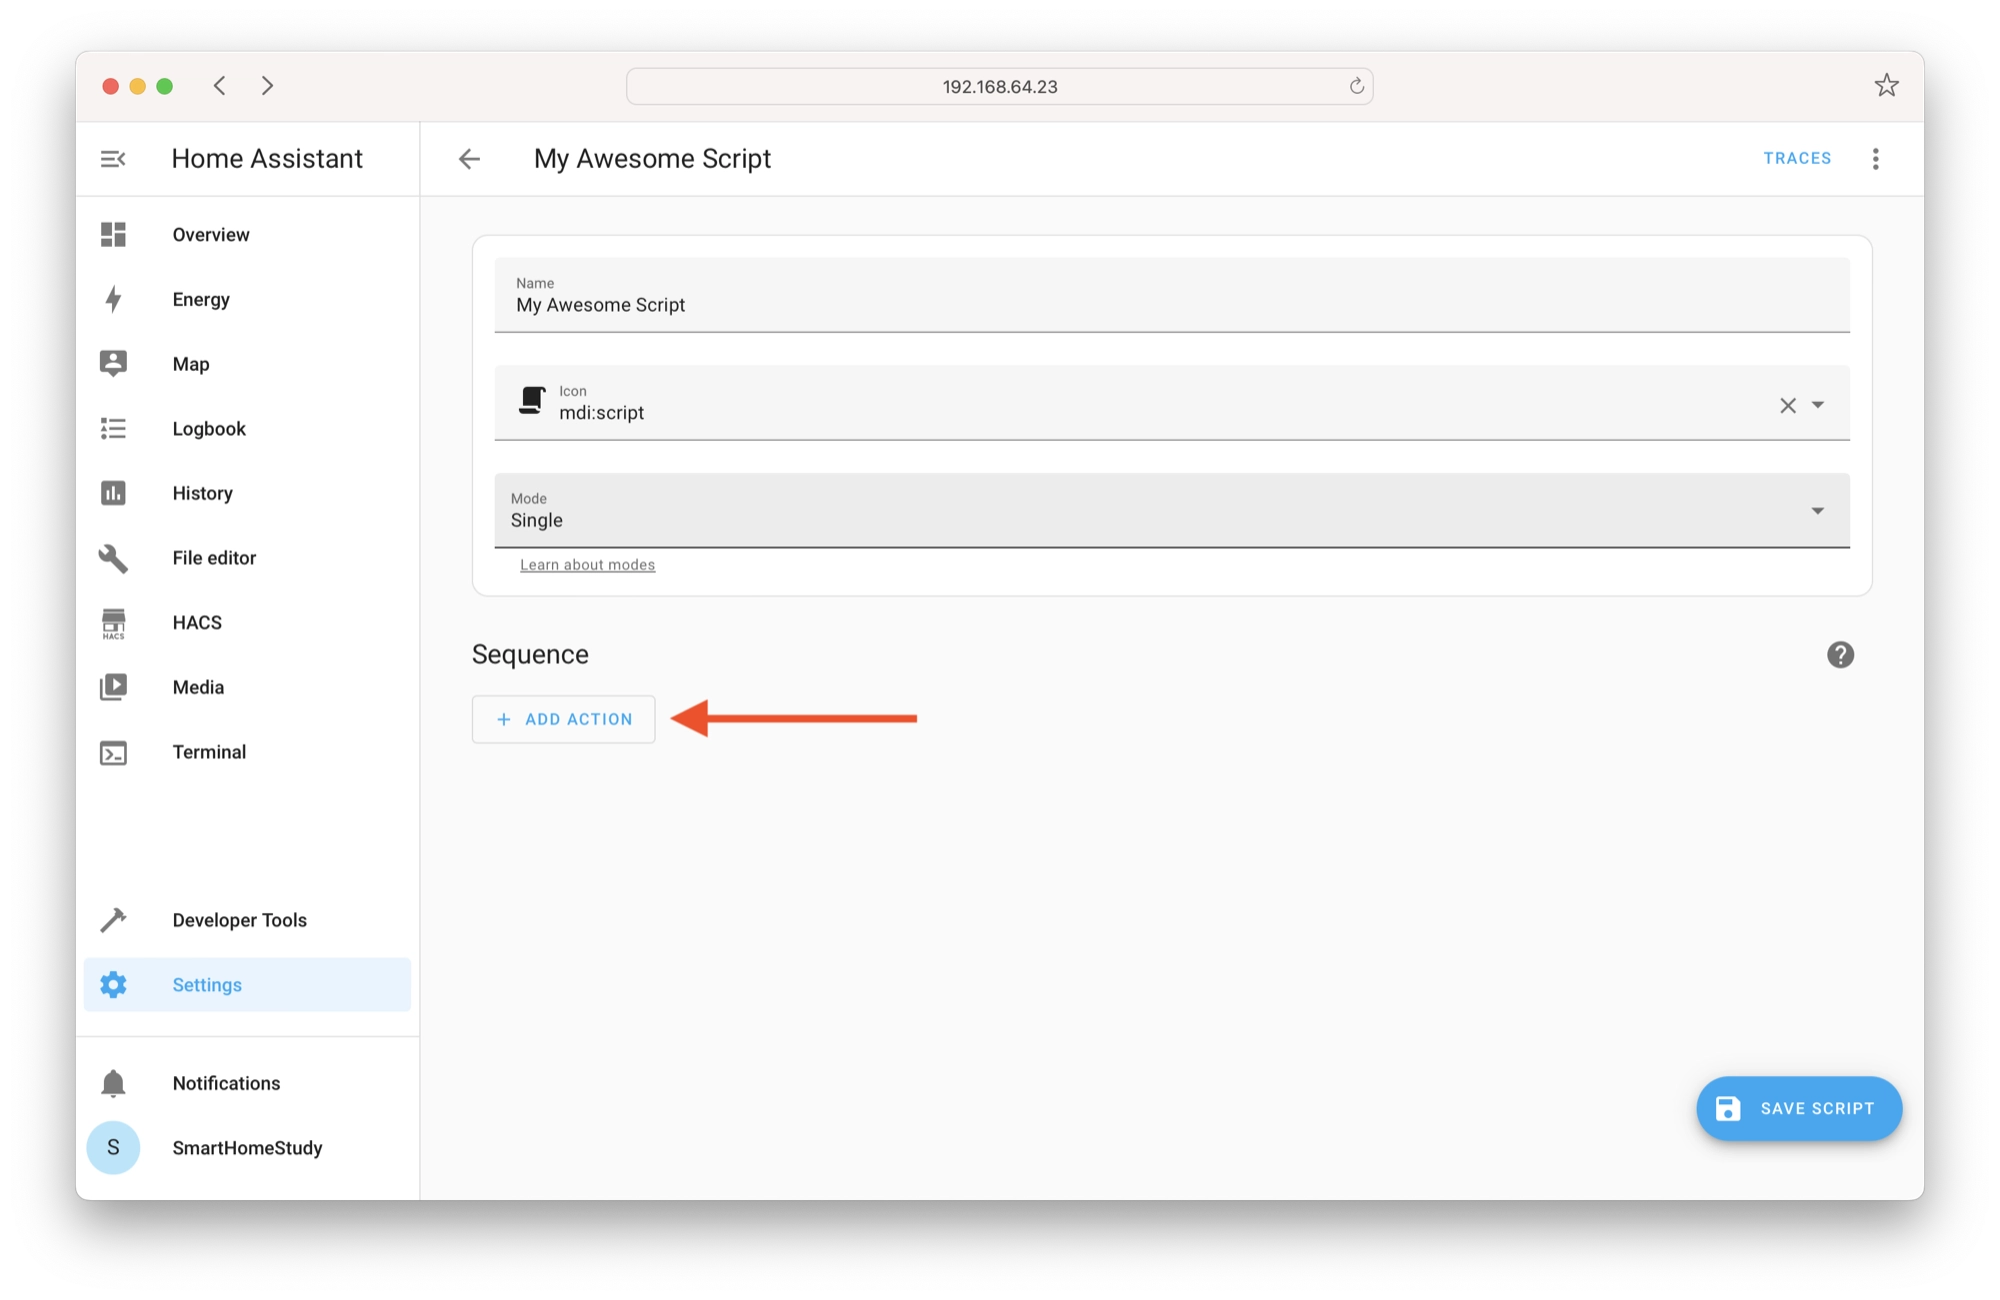
Adding a Script Action
Once the main attributes of the script are set, we can start to add actions. Each action that we add to the script will trigger in sequence. Click Add action to add the first action.
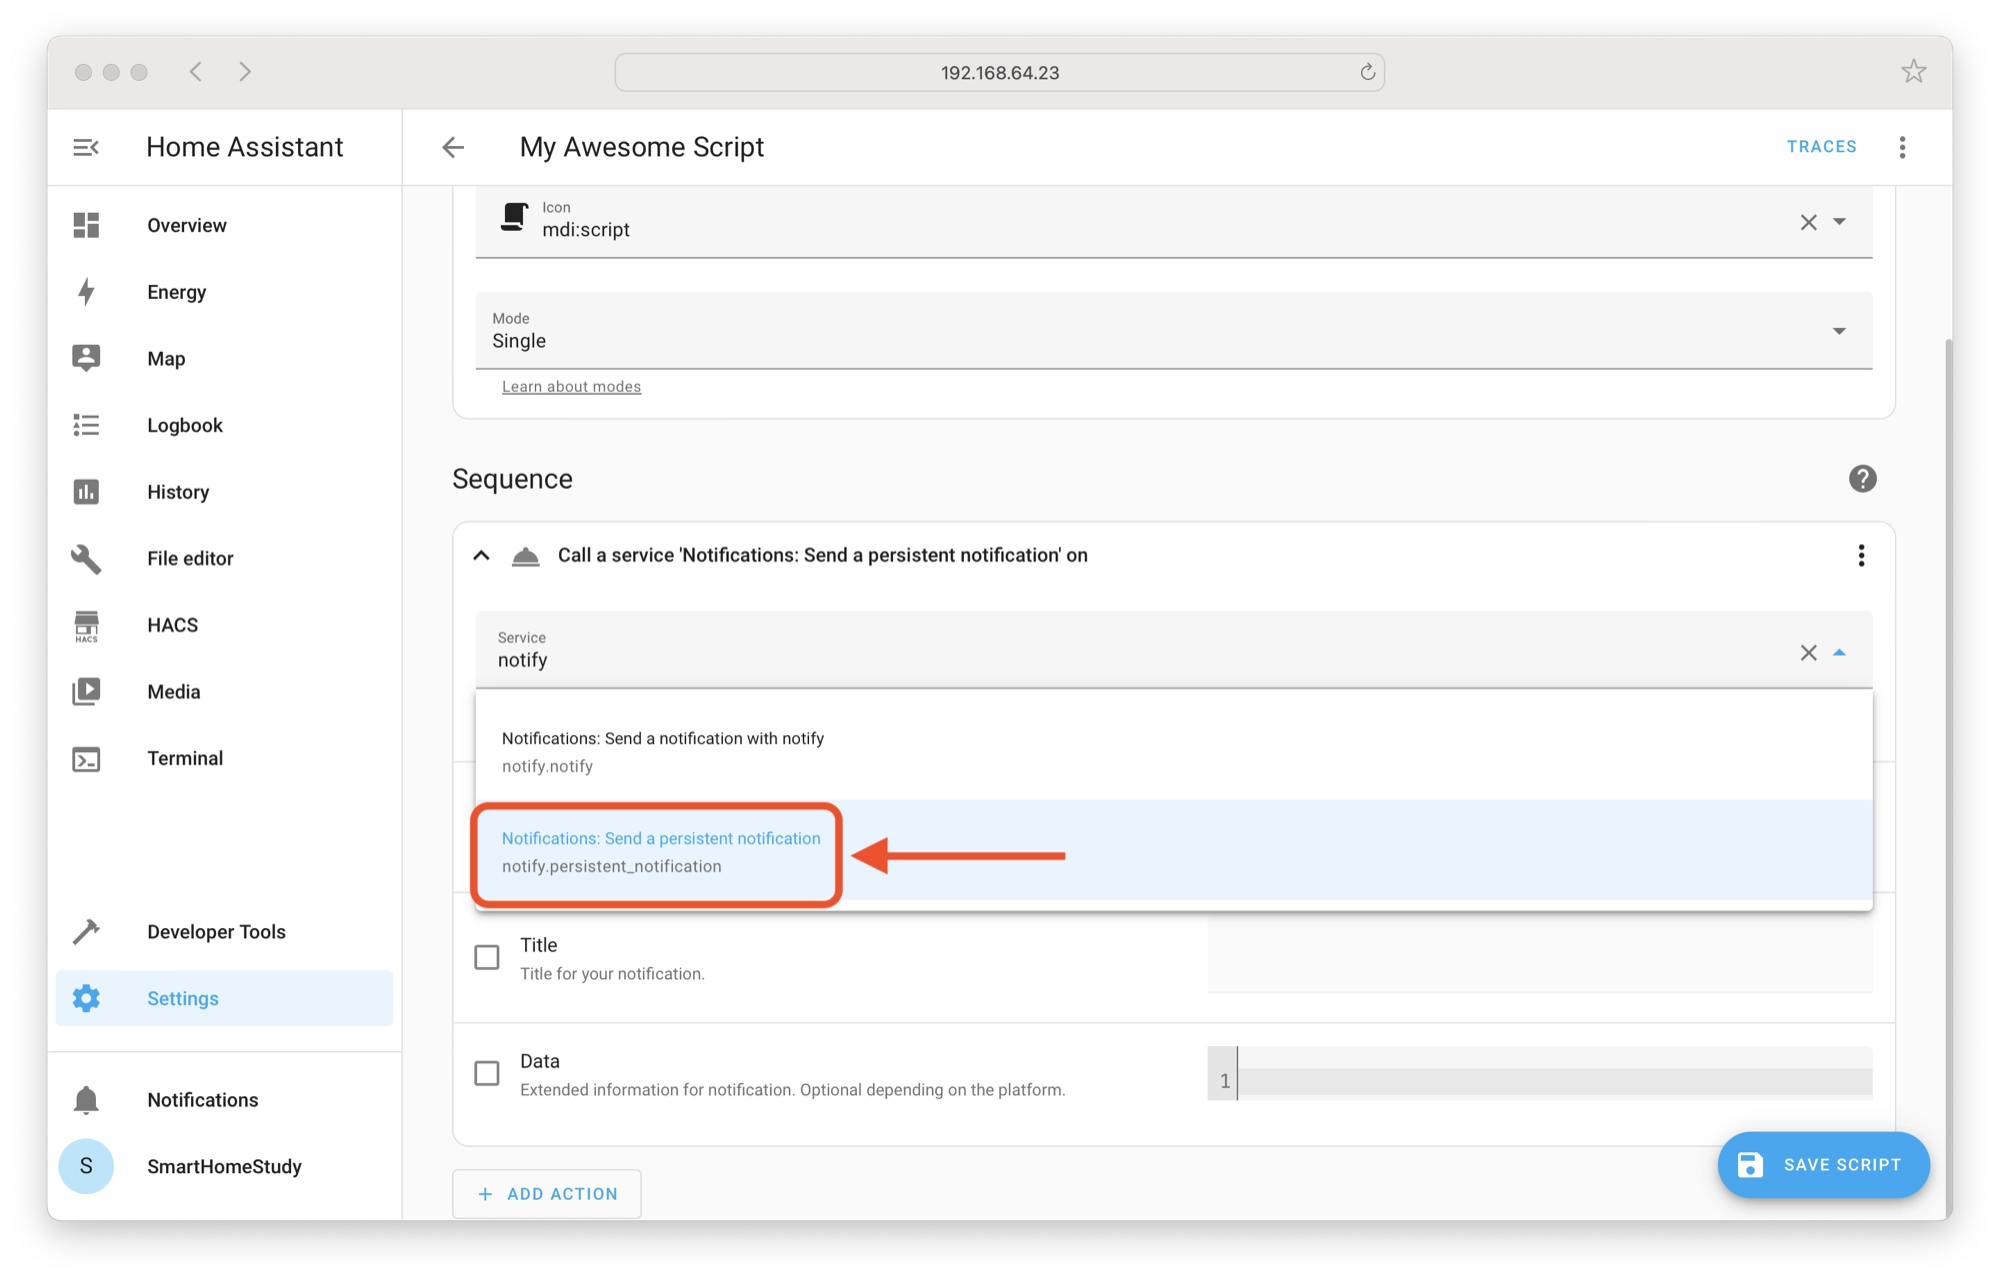
Choose Call service from the popup menu and type “notify” into the service text field in order to find the notify.persistent_notification service. Click it in order to select it as the chosen service.
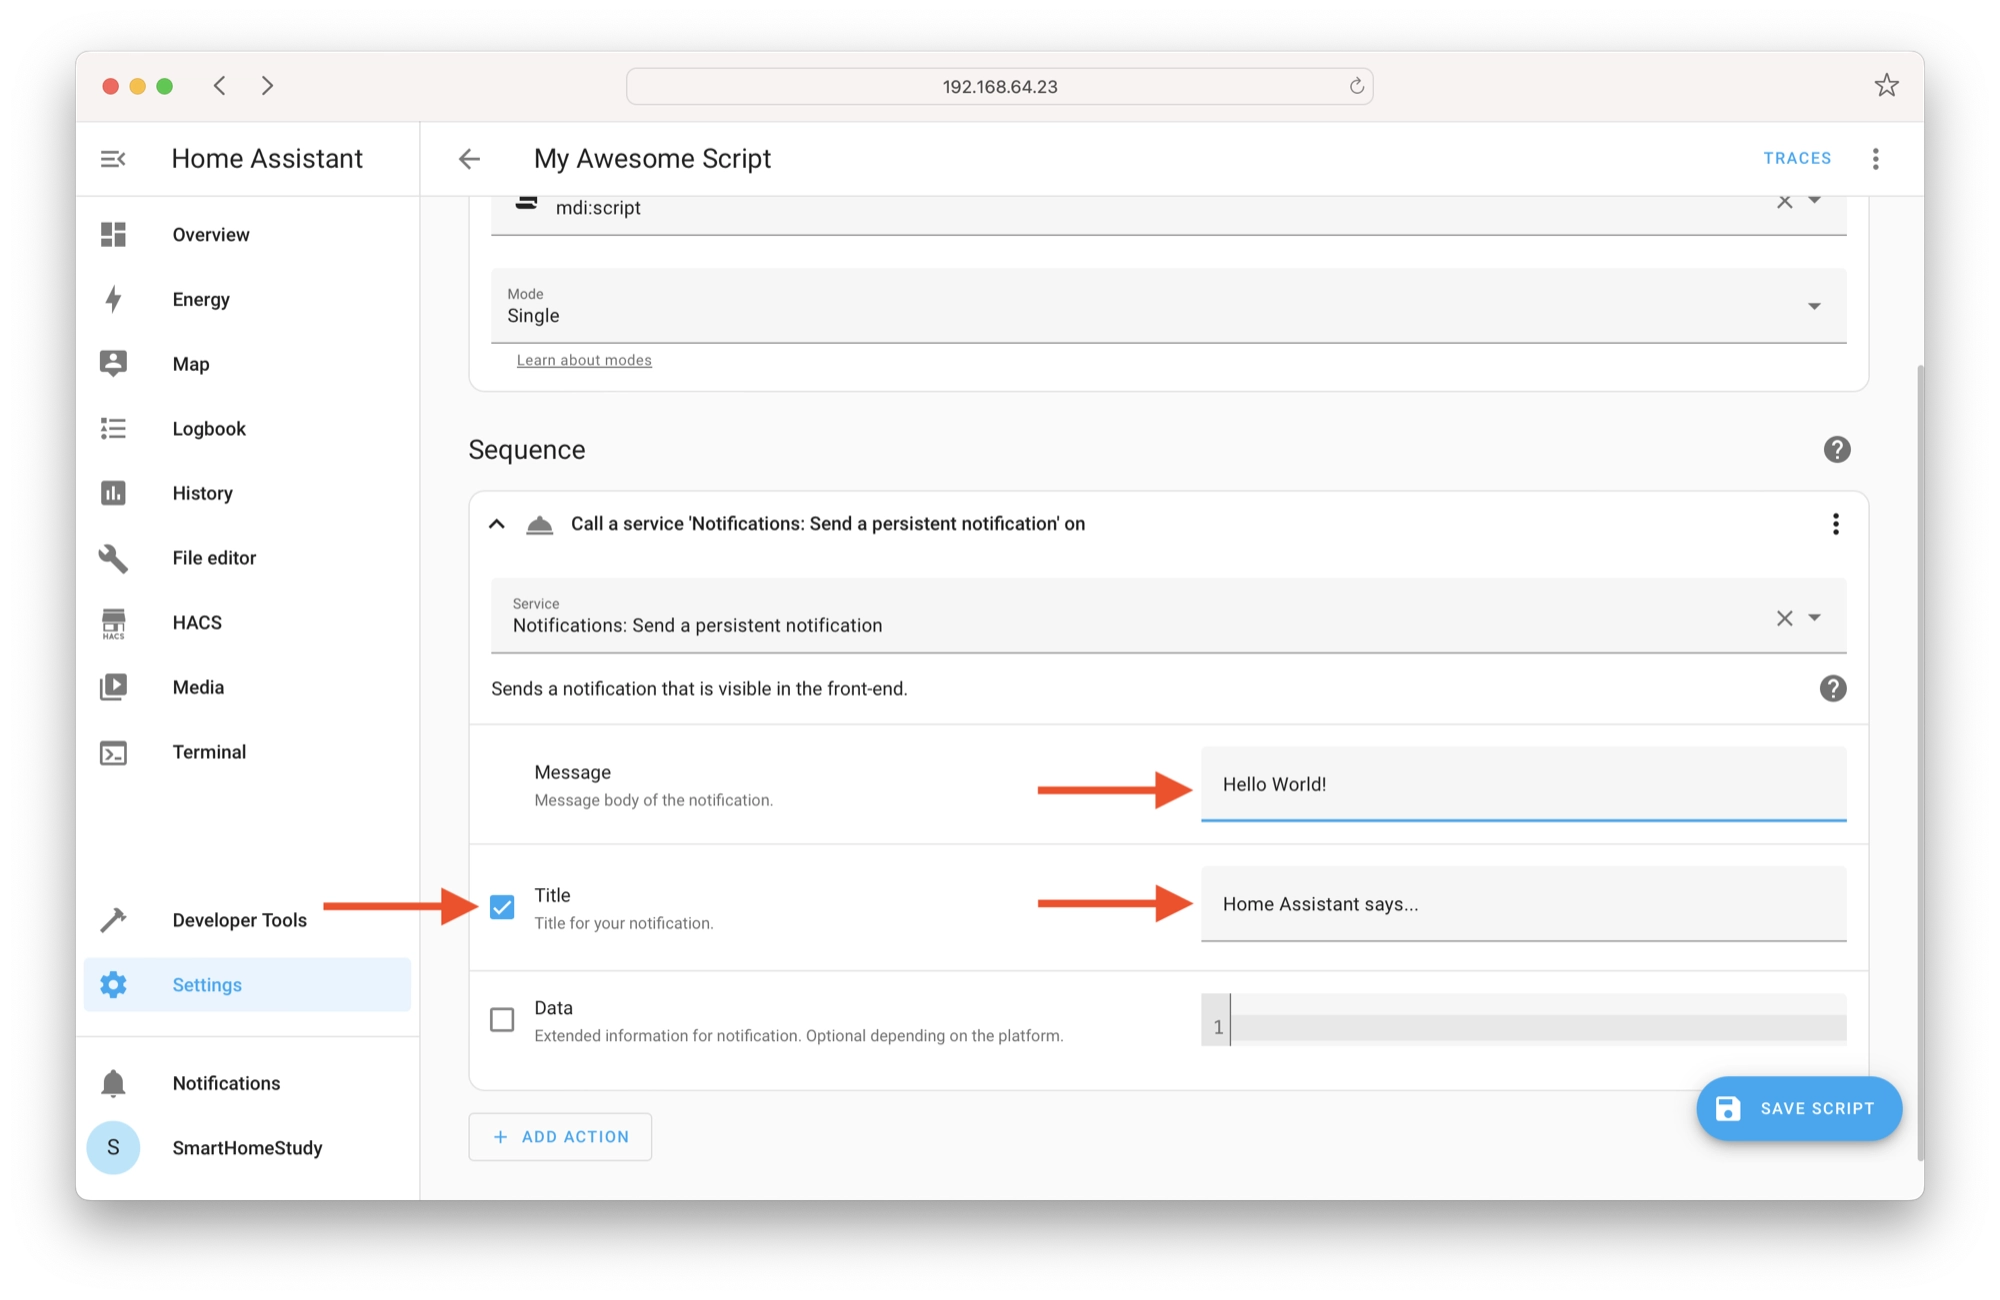
Enter some text into the Message text field and optionally, you can add a title as shown below.
Click the Save script button in order to save the script. Head back to the main scripts list on the script tab and you should now see the script in the list.
Testing the Script
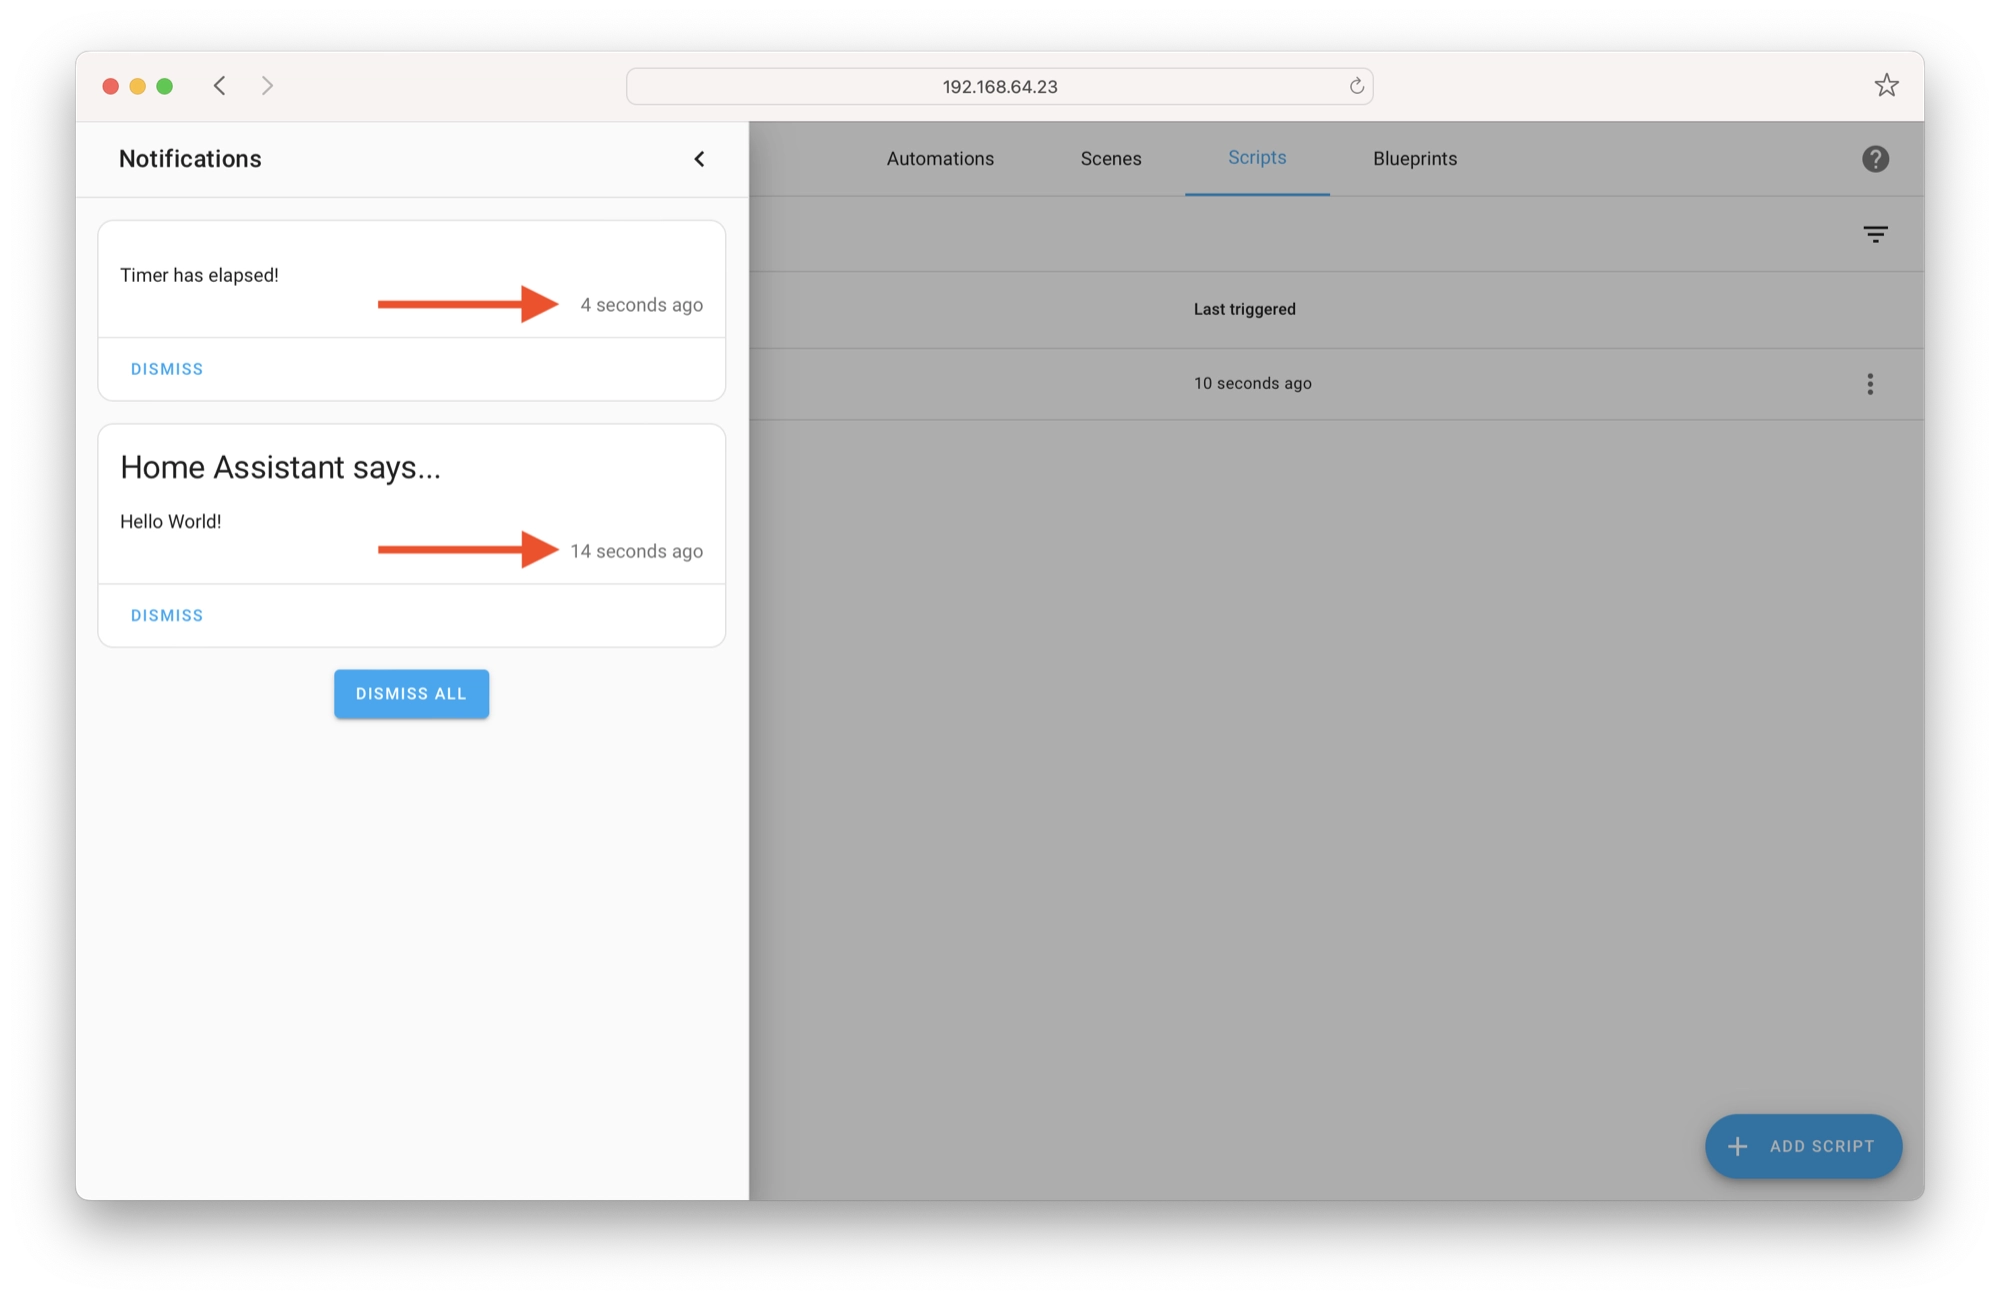
We can now test the script! Click the kebab menu (three dots) to the right of the script name in the list and click Run.
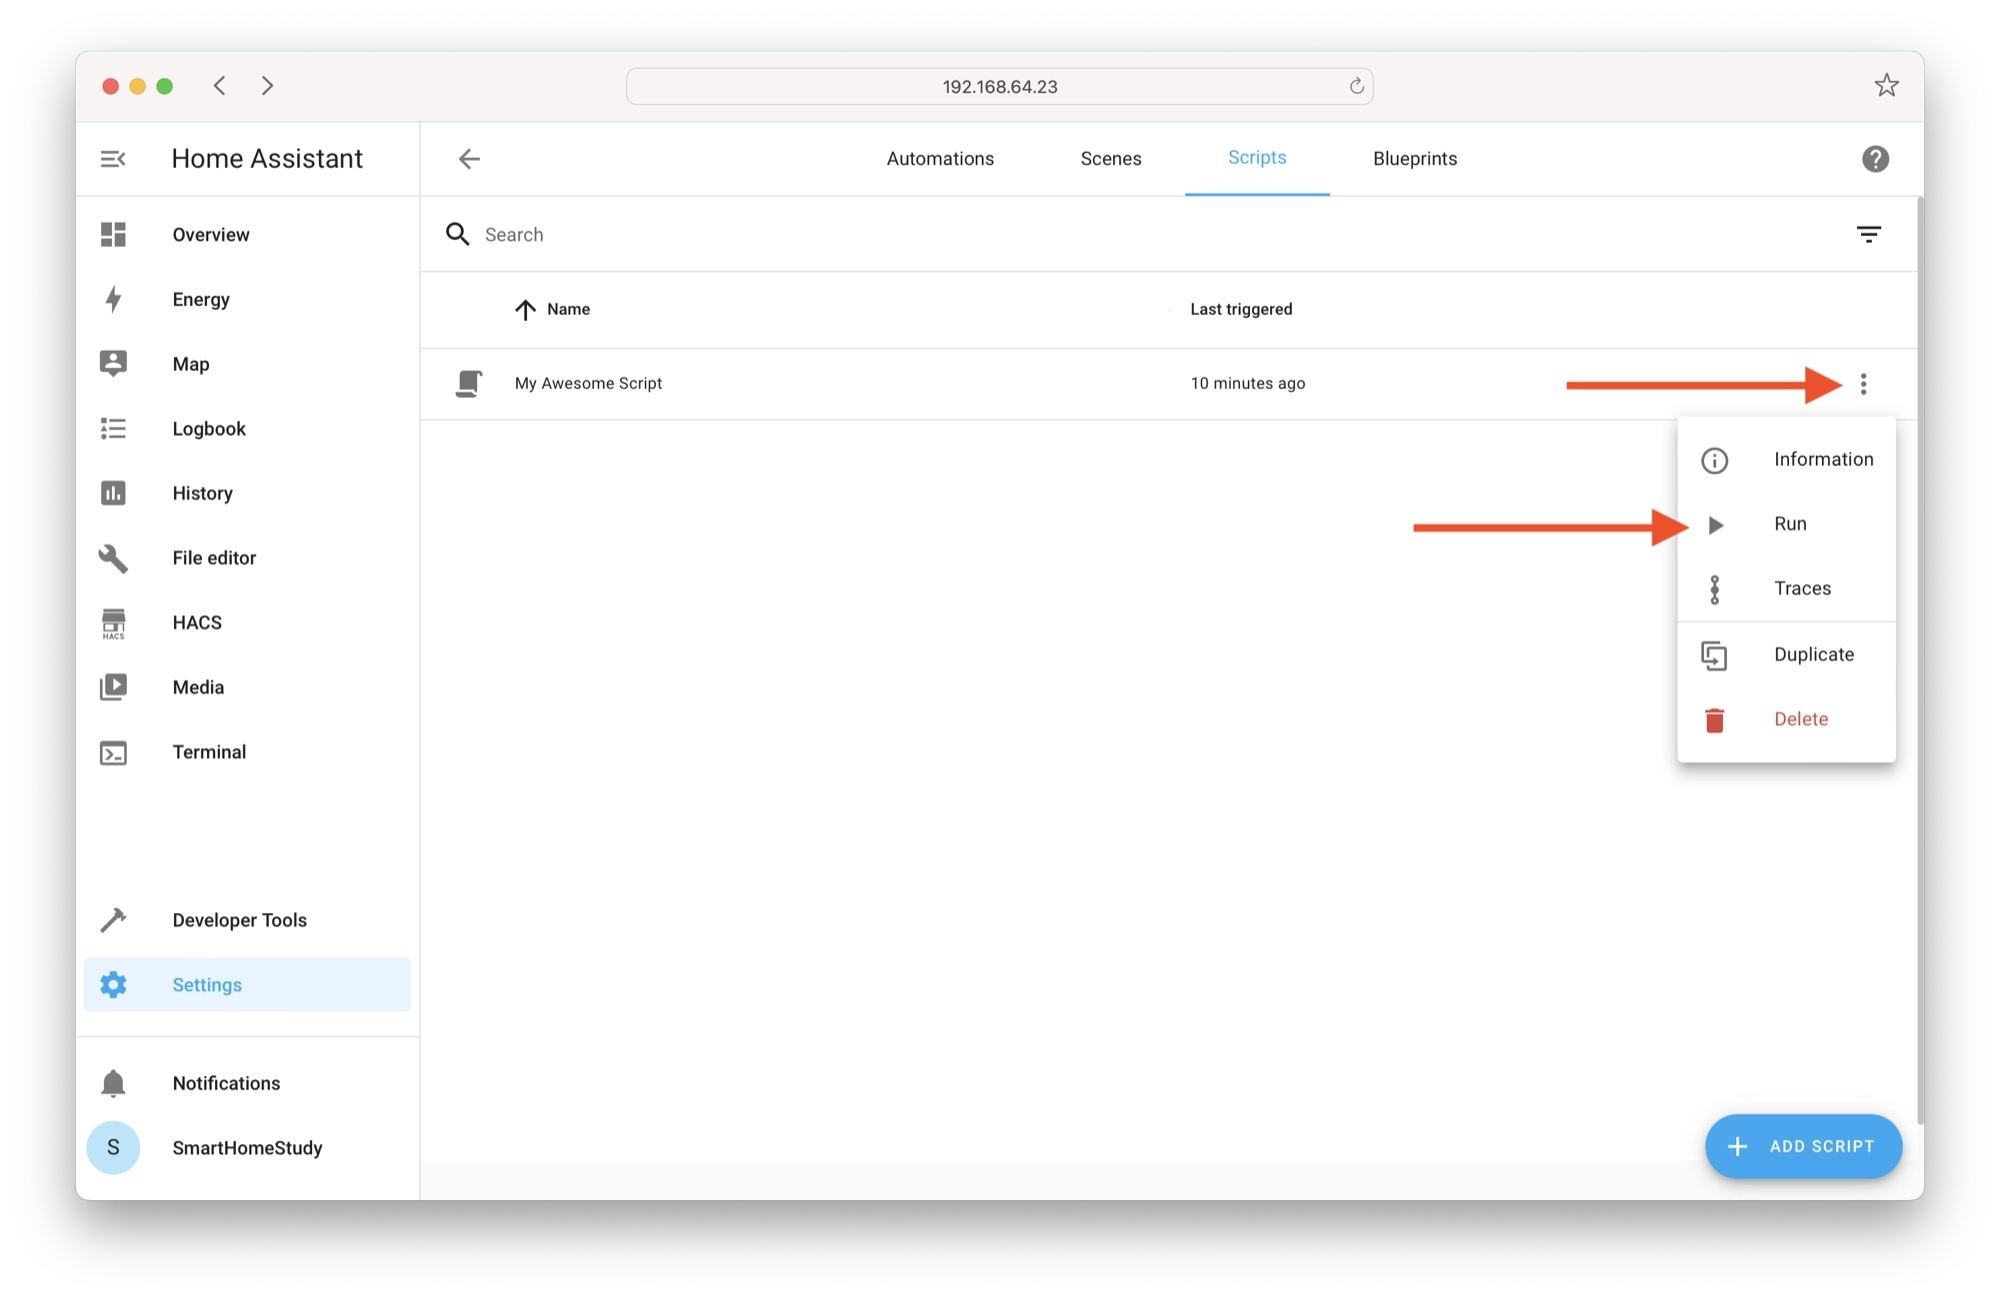
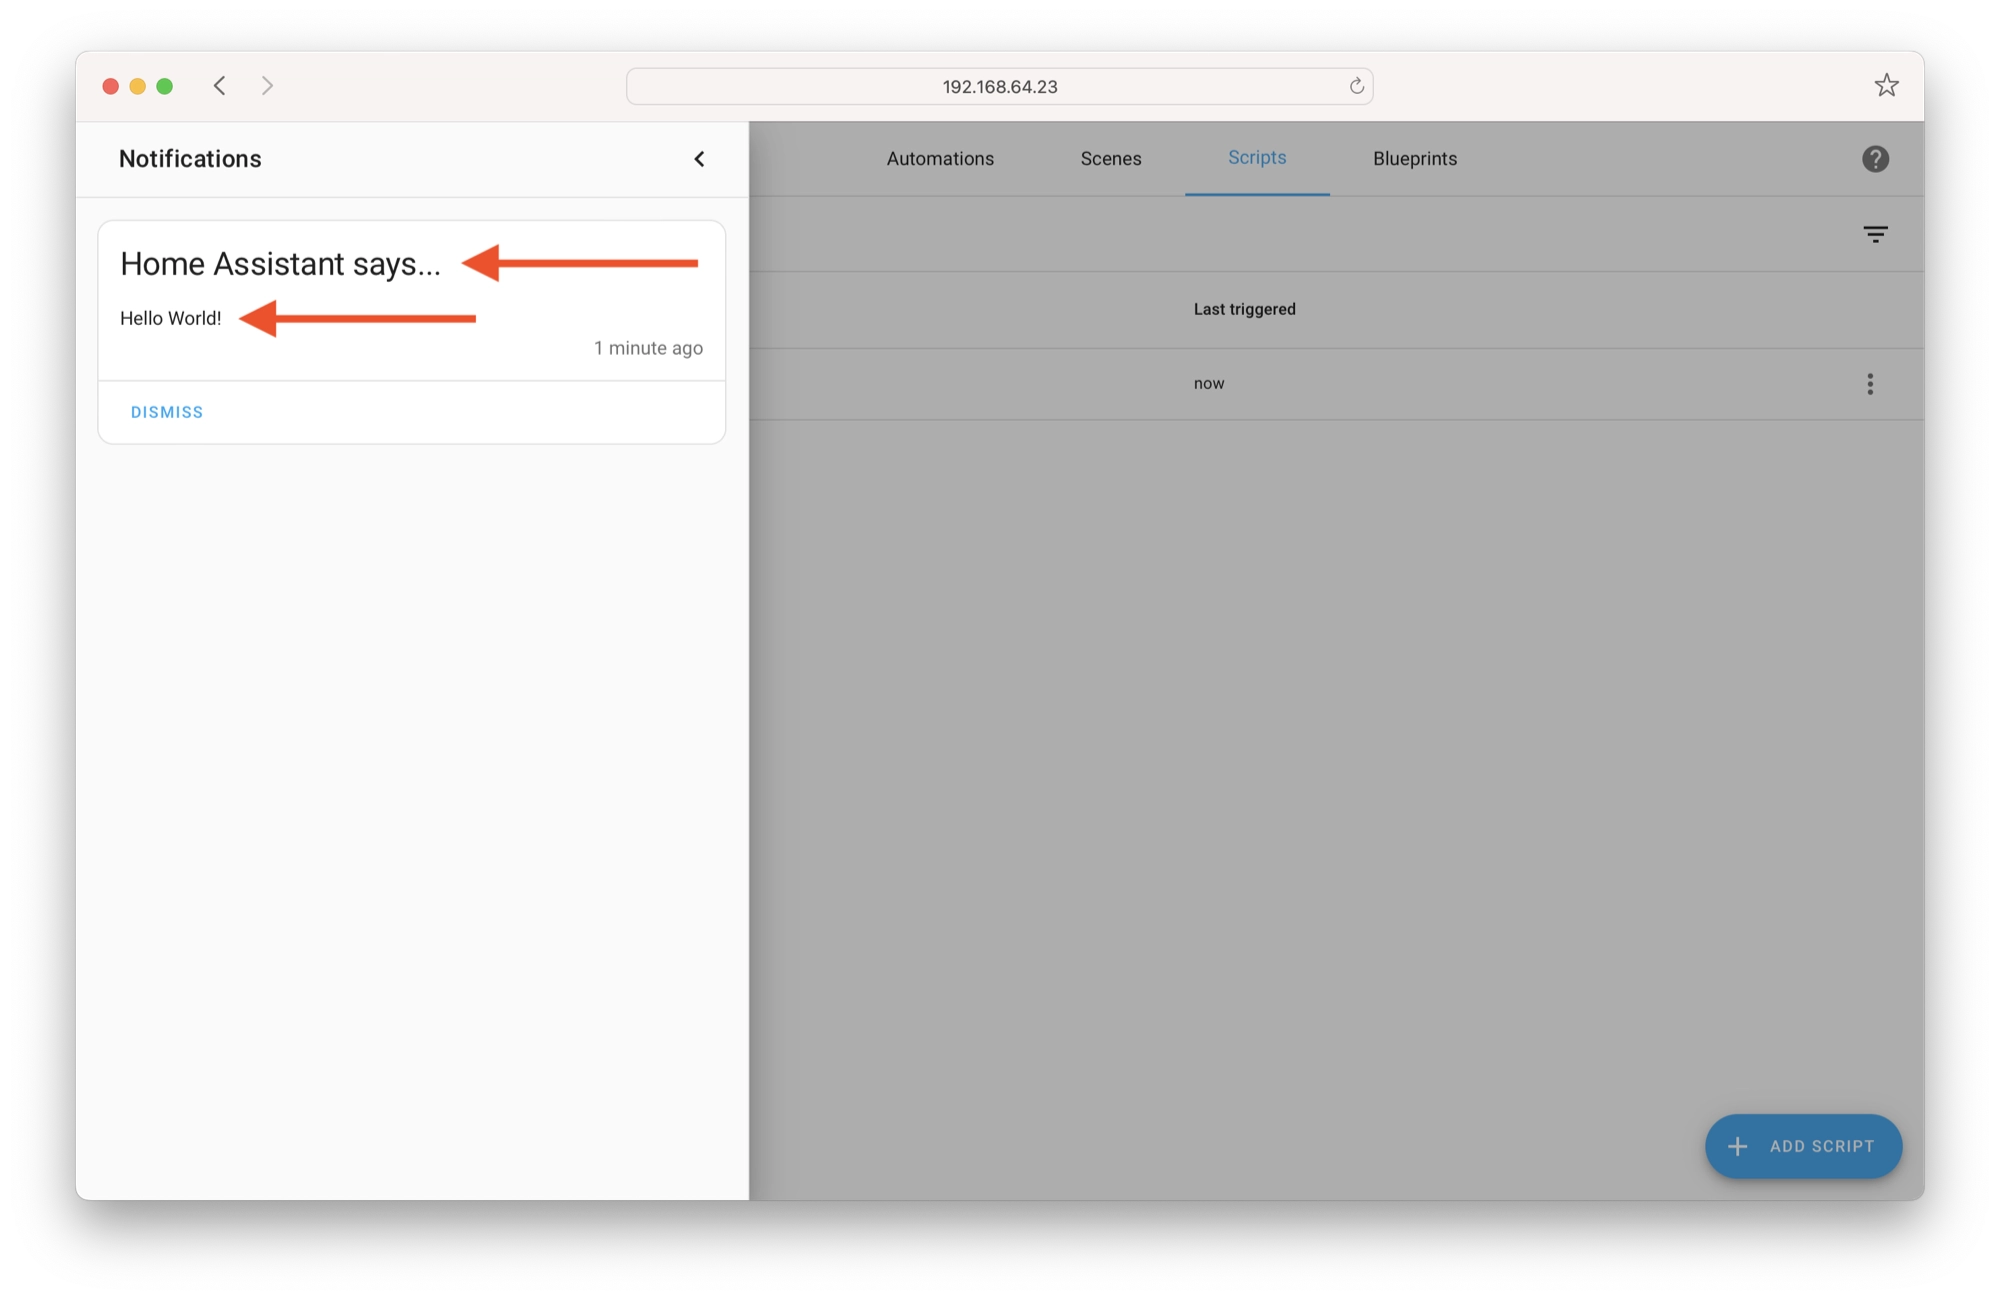
When you run the script, you will be sent a notification. Click Notifications at the bottom of the left-hand sidebar and view the notification, you should see the title and message that you wrote.
Creating a Sequence of Events
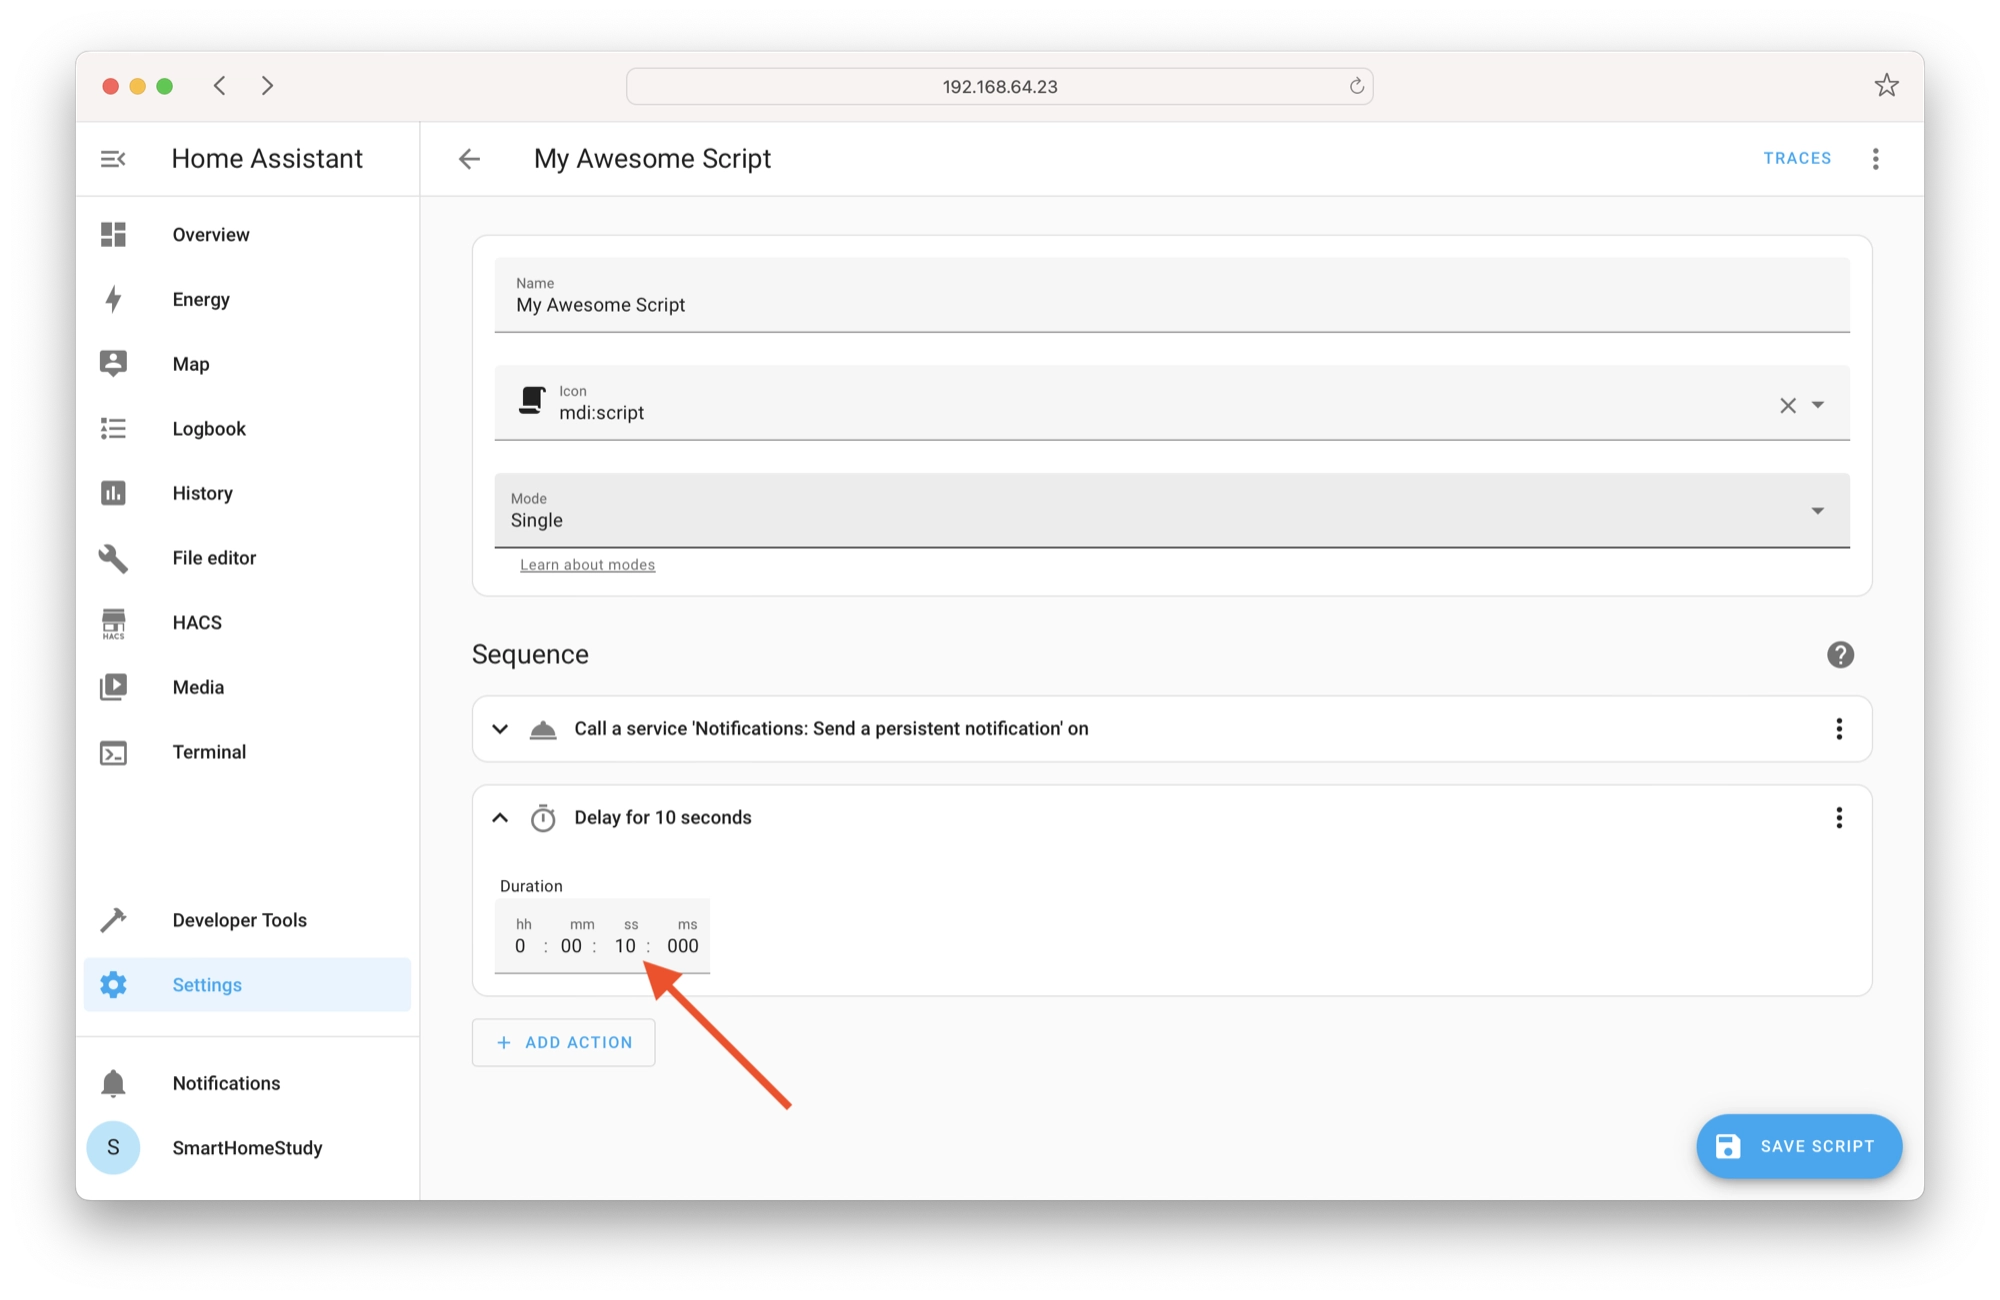
Let’s go back to the script we just created. We can add further events that will be triggered in sequence simply by clicking the Add action button again.
Click Add action and choose Wait for time to pass. Set the duration to 10 seconds.
Now let’s add another persistent notification with a message that informs us that the timer has elapsed.
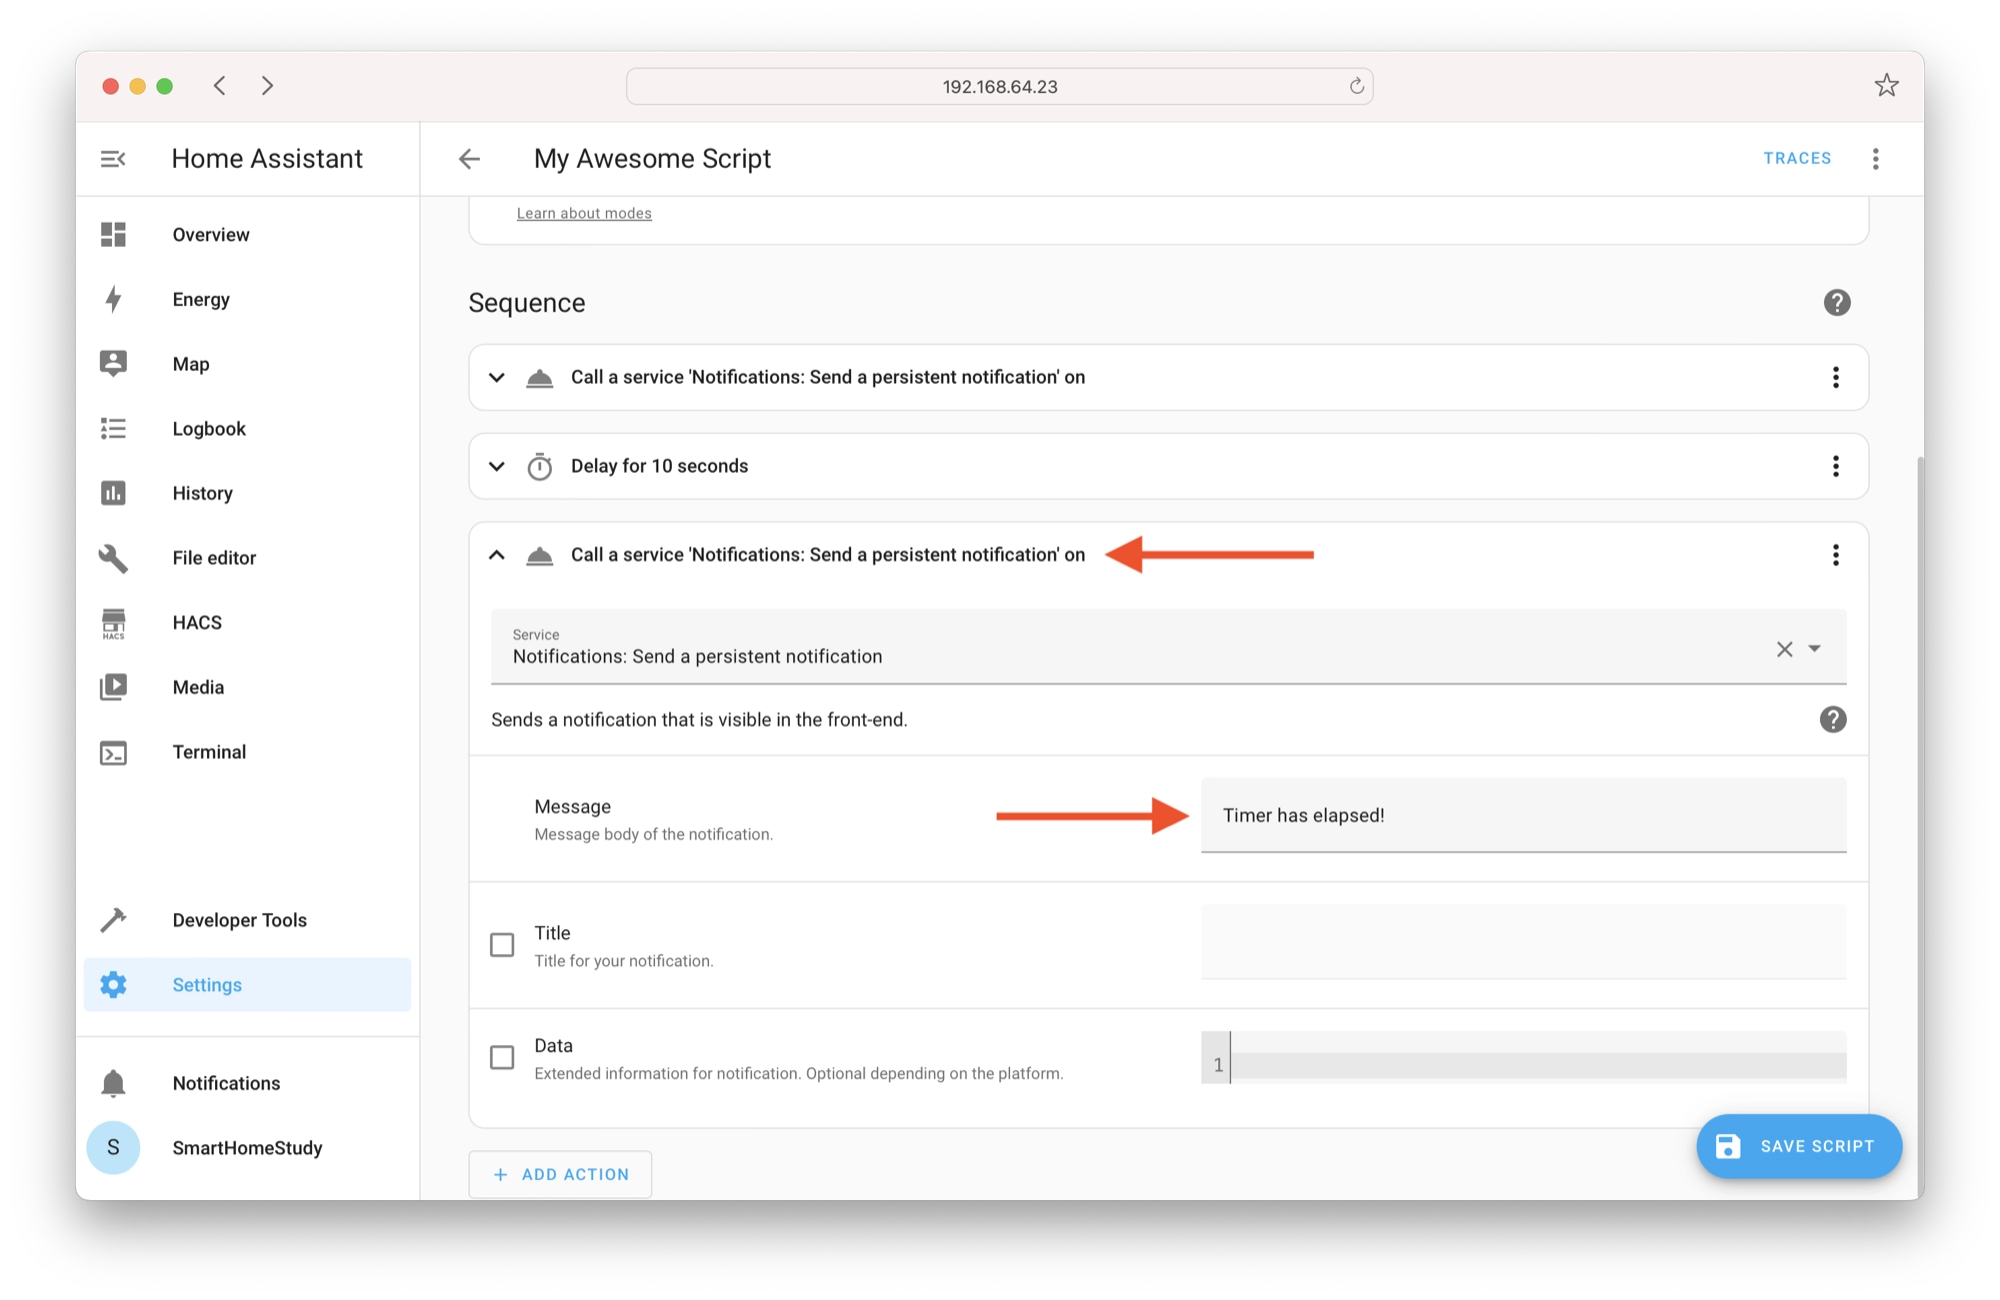
Next, click Save script and click the back arrow to return to the list of scripts.
Now run the script again and you should receive the first notification, then the second notification after a delay of 10 seconds. This is because each event occurs in the sequence that they are ordered in the list of actions.
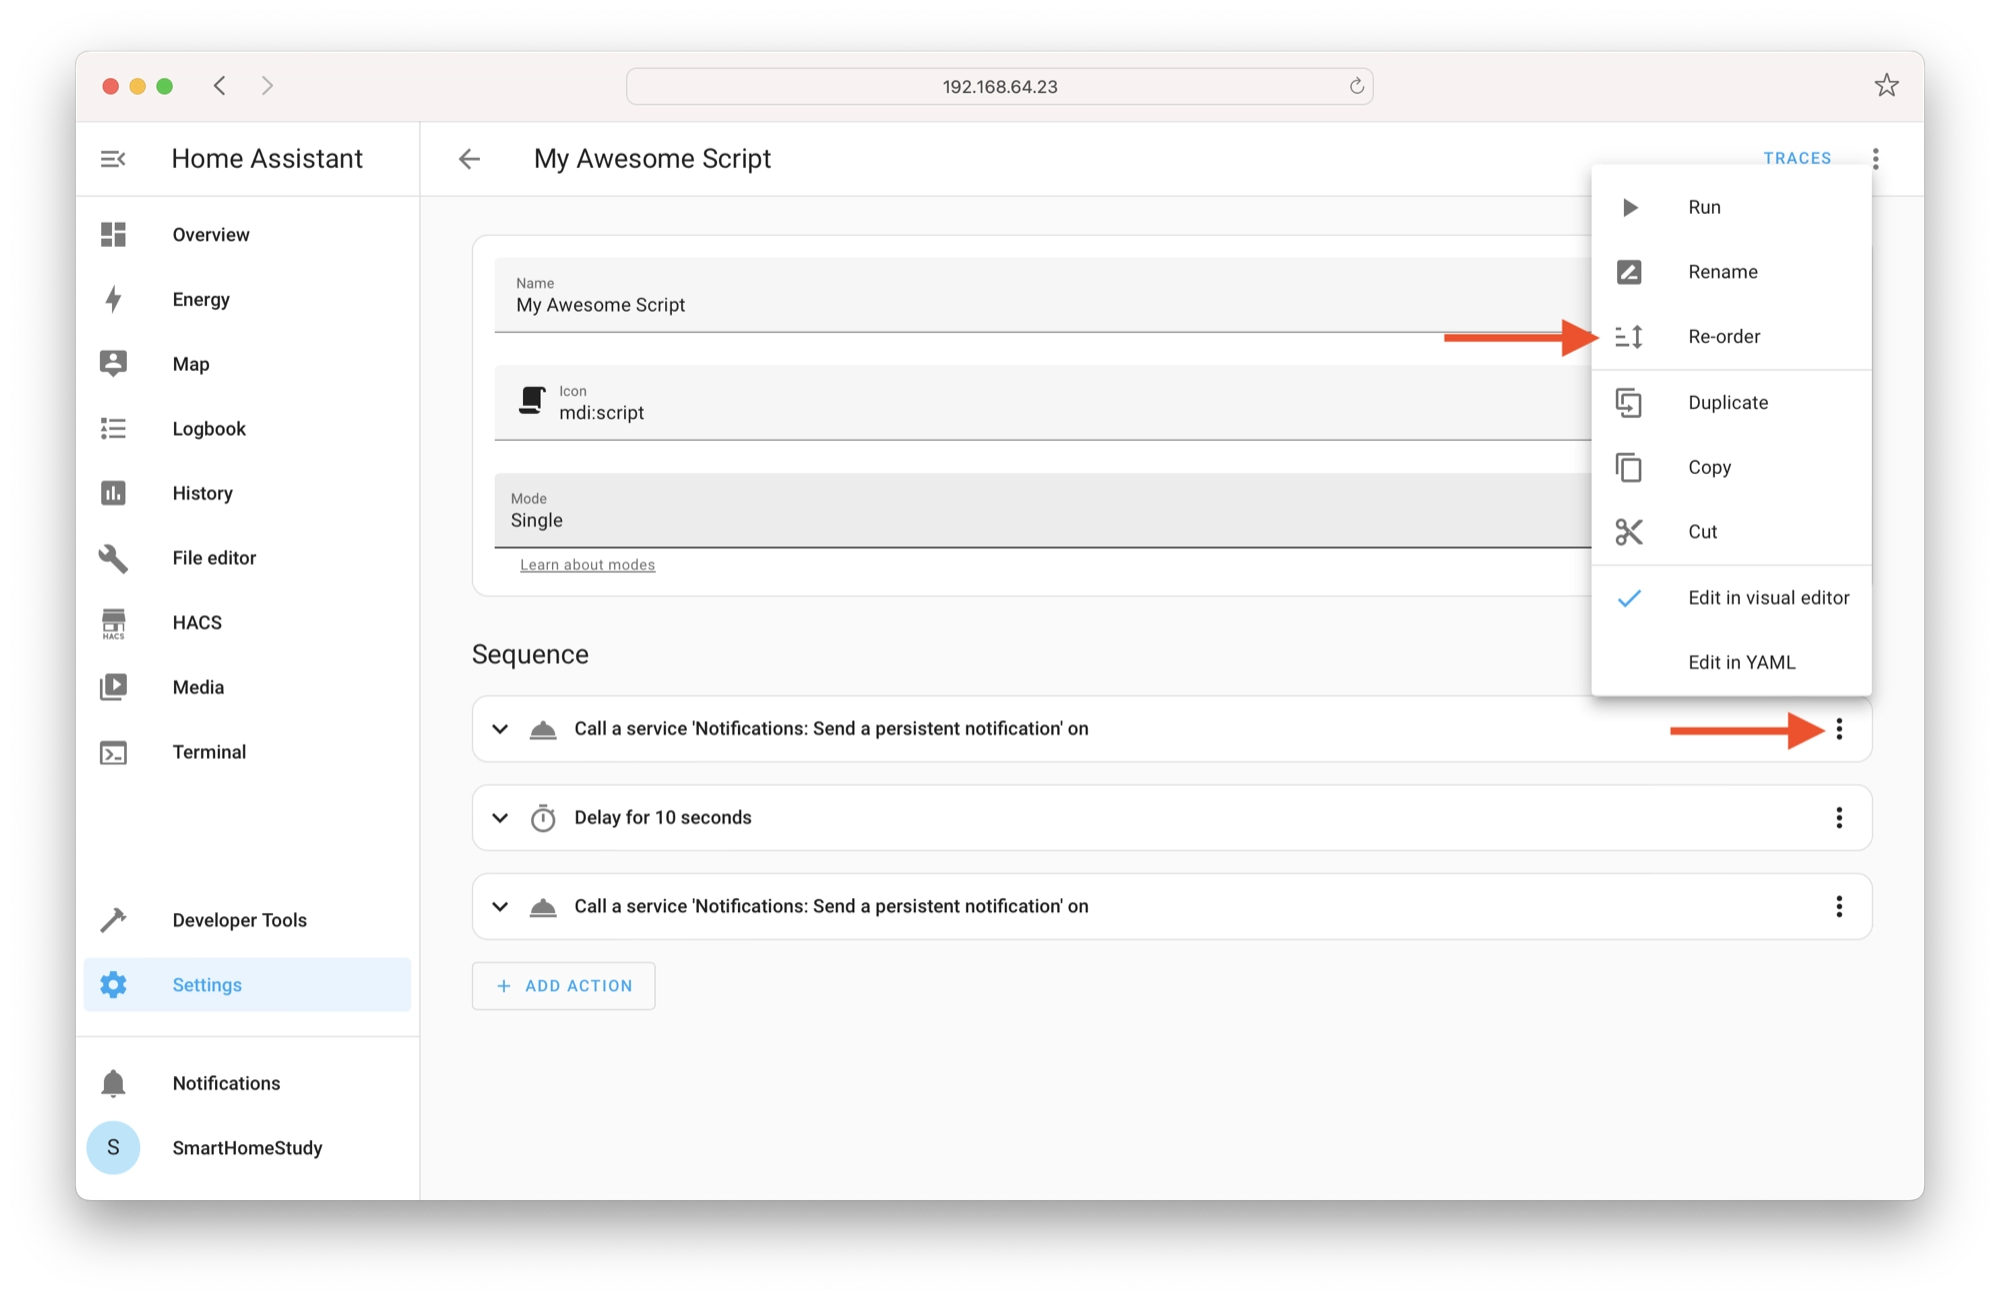
How to Change the Event Order in a Home Assistant Script
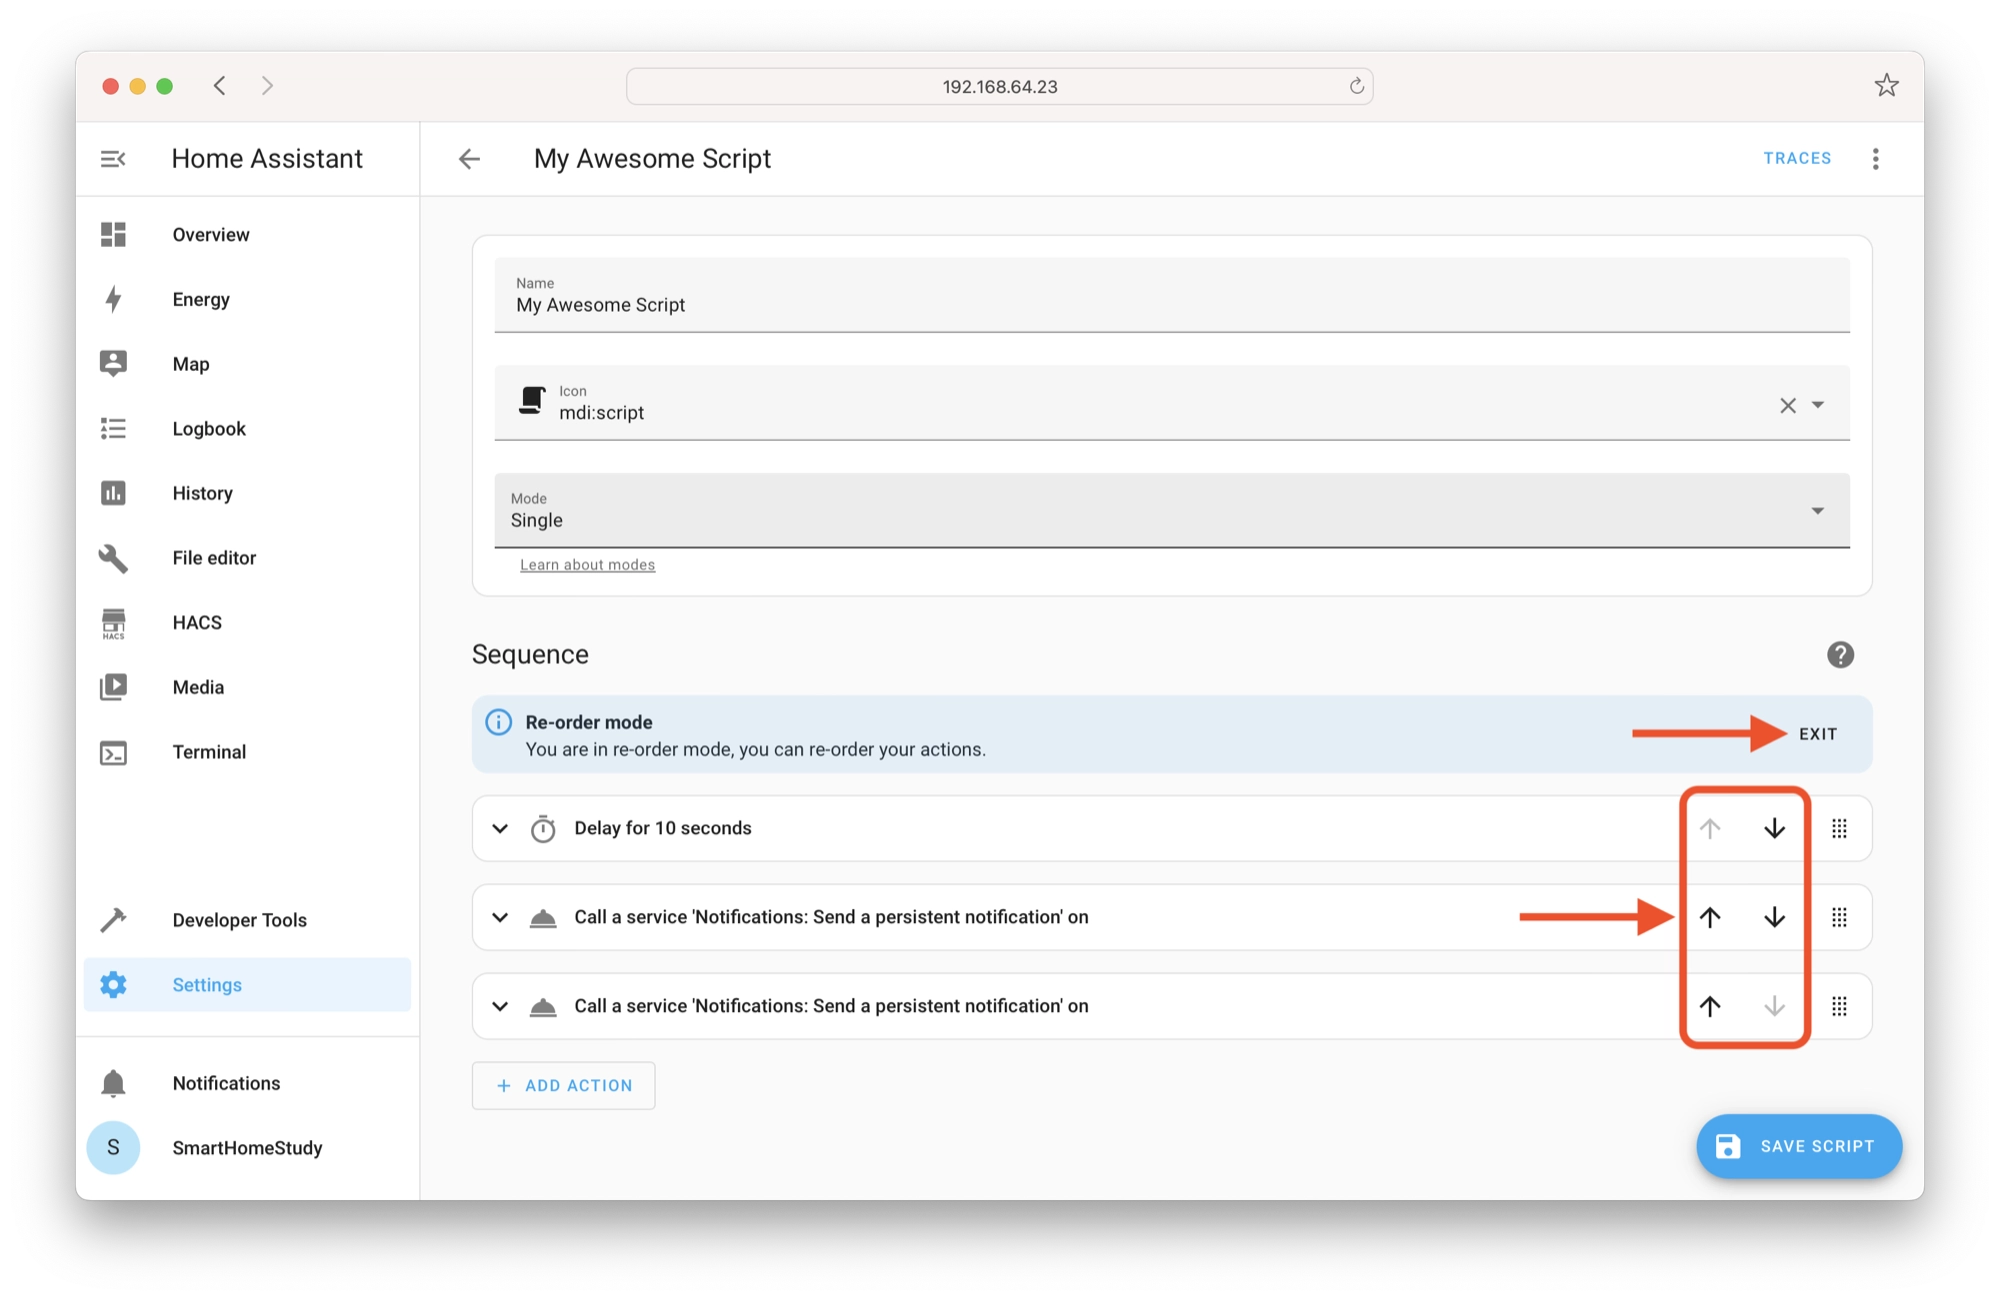
The Home Assistant graphical editor makes it really easy to change the order in which events occur. First, click the kebab menu (three dots) next to any of the existing events, then click Re-order.
Once in re-order mode, you can use the up and down arrows to change the order of the events. One you are happy with the changes, click Exit.
Creating a Home Assistant Script With YAML
As Home Assistant has developed, the graphical editor has reached the point whereby it is not really necessary to edit scripts directly in YAML anymore.
However it can be useful to understand how scripts are structured in YAML to gain a better understanding overall of this functionality in Home Assistant.
If you want to build your YAML skills and understanding, I would recommend reading the next section. You can also check out my beginners guide to YAML for Home Assistant by clicking here.
The YAML Script Anchor
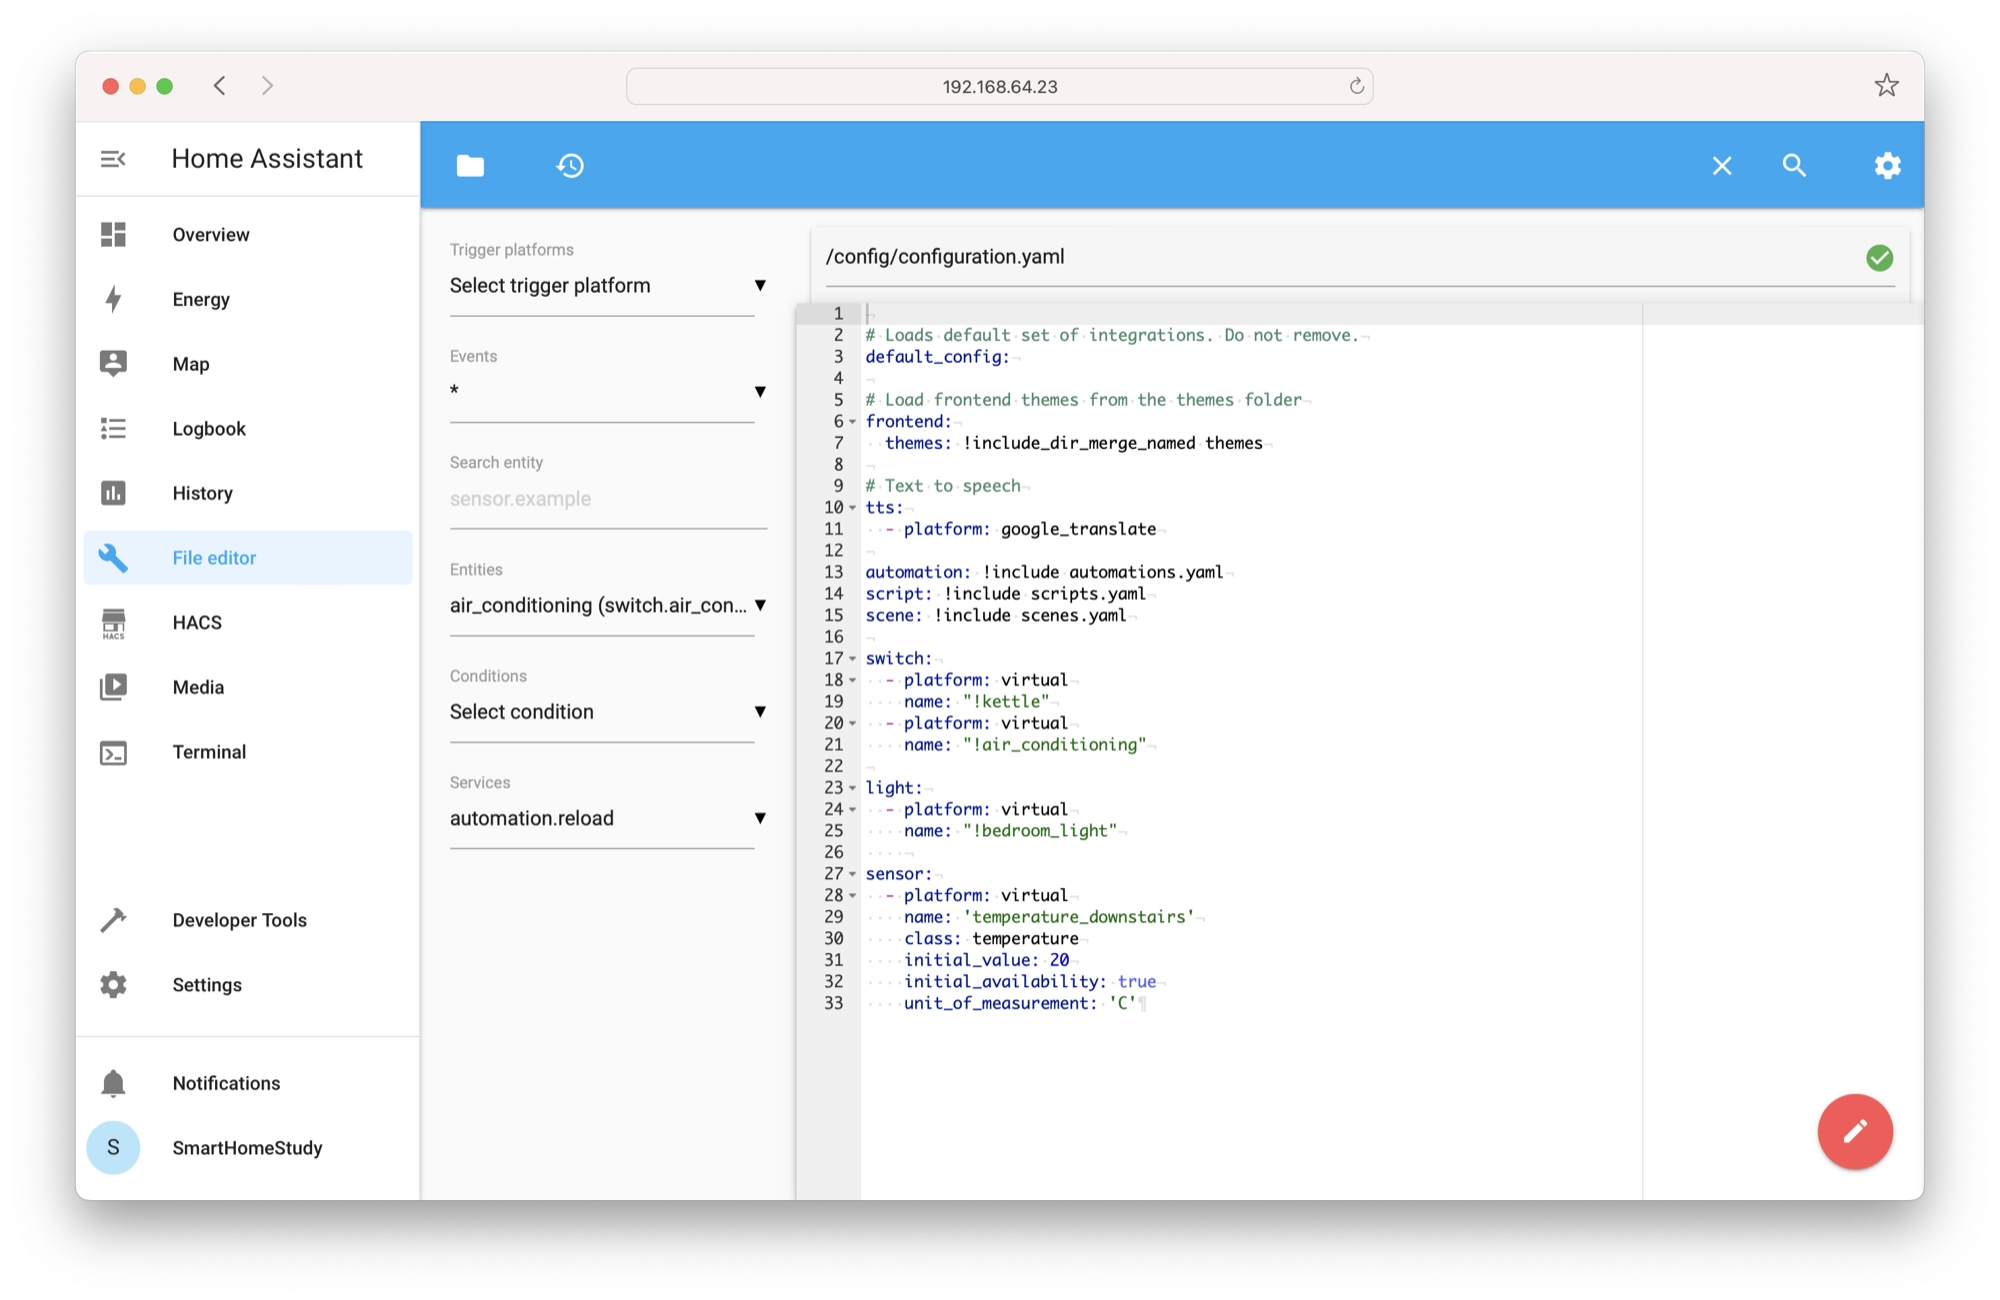
In order to add scripts to Home Assistant using YAML, we will be using the File Editor add-on to edit the configuration.yaml file.
If you are unsure what the configuration.yaml is or how to edit it, I would recommend first reading the beginners guide to YAML for Home Assistant guide.
In order to use scripts we need to add the script anchor to our configuration.yaml file. All scripts within Home Assistant should be children of this anchor.
script:
  my_cool_script:
  .
  .
  .
  also_my_cool_script:
  .
  .
  .
Splitting the YAML Configuration
However there is one problem with using the notation above. That is, we may want to add many scripts to Home Assistant, and each script can itself become quite lengthy.
A more practical way to manage the YAML is to split it up into multiple files. We can do this by pointing the script: anchor to a specific file, such as scripts.yaml.
script: !include scripts.yaml
This syntax will automatically make the contents of scripts.yaml a child of the script: anchor. It means we can keep all of our scripts in this dedicated file and thus keep our YAML configuration neat and tidy.
It is also possible to point anchors to multiple files for even more granular organization. You can learn more about splitting the YAML configuration in this article.
YAML and The Graphical Editor
It is worth noting that since the introduction of the scripts graphical editor, the script anchor points to the scripts.yaml file by default and you will find the file in the config directory.
This is because all scripts created with the graphical editor are stored in the scripts.yaml file.
It is possible to edit scripts directly in the scripts.yaml file, or by using the graphical editor. Scripts that you add by hand in YAML will appear in the graphical editor and vice versa.
For example, if we open the scripts.yaml file, we can see the YAML that has been generated by the graphical editor:
my_awesome_script:
  alias: My Awesome Script
  sequence:
  - service: notify.persistent_notification
    data:
      message: Hello World!
      title: Home Assistant says...
  - delay:
      hours: 0
      minutes: 0
      seconds: 10
      milliseconds: 0
  - service: notify.persistent_notification
    data:
      message: Timer has elapsed!
  mode: single
  icon: mdi:script
We can create a new script here in YAML simply by appending the file:
my_awesome_script:
alias: My Awesome Script
sequence:
- service: notify.persistent_notification
data:
message: Hello World!
title: Home Assistant says...
- delay:
hours: 0
minutes: 0
seconds: 10
milliseconds: 0
- service: notify.persistent_notification
data:
message: Timer has elapsed!
mode: single
icon: mdi:script
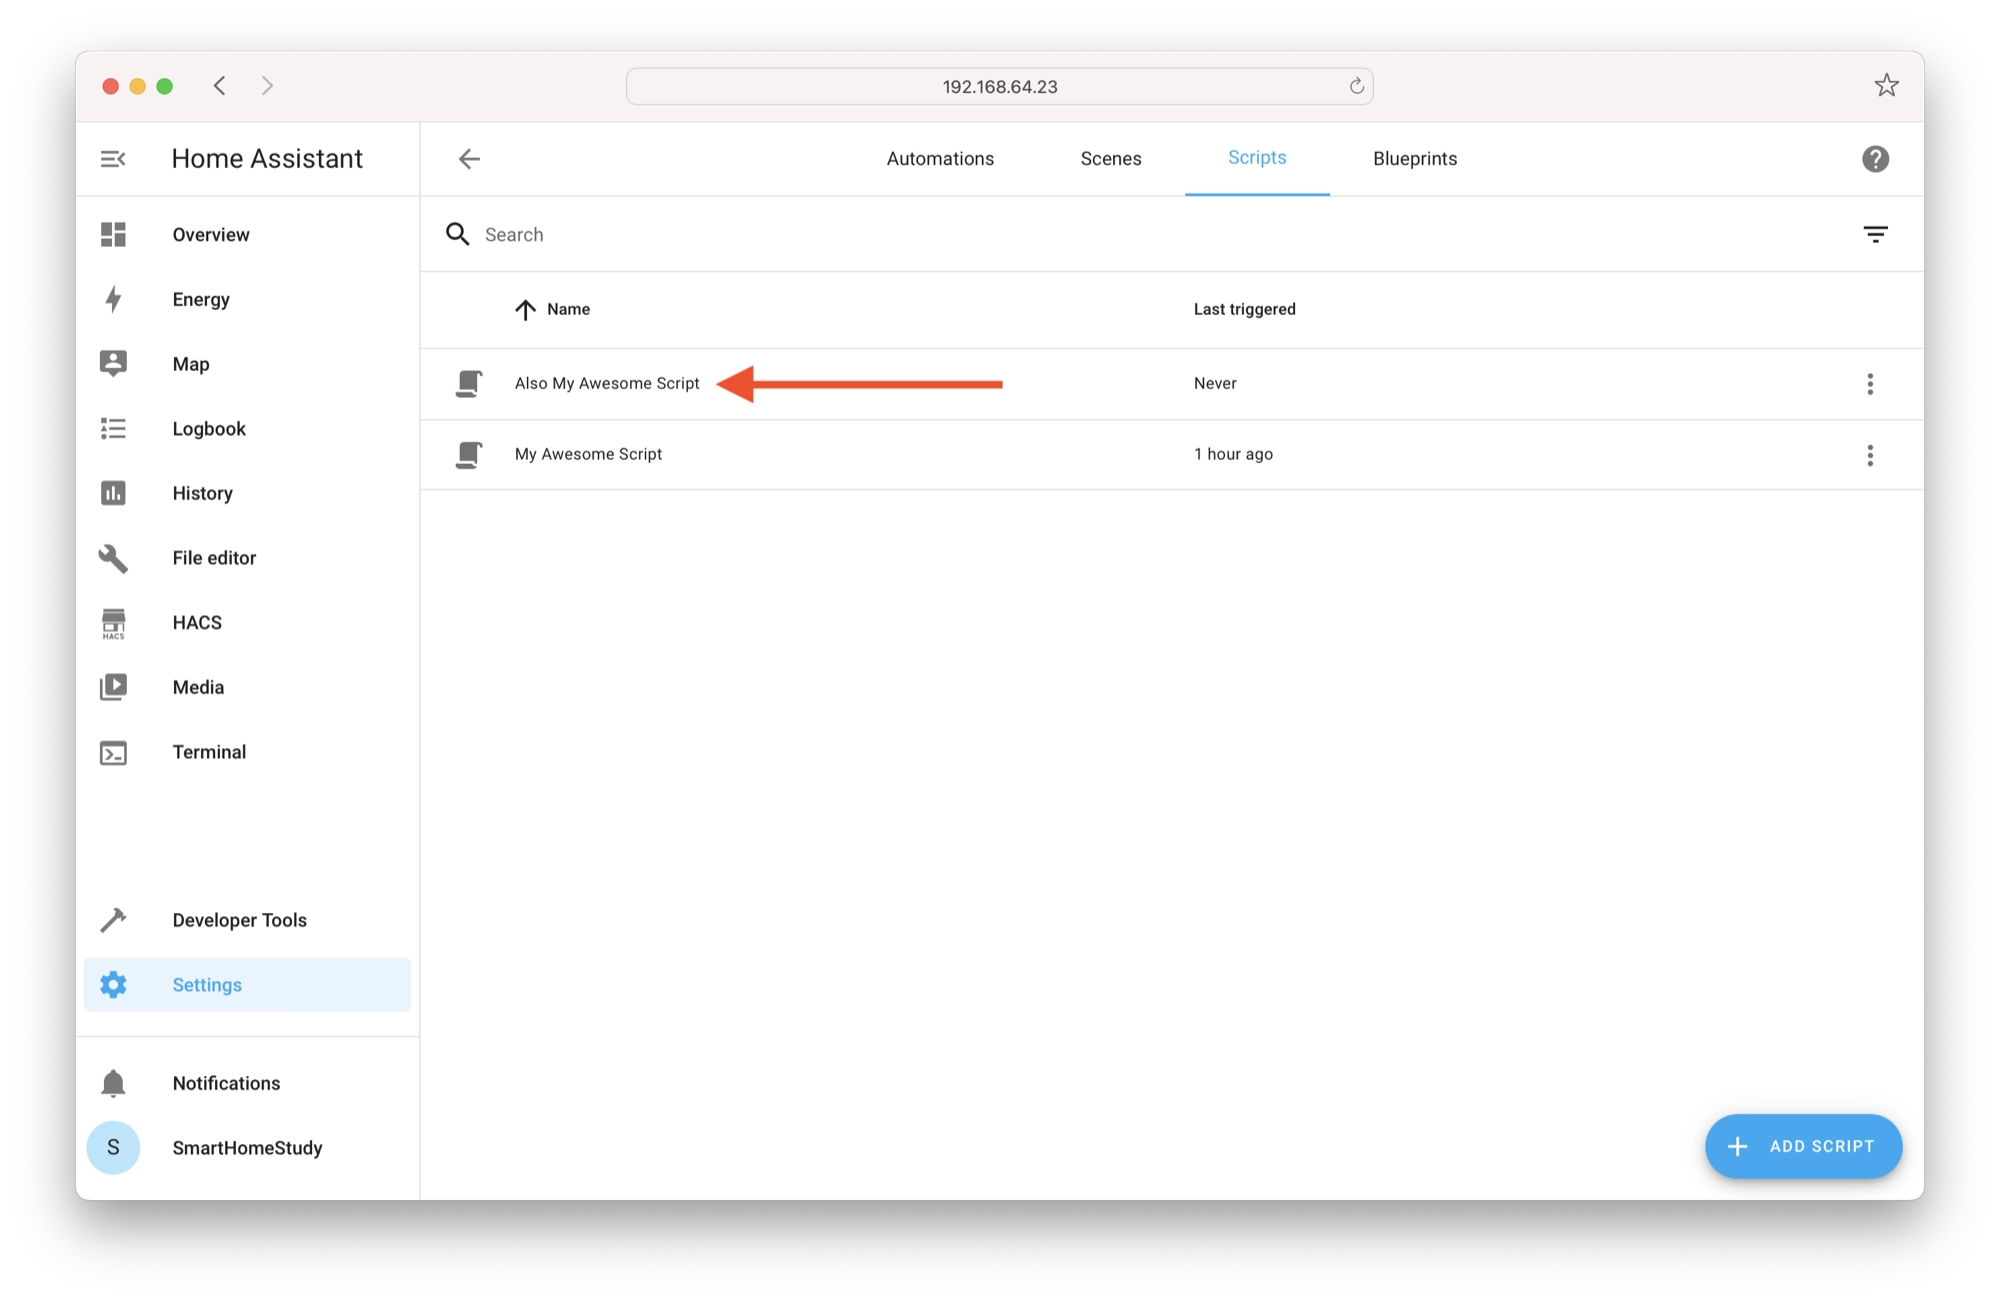
my_awesome_script_2:
alias: Also My Awesome Script
sequence:
- service: notify.persistent_notification
data:
message: Hello World, Again!
title: Home Assistant says...
mode: single
icon: mdi:script
If we save the scripts.yaml file and reload the YAML configuration, the new script that we just wrote in YAML will appear in the graphical editor.
Writing a YAML Script
For this part of the tutorial we will write a simple bedtime routine script using YAML. If you don’t know what YAML is, I would suggest reading the YAML beginners guide first.
We will be creating a simple script using YAML, where the main purpose is to demonstrate the process of using the File Editor in order to create a YAML script.
The sample script will perform a bedtime routine:
- A time for bedtime is set in Home Assistant, for example, 11pm.
- When bedtime is reached, Home Assistant triggers the bedtime routine script.
- The main light in the living room turns blue, to indicate that it is bedtime.
- A 30 second timer begins.
- After the timer elapses, the TV, lamps and LED strip lighting is turned off.
- A 2 minute timer begins, which gives us time to go upstairs to bed.
- After the timer elapses, the remaining main lights are turned off.
The purpose of this script is to get Home Assistant to assist us with a routine that ensures we go to bed at the same time each day.
You can of course adapt it to your needs, but the example in this article serves mainly to demonstrate the basics of Home Assistant scripts.
Define the new script
First we will define a new script called “bedtime.” We will give it a friendly name and description. Following the description we will begin the sequence.
bedtime:
    alias: Time for bed
    description: 'Turns off lights and TV in living room at bed time'
    sequence:
One very important point to make is that YAML is very sensitive to spacing. You must ensure that your indentations and spacing are correct in the file or you will get syntax errors.
This is the number one cause of problems when people are editing YAML.
Add the first actions
Next we will add the first action, this will occur as soon as the script starts. The first action that our script needs to perform is to turn the main light blue.
In this example we will be using an entity called light.main_light, but you can use any existing light entity in your configuration.
After we specify sequence we will use the “-” operator to denote the start of a list item, think of it as similar to a bullet point. We will define the alias key as “Main Light turn blue” in order to assign a descriptive name to the action.
bedtime:
    alias: Time for bed
    description: 'Turns off lights and TV in living room at bed time'
    sequence:
        - alias: Main Light turn blue
Define the service
We will define the service as light.turn_on in order to turn on the main light (if it is not already on) and this also gives us the option to change the color.
bedtime:
alias: Time for bed
description: 'Turns off lights and TV in living room at bed time'
sequence:
- alias: Main Light turn blue
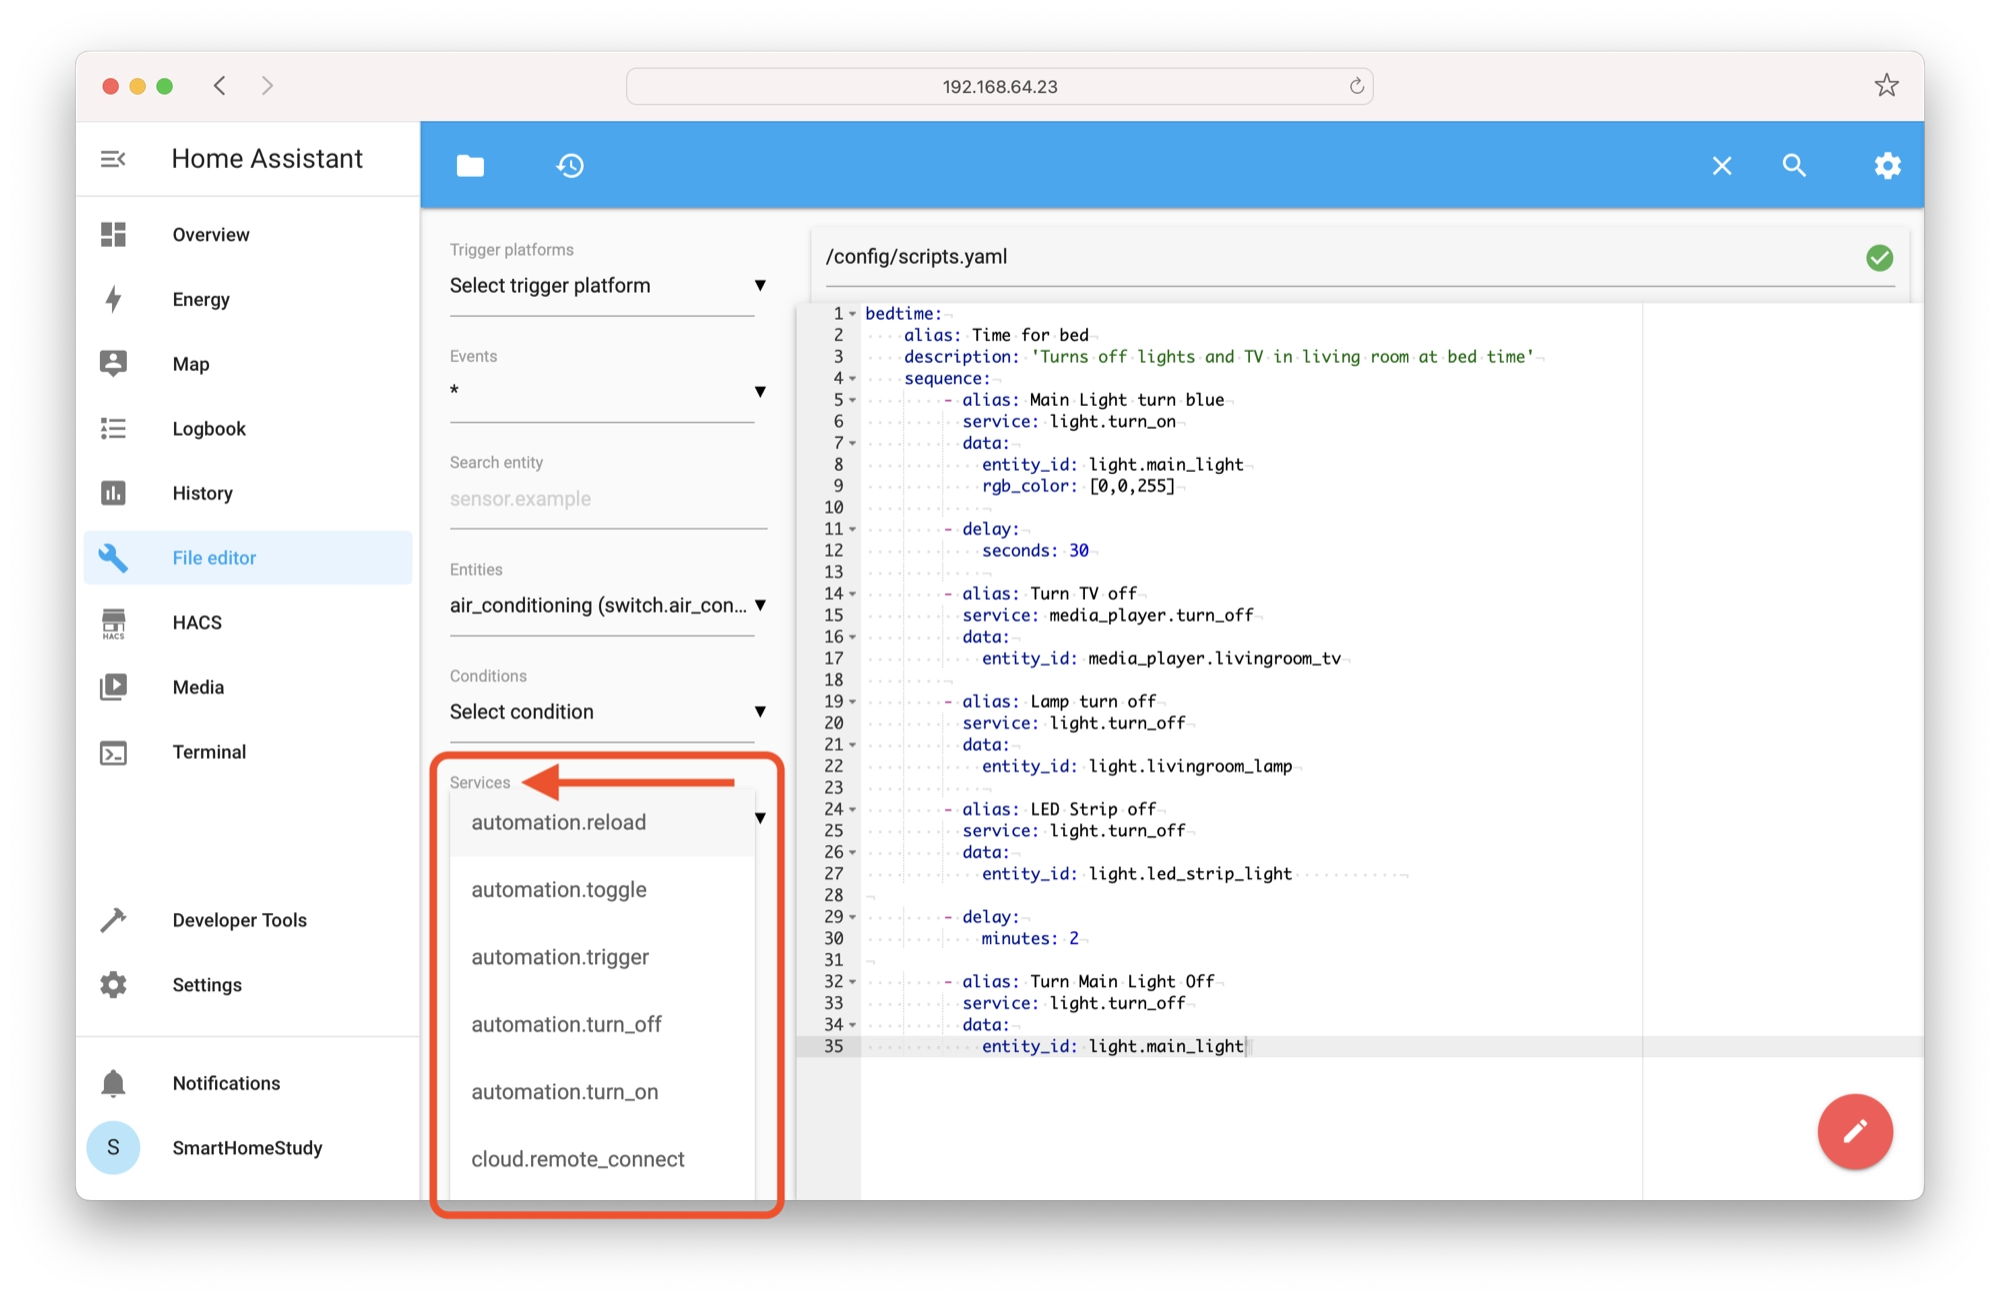
service: light.turn_onYou can see a full list of services using the dropdown services box in the file editor sidebar. The services are well documented on the Home Assistant website if you require further information.
Add the entity and data
Next we will add the entity_id and rgb_color for the main light. These need to be specified as children of the data key. The colour is specified by entering a value of 0 to 255, which represents the brightness level of red, green and blue respectively.
rgb_color: [red value, green value, blue value]
You can use this handy tool to pick a colour and generate the necessary RGB values.
bedtime:
    alias: Time for bed
    description: 'Turns off lights and TV in living room at bed time'
    sequence:
        - alias: Main Light turn blue
          service: light.turn_on
          data:
            entity_id: light.main_light
            rgb_color: [0,0,255]
Add the delay
Now that we have defined our first action and our bedtime warning script has turned the main light blue, we will add the delay.
Note that the script will work sequentially from top to bottom. This means that the delay will occur after the main light is turned blue because it is the next item in the list, beneath the light.turn_on service.
We can specify a delay using different units of time. In this example we will use seconds: and this should be specified as a child of delay:
bedtime:
    alias: Time for bed
    description: 'Turns off lights and TV in living room at bed time'
    sequence:
        - alias: Main Light turn blue
          service: light.turn_on
          data:
            entity_id: light.main_light
            rgb_color: [0,0,255]

        - delay:
            seconds: 30
Turn off the lamp, LEDs and TV
Following the delay we will turn off the LED strip, the lamp and the TV.
For the LED strip light and the lamp, we can use the light.turn_off service. For the TV, we can use the media_player.turn_off service.
bedtime:
    alias: Time for bed
    description: 'Turns off lights and TV in living room at bed time'
    sequence:
        - alias: Main Light turn blue
          service: light.turn_on
          data:
            entity_id: light.main_light
            rgb_color: [0,0,255]

        - delay:
            seconds: 30

        - alias: Turn TV off
          service: media_player.turn_off
          data:
            entity_id: media_player.livingroom_tv

        - alias: Lamp turn off
          service: light.turn_off
          data:
            entity_id: light.livingroom_lamp

        - alias: LED Strip off
          service: light.turn_off
          data:
            entity_id: light.led_strip_light
Following these actions, we will add another delay of 2 minutes before turning the main light off. This will give us time to get to the bedroom during our bedroom routine.
For this delay, we will use the minutes: key in order to specify the delay time in minutes.
bedtime:
    alias: Time for bed
    description: 'Turns off lights and TV in living room at bed time'
    sequence:
        - alias: Main Light turn blue
          service: light.turn_on
          data:
            entity_id: light.main_light
            rgb_color: [0,0,255]

        - delay:
            seconds: 30

        - alias: Turn TV off
          service: media_player.turn_off
          data:
            entity_id: media_player.livingroom_tv

        - alias: Lamp turn off
          service: light.turn_off
          data:
            entity_id: light.livingroom_lamp

        - alias: LED Strip off
          service: light.turn_off
          data:
            entity_id: light.led_strip_light

        - delay:
            minutes: 2
Turn off the main light
Lastly, we will use the light.turn_off service to switch off the main light. This completes our script and the finished code should look something like this.
bedtime:
    alias: Time for bed
    description: 'Turns off lights and TV in living room at bed time'
    sequence:
        - alias: Main Light turn blue
          service: light.turn_on
          data:
            entity_id: light.main_light
            rgb_color: [0,0,255]

        - delay:
            seconds: 30

        - alias: Turn TV off
          service: media_player.turn_off
          data:
            entity_id: media_player.livingroom_tv

        - alias: Lamp turn off
          service: light.turn_off
          data:
            entity_id: light.livingroom_lamp

        - alias: LED Strip off
          service: light.turn_off
          data:
            entity_id: light.led_strip_light

        - delay:
            minutes: 2

        - alias: Turn Main Light Off
          service: light.turn_off
          data:
            entity_id: light.main_light
Create an entity button
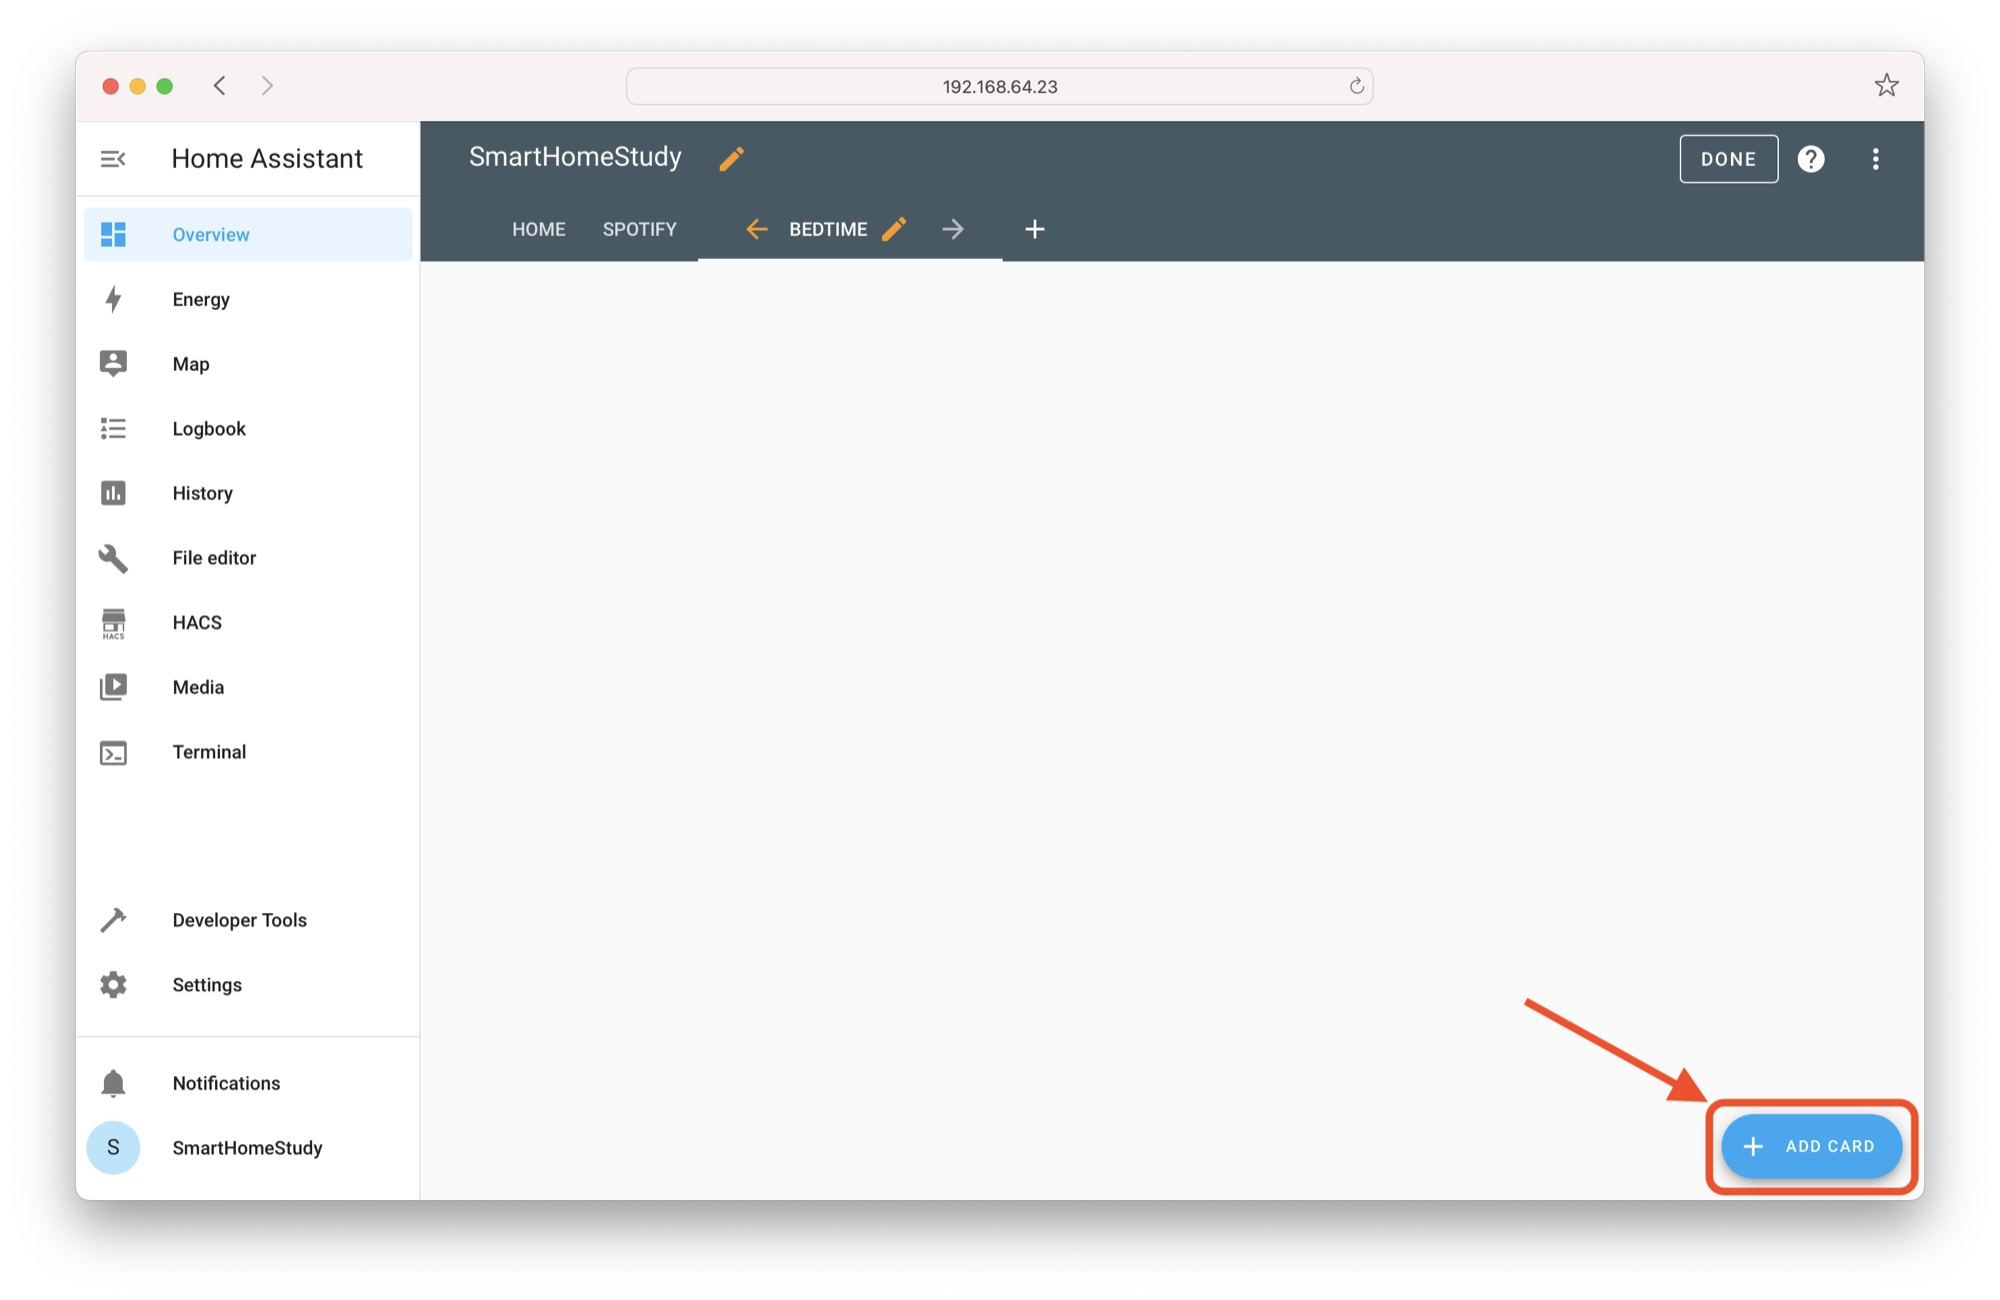
Now that we have completed our script, we can create an entity button in the user interface in order to test it. Alternatively if you would like fire the script at a particular time such as bedtime, the information explaining how to do this can be found in this tutorial.
Open the UI editor
First goto the overview page and click the kebab menu (three dots), followed by Edit Dashboard.

Create a new entity button card
Then click the Add Card button in order to create a new dashboard card.
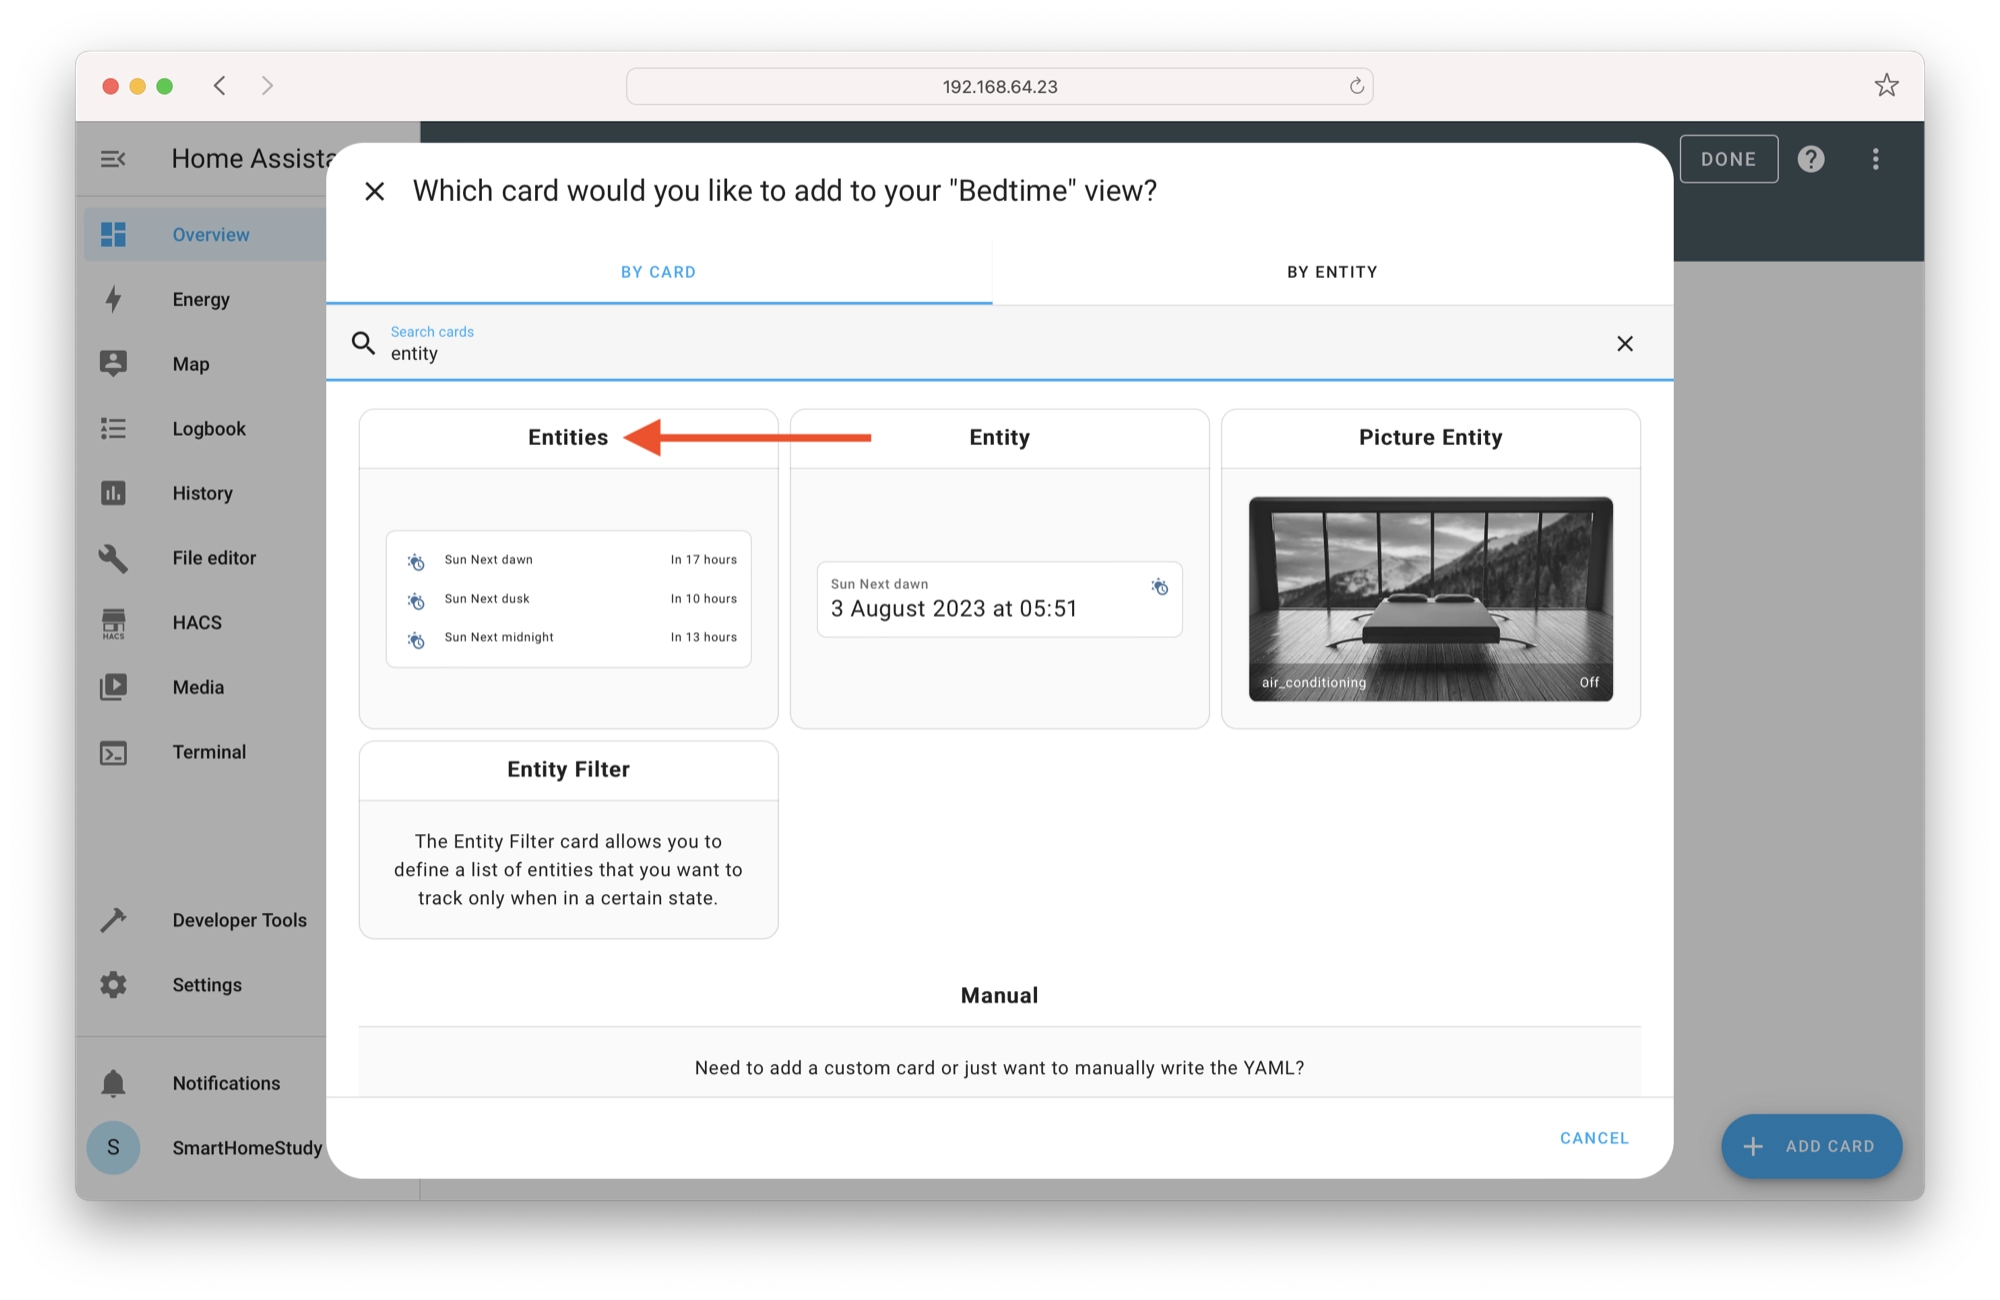
Next, search for the Entities card and select it. Note that you can use other cards to display entities, however we will use the Entities card for this example.
In the entities card configuration, set the following options:
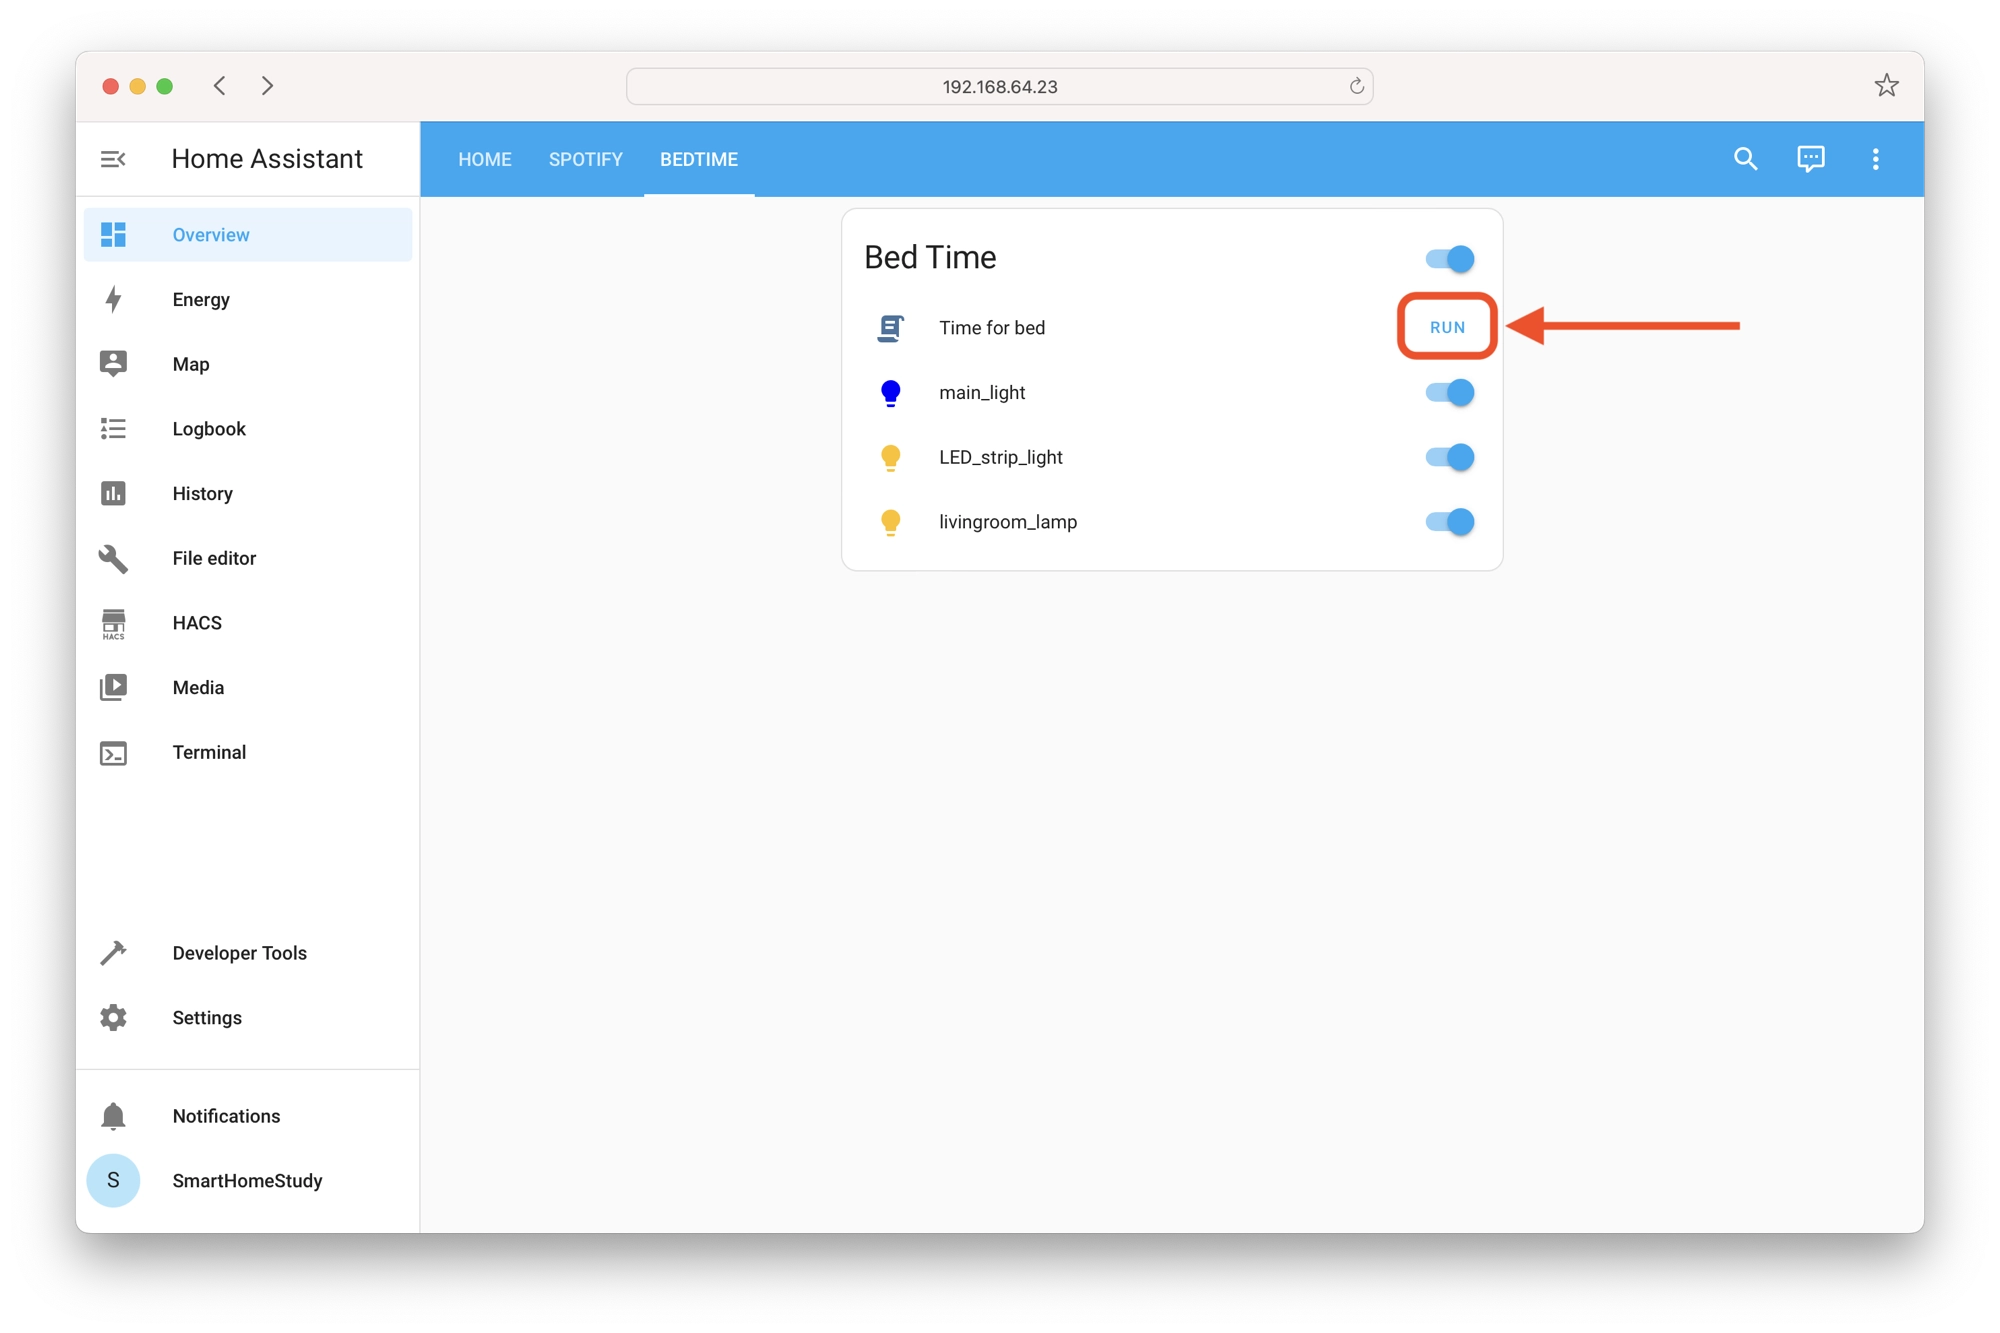
- Title – Enter a name for the entity card, such as “Bed Time”
- Color icons based on state – This option will allow icon colors to represent the entity state. For example, the script icon will change color when the script is executing.
- Entities – Add the script entity created in the previous section. Optionally, add the other entities used in the script to monitor their state.
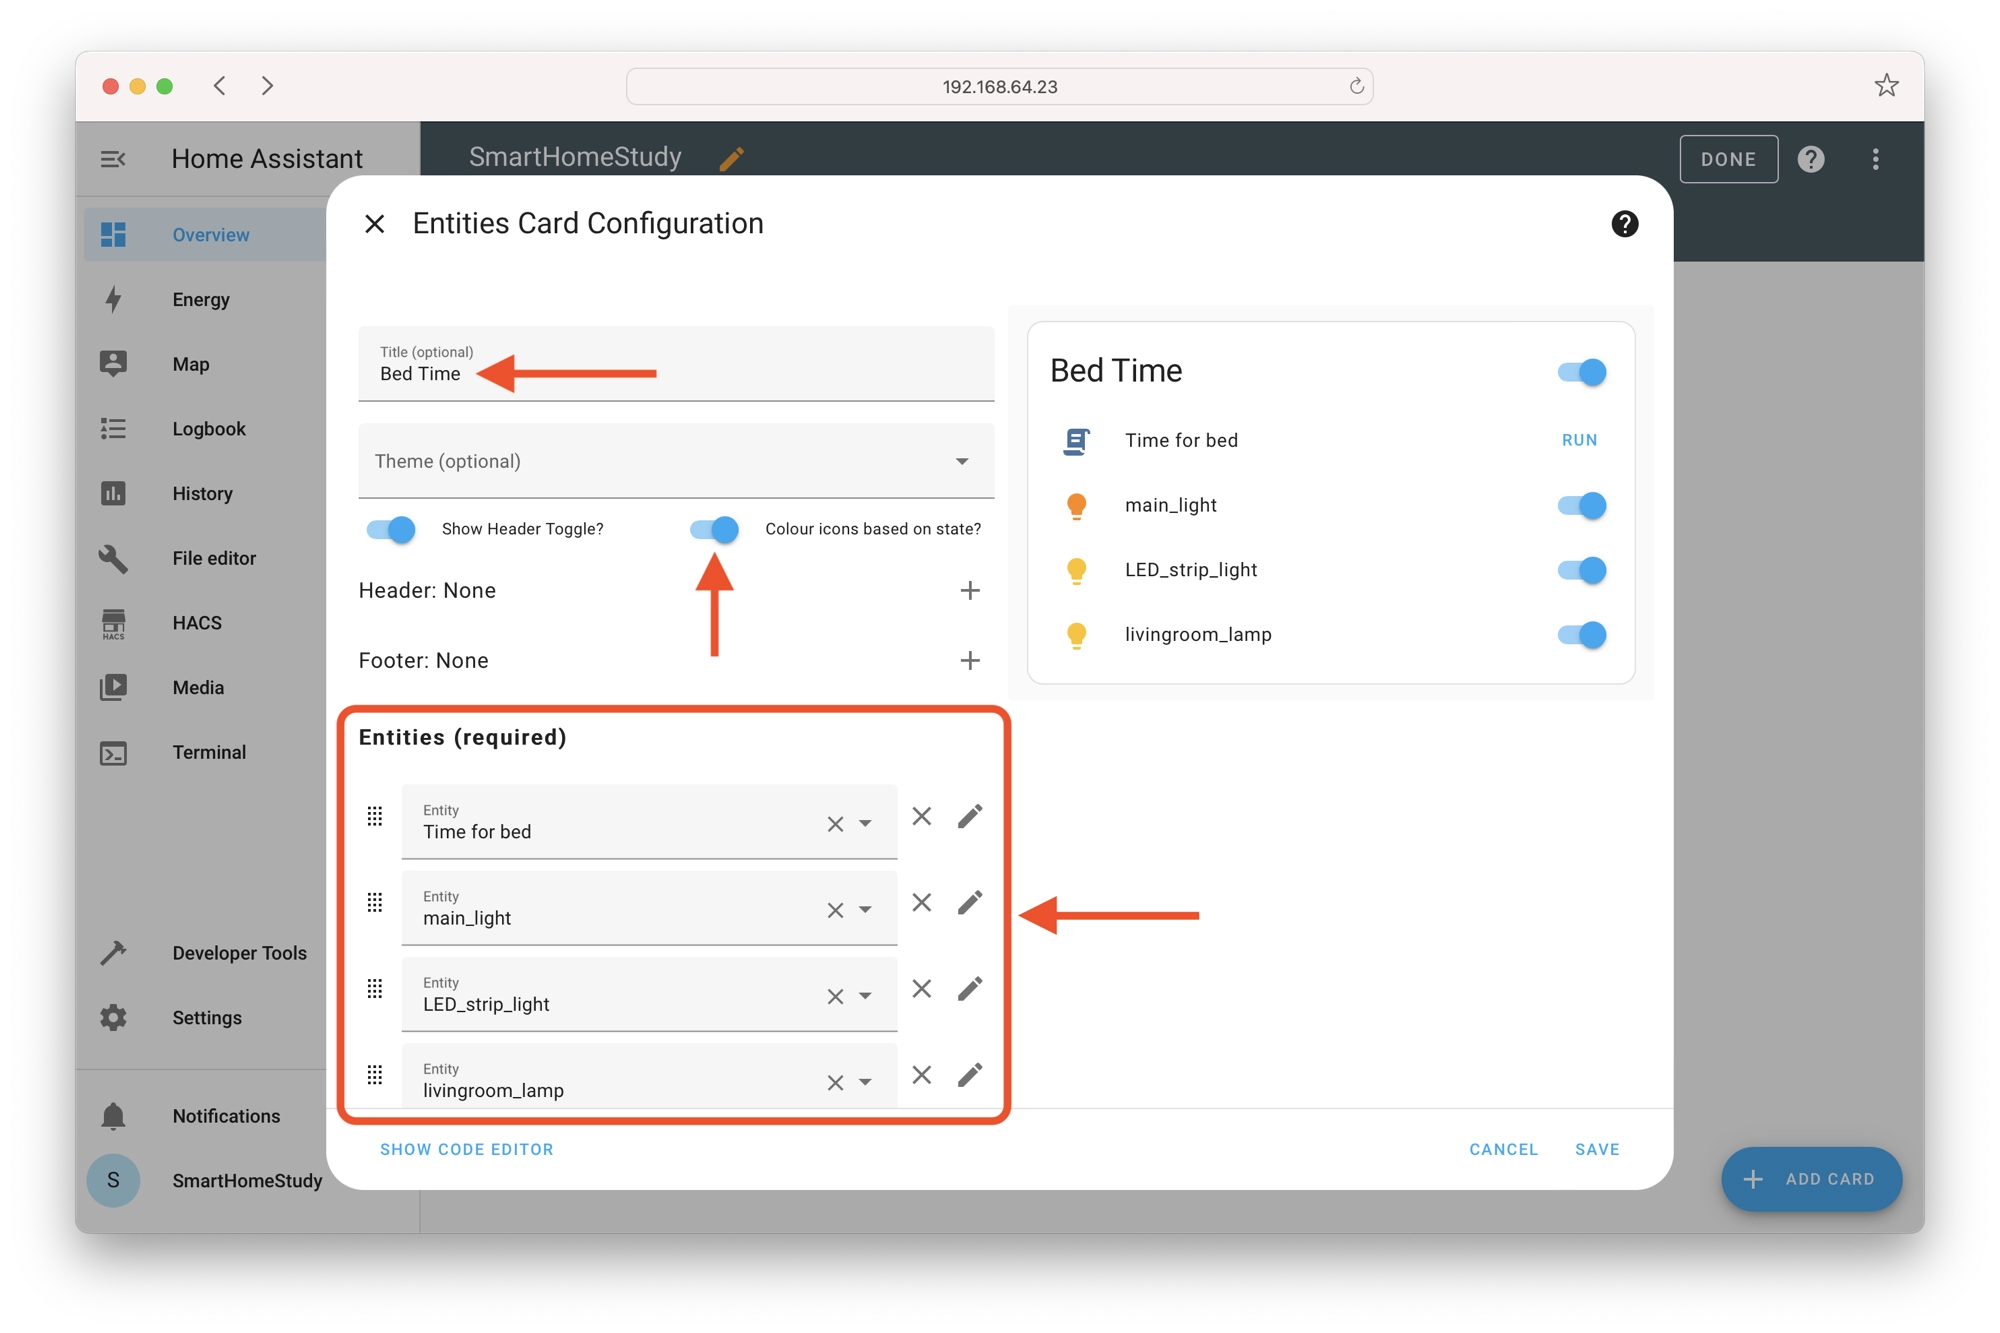
Test the script
Once done, click the Save button to add the card to the dashboard. You can now test the script by clicking the Run button next to the script on the entity card.
If you have added the other entities in the script, you can observe the script actions and see the entity state changes, such as the lights turning on/off and changing color.
Conclusion
Home Assistant scripts offer a powerful and efficient way for you to produce sequential actions in your smart home. This guide has provided a comprehensive overview of the key concepts, tools, and steps needed to create and utilize scripts effectively.
By simplifying complex tasks and enhancing the overall smart home experience, scripts empower users to save time, enhance security, and increase comfort effortlessly.
As smart home technology continues to evolve, embracing Home Assistant scripts can be a game-changer for anyone seeking a seamless and personalized home automation journey.
So, whether you’re a novice or tech-savvy individual, now is the time to dive into the world of Home Assistant scripts and transform your smart home into a truly intelligent oasis. Happy automating!
Article Updates
August 2nd 2023 : Major overhaul, article rewritten for latest Home Assistant. Featured image updated. TOC added.
Article first published February 25th 2020.
Thanks so much for visiting my site! If this article helped you achieve your goal and you want to say thanks, you can now support my work by buying me a coffee. I promise I won't spend it on beer instead... 😏


%%