Did you know that there are several ways to install Home Assistant on a Raspberry Pi?
For most people it makes sense to use the image supplied by Home Assistant, but what about the bold, the adventurous and the curious?
If you are new to Home Assistant and you have little to no Linux experience, I would recommend following the recommended installation procedure instead, which will give you a fully featured Home Assistant using the Home Assistant OS.
This method of installation is ideal for more advanced users who wish to squeeze a little more Raspberry juice out of their Pi!
Note that installing Home Assistant Core only will not give you the add-ons store.
Prerequisite
You will need a Raspberry Pi that meets the requirements of running Home Assistant. Ideally I would recommend getting one that has the top specification if you plan to run Home Assistant alongside other applications.
As a minimum I would suggest the 4GB model (check the price on Amazon), but I would recommend going for the maximum possible, which at the time of writing is 8GB (check the price on Amazon).
You will also need to have Raspberry Pi OS installed on your chosen storage media. The easiest way to do this is to get a blank SD card and follow the official installation guide.
Installing the desktop GUI is optional. Unless you have a need for it I would recommend installing the command line only, Raspberry Pi OS lite.
Everything here will be done in the terminal, both of which is possible with the GUI and non-GUI installations of Raspberry Pi OS, so the choice is yours!
You will also need to be able to access the Raspberry Pi terminal. You can either do this directly on the Pi, by remote desktop or by using an SSH terminal.
You can of course just connect the Pi to a screen, keyboard and mouse instead. You can even use your existing laptop screen if you want to save some money and space.
Installing Home Assistant
There are two main ways that we can approach installing Home Assistant on Raspberry Pi OS:
- Within a container – the easier way to install Home Assistant.
- Using a virtual environment – this is an advanced method for running Home Assistant core natively on the operating system.
Unless you know that you specifically want to run Home Assistant in a Python virtual environment, I would recommend following the steps to install Home Assistant in a docker container.
How To Install Home Assistant on Raspberry Pi OS in a Docker Container
Using Docker to install Home Assistant in a container is the prefered method of installation when not using the Home Assistant operating system.
It also makes it easier to migrate your Home Assistant setup to a more powerful machine at a later date, should you require it.
Installing Docker
The first thing that we need to do is install Docker on to our Raspberry Pi.
Just before we run the installation, lets go ahead and make sure everything is up to date.
sudo apt update
sudo apt upgrade
Next, we can run the following command in order to install Docker.
curl -sSL https://get.docker.com | sh
The script will execute the installation of Docker, however once it completes we need to manually give the Pi user account access to Docker.
sudo usermod -aG docker pi
Installing Portainer
It is possible to set up everything in Docker using the command line, however that can be quite challenging.
Portainer is a GUI based management tool for configuring Docker, which runs in a browser.
We can simply install Portainer on our Raspberry Pi and then we can access the Docker settings within our computers browser.
Use the following command to install Portainer on your Raspberry Pi.
Portainer for Raspberry Pi OS 32-bit:
sudo docker pull portainer/portainer-ce:linux-arm
Portainer for Raspberry Pi OS 64-bit:
sudo docker pull portainer/portainer-ce:linux-arm64
Start Portainer in its own container
Portainer also runs within a container and we will need to create this container using the following command.
Port 9000 is most commonly used, however you can choose a different port if for some reason this is already in use.
If in doubt, just use port 9000 unless you have an error.
Start a container for Raspberry Pi OS 32-bit:
sudo docker run --restart always -d -p 9000:9000 -v /var/run/docker.sock:/var/run/docker.sock -v portainer_data:/data portainer/portainer-ce:linux-arm
Start a container for Raspberry Pi OS 64-bit:
sudo docker run --restart always -d -p 9000:9000 -v /var/run/docker.sock:/var/run/docker.sock -v portainer_data:/data portainer/portainer-ce:linux-arm64
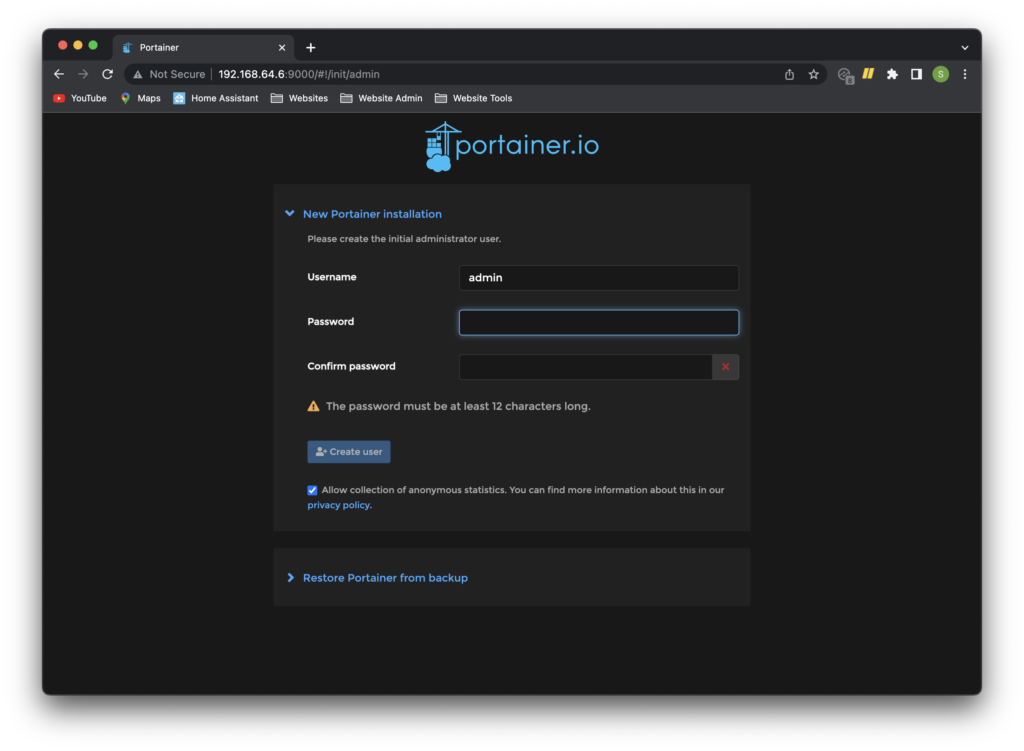
Accessing Portainer
You should now be able to access Portainer by navigating to the following address.
You will need to insert your own Raspberry Pi IP address.
http://<your-raspberry-pi-IP>:9000
If you don’t know what the IP address of your Raspberry Pi is, check out my tutorial which explains how to find your Raspberry Pi IP address.
Once you are connected, go ahead and create a new user by entering a username and password.
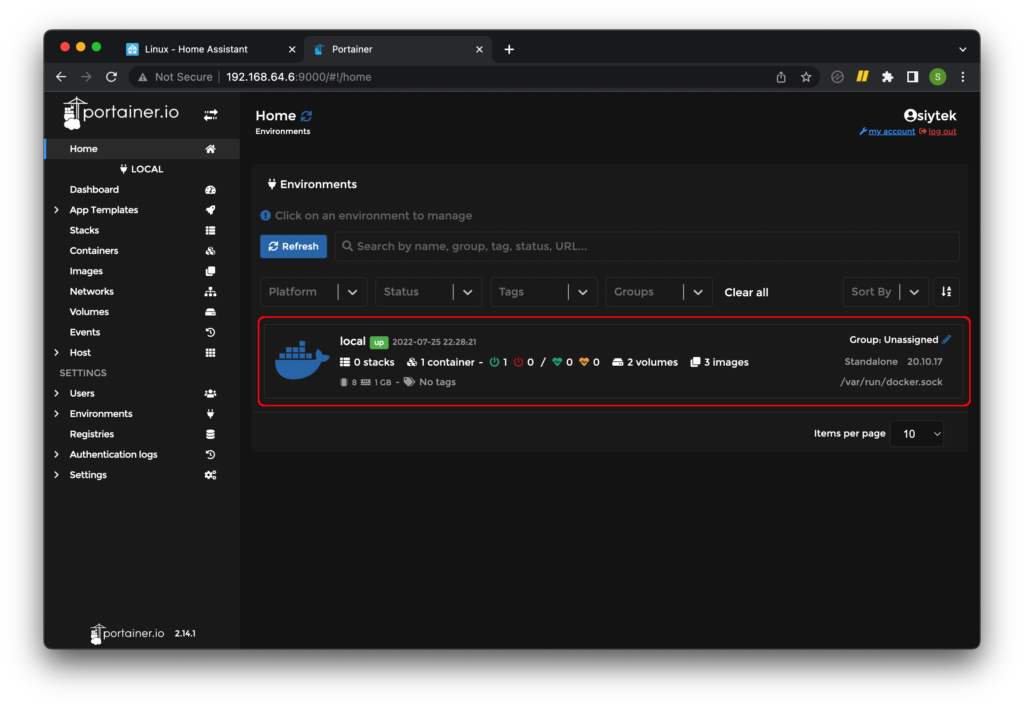
Setup a new Docker container for Home Assistant
Now that we have Docker and Portainer installed, we can create a new container in which to run Home Assistant.
First let’s log in to Portainer by navigating to our Pi’s IP address, using the port for our Portainer container.
http://<your-raspberry-pi-IP>:9000
Go ahead and choose local containers by clicking the main display.
Create a new container
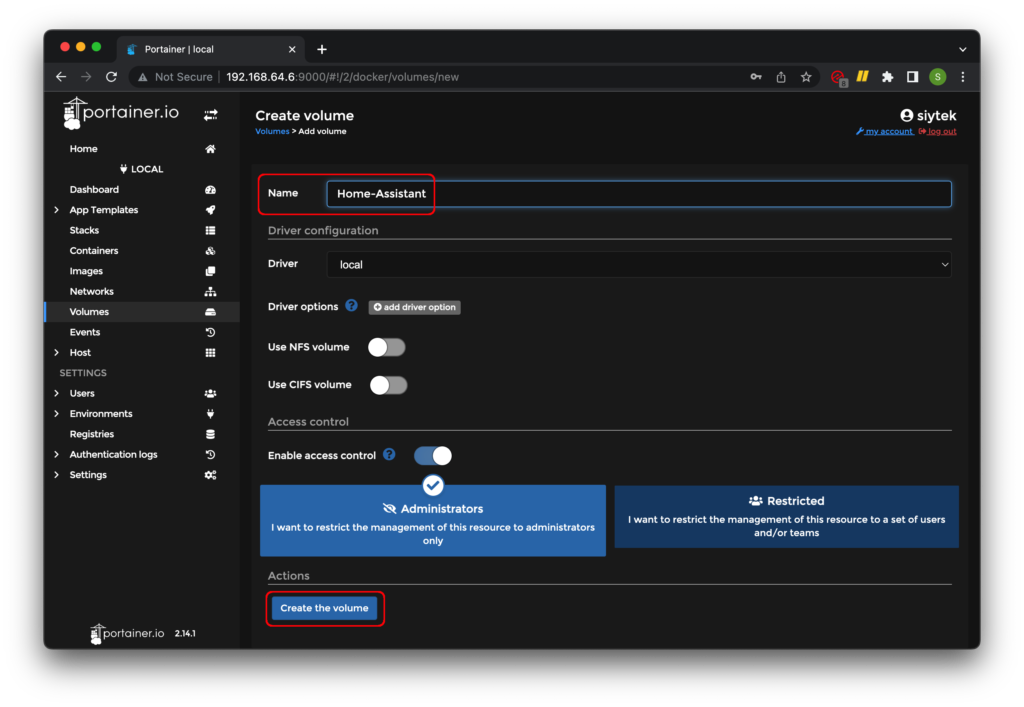
From the left-hand sidebar menu choose Volumes and then click Add volume.
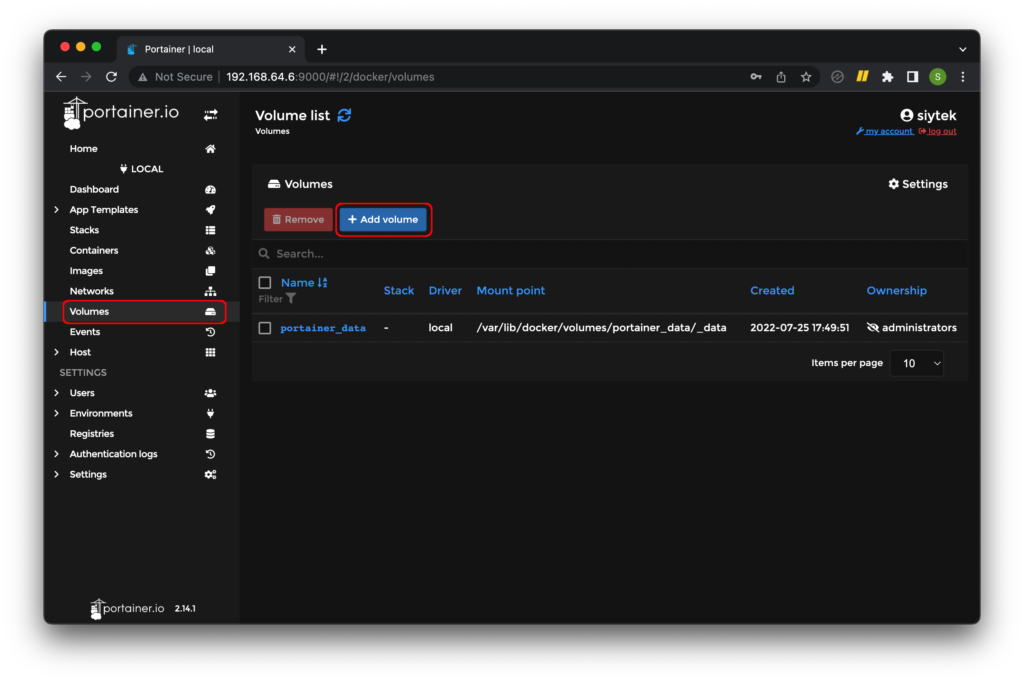
Let’s give the new volume the name Home-Assistant, and then click Create the volume.
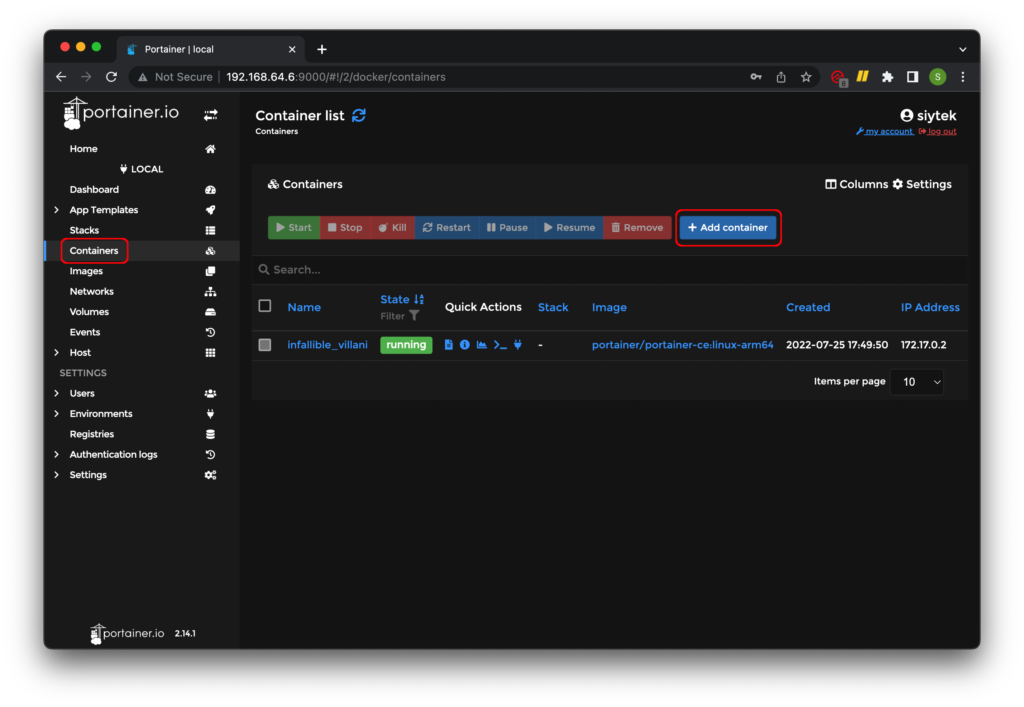
On the left-hand menu select Containers and then click the Add container button.
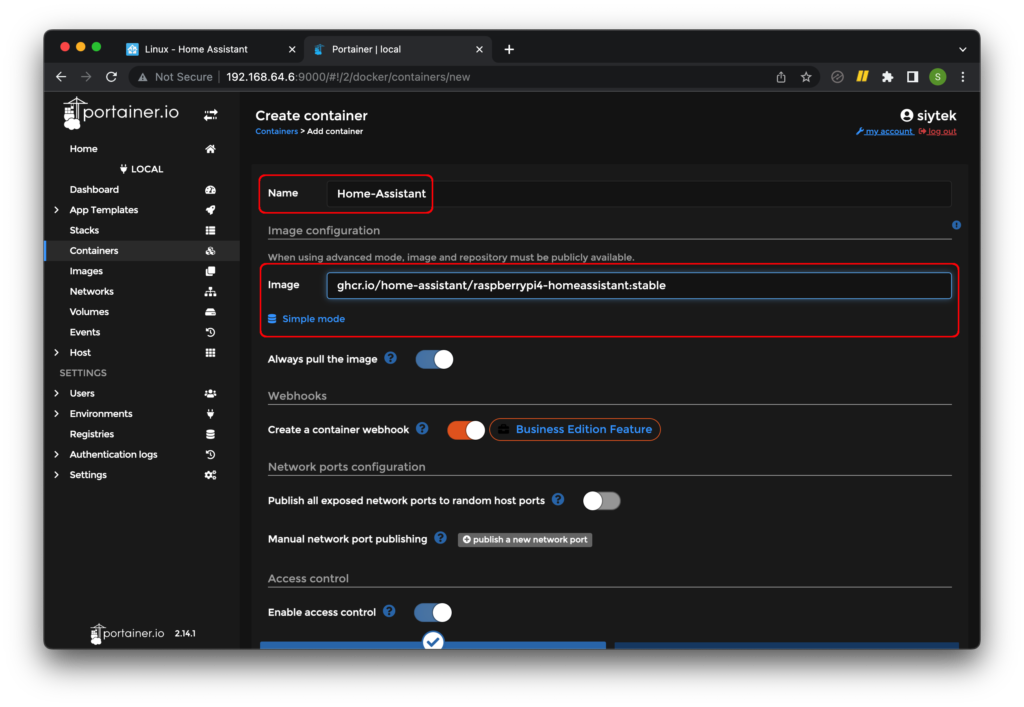
Our new container will be created from an image, you need to make sure you select the correct image depending on the Raspberry Pi that you are using.
First let’s enter the name Home-Assistant for our new container. Then switch to advanced mode and enter the image address, using either of the following:
Raspberry Pi 4 Image
ghcr.io/home-assistant/raspberrypi4-homeassistant:stable
Raspberry Pi 3 Image
ghcr.io/home-assistant/raspberrypi3-homeassistant:stable
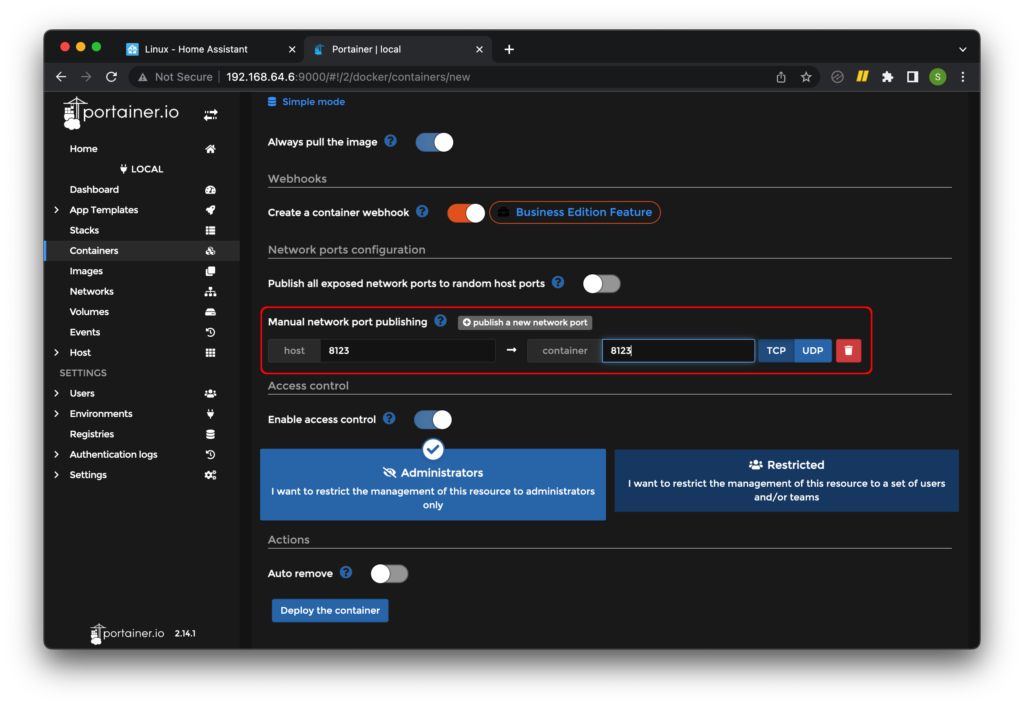
Set up port mapping
Home Assistant most commonly uses port 8123, although you can choose whatever port you prefer.
However unless you have a reason to change it, I would recommend just using port 8123.
Choose publish a new network port and then enter 8123 as the port for both the host and the container.
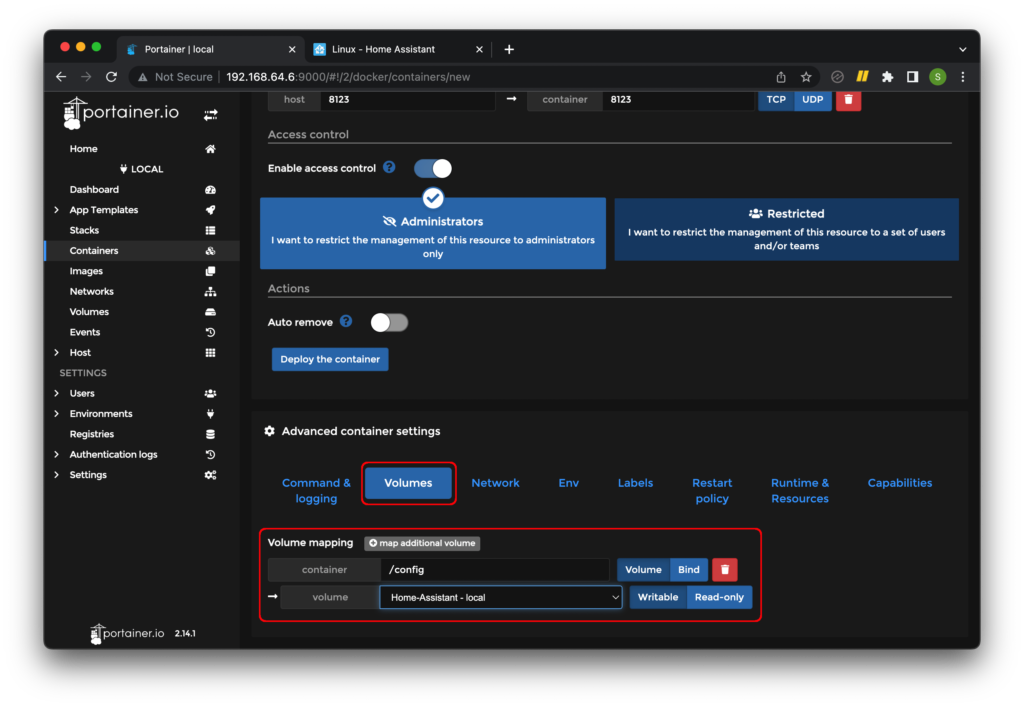
Mapping the Home Assistant Config directory
Next choose Volumes and then map additional volume. In the section for container, enter /config in order to map this location to the new volume.
In the section for volume, drop down the menu and choose the volume that we created earlier.
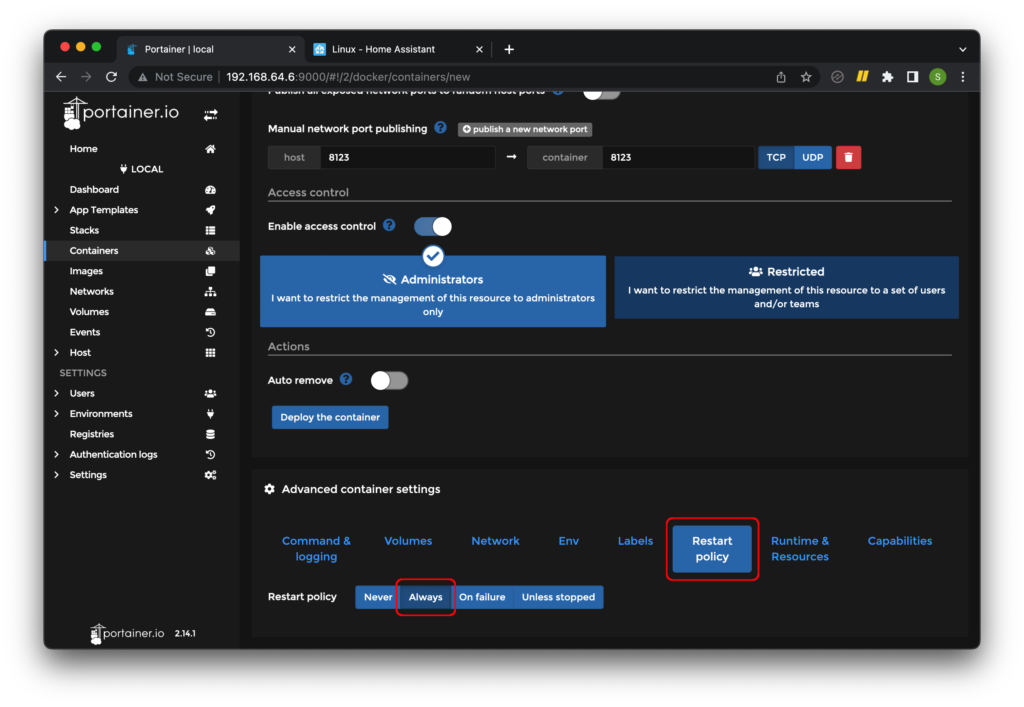
Setting the restart policy and the runtime and resources options
Choose Restart policy and change the restart policy to always.
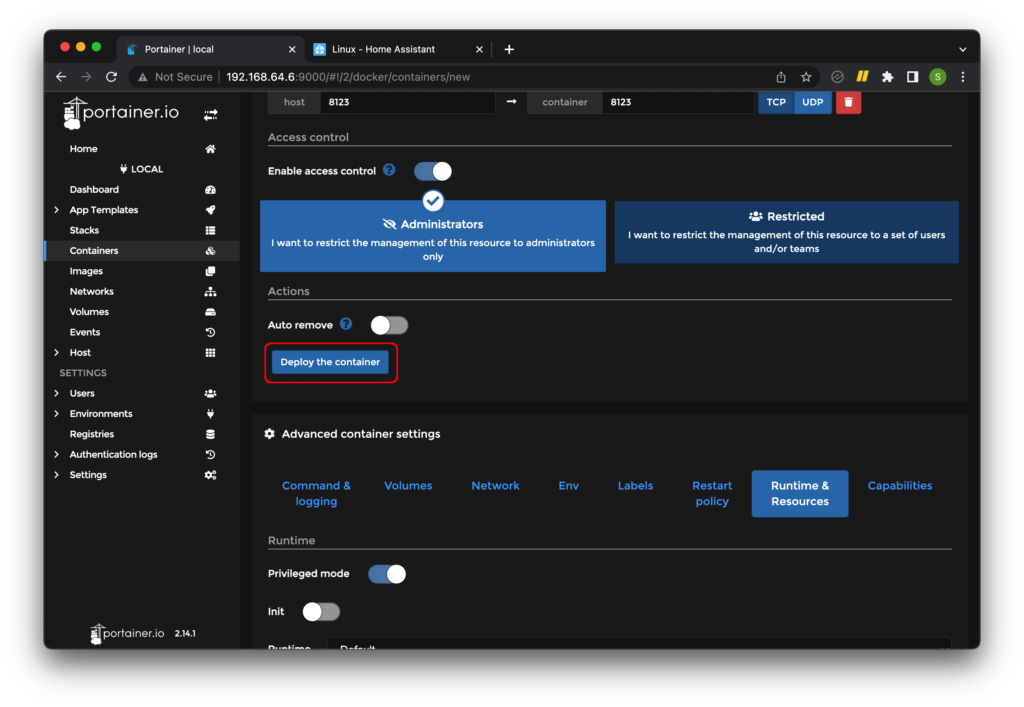
Choose Runtime & Resources and enable the Privileged mode.

Deploy the container
Go ahead and click Deploy the container to start Home Assistant.
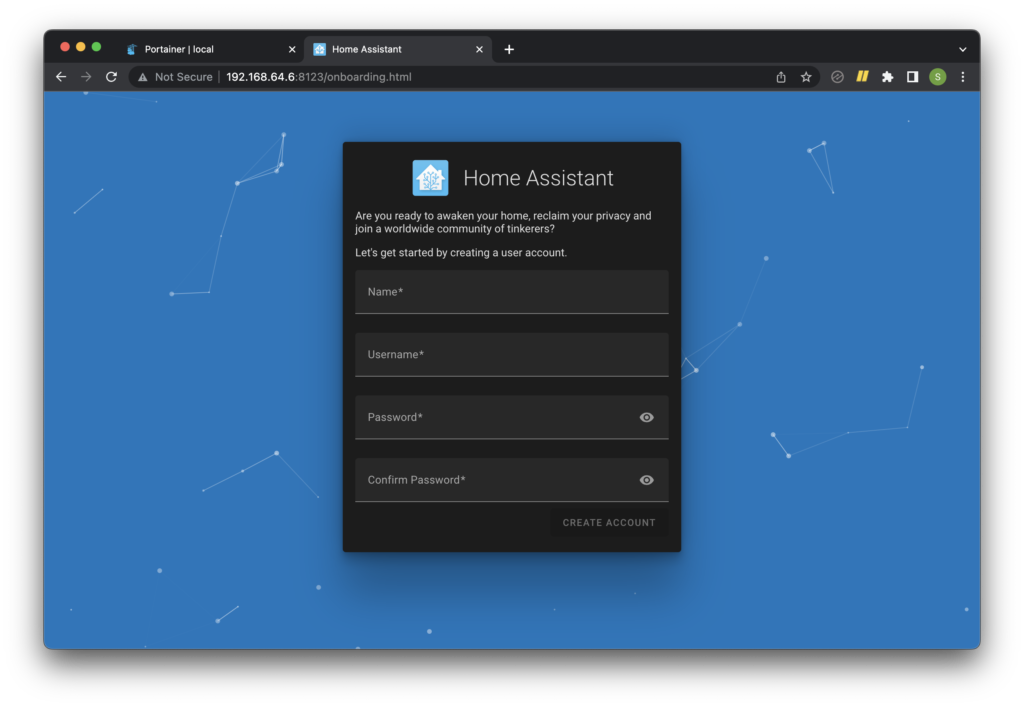
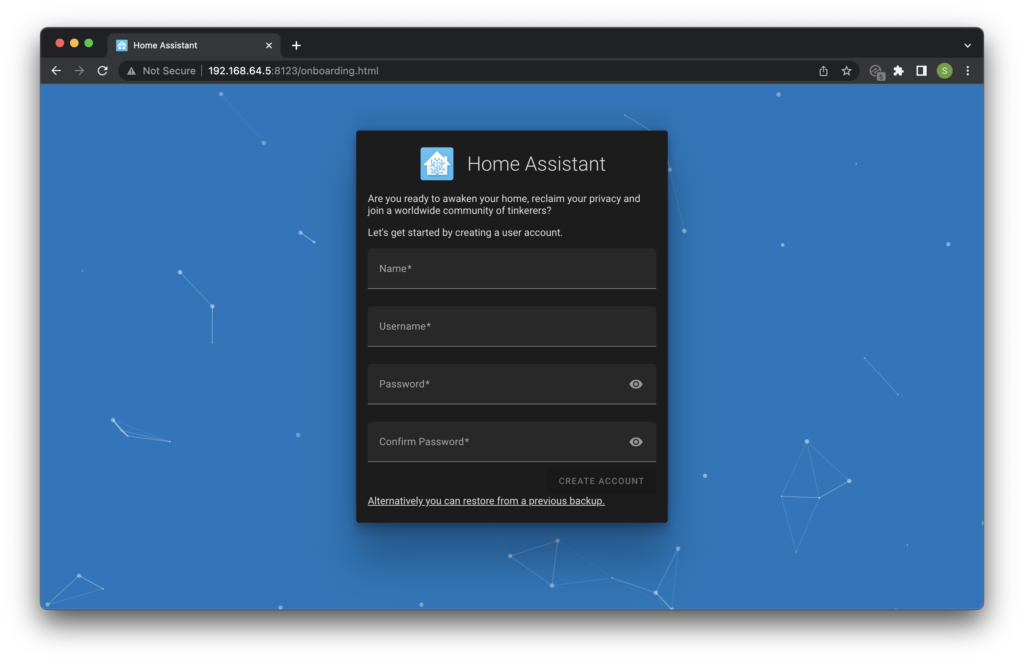
Connect to Home Assistant
Congratulations! You should now have Home Assistant up and running. To access Home Assistant and begin onboarding, navigate to the IP address of your Pi using the Home Assistant port.
http://<your-pi-ip-address>:8123
How To Install Home Assistant on Raspberry Pi OS in a Python Virtual Environment
As previously mentioned I would not recommend using this installation method unless you know you want to install only Home Assistant core in a Python virtual environment.
The prefered method to install Home Assistant without the Home Assistant operating system is to use a docker container.
This installation method allows Home Assistant and all dependencies to be installed an run natively, however still in a separate wrapper so as not to disrupt other programs on the Pi.
Update Raspberry Pi OS
The first thing to do is run the Raspberry Pi OS update commands to make sure that everything on the system is up to date. Go ahead and enter the following commands into the terminal.
sudo apt-get update
sudo apt-get upgrade -y
Install dependencies
In order to run Home Assistant we need to add some additional dependencies. These are packages that will be installed within Raspberry Pi OS that are needed to install and run Home Assistant.
sudo apt-get install python3 python3-dev python3-venv python3-pip libffi-dev libssl-dev
Create homeassistant user
We need to create a new user within Raspberry Pi OS for the Home Assistant core. It is best just to call this user ‘homeassistant‘ although you can choose a different name if you like.
We also need this user to have access to the GPIO, I2C and dialout groups. This will allow the Home Assistant core to have access to some of the necessary hardware peripherals on the Pi.
sudo useradd -rm homeassistant -G dialout,gpio,i2c
Activate virtual environment
Remember that virtual environment thing we talked about earlier? Now it is time to create a wrapper for Home Assistant. First we need to make a new directory.
sudo mkdir /srv/homeassistant
Next we need to set the permissions for the new folder to allow our homeassistant user access.
sudo chown homeassistant:homeassistant /srv/homeassistant
Next we need to switch to the homeassistant user in order to activate the virtual environment.
sudo -u homeassistant -H -s
You should see the bash prompt change to the homeassistant user.
We can now activate the Home Assistant virtual environment using Python3.
python3 -m venv /srv/homeassistant
source /srv/homeassistant/bin/activate
You should notice the prompt change again to the homeassistant virtual environment.
Install and run Home Assistant
Now that we are inside of the virtual environment, we need to install the Python distribution, known as a wheel.
python3 -m pip install wheel
Once the wheel has been installed, we can install Home Assistant within our virtual environment.
pip3 install homeassistant
After the installation files have downloaded we can complete the installation by running Home Assistant. This will create the Home Assistant directory.
hass
You should now be able to access the Home Assistant user interface by pointing your browser to port 8123 of your Raspberry Pi IP address. Note that you may see an unavailable screen whilst hass completes the installation. After the first run, subsequent executions of hass will be much faster.
http://<your-pi-ip-address>:8123
Autostart Home Assistant
Your first execution of hass will run in the foreground so go ahead and press ctrl + C to stop it. Then we need to return to the pi user prompt.
exit
Create systemd file
We need to create a systemd file in order to use the systemctl command to start Home Assistant in the background on booting up. We can create this file using the Nano file editor.
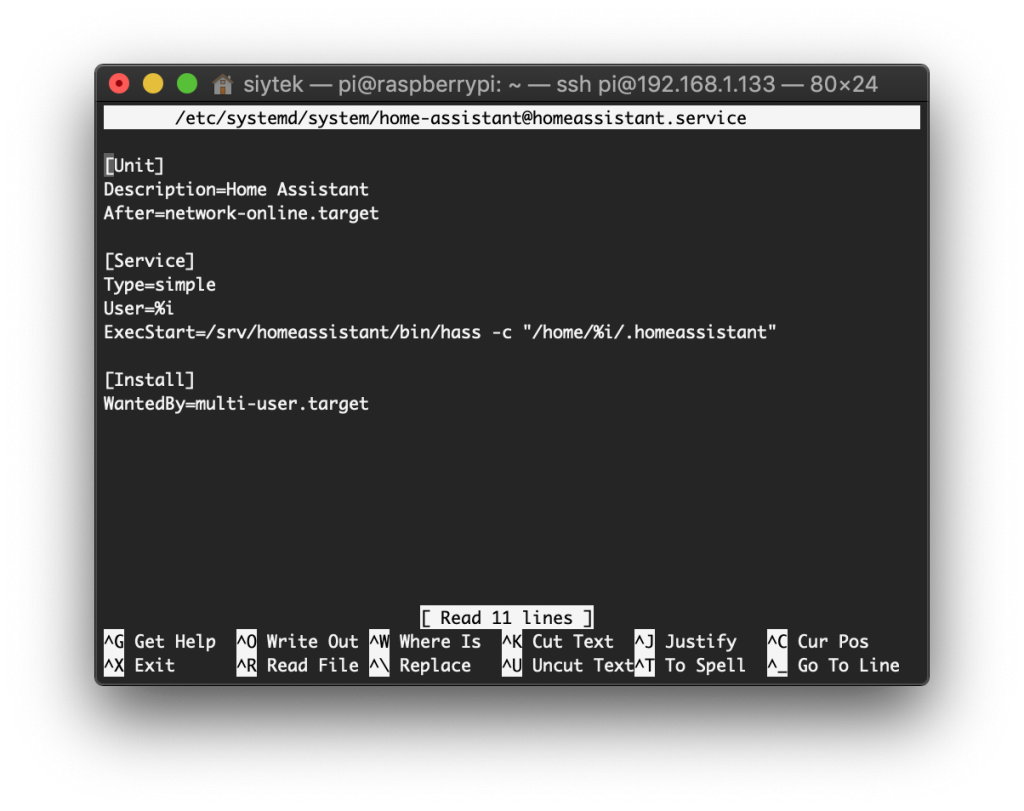
sudo nano -w /etc/systemd/system/[email protected]
This will open up the Nano file editor. Go ahead and enter the following template, then press Ctrl + X to exit. When it prompts you to save, press ‘y.’
[Unit]
Description=Home Assistant
After=network-online.target

[Service]
Type=simple
User=%i
ExecStart=/srv/homeassistant/bin/hass -c "/home/%i/.homeassistant"

[Install]
WantedBy=multi-user.target
Reload daemon
Once we have saved the file and are back at the command prompt, we must first reload the daemon to update it with the changes.
sudo systemctl --system daemon-reload
Set start at boot
We can then set Home Assistant to start in the background at boot.
sudo systemctl enable home-assistant@homeassistant
Disable start at boot
If you wish to disable Home Assistant from starting at boot, you can enter the following command.
sudo systemctl disable home-assistant@homeassistant
Reboot
Now you can go ahead and reboot your Pi! Once it has rebooted you should be able to access your Home Assistant user interface.
sudo reboot
Conclusion
Installing Home Assistant in Raspberry Pi OS is considerably more involved than using the standard installation. However it offers more flexibility for those wanting more from their Pi, therefore it is worth spending a little more time with this process.
Thanks for visiting my site and hope you managed to find some helpful information! Why not go ahead and take a look at my other awesome Home Assistant tutorials!
Article Updates
July 2022 : Article updated to match latest version of Home Assistant, 2022.7.6. Raspbian has now been replaced by Raspberry Pi OS. Tutorial checked and updated to match Raspberry Pi OS version x. Section for docker image installation added.
Article first published March 29th 2020.
Thanks so much for visiting my site! If this article helped you achieve your goal and you want to say thanks, you can now support my work by buying me a coffee. I promise I won't spend it on beer instead... 😏


Thank you for this guide, precise and detailed in every step. I wanted to ask you if there is a guide to update Docker, Portainer and Home Assistant, without losing their respective configurations.
Only thing missing in this article is that it will NOT have a SUPERVISED version installed, what means you will miss the Add-Ons (if you need) and other functionalities….
I found it only at the end, do you know how can I install the supervised version?
Well well, so fa so good, but Johnny is right, how do I update my container (when I update the container in portainer, all data will be lost) and – I have no chance to restore a backup, because you are only running HA core….
You should be able to manually backup and restore the
/configdirectory, eg.docker cp:/config and then usedocker run -d --name= -v :/config homeassistant/home-assistant:tag . See here for further information: https://community.home-assistant.io/t/moving-ha-to-docker-trying-to-restore-a-backup/477800Good guide! One thing I was a little unsure of, though: in your screenshot for the port configuration, I can’t tell if you chose TDP or UDP after entering the port number mapping. The UI doesn’t look quite the same as it does for me.