Looking to flash Arduino via the serial bootloader with the Raspberry Pi GPIO serial port?
This article explains how to use the Raspberry Pi serial port to flash Arduino without having to use ICSP.
If you are looking to make a custom Arduino-based Pi hat and want to provide firmware updates from the Pi then this is the ideal method.
Or perhaps your dog ate your FTDI programmer and you want to make use of a spare Pi that you have lying around.
Either way, let’s get started!
Table of Contents
- Prerequisite
- Connect the Arduino to the Raspberry Pi
- Setup the Raspberry Pi
- Modify arduino-cli
- Flash Arduino
- Conclusion
Prerequisite
You will need a Raspberry Pi with the latest version of Raspbian, check the latest price at Amazon.
This tutorial is suitable for headless machines, so you can use Raspbian Lite if you prefer.
I would recommend connecting to the Pi using SSH so that it is easier to copy and paste the commands.
I would imagine that your interest in this tutorial means you are well beyond the point of needing a Raspbian installation guide!
However if you need it for quick reference, you can check out my guide on how to install Raspbian.
You will need to install the Arduino command line tools so that Arduino can be programmed from the Raspberry Pi terminal.
Go ahead and check out my tutorial on how to install arduino-cli on Raspberry Pi if you don’t already have them on your system. We will make a slight modification to them in order to use the GPIO serial port.
You will also need a method to shift the voltage level between 3.3V and 5V as the Raspberry Pi and Arduino operate at these different voltages respectively.
It is possible to shift the levels using only resistors, however I would recommend using a simple and inexpensive level shifter.
Connect the Arduino to the Raspberry Pi
First let’s take a quick look at the hardware.
The Raspberry Pi GPIO pins (including the TX and RX serial port pins) are not 5V compatible, therefore we must ensure the Arduino does not deliver the full 5V to the Pi.
The logic level threshold on the Arduino is however lower than 3.3V. This means that the Pi serial port TX pin is capable of switching the Arduino serial port RX pin without additional hardware.
If you are confident enough with hardware design then feel free to use a potential divider.
For this tutorial I will be using a simple level shifter wired as per the following diagram.
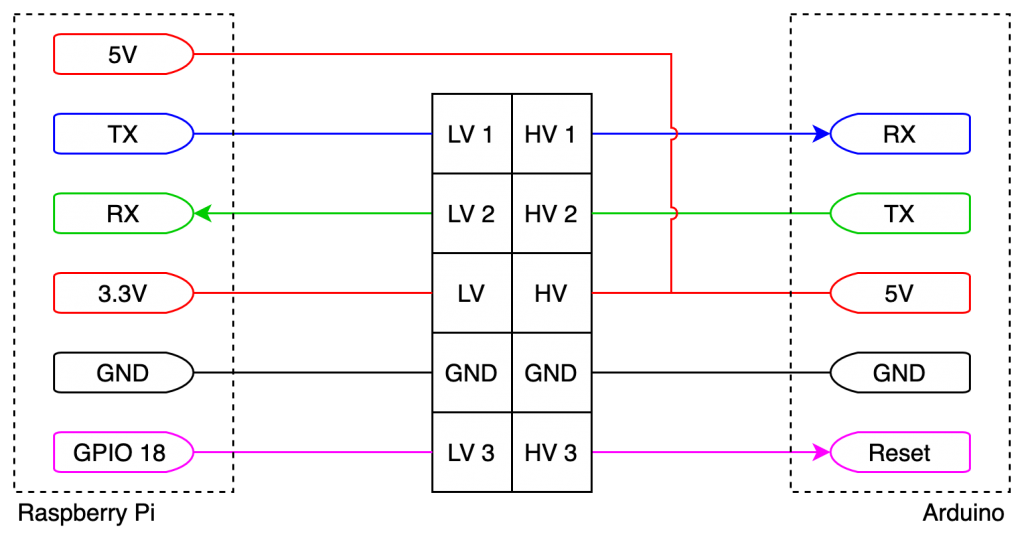
Note that the reset pin on the Arduino requires a pull-up resistor and this is not always included.
Another benefit of the level shifter is the outputs have pull-up resistors, therefore an additional pull-up resistor is not necessary when using a level shifter.
Setup the Raspberry Pi
First we should make sure everything is up to date in Raspbian, so go ahead and enter the following into terminal.
sudo apt-get update && apt-get upgrade -y
In the default Raspbian configuration, Linux uses the serial port to allow access via serial terminal programs.
We must disable this in the Raspberry Pi configuration menu.
sudo raspi-config
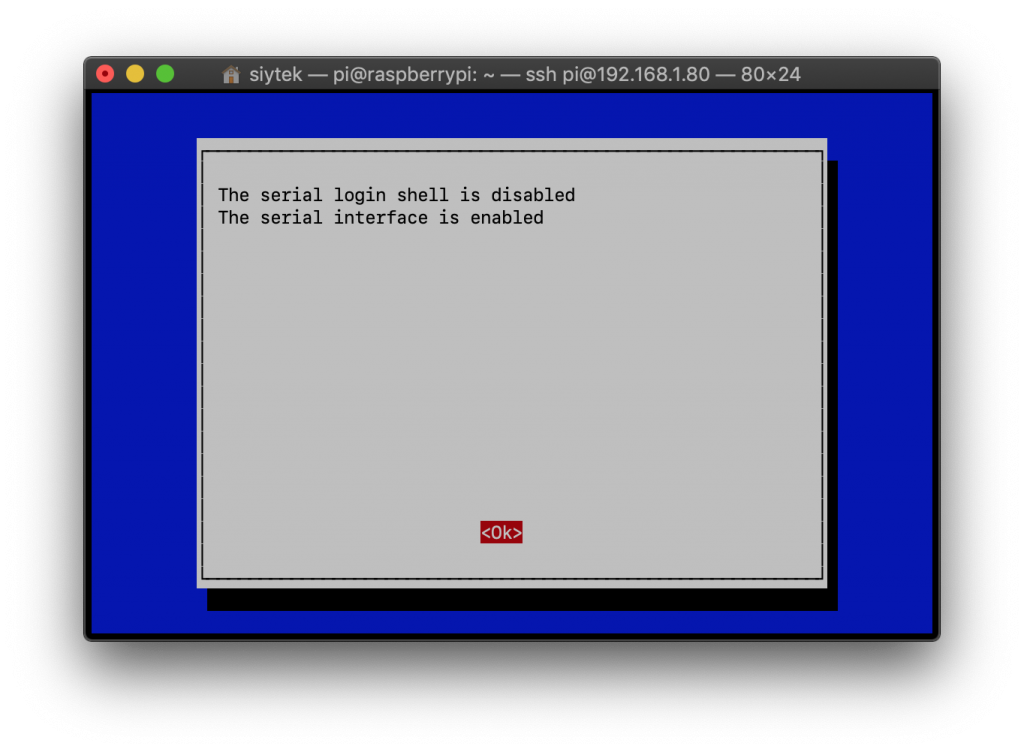
From the menu select interfacing options > serial and when you are asked whether you would like the login shell to be available over serial, select no.
You will then be asked whether you would like the serial hardware to be enabled, select yes.
Once you have changed the configuration, click finish to return to the command prompt, then reboot the Pi.
sudo reboot
Modify arduino-cli
Now we can make the necessary modification to arduino-cli in order to support the GPIO serial port.
The serial port itself will work without modification, however we need to add DTR functionality so that the Arduino is reset into bootloader mode by a spare Raspberry Pi GPIO pin.
When the arduino-cli upload command is run it uses a tool called avrdude to flash the compiled .hex file to the board.
As we must make a modification for this tool we first need to locate it.
Locate avrdude
The easiest way to locate the tools folder is to compile a sketch in verbose mode. You can compile any sketch you like, simply add the -v flag to the end of the command.
arduino-cli compile --fqbn <your-fqbn> <path-to-your-sketch> -v
The compiler will run with more output than usual, producing a mess of output before echoing the usual success message.
Within this information you will be able to see the path to the tools folder.
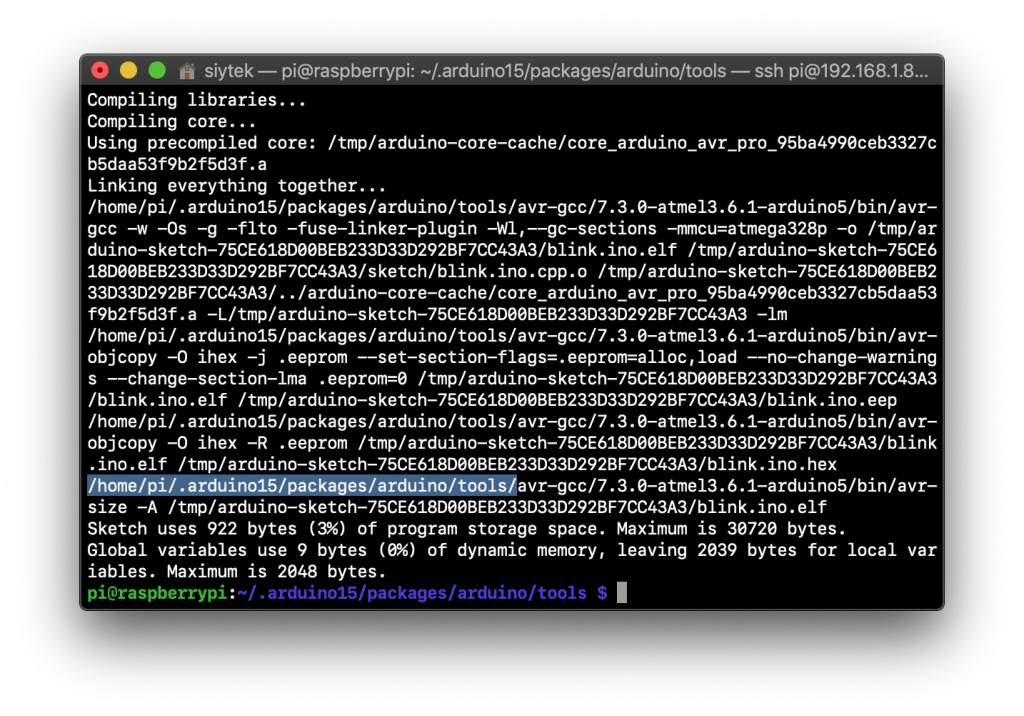
In my case the path is as follows, however yours may be different. Go ahead and change to the tools folder using your own path.
cd /home/pi/.arduino15/packages/arduino/tools/
Open the bin directory
Once in the tools folder we should find the avrdude folder containing another folder with the Arduino version number.
Within this folder is the bin directory containing the avrdude file used by arduino-cli. Go ahead and change to the bin directory.
You may need to modify the path if you are using a different version of Arduino.
cd avrdude/6.3.0-arduino17/bin
Rename the original avrdude
Next we need to rename the avrdude file within the bin directory to avrdude-original.
mv avrdude avrdude-original
Download modified avrdude
Now we can download the additional files from the Github repository by entering the following curl commands.
curl https://raw.githubusercontent.com/Siytek/avrdude-rpi/master/autoreset -o autoreset
curl https://raw.githubusercontent.com/Siytek/avrdude-rpi/master/avrdude -o avrdude
Install dependencies
Finally we need to install some dependencies to support the autoreset script, so go ahead and run the following command.
sudo apt-get install -y python-dev python-rpi.gpio minicom
Now when arduino-cli calls for avrdude, the newly added bash script will launch the original avrdude with the addition of using the autoreset script to pulse the Arduino reset pin just at the correct time. Awesome!
Flash Arduino
As we have made the modification within arduino-cli, it is now possible for us to use the Arduino command line to flash devices as usual with or without the GPIO serial port.
If you followed my tutorial explaining how to flash Arduino using the Raspberry Pi terminal, you can go ahead and try flashing the blink script using the GPIO serial port with the following command.
arduino-cli upload --port /dev/ttyAMA0 --fqbn <your-fqbn> ~/blink
Note that you can ignore the error “strace: |autoreset: Broken pipe“
Conclusion
With a little effort to modify the arduino-cli program it is easily possible to use the Raspberry Pi GPIO header to flash Arduino.
Now you can use it in your Pi hat design or perhaps as a backup for that time you cannot find your FTDI adapter!
Why not go ahead and check out some more of my awesome Arduino or Raspberry Pi tutorials!
Thanks so much for visiting my site! If this article helped you achieve your goal and you want to say thanks, you can now support my work by buying me a coffee. I promise I won't spend it on beer instead... 😏


Hello,
I appreciate the tutorial.
I’m currently doing a neat project where a ‘master’ pi zero w programs 4 atmega328pu chips…these chips then work together to perform a series of tests, where one chip acts as a master/user interface and the rest report successes/fails…right now I’m flashing the avr’s via the spi bus on the pi…but per my PCB routing I find it much cleaner to route the pi:avr comm via uart and the avr:avr comm via spi. Also time is a big concern during the testing phase but not setup phase, so I’m hoping the avr:avr spi comm setup saves some time
I see the following after this command:
arduino-cli upload –port /dev/ttyAMA0 –fqbn arduino:avr:uno ~/blink
Error during Upload: uploading error: cannot execute upload tool: fork/exec /home/pi/.arduino15/packages/arduino/tools/avrdude/6.3.0-arduino17/bin/avrdude: permission denied
I’ve searched various threads for giving user ‘pi’ permission to use /dev/ttyAMA0 but I continue to get the above error.
Below are the steps I tried one at a time…
I enabled serial through raspi-config,
disabled Bluetooth,
and entered ‘sudo chmod a+rw /dev/ttyAMA0’ in the command line
One thing I think worth noting…I access the pi via usb as ethernet following the tutorial here https://www.circuitbasics.com/raspberry-pi-zero-ethernet-gadget/#:~:text=Setting%20up%20your%20Raspberry%20Pi%20Zero%20as%20a,power%20cord%20and%20ethernet%20cable%20or%20WiFi%20adapter.
any help is greatly appreciated!