Welcome to the final article in our comprehensive tutorial series, the beginners guide to making a macOS app using Swift and Xcode.
In this fifth and concluding installment, we will complete the journey of building a finger drumming app using Xcode and SwiftUI.
If you have not been following a long with the whole series, be sure to check out the tutorial series from part 1.
Complete Beginners Guide: Swift & Xcode
- Part 1 – How to Make a macOS Desktop App: Beginners Start Here
- Part 2 – Beginners Guide to Adding Images, Sounds and Icons to Xcode
- Part 3 – An Easy Beginners Guide to Making a macOS GUI using Swift
- Part 4 – How to Add Audio to your macOS App Using Swift
- Part 5 – Beginners Guide to Xcode & Swift: Completing the App
Throughout this series, we have explored Xcode’s development environment, mastered the fundamentals of Swift programming, and learned how to create visually stunning interfaces with SwiftUI.
Now, it’s time to apply our knowledge and add those finishing touches to our finger drumming app.
By the end of this tutorial, you’ll have a fully functional finger drumming app that showcases your newfound skills in Xcode and Swift development. Let’s embark on this final leg of our beginner tutorial series and bring your app to life!
Prerequisite
This article is intended for putting the finishing touches on the finger drumming app that we have been building throughout the series.
At this stage you should have completed the following:
- Downloaded, installed and configured a new project in Xcode.
- Added image and sound assets to the project.
- Written the Swift code to generate the GUI.
- Created a sound player module for playing back the audio files.
If you have not yet completed these steps, go ahead and check out the series starting from part 1 in order to get up to speed.
In this final part we will connect the functionality of the sound player to the main app GUI. We will also add keyboard shortcuts for each sound, so you can use your keyboard to practice those finger drumming skills!
Lastly we will learn how to build the project and output it to an app file that you can share with all of your Mac-loving friends!
Adding the Ability to Play Audio
The first thing that we are going to do is link the buttons in our app with the sound player class that you created in the previous tutorial.
If you haven’t done so already, the first thing that you need to do is actually create an instance of the soundPlayer class within your app.
Creating an Instance of a Class
In order to do this, open the ContentView file and the following line just inside of the ContentView struct:
struct ContentView: View {
    let soundPlayer = SoundPlayer()
Next, I want to draw your attention to the create button function within the ContentView file, which is used to generate the buttons in our app:
func createButton(imageName: String) -> some View {
        return Button(action: {}) {
            Image(imageName)
                .resizable()
                .aspectRatio(contentMode: .fit)
        }
        .buttonStyle(.plain)
        .padding(.all)
        .applyColorInvert(colorScheme)

    }
We can see in the following like that the function returns a button, but the absence of any code between the curly braces {} means that nothing happens when we click the button.
return Button(action: {}) {Triggering the playSound function
In order to play a sound when the button is pressed, we want to add an action inside of the curly braces, which triggers the playSound function inside of the soundPlayer class.
We can access this function using dot notation. First we specify the class, then we specify the function inside of the class that we wish to access.
We also need to pass the file name that we wish to open, so that the playSound function knows which file to play.
soundPlayer.playSound(file: soundFile)
Let’s go ahead and add this inside of the button action:
func createButton(imageName: String) -> some View {
        return Button(action: { soundPlayer.playSound(file: soundFile) }) {
            Image(imageName)
                .resizable()
                .aspectRatio(contentMode: .fit)
        }
        .buttonStyle(.plain)
        .padding(.all)
        .applyColorInvert(colorScheme)

    }
You should notice that adding this line generates an error. This is because the createButton function is not yet passing a sound file name to the playSound function.
We can fix this by adding a second parameter within the parentheses of the createButton function declaration:
func createButton(soundFile: String, imageName: String) -> some View {Great! That has solved the issue, however you may have noticed that it has moved the issue elsewhere.
Passing the Audio Sample File Names to the playSound Function
So far we have modified the createButton function to accept a second variable, which is the file name for the audio file that we want to play.
We have also added the playSound function to the button and set it up to play back the sound using the file name passed to the createButton function.
However we actually need to specify the file name somewhere. We will specify the audio file name along with image name for the button, in each of the createButton function calls.
Add each of the drum sounds (including the file extension) as the first variable in the the createButton function calls:
HStack {
  VStack {
    // Row 1 GUI elemenets
    createButton(soundFile: "snare.wav",imageName: "snare")
    createButton(soundFile: "crash.wav",imageName: "crash")
  }
  VStack {
    // Row 2 GUI elemenets
    createButton(soundFile: "closed-hi-hat.wav",imageName: "closed-hi-hat")
    createButton(soundFile: "open-hi-hat.wav",imageName: "open-hi-hat")
  }
  VStack {
    // Row 3 GUI elemenets
    createButton(soundFile: "kick.wav",imageName: "kick")
  }
}
.padding(.all)
.frame(width: 300.0, height: 300.0)
With this code in place you should now be able to trigger the audio sounds when clicking the drum buttons in the application GUI!
Adding Keyboard Shortcuts
The last thing we need to do in order to complete our app is to add keyboard shortcuts for our drum samples. This will allow us to actually trigger the sounds with our fingers, a true finger drumming app!
Creating a Key Map Array
Still within the ContentView struct of the ContentView file, we can create a new array to store each key value that we wish to use for each sound.
This makes it easy to change the key mapping if you desire. Feel free to change the values as you prefer, however we will use the following defaults:
Add the following array just before the createButton function.
let keyboardMappings: [String: String] = [
        "snare": "j",
        "closedhat": "k",
        "openhat": "l",
        "crash": "u",
        "kickpedal": "h"
    ]
Adding Mapped Keys to the Buttons
In order to actually map the keys to the buttons, the first thing that we need to do is load the key map array when the createButton function is called.
Add the following line just inside of the createButton function in order to retrieve the key values:
let keyboardShortcut = keyboardMappings[imageName] ?? ""
The line works by evaluating which image has been assigned to the button (e.g. “snare”) and then uses that to look up which key should be mapped to the button.
The ?? operator towards the end of the line sets the value of keyboardShortcut to empty if the image name passed to the createButton function does not match anything in the keyboardMappings array.
Now that we have created a map of keys that we wish to assign to the drum sounds, we can add the .keyboardShortcut() modifier to the the button in order to map the key.
In order to do this, add the following line to the button within the createButton function:
.keyboardShortcut(KeyEquivalent(Array(keyboardShortcut)[0]), modifiers: [])
This line of code is used to assign a keyboard shortcut to a button in the user interface. It consists of two main parts:
- The
KeyEquivalentpart: This represents the actual key or key combination that will trigger the button’s action when pressed. - The
modifierspart: This represents any additional keys that need to be pressed simultaneously with the main key to trigger the action.
To explain it in more detail:
- The
keyboardShortcutvariable holds the keyboard shortcut for a specific button. It’s obtained from a dictionary calledkeyboardMappings, which maps the button’s image name to its associated keyboard shortcut. If there’s no keyboard shortcut specified for that image, an empty string is used as a default value. - The
Array(keyboardShortcut)[0]part is used to extract the first character from thekeyboardShortcutstring. It treats thekeyboardShortcutas an array of characters and retrieves the character at index 0, which is the first character. This assumes that the keyboard shortcut is a single character, like a letter or a number. - The extracted first character is then passed to the
KeyEquivalentinitializer. This initializer converts the character into a format that represents a keyboard key. For example, if the character is ‘a’, it will represent the ‘A’ key on the keyboard. - Finally, the
modifiers: []part indicates that no additional keys need to be pressed along with the main key to trigger the action. It ensures that only the main key itself is required.
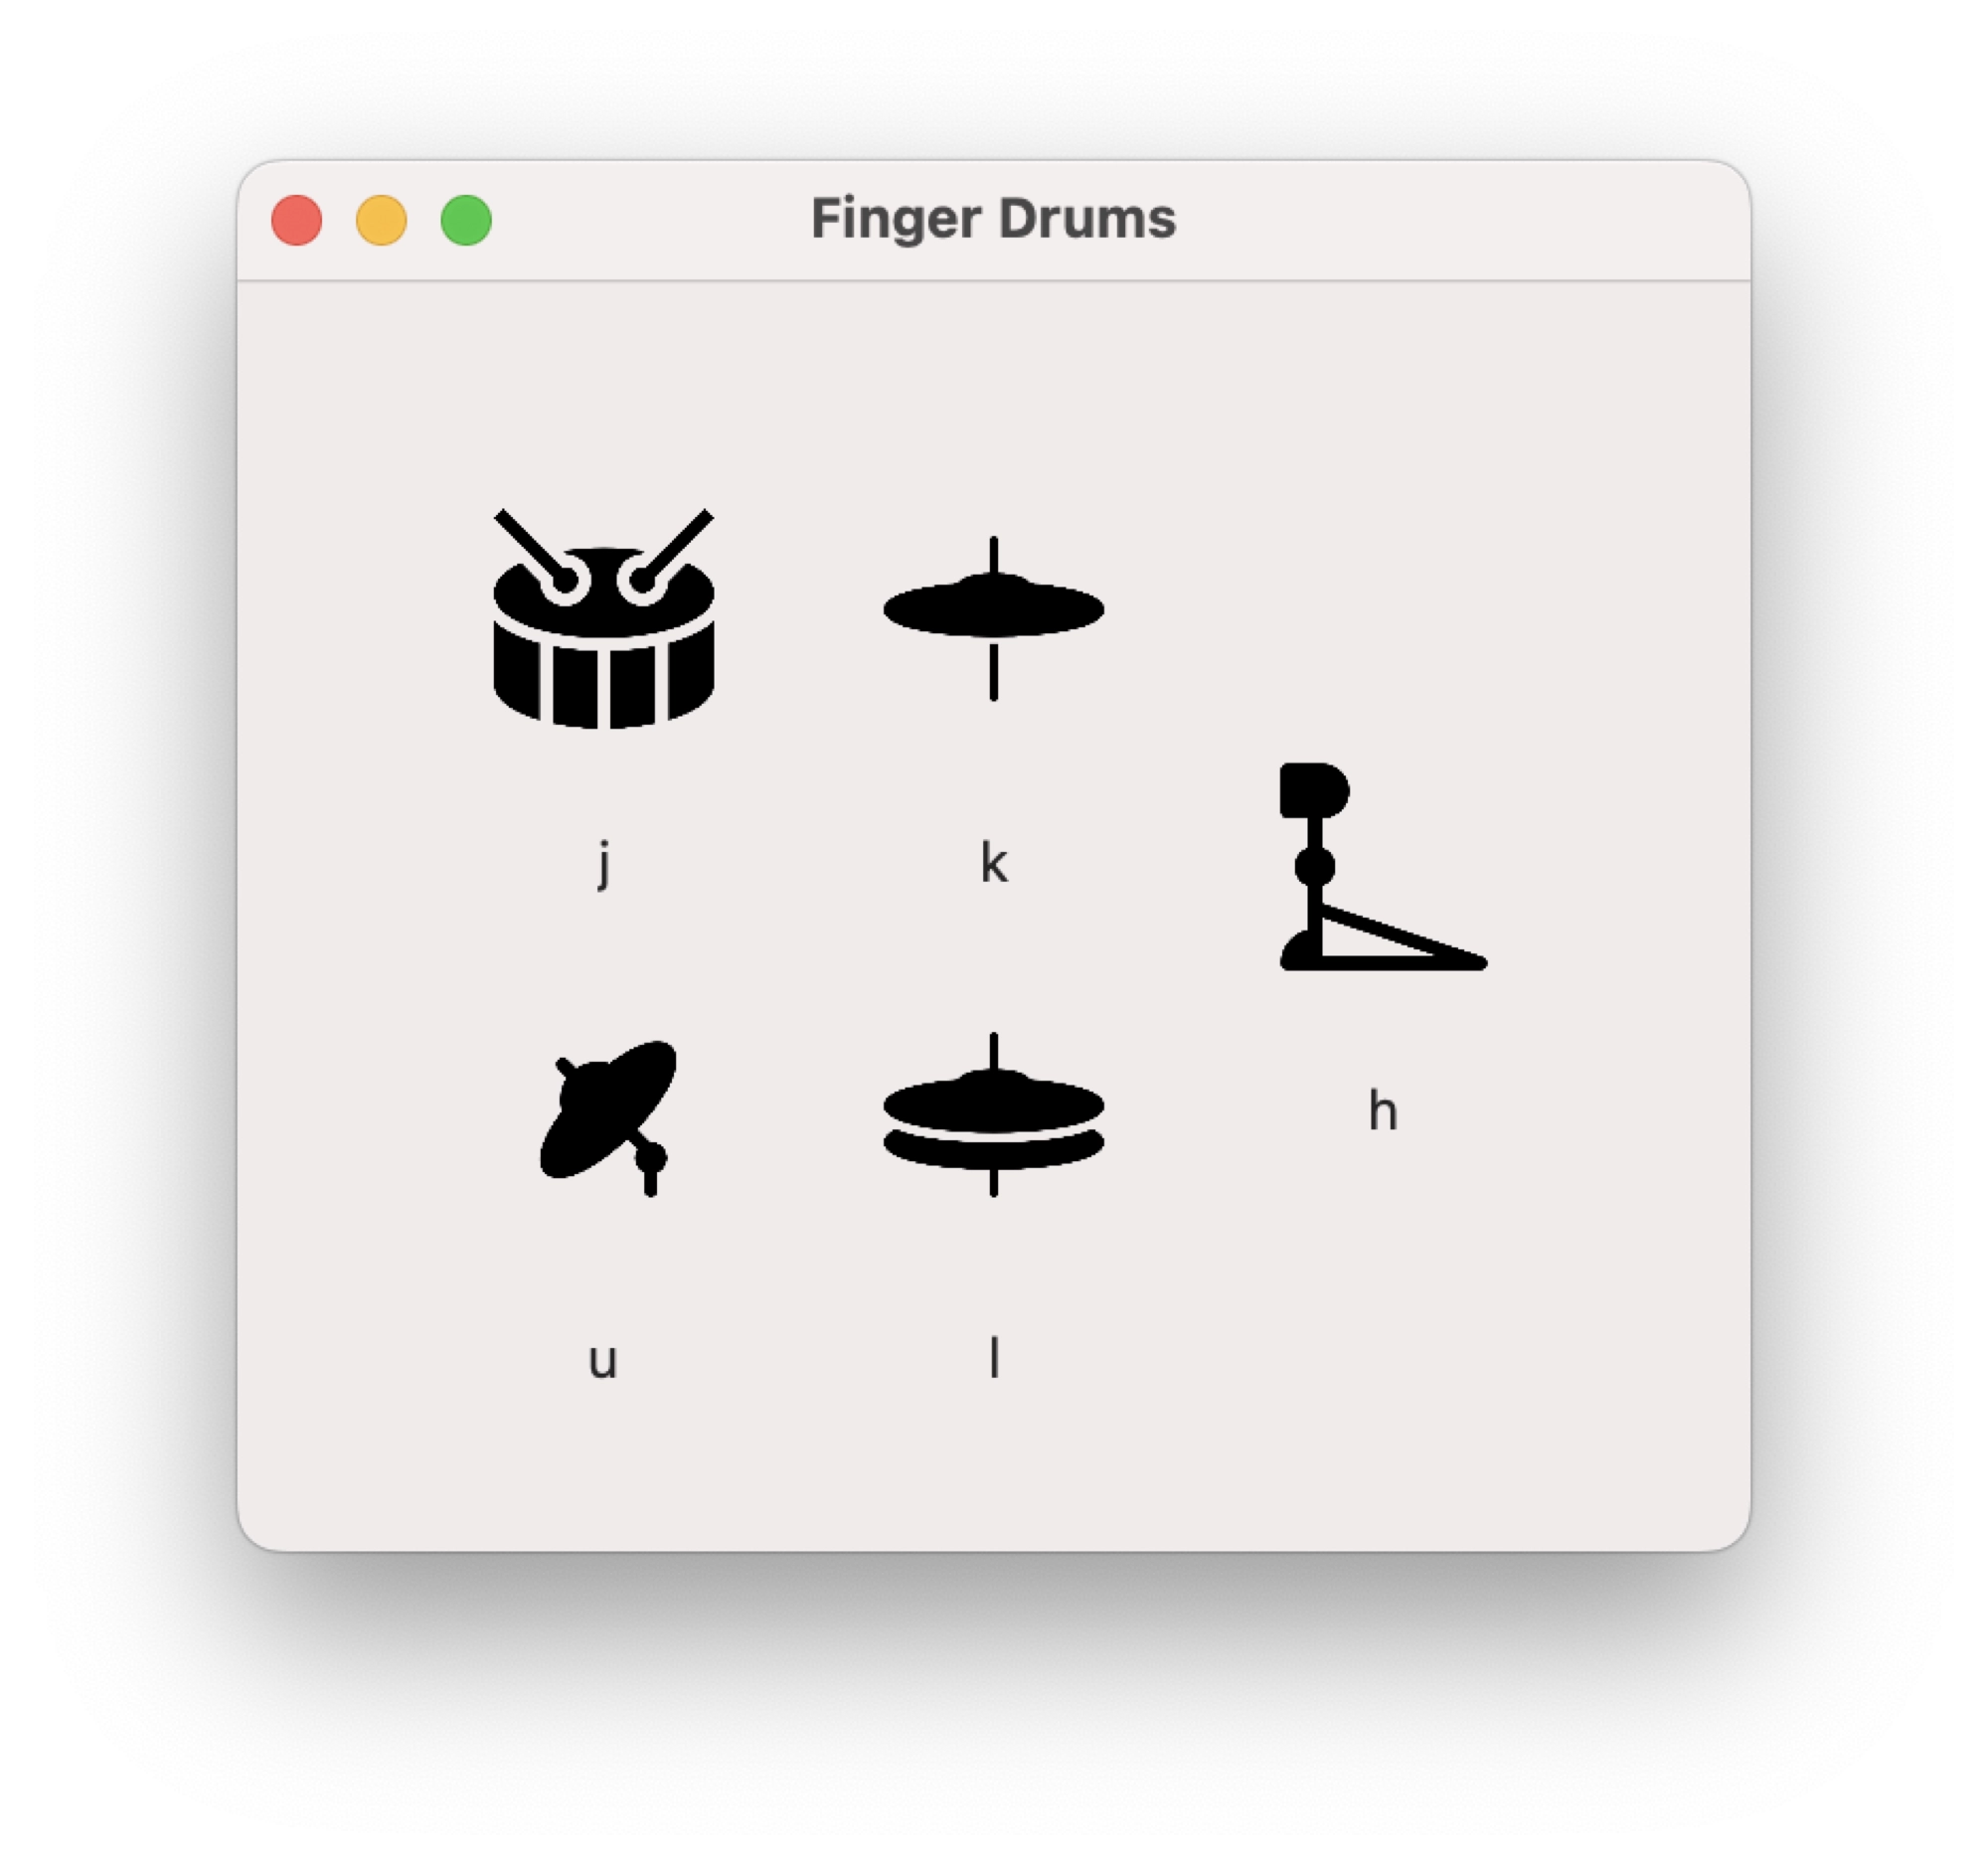
Adding a Button Label
Now that we have functioning keyboard mappings, the last little finishing touch will be to add a label beneath each drum button that details which key is assigned to the particular drum.
We can do this by adding a Text element beneath the drum in our HStack and setting the text to the array value relevant to the particular button:
createButton(soundFile: "snare.wav",imageName: "snare")
Text(keyboardMappings["snare", default: ""])
Add a line for each instance of the createButton function within the HStack, making sure to match the keyboardMappings value with the imageName so that the correct key is fetched from the key map array.
Once you have added the text, the final HStack should be as follows:
HStack {
  VStack {
    // Row 1 GUI elemenets
    createButton(soundFile: "snare.wav",imageName: "snare")
    Text(keyboardMappings["snare", default: ""])
    createButton(soundFile: "crash.wav",imageName: "crash")
    Text(keyboardMappings["crash", default: ""])
  }
  VStack {
    // Row 2 GUI elemenets
    createButton(soundFile: "closed-hi-hat.wav",imageName: "closed-hi-hat")
    Text(keyboardMappings["closed-hi-hat", default: ""])
    createButton(soundFile: "open-hi-hat.wav",imageName: "open-hi-hat")
    Text(keyboardMappings["open-hi-hat", default: ""])
  }
  VStack {
    // Row 3 GUI elemenets
    createButton(soundFile: "kick.wav",imageName: "kick")
    Text(keyboardMappings["kick", default: ""])
  }
}
The Completed Code
That’s it! We have now completed our Finger Drumming app! You can go ahead and build the project and try out your finger drumming skills!
Let’s take a recap on the completed code:
ContentView
//
//  ContentView.swift
//  Finger Drums
//
//  Created by Simon Ogden on 06/06/2023.
//

import SwiftUI

struct ContentView: View {
    let soundPlayer = SoundPlayer()
    @Environment(\.colorScheme) var colorScheme
    var body: some View {
        // The main GUI space
        HStack {
            VStack {
                // Row 1 GUI elemenets
                createButton(soundFile: "snare.wav",imageName: "snare")
                Text(keyboardMappings["snare", default: ""])
                createButton(soundFile: "crash.wav",imageName: "crash")
                Text(keyboardMappings["crash", default: ""])
            }
            VStack {
                // Row 2 GUI elemenets
                createButton(soundFile: "closed-hi-hat.wav",imageName: "closed-hi-hat")
                Text(keyboardMappings["closed-hi-hat", default: ""])
                createButton(soundFile: "open-hi-hat.wav",imageName: "open-hi-hat")
                Text(keyboardMappings["open-hi-hat", default: ""])
            }
            VStack {
                // Row 3 GUI elemenets
                createButton(soundFile: "kick.wav",imageName: "kick")
                Text(keyboardMappings["kick", default: ""])
            }
        }
        .padding(.all)
        .frame(width: 300.0, height: 300.0)
    }

    let keyboardMappings: [String: String] = [
        "snare": "j",
        "closed-hi-hat": "k",
        "open-hi-hat": "l",
        "crash": "u",
        "kick": "h"
    ]

    func createButton(soundFile: String, imageName: String) -> some View {
        let keyboardShortcut = keyboardMappings[imageName] ?? ""

        return Button(action: { soundPlayer.playSound(file: soundFile) }) {
            Image(imageName)
                .resizable()
                .aspectRatio(contentMode: .fit)
        }
        .buttonStyle(.plain)
        .padding(.all)
        .applyColorInvert(colorScheme)
        .keyboardShortcut(KeyEquivalent(Array(keyboardShortcut)[0]), modifiers: [])

    }

}

extension View {
    func applyColorInvert(_ colorScheme: ColorScheme) -> some View {
        if colorScheme == .dark {
            return AnyView(self.colorInvert())
        } else {
            return AnyView(self)
        }
    }
}

struct ContentView_Previews: PreviewProvider {
    static var previews: some View {
        ContentView()
    }
}
SoundPlayer
//
//  SoundPlayer.swift
//  A class for playing audio
//
//  Created by Simon Ogden on 04/06/2023.
//

import AVFoundation

class SoundPlayer: NSObject, AVAudioPlayerDelegate {
    // An array to hold the AVAudioPlayer instances
    private var audioPlayers: [AVAudioPlayer] = []

    // Function to play a sound given a file name
    func playSound(file: String) {
        // Use the locateSoundFile function to get the URL of the sound file
        guard let soundURL = locateSoundFile(file) else {
            // If the sound file URL is nil, print an error message and return
            print("Sound file not found")
            return
        }

        do {
            // Create an AVAudioPlayer instance with the sound file URL
            let audioPlayer = try AVAudioPlayer(contentsOf: soundURL)

            // Set the delegate of the audioPlayer to self (SoundPlayer)
            audioPlayer.delegate = self

            // Prepare the audioPlayer for playback
            audioPlayer.prepareToPlay()

            // Start playing the audio
            audioPlayer.play()

            // Add the audioPlayer to the array
            audioPlayers.append(audioPlayer)
        } catch {
            // If there is an error initializing the AVAudioPlayer, print the error message
            print("Failed to play sound: \(error.localizedDescription)")
        }
    }

    // Function to locate the sound file URL given a file name
    private func locateSoundFile(_ fileName: String) -> URL? {
        // Get the URL of the sound file from the main bundle
        return Bundle.main.url(forResource: fileName, withExtension: nil)
    }

    // Delegate method called when the AVAudioPlayer finishes playing a sound
    func audioPlayerDidFinishPlaying(_ player: AVAudioPlayer, successfully flag: Bool) {
        // Find the index of the finished audioPlayer in the array
        if let index = audioPlayers.firstIndex(of: player) {
            // Remove the finished audioPlayer from the array
            audioPlayers.remove(at: index)
        }
    }
}
Deploying your App
Now that we have complete the Finger Drumming app, the last thing that remains is to deploy it so that you can distribute it to all of your friends!
The deployment process will create a singular file containing all of the necessary files for the app. This file will be just like the ones that you are already familiar with for macOS apps.
First, click Product > Build in order to build the project ready for deployment. Next, click Product > Archive from the main menu at the top of the screen.
You should see the build that you just created appear in the Archives list:
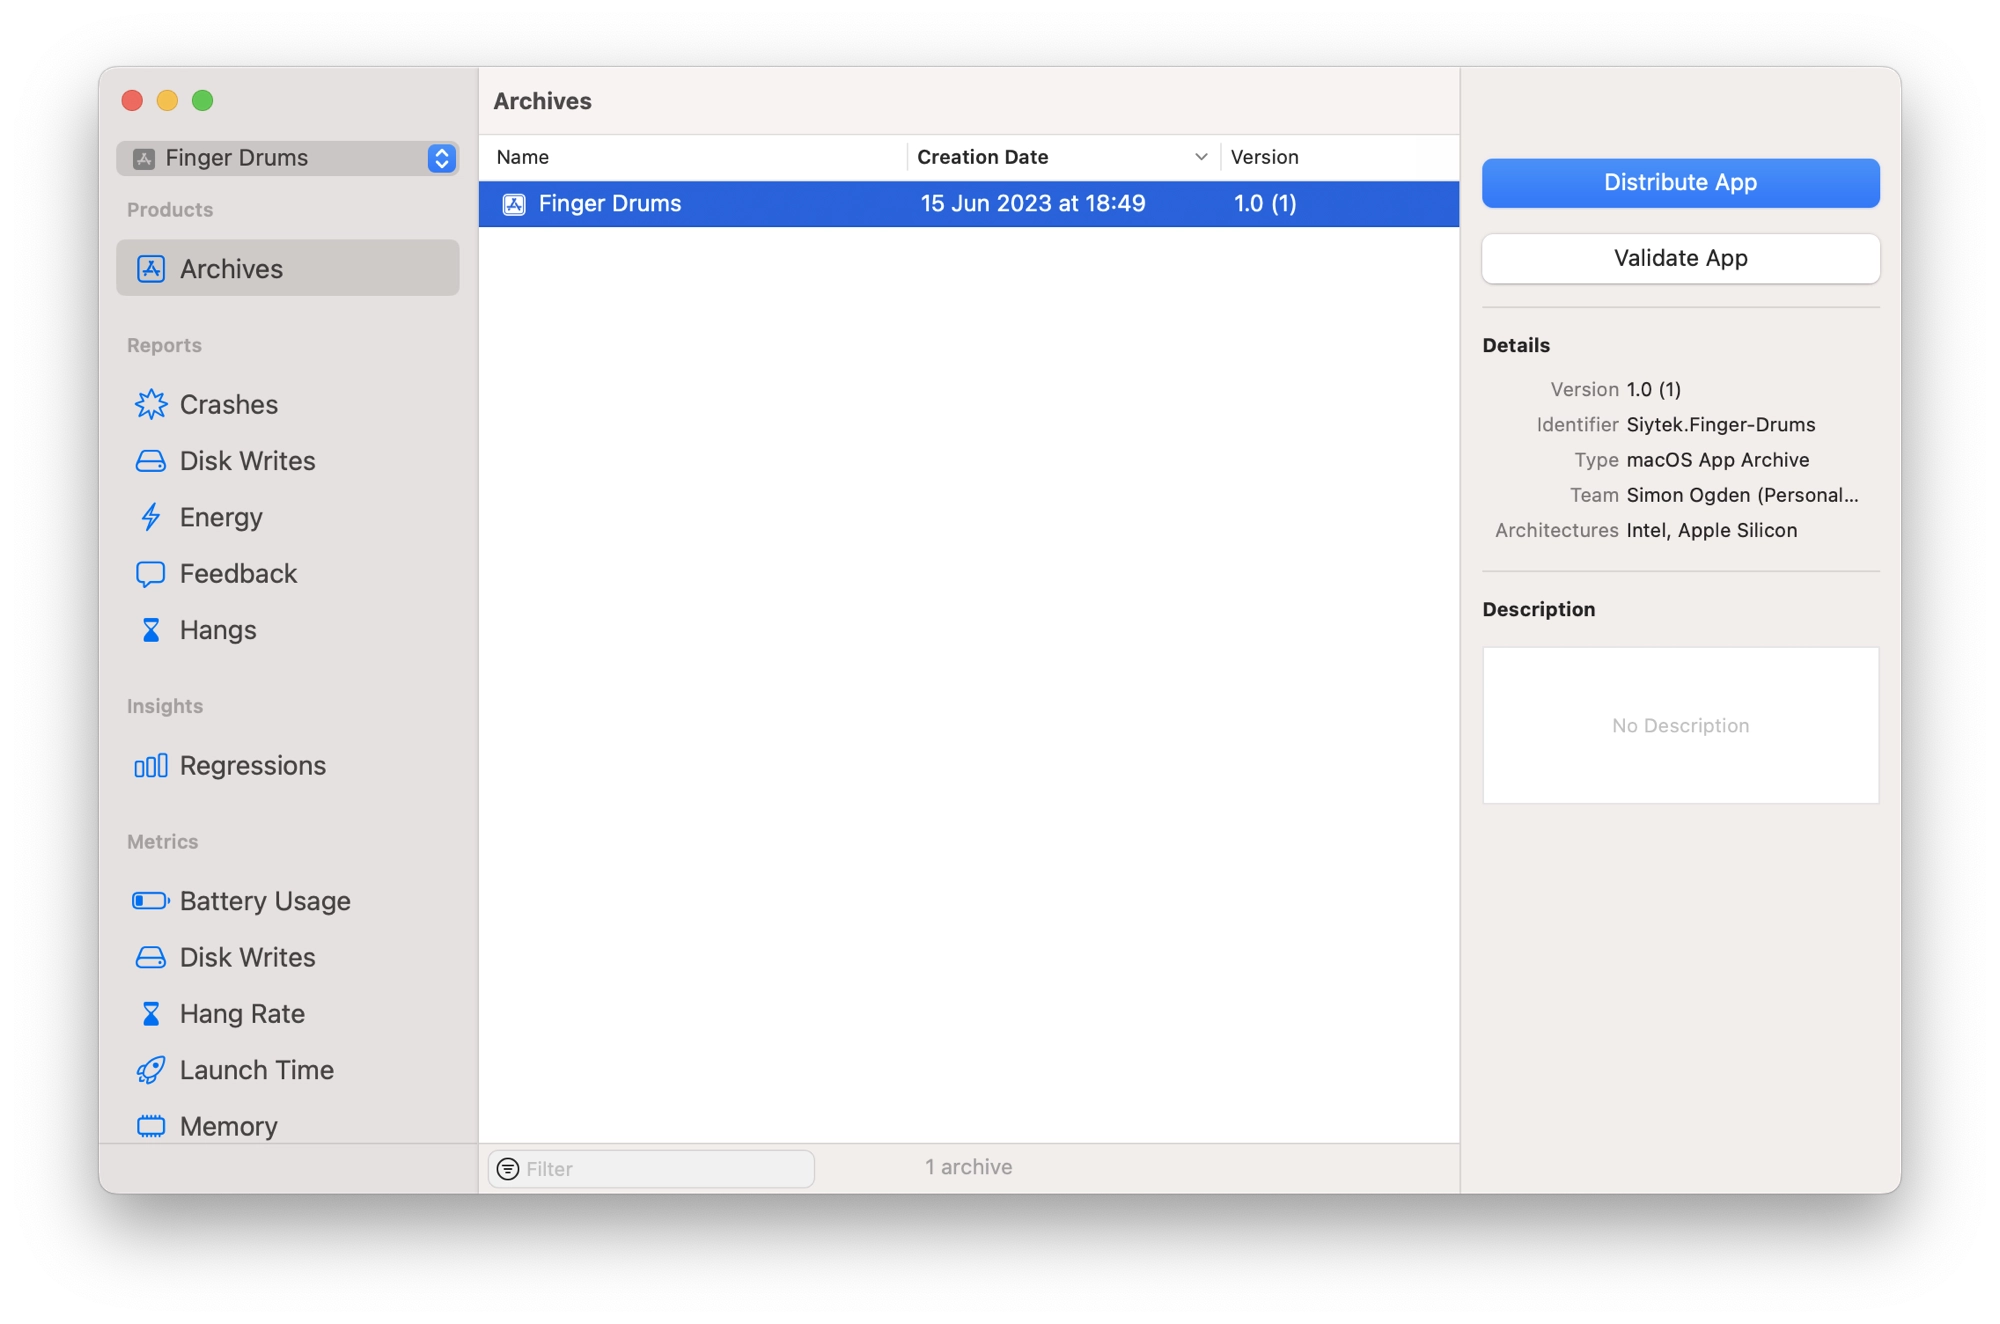
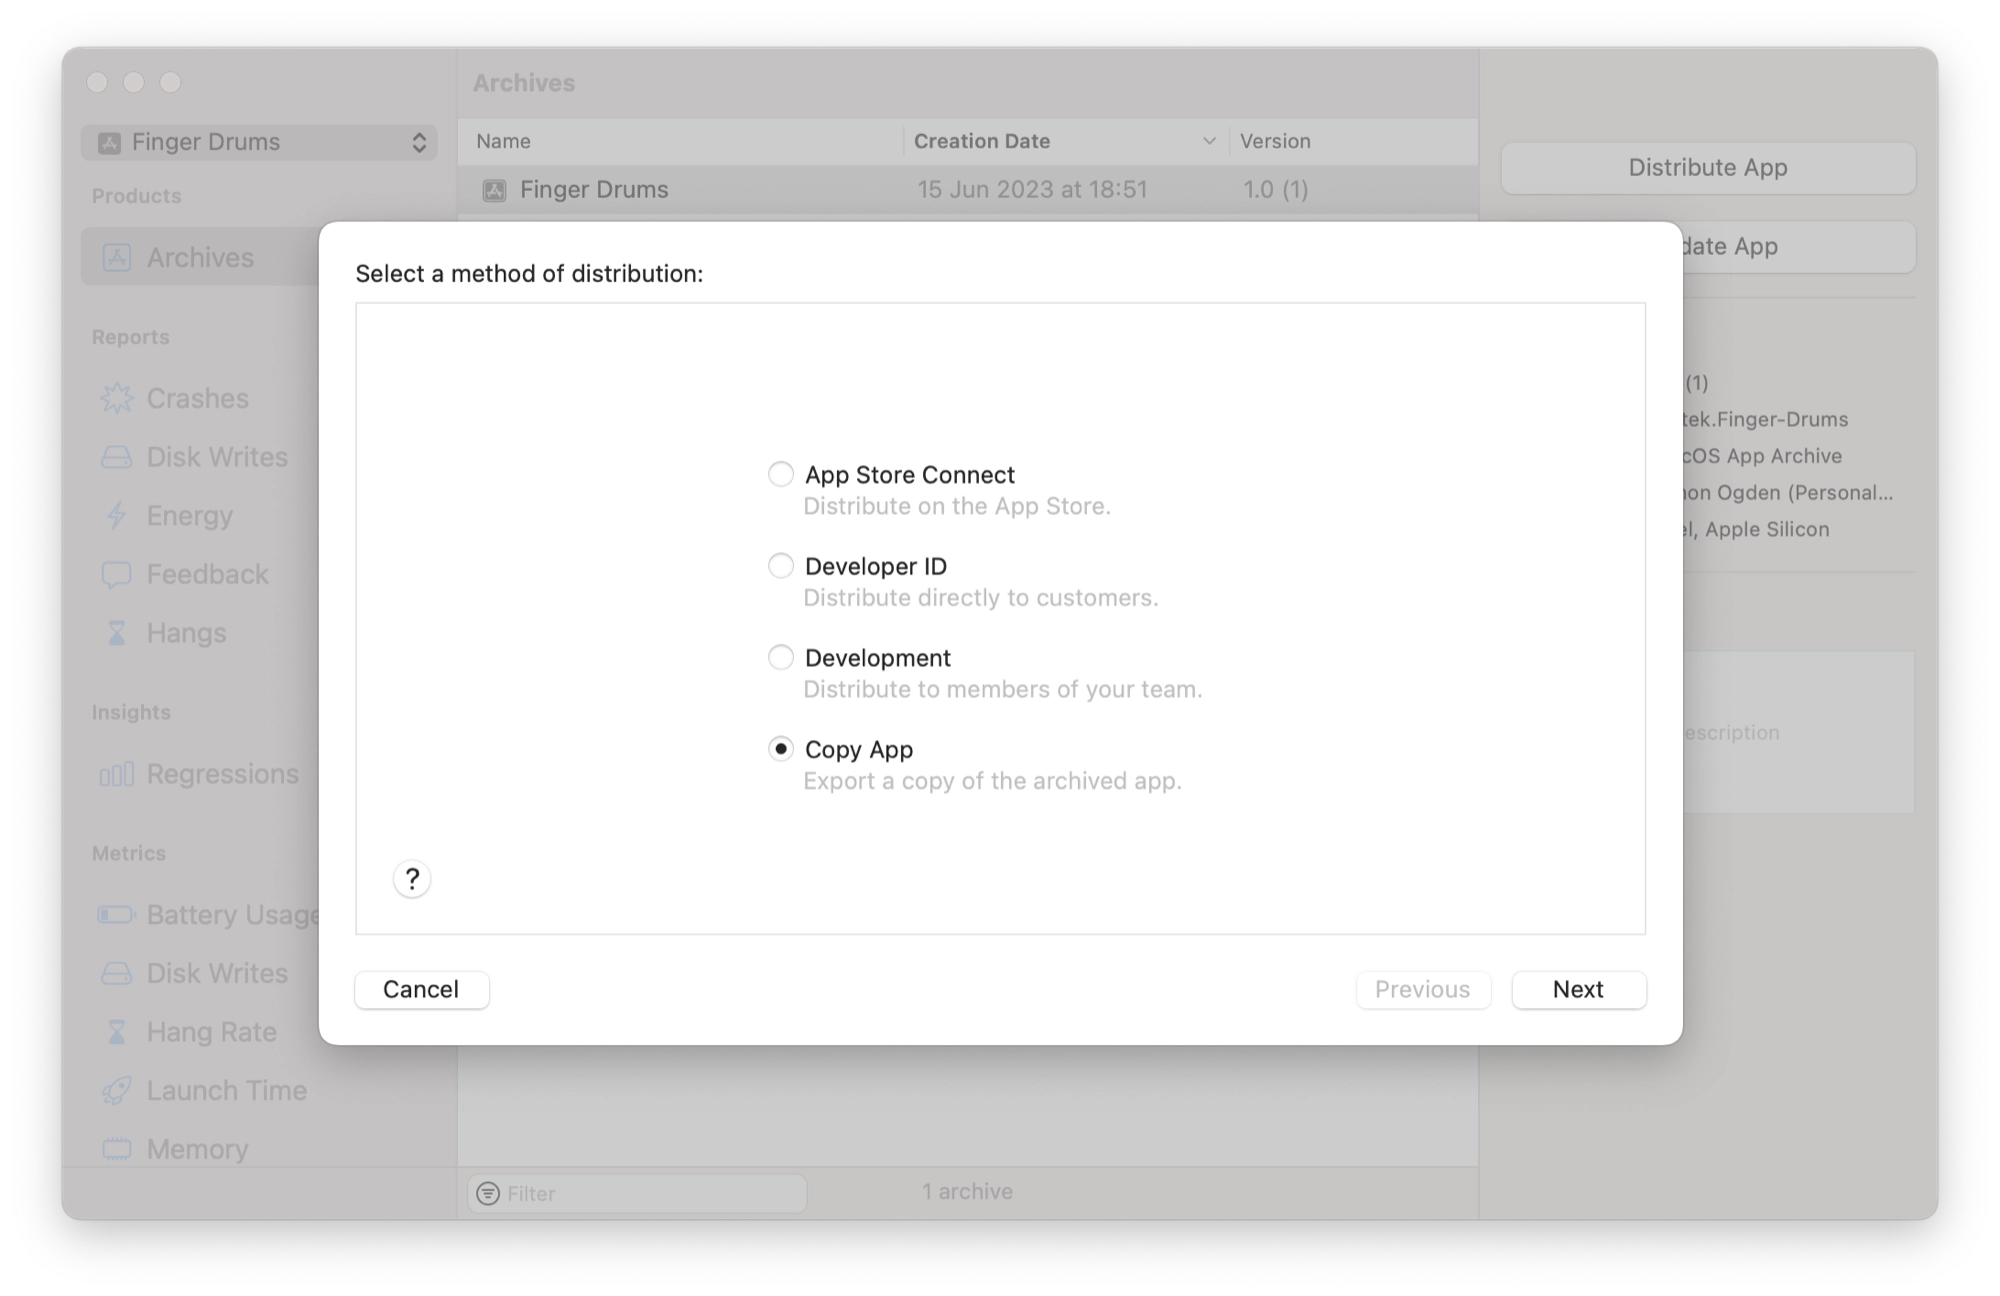
With the archive selected, click Distribute App. Choose Copy App for the method of distribution and then click Next.
Lastly, choose a location where you want to save your newly completed app and click Export. That’s it!
Your new app is finished and can be run from the location where you saved it!
Conclusion
In conclusion, the beginner Xcode and Swift tutorial series has guided you through the process of creating a finger drumming app. Throughout the series, you have learned essential concepts and techniques to develop iOS applications using Xcode and SwiftUI.
Starting from the basics, you have gained an understanding of the Xcode development environment and how to create user interfaces using SwiftUI.
You have explored various features and tools, such as buttons, images, and layout structures, to design an interactive and visually appealing app.
Additionally, you have learned how to incorporate audio playback functionality using the SoundPlayer class, enabling your app to produce drum sounds upon user interaction.
The implementation of keyboard shortcuts has provided users with a convenient way to trigger drum sounds using their computer keyboard.
By following the step-by-step tutorials and leveraging the provided code examples, you have not only built a functional finger drumming app but also acquired fundamental knowledge that can be applied to future iOS app development projects.
With your newfound understanding of Xcode, Swift, and SwiftUI, you are well-equipped to explore and expand upon this foundation to create more sophisticated and engaging applications.
So, continue to explore and experiment with your newfound skills, and let your creativity flourish in the world of app development!
Happy coding!
Thanks so much for visiting my site! If this article helped you achieve your goal and you want to say thanks, you can now support my work by buying me a coffee. I promise I won't spend it on beer instead... 😏