
As the IFTTTWebhooks Arduino library is now deprecated and no longer works, I thought I would make my own solution.
After several hours of research I have put together a simple yet powerful solution to send webhooks to IFTTT from Arduino.
If you are pretty competent with Arduino you might just want to head on over to my Github repository and grab the code.
In this tutorial we setup a simple program in Arduino and use a Wemos D1 Mini connected via WiFi to send a webhook to IFTTT, which will generate send back an email.
You can of course adapt this to any service supported by IFTTT. Once you understand the basics, you can get creative with your own application!
Table of Contents
Prerequisite
You will need an Arduino board connected to your network, for this example I will be using the Wemos D1 Mini board.
A USB cable will be required to connect your board to a Mac/Linux/Windows machine.
You will also need the Arduino IDE, download the latest version from the website.
If this is your first time using a Wemos D1 Mini with Arduino, check out my tutorial on how to add it to the Arduino IDE first. This will allow you to program the board with the Arduino IDE.
Finally you will need an account setup with IFTTT. It’s completely free, head over to their website to set one up if you don’t have one yet.
Setup IFTTT Webhook
In order to connect our Arduino board with IFTTT we will be using Webhooks. This allows us to send from a message from Arduino over the internet, which is picked up by IFTTT and turned into some other kind of action.
IFTTT webhooks allow us to send three an event name, three arbitrary values and a timestamp. Each webhook is identified by the event name, but we can also include it in the chosen action.
We can use any or none of the available values to pass whatever data we like to the receiving service. In this case we will use them to pass a message from Arduino, which we would like to include in the email.
However you could pass any information you like, such as a sensor value or button state. This tutorial will give you a basic understanding so that you can implement something more exciting!
Create an IFTTT applet
Assuming that you already have an IFTTT account and are signed in, we need to create an applet. For this example we will use the webhook to trigger the email service.
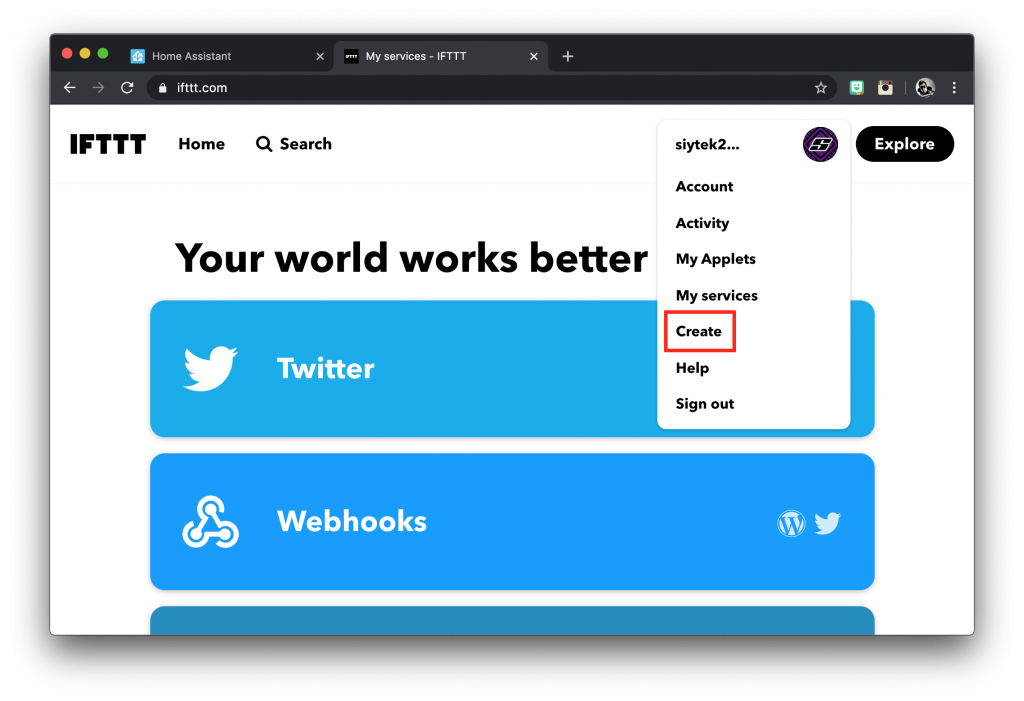
From the IFTTT website, click your profile picture and select create from the dropdown menu.
Setup Webhooks
You will be presented with the If This Then That page. Click on the plus icon to add the service that will act as the event trigger.
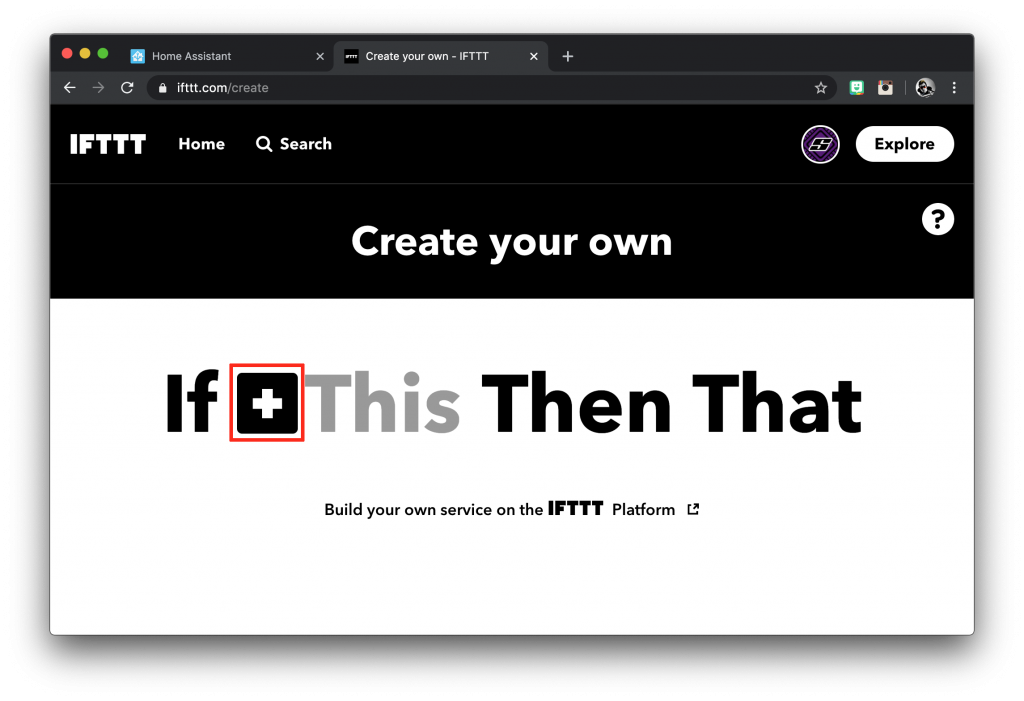
You will then be presented with a list of services and a search box. Search for Webhooks and select it. Then choose receive a web request.
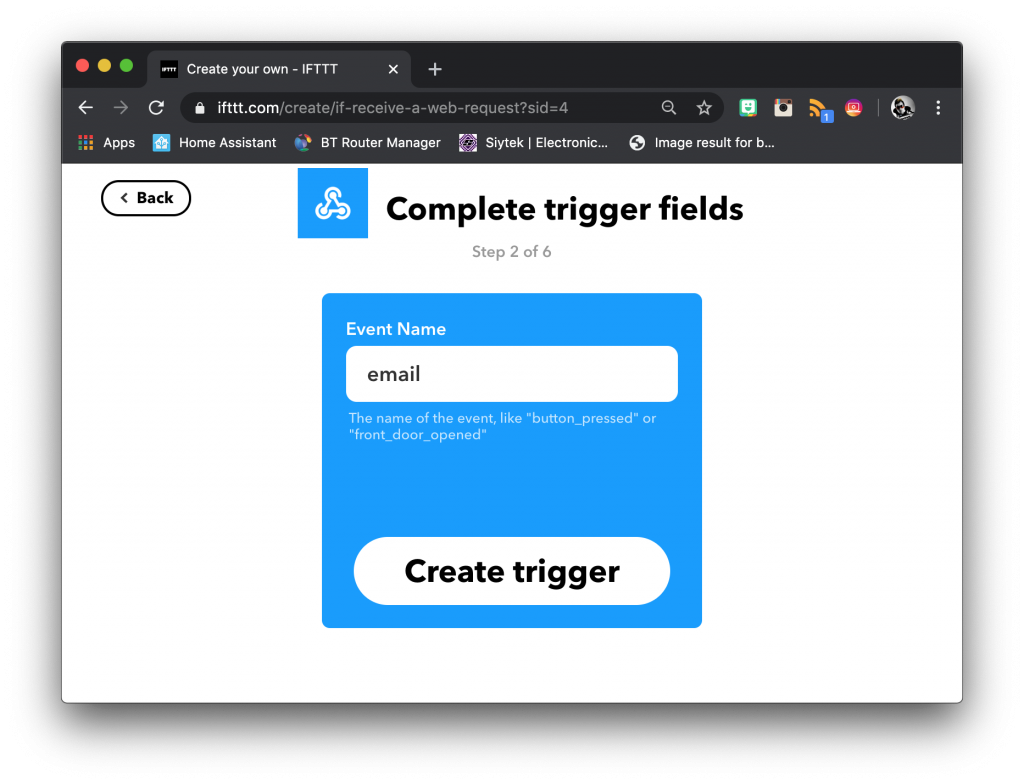
On the next screen we need to enter the event name as something unique, in this case we will just call it email. Then click on create trigger.
Setup Email
Now we can choose an option for the service we wish to use when the applet is triggered. For this example we will be using the email service.

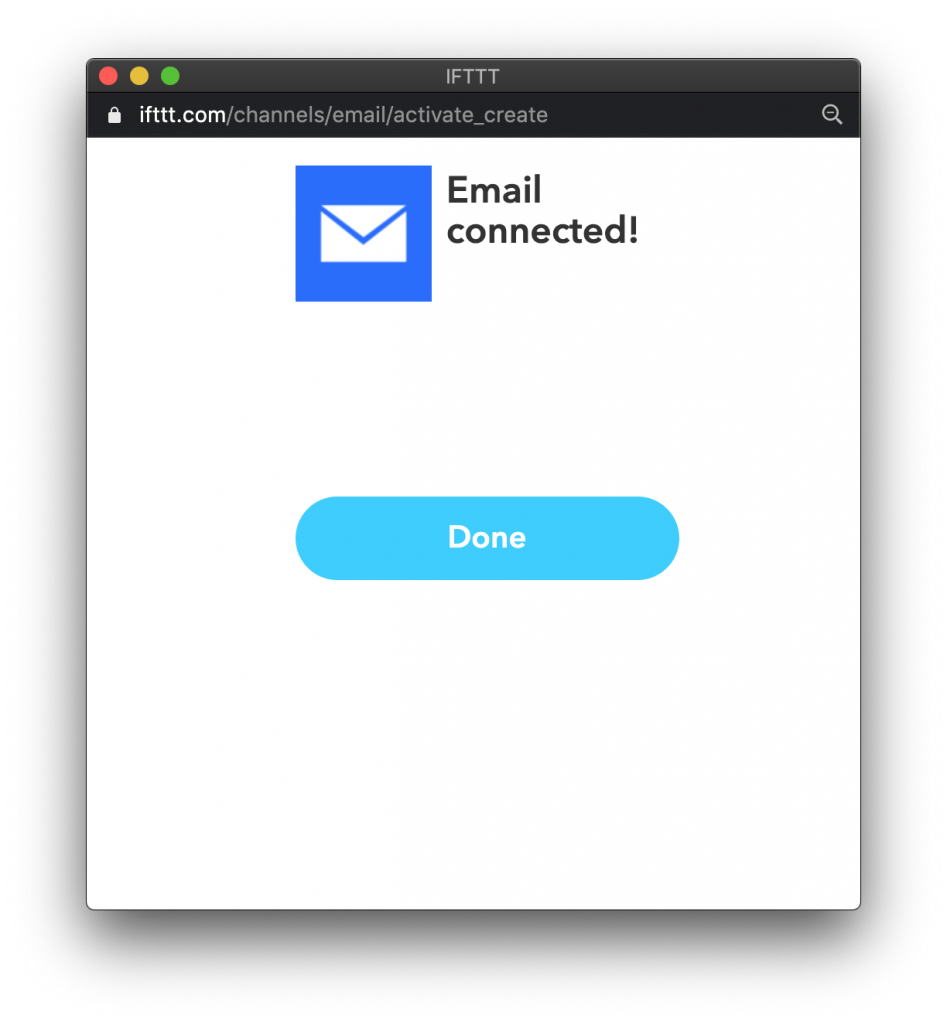
Search for Email in the list of services presented to you and select it. If you have not yet setup the service then you will first need to connect your email account.
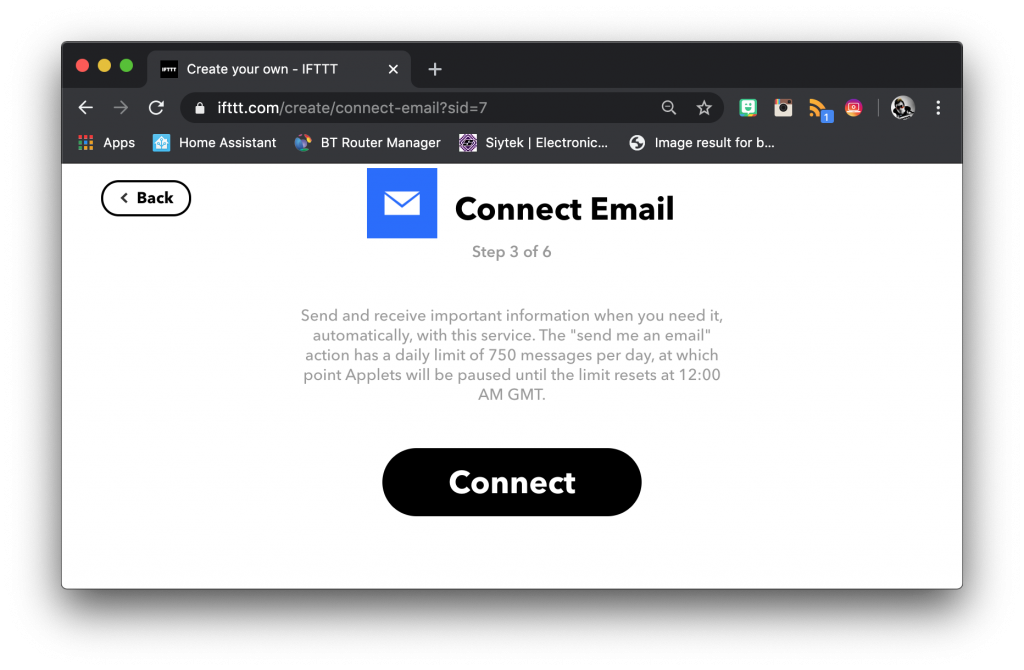
Click on connect and enter your email address. IFTTT will then email you a PIN, which you can type in to verify your email account.
Next you need to choose send me an email. The action fields of the email service allow us to structure our email. We will use Value1 as the message subject. We will then include EventName, OccurredAt, Value2 and Value3 in the email body.
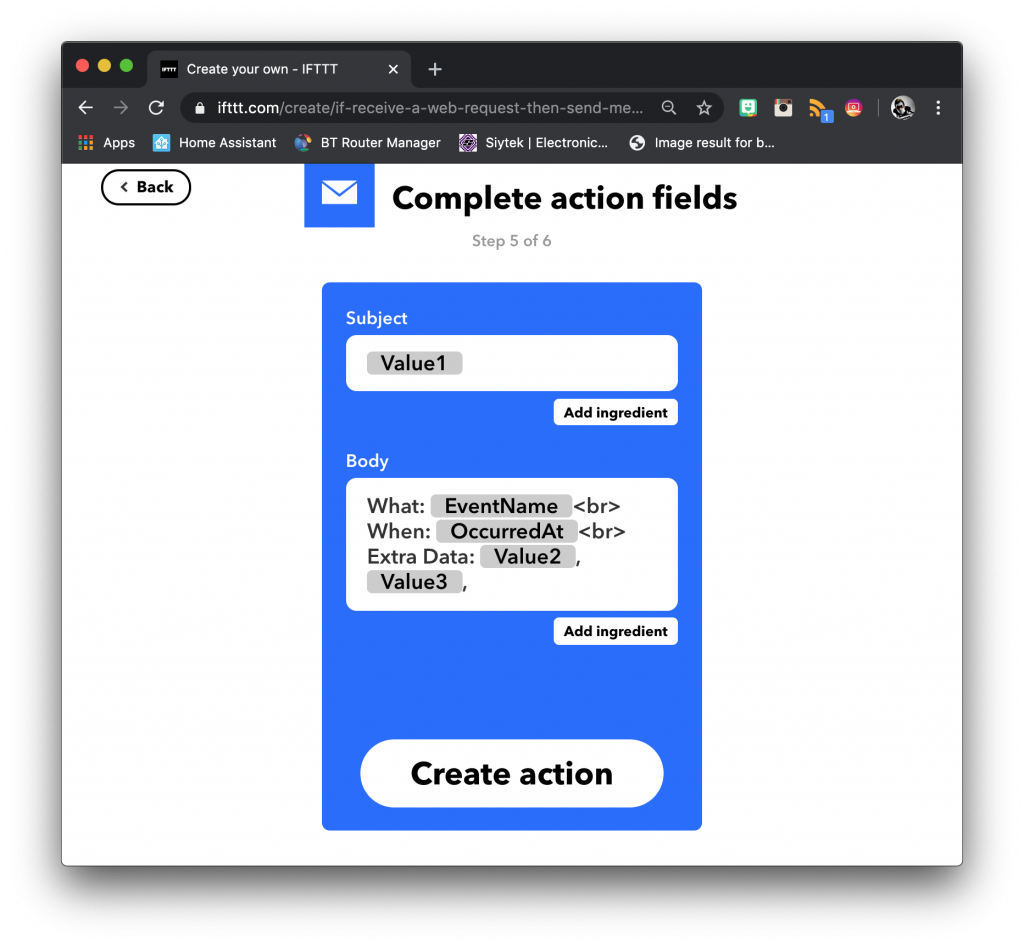
You can of course set this however you like. The EventName and OccurredAt values will be filled out automatically, but we can pass the Value variables from our Arduino program.
Once complete click on create action and you will be taken to a summary of the applet. You can turn on receive notifications when this Applet runs if you wish to see it in your IFTTT log.
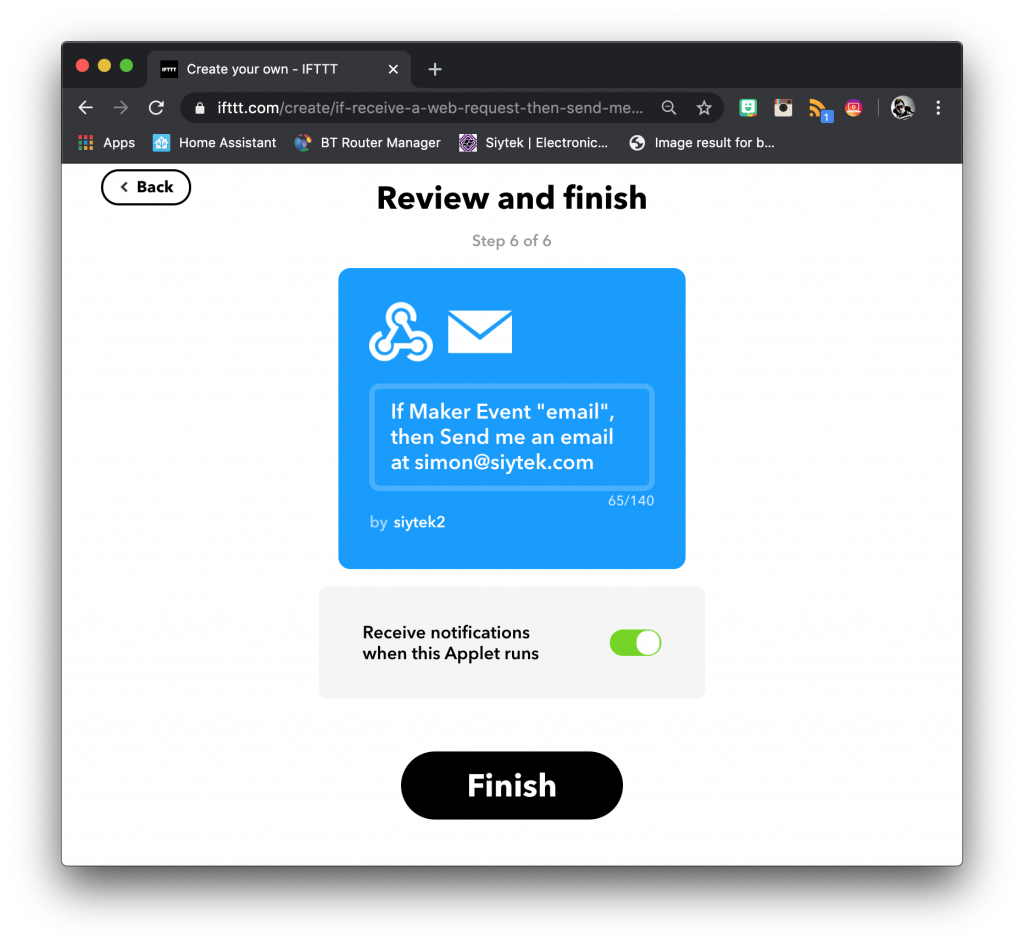
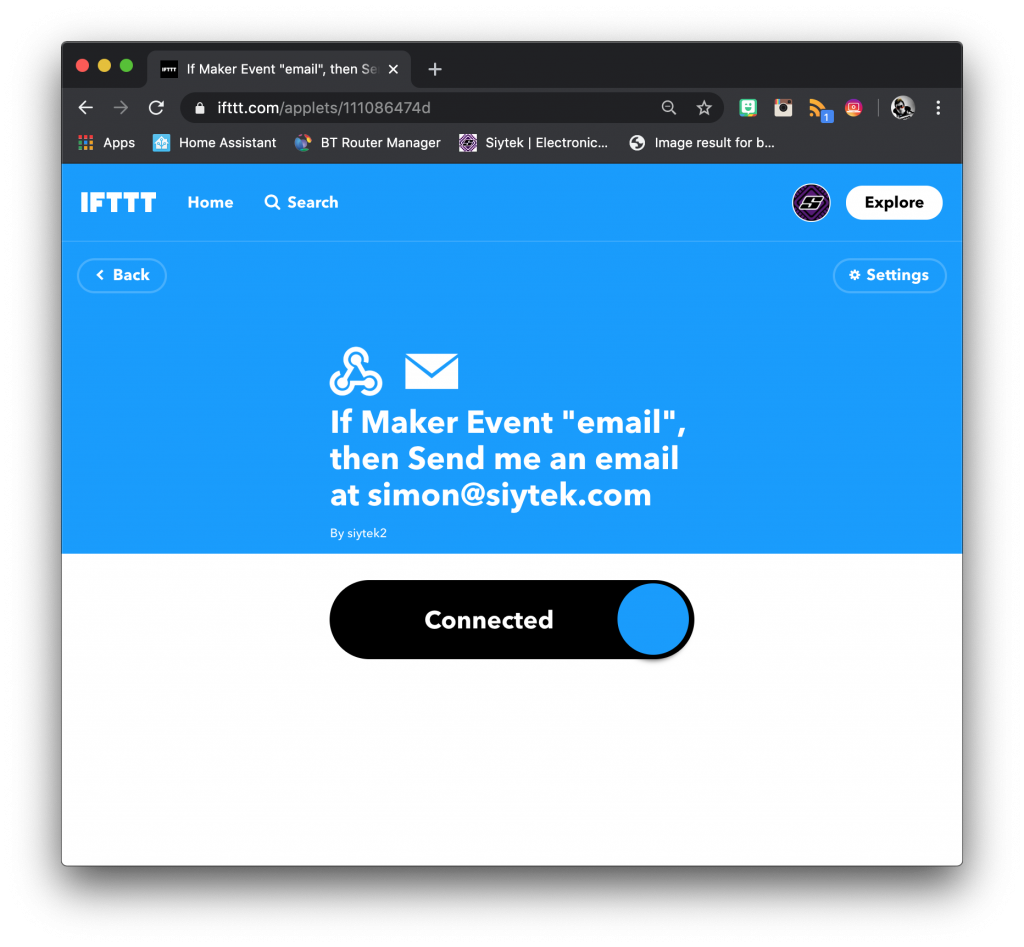
Click finish and we are all done! The applet will now show in your applets list. You can disable it with the huge switch showing connected if you need to turn it off.
Writing the code
Now that we have our IFTTT webhook setup, we can write the code in the Arduino IDE that will send the webhook to IFTTT. Go ahead and open up the Arduino IDE and create a new project.
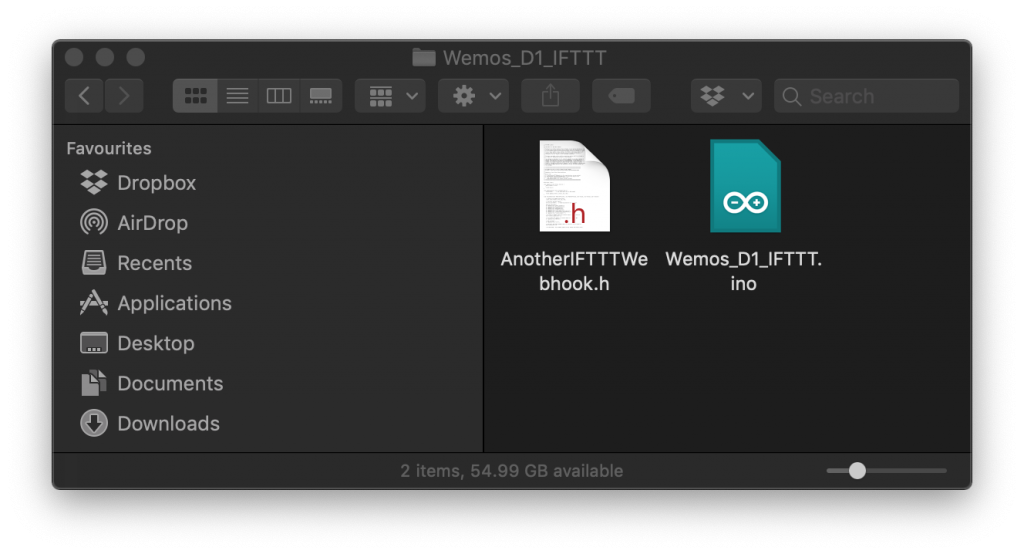
Adding the AnotherIFTTTWebhook file
Now we need to download and add the AnotherIFTTTWebhook.h file to the project. Head on over to my Github page and download the repository. You can click on clone or download and then just extract the file from the .zip file.
Alternatively you can also view the raw file if you would rather copy and paste it to a new blank file.
Once you have the AnotherIFTTTWebhook.h file, simply move it to the same location as your main project .ino file.
Add the includes
Going back to our main project .ino file, the first thing we need to do is add the includes. If you are using an ESP based board like the D1 Mini, you will need to include ESP8266Wifi.h and we will also need to include AnotherIFTTTWebhook.h.
#include <Arduino.h>
#include <ESP8266WiFi.h>
#include "AnotherIFTTTWebhook.h"

void setup() {
  // put your setup code here, to run once:

}

void loop() {
  // put your main code here, to run repeatedly:

}
Define WiFi credentials
Next we need to define the WiFi credentials. You should replace the placeholders for the values required to connect to your WiFi network.
See line 5 to 7:
#include <Arduino.h>
#include <ESP8266WiFi.h>
#include "AnotherIFTTTWebhook.h"

// Set WiFi credentials
#define WIFI_SSID "YOUR SSID"
#define WIFI_PASS "YOUR WIFI PASSWORD"

void setup() {
  // put your setup code here, to run once:

}

void loop() {
  // put your main code here, to run repeatedly:

}
Define IFTTT
We also need to define the webhooks key and event. The event is the one that we defined earlier, in this case email.
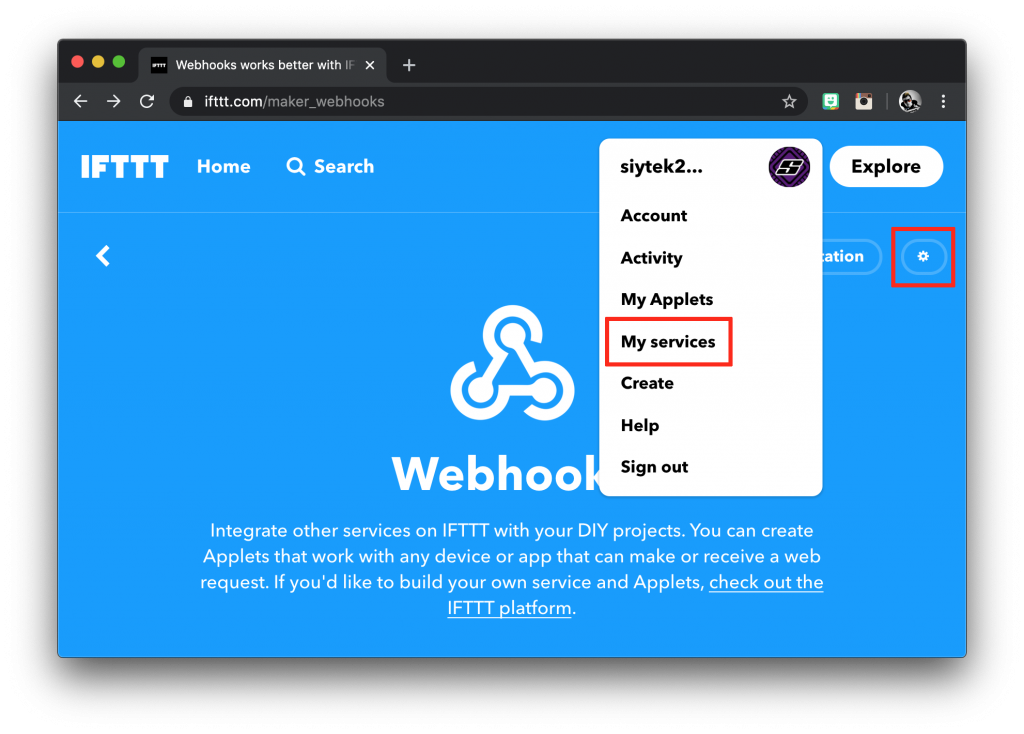
In order to get your key from IFTTT, click on your profile picture and choose my services from the drop down menu.
Select Webhooks from the list of services and then click on the cog icon to bring up the settings.
Under account info you will see your Webhooks URL. We will need to copy the key at the end of the address, not the whole URL but just the random characters after the forward slash.
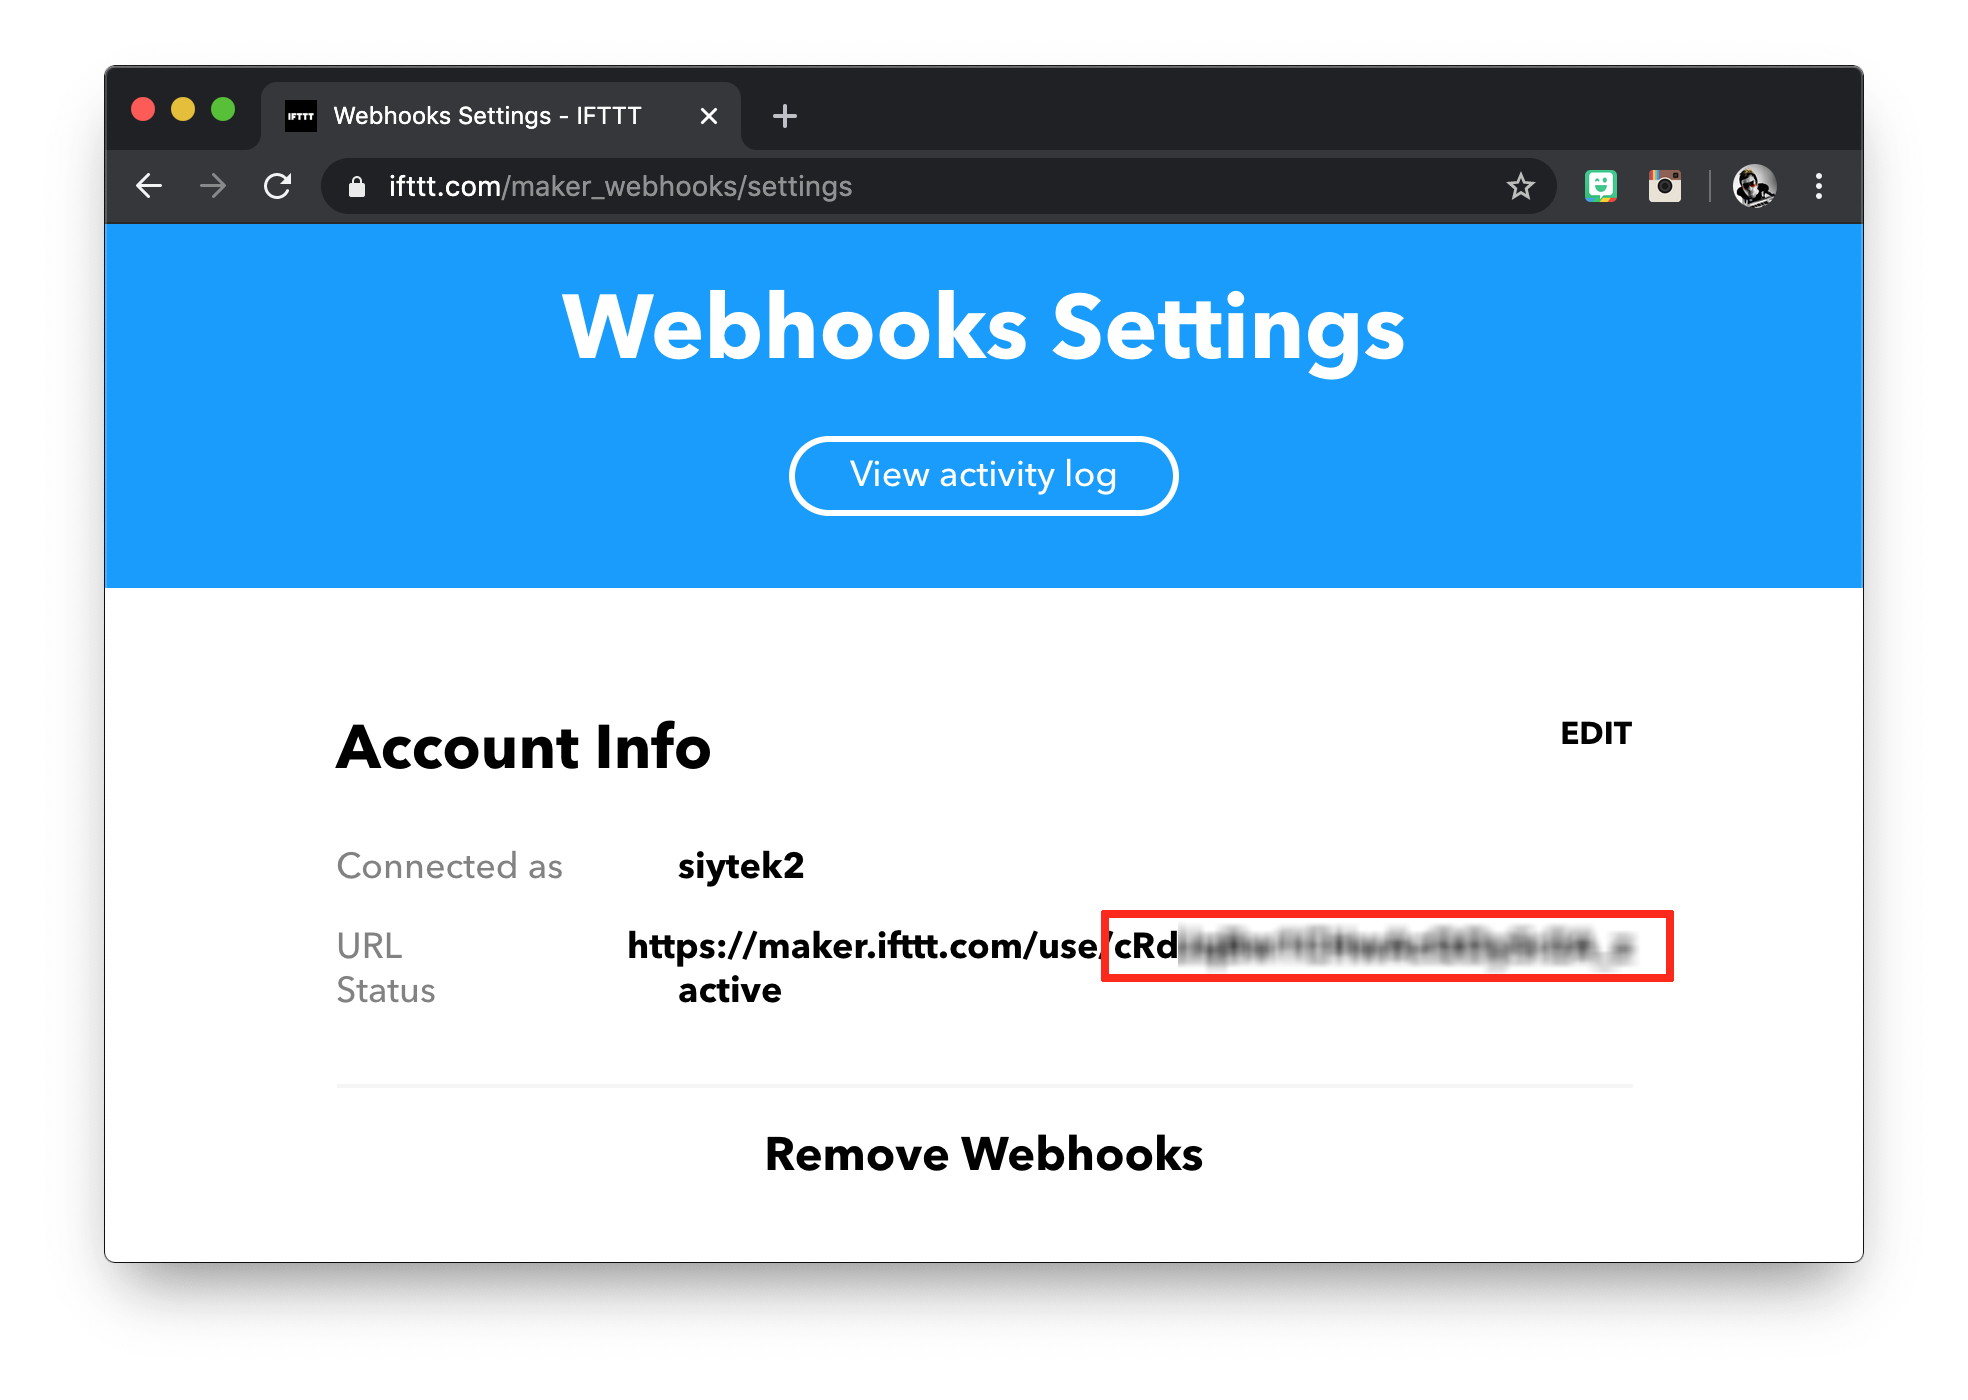
When you add the defines, simply replace YOUR KEY with the key that you copy and paste from IFTTT.
See line 9 to 11:
#include <Arduino.h>
#include <ESP8266WiFi.h>
#include "AnotherIFTTTWebhook.h"

// Set WiFi credentials
#define WIFI_SSID "YOUR SSID"
#define WIFI_PASS "YOUR WIFI PASSWORD"

// Set IFTTT Webhooks event name and key
#define IFTTT_Key "YOUR KEY"
#define IFTTT_Event "email"

void setup() {
  // put your setup code here, to run once:

}

void loop() {
  // put your main code here, to run repeatedly:

}
Setup serial port
Next we will start the serial port in order to receive debug information from the application regarding the WiFi connection.
See line 14 to 16:
#include <Arduino.h>
#include <ESP8266WiFi.h>
#include "AnotherIFTTTWebhook.h"

// Set WiFi credentials
#define WIFI_SSID "YOUR SSID"
#define WIFI_PASS "YOUR WIFI PASSWORD"

// Set IFTTT Webhooks event name and key
#define IFTTT_Key "YOUR KEY"
#define IFTTT_Event "email"

void setup() {
  // Setup serial port
  Serial.begin(115200);
  Serial.println();

}

void loop() {
  // put your main code here, to run repeatedly:

}
Connect to WiFi
Then we will add the code required to connect to WiFi. I won’t cover it in detail as it is already fully documented in my tutorial on how to setup the Wemos D1 Mini with Arduino.
See line 18 to 30:
#include <Arduino.h>
#include <ESP8266WiFi.h>
#include "AnotherIFTTTWebhook.h"

// Set WiFi credentials
#define WIFI_SSID "YOUR SSID"
#define WIFI_PASS "YOUR WIFI PASSWORD"

// Set IFTTT Webhooks event name and key
#define IFTTT_Key "YOUR KEY"
#define IFTTT_Event "email"

void setup() {
  // Setup serial port
  Serial.begin(115200);
  Serial.println();

  // Connecting to WiFi...
  Serial.print("Connecting to ");
  Serial.print(WIFI_SSID);
  while (WiFi.status() != WL_CONNECTED)
  {
    delay(100);
    Serial.print(".");
  }

  // Connected to WiFi
  Serial.println();
  Serial.print("Connected! IP address: ");
  Serial.println(WiFi.localIP());

}

void loop() {
  // put your main code here, to run repeatedly:

}
Send Webhook
Finally we can send our webhook! All we need to do is call the function send_webhook. We need to supply the event, key and three values respectively, separated by commas.
Note that this is placed within the setup() function so that it is only called once. Not a good idea to place it into loop() and spam yourself with hundreds of emails!
You can of course use it anywhere you like, however in a more functional application you would call it conditionally through some other input within your application.
See line 32 to 33:
#include <Arduino.h>
#include <ESP8266WiFi.h>
#include "AnotherIFTTTWebhook.h"

// Set WiFi credentials
#define WIFI_SSID "YOUR SSID"
#define WIFI_PASS "YOUR WIFI PASSWORD"

// Set IFTTT Webhooks event name and key
#define IFTTT_Key "YOUR KEY"
#define IFTTT_Event "email"

void setup() {
  // Setup serial port
  Serial.begin(115200);
  Serial.println();

  // Connecting to WiFi...
  Serial.print("Connecting to ");
  Serial.print(WIFI_SSID);
  while (WiFi.status() != WL_CONNECTED)
  {
    delay(100);
    Serial.print(".");
  }

  // Connected to WiFi
  Serial.println();
  Serial.print("Connected! IP address: ");
  Serial.println(WiFi.localIP());

  // Send Webook to IFTTT
  send_webhook(IFTTT_Event,IFTTT_Key,"Hi its Wemos!","value 2","value 3");
}

void loop() {
  // put your main code here, to run repeatedly:

}
The code is now complete! You can download it from the project repository over at Github along with AnotherIFTTTWebhook.h.
Testing
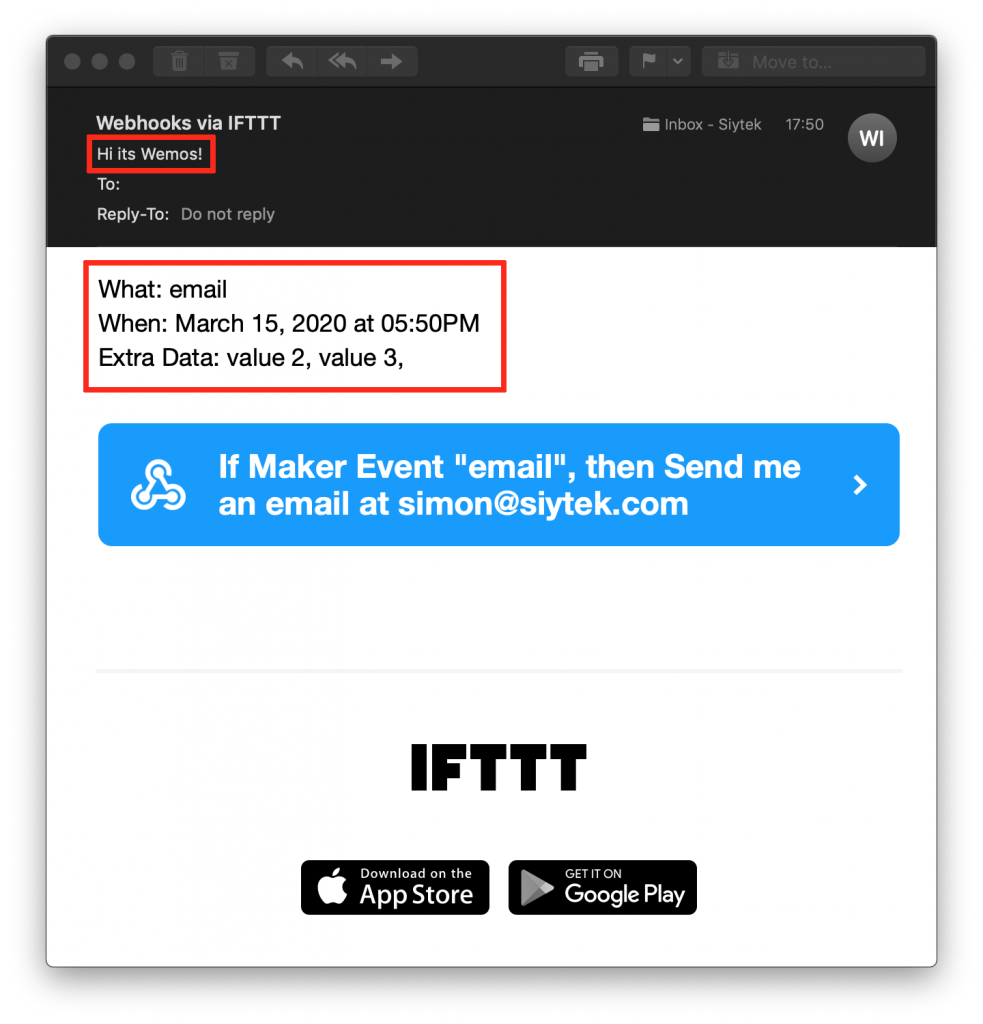
Now all the code is complete, simply upload your sketch and the webhook will be sent! Here is the email received from the webhook.
You can see that Value1 has been placed in the subject line. The EventName, OccurredAt, Value2, and Value3 data is found in the body of the email.
Conclusion
In the modern world cloud services have become ubiquitous. IFTTT is a superb concept that works very well when properly implemented.
The ability to connect IoT devices to IFTTT opens up a whole world of possibilities for IoT projects. In this tutorial we have covered the basic setup for Arduino. You should now be able to create your own application with webhooks and IFTTT integration!
Why not check out some more awesome ESP device articles here on my website to get some ideas for your next project!
Thanks so much for visiting my site! If this article helped you achieve your goal and you want to say thanks, you can now support my work by buying me a coffee. I promise I won't spend it on beer instead... 😏


This was very helpful, and I was able to easily get it working.
The only problem I had was with value1, value2, and value3.
How do I use an integer variable for one or more of these fields? I want to use the value read from a sensor, but I get an error saying it must be a char*.
Thank you,
Len
Hey Len, thanks for visiting. Could you post your code?