
Did you know that it is possible to access Home Assistant when you are not at home? Did you know you can turn your kitchen light on from halfway around the globe?!
It seems there are now more ways than ever to access Home Assistant remotely!
This means we can do cool stuffTM such as remotely receiving notifications on the Home Assistant mobile app or spying on the cat from your favourite bar or nightclub.
You can also connect Home Assistant to a plethora of internet services via IFTTT.
Sound good?
The easiest way to do this is by paying a whopping 65 USD annually for access to Nabucasa, the Home Assistant cloud service.
Ok, ok… the cloud service is affordable and is indeed is a sensible way to gain remote access to Home Assistant for some people.
But here’s the kicker…
You don’t have to pay for remote access to your Home Assistant.
Plus some people just don’t want to link everything to a cloud which could go down at any given moment.
In this article we are going to learn the various ways to set up secure remote access to Home Assistant without relying on a cloud service or spending any money.
Prerequisite
This guide assumes that you have Home Assistant installed and configured. If for some reason you don’t yet have Home Assistant installed, go ahead and check out this article first.
You will also need to have access to your router admin page in order to set up port forwarding. If you can’t access your router admin page, check out this tutorial instead to learn how to configure remote access without port forwarding.
We will also be using the file editor add-on, so if you didn’t install it yet go ahead and have a quick read of this guide which explains how to install it.
How do I Make Home Assistant Available Outside of My Network?
There are several ways that you can access Home Assistant from outside of your local network:
- DuckDNS & Port Forwarding
- Cloudflare Tunnel
- NGINX Reverse Proxy
- Virtual Private Network (VPN)
- Home Assistant Cloud (the official paid subscription paid service)
The two ways that I most recommend are either by using DuckDNS with port forwarding, or by setting up a Cloudflare tunnel.
The Cloudflare method is definitely the best option and can be done without having to configure port forwarding. This is very useful if you are using some kind of WiFi network where you don’t have access to the router (for example, at university).
However the Cloudflare method does require you to have your own domain name. It is very easy to register one with a company like Namecheap, but it will cost you a few bucks per year.
By comparison you can use the DuckDNS method, which we will cover in this article, and it won’t cost you a penny!
How To Access Home Assistant with DuckDNS and Port Forwarding
You may already know that your Home Assistant server has an IP address on your local area network.
However this address is not visible to the outside world.
The only address that is visible to the outside world is our internet IP address, which is assigned to the router.
In order to access our Home Assistant server from outside of our local network (e.g. over the internet), we must use the internet IP address assigned to our router.
We can then configure the router to pass data between our Home Assistant server and our other devices (e.g. our mobile phone) outside of our local area network.
This is done using ports and is called port forwarding, more on that later.
Sounds simple enough, right?
But wait! There is one huge problem.
Most internet IP addresses assigned to domestic routers are dynamic. This means that if the connection is interrupted, your internet service provider (ISP) will provide a completely different address.
This causes a problem when trying to set up remote access to Home Assistant as we must use our internet IP address to connect our remote devices.
One minute everything will be working great…
Then BOOM! A power cut, your IP address changes without warning, and all of your remote access configuration is BROKEN!
The internet IP address that you specified in your Home Assistant mobile app is no longer correct, therefore the app can no longer connect.
This is true for all devices that we connect to Home Assistant outside of our local network.
So how do we fix this problem? How do we prevent these problems? Enter DuckDNS…
How can I access Home Assistant from the Internet?
The recommended way to access Home Assistant over the internet is by using a dynamic DNS service such as DuckDNS.
DuckDNS is a free service that allows us to assign a free domain name to our system, which we can use instead of our internet IP address.
The domain name provided by DuckDNS always remains constant and never changes.
It is always pointing towards our internet IP address, even if our internet IP address changes due to a router reboot, power cut or cat chewing the cable.
Want to know the best part?
DuckDNS is a free service that also has an add-on within Home Assistant which allows very easy integration.
We will now go through the steps to setup and install the DuckDNS Home Assistant add-on.
How to Sign Up For DuckDNS
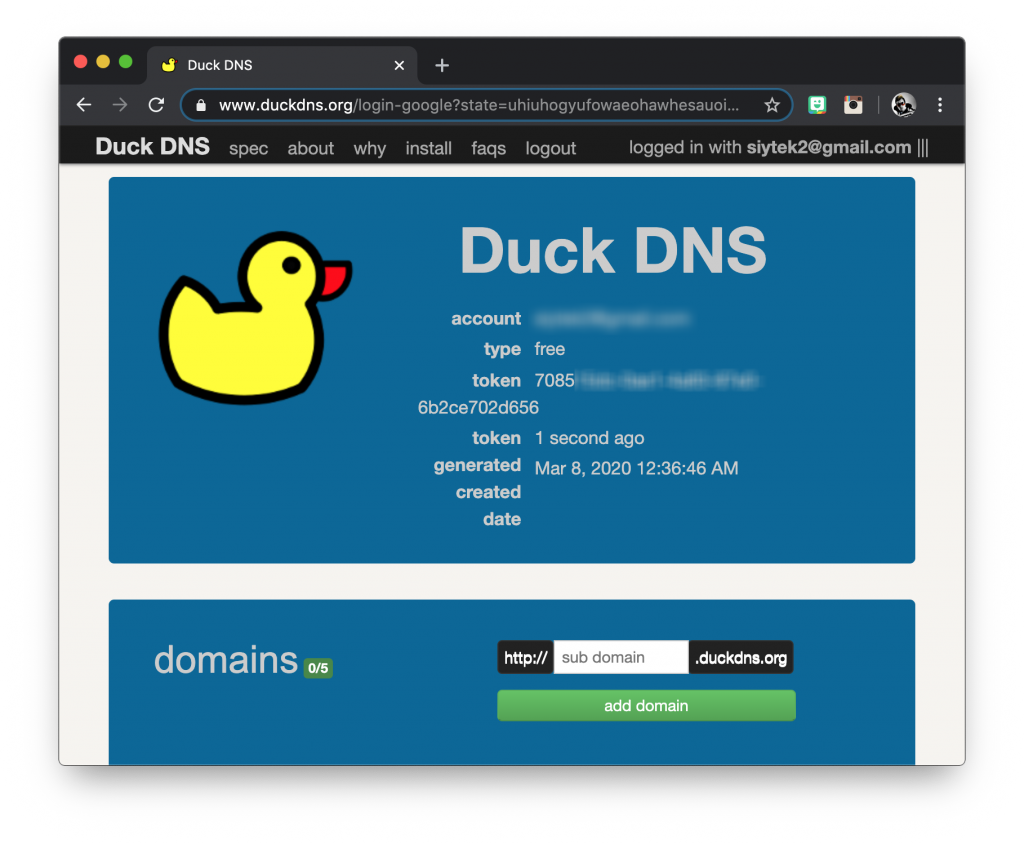
In order to setup remote access in Home Assistant we must first set up a free DuckDNS account.
Simply head over to the DuckDNS website and sign up using the account of your preference (Google, Github and more).
Once you have logged in, enter a subdomain and click add domain. This needs to be unique so you might need to get a little creative.
https://<your-subdomain>.duckdns.org
Make a note of your chosen subdomain and your token. Copy and paste it into a text file as we will need it later.
How To Install the DuckDNS Add-on in Home Assistant
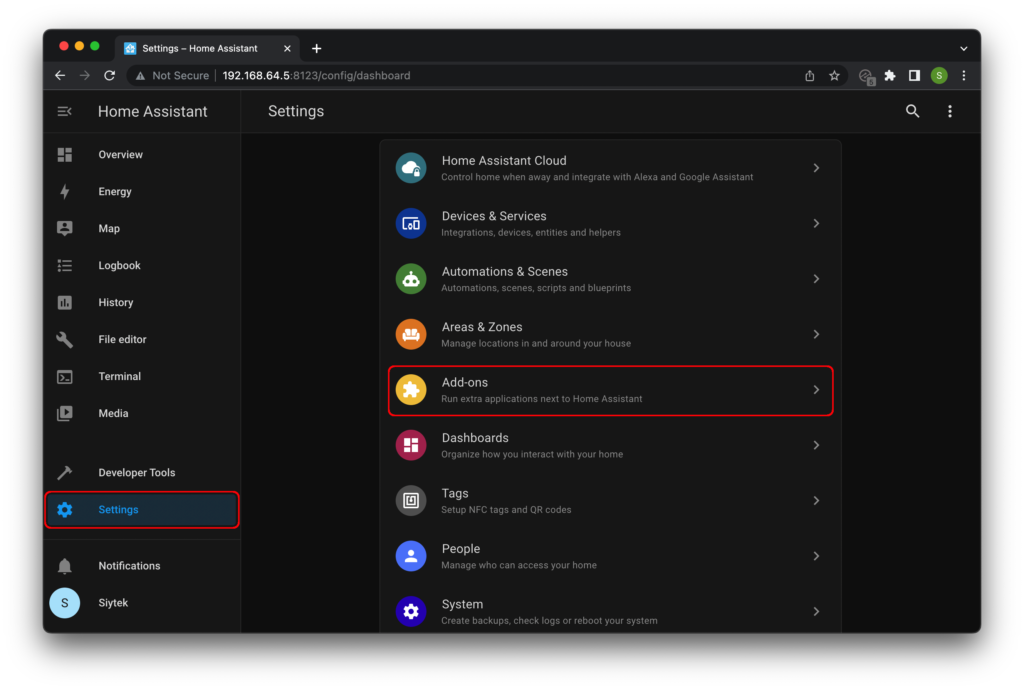
Once we have our DuckDNS account we can open up Home Assistant and install the DuckDNS add-on.
Click settings on the left-hand sidebar and then choose Add-ons from the settings menu. Or use the handy button:

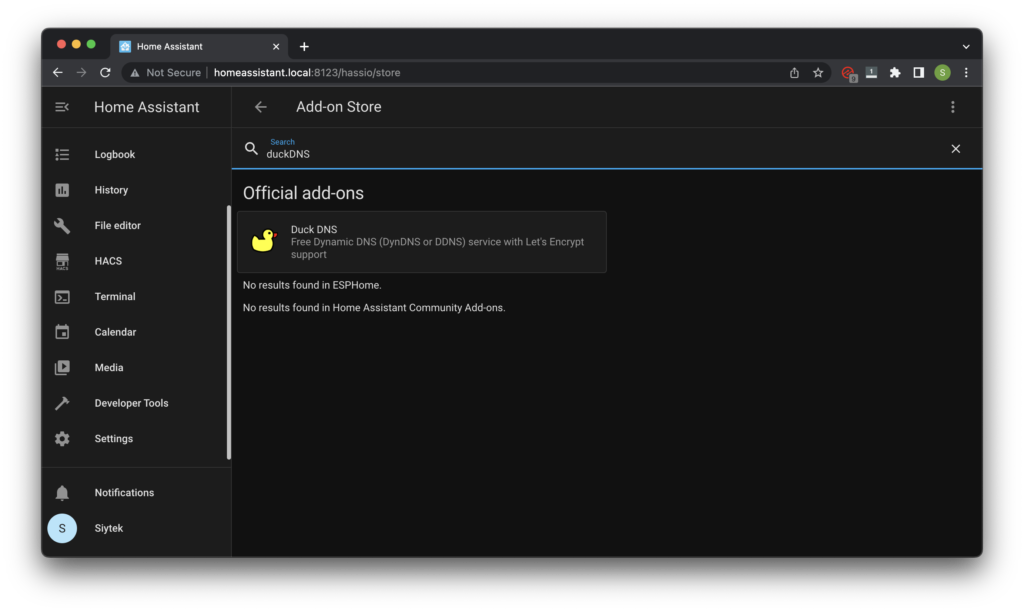
Click the add-ons store button in the lower corner of the screen and search for the DuckDNS add-on.
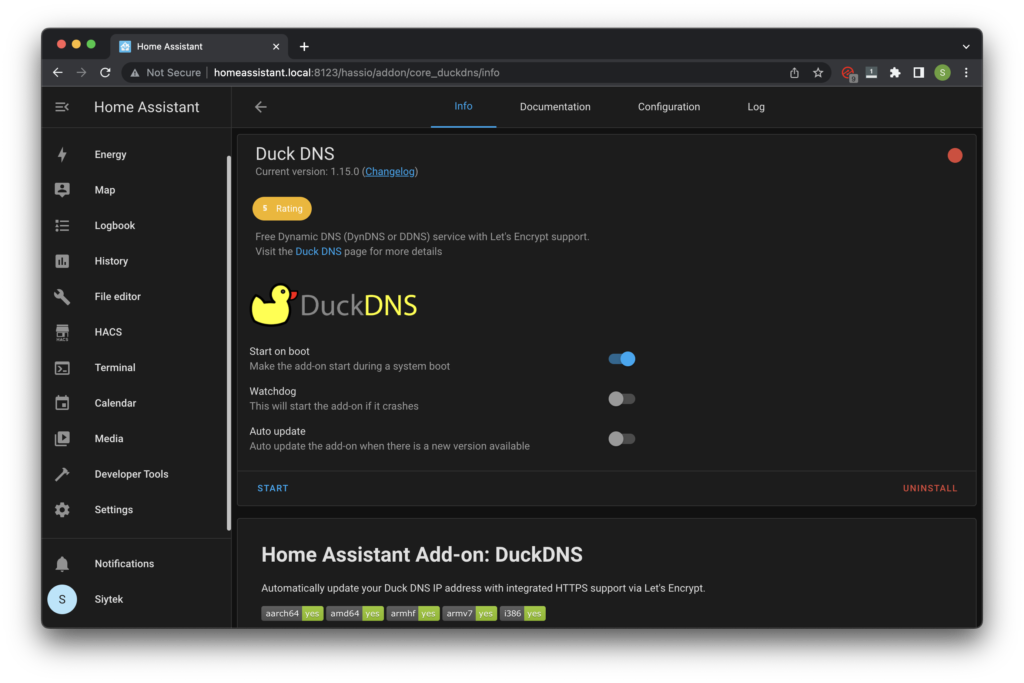
Click on the DuckDNS add-on and install it from the DuckDNS add-on page.
Once the installation has complete, the start button will appear, but we should configure DuckDNS before starting the service.
Setup DuckDNS configuration
Once the installation has completed, click the configuration tab at the top to bring up the configuration page.
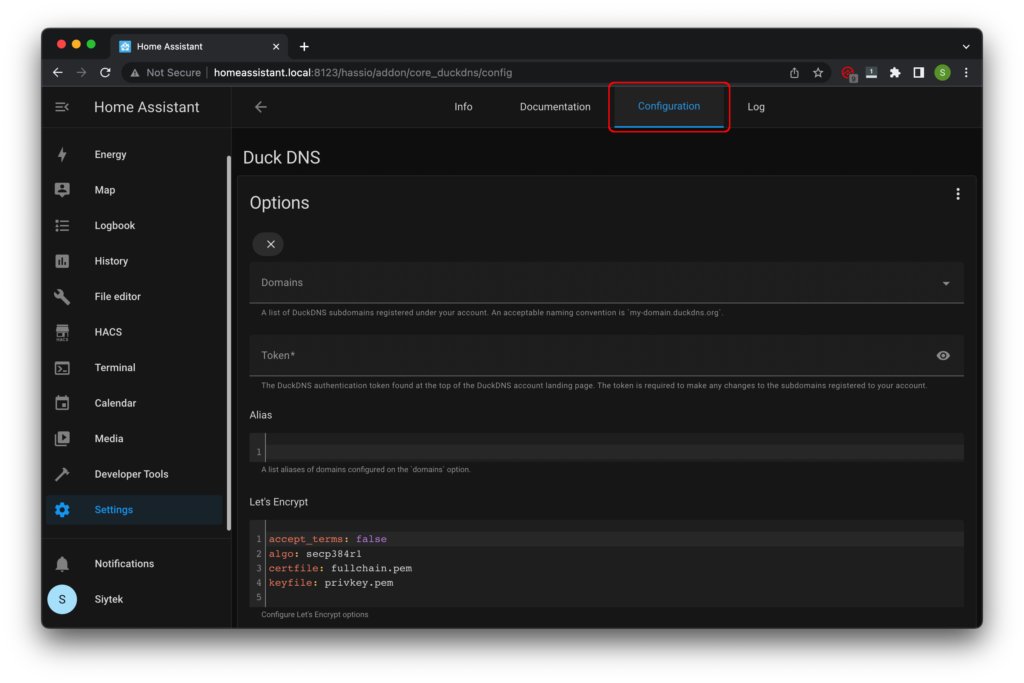
Click the three dots icon in the top right of the screen and choose Edit in YAML:
When editing the configuration in YAML, there should already be a configuration available. If not then you can paste the one below.
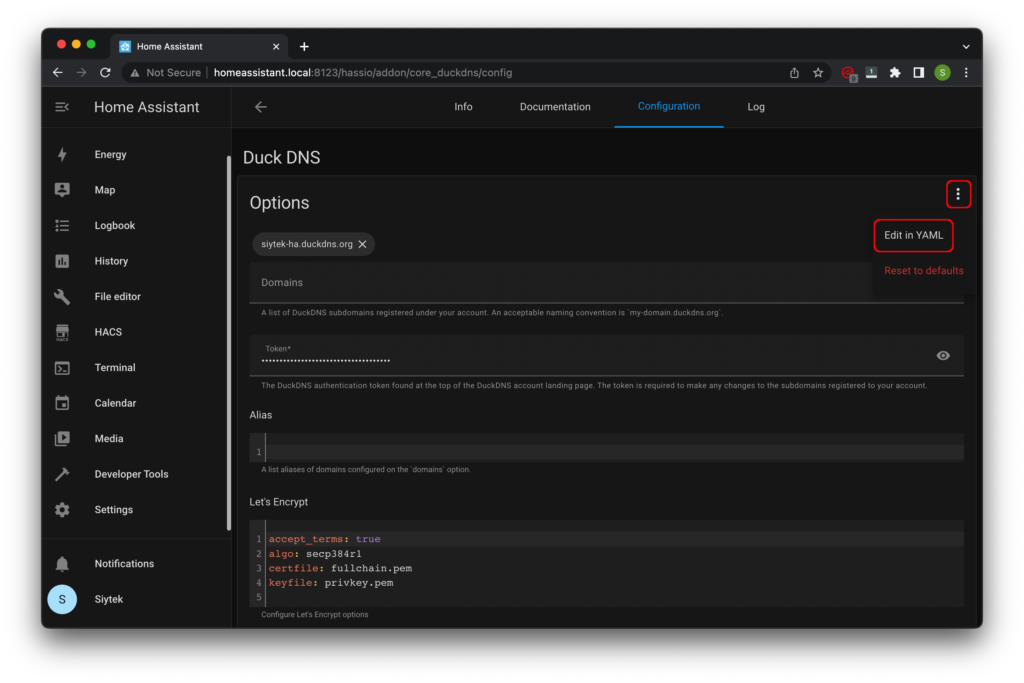
You will need to edit the following parameters:
- domains – change the subdomain your-subdomain to your own DuckDNS subdomain that you configured earlier.
- token – enter your DuckDNS token here.
- accept_terms – you need to change this to true in order for SSL encryption to work (secure connection).
Everything else can be left as the default setting.
domains:
  - your-subdomain.duckdns.org
token: ade7d878-xxxx-xxxx-xxxx-xxxxxxxxxxxx
aliases: []
lets_encrypt:
  accept_terms: true
  algo: secp384r1
  certfile: fullchain.pem
  keyfile: privkey.pem
seconds: 300
Edit configuration.yaml
Next we will need to add a few lines of code to the http integration so that the Home Assistant Core can pick up the SSL certificates.
This should be added to your configuration.yaml file.
Go ahead and click on file editor on the sidebar and navigate to your configuration.yaml file.
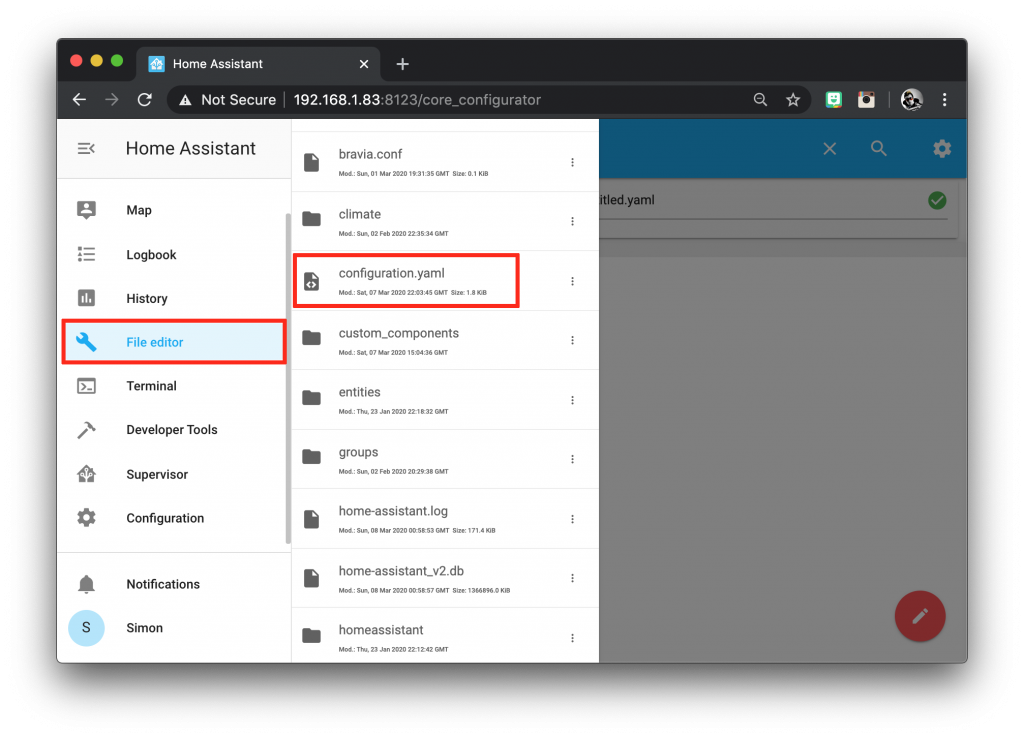
Next we need to enter the HTTP integration and SSL parameters:
http:
  ssl_certificate: /ssl/fullchain.pem
  ssl_key: /ssl/privkey.pem
Once you have added this to your YAML configuration, click Developer Tools > YAML and then restart Home Assistant.
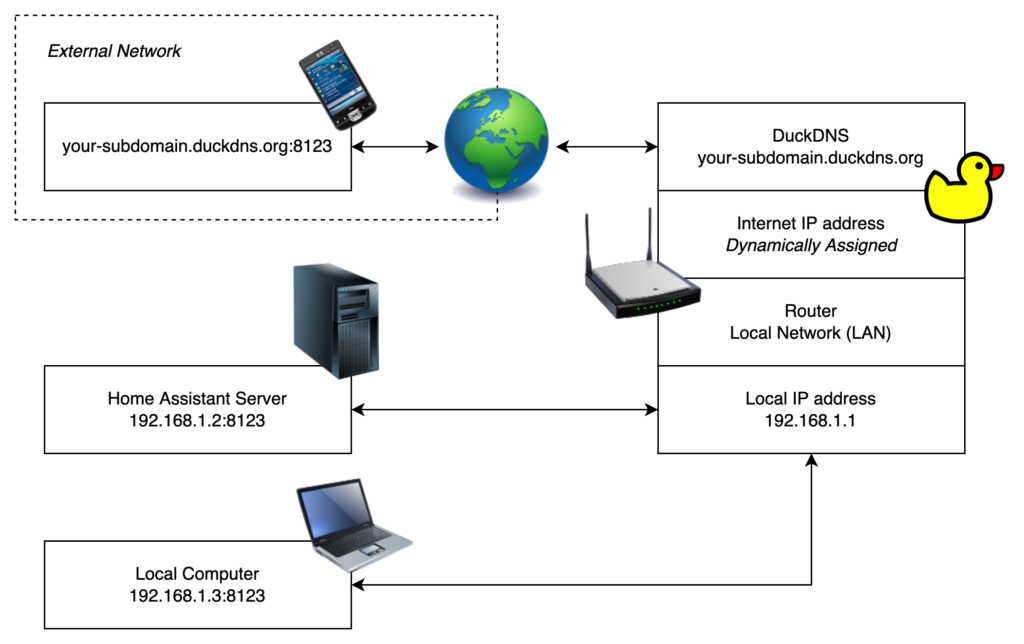
How to Set Up Port Forwarding for Home Assistant
Port forwarding is function within a router that allows us to route incoming data from an external network (the internet) to a computer on our internal network.
So far we have configured DuckDNS to represent our network on the internet with a static domain name.
We can send data to our DuckDNS address but as it stands, it won’t go anywhere.
We need our router to receive that data and direct it to our Home Assistant server on our internal network.
This is achieved by using something called port forwarding.
What is Port Forwarding?
When we send data to our DuckDNS address that is destined for our Home Assistant server, we will use port 8123 (assuming you didn’t change the default value) just like when we connect on our internal network:
your-subdomain.duckdns.org:8123
We can configure the router to forward any data received on port 8123 to port 8123 of our Home Assistant server using it’s local area network IP address.
The following diagram illustrates the principal:
Setting up Port Forwarding
Port forwarding itself is usually pretty simple to configure. However the setup for port forwarding is specific to the router that you are using.
Therefore I cannot create a step-by-step guide that matches your router exactly.
However I can walk you through the process using my own router, and hopefully you can figure it out!
In order to log in to your router settings page it is usually as simple as entering your router IP address into your browser.
Many routers default to 192.168.0.1 or 192.168.1.1 so it is worth trying those first.
If you can’t find your router IP address and it is not written on the router anywhere, take a look at this article.
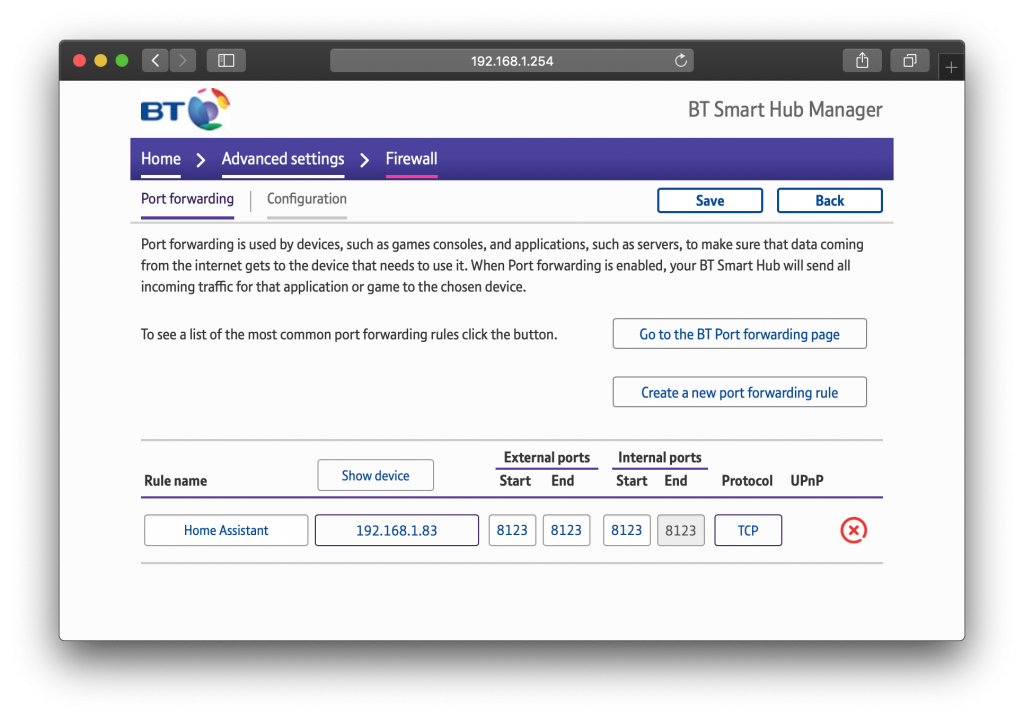
My internal Home Assistant server IP address is 192.168.1.83 and I am using the default port 8123.
My port forwarding rule is configured to forward all incoming data on port 8123 to my Home Assistant internal server IP address:
How To Test Home Assistant Remote Access
Once you have port forwarding setup you should be able to access Home Assistant remotely.
You can try it right away, from the comfort of your own home. You don’t need to actually be remote in order to test the connection.
Go ahead and enter your DuckDNS address into your browser:
your-subdomain.duckdns.org:8123
If everything has worked correctly, your Home Assistant dashboard will load as normal.
However you are not accessing Home Assistant directly, you are actually routing the data out of your local network and back into your local network again.
This means that you can continue to use your DuckDNS address when you take your mobile or laptop outside of your local network. Awesome!
Conclusion
The Home Assistant developers are doing a superb job of keeping privacy and security at the top of their agenda.
With the addition of DuckDNS it is possible to safely access your Home Assistant server remotely over the internet.
But before you dash off at lightning speed to the nearest coffee shop to devour a stupidly expensive croissant whilst marveling at your Home Assistant dashboard, why not check out some of my awesome Home Assistant tutorials!
Article Updates
Aug 16th 2022 : Tested on Mac M1 and Mac OS 12.4 Home Assistant Core 2022.8.5. Screenshots updated to latest frontend, version 20220601.0. Fixed broken links in table of contents. Some additions to article information.
Article first published March 7th 2020.
Thanks so much for visiting my site! If this article helped you achieve your goal and you want to say thanks, you can now support my work by buying me a coffee. I promise I won't spend it on beer instead... 😏


This was a very thorough article and it got me up and running on the first try! Thanks! Unfortunately, after shutting down and starting again, I’m unable to view home assistant in my browser. I’m getting an error connection refused at the ip address and port i see in my screen. I’ve checked and removed any proxies, ad filters, and vpn but no luck. Any ideas?
Same happened to me here. 🙁
Did you use https (with an ‘s’) ?
sorry. wrong article. I meant to put it on the macos install article.
Assuming you meant the latest guide for M1 Mac, did you try this… https://siytek.com/home-assistant-supervised-on-mac/#Fixing-Network-Interface-Problems ?
I am having problems implementing this. when I get to “Developer tools – YAML – restart” I get this error :-
Configuration invalid!
Configuration errors
Invalid config for ‘http’ at configuration.yaml, line 14: not a file for dictionary value ‘http->ssl_certificate’, got ‘/ssl/fullchain.pem’
Invalid config for ‘http’ at configuration.yaml, line 15: not a file for dictionary value ‘http->ssl_key’, got ‘/ssl/privkey.pem’
Any Suggestions appreciated.