
Looking to set up a tech blog or website for programming, electronics, engineering or another similar field? This is a complete WordPress setup guide for new webmasters who will benefit from a more specific webmaster tutorial.
There are plenty of WordPress tutorials already available so I wanted to create something a little different. I have already travelled the path necessary to create a WordPress tech blog (the one you are visiting!) therefore in this article I will also be sharing some great tips discovered during my journey.
I have some awesome tips that you won’t find in a common WordPress beginners guide, which are suited to someone like yourself with a tech background. For example, during my own journey I have discovered how to save a little money by using tech knowledge to bypass some basic paid tools! Sounds interesting? Ready to get started?
What type of blog do you want?
Firstly, if you already know that you want to set up a managed WordPress website then I would first recommend checking out the options on Siteground, as I found this to be the most awesome hosting company. Then you can skip ahead to the setup.
There are a couple of ways that you can approach building your blog with WordPress, depending on what you want to achieve. The first we should understand is what is WordPress and why are there two different versions?
Why WordPress?
WordPress itself is a free and open source content management system. It is massively widespread over the internet, powering a majority of online blogs.
In my humble opinion, using WordPress is a no-brainer. It has the perfect balance of ease-of-use whilst still being open and accessible enough for huge customisation. In short it can be perfect for massive high-traffic websites running e-commerce, or your mom’s cooking blog!
Are there any negatives? Despite being very easy to use, it is still a little complex for some users. For those who want the easiest option or perhaps something that allows a very professional looking site to be made with almost zero effort, options such as Wix and Squarespace are probably better.
Of course you will pay a premium for services like these and you won’t really have full control of your site. For example it would be a total pain to move it to another host. You effectively do not own the platform that you are publishing on. This is something I would absolutely avoid at all costs, especially if you wish to monetise your site.
If you have ever heard the acronym “HTML” then you are definitely tech savvy enough for WordPress! So which version of WordPress is right for you?
WordPress.org
WordPress.org is the official home for the WordPress open source content management system. Here you can find many WordPress resources as well as a link to download WordPress for free.
However there are several elements required for actually hosting a WordPress site and simply downloading it will not give you a complete website which you can start publishing to.
In order to have a fully functioning WordPress site you technically need a LAMP server (Linux, Apache, MySQL, PHP). But don’t worry! We don’t need to know anything about those elements as everything will be automatically handled by our chosen hosting company.
However it is totally possible to build your own LAMP server if you really wanted to. I even wrote a guide explaining how to set up a LAMP server on a Raspberry Pi! However this still won’t give you a domain name and is really only suitable for a DIY project.
Besides, hosting your own LAMP server is way too much effort! The ideal solution is to have an easy solution for hosting so you can focus your effort on the site itself. There are two options for hosting WordPress.
WordPress.com
WordPress.com is a hosting solution for WordPress that I will take a moment to mention. WordPress.com is a fully fledged hosting solution, which means that you can host your entire website there simply by creating a free account and you can be up and running in as little as 5 minutes.
If you are looking to build a WordPress blog that is completely free then this is the way to go. Sounds perfect, right?! Not exactly. There are some considerations:
- A basic site is free but additional features are premium
- You cannot upload plug-ins
- No backend code allowed
- No database access
- No theme uploads
- Not self-hosted (you don’t own the platform)
- No personal domain name
As you can see there are some huge limitations with using WordPress.com to host your site. I would certainly recommend using WordPress.com, but only if you have absolutely zero budget for your site.
Might I also add that the monthly cost of hosting a site is literally the price of a beer! It is so cheap to host a site that it simply isn’t worth imposing all of this limitation on yourself, when you can have complete freedom for the cost of a beer!
Not convinced? A well designed site with a few carefully placed ads can easily earn enough to be paying for its own hosting plus it will be buying YOU the beer!
Self-hosting WordPress
By far the most common way to build your own WordPress blog is to use a self-hosting service. This consists of renting a LAMP server from a web hosting company in order to run the WordPress content management software.
Sounds complicated, but fear not! Mostly all decent web hosting companies in this modern age will do all of the hard work for you. All you need to do is sign up for the service and WordPress will be installed for you.
Once you complete the sign-up process, you will be taken straight to your WordPress dashboard. In short, my mom could set up her cooking blog easily with a self-hosted WordPress service!
However this does not mean you cannot do the tech stuff! You can still access the site backend and database. You can upload and download files with SSH and FTP. You can run shell scripts on your server. You can upload custom themes and plug-ins. You can edit all of the code for your site in a code editor. You can backup and migrate your site to another host at your own free will.
In short if someone asked me what my number one tip would be for setting up a website, I would say to keep it hosted on your own platform and preferably one that is highly reputable.
Setting up the hosting
After spending considerable time researching the options available for hosting I settled on Siteground for hosting this site. I felt that there were many positive reviews and the pricing seemed good (the first three months are less than the cost of a beer!).
Set up a hosting account
You are of course free to choose any host you like, but if you have no particular allegiance then I would certainly recommend checking out the latest prices over at Siteground (click for new tab) and go ahead and get yourself setup with any of the available plans, as it will make the rest of the tutorial easier to follow.
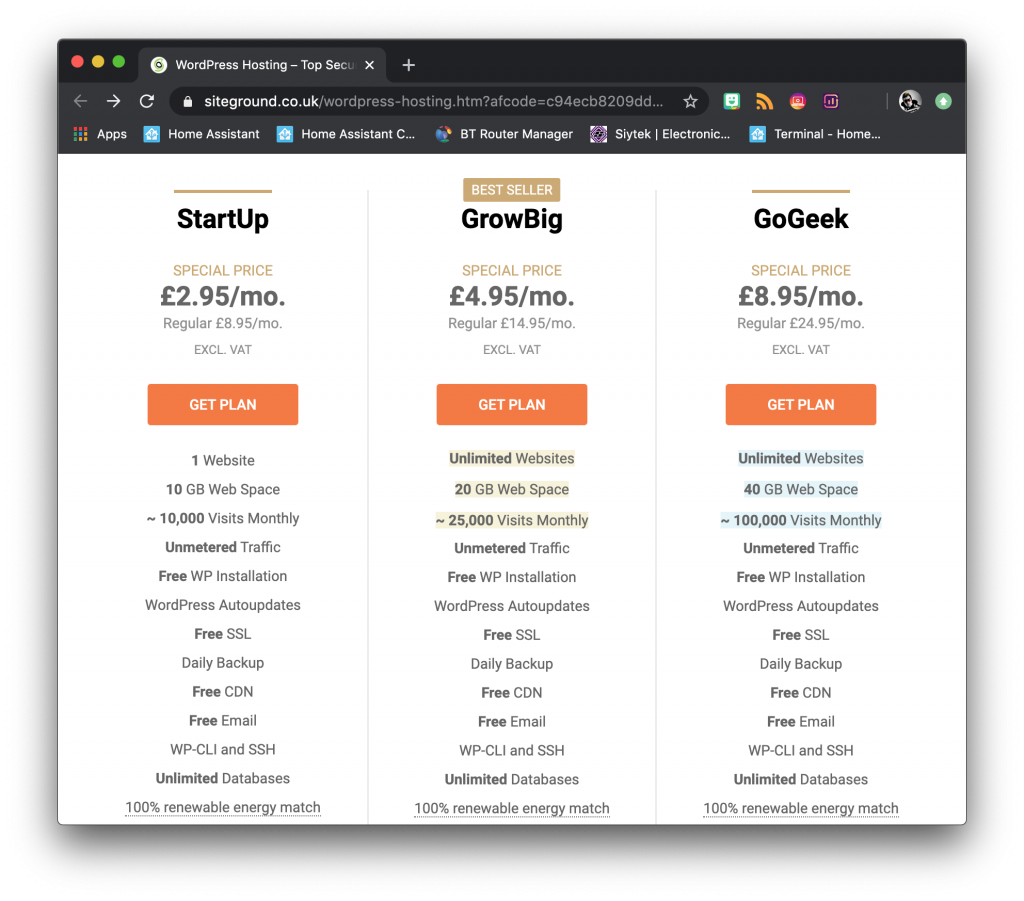
In mostly all circumstances I would recommend their StartUp plan. It should suffice for a minimum of 3 to 6 months for a new website and if your site proves popular, it is easy to upgrade.
There are some exceptions and folks that fit into the following categories may want to consider the other options.
- You already have a large fanbase elsewhere to push to your site and are likely to get more than 10,000 monthly visits.
- You wish to host multiple websites/domain names.
- You are literally a media junky and need more than 10GB (not likely unless you want to keep a lot of audio/video or large software downloads on your server).
Notice that all of the plans have free SSL, daily backup, free CDN, free email, SSH access and unlimited databases! I think it is awesome that Siteground give all of this power to even the most basic plan!
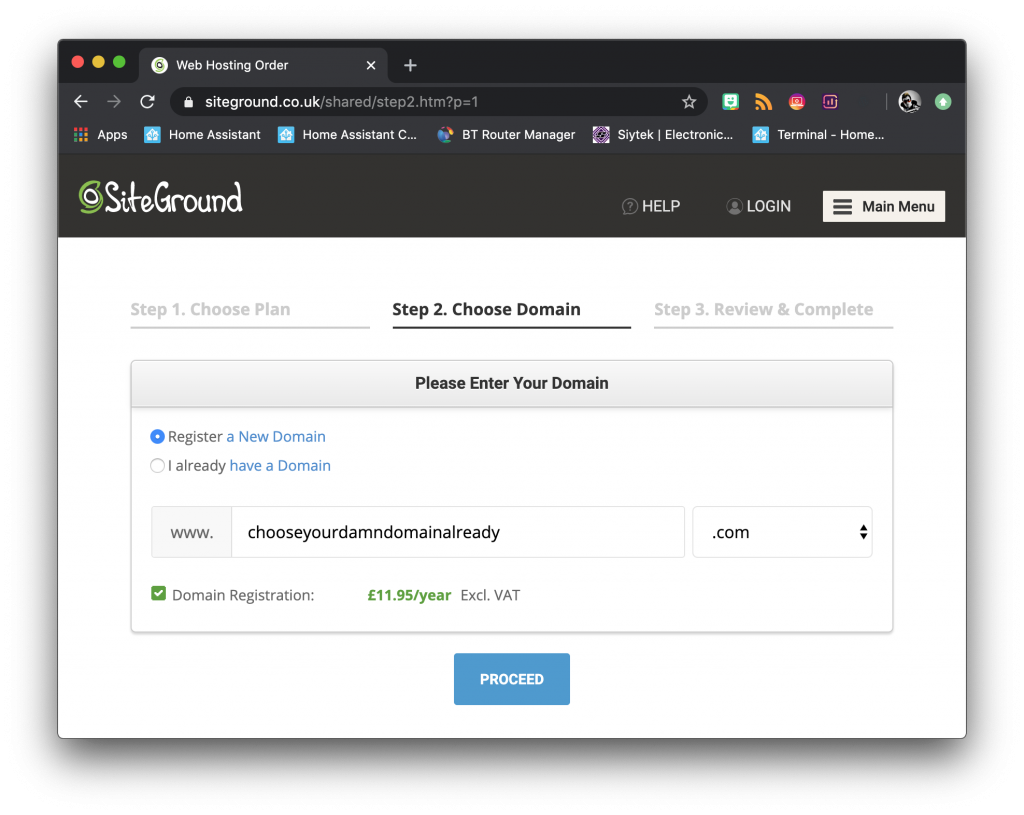
Choose a domain
It’s crunch time! I have lost count of the number of people I have come across that still haven’t started their site ONE WHOLE YEAR down the line because they cannot choose something fundamental like a niche or domain name!
Yes it is important to choose a good domain name, especially if you are trying to build a business. However if you have been thinking about this for longer than a week then you are overthinking it.
I get it. I had this problem too. I thought of many names in the short space of time I allocated to think of a name for this site. I felt happy with absolutely none of them.
In the end I chose “Siytek” because it is my nickname and the dot com was available. I wasn’t 100% certain but I knew it was vital not to dwell on trying to choose a domain.
So does it rank on Google well? Yes! Am I happy with the branding now that I have designed the site? Absolutely! Besides, what the hell did “Google” even mean before Google?
With that said, if you are still trying to choose a domain name then there are a few considerations, so here are my top tips!
- It is beneficial to get a dot com if you can, but don’t dwell on it too much and allow it to prevent you from starting a site.
- Don’t limit yourself too much by your domain name by being very specific. Very specific domain names don’t have much benefit in modern SEO. It is better to create a brand around something short, snappy and unique. Make up a word and give it meaning!
- Try to use short and memorable words, one or two syllables if possible.
- Don’t use words that are next to impossible to spell, for example literally no one can spell “pterodactyl” correctly despite it being a very commonly known word.
- If you are completely stuck for ideas then you could give Name Mesh a try!
Once you have a suitable domain name, go ahead and complete your registration. It is a straightforward process requiring your billing details and probably no need to explain further.
Log in to your web hosting
Once you have your Siteground account up and running you can pour yourself a beer and congratulate yourself! You are now the proud owner of one brand new, shiny WordPress website!
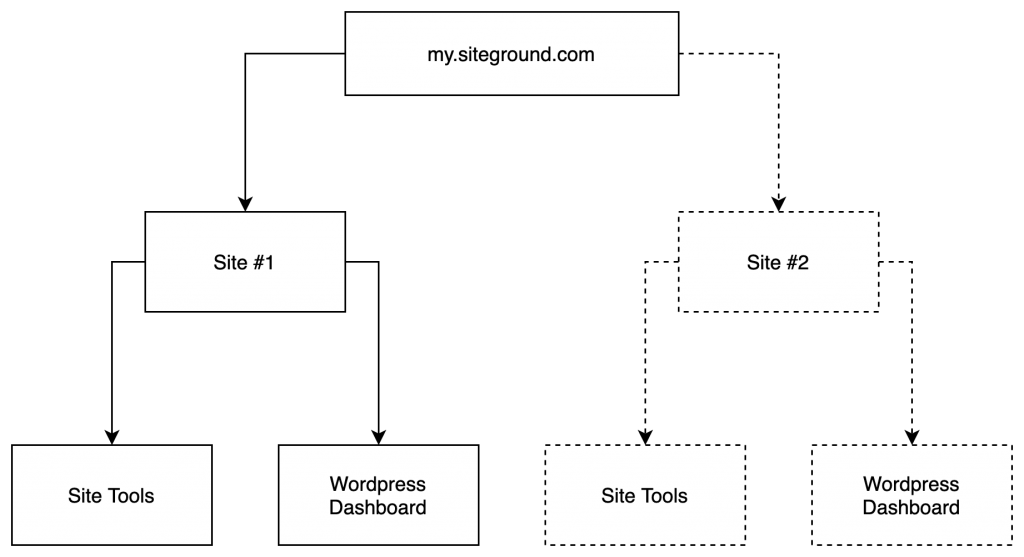
So what next, huh? Following the sign-up process you will be able to log in to your Siteground members area. This consists of a main area where you can access the dashboards for each site. Each site has a main dashboard and a WordPress dashboard.
You can use your Siteground dashboard to manage the settings for your websites and also to access the WordPress dashboard.
WordPress dashboard
The WordPress dashboard is very easy to access. When you log in to your Siteground account you will be taken to the main page. From here you can access your WordPress tools by clicking websites > wordpress kit.
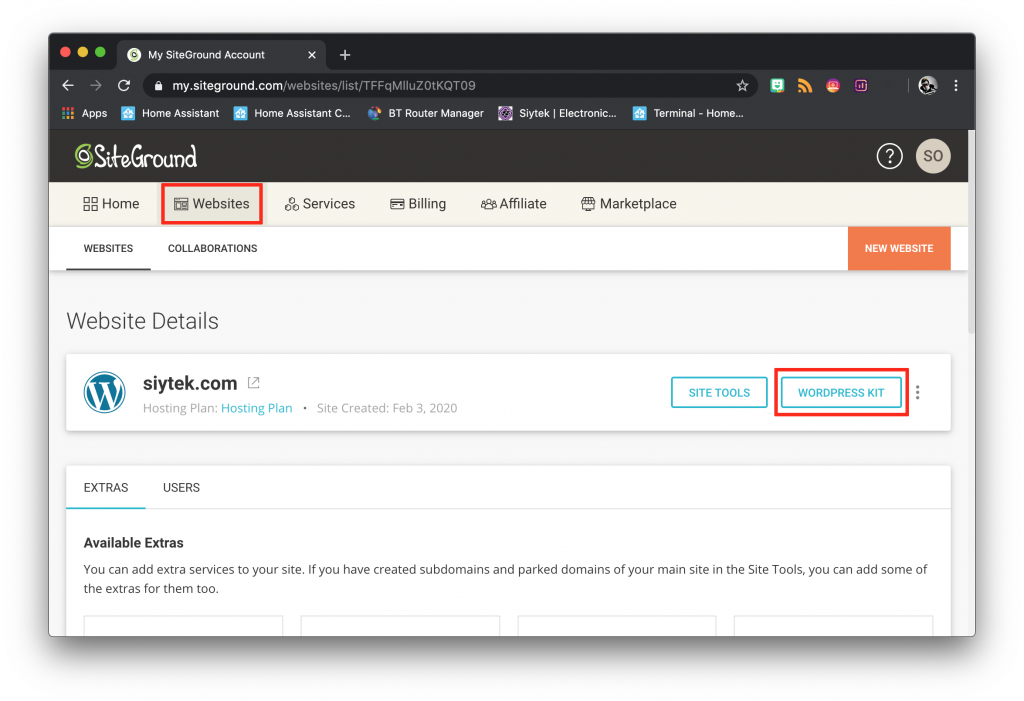
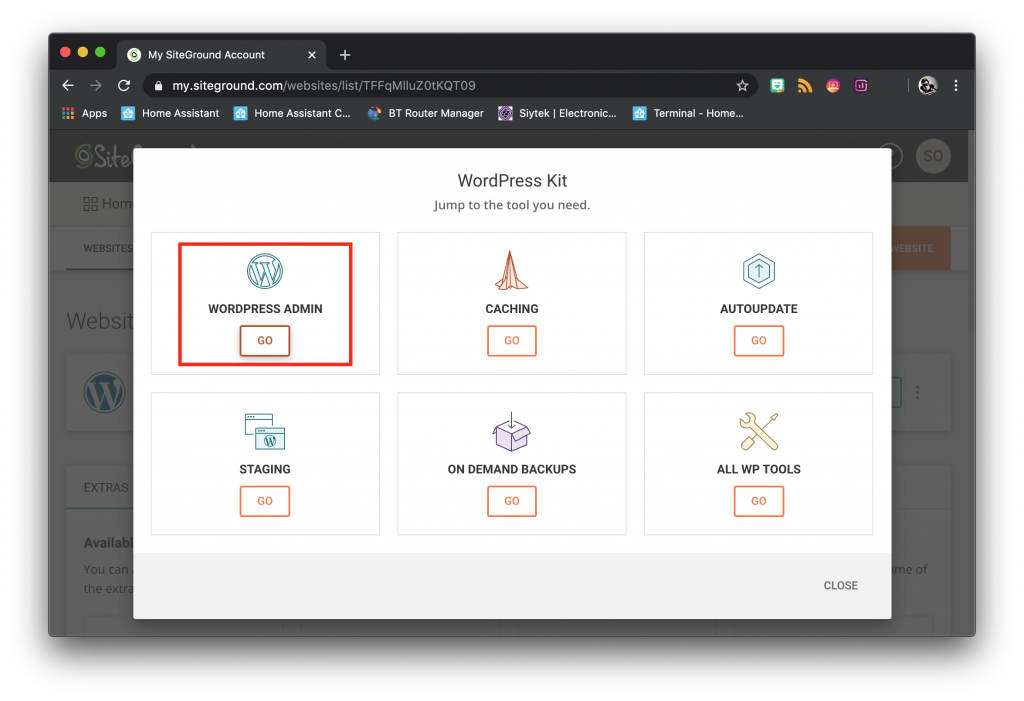
This will open up a pop-up window with a set of available tools for the applicable site. The WordPress dashboard can be accessed using the wordpress admin tool. You can also access the dashboard using your domain name.
https://your-domain-name.com/wp-admin
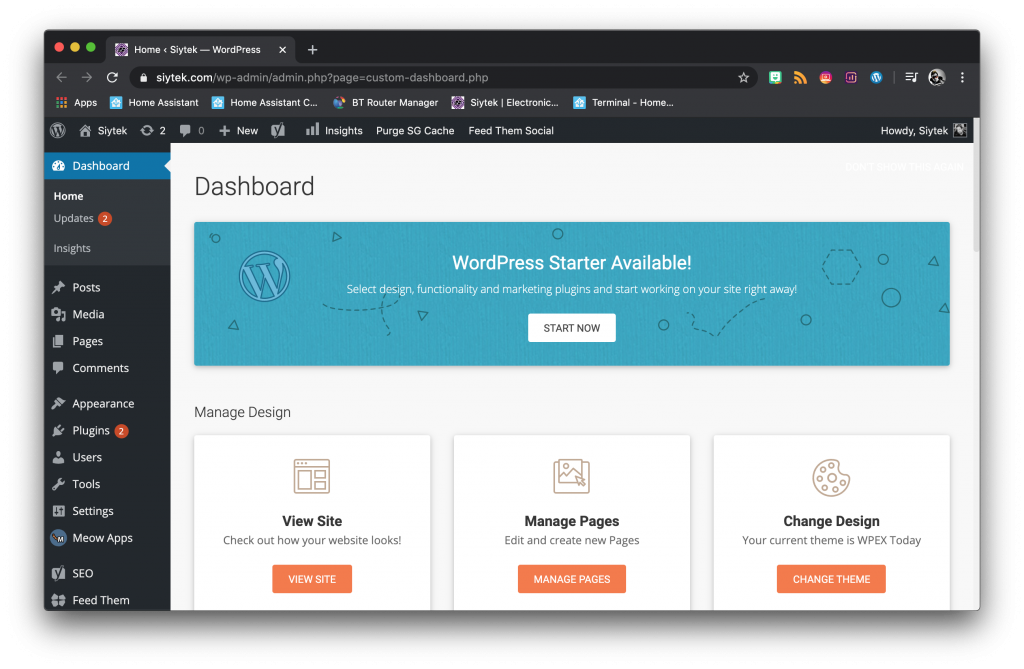
Once you have logged in you will land on your dashboard page. When using WordPress, all of the site management and content creation tools are accessible right from the browser. Awesome! We can also access the server and edit the site with some other methods, but more on that later.
Let’s quickly summarize the uses for the WordPress dashboard portion of your website:
- Create and edit new pages and posts
- Choose themes and edit the design of your website
- Add new functionality to your website with plug-ins
- Moderate and edit comments from your users
- Manage your website media
- Manage your website team (add new users who can log in and add content)
- Change general settings related to your website
Siteground dashboard
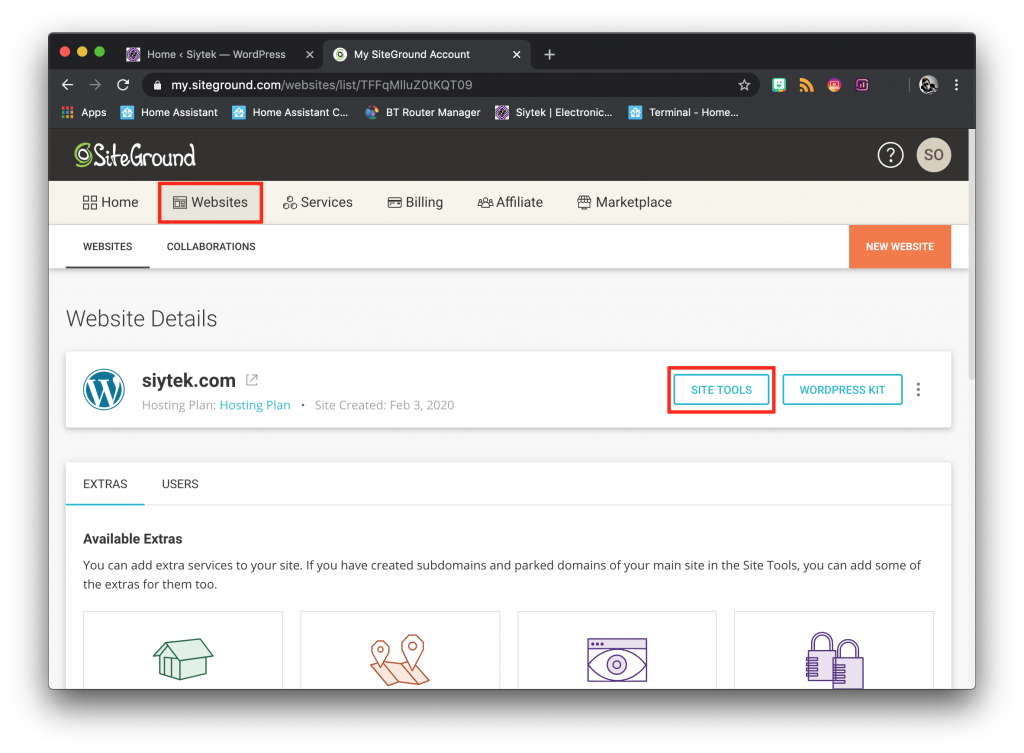
The Siteground dashboard for your site gives you lower level administration tools for managing and maintaining your website. It is not often required but there are some very useful tools here for getting your site configured. You can access by clicking site tools on the websites tab.
The dashboard is clearly organised with tools grouped into categories in the sidebar. You can customise the tools that are displayed in the main window for quicker access, more on this later.
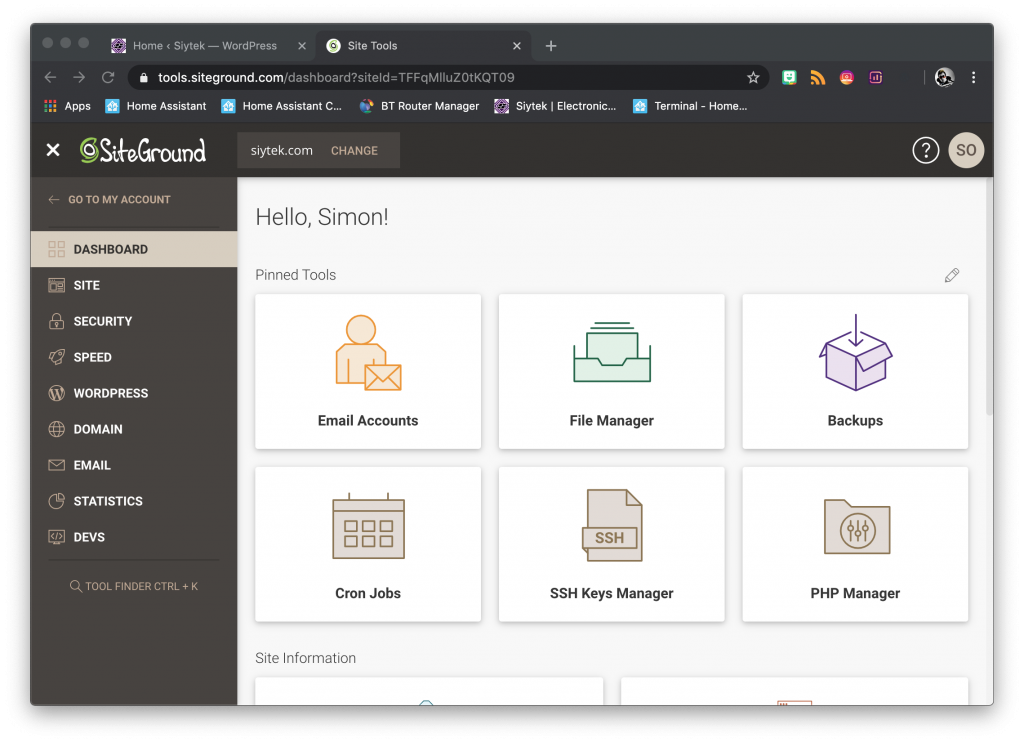
Let’s quickly summarize some of the uses for the Siteground dashboard portion of your website:
- Managing the files on your web server
- Managing FTP and SSH access to your web server
- Managing your MySQL databases
- Managing your PHP
- Managing your site security settings and backups
- Setting up and managing Cloudflare
- Installing and maintaining your WordPress installation
- Managing your site domain names
- Managing your email accounts
Building your WordPress site
So now you have your new website up and running, you are probably going to want to jump straight in and start building the site! Before we start publishing any content we are going to need to set a few things in the basic configuration.
Basic configuration
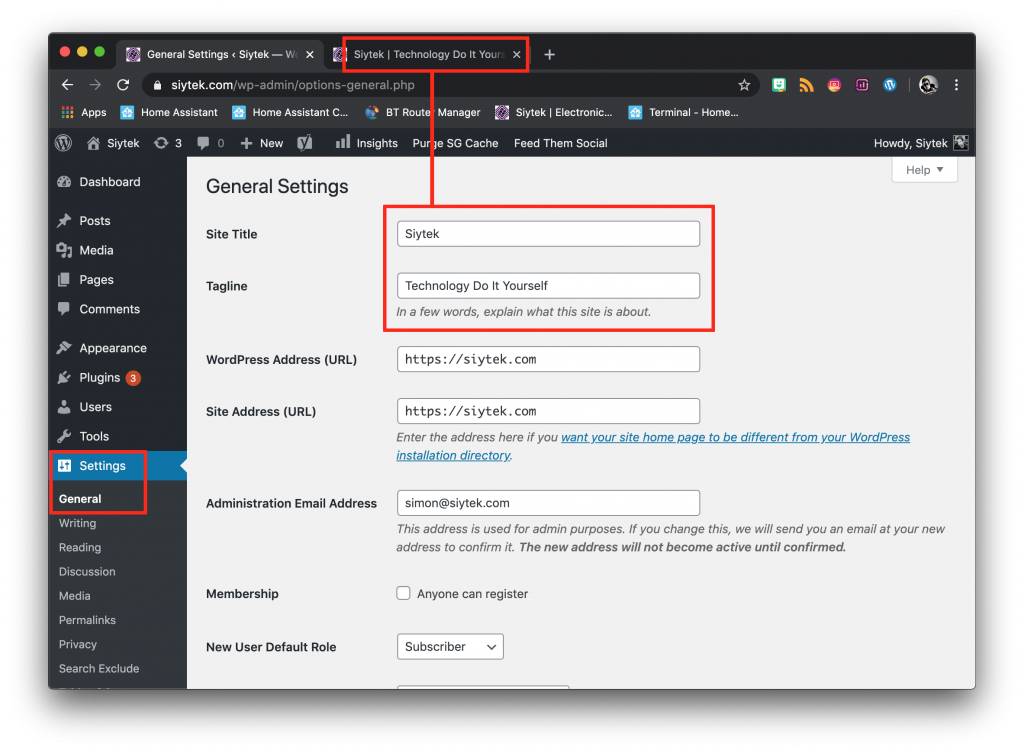
First we need to check and change the site title and tagline. This will be displayed in various locations such as on the browser tab. You can find it via the settings > general option on the sidebar menu.
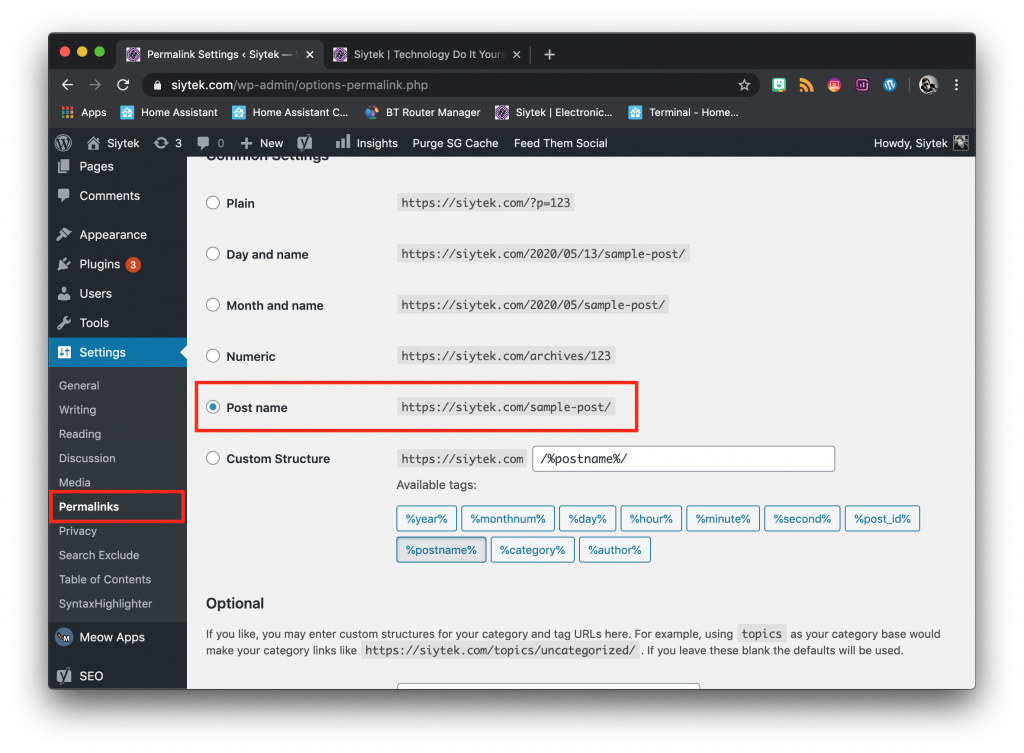
The next thing to check is how permalinks on your site are structured. This is quite important as it can affect your website performance in the search results.
It is also important to define this early on as changing it when your site has a lot of content can be a pain! It would be necessary to 301 redirect all of your links in order prevent broken links and search engine problems.
In general most modern websites simply use the post name option. It is likely selected as default, but I would recommend that you change it if a different options is set.
Setting up a theme
Now we have everything ready to start the fun bit! The first thing that I would recommend doing is choosing a theme. I have a very important piece of advice here, which is KISS. Keep It Simple, Stupid!
Choosing a theme
There are a plethora of paid themes and fancy-dancy page editors available. My recommendation here is skip all of the frills and pick a nice clean and simple free theme to use with Gutenberg, the standard editor bundled with WordPress.
I have seen many people struggling with page speed or poor editing on their site (incorrect image sizes, elements of their pages not displaying correctly etc). The culprit is over-complicated editors and bloated themes. Page speed matters a lot to the end user and also to Google, make it a top priority over aesthetics!
It is very easy to get drawn into the pretty looking theme demos when they have been build with clever graphics. You should not pick a theme based primarily on its appearance, instead consider the features and performance. You can make a basic theme look great by using good design practice and great media.
By all means use one of the free themes bundled with WordPress if you like the aesthetics. I would also recommend checking out WPExplorer, I am using Today Magazine, which is simple, easy to edit, very fast and completely free.
Installing a new theme
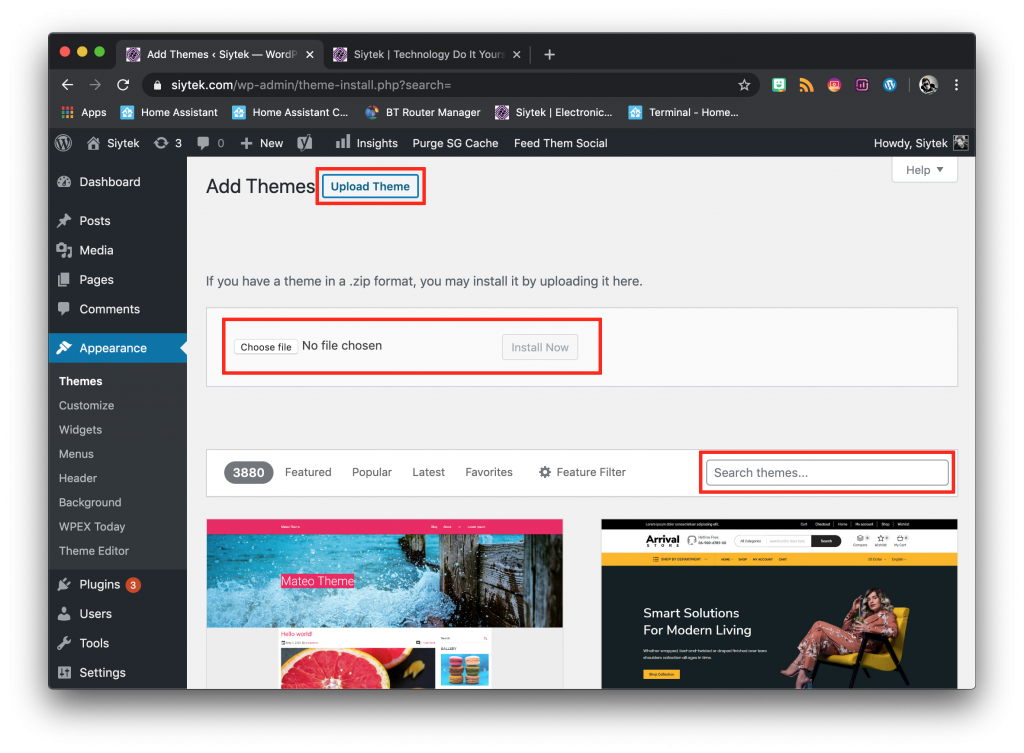
To install a new theme, click themes under the appearance section on the sidebar menu. With a new WordPress installation you will see several themes that come bundled with WordPress. You should remove any themes that you are not using in order to maximise performance.
Feel free to browse Google for a good theme, there are many blog posts reviewing the options. In order to add a theme go ahead and click add new.
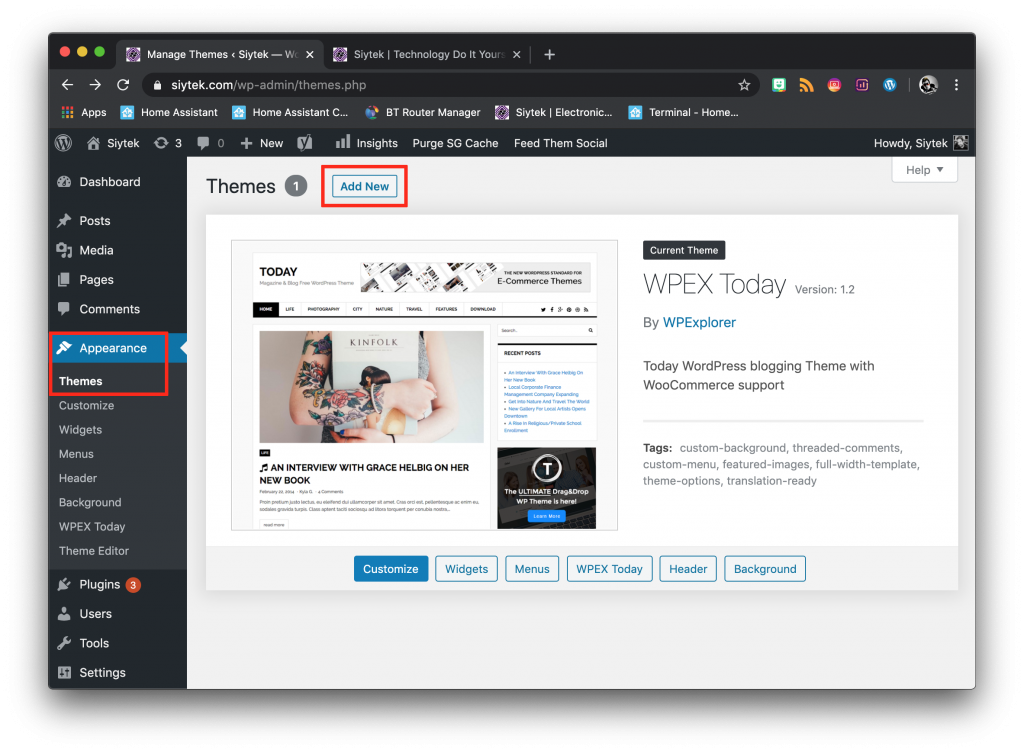
From the add themes menu you can either search for a new theme or upload your own.
Adding plug-ins
A plug-in is a small tool that you can add to WordPress, which gives some additional functionality to your website. I would highly recommend keeping the number of plug-ins to a minimum in order to achieve the best possible site performance.
There are many examples of sites that are bloated, slow and have a poor user experience. The over-use of plug-ins is a great example of how to screw up the user experience!
With that said one of the most powerful features of WordPress is the ability to add the functionality you need by using plug-ins. There are many to choose from, including paid and free versions.
Adding a plug-in
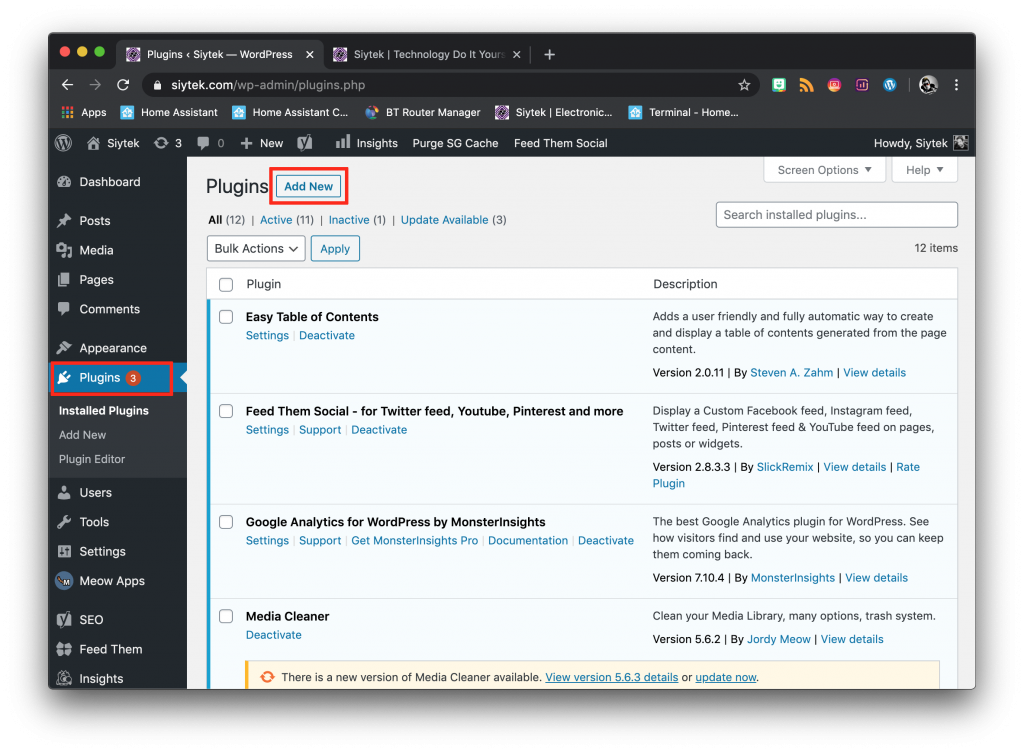
Adding a plug-in is much the same as adding a theme. You can find a list of installed plug-ins by navigating to the plugins menu on the sidebar. To search for a new plug-in to add, simply click add new.
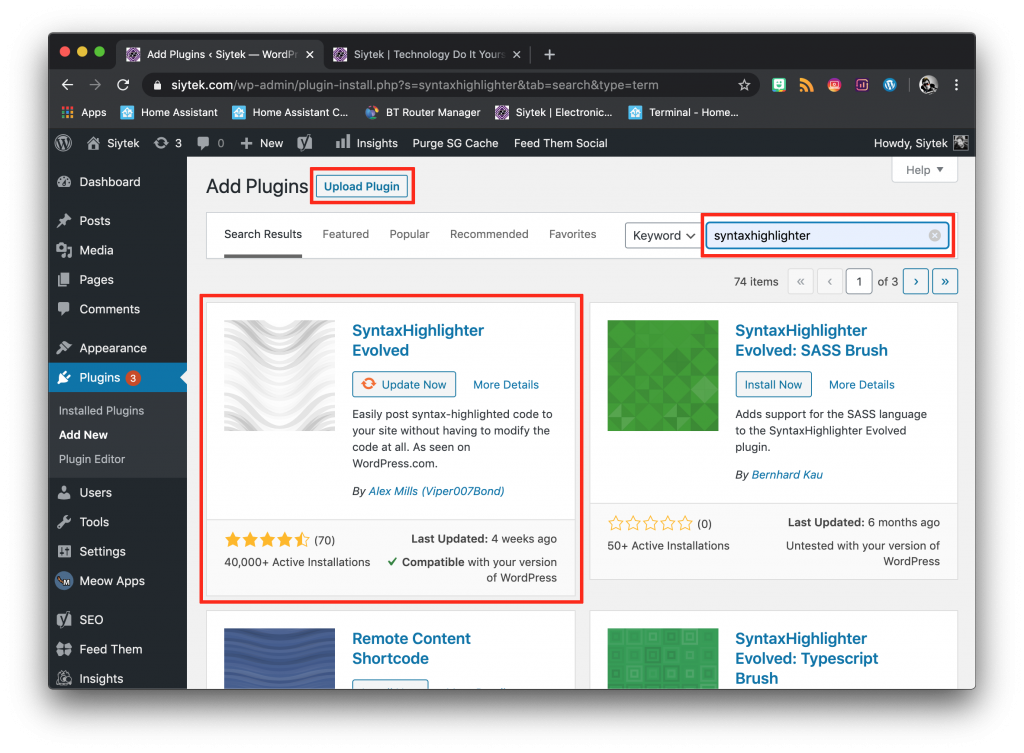
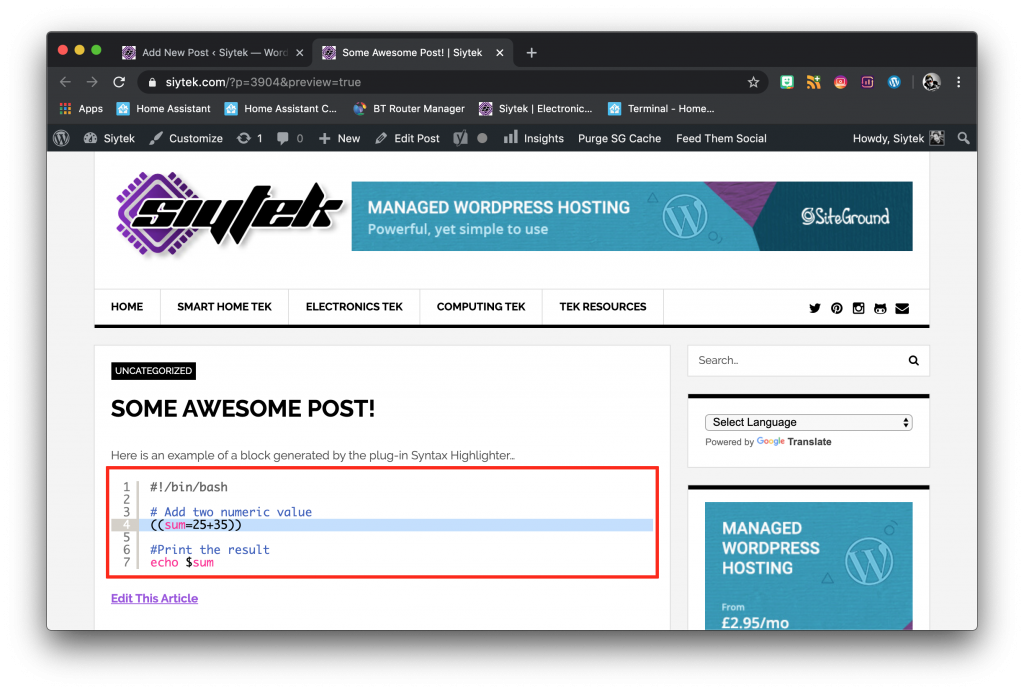
You can install new plug-ins and update existing ones from the results page as well as uploading a plug-in that you wish to install. Syntax Highligher is a really cool free plug-in that allows us to include code in our blog posts.
Note that I have not updated to the latest version of Syntax Highlighter because I have contributed to the code and I am currently running a custom version on this site with a feature not yet available in the main release (if I updated I would lose this functionality).
Once the changes are merged into the main release, I will be able to update my WordPress. Later in the tutorial we will cover accessing files in the backend, where you can make changes or even develop your own plug-in!
Plug-in settings
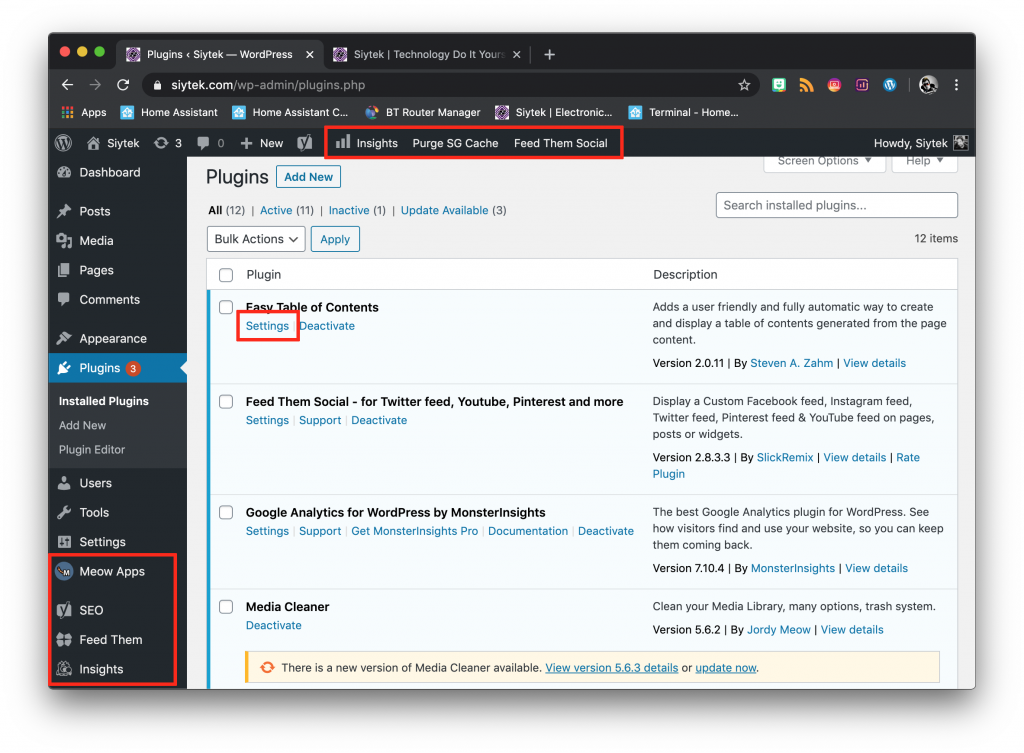
The settings available for plug-ins are different depending on the plug-in and its functionality. Some plug-ins will give you options in the sidebar menu.
Others will give you extra features in the page editor. Most plug-ins will give you a main list of options via the settings option on the main plug-ins menu.
You can also remove and deactivate plug-ins from the main menu. The option to deactivate a plug-in can be useful if you wish to deactivate a plug-in without deleting it entirely. However I would recommend removing any unused plug-ins to maximize your site performance.
Writing your first content
In order to create a new piece of content for your website, you first need to decide whether you want to create a page or a post. You can create either by clicking the relevant option in the sidebar menu.
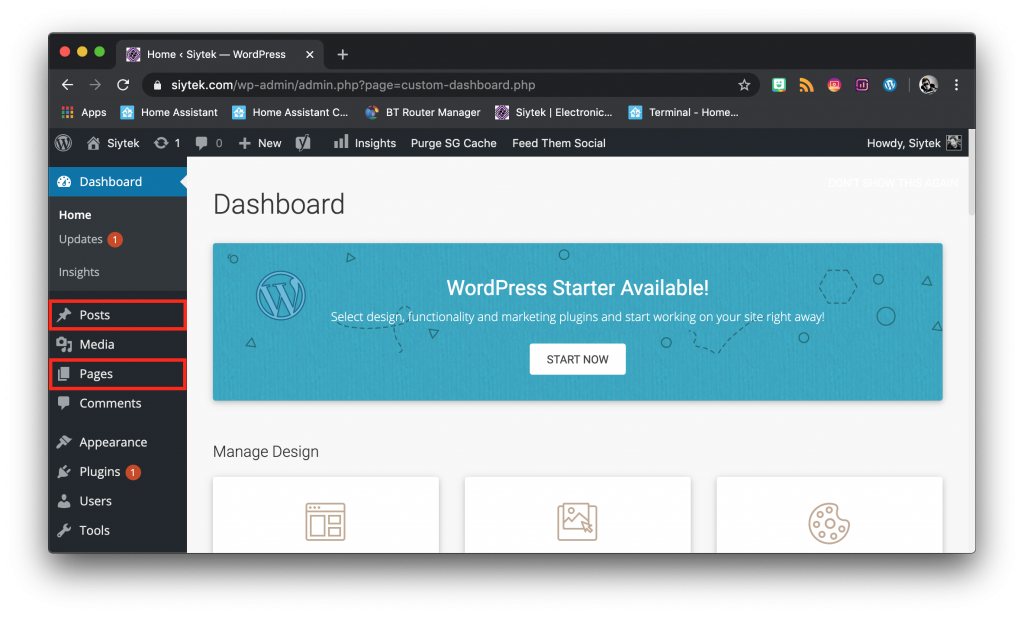
There are a few technical differences between a page and a post that are worth understanding. There can be aesthetic differences between the pages depending on the template but the main difference is that a post is published with a time and date, whilst a page is to be considered a static element.
WordPress post
WordPress gained huge success and became known for its ability to manage chronologically ordered blog posts. Additional features such as multiple author support and social sharing are also available, making it possible to build a very powerful information tool.
Posts are syndicated through RSS and feature a user comment system that allows users to engage with the author. Pingbacks and trackbacks are also supported.
WordPress page
A page in WordPress is ideal for static content. You can use a page to create a permanent place for users to access your contact details, about me information or resources.
Pages do not expire and are not included in the RSS feed. They can be built in the same way as a post, using your prefered page builder.
Publishing with Gutenberg
Let’s take a quick look at Gutenberg, the WordPress editor. It is very intuitive and easy to use. Once you create a new page or post, you will be taken to the editor.
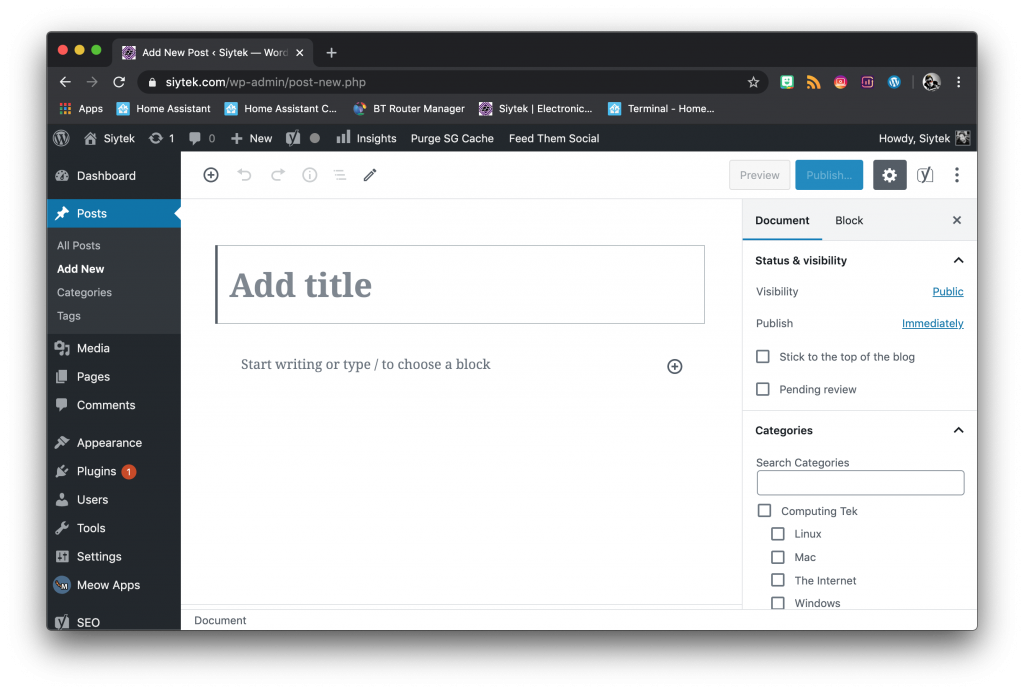
In the main wordspace you will be presented with a blank document containing a main title block, which will become the H1 title for to post. This is the title that will appear in the search engine results.
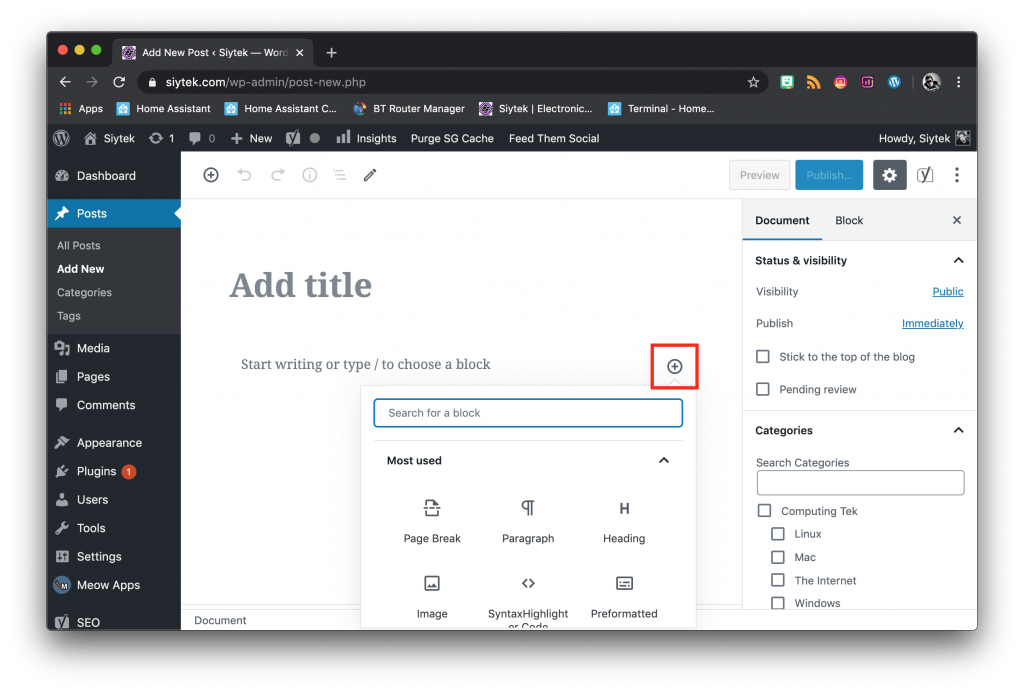
You can add new blocks by clicking the + plus icon in the circle. The blocks that you use the most will appear, but you can also browse and search for different blocks.
To the right-hand side there are some menu options. Clicking the document tab at the top will show the options for the post, such as which category the post will appear in. Clicking block will show the options for the block that is currently selected.
It is also possible to add additional functionality to WordPress by using plug-ins. A useful free plug-in to have for tech enthusiasts is Syntax Highlighter. This gives you a block that allows you to produce highlighted code on your webpage.
If you want to add Syntax Highlighter, simply search for it in WordPress plug-ins.
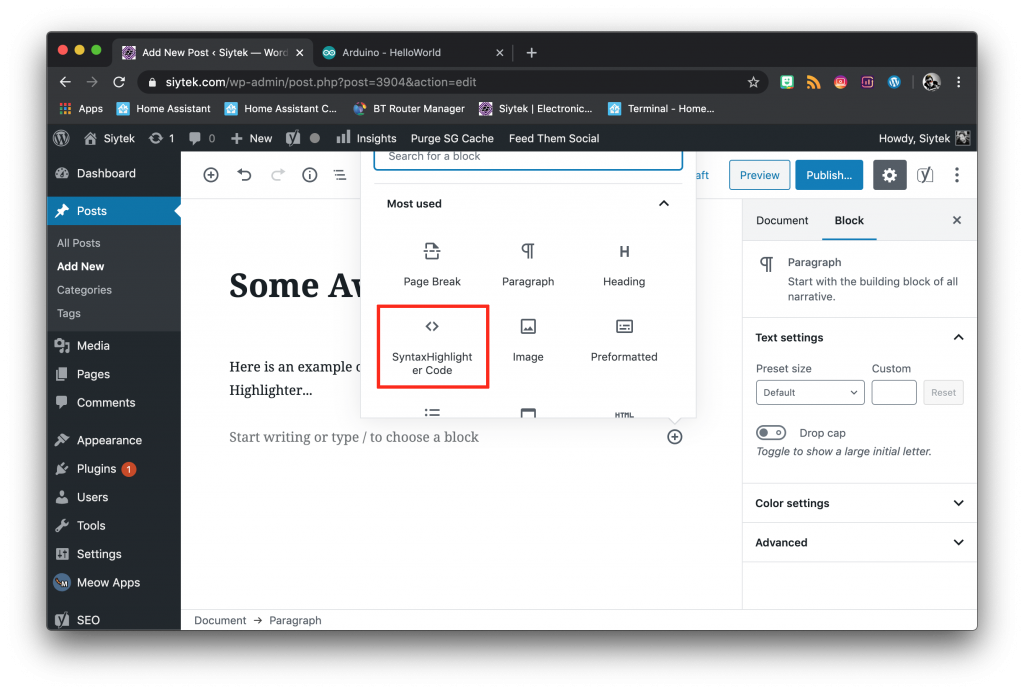
With this block we can write code in various supported languages and then specify formatting options.

The code is shown in the editor as unformatted text, but as soon as we preview the post we can see the magic happen! Here you can see the code produced with automatic formatting and line numbering.
Promoting your site
The topic of digital marketing and search engine optimisation (SEO) is an entire industry by itself. There are vast resources devoted to teaching these skills, however we will look at the basics to get you started.
Google Analytics
One of the most important tools for site promotion and management is Google Analytics. This is a free service offered by Google, which provides a wealth of information about your website and its visitors.
It will allow you to see the behaviour of your visitors and gauge which pages are successful on your site. In order to use Google Analytics you will need to sign up for a free Google account and set up analytics.
There are several ways to add Google Analytics to your website. You can manually add the code to each page, however this is unnecessarily time consuming. The easiest way is to just add a plug-in to your WordPress site. As of now I am using the free version of Monster Insights and it works great!
You can follow this guide in order to link Google Analytics to your website once you have installed the plug-in.
Social media
Social media is a powerful way to start promoting your website. A new website will take time to rank in the search results and get traffic, however social media can be used to drive traffic right away!
Automating social posting
A great way to drive traffic to your site without too much additional effort is to automate the process of re-posting your blog posts to social media. This can be accomplished by paid tools, however it can also be done for free using IFTTT.
IFTTT is basically an online service that allows you to connect many different services together. For example you can link your WordPress account to your smart home devices and get your kettle to boil when you publish an article. Awesome!

Cross posting with IFTTT
Let’s take a look at an example of how we can use IFTTT to automate our website by searching for “wordpress twitter.”
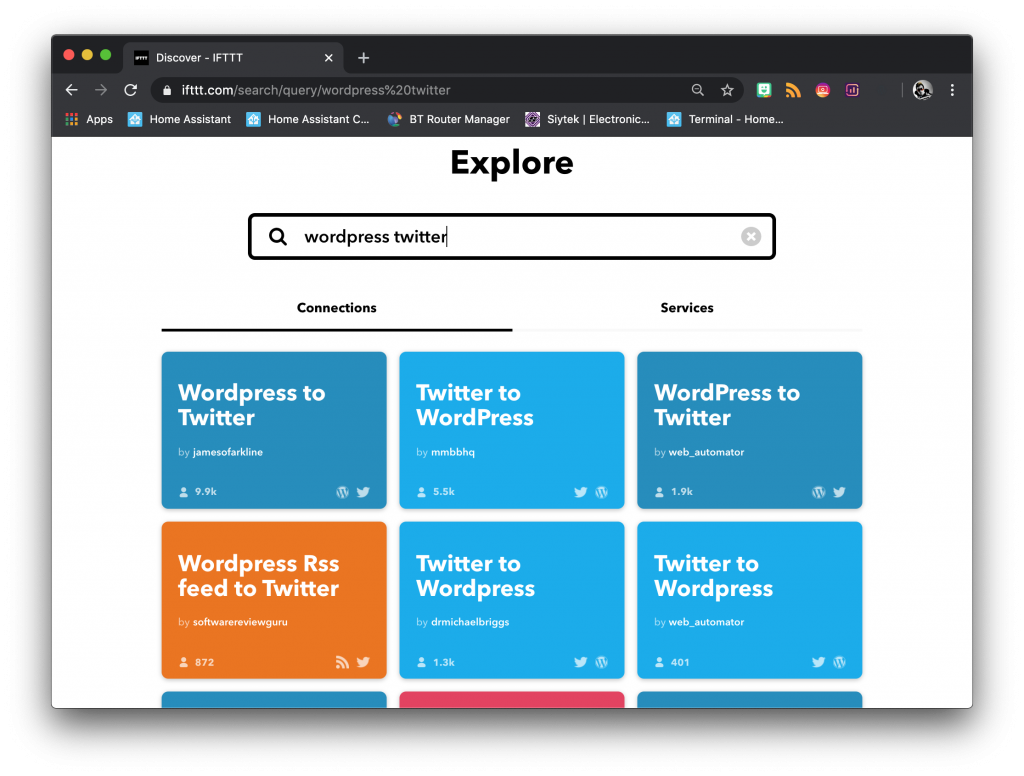
There are already many ‘recipes’ available on the service that will link your accounts and perform various tasks. It is also possible to set up your own recipe.
Setting up a recipe
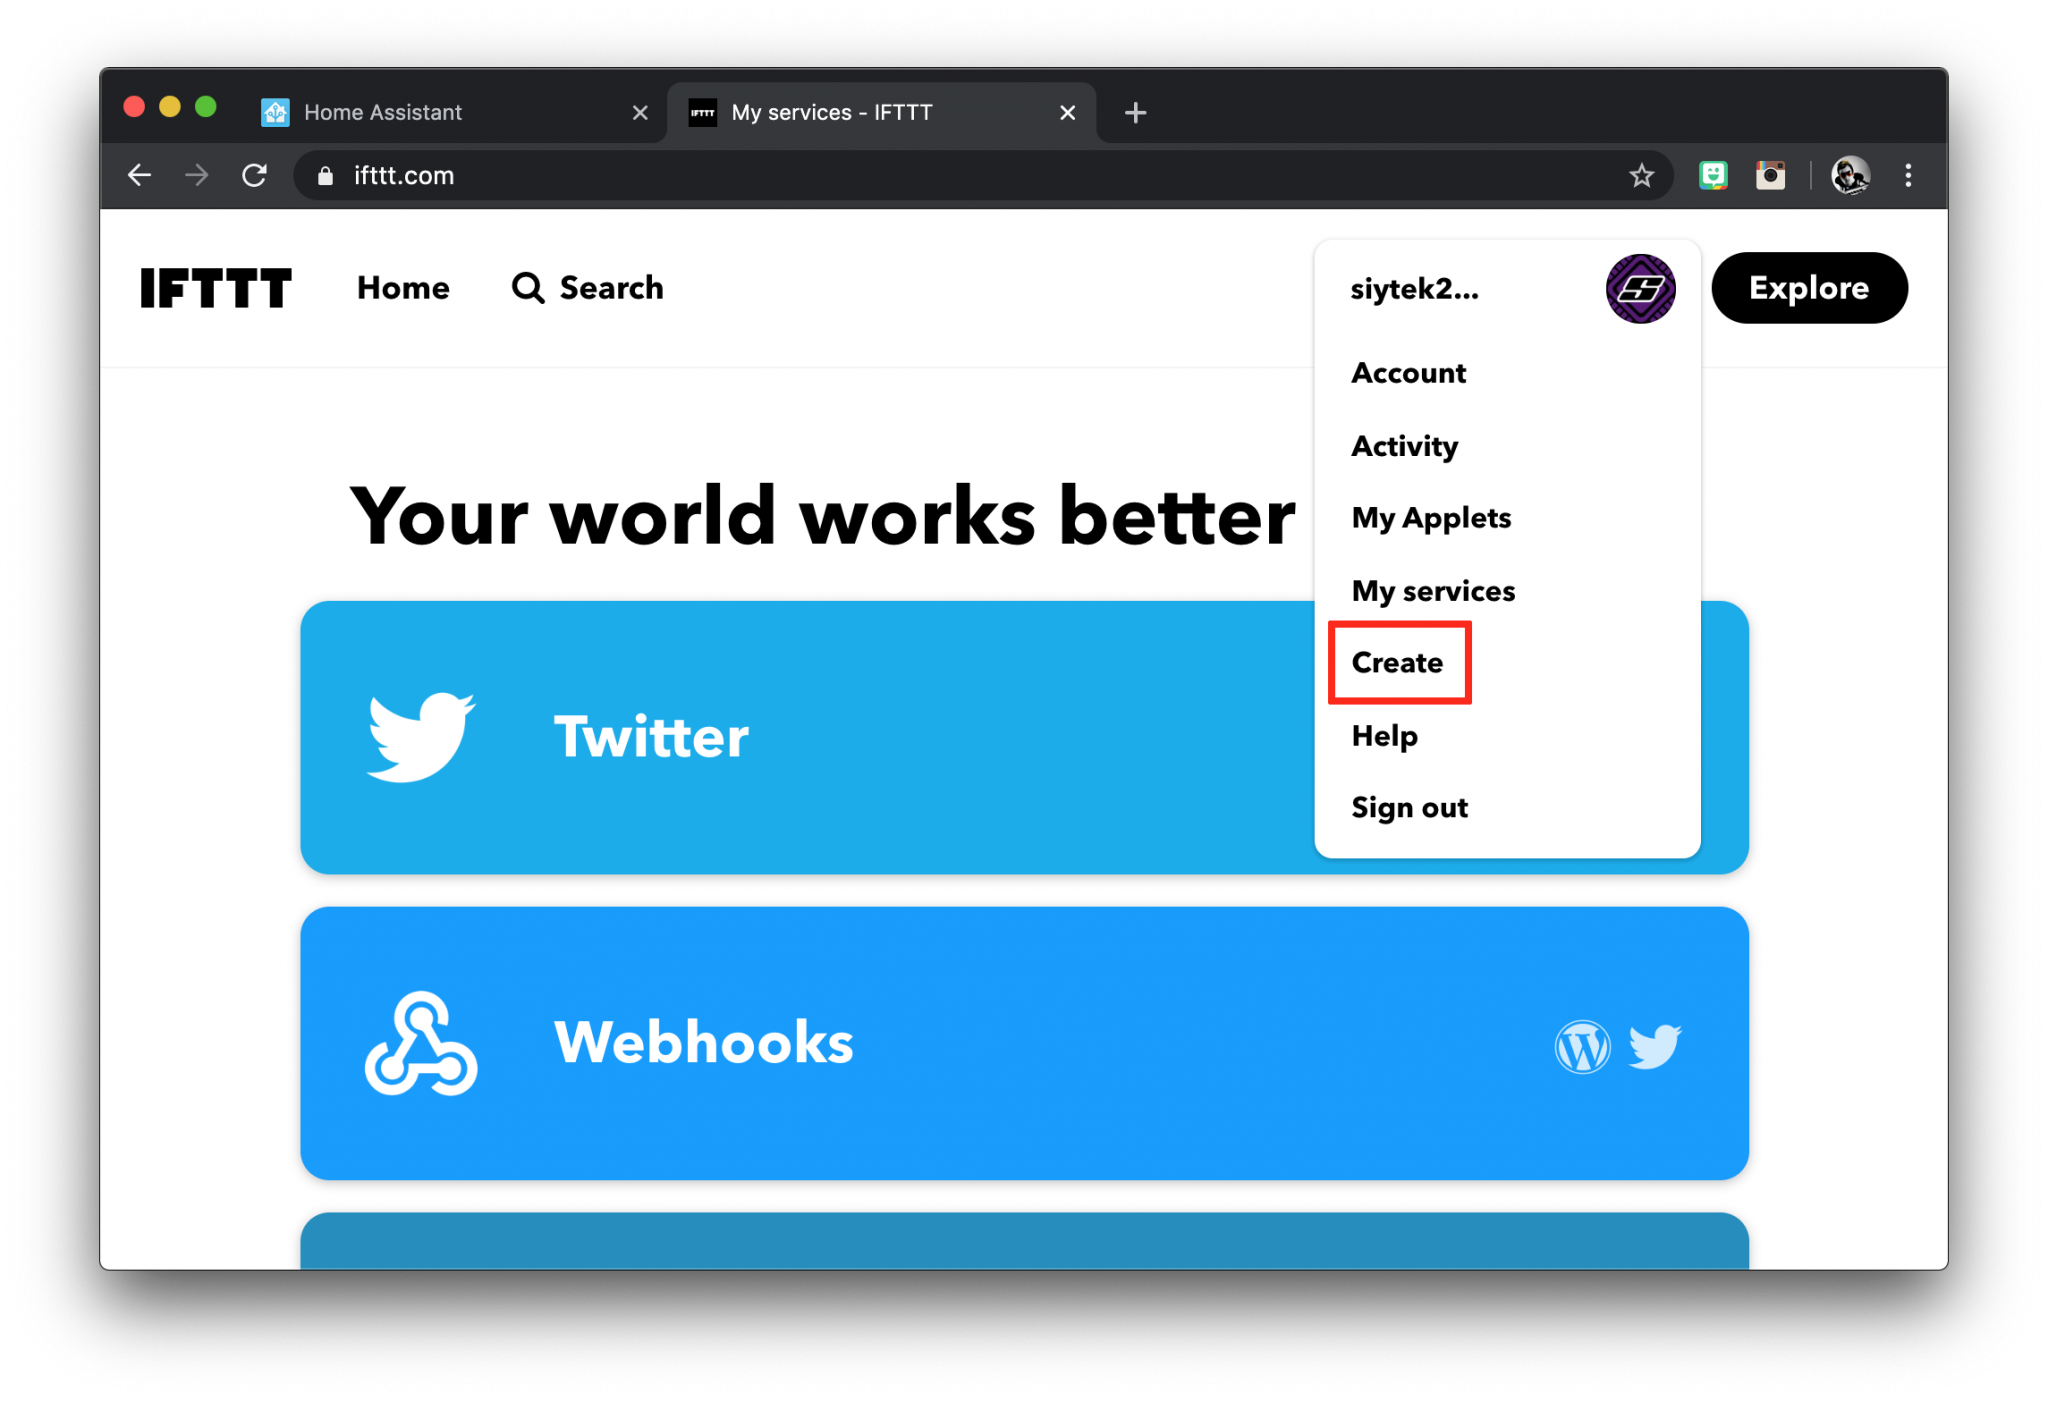
First you should go ahead and create a free account on IFTTT. Then click your avatar and select create from the menu.
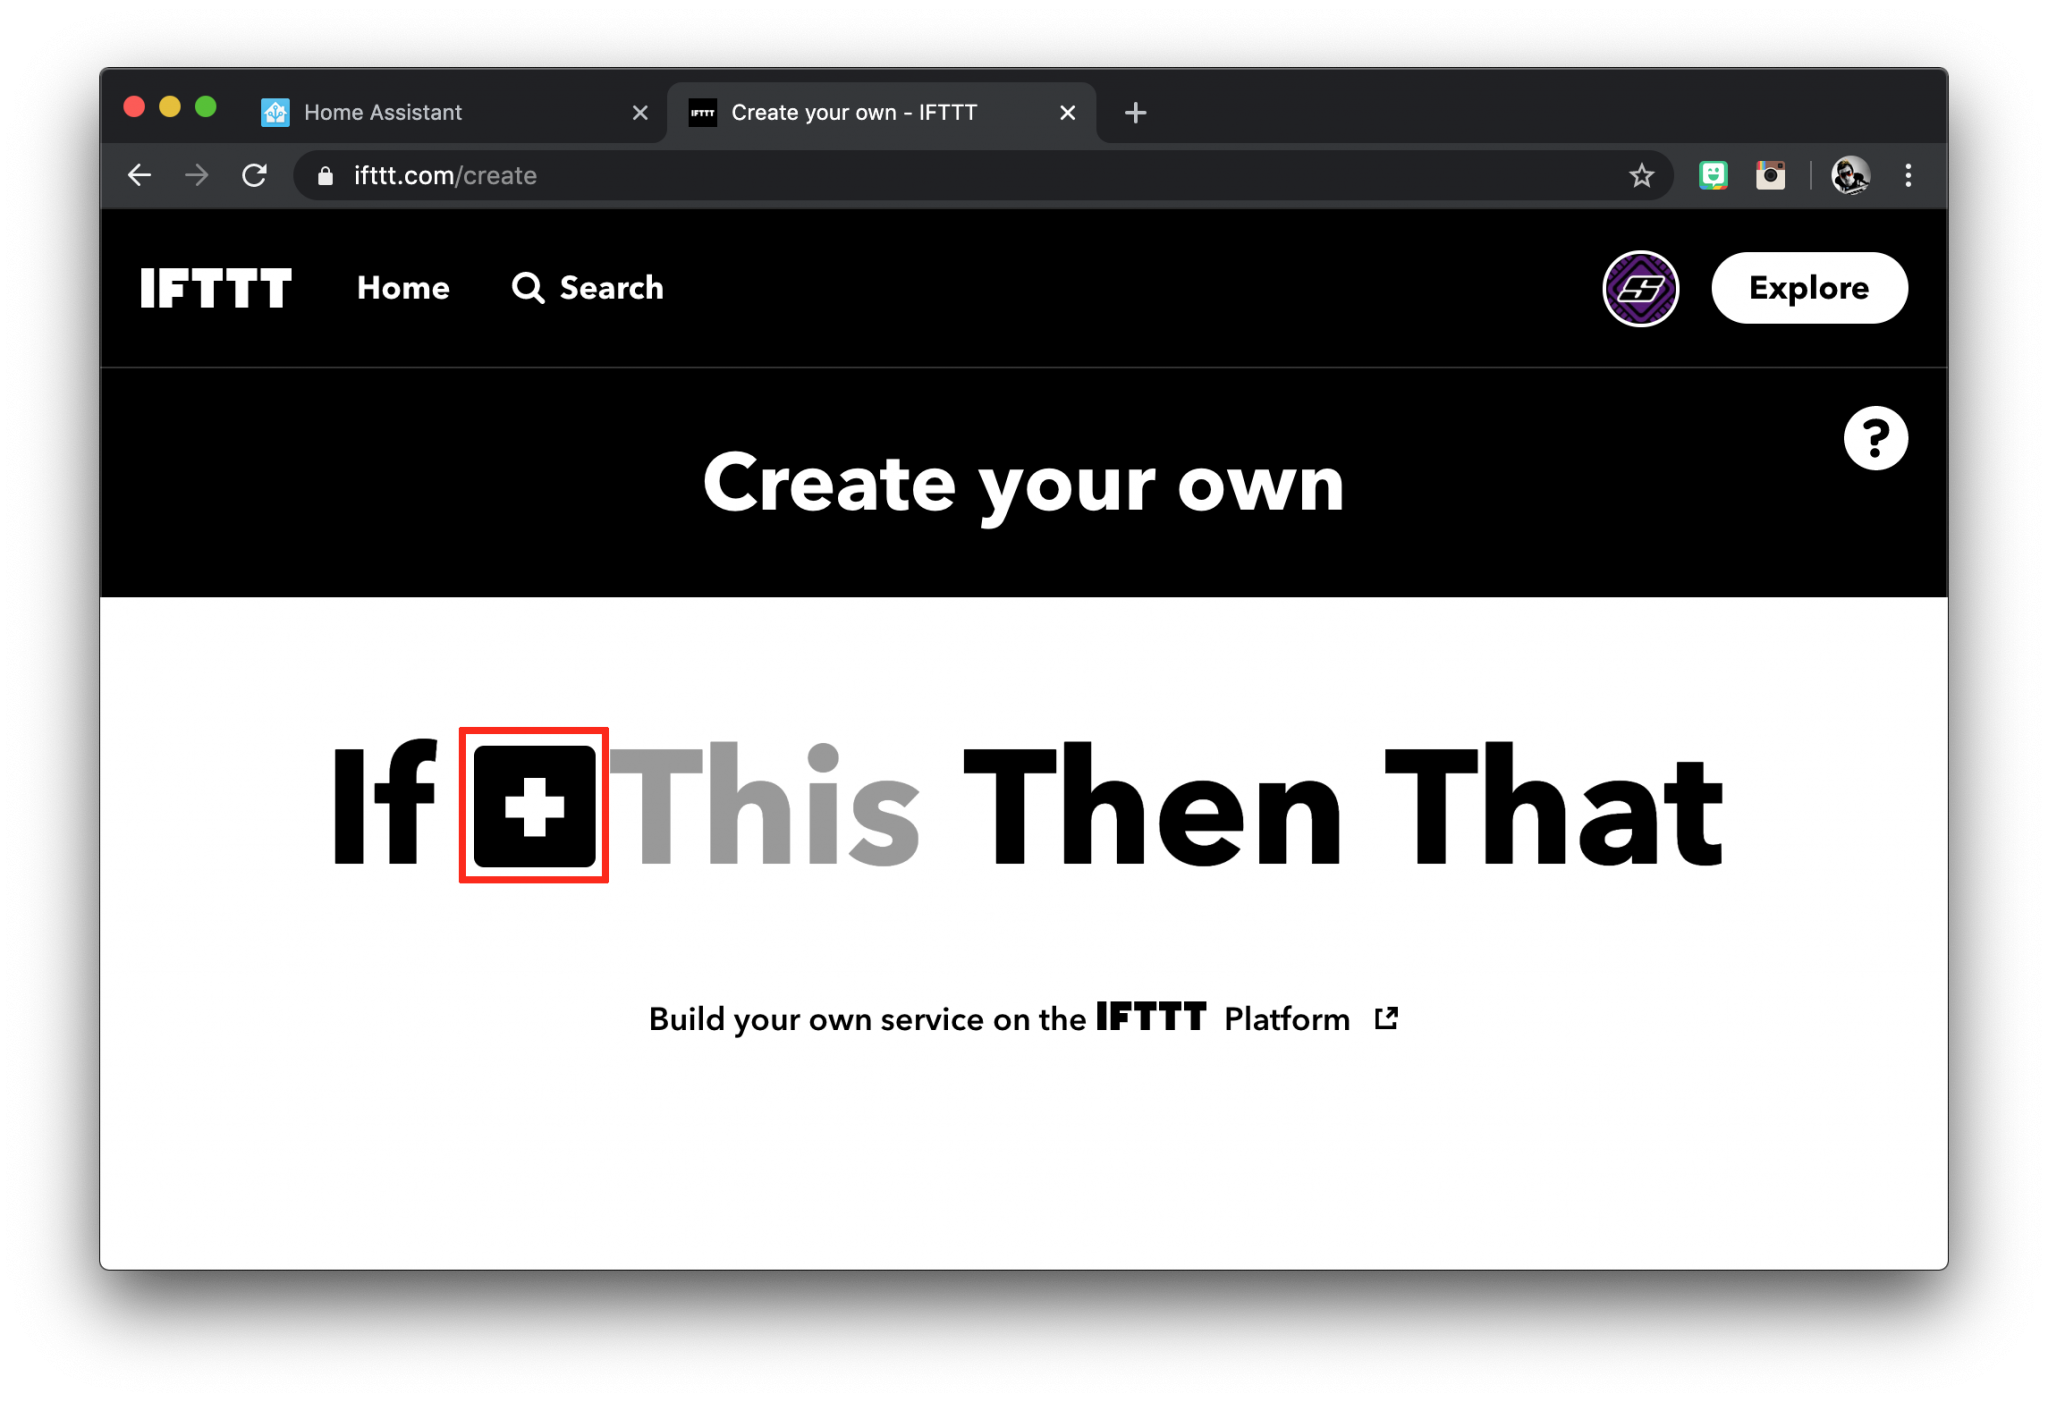
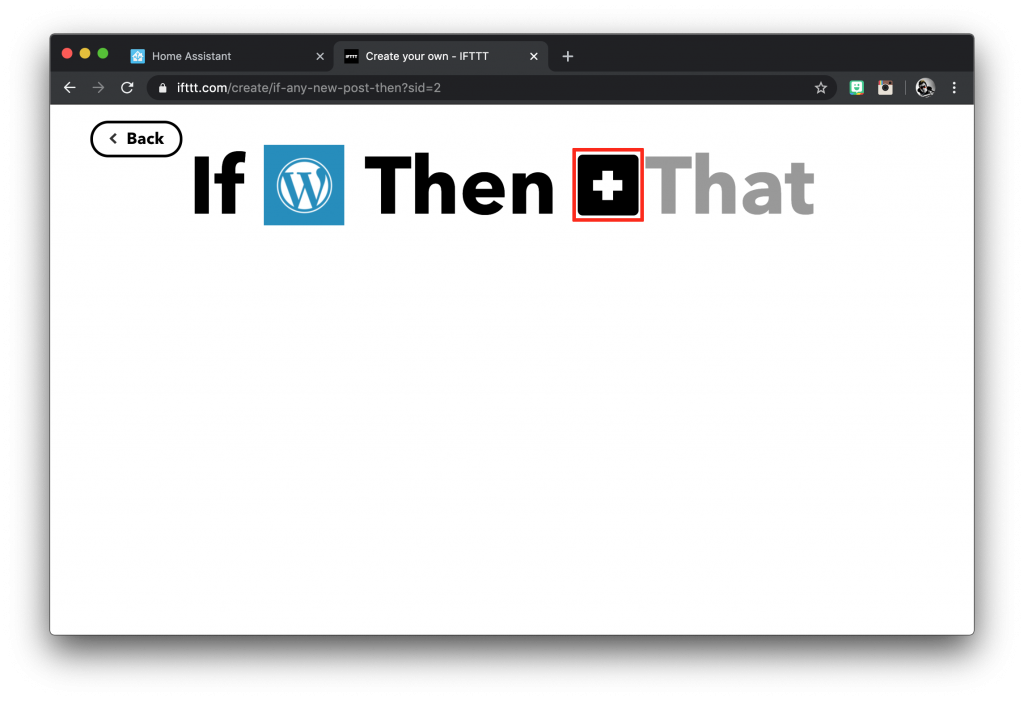
You will be presented with the If This Then That page. Click on the plus icon to add the service that will act as the event trigger.
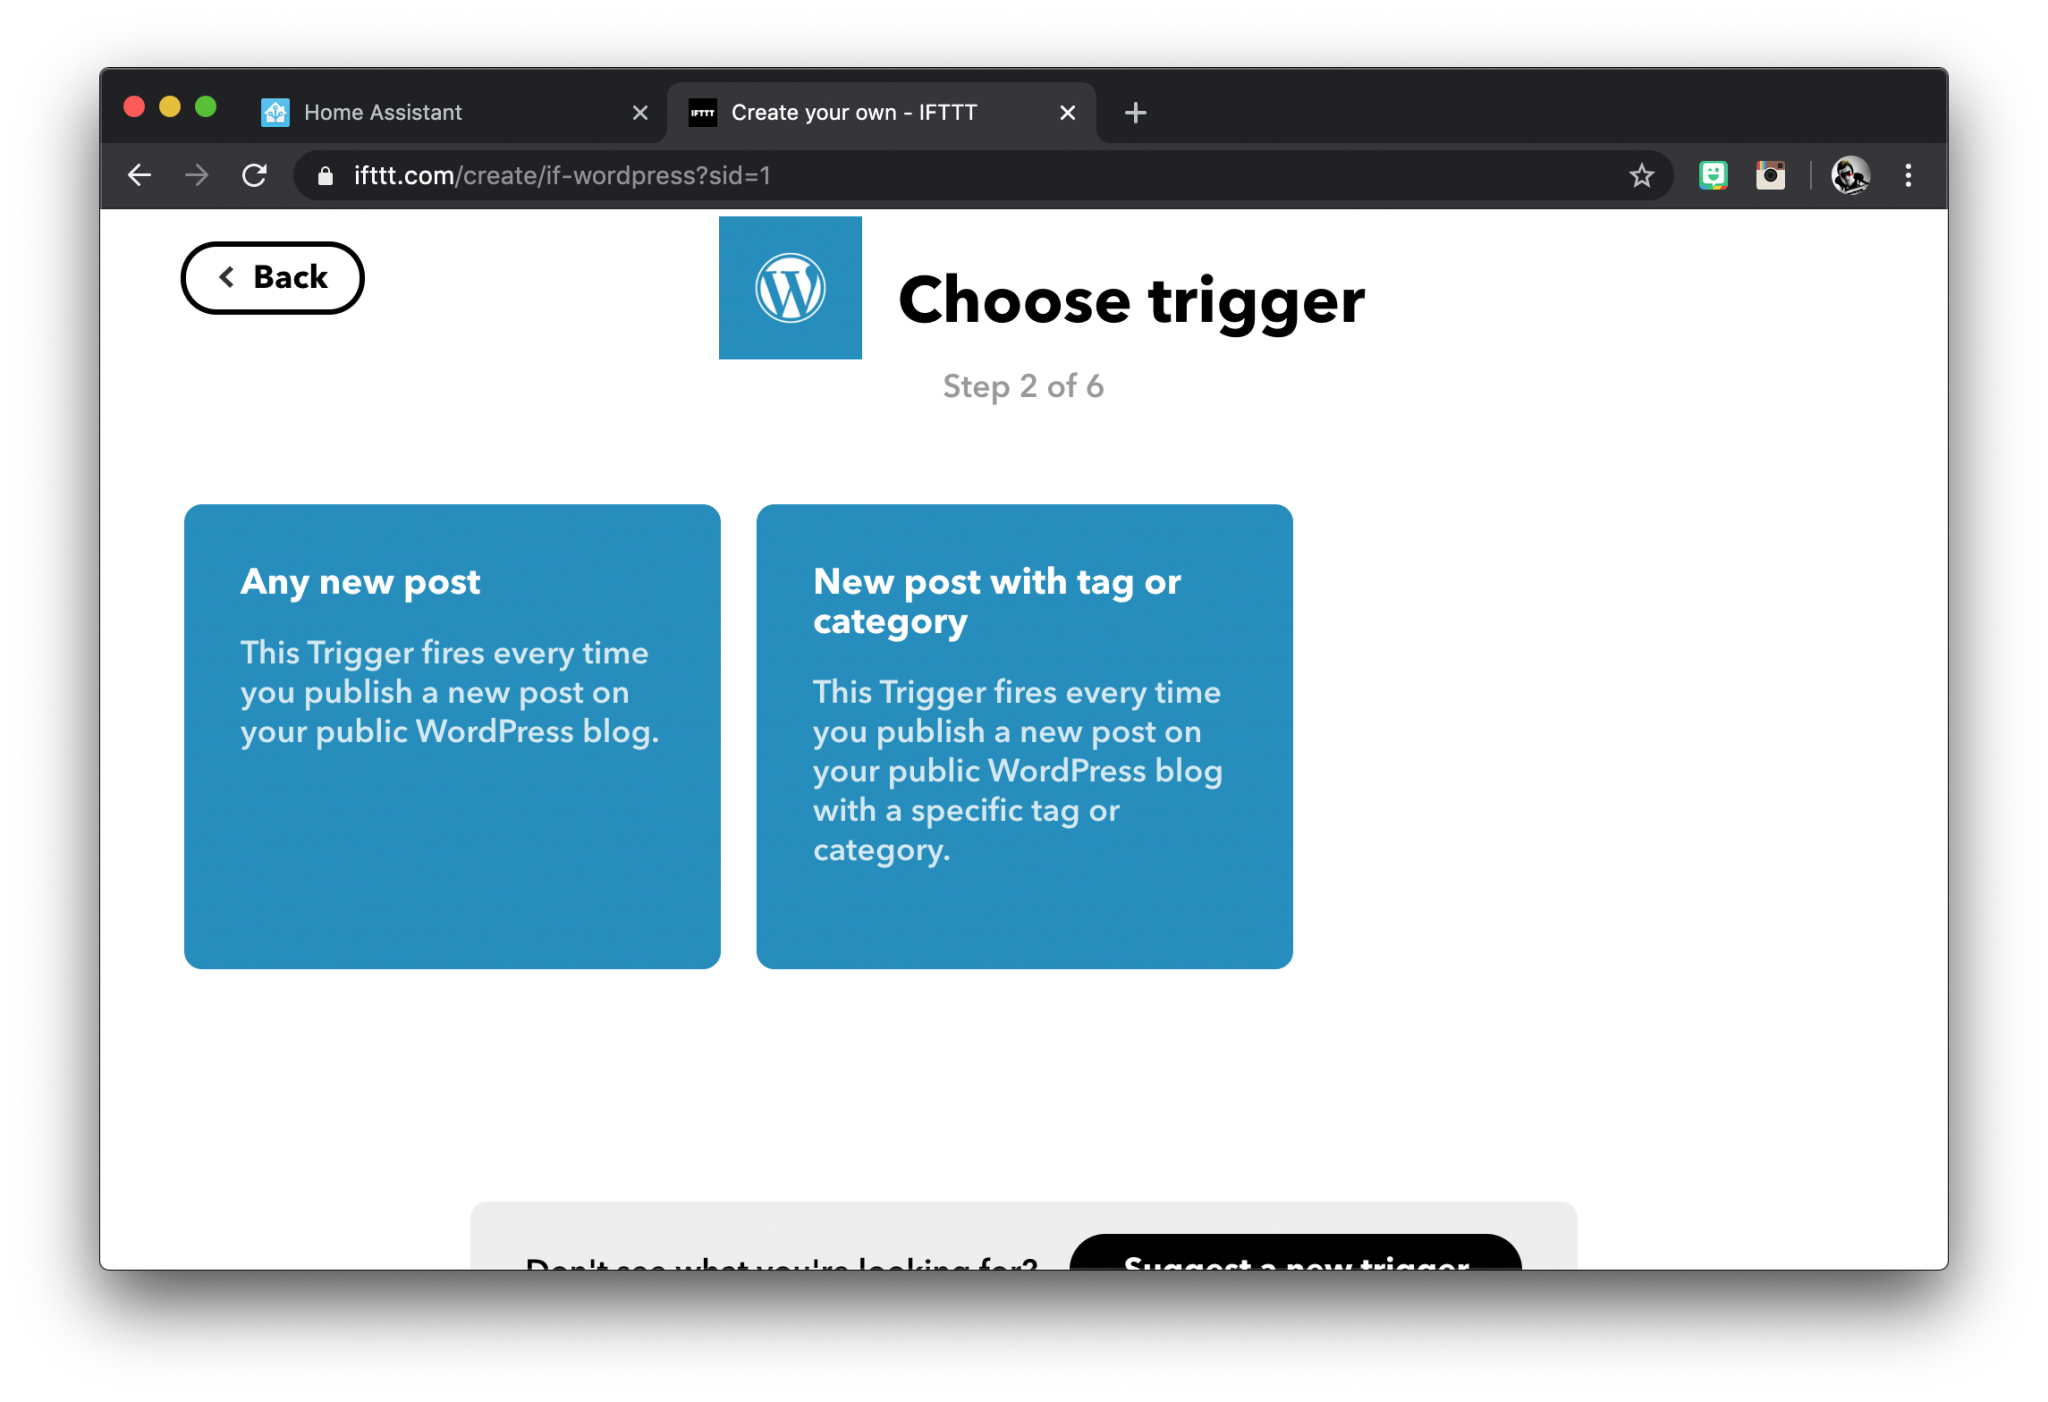
You will be given a list of services and also a search box, simply type in the name of the service you wish to use. For this example we will be using WordPress.
We want the trigger to occur when we publish any post, therefore we can go ahead and click the any new post option.
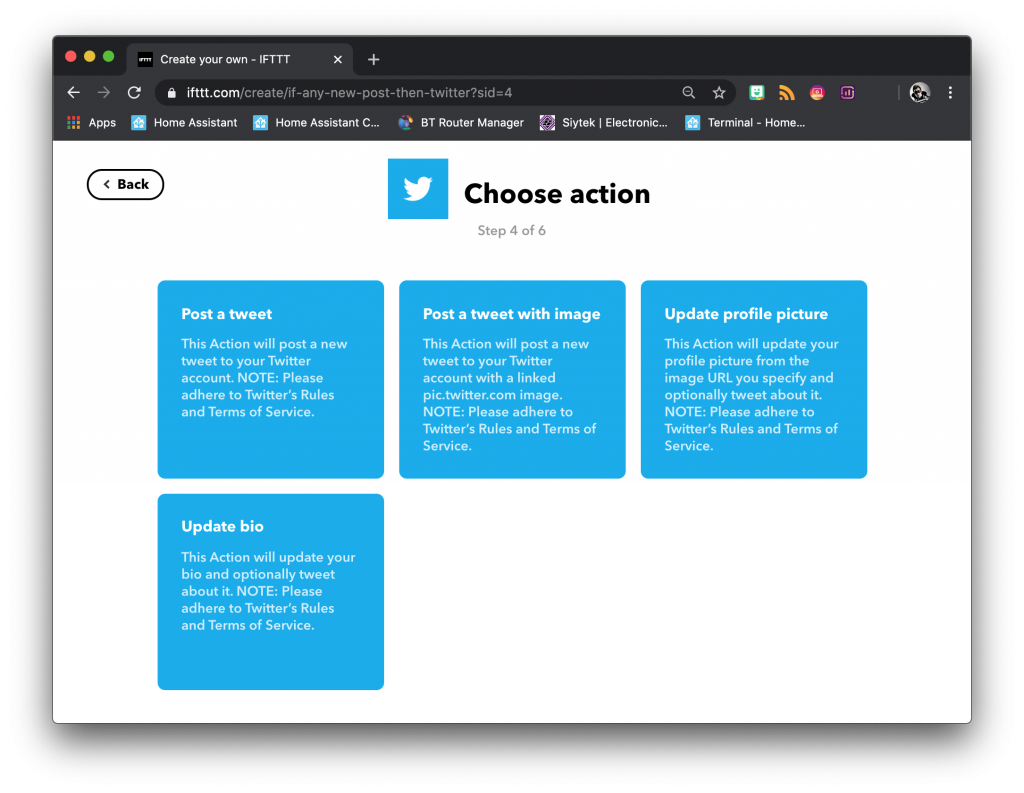
Now we can choose an option for the service we wish to use when the applet is triggered. For this example we will set up cross-posting to Twitter.
There are several options provided by Twitter, you can choose the one that you prefer.
It is also possible to choose the content that is transferred from WordPress to Twitter. In this example the featured image from the post will be used as the Tweeted image.
Tags & categories as well as the post title will be transferred as text. You can click add ingredient to change the content transferred. Once you complete the applet, your blog posts will automatically be Tweeted to your Twitter feed. Awesome!

Advanced website management
There is a whole wealth of beginner WordPress tutorials available but they generally don’t cover some more of the technical aspects of setting up a website.
The following part of the tutorial would generally be considered more advanced, however it should be relatively straightforward for someone who is planning to setup a tech-centric blog.
Setting up SSL
Setting up SSL is an important part of building a modern website as Google is placing more importance on the use of HTTPS addresses. Therefore it is necessary to configure SSL.
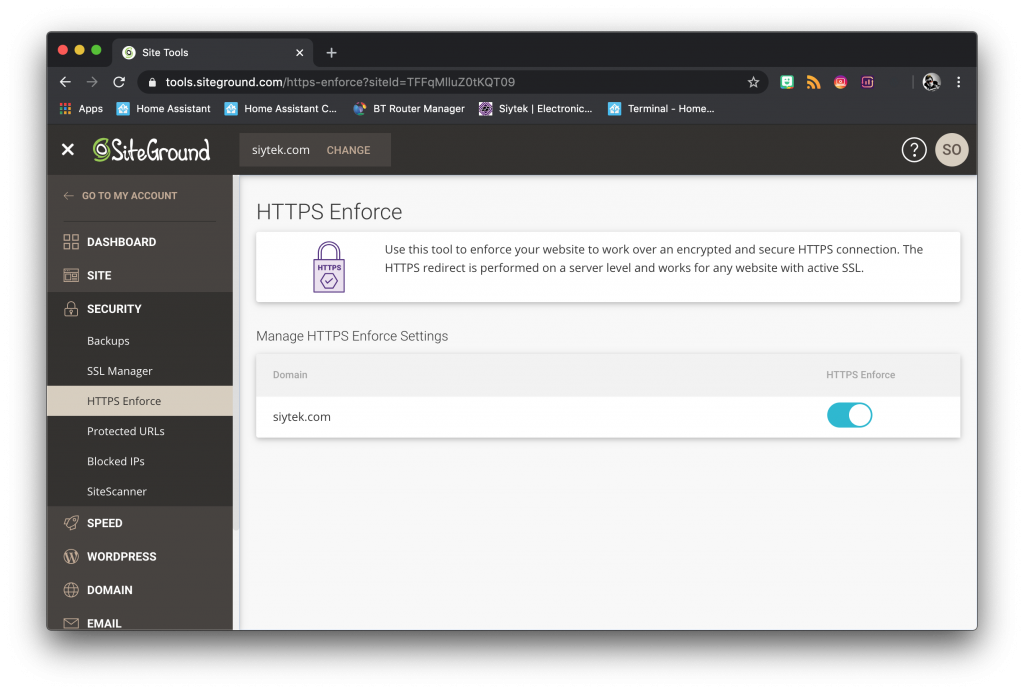
From your Siteground dashboard under Security > SSL Manager you should find an SSL certificate already activated on your website. Go ahead and click the three dots to open the menu and select Enforce HTTPS.
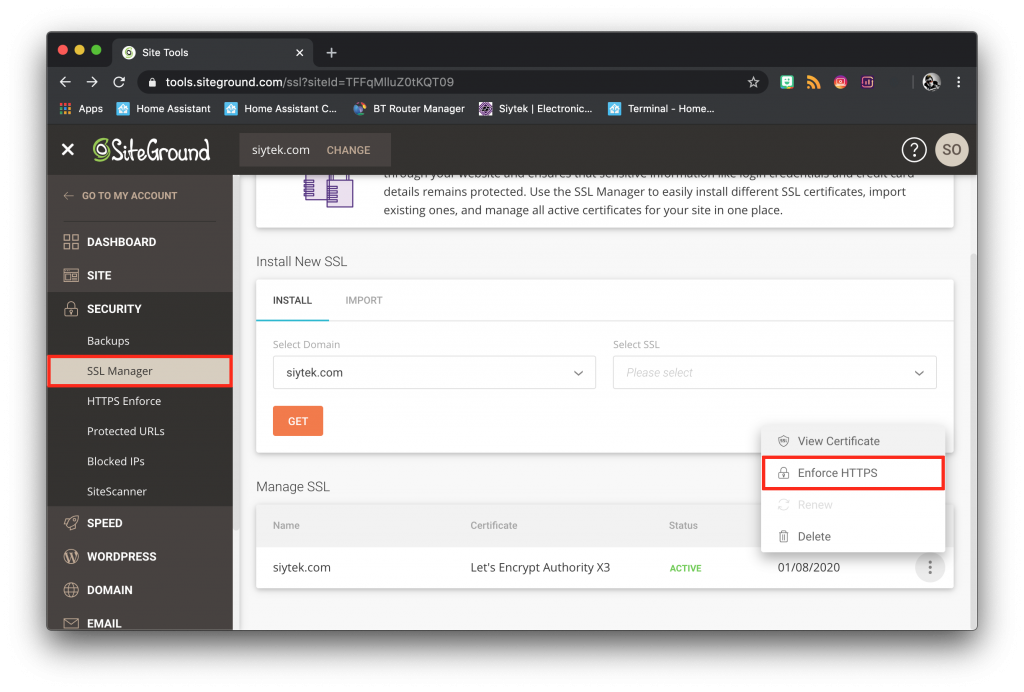
This will take you to a page where you can turn on the enforce HTTPS feature. Activating this will redirect all HTTP traffic to the HTTPS version of the domain. It is also recommended to use the HTTPS version of your domain when linking to your site.
Manage files with FTP
At times it can be very handy to be able to access your site file structure directly. This can be useful if you wish to make small edits to particular files, edit your site with a code editor like Atom or upload files to host as downloads.
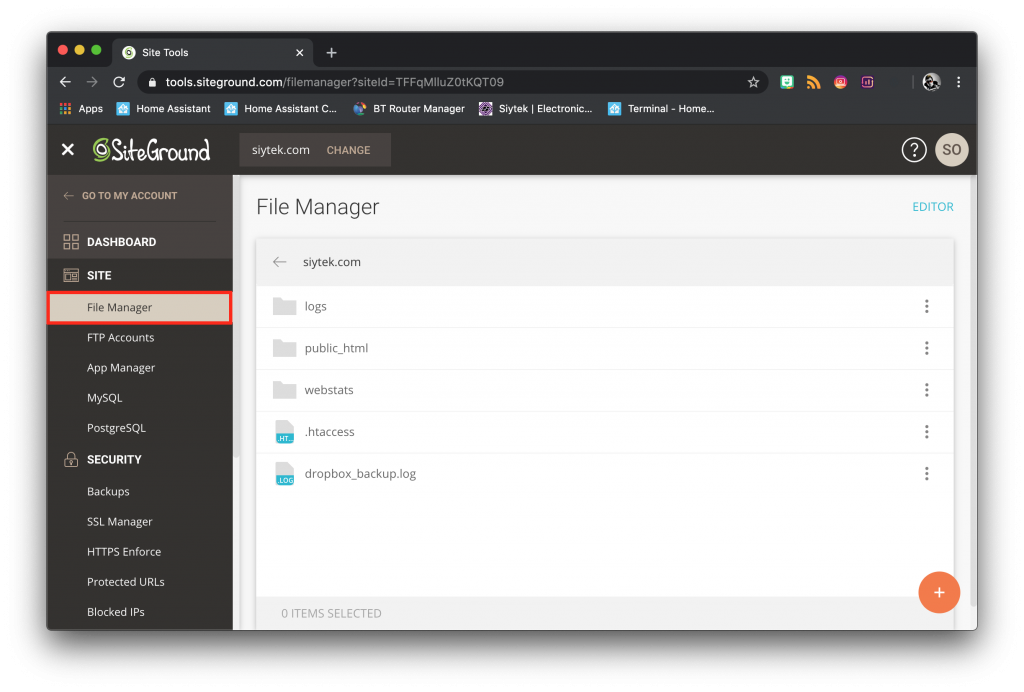
There are two ways that you can access your file structure. Firstly there is a file manager accessible from your Siteground dashboard. It can be found by clicking Site > File Manager from the sidebar menu.
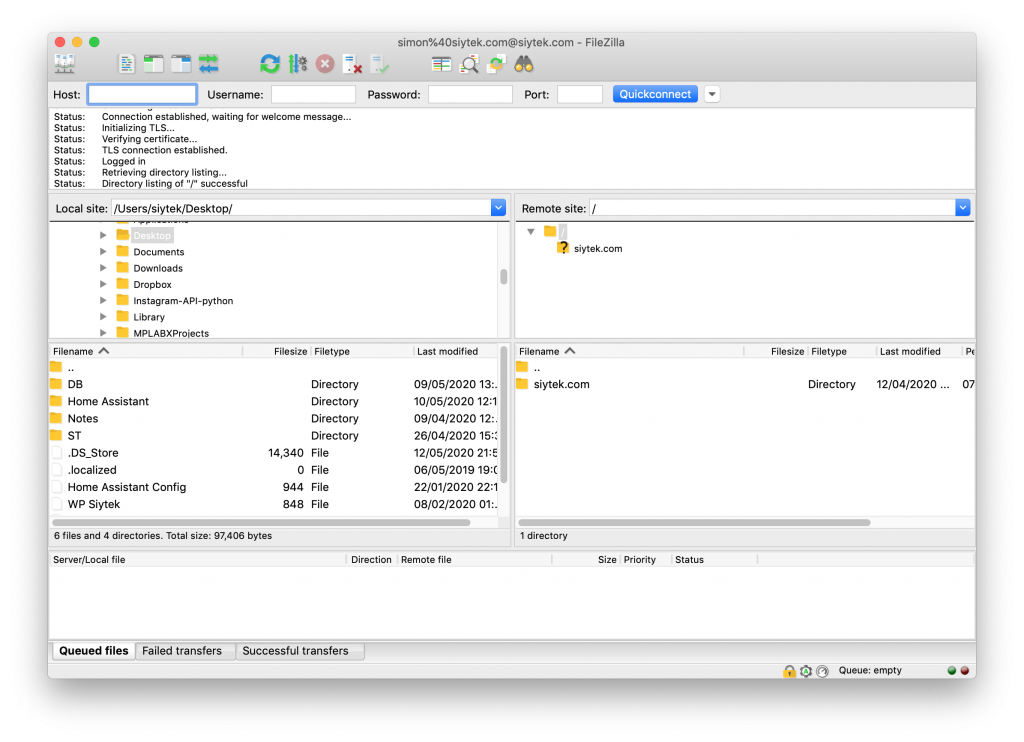
You can also access your files using an external FTP account with a program like FileZilla or LFTP from the Linux terminal. This is particularly useful for uploading and downloading files to your server.
In order to use an external FTP program you first need to setup the credentials. You can create a new FTP account by clicking Site > FTP Accounts on the sidebar menu.
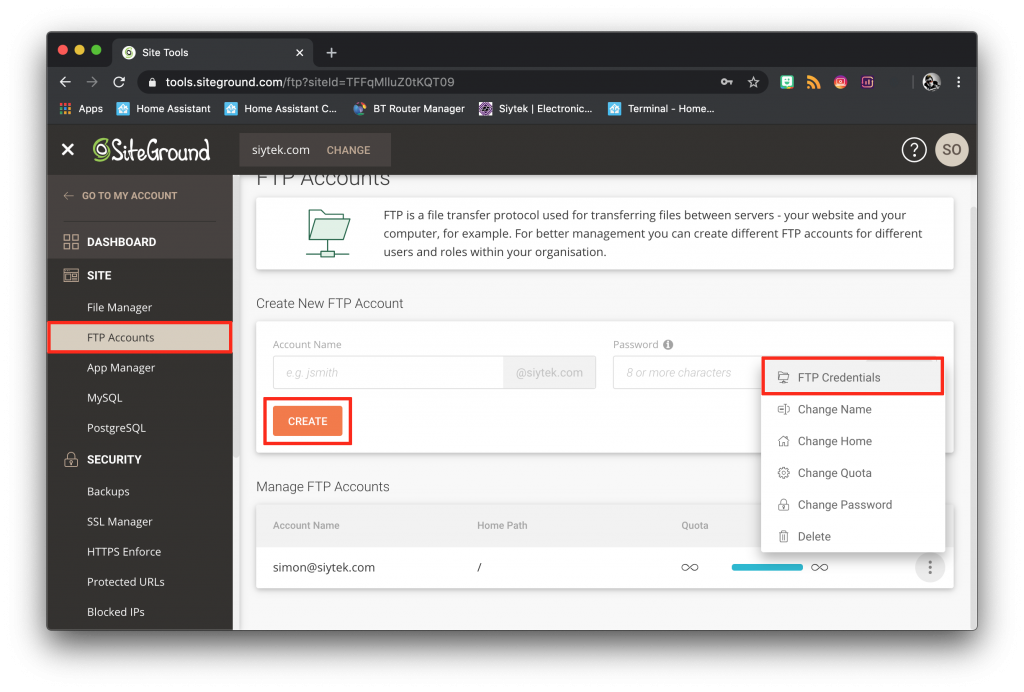
Once you have added an account, click the three dots and select FTP credentials from the menu. This will give you a pop-up with the necessary FTP information for logging into your site.
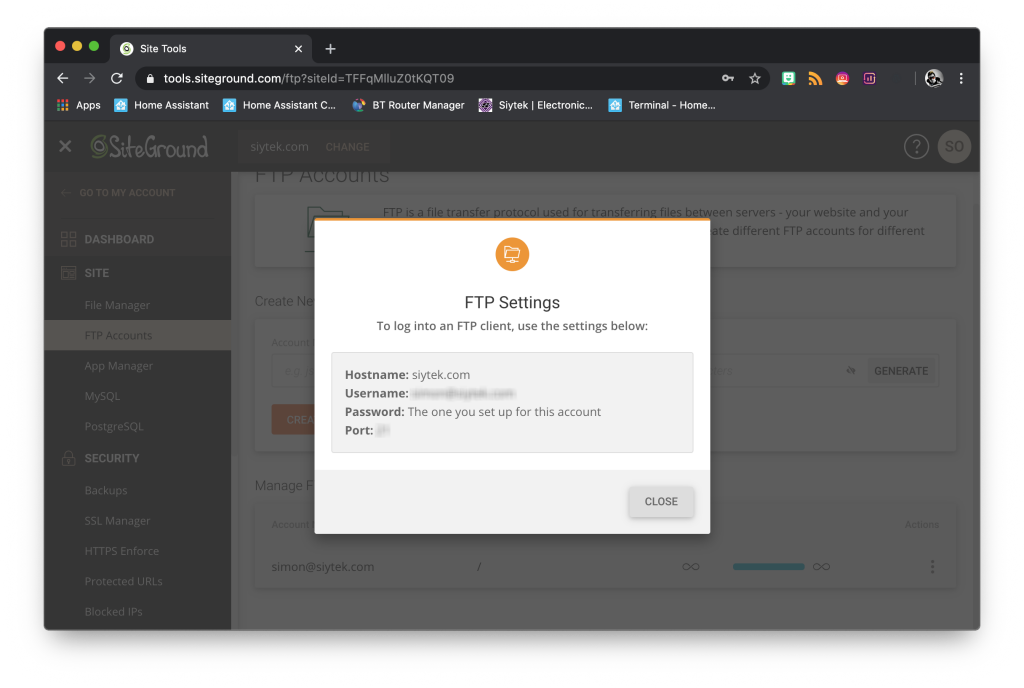
Once these details are entered into the FTP client, you can manually upload and download to any location within your website file structure. FileZilla is a great FTP client, it is Mac compatible too and it’s totally free!
Access your site with SSH
Another way to access the file structure of your website is to connect to the Linux backend using a terminal program. This not only gives you access to the file structure but also to the Linux prompt, where you can perform tasks such as running scripts and other automations.
In order to connect to your web server backend, you will need to use a terminal program. Mac/Linux users can use the terminal built into the operating system. Windows 10 users now also have access to a built in SSH terminal. Users of other Windows operating systems can use a third party terminal program such as PuTTY.
Getting an SSH key
The first thing we need to is look at the instructions for accessing SSH provided by the web hosting company. Siteground require us to create a new private key and copy it to our local machine. A new key can be created with the key manager tool found in the members area. Click devs > SSH Key Manager from the dashboard sidebar menu.
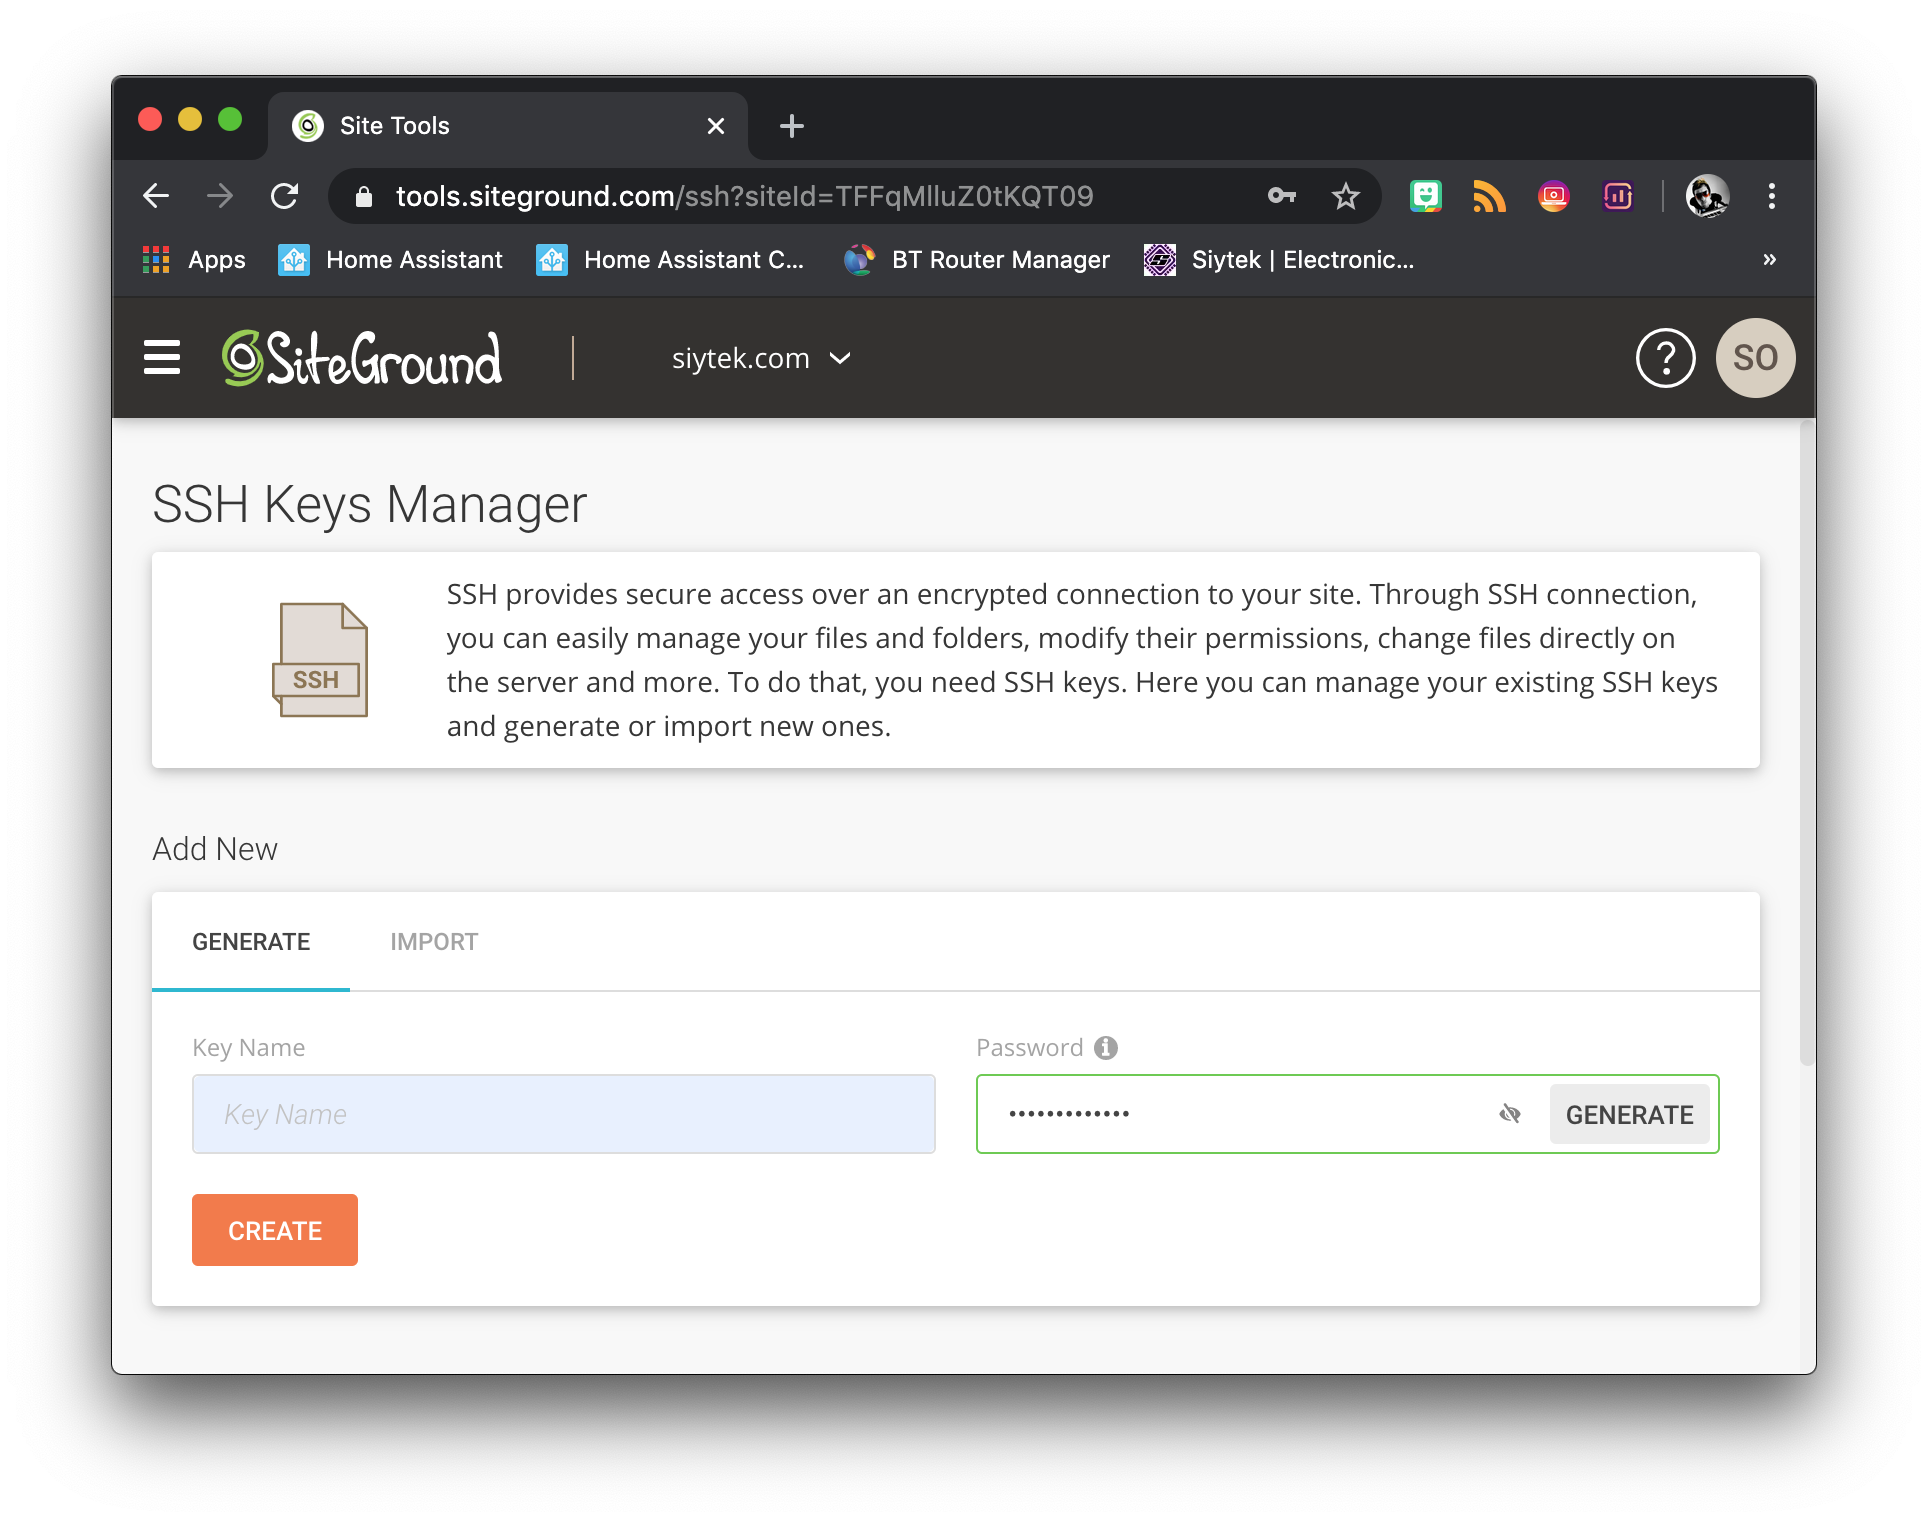
We can create a new key specifically for Home Assistant to gain access to the website backend. We will name this key “Home Assistant” to differentiate it from SSH access from the main system terminal. Once the key is created we can go ahead and copy it to the clipboard.
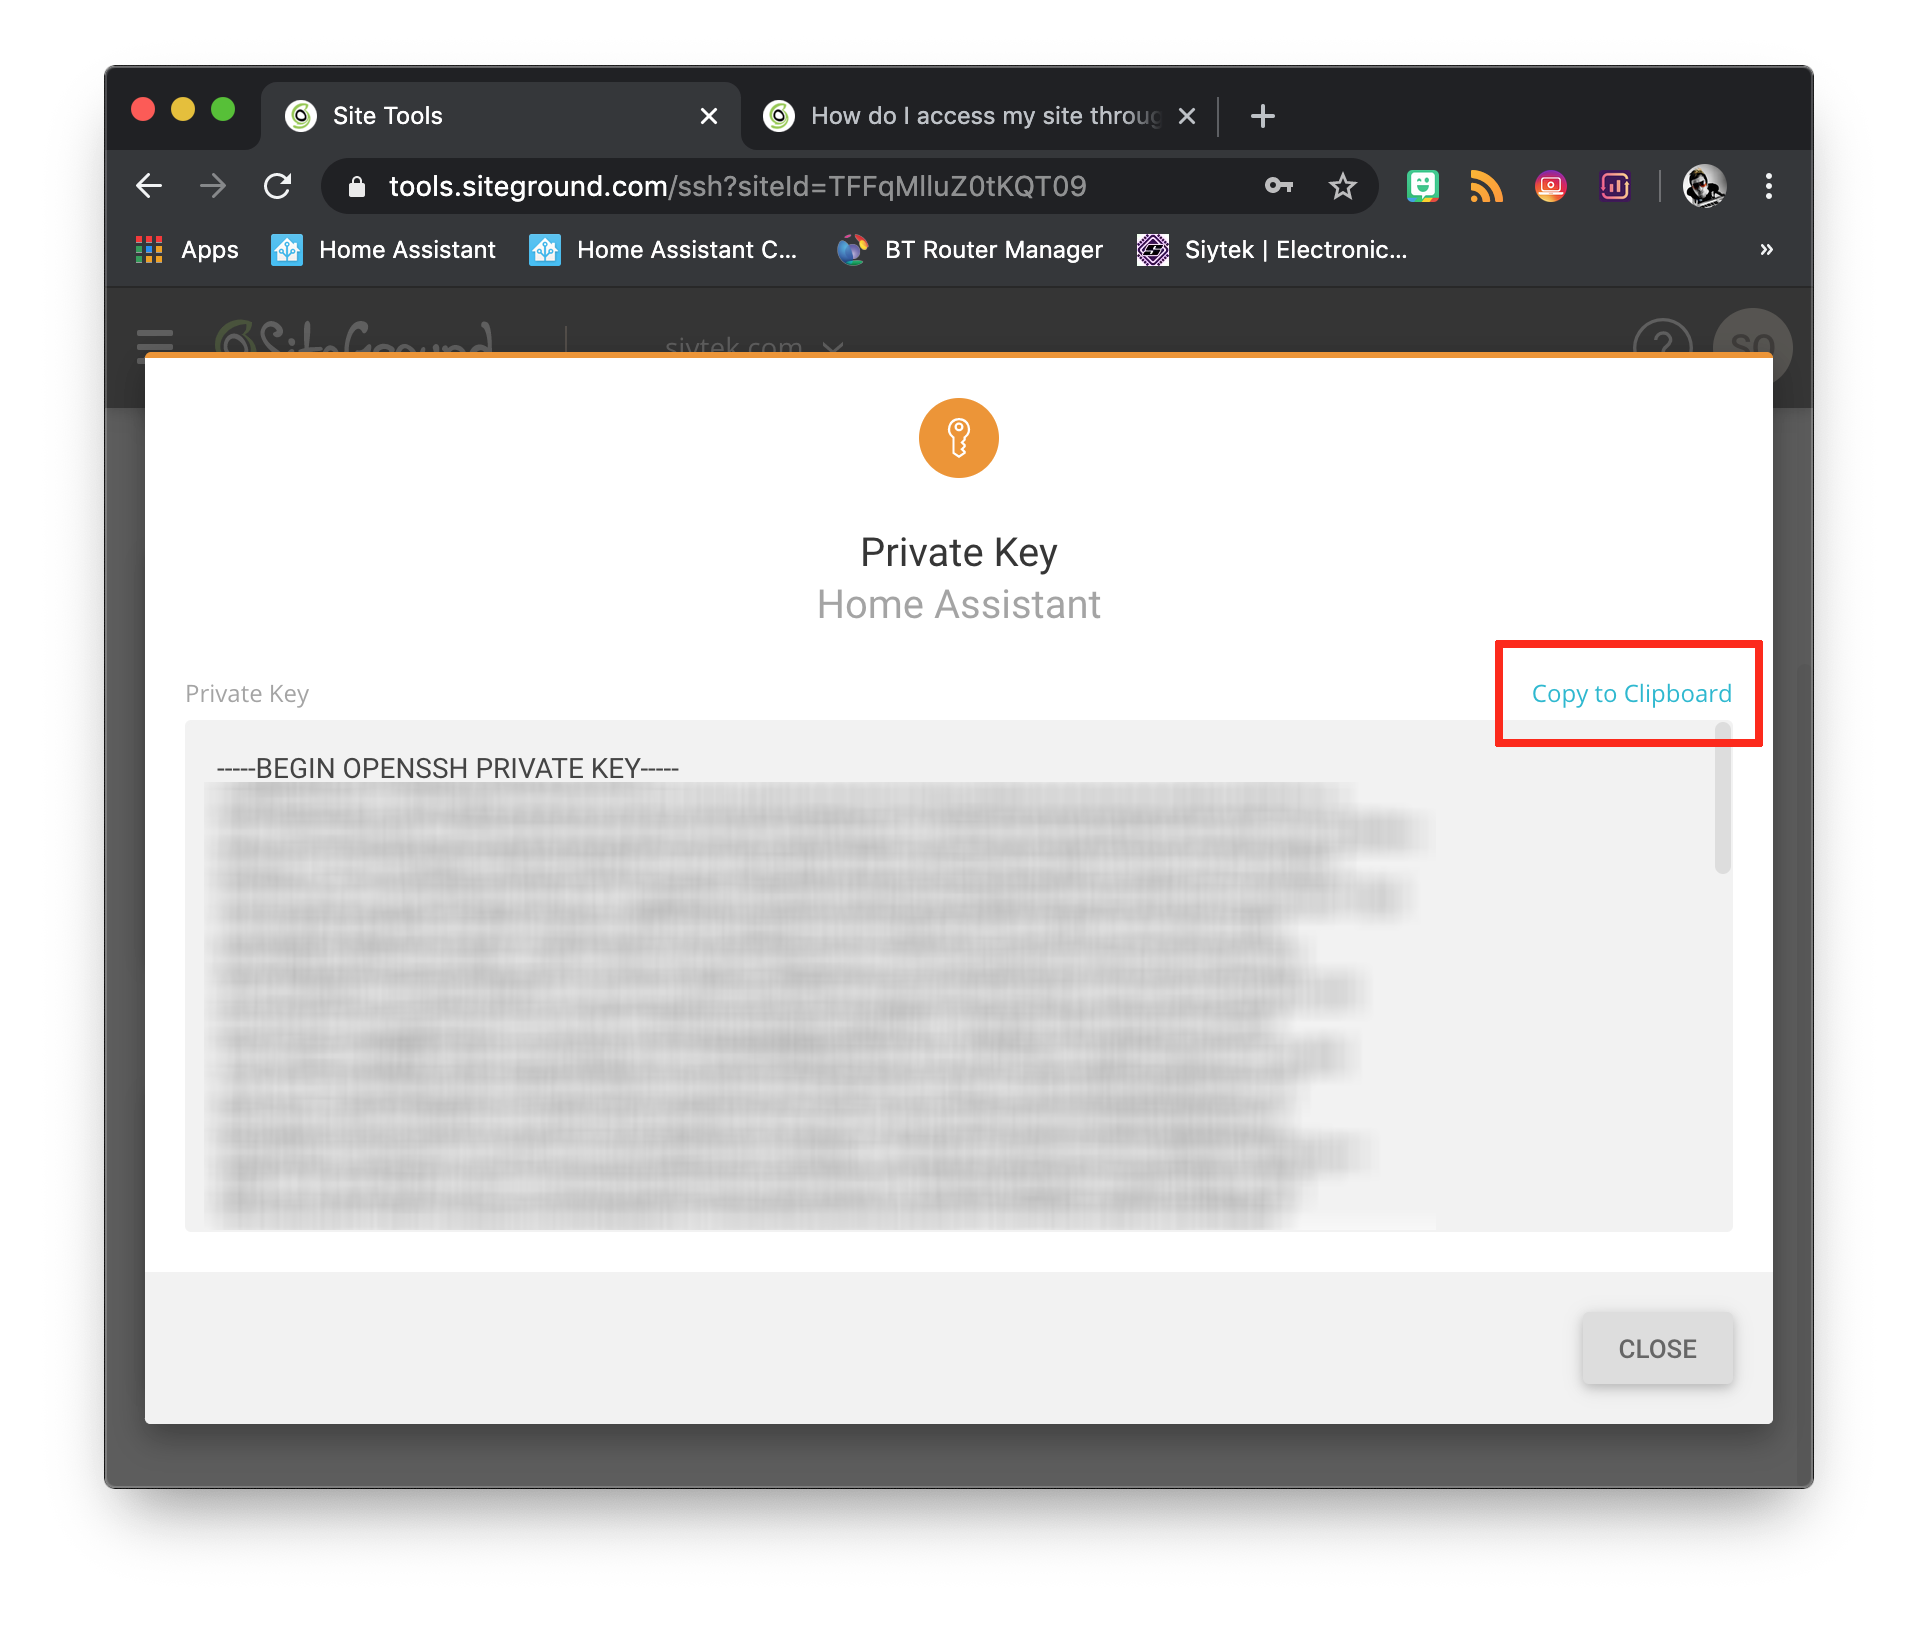
Next we need to create a new blank plain text file called website_key.txt with a text editor. It is important that this file is saved in plain text format. Copy and paste the key into the text file and then save it.
Adding the key to your host system
Now that we have the key saved in a text file, we can add it to the host system. Go ahead and open your terminal program and navigate to the directory where your key text file is stored.
If you are using a Mac or Linux host, you will need to give the key file the correct permissions.
chmod 600 /config/website_key.txt
If you are using PuTTY, you can open the key file by clicking load and then opening the key file.
If you are using the terminal, you must first ensure that the SSH agent is running by entering the following command.
eval "$(ssh-agent -s)"
The command should echo the PID of the SSH agent. Now we can go ahead and add the key to the host.
ssh-add /config/website_key.txt
Now you should have access to your website backend via SSH. You can log in to your website backend either by creating a new connection in PuTTY or by entering the following command.
<username>@<yoursite.com> -p <port>
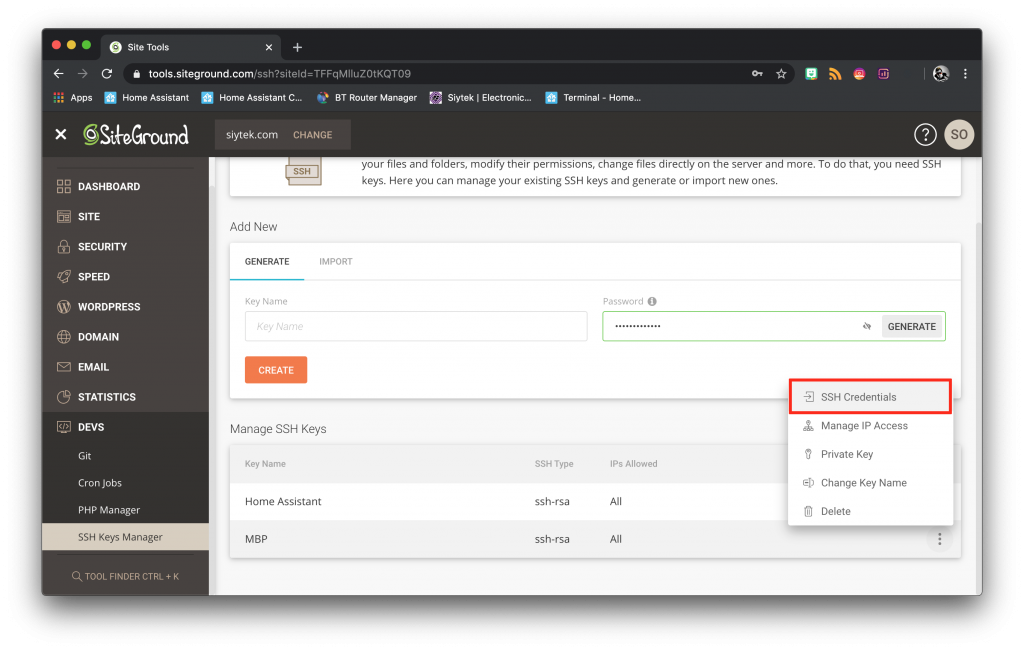
You can access the credentials for for the key that you generated by clicking the three dots and choosing SSH Credentials.
Running server scripts
So now that we have access to the website backend, what can we use it for? Firstly, you can use standard terminal commands to manipulate files as necessary. This gives you mostly all of the power of Linux, but remotely. Awesome!
I have several articles of further reading that relate to Linux and may be of interest with regards to what can be done with the web server backend. Once you grasp the basics of BASH scripting, a whole host of automation options becomes available to the tech-centric webmaster!
- How To Write A Bash Script With Arguments – BASH scripts can be used to automate tasks on your web server, such as backups and automatic updates. Learn how to make BASH scripts with this beginner tutorial.
- How To Store Values In An Array Using Bash Shell Script – further reading for creating BASH scripts.
- Home Assistant For Webmasters: Managed Dropbox Backups – in this tutorial you will learn how to integrate your website backend with your Home Automation setup. Add a control panel to manage automated backups of your website to Dropbox.
- Raspberry Pi WordPress With MariaDB – learn how to build a localised Raspberry Pi web server. Use your website backend to automatically mirror your site to your Pi for offline editing and testing new code.
Conclusion
Congratulations on setting up your website! This article has covered the many of the basics to get you started with your own site, including some of my own personal tech-centric tips that I picked up during my own journey to becoming a webmaster.
Setting up your own website can be a very rewarding experience. My final tip would be to not get too entangled with the details of SEO and really focus on producing great content. I assure you from first-hand experience that Google will reward you for this! Go ahead and drop me a comment with your new domain name in the comments, it would be great to see your new site!
Thanks so much for visiting my site! If this article helped you achieve your goal and you want to say thanks, you can now support my work by buying me a coffee. I promise I won't spend it on beer instead... 😏