
Want to know why the ESP8266 is such a raging success in the maker and IoT enthusiast domain?
The ESP8266 is made by fabless semiconductor company Espressif and it contains fully featured WiFi capability that has been made easily accessible by a number of platforms.
When I say easily accessible, I mean really easy to program!
You may have already known that Arduino, the OG of the maker community, can be used directly to program the ESP8266.
However Arduino is certainly not the only choice.
MicroPython offers an equally as powerful alternative, great for those who want to learn or already have experience with Python.
The ESP8266 has manage to combine powerful WiFi hardware with the most popular maker platforms in one tiny package.
This is the tutorial that you have been waiting for!
In this tutorial we are going to learn how to harness the power of WiFi using MicroPython and at the end we will learn how to program a simple web server application.
Table of Contents
- Prerequisite
- How To Setup WiFi Networking in MicroPython
- Connecting to Network Sockets with MicroPython
- How to Program a Simple Web Server a MicroPython
- Whats Next?
Prerequisite
This tutorial is part of a series of tutorials and therefore assumes you are already up and running with MicroPython.
This means that you should have a compatible board with the MicroPython firmware already installed. You should also have access to the REPL prompt.
If none of that makes any sense, don’t worry!
All you need to do is first visit the tutorial that explains how to setup MicroPython and use the REPL prompt to get up to speed.
I would also recommend using an ESP8266 compatible board such as the Wemos D1 Mini as this is what will be used in the tutorial, although any MicroPython compatible board should work just fine.
How To Setup WiFi Networking in MicroPython
The first thing to consider when connecting an ESP8266 to WiFi is whether or not we want it to operate in station mode (STA) or access point (AP) mode:
- Station Mode (STA) – the ESP8266 functions as a standard WiFi device and can connect to a WiFi network/router/access point.
- Access Point (AP) – other devices can connect to the ESP8266, it appears as a WiFi network/hotspot.
When a new instance of MicroPython is loaded on to the ESP8266 it will automatically start in AP mode.
This allows us to connect to it and access it with WebREPL out of the box.
From the REPL prompt we can then configure it to use STA mode to connect to our network/router.
How to Connect to WiFi Using MicroPython
First we will recap the code used in the previous tutorial to setup the ESP8266 in STA mode.
import network
wifi = network.WLAN(network.STA_IF)
wifi.active(True)
wifi.connect('ssid', 'password')
Lets take a closer look at this code. The first line is easy, we simply import the network module:
import network
On the next line we create a new network object called wifi and initialise in STA mode:
wifi = network.WLAN(network.STA_IF)
Next we need to activate the network object that we just created:
wifi.active(True)
Lastly we can connect to a WiFi network in STA mode simply by specifying the SSID and network password:
wifi.connect('ssid', 'password')Once the ESP8266 connects to your network, you can run the following command to check what IP address has been assigned to it:
wifi.ifconfig()
This will return the IP address, subnet mask, gateway and DNS server respectively.
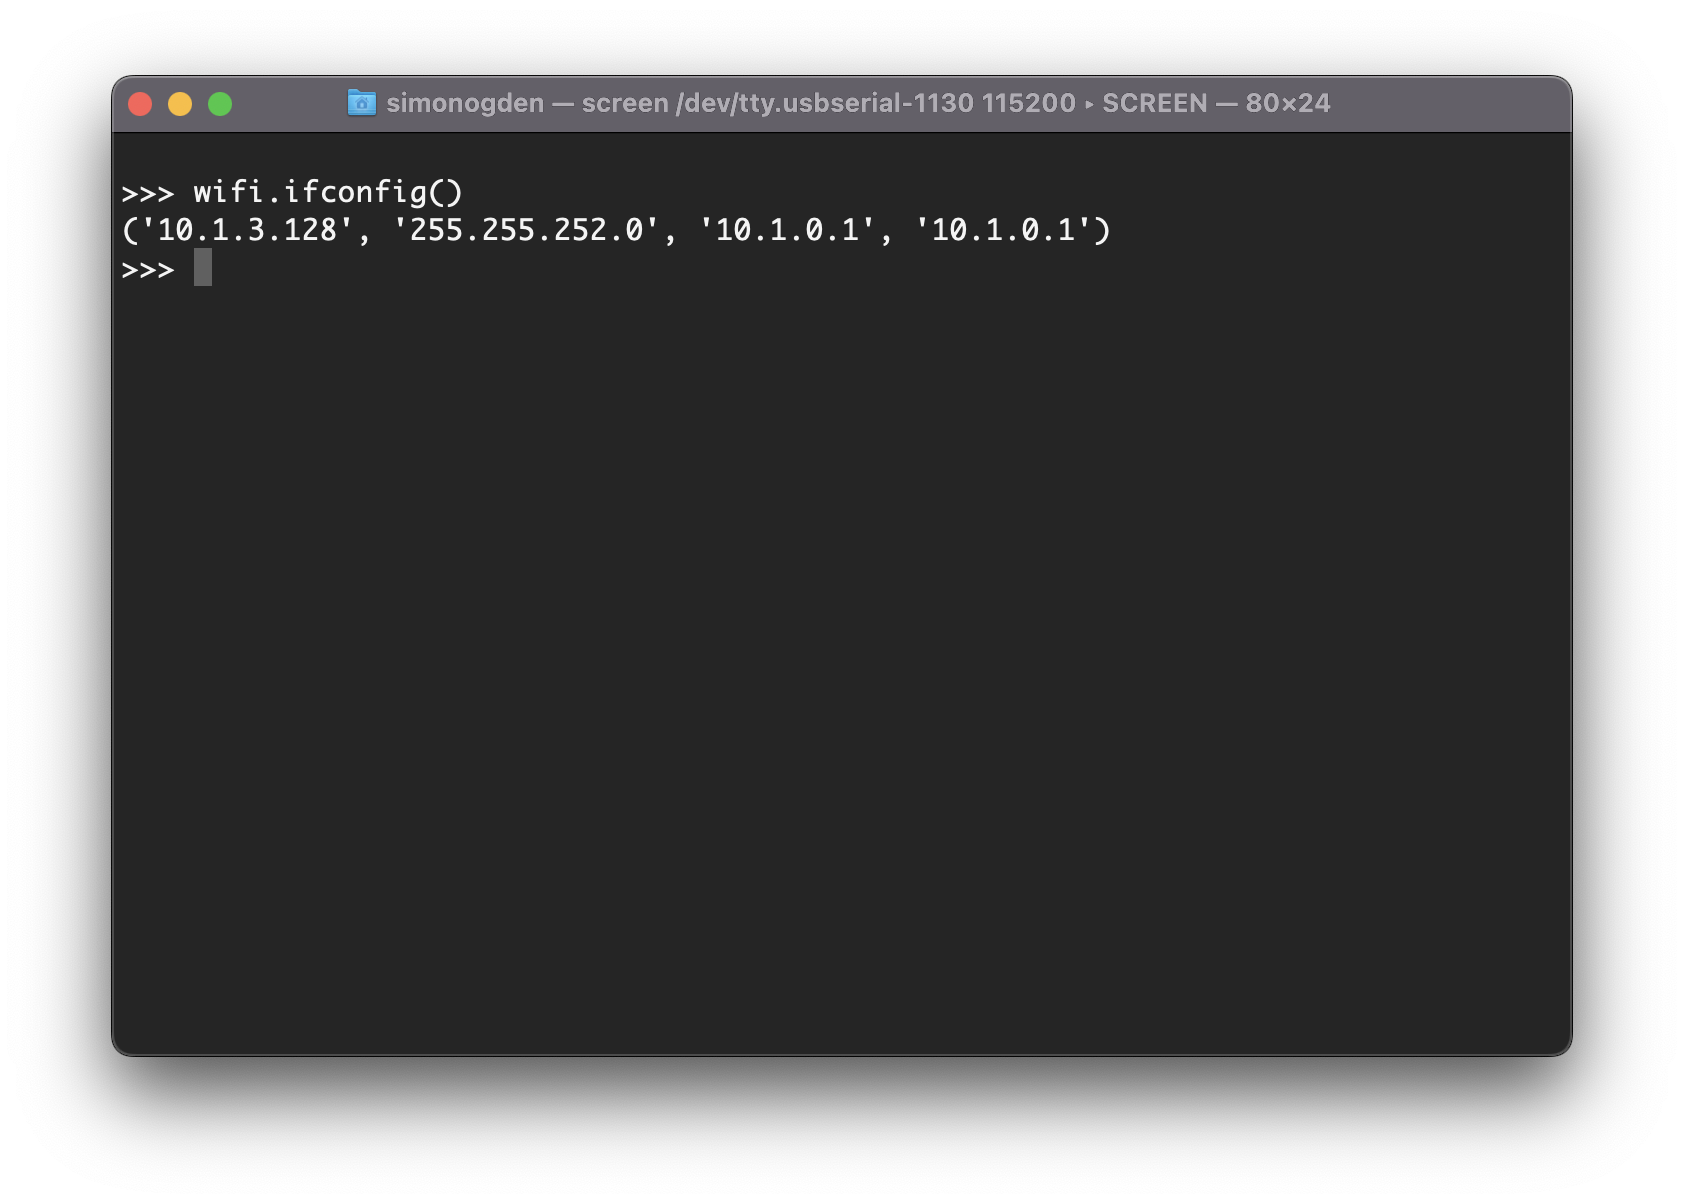
You can also use the command to set these values, should you need to change them:
wifi.ifconfig(('<IP address>' , '<subnet mask>' , '<gateway>' , '<DNS server>'))If you want to check whether or not the interface is active, you can use the following command:
sta_if.active()
This command will either return true or false depending on whether the network is active or not.
It is also possible to check if the network connection is established and ready to use:
sta_if.isconnected()
How To Setup a WiFi Access Point (AP) using MicroPython
The ESP8266 is also capable of functioning as a WiFi access point, which means it can also create a WiFi network.
Other devices can connect to this WiFi network in the same way that they connect to a WiFi router or hotspot.
This is a very powerful feature of the ESP8266!
Lets learn how to configure the ESP8266 as an access point using MicroPython. First we need to import the network module:
import network
Next we need to create a new network object and configure it as an AP.
wifi = network.WLAN(network.AP_IF)
Then we need to activate the network object:
wifi.active(True)
Once the AP is activated we can configure the name and password for our network:
wifi.config(essid='ssid', password='password')
This will be the SSID and password required by the clients wishing to connect to the ESP8266 AP.
The complete code in this example is as follows:
import network
wifi = network.WLAN(network.AP_IF)
wifi.active(True)
wifi.config(essid='ssid', password='password')
Connecting to Network Sockets with MicroPython
Now that we have learned how to connect the ESP8266 to WiFi, we can take a look at doing something useful with it!
We will be using something called sockets to connect our MicroPython to the outside world.
So, what on earth is a socket?
On a network device, a socket represents an endpoint, and communication can start when two sockets are connected to one another.
Many other internet protocols, including email (SMTP), the web (HTTP), telnet, and ssh, are constructed on top of sockets.
These protocols are each given a unique port, which is simply an integer value.
You can establish a connection to a remote device and begin communicating with it using its IP address and port number.
For example, web servers often use the port number 80.
Therefore to retrieve a web page from a web server, we specify the IP address of the server and the port number so that the server knows we wish to communicate with the web server application.
How To Connect to a Network Socket Using MicroPython
In order to get started with sockets we first need to load the socket module.
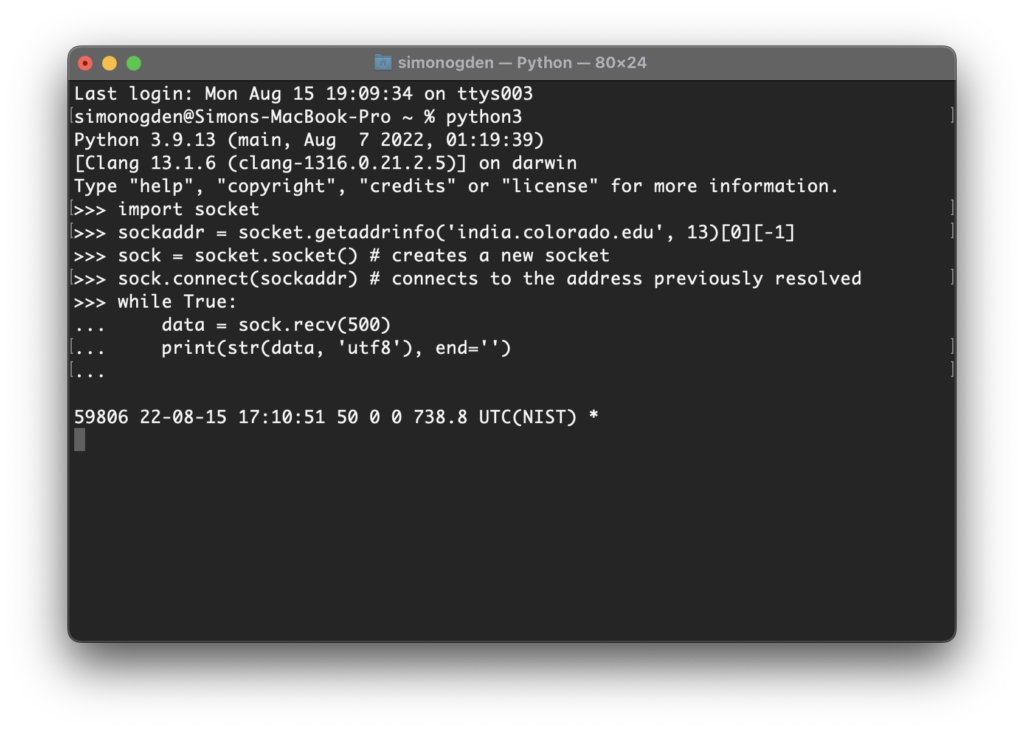
import socket
There is a very powerful function called getaddrinfo() within the socket library that allows us to convert provided host information into the necessary address required to open a new socket.
It is beyond the scope of this article to delve into too much detail, however you can read more about it here if you want to try to understand it better.
For this example we will use a Telnet service from this list. This is a simple text-based service that we can connect to and receive a datetime stamp.
We will use is getaddrinfo() function to store the Telnet address for ‘india.colorado.edu‘ into a variable called sockaddr:
sockaddr = socket.getaddrinfo('india.colorado.edu', 13)[0][-1]Note that this particular Telnet service is provided by port 13, which is given in the list.
Also note that the getaddrinfo() function should always be used to resolve an address into a variable prior to opening a socket, even if the provided host information is an IP address.
At this stage we can now make a new socket and connect to ‘india.colorado.edu‘ using the variable sockaddr:
sock = socket.socket() # creates a new socket
sock.connect(sockaddr) # connects to the address previously resolved
Now we can create a simple while statement that will use the socket to receive data and then print it to the terminal:
while True:
    data = sock.recv(500)
    print(str(data, 'utf8'), end='')
If everything works ok then the terminal should display the date time message! Press control + C to exit.
How to Program a Simple Web Server a MicroPython
I have already covered how to make a web server with ESP8266 and Arduino, which proved very popular! Therefore I thought it would be a great idea to do the same but with MicroPython.
At this stage I am aiming to keep this as simple as possible, so that you can best understand what is happening.
Therefore I won’t introduce reading GPIO and outputting the values to a web page just yet…
Let’s take a look at how we can serve a simple HTML web page over WiFi.
Setting up variables
The first thing we are going to do is declare 3 variables:
- html – in this variable we will store our HTML. You generate your own simple HTML page here.
- resp – is the OK response that we send back to the browser following a connection attempt.
- ssid – you should change this to the SSID of your router/network.
- password – this will be your WiFi password.
Let’s take a look at the code:
html = """<!DOCTYPE html>
<html>
    <head> <title>ESP8266 Test</title> </head>
    <body> <h1>ESP8266 Test Site!</h1>
    </body>
</html>
"""
resp='HTTP/1.0 200 OK\r\nContent-type: text/html\r\n\r\n'
ssid = '<your-WiFi-SSID>'
password = '<your-WiFi-password>'
Establishing a WiFi network connection
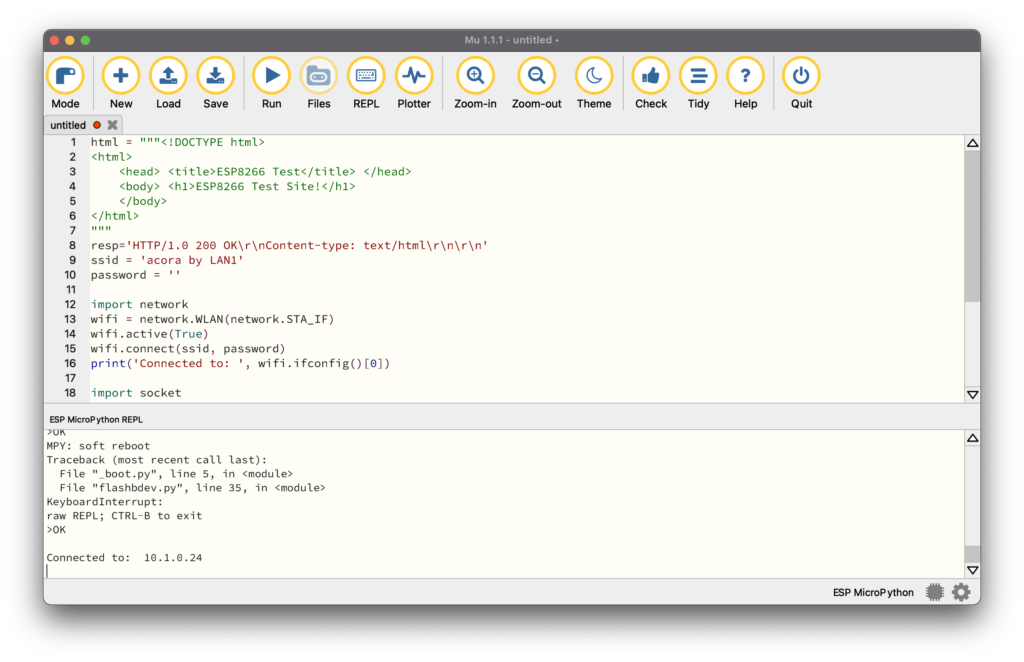
Next we will establish a connection to our WiFi network using the following code:
import network
wifi = network.WLAN(network.STA_IF)
wifi.active(True)
wifi.connect(ssid, password)
print('Connected to: ', wifi.ifconfig()[0])
I won’t go into detail here explaining this code as I have already covered it in an earlier tutorial. If you need further explanation, go ahead and check out this section of the previous tutorial.
The last line of the code uses wifi.ifconfig() to print the ESP8266 network address in the terminal on establishing a connection.
This is useful to know so that we can make a test connection to the ESP8266 using our browser. More on that later.
Opening a new socket
Next we need to import the socket module and set an address to listen to. Note that we only need to define the port, so 0.0.0.0 is used as a null address:
import socket
addr = socket.getaddrinfo('0.0.0.0', 80)[0][-1]
Once we have resolved our connection address and loaded it into the addr variable, we can go ahead and make a new socket connection:
s = socket.socket()
s.bind(addr)
s.listen(1)
In this section of code a net socket s is created and our resolved address is binded to it. We can then begin to listen for incoming connections on the specified port (80).
At this point the program will enter a continuous loop waiting for a connection (press control + C to exit if necessary).
Handling the incoming connection
The next part of the program handles incoming connections:
conn,addr = s.accept()
conn.send(resp)
conn.send(html)
conn.close()
When a connection is made the response is sent back to the browser to communicate an OK state, then the HTML is sent. Once the HTML has been sent the connection is closed.
Testing the ESP8266 web server
Now we are ready to give the ESP8266 web server a try! First, let’s take a look at the code as a whole:
html = """<!DOCTYPE html>
<html>
    <head> <title>ESP8266 Test</title> </head>
    <body> <h1>ESP8266 Test Site!</h1>
    </body>
</html>
"""
resp='HTTP/1.0 200 OK\r\nContent-type: text/html\r\n\r\n'
ssid = '<your-network-SSID>'
password = '<your-network-password>'

import network
wifi = network.WLAN(network.STA_IF)
wifi.active(True)
wifi.connect(ssid, password)
print('Connected to: ', wifi.ifconfig()[0])

import socket
addr = socket.getaddrinfo('0.0.0.0', 80)[0][-1]

s = socket.socket()
s.bind(addr)
s.listen(1)

conn,addr = s.accept()
conn.send(resp)
conn.send(html)
conn.close()
In order to run the code I would recommend using Mu Editor, which I discussed in a previous tutorial.
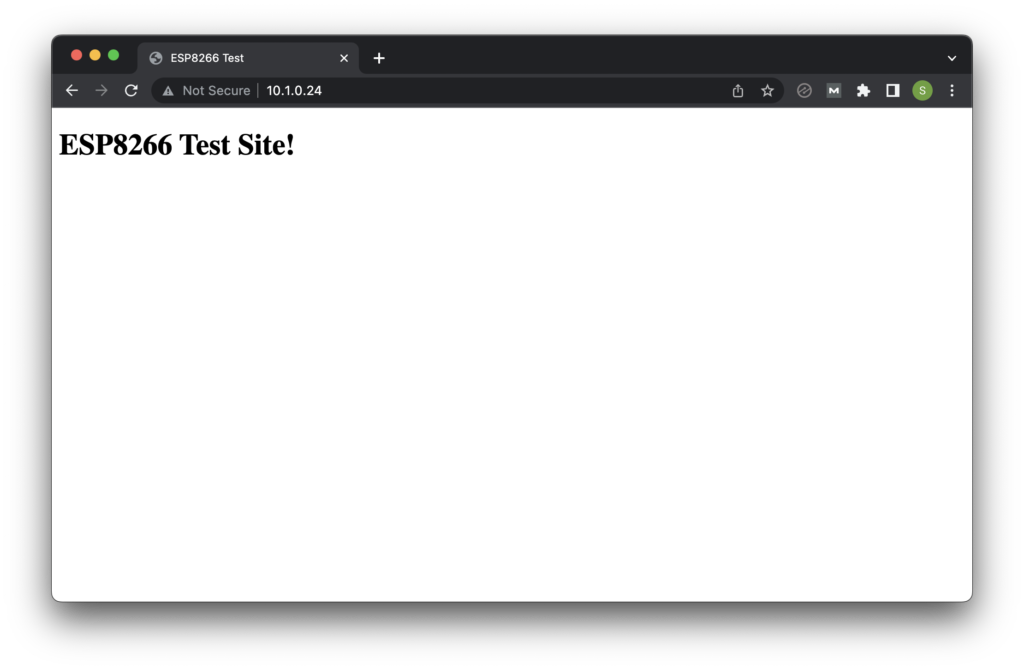
On running the code you should see your ESP8266 IP address displayed at the REPL prompt, in my case 10.1.0.24:
Now you should be able to point your browser to this IP address by typing it into the address bar and the HTML page will be displayed. Awesome!
Whats Next?
In this tutorial we have covered the basics of networking, including a recap on connecting to WiFi and the use of the sockets module.
If you came this far then a gold medal for you! Well done, that was a lot of information to consume from a single tutorial.
Now you are well on your way to becoming a MicroPython expert!
I recommend skimming back over this tutorial to make sure that you are au fait with everything there before moving on to the next.
In the next tutorial we will be taking a look at serial communications, such as UART, I2C and SPI. Stay tuned!
Thanks so much for visiting my site! If this article helped you achieve your goal and you want to say thanks, you can now support my work by buying me a coffee. I promise I won't spend it on beer instead... 😏


OSError: [Errno 98] EADDRINUSE